一、目标识别
1.1 传统目标识别算法
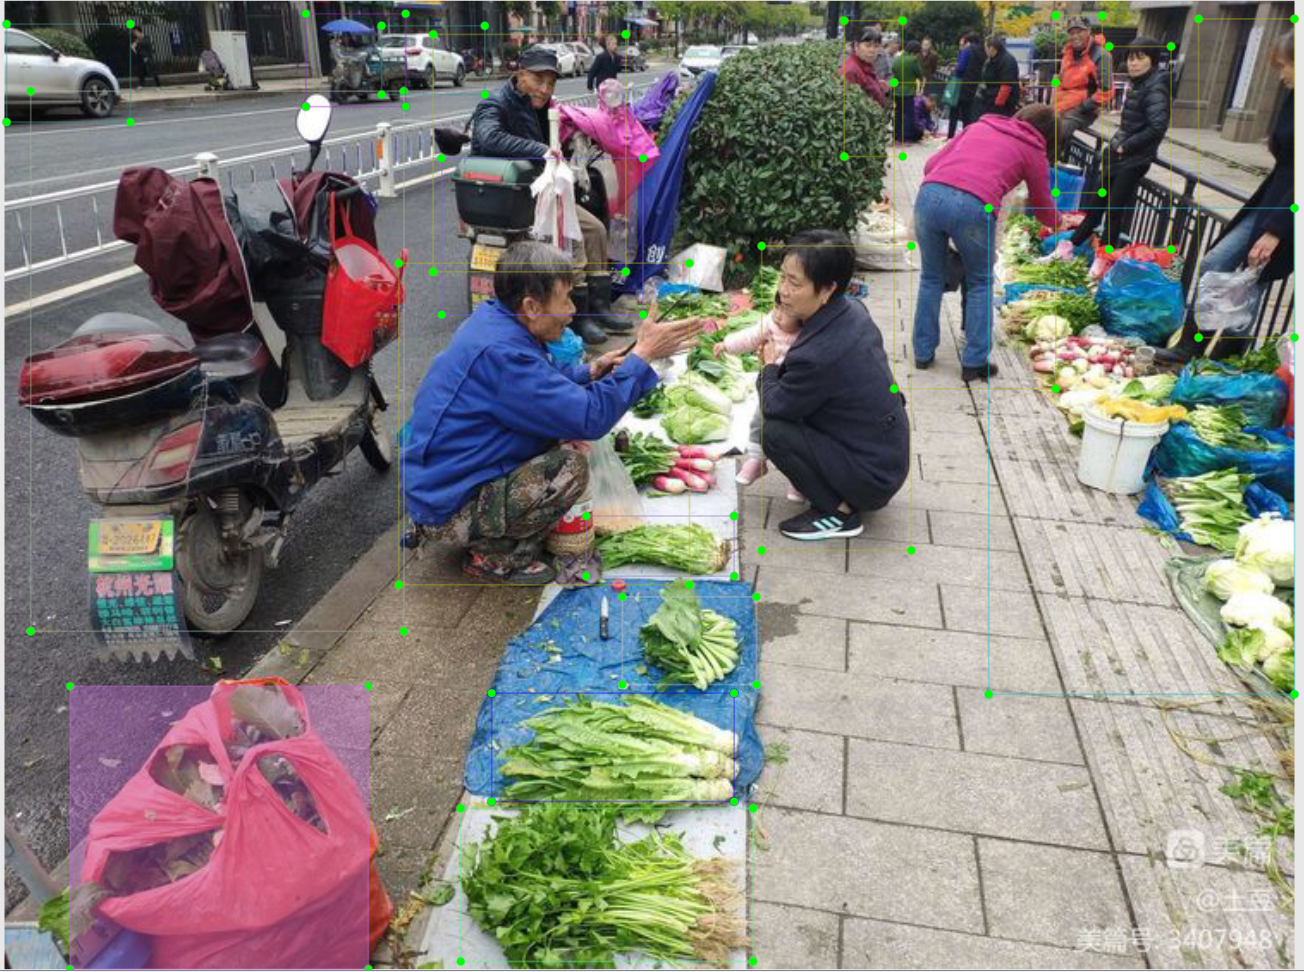
传统目标检测通常将分类(确定物体属于哪个类别)和定位(确定物体的位置,通常使用边界框bbox表示)任务耦合在一起。这要求训练数据集中包含每个物体的类别标签以及其对应的bbox位置信息。这种需求导致了为了检测多少个类别,就需要标注多少种类别的数据,在数据标注方面,往往要投入很大的人工成本来对识别目标进行标注。
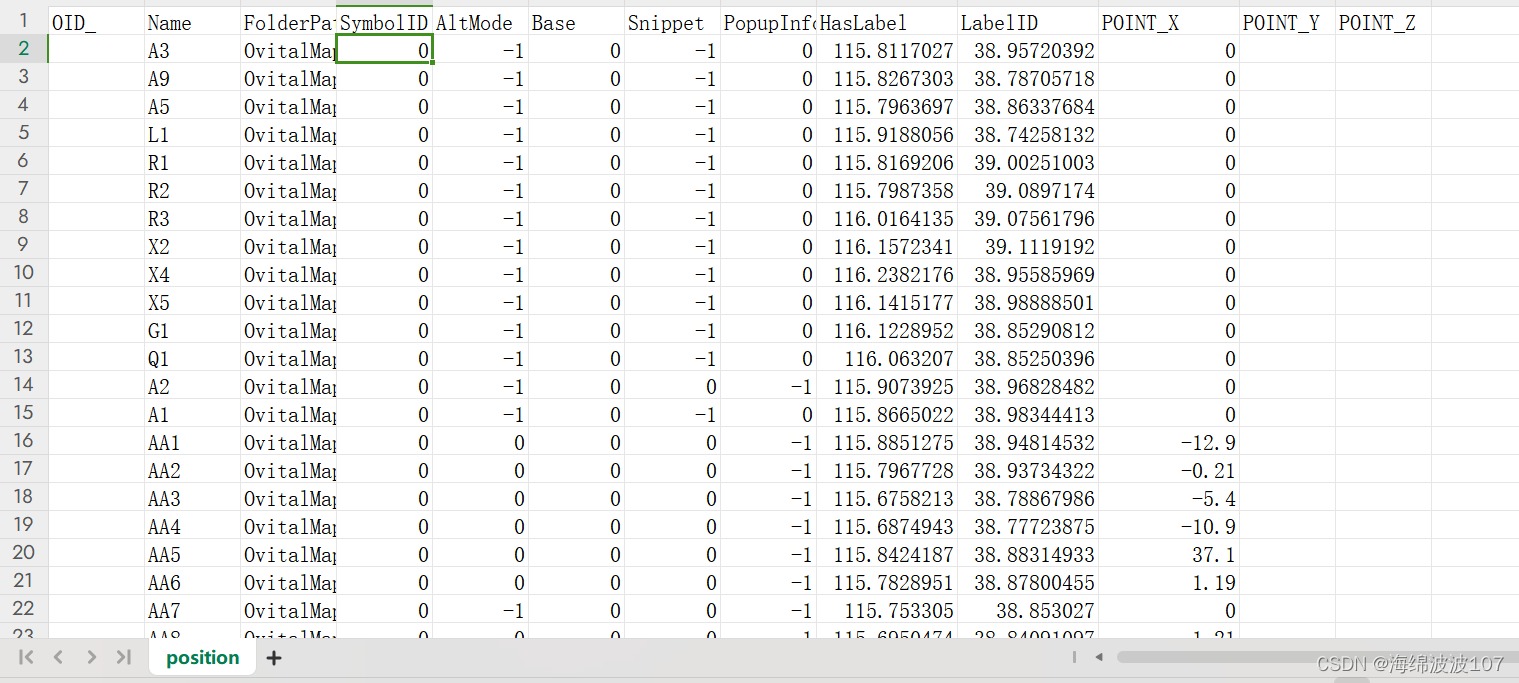
像下面的数据,要标注出所有的目标,对于人工,还是有一点复杂。
1.2 Detic目标识别
对于现阶段的目标检测器的性能瓶颈,Detic的作者认为:
现阶段的目标检测性能瓶颈: 目标检测器的性能进一步提升受到了数据量规模的限制。传统目标检测任务需要大规模的训练数据以获得良好的性能,但获取这些数据通常很昂贵和耗时。这导致了性能提升的瓶颈。
图像分类数据的优势: 与目标检测不同,图像分类任务的数据量通常更大,而且更容易获取。这些数据包含了更广泛的图像类别,使得可以在更大规模的词汇表上进行推理。
Detic提出解决方法: 为了克服目标检测器性能提升的数据限制,作者提出了Detic这一新的目标检测训练方法。Detic的核心思想是使用图像分类的数据集来训练目标检测器的分类头(classification head)。
Detic的主要特点:
- 简单性: Detic的最大特点在于其简单性。相较于以前的类似弱监督方法,Detic的实施更加简单。
- 适用性广泛: 以前目标检测的方法通常需要复杂的预测和box-class分配过程,且只能在特定的检测器结构上进行训练。而Detic则易于实施,可以在大部分的检测模型构架和backbone上使用。
1.3 Detic算法简介
Detic论文:https://arxiv.org/abs/2201.02605v3
项目源码:https://github.com/facebookresearch/Detic
在Detic论文中,Detic提到了一种新目标识别方法,将分类和定位任务解耦成两个独立的问题。Detic的数据集分为两类:一种是传统目标检测数据集,其中包含类别标签和bbox信息;另一种是label-image数据,类似于图像分类数据,不包含bbox信息。对于第一种数据,Detic可以按照传统目标检测的方式进行训练,从中学习到分类器的权重W和bbox预测分支B。对于第二种数据,仅进行分类任务,仍然可以使用相同的分类器权重W。这种方法的好处在于,使用第二种数据,你可以训练更多种类的分类器,从而降低了数据标注的成本。
在当前情况,与图像分类相比,目标检测的标注数据量明显有限。以LVIS(Large Vocabulary Instance Segmentation)数据集为例,它包含了120,000张图片,涵盖了1000多个类别,而OpenImages数据集拥有1.8百万张图片,包含了500多个类别。相比之下,早期的图像分类数据集ImageNet在10年前就包含了21,000多个类别和1400万张图片。
由于目标检测数据集中可用的类别和样本数量相对较少,因此在有限的类别上训练的目标检测器容易出现错误。然而,Detic采用了图像分类的数据集,这使得它能够检测出更多样的类别,并提供更精确的结果。
Detic方法的创新之处在于,它利用了图像分类数据的丰富性,以更大的词汇表进行推理,从而增加了目标检测器对不同类别的敏感性和准确性。这意味着Detic能够检测出更多样化和更准确的目标类别,而不仅仅局限于有限的类别集合。
总的来说,Detic的使用图像分类数据集的方法为目标检测带来了更多的多样性和精确性,克服了数据限制带来的问题,降低了数据获取的成本,使得可以更轻松地训练更多种类的分类器,从而提高了检测器的性能和鲁棒性。这种方法对于应对目标检测中的数据稀缺问题具有重要意义。
1.4 Detic中所提到的问题和解决方法
问题的识别和替代方案:
作者首先确定了目标检测中弱监督训练所面临的问题,特别是对于那些需要大量bbox标注的情况。这些问题包括数据标注的繁琐性和资源消耗,以及在使用图像级别监督信号时性能不佳。为了解决这些问题,Detic引入了更简单且易于使用的替代方案,其中关键的创新是引入了一种新的损失函数,可以有效地利用图像级别的监督信号。
新的损失函数:
为了使用图像级别的监督信号,作者提出了一种全新的损失函数。这个损失函数可以让目标检测器从图像级别的标签中学习有关目标的信息,而无需详细的bbox标注。实验证明,这个新的损失函数非常有效,尤其是在检测新颖类别时,它显著提高了目标检测器的性能。这意味着模型可以更好地处理之前未见过的物体类别。
无需微调的通用性:
Detic方法的另一个关键优势是,它允许训练出的目标检测器无需进行微调,就可以直接迁移到新的数据集和检测词汇表上。
这个特性提高了模型的通用性和易用性,减少了额外的工作和复杂性,使得模型更具应用价值。
1.5 Detic的损失函数
在论文中,作者列举了常规的弱监督目标检测的处理方法和Detic的区别:
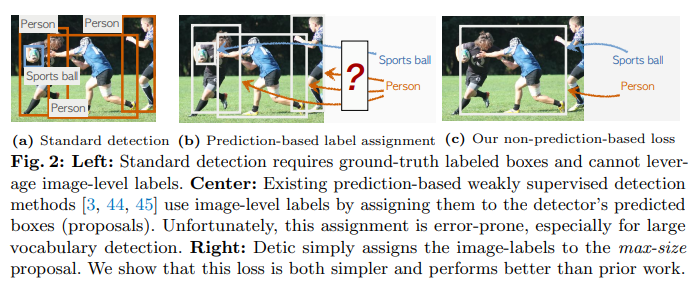
传统方法:
- 传统目标检测方法通常采用基于预测的label-box分配机制。
- 这种方法首先选择一组提议(proposals),然后将每个图像层面的类别标签(如人、篮球等)分配给这些提议。
- 由于缺乏区域级别的监督信号,这种分配方式容易引入误差,尤其是在具有重叠物体或复杂场景的情况下。
Detic方法:
- Detic采用了一种完全不同的方法,它选择了覆盖整个图像的最大面积提议(通常几乎包括整张图片)。
- 然后,Detic将整个图像的类别标签分配给这个最大面积的提议。
- 这种方法的关键在于,Detic不再依赖于传统的proposal级别的标签分配,而是将整个图像视为一个整体,并为其分配类别标签。
- 这种做法消除了传统方法中可能导致误差的标签和bbox分配过程,简化了训练流程,提高了性能,特别是在检测新颖类别时。
Detic方法通过选择整个图像的最大提议并将整个图像的类别标签分配给它,从而消除了传统方法中可能出现的标签和bbox分配误差。这种简化和创新的方法有望提高目标检测的性能和鲁棒性,特别是在具有挑战性的场景中。
作者提出了以下损失函数来让目标检测器可以使用图像级别的标签进行训练:

其中f代表proposal对应的RoI feature,c是最大的proposal对应的类别,也就是是该图片对应的类别,W是分类器的权重。同时,再加上传统目标检测器里使用的loss,就组成了Detic的最终loss。

二、模型转换
可以从官方下载到官方发布的模型,但官方给的模型是torch的模型,单独部署则要把它转成onnx的模型。
模型转换代码:
import argparse
import os
from typing import Dict, List, Tuple
import torch
from torch import Tensor, nn

import detectron2.data.transforms as T
from detectron2.checkpoint import DetectionCheckpointer
from detectron2.config import get_cfg
from detectron2.data import build_detection_test_loader, detection_utils
from detectron2.evaluation import COCOEvaluator, inference_on_dataset, print_csv_format
from detectron2.export import (
    STABLE_ONNX_OPSET_VERSION,
    TracingAdapter,
    dump_torchscript_IR,
    scripting_with_instances,
)
from detectron2.modeling import GeneralizedRCNN, RetinaNet, build_model
from detectron2.modeling.postprocessing import detector_postprocess
from detectron2.projects.point_rend import add_pointrend_config
from detectron2.structures import Boxes
from detectron2.utils.env import TORCH_VERSION
from detectron2.utils.file_io import PathManager
from detectron2.utils.logger import setup_logger


def setup_cfg(args):
    cfg = get_cfg()
    # cuda context is initialized before creating dataloader, so we don't fork anymore
    cfg.DATALOADER.NUM_WORKERS = 0
    add_pointrend_config(cfg)
    cfg.merge_from_file(args.config_file)
    cfg.merge_from_list(args.opts)
    cfg.freeze()
    return cfg


def export_caffe2_tracing(cfg, torch_model, inputs):
    from detectron2.export import Caffe2Tracer

    tracer = Caffe2Tracer(cfg, torch_model, inputs)
    if args.format == "caffe2":
        caffe2_model = tracer.export_caffe2()
        caffe2_model.save_protobuf(args.output)
        # draw the caffe2 graph
        caffe2_model.save_graph(os.path.join(args.output, "model.svg"), inputs=inputs)
        return caffe2_model
    elif args.format == "onnx":
        import onnx

        onnx_model = tracer.export_onnx()
        onnx.save(onnx_model, os.path.join(args.output, "model.onnx"))
    elif args.format == "torchscript":
        ts_model = tracer.export_torchscript()
        with PathManager.open(os.path.join(args.output, "model.ts"), "wb") as f:
            torch.jit.save(ts_model, f)
        dump_torchscript_IR(ts_model, args.output)


# experimental. API not yet final
def export_scripting(torch_model):
    assert TORCH_VERSION >= (1, 8)
    fields = {
        "proposal_boxes": Boxes,
        "objectness_logits": Tensor,
        "pred_boxes": Boxes,
        "scores": Tensor,
        "pred_classes": Tensor,
        "pred_masks": Tensor,
        "pred_keypoints": torch.Tensor,
        "pred_keypoint_heatmaps": torch.Tensor,
    }
    assert args.format == "torchscript", "Scripting only supports torchscript format."

    class ScriptableAdapterBase(nn.Module):
        # Use this adapter to workaround https://github.com/pytorch/pytorch/issues/46944
        # by not retuning instances but dicts. Otherwise the exported model is not deployable
        def __init__(self):
            super().__init__()
            self.model = torch_model
            self.eval()

    if isinstance(torch_model, GeneralizedRCNN):

        class ScriptableAdapter(ScriptableAdapterBase):
            def forward(self, inputs: Tuple[Dict[str, torch.Tensor]]) -> List[Dict[str, Tensor]]:
                instances = self.model.inference(inputs, do_postprocess=False)
                return [i.get_fields() for i in instances]

    else:

        class ScriptableAdapter(ScriptableAdapterBase):
            def forward(self, inputs: Tuple[Dict[str, torch.Tensor]]) -> List[Dict[str, Tensor]]:
                instances = self.model(inputs)
                return [i.get_fields() for i in instances]

    ts_model = scripting_with_instances(ScriptableAdapter(), fields)
    with PathManager.open(os.path.join(args.output, "model.ts"), "wb") as f:
        torch.jit.save(ts_model, f)
    dump_torchscript_IR(ts_model, args.output)
    # TODO inference in Python now missing postprocessing glue code
    return None


# experimental. API not yet final
def export_tracing(torch_model, inputs):
    assert TORCH_VERSION >= (1, 8)
    image = inputs[0]["image"]
    inputs = [{"image": image}]  # remove other unused keys

    if isinstance(torch_model, GeneralizedRCNN):

        def inference(model, inputs):
            # use do_postprocess=False so it returns ROI mask
            inst = model.inference(inputs, do_postprocess=False)[0]
            return [{"instances": inst}]

    else:
        inference = None  # assume that we just call the model directly

    traceable_model = TracingAdapter(torch_model, inputs, inference)

    if args.format == "torchscript":
        ts_model = torch.jit.trace(traceable_model, (image,))
        with PathManager.open(os.path.join(args.output, "model.ts"), "wb") as f:
            torch.jit.save(ts_model, f)
        dump_torchscript_IR(ts_model, args.output)
    elif args.format == "onnx":
        with PathManager.open(os.path.join(args.output, "model.onnx"), "wb") as f:
            torch.onnx.export(traceable_model, (image,), f, opset_version=STABLE_ONNX_OPSET_VERSION)
    logger.info("Inputs schema: " + str(traceable_model.inputs_schema))
    logger.info("Outputs schema: " + str(traceable_model.outputs_schema))

    if args.format != "torchscript":
        return None
    if not isinstance(torch_model, (GeneralizedRCNN, RetinaNet)):
        return None

    def eval_wrapper(inputs):
        """
        The exported model does not contain the final resize step, which is typically
        unused in deployment but needed for evaluation. We add it manually here.
        """
        input = inputs[0]
        instances = traceable_model.outputs_schema(ts_model(input["image"]))[0]["instances"]
        postprocessed = detector_postprocess(instances, input["height"], input["width"])
        return [{"instances": postprocessed}]

    return eval_wrapper


def get_sample_inputs(args):

    if args.sample_image is None:
        # get a first batch from dataset
        data_loader = build_detection_test_loader(cfg, cfg.DATASETS.TEST[0])
        first_batch = next(iter(data_loader))
        return first_batch
    else:
        # get a sample data
        original_image = detection_utils.read_image(args.sample_image, format=cfg.INPUT.FORMAT)
        # Do same preprocessing as DefaultPredictor
        aug = T.ResizeShortestEdge(
            [cfg.INPUT.MIN_SIZE_TEST, cfg.INPUT.MIN_SIZE_TEST], cfg.INPUT.MAX_SIZE_TEST
        )
        height, width = original_image.shape[:2]
        image = aug.get_transform(original_image).apply_image(original_image)
        image = torch.as_tensor(image.astype("float32").transpose(2, 0, 1))

        inputs = {"image": image, "height": height, "width": width}

        # Sample ready
        sample_inputs = [inputs]
        return sample_inputs


if __name__ == "__main__":
    parser = argparse.ArgumentParser(description="Export a model for deployment.")
    parser.add_argument(
        "--format",
        choices=["caffe2", "onnx", "torchscript"],
        help="output format",
        default="torchscript",
    )
    parser.add_argument(
        "--export-method",
        choices=["caffe2_tracing", "tracing", "scripting"],
        help="Method to export models",
        default="tracing",
    )
    parser.add_argument("--config-file", default="", metavar="FILE", help="path to config file")
    parser.add_argument("--sample-image", default=None, type=str, help="sample image for input")
    parser.add_argument("--run-eval", action="store_true")
    parser.add_argument("--output", help="output directory for the converted model")
    parser.add_argument(
        "opts",
        help="Modify config options using the command-line",
        default=None,
        nargs=argparse.REMAINDER,
    )
    args = parser.parse_args()
    logger = setup_logger()
    logger.info("Command line arguments: " + str(args))
    PathManager.mkdirs(args.output)
    # Disable re-specialization on new shapes. Otherwise --run-eval will be slow
    torch._C._jit_set_bailout_depth(1)

    cfg = setup_cfg(args)

    # create a torch model
    torch_model = build_model(cfg)
    DetectionCheckpointer(torch_model).resume_or_load(cfg.MODEL.WEIGHTS)
    torch_model.eval()

    # convert and save model
    if args.export_method == "caffe2_tracing":
        sample_inputs = get_sample_inputs(args)
        exported_model = export_caffe2_tracing(cfg, torch_model, sample_inputs)
    elif args.export_method == "scripting":
        exported_model = export_scripting(torch_model)
    elif args.export_method == "tracing":
        sample_inputs = get_sample_inputs(args)
        exported_model = export_tracing(torch_model, sample_inputs)

    # run evaluation with the converted model
    if args.run_eval:
        assert exported_model is not None, (
            "Python inference is not yet implemented for "
            f"export_method={args.export_method}, format={args.format}."
        )
        logger.info("Running evaluation ... this takes a long time if you export to CPU.")
        dataset = cfg.DATASETS.TEST[0]
        data_loader = build_detection_test_loader(cfg, dataset)
        # NOTE: hard-coded evaluator. change to the evaluator for your dataset
        evaluator = COCOEvaluator(dataset, output_dir=args.output)
        metrics = inference_on_dataset(exported_model, data_loader, evaluator)
        print_csv_format(metrics)
    logger.info("Success.")
三、模型C++ 部署
模型C++可以使用ONNXRuntime或者OpenCV的DNN进行部署,ONNXRuntime是一个开源的高性能推理引擎,用于在不同硬件平台上运行深度学习模型。它是由微软开发的,并且作为开放神经网络交换(ONNX)的一部分,与各种深度学习框架(如PyTorch、TensorFlow、ONNX等)兼容。ONNX Runtime的主要特点包括:
跨平台支持:ONNX Runtime支持多种硬件平台,包括CPU、GPU和边缘设备,以便在不同的硬件上运行深度学习模型。
高性能:ONNX Runtime经过优化,具有高性能,可以在实时应用中进行推理,包括对大型模型的高效支持。
开源:ONNX Runtime是开源项目,可根据需要进行自定义和扩展。
跨框架兼容性:ONNX Runtime支持多种深度学习框架生成的模型,使其能够在不同框架之间进行模型转换和推理。
轻量级:ONNX Runtime可以在嵌入式和边缘设备上运行,因为它具有相对较小的内存和计算资源需求。
支持ONNX标准:ONNX Runtime遵循ONNX标准,这是一个开放的模型表示标准,有助于实现模型的互操作性和可移植性。
#include "RAMDetic.h"

RAMDetic::RAMDetic()
{

}

bool file_exists(std::string& name)
{
	std::ifstream f(name.c_str());
	return f.good();
}

int RAMDetic::init_model(std::string model_path, std::string names_path)
{
	if (!(file_exists(model_path) && file_exists(names_path)))
	{
		std::cout << "model or class name file does not exist !" << std::endl;
		return -1;
	}

	OrtStatus* status = OrtSessionOptionsAppendExecutionProvider_CUDA(sessionOptions, 0);//GPU加速度,如果没有安装CUDA,要注掉
	sessionOptions.SetGraphOptimizationLevel(ORT_ENABLE_BASIC);

	std::wstring widestr = std::wstring(model_path.begin(), model_path.end());
	ort_session = new Ort::Session(env, widestr.c_str(), sessionOptions);
	///ort_session = new Session(env, model_path.c_str(), sessionOptions);  ///linux写法

	size_t numInputNodes = ort_session->GetInputCount();
	size_t numOutputNodes = ort_session->GetOutputCount();
	Ort::AllocatorWithDefaultOptions allocator;
	for (int i = 0; i < numInputNodes; i++)
	{
		input_names.push_back(ort_session->GetInputName(i, allocator));
		//AllocatedStringPtr input_name_Ptr = ort_session->GetInputNameAllocated(i, allocator);
		//input_names.push_back(input_name_Ptr.get());
		Ort::TypeInfo input_type_info = ort_session->GetInputTypeInfo(i);
		auto input_tensor_info = input_type_info.GetTensorTypeAndShapeInfo();
		auto input_dims = input_tensor_info.GetShape();
		input_node_dims.push_back(input_dims);
	}
	for (int i = 0; i < numOutputNodes; i++)
	{
		output_names.push_back(ort_session->GetOutputName(i, allocator));
		//AllocatedStringPtr output_name_Ptr = ort_session->GetInputNameAllocated(i, allocator);
		//output_names.push_back(output_name_Ptr.get());
		Ort::TypeInfo output_type_info = ort_session->GetOutputTypeInfo(i);
		auto output_tensor_info = output_type_info.GetTensorTypeAndShapeInfo();
		auto output_dims = output_tensor_info.GetShape();
		output_node_dims.push_back(output_dims);
	}

	std::ifstream ifs(names_path);
	std::string line;
	while (getline(ifs, line))
	{
		this->class_names.push_back(line);
	}

	return 0;
}

void RAMDetic::preprocess(cv::Mat &srcimg)
{
	cv::Mat dstimg;
	cvtColor(srcimg, dstimg, cv::COLOR_BGR2RGB);
	int im_h = srcimg.rows;
	int im_w = srcimg.cols;
	float oh, ow, scale;
	if (im_h < im_w)
	{
		scale = (float)max_size / (float)im_h;
		oh = max_size;
		ow = scale * (float)im_w;
	}
	else
	{
		scale = (float)max_size / (float)im_h;
		oh = scale * (float)im_h;
		ow = max_size;
	}
	float max_hw = std::max(oh, ow);
	if (max_hw > max_size)
	{
		scale = (float)max_size / max_hw;
		oh *= scale;
		ow *= scale;
	}

	resize(dstimg, dstimg, cv::Size(int(ow + 0.5), int(oh + 0.5)), cv::INTER_LINEAR);

	this->inpHeight = dstimg.rows;
	this->inpWidth = dstimg.cols;
	this->input_image_.resize(this->inpWidth * this->inpHeight * dstimg.channels());
	int k = 0;
	for (int c = 0; c < 3; c++)
	{
		for (int i = 0; i < this->inpHeight; i++)
		{
			for (int j = 0; j < this->inpWidth; j++)
			{
				float pix = dstimg.ptr<uchar>(i)[j * 3 + c];
				this->input_image_[k] = pix;
				k++;
			}
		}
	}
}

std::vector<BoxInfo> RAMDetic::detect(cv::Mat &srcimg, int _max_size)
{
	max_size = _max_size;
	int im_h = srcimg.rows;
	int im_w = srcimg.cols;
	this->preprocess(srcimg);
	std::array<int64_t, 4> input_shape_{ 1, 3, this->inpHeight, this->inpWidth };

	auto allocator_info = Ort::MemoryInfo::CreateCpu(OrtDeviceAllocator, OrtMemTypeCPU);
	Ort::Value input_tensor_ = Ort::Value::CreateTensor<float>(allocator_info,
		input_image_.data(), input_image_.size(), input_shape_.data(), input_shape_.size());

	// 开始推理
	std::vector<Ort::Value> ort_outputs = ort_session->Run(Ort::RunOptions{ nullptr },
		&input_names[0], &input_tensor_, 1, output_names.data(), output_names.size());

	const float* pred_boxes = ort_outputs[0].GetTensorMutableData<float>();
	const float* scores = ort_outputs[1].GetTensorMutableData<float>();
	const int* pred_classes = ort_outputs[2].GetTensorMutableData<int>();
	//const float *pred_masks = ort_outputs[3].GetTensorMutableData<float>();

	int num_box = ort_outputs[0].GetTensorTypeAndShapeInfo().GetShape()[0];
	const float scale_x = float(im_w) / float(inpWidth);
	const float scale_y = float(im_h) / float(inpHeight);
	std::vector<BoxInfo> preds;
	for (int i = 0; i < num_box; i++)
	{
		float xmin = pred_boxes[i * 4] * scale_x;
		float ymin = pred_boxes[i * 4 + 1] * scale_y;
		float xmax = pred_boxes[i * 4 + 2] * scale_x;
		float ymax = pred_boxes[i * 4 + 3] * scale_y;
		xmin = std::min(std::max(xmin, 0.f), float(im_w));
		ymin = std::min(std::max(ymin, 0.f), float(im_h));
		xmax = std::min(std::max(xmax, 0.f), float(im_w));
		ymax = std::min(std::max(ymax, 0.f), float(im_h));

		const float threshold = 0;
		const float width = xmax - xmin;
		const float height = ymax - ymin;
		if (width > threshold && height > threshold)
		{
			preds.push_back({ int(xmin), int(ymin), int(xmax), int(ymax), scores[i], class_names[pred_classes[i]] });
		}
	}
	return preds;
}

void RAMDetic::draw(cv::Mat& cv_src, cv::Mat& cv_dst)
{
	if (cv_src.empty())
	{
		return;
	}
	cv_dst = cv_src.clone();
	std::vector<BoxInfo> preds = detect(cv_dst);

	cv::RNG rng(12345);//产生随机数

	for (size_t i = 0; i < preds.size(); ++i)
	{
		int b = rng.uniform(0, 255);
		int g = rng.uniform(0, 255);
		int r = rng.uniform(0, 255);
		cv::rectangle(cv_dst, cv::Point(preds[i].xmin, preds[i].ymin),
			cv::Point(preds[i].xmax, preds[i].ymax), cv::Scalar(b, g, r), 2);
		std::string label = cv::format("%.2f", preds[i].score);

		cv::putText(cv_dst, label, cv::Point(preds[i].xmin,
			preds[i].ymin - 5), cv::FONT_HERSHEY_SIMPLEX, 0.5, cv::Scalar(b, g, r), 1);
	}
}

void RAMDetic::detect_video(std::string input_path, std::string output_path)
{
	cv::VideoCapture video_capture(input_path);

	if (!video_capture.isOpened())
	{
		std::cout << "Can not open video: " << input_path << "\n";
		return;
	}

	cv::Size S = cv::Size((int)video_capture.get(cv::CAP_PROP_FRAME_WIDTH),
		(int)video_capture.get(cv::CAP_PROP_FRAME_HEIGHT));

	cv::VideoWriter output_video(output_path, cv::VideoWriter::fourcc('m', 'p', '4', 'v'),25.0, S);

	if (!output_video.isOpened())
	{
		std::cout << "Can not open writer: " << output_path << "\n";
		return;
	}

	cv::Mat cv_mat;
	while (video_capture.read(cv_mat))
	{
		cv::Mat bg_upsample;

		draw(cv_mat, bg_upsample);

		output_video << bg_upsample;
	}

	video_capture.release();
	output_video.release();
}
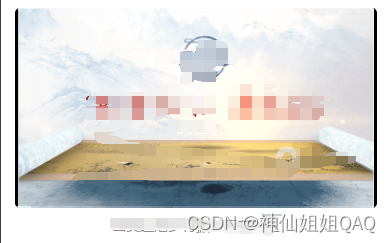
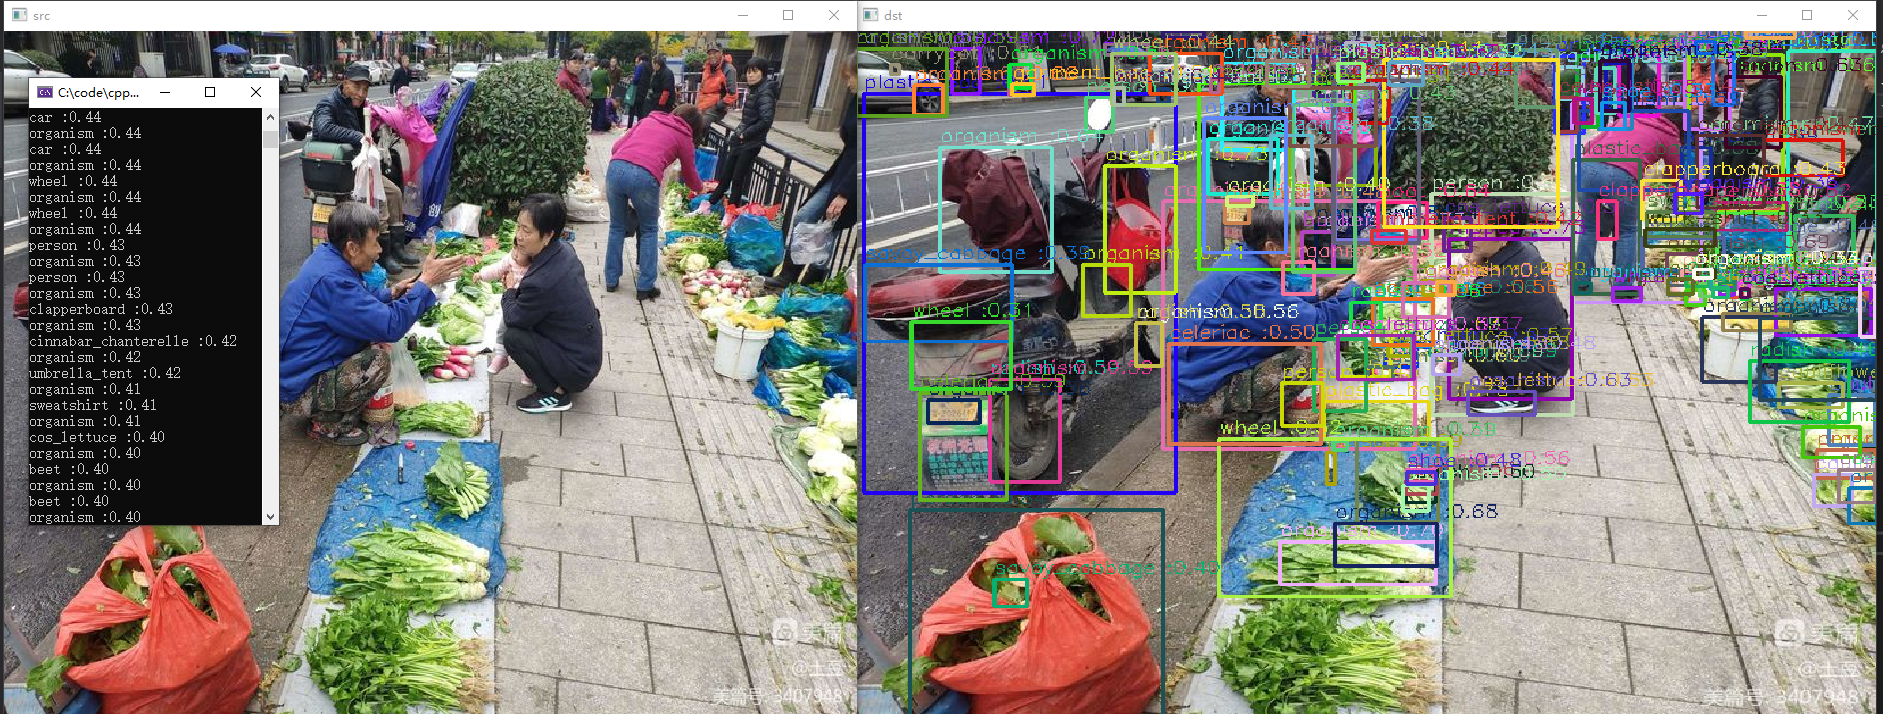
检测结果:
开放世界目标检测
图像检测结果:
四、python代码部署
python代码推理要安装opencvt和onnxruntime这两个库:
import argparse
import cv2
import numpy as np
import onnxruntime as ort


class Detic():
    def __init__(self, modelpath, detection_width=800, confThreshold=0.8):
        # net = cv2.dnn.readNet(modelpath)
        so = ort.SessionOptions()
        so.log_severity_level = 3
        self.session = ort.InferenceSession(modelpath, so)
        model_inputs = self.session.get_inputs()
        self.input_name = model_inputs[0].name
        self.max_size = detection_width
        self.confThreshold = confThreshold
        self.class_names = list(map(lambda x: x.strip(), open('models/class_names.txt').readlines()))
        self.assigned_colors = np.random.randint(0,high=256, size=(len(self.class_names), 3)).tolist()

    def preprocess(self, srcimg):
        im_h, im_w, _ = srcimg.shape
        dstimg = cv2.cvtColor(srcimg, cv2.COLOR_BGR2RGB)
        if im_h < im_w:
            scale = self.max_size / im_h
            oh, ow = self.max_size, scale * im_w
        else:
            scale = self.max_size / im_w
            oh, ow = scale * im_h, self.max_size

        max_hw = max(oh, ow)
        if max_hw > self.max_size:
            scale = self.max_size / max_hw
            oh *= scale
            ow *= scale
        ow = int(ow + 0.5)
        oh = int(oh + 0.5)
        dstimg = cv2.resize(dstimg, (ow, oh))
        return dstimg

    def post_processing(self, pred_boxes, scores, pred_classes, pred_masks, im_hw, pred_hw):
        scale_x, scale_y = (im_hw[1] / pred_hw[1], im_hw[0] / pred_hw[0])

        pred_boxes[:, 0::2] *= scale_x
        pred_boxes[:, 1::2] *= scale_y
        pred_boxes[:, [0, 2]] = np.clip(pred_boxes[:, [0, 2]], 0, im_hw[1])
        pred_boxes[:, [1, 3]] = np.clip(pred_boxes[:, [1, 3]], 0, im_hw[0])

        threshold = 0
        widths = pred_boxes[:, 2] - pred_boxes[:, 0]
        heights = pred_boxes[:, 3] - pred_boxes[:, 1]
        keep = (widths > threshold) & (heights > threshold)

        pred_boxes = pred_boxes[keep]
        scores = scores[keep]
        pred_classes = pred_classes[keep]
        pred_masks = pred_masks[keep]

        # mask_threshold = 0.5
        # pred_masks = paste_masks_in_image(
        #     pred_masks[:, 0, :, :], pred_boxes,
        #     (im_hw[0], im_hw[1]), mask_threshold
        # )

        pred = {
            'pred_boxes': pred_boxes,
            'scores': scores,
            'pred_classes': pred_classes,
            'pred_masks': pred_masks,
        }
        return pred

    def draw_predictions(self, img, predictions):
        height, width = img.shape[:2]
        default_font_size = int(max(np.sqrt(height * width) // 90, 10))
        boxes = predictions["pred_boxes"].astype(np.int64)
        scores = predictions["scores"]
        classes_id = predictions["pred_classes"].tolist()
        # masks = predictions["pred_masks"].astype(np.uint8)
        num_instances = len(boxes)
        print('detect', num_instances, 'instances')
        for i in range(num_instances):
            x0, y0, x1, y1 = boxes[i]
            color = self.assigned_colors[classes_id[i]]
            cv2.rectangle(img, (x0, y0), (x1, y1), color=color,thickness=default_font_size // 4)
            text = "{} {:.0f}%".format(self.class_names[classes_id[i]], round(scores[i],2) * 100)
            cv2.putText(img, text, (x0, y0 - 5), cv2.FONT_HERSHEY_SIMPLEX, 0.5, color, thickness=1, lineType=cv2.LINE_AA)
        return img

    def detect(self, srcimg):
        im_h, im_w = srcimg.shape[:2]
        dstimg = self.preprocess(srcimg)
        pred_hw = dstimg.shape[:2]
        input_image = np.expand_dims(dstimg.transpose(2, 0, 1), axis=0).astype(np.float32)

        # Inference
        pred_boxes, scores, pred_classes, pred_masks = self.session.run(None, {self.input_name: input_image})
        preds = self.post_processing(pred_boxes, scores, pred_classes, pred_masks, (im_h, im_w), pred_hw)
        return preds


if __name__ == '__main__':
    parser = argparse.ArgumentParser()
    parser.add_argument("--imgpath", type=str, default='desk.jpg', help="image path")
    parser.add_argument("--confThreshold", default=0.5, type=float, help='class confidence')
    parser.add_argument("--modelpath", type=str, default='models/Detic_896.onnx', help="onnxmodel path")
    args = parser.parse_args()

    mynet = Detic(args.modelpath, confThreshold=args.confThreshold)
    srcimg = cv2.imread(args.imgpath)
    preds = mynet.detect(srcimg)
    srcimg = mynet.draw_predictions(srcimg, preds)

    # cv2.imwrite('result.jpg', srcimg)
    winName = 'Deep learning Detic in ONNXRuntime'
    cv2.namedWindow(winName, cv2.WINDOW_NORMAL)
    cv2.imshow(winName, srcimg)
    cv2.waitKey(0)
    cv2.destroyAllWindows()
五、模型与源码
1.模型和源码已上传到csdn:https://download.csdn.net/download/matt45m/88335108
2.如果对该项目感兴趣或者在安装的过程中遇到什么错误的的可以加我的企鹅群:487350510,大家一起探讨。