一、项目简介
本项目是一套基于Python开发的智能停车场车牌识别计费系统,主要针对计算机相关专业的正在做毕设的学生与需要项目实战练习的Python学习者。
包含:项目源码、项目文档等,该项目附带全部源码可作为毕设使用。
项目都经过严格调试,确保可以运行!
二、开发环境要求
本系统的软件开发及运行环境具体如下。
操作系统:Windows 7、Windows 10。
Python版本:Python 3.7。
开发工具:PyCharm 2018。
Python内置模块:os、time、datetime。
第三方模块:opencv-python、pandas、matplotlib、pygame、baidu-aip、xlrd。
注意:在使用第三方模块时,首先需要使用pip install命令安装该模块,例如,安装pygame模块,可以在Python命令窗口中执行以下命令:
pip install pygame
三、系统功能
在PyCharm中运行《智能停车场车牌识别计费系统》即可进入如图1所示的系统主界面。
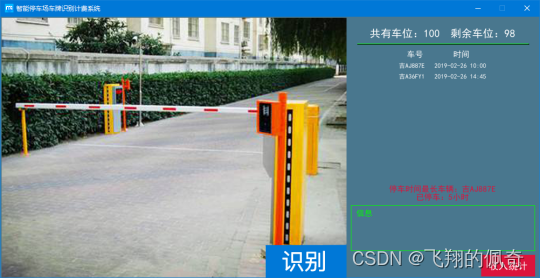
说明:在运行程序前,先将当前的计算机连接互联网,并且需要先申请百度AI开放平台的图片识别需要的Key,并且复制该Key到项目根目录下的file子目录的key.txt文件中替换相应的内容即可。替换时需要注意不要把原来的单引号删除。
具体的操作步骤如下:
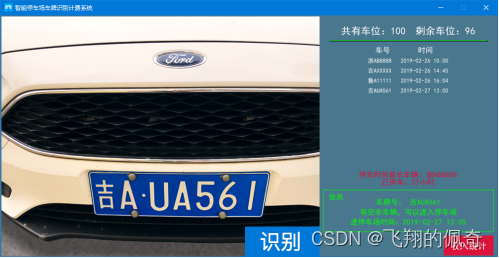
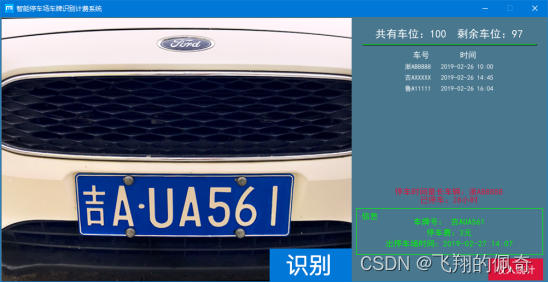
(1)识别车牌,并实现车辆入场和出场。当有车辆的车头或车尾对准摄像头后,管理员单击“识别”按钮,系统将识别该车牌,并且根据车牌判断入场或出场,显示不同信息。车辆入场时效果如图2所示,车辆驶出时效果如图3所示。
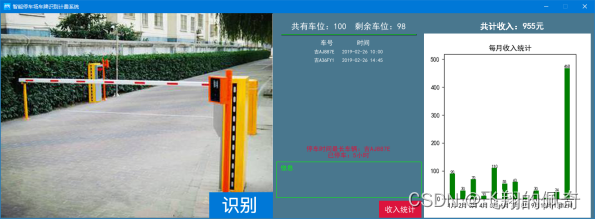
(2)收入统计。单击“收入统计”按钮,系统会根据车辆进出记录汇总出一个的收入信息,并且通过柱型图显示出来,效果如图4所示。
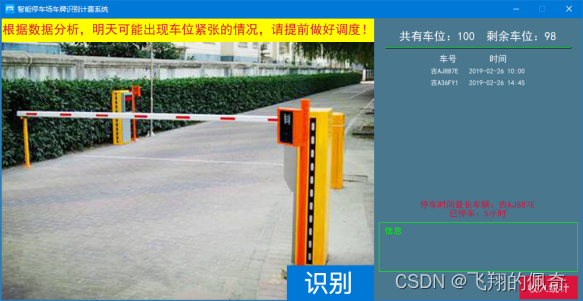
(3)满预警。系统会根据以往的数据自动判断一周中的哪一天会出现车位紧张的情况,从而在前一天给出预警提示,方便管理员提前做好调度,效果如图5所示。
四、部分代码展示
# !/usr/bin/env python
# -*- coding: utf-8 -*-
import cv2
import pandas as pd
from pandas import DataFrame
import matplotlib.pyplot as plt
import pygame

import time
import os

import ocrutil
import btn
import timeutil

# 定义颜色
BLACK = ( 0, 0, 0)
WHITE = (255, 255, 255)
GREEN = (0, 255, 0)
BLUE = (0, 120, 215)
GRAY = (96,96,96)
RED = (220,20,60)
YELLOW = (255,255,0)
DARKBLUE = (73, 119, 142)
BG = DARKBLUE  # 指定背景颜色
#信息内容
txt1=''
txt2=''
txt3=''
# 窗体大小
size = 1000, 484
# 设置帧率(屏幕每秒刷新的次数)
FPS = 60
# 一共有多少车位
Total =100
# 月收入统计分析界面开关
income_switch=False

# 获取文件的路径
cdir = os.getcwd()
# 文件路径
path=cdir+'/datafile/'
# 读取路径
if not os.path.exists(path):
    # 根据路径建立文件夹
    os.makedirs(path)
    # 车牌号 日期 时间 价格 状态
    carnfile = pd.DataFrame(columns=['carnumber', 'date', 'price', 'state'])
    # 生成xlsx文件
    carnfile.to_excel(path+'停车场车辆表' + '.xlsx', sheet_name='data')
    carnfile.to_excel(path+'停车场信息表' + '.xlsx', sheet_name='data')

# 读取文件内容
pi_table = pd.read_excel(path+'停车场车辆表.xlsx', sheet_name='data')
pi_info_table = pd.read_excel(path+'停车场信息表.xlsx', sheet_name='data')
# 停车场车辆
cars = pi_table[['carnumber', 'date', 'state']].values
# 已进入车辆数量
carn =len(cars)

# pygame初始化
pygame.init()
# 设置窗体名称
pygame.display.set_caption('智能停车场车牌识别计费系统')
# 图标
ic_launcher = pygame.image.load('file/ic_launcher.png')
# 设置图标
pygame.display.set_icon(ic_launcher)
# 设置窗体大小
screen=pygame.display.set_mode(size)
# 设置背景颜色
screen.fill(BG)

try:
    cam = cv2.VideoCapture(0)
except:
    print('请连接摄像头')

# 背景文图案
def text0(screen):
    # 底色
    pygame.draw.rect(screen, BG, (650, 2, 350, 640))
    # 绘制横线
    pygame.draw.aaline(screen, GREEN, (662, 50), (980, 50), 1)
    # 绘制信息矩形框
    pygame.draw.rect(screen, GREEN, (650, 350, 342,85),1)
    # 使用系统字体
    xtfont = pygame.font.SysFont('SimHei', 15)
    # 重新开始按钮
    textstart = xtfont.render('信息', True, GREEN)
    # 获取文字图像位置
    text_rect = textstart.get_rect()
    # 设置文字图像中心点
    text_rect.centerx = 675
    text_rect.centery = 365
    # 绘制内容
    screen.blit(textstart, text_rect)
    cars = pi_table[['carnumber', 'date', 'state']].values
    if len(cars)>0:
        longcar=cars[0][0]
        cartime =cars[0][1]
        # 使用系统字体
        xtfont = pygame.font.SysFont('SimHei', 15)
        # 转换当前时间 2018-12-11 16:18
        localtime = time.strftime('%Y-%m-%d %H:%M', time.localtime())
        htime = timeutil.DtCalc(cartime, localtime)
        # 重新开始按钮
        textscar = xtfont.render('停车时间最长车辆:'+str(longcar), True, RED)
        texttime = xtfont.render("已停车:" + str(htime) + '小时', True, RED)
        # 获取文字图像位置
        text_rect1 = textscar.get_rect()
        text_rect2 = texttime.get_rect()
        # 设置文字图像中心点
        text_rect1.centerx = 820
        text_rect1.centery = 320
        text_rect2.centerx = 820
        text_rect2.centery = 335
        # 绘制内容
        screen.blit(textscar, text_rect1)
        screen.blit(texttime, text_rect2)
        pass

# 车位文字
def text1(screen):
    # 剩余车位
    k =Total - carn
    if k<10:
        # 剩余车位
        sk='0'+str(k)
    else:
        sk =str(k)
    # 使用系统字体
    xtfont = pygame.font.SysFont('SimHei', 20)
    # 重新开始按钮
    textstart = xtfont.render('共有车位:'+str(Total)+'  剩余车位:'+sk, True,WHITE)
    # 获取文字图像位置
    text_rect = textstart.get_rect()
    # 设置文字图像中心点
    text_rect.centerx =820
    text_rect.centery =30
    # 绘制内容
    screen.blit(textstart, text_rect)

# 停车场信息表头
def text2(screen):
    # 使用系统字体
    xtfont = pygame.font.SysFont('SimHei', 15)
    # 重新开始按钮
    textstart = xtfont.render('  车号       时间    ', True,WHITE)
    # 获取文字图像位置
    text_rect = textstart.get_rect()
    # 设置文字图像中心点
    text_rect.centerx =820
    text_rect.centery =70
    # 绘制内容
    screen.blit(textstart, text_rect)
    pass

# 停车场车辆信息
def text3(screen):
    # 使用系统字体
    xtfont = pygame.font.SysFont('SimHei', 12)
    # 获取文档表信息
    cars = pi_table[['carnumber', 'date', 'state']].values
    # 页面就绘制10辆车信息
    if len(cars) > 10:
        cars = pd.read_excel(path + '停车场车辆表.xlsx', skiprows=len(cars) - 10, sheet_name='data').values
    # 动态绘制y点变量
    n=0
    # 循环文档信息
    for car in cars:
        n+=1
        # 车辆车号 车辆进入时间
        textstart = xtfont.render( str(car[0])+'   '+str(car[1]), True, WHITE)
        # 获取文字图像位置
        text_rect = textstart.get_rect()
        # 设置文字图像中心点
        text_rect.centerx = 820
        text_rect.centery = 70+20*n
        # 绘制内容
        screen.blit(textstart, text_rect)
    pass

# 历史信息 满预警信息
def text4(screen,txt1,txt2,txt3):
    # 使用系统字体
    xtfont = pygame.font.SysFont('SimHei', 15)
    texttxt1 = xtfont.render(txt1, True, GREEN)
    # 获取文字图像位置
    text_rect = texttxt1.get_rect()
    # 设置文字图像中心点
    text_rect.centerx = 820
    text_rect.centery = 355+20
    # 绘制内容
    screen.blit(texttxt1, text_rect)

    texttxt2 = xtfont.render(txt2, True, GREEN)
    # 获取文字图像位置
    text_rect = texttxt2.get_rect()
    # 设置文字图像中心点
    text_rect.centerx = 820
    text_rect.centery = 355+40
    # 绘制内容
    screen.blit(texttxt2, text_rect)

    texttxt3 = xtfont.render(txt3, True, GREEN)
    # 获取文字图像位置
    text_rect = texttxt3.get_rect()
    # 设置文字图像中心点
    text_rect.centerx = 820
    text_rect.centery = 355+60
    # 绘制内容
    screen.blit(texttxt3, text_rect)

    # 满预警
    kcar = pi_info_table[pi_info_table['state'] == 2]
    kcars = kcar['date'].values
    # 周标记 0代表周一
    week_number=0
    for k in kcars:
        week_number=timeutil.get_week_numbeer(k)
    # 转换当前时间 2018-12-11 16:18
    localtime = time.strftime('%Y-%m-%d %H:%M', time.localtime())
    # 根据时间返回周标记 0代表周一
    week_localtime=timeutil.get_week_numbeer(localtime)
    if week_number ==0:
        if week_localtime==6 :
            text6(screen,'根据数据分析,明天可能出现车位紧张的情况,请提前做好调度!')
        elif week_localtime==0:
            text6(screen,'根据数据分析,今天可能出现车位紧张的情况,请做好调度!')
    else:
        if week_localtime+1==week_number:
            text6(screen, '根据数据分析,明天可能出现车位紧张的情况,请提前做好调度!')
        elif week_localtime==week_number:
            text6(screen, '根据数据分析,今天可能出现车位紧张的情况,请做好调度!')
    pass

# 收入统计
def text5(screen):
    # 计算price列 和
    sum_price = pi_info_table['price'].sum()
    # print(str(sum_price) + '元')
    # 使用系统字体
    xtfont = pygame.font.SysFont('SimHei', 20)
    # 重新开始按钮
    textstart = xtfont.render('共计收入:' + str(int(sum_price)) + '元', True, WHITE)
    # 获取文字图像位置
    text_rect = textstart.get_rect()
    # 设置文字图像中心点
    text_rect.centerx = 1200
    text_rect.centery = 30
    # 绘制内容
    screen.blit(textstart, text_rect)
    # 加载图像
    image = pygame.image.load('file/income.png')
    # 设置图片大小
    image = pygame.transform.scale(image, (390, 430))
    # 绘制月收入图表
    screen.blit(image, (1000,50))

# 显示满预警提示内容
def text6(screen,week_info):
    pygame.draw.rect(screen, YELLOW, ((2, 2), (640, 40)))
    xtfont = pygame.font.SysFont('SimHei', 22)
    textweek_day = xtfont.render(week_info, True, RED)
    # 获取文字图像位置
    text_rectw = textweek_day.get_rect()
    # 设置文字图像中心点
    text_rectw.centerx = 322
    text_rectw.centery = 20
    # 绘制内容
    screen.blit(textweek_day, text_rectw)

# 游戏循环帧率设置
clock = pygame.time.Clock()
# 主线程
Running =True
while Running:
    # 从摄像头读取图片
    sucess, img = cam.read()
    # 保存图片,并退出。
    cv2.imwrite('file/test.jpg', img)
    # 加载图像
    image = pygame.image.load('file/test.jpg')
    # 设置图片大小
    image = pygame.transform.scale(image, (640, 480))
    # 绘制视频画面
    screen.blit(image, (2,2))
    # 背景文字图案
    text0(screen)
    # 停车位信息
    text1(screen)
    # 停车场信息表头
    text2(screen)
    # 停车场车辆信息
    text3(screen)
    # 提示信息
    text4(screen, txt1, txt2, txt3)
    # 创建识别按钮
    button_go = btn.Button(screen, (640, 480), 150, 60, BLUE, WHITE, "识别", 25)
    # 绘制创建的按钮
    button_go.draw_button()
    # 创建分析按钮
    button_go1 = btn.Button(screen, (990, 480), 100, 40, RED, WHITE, "收入统计", 18)
    # 绘制创建的按钮
    button_go1.draw_button()
    # 判断是否开启了收入统计按钮
    if income_switch:
        # 开启时候绘制页面
        text5(screen)
        pass
    else:
        pass
    for event in pygame.event.get():
        # 关闭页面游戏退出
        if event.type == pygame.QUIT:
            # 退出
            pygame.quit()
            # 关闭摄像头
            cam.release()
            exit()
        #判断点击
        elif event.type == pygame.MOUSEBUTTONDOWN:
            # 输出鼠标点击位置
            print(str(event.pos[0])+':'+str(event.pos[1]))
            # 判断是否点击了收入统计按钮位置
            # 收入统计按钮
            if 890 <= event.pos[0] and event.pos[0] <= 990 \
                    and 440 <= event.pos[1] and event.pos[1] <= 480:
                print('分析统计按钮')
                if income_switch:
                    income_switch = False
                    # 设置窗体大小
                    size  = 1000, 484
                    screen = pygame.display.set_mode(size)
                    screen.fill(BG)
                else:
                    income_switch = True
                    # 设置窗体大小
                    size  = 1400, 484
                    screen = pygame.display.set_mode(size)
                    screen.fill(BG)
                    attr = ['1月', '2月', '3月', '4月', '5月',
                            '6月', '7月', '8月', '9月', '10月', '11月', '12月']
                    v1 = []
                    # 循环添加数据
                    for i in range(1, 13):
                        k = i
                        if i < 10:
                            k = '0' + str(k)
                        #筛选每月数据
                        kk = pi_info_table[pi_info_table['date'].str.contains('2019-' + str(k))]
                        # 计算价格和
                        kk = kk['price'].sum()
                        v1.append(kk)
                    # 设置字体可以显示中文
                    plt.rcParams['font.sans-serif'] = ['SimHei']
                    # 设置生成柱状图图片大小
                    plt.figure(figsize=(3.9, 4.3))
                    # 设置柱状图属性 attr为x轴内容 v1为x轴内容相对的数据
                    plt.bar(attr, v1, 0.5, color="green")
                    # 设置数字标签
                    for a, b in zip(attr, v1):
                        plt.text(a, b, '%.0f' % b, ha='center', va='bottom', fontsize=7)
                    # 设置柱状图标题
                    plt.title("每月收入统计")
                    # 设置y轴范围
                    plt.ylim((0, max(v1) + 50))
                    # 生成图片
                    plt.savefig('file/income.png')
                pass
            # 判断是否点击了识别按钮位置
            #识别按钮
            if 492<=event.pos[0] and event.pos[0]<=642 and 422<=event.pos[1] and event.pos[1]<=482:
                print('点击识别')
                try:
                    # 获取车牌
                    carnumber=ocrutil.getcn()
                    # 转换当前时间 2018-12-11 16:18
                    localtime = time.strftime('%Y-%m-%d %H:%M', time.localtime())
                    # 获取车牌号列数据
                    carsk = pi_table['carnumber'].values
                    # 判断当前识别得车是否为停车场车辆
                    if carnumber in carsk:
                        txt1='车牌号: '+carnumber
                        # 时间差
                        y=0
                        # 获取行数用
                        kcar=0
                        # 获取文档内容
                        cars = pi_table[['carnumber', 'date', 'state']].values
                        # 循环数据
                        for car in cars:
                            # 判断当前车辆根据当前车辆获取时间
                            if carnumber ==car[0]:
                                # 计算时间差 0,1,2...
                                y = timeutil.DtCalc(car[1], localtime)
                                break
                            #行数+1
                            kcar = kcar + 1
                        #判断停车时间 如果时间
                        if y==0:
                            y=1
                        txt2='停车费:'+str(3*y)+'元'
                        txt3='出停车场时间:'+localtime
                        # 删除停车场车辆表信息
                        pi_table=pi_table.drop([kcar],axis = 0)
                        # 更新停车场信息
                        pi_info_table=pi_info_table.append({'carnumber': carnumber,
                                                            'date': localtime,
                                                            'price':3*y,
                                                            'state': 1}, ignore_index=True)
                        # #保存信息更新xlsx文件
                        DataFrame(pi_table).to_excel(path + '停车场车辆表' + '.xlsx',
                                                     sheet_name='data', index=False, header=True)
                        DataFrame(pi_info_table).to_excel(path + '停车场信息表' + '.xlsx',
                                                          sheet_name='data', index=False, header=True)
                        # 停车场车辆
                        carn -= 1
                    else:
                        if carn <=Total:
                           # 添加信息到文档 ['carnumber', 'date', 'price', 'state']
                           pi_table=pi_table.append({'carnumber': carnumber,
                                                     'date': localtime ,
                                                     'state': 0}, ignore_index=True)
                           # 更新xlsx文件
                           DataFrame(pi_table).to_excel(path + '停车场车辆表' + '.xlsx',
                                                        sheet_name='data', index=False, header=True)
                           if carn<Total:
                               # state等于0得时候为 停车场有车位进入停车场
                               pi_info_table = pi_info_table.append({'carnumber': carnumber,
                                                                     'date': localtime,
                                                                     'state': 0}, ignore_index=True)
                               # 车辆数量+1
                               carn += 1
                           else:
                               # state等于2得时候为 停车场没有车位的时候
                               pi_info_table = pi_info_table.append({'carnumber': carnumber,
                                                                     'date': localtime,
                                                                     'state': 2}, ignore_index=True)
                           DataFrame(pi_info_table).to_excel(path + '停车场信息表' + '.xlsx',
                                                             sheet_name='data', index=False,header=True)
                           ...............................此处省略
五、源码地址
https://download.csdn.net/download/weixin_43860634/88335364

