工程复现 – SiamMOT
先赞后看,养成好习惯,感谢您的理解与支持!
参考:
1. siam-mot源码地址
2. SiamMOT 论文地址
3. SiamMOT 论文解析
简单介绍
SiamMOT(SiamMOT: Siamese Multi-Object Tracking)是一个基于区域的孪生多对象跟踪网络,可同时进行图像的检测和追踪。该网络作为baseline ,由亚马逊提出的一个解决Airbone Object Tracking(AOT) 空中障碍物追踪问题。目前仅支持EMM运动模型。
一. 下载和安装工程
- 下载工程
git clone https://github.com/amazon-science/siam-mot.git
- 安装依赖
conda create -n siammot python=3.7
conda activate siammot
pip3 install -r requirements.txt
conda install pytorch==1.10.1 torchvision==0.11.2 torchaudio==0.10.1 cudatoolkit=10.2 -c pytorch  # 因为本机CUDA10.2,故需要找到对应版本torch
- 下载三方库maskrnn_benchmark及其相关依赖包
参考:maskrcnn-benchmark install
git clone https://github.com/facebookresearch/maskrcnn-benchmark.git

pip install ninja yacs cython matplotlib tqdm opencv-python
conda install -c pytorch pytorch-nightly torchvision cudatoolkit=9.0 # pytorch-nightly 和 cudatoolkit=9.0 未安装上
export INSTALL_DIR=$PWD

# install pycocotools
cd $INSTALL_DIR
git clone https://github.com/cocodataset/cocoapi.git
cd cocoapi/PythonAPI
python setup.py build_ext install

# install cityscapesScripts
cd $INSTALL_DIR
git clone https://github.com/mcordts/cityscapesScripts.git
cd cityscapesScripts/
python setup.py build_ext install

# install apex
cd $INSTALL_DIR
git clone https://github.com/NVIDIA/apex.git
cd apex
python setup.py install --cuda_ext --cpp_ext

# install maskrcnn-benchmark
cd maskrcnn-benchmark
python setup.py build develop

unset INSTALL_DIR
二. demo 测试
1.详情参考README.md, 遇到问题请参考第三模块。
python3 demos/demo.py --demo-video PATH_TO_DEMO_VIDE --track-class person --dump-video True
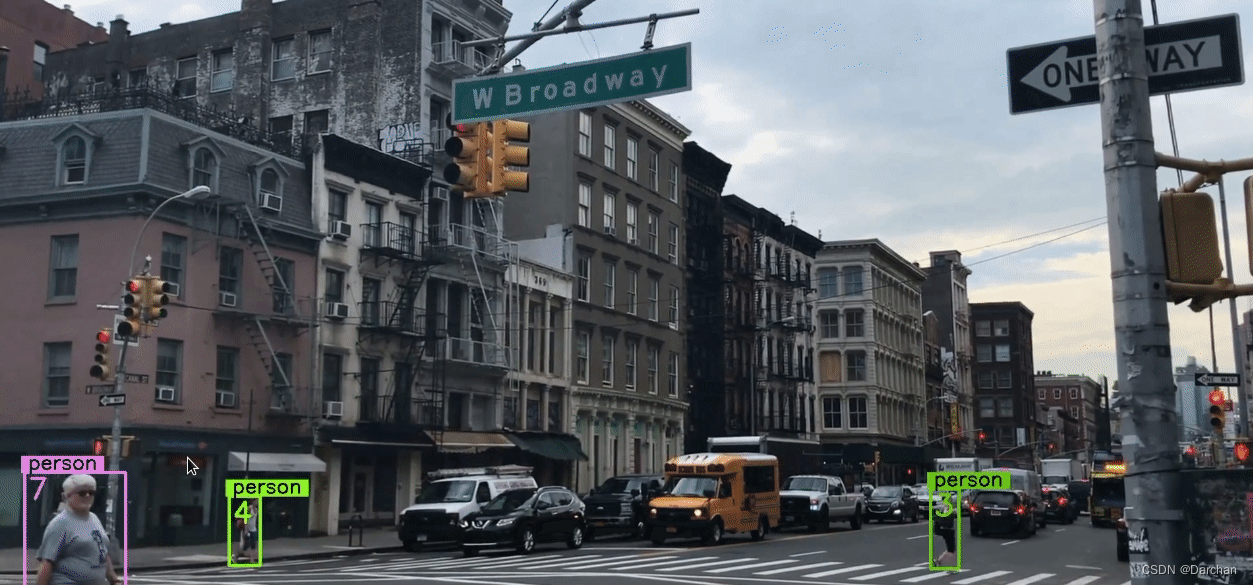
2.结果
三.可能遇到的问题
Q1: 运行demo测试脚本,出现ModuleNotFoundError: No module named ‘demos’
A1: 将工程加入python环境变量
export PYTHONPATH=/home/cui/workspace/siam-mot
Q2: 将工程加入环境变量后,出现ModuleNotFoundError: No module named ‘maskrcnn_benchmark’
A2: 需要下载拷贝三方库,详细参考一中第3点。
Q3: 拷贝maskrcnn_benchmark后,出现库中模块缺少属性,AttributeError: module ‘torch._six’ has no attribute ‘PY3’
A3: 可能是torch版本不对,这里判断主要是否引入头文件和定义函数,直接暴力取true即可。
if torch._six.PY3: 直接修改为
if 1:
Q4: ImportError: cannot import name ‘_download_url_to_file’ from ‘torch.utils.model_zoo’
A4: 未进入python虚拟环境 或者 vscode IDE未切换到新建的虚拟环境,或者由于torch版本问题,修改_download_url_to_file函数名如下
#from torch.hub import _download_url_to_file  # 原版
from torch.hub import download_url_to_file as _download_url_to_file  # 修改
Q5: ImportError: cannot import name ‘_C’ from ‘maskrcnn_benchmark’
A5: 修改如下,修改_C 路径
from ._utils import _C
#from maskrcnn_benchmark import _C
Q6:Maskrcnn第三方依赖,apex安装过程中 cuda版本不对应,RuntimeError: Cuda extensions are being compiled with a version of Cuda that does not match the version used to compile Pytorch binaries. Pytorch binaries were compiled with Cuda 11.7.
A6:
参考:如何安装apex
本机CUDA版本10.2,注意torch、cudatoolkit对应版本
conda install pytorch==1.10.1 torchvision==0.11.2 torchaudio==0.10.1 cudatoolkit=10.2 -c pytorch
再次重新安装apex
Q7: fatal error: THC/THC.h: No such file or directory
A7:原因及解决:最新的版(1.11)本中将THC/THC.h文件删除了,pytorch降级1.10即可.
## 设置清华源,加速安装(貌似没什么效果)
conda config --add channels https://mirrors.tuna.tsinghua.edu.cn/anaconda/pkgs/free/
conda config --add channels https://mirrors.tuna.tsinghua.edu.cn/anaconda/pkgs/main/
conda config --set show_channel_urls yes
conda install pytorch==1.10.1 torchvision==0.11.2 torchaudio==0.10.1 cudatoolkit=10.2 -c pytorch
Q8:编译maskrcnn_benchmark, /home/cui/workspace/maskrcnn_benchmark/maskrcnn_benchmark/csrc/cuda/deform_conv_cuda.cu(72): error: identifier “AT_CHECK” is undefined
A8:在maskrcnn_benchmark/maskrcnn_benchmark/csrc/cuda/文件夹下,修改deform_conv_cuda.cu和deform_pool_cuda.cu两个文件开头添加如下内容:
#ifndef AT_CHECK
#define AT_CHECK TORCH_CHECK
#endif
Q9: 执行demo脚本,出现bug:libtorch_cuda_cu.so: cannot open shared object file: No such file or directory
A9: 首先进入到虚拟环境torch下,可以找到该文件。查看torch版本发现不是gpu版本(使用conda方式 安装的pytorch 是GPU版本),安装完之后如果还是不行,可以重新安装一边maskrcnn-benchmark。
cd ~/anaconda3/envs/siammot/lib/python3.7/site-packages/torch/lib
ls
pip install torch==1.10.1+cu102 torchvision==0.11.2+cu102 torchaudio==0.10.1 -f
 https://download.pytorch.org/whl/torch_stable.html
Q10:ModuleNotFoundError: No module named ‘torchvision.models.utils’
A10:
参考:torchvision版本问题,修改/home/cui/workspace/siam-mot/siammot/modelling/backbone/dla.py", line 11
#from torchvision.models.utils import load_state_dict_from_url  # 原版
from torch.hub import load_state_dict_from_url                  # 改版
Q11:ModuleNotFoundError: No module named ‘decord’
A11:
pip install decord
Q12: ModuleNotFoundError: No module named ‘ffmpeg’
A12: 使用如下命令,切忌不要使用pip install ffmpeg,否则会出现Q17的问题(不识别的参数crf)。
sudo apt-get install ffmpeg
Q13: 运行demo脚本,RuntimeError: Error reading PATH_TO_DEMO_VIDE…
A13:
修改运行脚本中–demo-video PATH_TO_DEMO_VIDE 数据输入路径 为自己本地数据路径,以.mp4为结尾命名的文件,如下所示工程的data目录下。(注:如果实在无法录制视频数据,可以去掉--dump-video参数,或者参考Q16解决视频无法录制问题)
参考数据下载地址为:siam-mot issue中有人提问的问题
python3 demos/demo.py --demo-video ./data/person_car.mp4 --track-class person --dump-video True --output-path ./demos/demo_vis/
Q14: 运行demo脚本,/home/cui/workspace/siam-mot/demos/utils/vis_writer.py", line 42,assert (self._video_writer is not None)
A14: 原因同Q16问题相同,/demos/demo_vis/ 目录下没有需要检测的视频文件。
Q15: 运行demo脚本,AttributeError: module ‘ffmpeg’ has no attribute ‘probe’
A15:
pip install ffmpeg-python
Q16: 运行demo脚本 [ERROR:0] global /tmp/pip-req-build-oxjbfc17/opencv/modules/videoio/src/cap_ffmpeg_impl.hpp (2650) open Could not find encoder for codec_id=27, error: Encoder not found
[ERROR:0] global /tmp/pip-req-build-oxjbfc17/opencv/modules/videoio/src/cap_ffmpeg_impl.hpp (2722) open VIDEOIO/FFMPEG: Failed to initialize VideoWriter
A16:
根本原因在于 VideoWriter 的初始化,推测是.mp4格式数据与 `
‘avc1’ 类型不兼容,这里推荐两种更改方法,用于生成AVI格式数据。
法一:修改demos/utils/vis_writer.py,36行_init_video_writer函数中cv2.VideoWriter_fourcc,修改完后会直接修改demos/demo_vis/下面的视频。
self._video_writer = cv2.VideoWriter(str(self._video_path), cv2.VideoWriter_fourcc(*'mp4v'), self._fps,(int(frame_width), int(frame_height)))
法二:修改demos/utils/vis_writer.py,36行_init_video_writer函数,同时可以注释掉close_video_writer函数中关于#compress the videos下面部分。
    def _init_video_writer(self, frame_width, frame_height):
        self._video_path = os.path.join(self._output_path, self._file_name)
        video_output_path = os.path.join(self._output_path, 'debug.avi') #
        fourcc = cv2.VideoWriter_fourcc('M','J','P','G') #
        self._video_writer = cv2.VideoWriter(str(video_output_path), fourcc, self._fps,
                                            (int(frame_width), int(frame_height)))
Q17: 运行demo脚本,Unrecognized option ‘crf’.
Error splitting the argument list: Option not found
A17: 原因可能是使用 ffmpeg 时使用到了 libx264,但在实际的编译过程中并有指定编译 libx264 参数,默认不会编译这一部分组件,从而产生报错。,参考crf 未识别参数
sudo apt-get install ffmpeg






![洛谷千题详解 | P1020 [NOIP1999 普及组] 导弹拦截【C++语言】](https://img-blog.csdnimg.cn/img_convert/6e4543e2cabedafc9804ae40e2753e5e.png)

