第1篇:Arduino与ESP32开发板的安装方法
第2篇:ESP32 helloword第一个程序示范点亮板载LED
第3篇:vscode搭建esp32 arduino开发环境
第4篇:vscode+platformio搭建esp32 arduino开发环境
第5篇:doit_esp32_devkit_v1使用pmw呼吸灯实验
第6篇:ESP32连接无源喇叭播放音乐《涛声依旧》
第7篇:ESP32连接按钮点亮LED无源喇叭播放声音
第8篇:ESP32连接超声波HC-SR04测距点亮LED无源喇叭播放声音
第9篇:ESP32超声波HC-SR04Arduino类库编写
esp32开发板D开的引脚可以用来作为中断使用
1. 开启外部中断 attachInterrupt(pin,function,mode);
attachInterrupt(uint8_t pin, std::function<void ()> intRoutine, int mode)函数功能:配置初始化外部中断
参数1:pin,外部中断所使用的引脚,ESP32所有引脚均可以配置为外部中断引脚
参数2:外部中断回调函数 ,此处填写函数名即可
参数3:中断触发方式,支持以下触发方式:

连接方法:
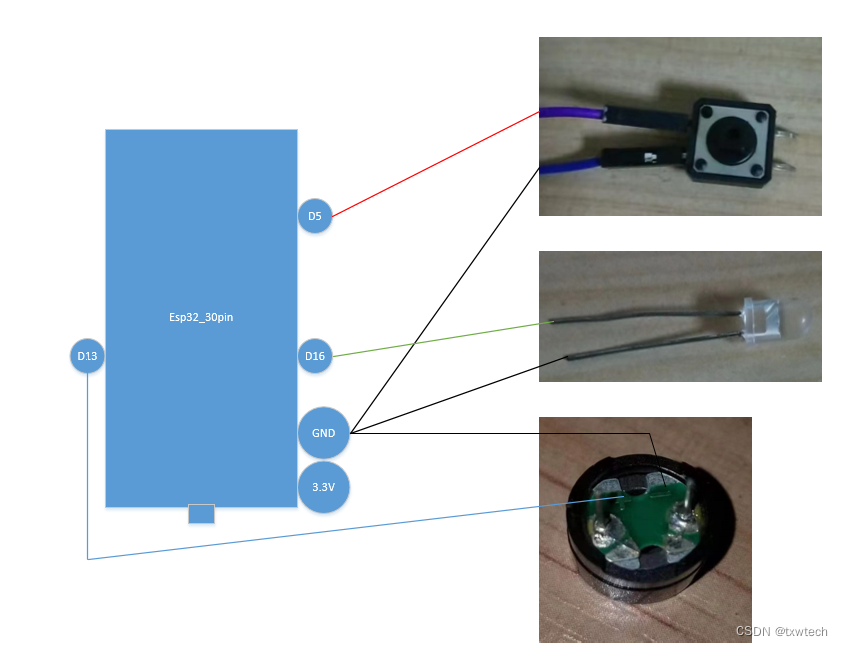
示范代码:
#include <Arduino.h>

// put function declarations here:
int myFunction(int, int);
int input_pin = 5;
int out_pin = 16;
bool b_led_state = false;
void SwitchState()
{
    b_led_state = !b_led_state;
}

void setup() {
  // put your setup code here, to run once:
   pinMode(input_pin,INPUT_PULLUP); //输入进行上拉,默认是高电平状态
   pinMode(out_pin,OUTPUT);
   attachInterrupt(input_pin,SwitchState,CHANGE);
}

void loop() {
  // put your main code here, to run repeatedly:
  //if(!digitalRead(input_pin))
  if(b_led_state)
  {
      digitalWrite(out_pin,HIGH);
      tone(13,1480,1);


  }
  else
  {
    digitalWrite(out_pin,LOW);
  //  tone(13,0,1);
    noTone(13);
  }
  delay(1000);
}

// put function definitions here:
int myFunction(int x, int y) {
  return x + y;
}
效果:按一下按钮,灯亮,喇叭响;再按一下,灯灭,喇叭不响。


