rt-thread 之 fal移植
提示:写完文章后,目录可以自动生成,如何生成可参考右边的帮助文档
文章目录
- rt-thread 之 fal移植
- 前言
- 一、fal是什么?
- 二、移植
- 1.片内flash fal移植
- step1:使能`RT-Thread Components--->`中的fal选项,如下图所示:
- step2:前两项是打开调试log输出和生成fal_cfg.h这两个文件,推荐默认选上,便于调试。
- step3:使能片上flash操作
- step 4 save .config文件
- 如果编译遇到错误需要确认几点:
- 2. 扩展外部flash
- step1 配置SPI2的使能
- step2 配置CS引脚
- step3 使用env使能SPI代码
- step4 使能片外flash
- step5 使能SFUD
- step6 添加对fal_cfg.h的修改
- step7 修改 rt_hw_spi_flash_init()
- 总结
前言
一、fal是什么?
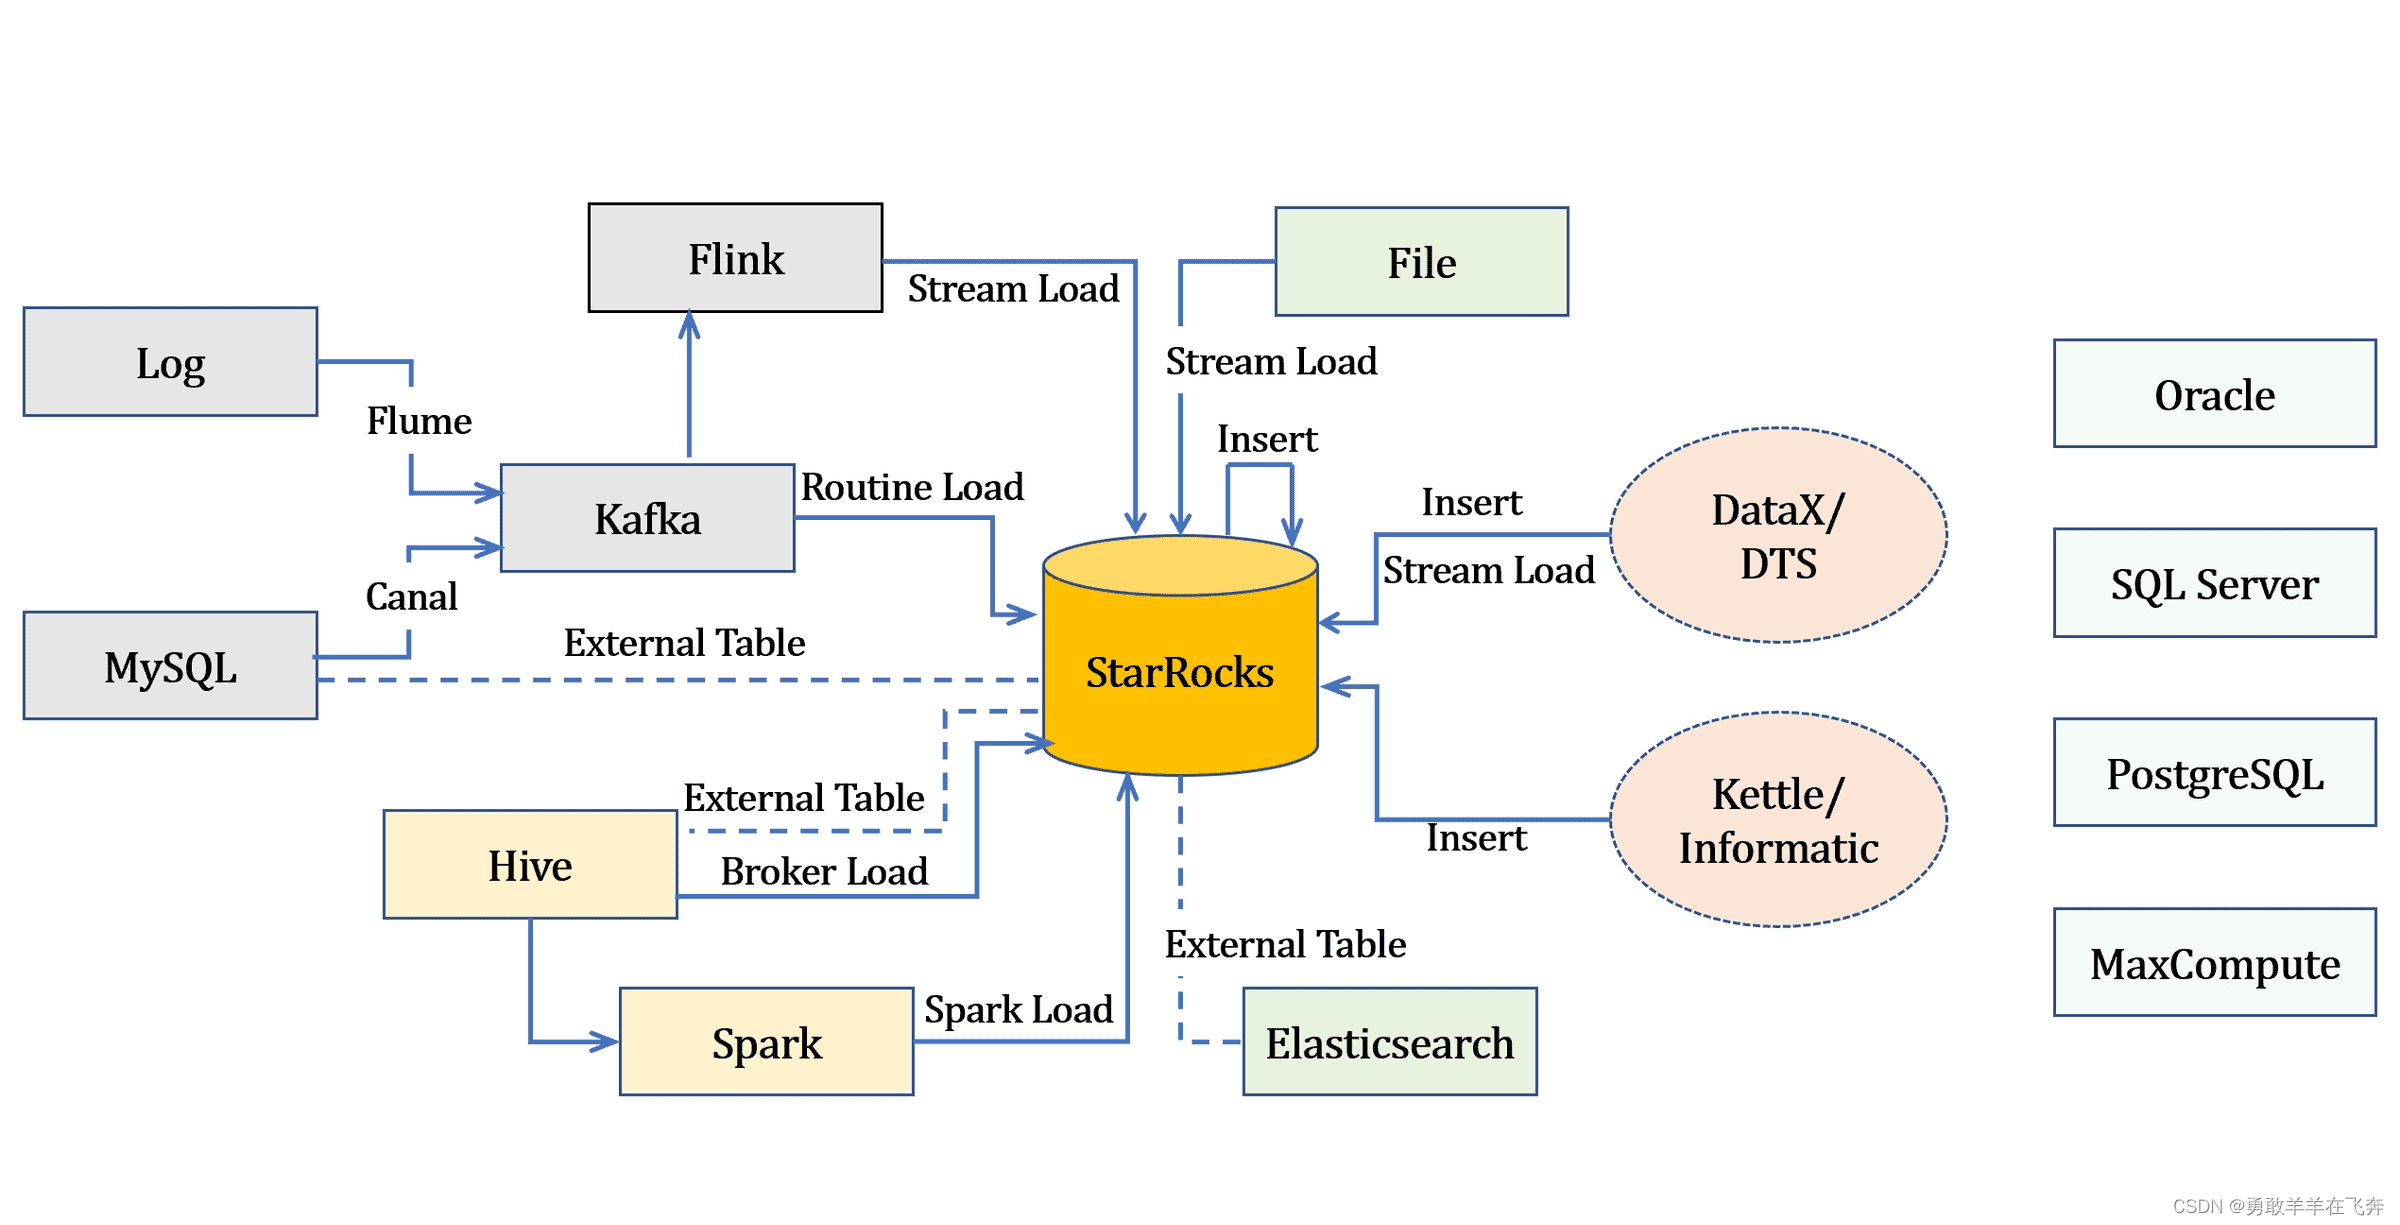
FAL (Flash Abstraction Layer) Flash 抽象层
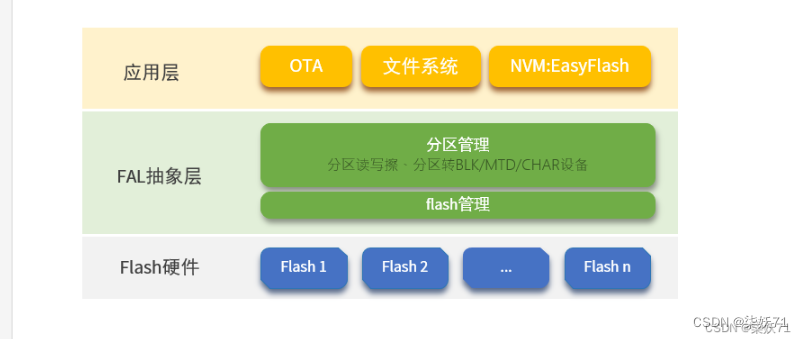
从上图可知,fal是对不同的flash设备做出抽象的接口,可以分区管理、读写且支持多块flash。
二、移植
首先在工程目录下打开env,我使用的是野火的模板,开发板是tb随便买的开发板,除了mcu与野火一致,其他外围电路都有些区别所以需要自己调整引脚和修改对应外设芯片。
1.片内flash fal移植
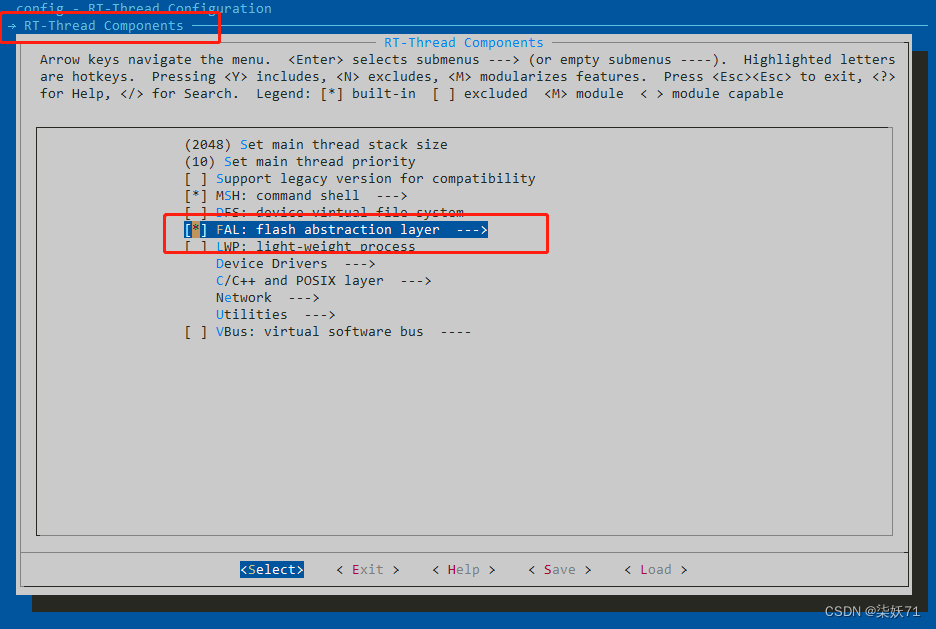
step1:使能RT-Thread Components--->中的fal选项,如下图所示:
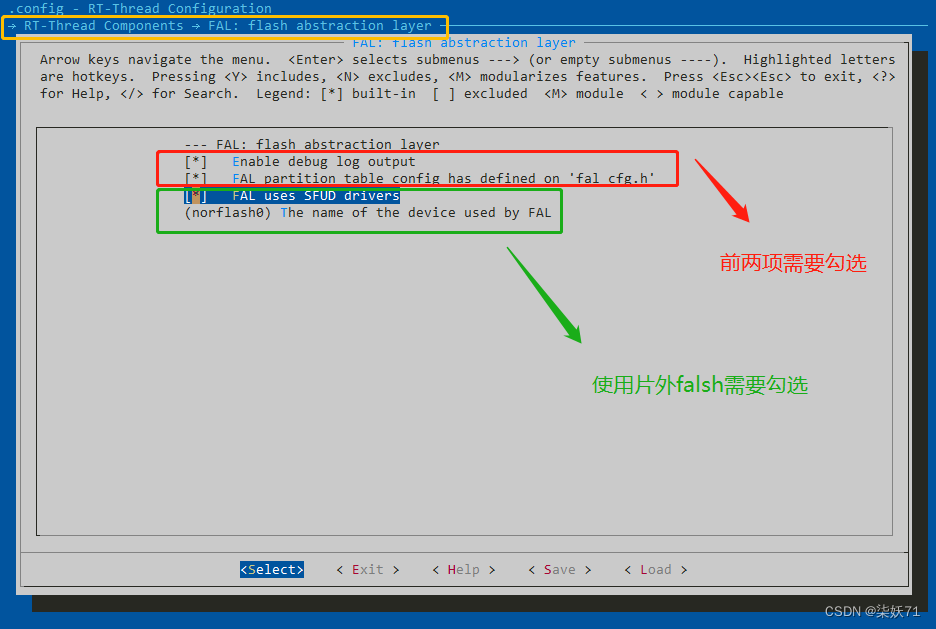
step2:前两项是打开调试log输出和生成fal_cfg.h这两个文件,推荐默认选上,便于调试。
第三个选项是使用SFUD驱动,这是对外部flash操作时需要的,这个可以根据自己需求勾选。
注:生成的fal_cfg.h会在 E:\xxx\stm32f103-fire-arbitrary\board\ports目录下,而不是fal目录下samples/porting目录下的文件(E:\xxx\stm32f103-fire-arbitrary\rt-thread\components\fal\samples\porting)sample只是个例子,供大家参考,后面添加外部flash可以参考。
step3:使能片上flash操作
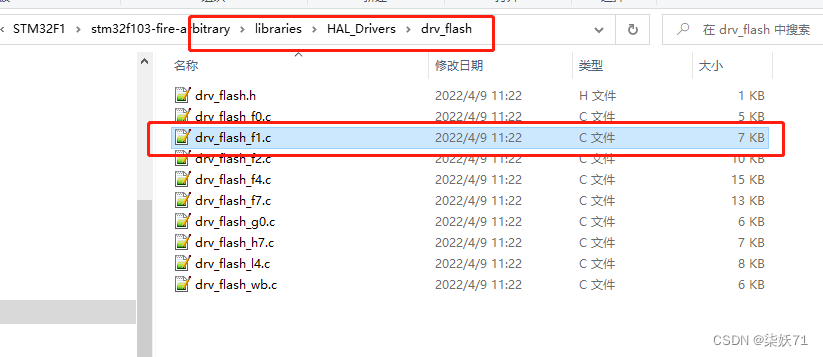
否则会缺少开发板对应的flash操作文件E:\xxx\stm32f103-fire-arbitrary\libraries\HAL_Drivers\drv_flash
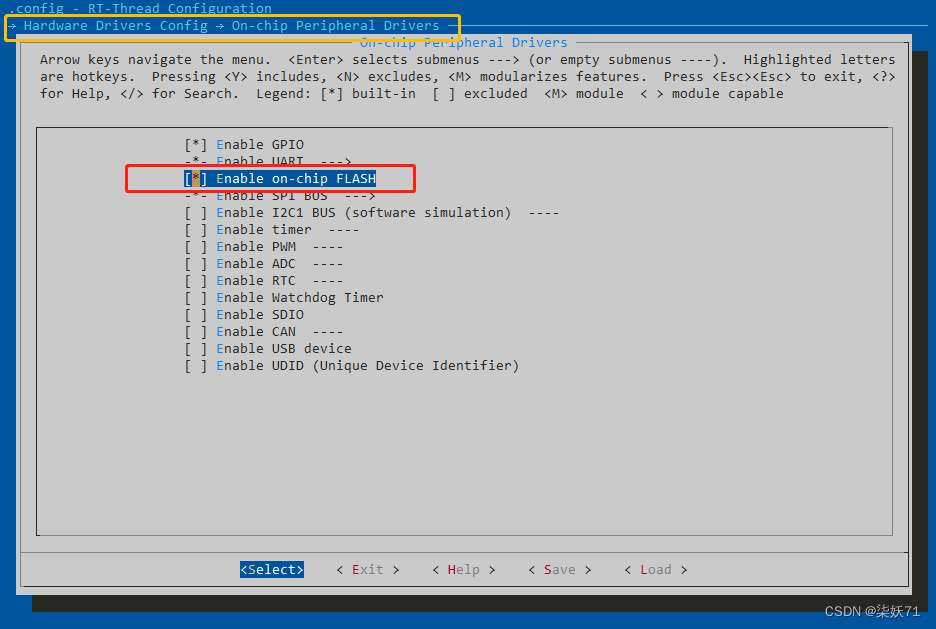
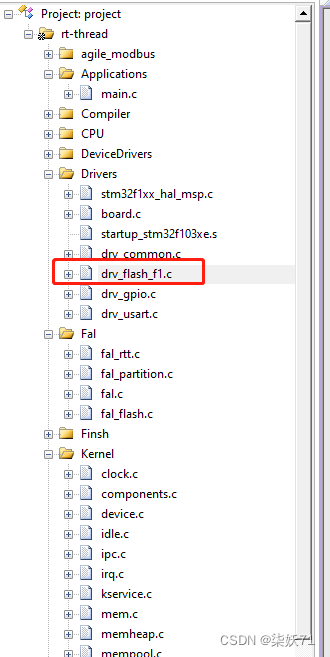
使能片上flash后会在工程中添加这些文件中对应的一个。STM32F1就是drv_flash_f1.c
step 4 save .config文件
使用pkgs -- update命令下载软件包,env设置自动下载可以省略这一步。最后使用scons --target=mdk5生成keil的工程即可。最后打开工程编译一下,没有报错。
将fal的初始化添加到main()函数中初始化,如下图所示:
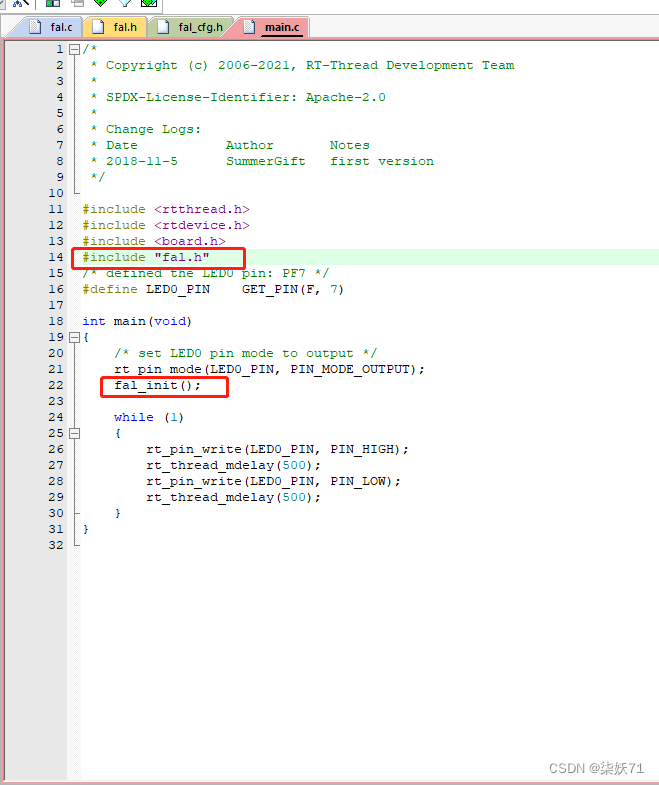
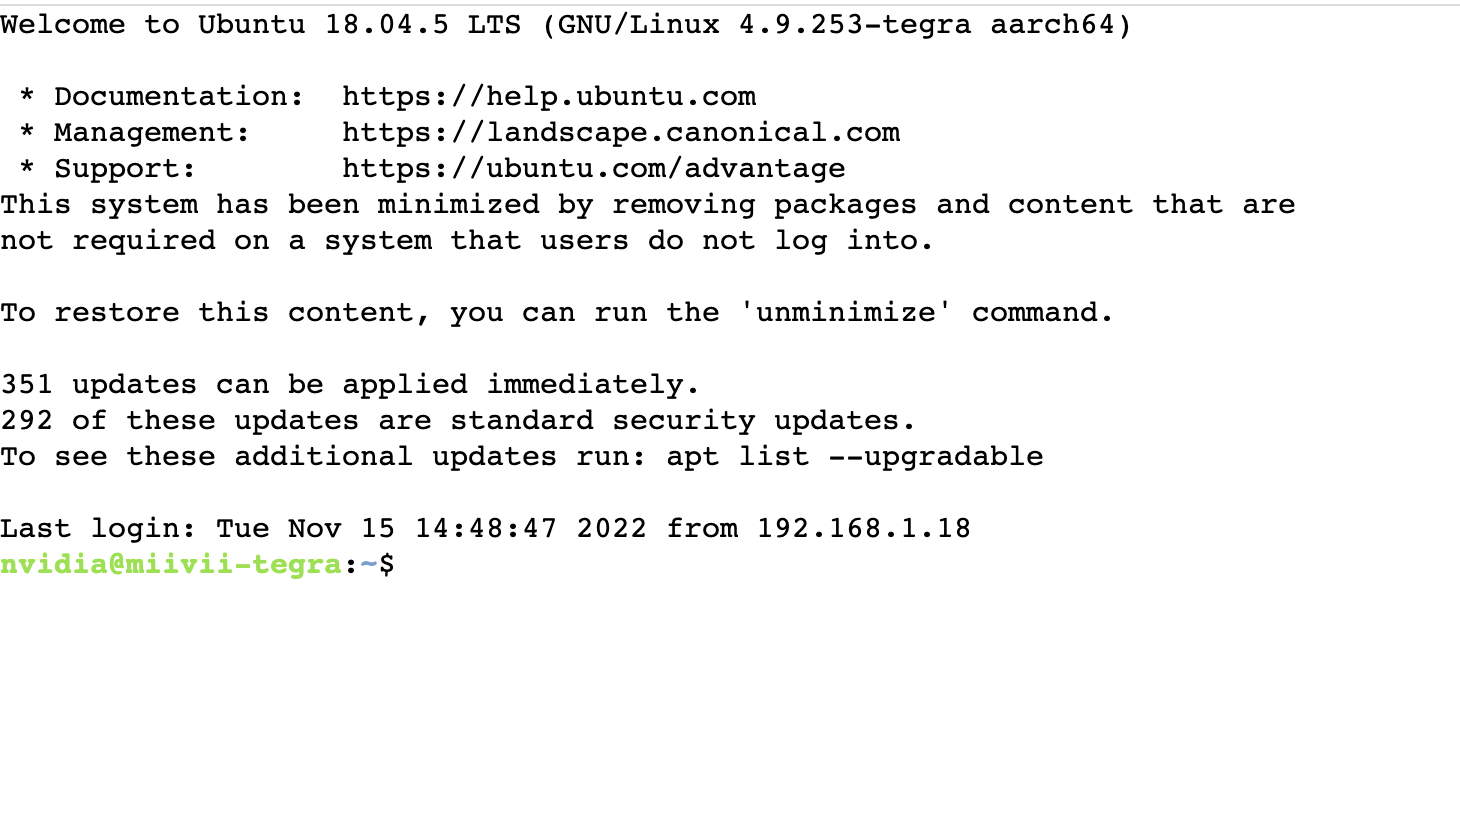
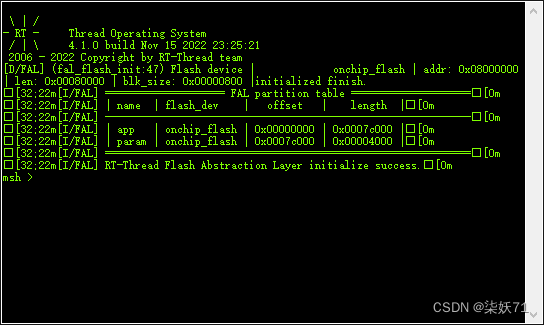
编译重新烧录并且重启一下开发板就可以看到如下打印信息,说明fal移植已经成功了。
如果编译遇到错误需要确认几点:
- 确认step3是否勾选,并且工程中是否有对应的
drv_flash_xx.c - 需要确认
fal_cfg.h中外部变量stm32_onchip_flash是否和drv_flash_xx.c中定义的stm32_onchip_flash、"onchip_flash"是一致的,代码如下:
fal_cfg.h
#ifndef _FAL_CFG_H_
#define _FAL_CFG_H_

#include <rtthread.h>
#include <board.h>

extern const struct fal_flash_dev stm32_onchip_flash;

/* flash device table */
#define FAL_FLASH_DEV_TABLE                                          \
{                                                                    \
    &stm32_onchip_flash,                                             \
}
/* ====================== Partition Configuration ========================== */
#ifdef FAL_PART_HAS_TABLE_CFG

/* partition table */
#define FAL_PART_TABLE                                                                      \
{                                                                                           \
    {FAL_PART_MAGIC_WROD,        "app",   "onchip_flash",       0,          496 * 1024, 0}, \
    {FAL_PART_MAGIC_WROD,        "param", "onchip_flash",       496* 1024 , 16 * 1024, 0},  \
}
#endif /* FAL_PART_HAS_TABLE_CFG */
#endif /* _FAL_CFG_H_ */
drv_flash_f1.c
const struct fal_flash_dev stm32_onchip_flash = { "onchip_flash", STM32_FLASH_START_ADRESS, STM32_FLASH_SIZE, FLASH_PAGE_SIZE, {NULL, fal_flash_read, fal_flash_write, fal_flash_erase} };
- 确认
fal.h中引用的fal_cfg.h因为看到有些教程把例程中的fal_cfg.h手动添加到目录中,如果step2勾选了添加fal_cfg.h则会在工程中出现两个fal_cfg.h,而且编译不会报错,所以需要确认最终生效的是哪个fal_cfg.h。建议移除一个fal_cfg.h。
2. 扩展外部flash
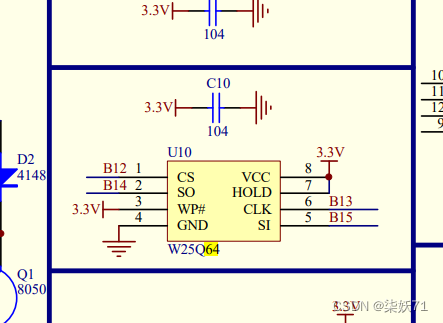
根据板子原理图配合STMcube软件使能对应SPI,开发板是SPI2和PB12为CS引脚。因为原理图上PB12引脚没有给上拉电阻,且W25Q64这个芯片是低电平选中,所以需要配置默认输出高电平并且给个上拉推挽输出。
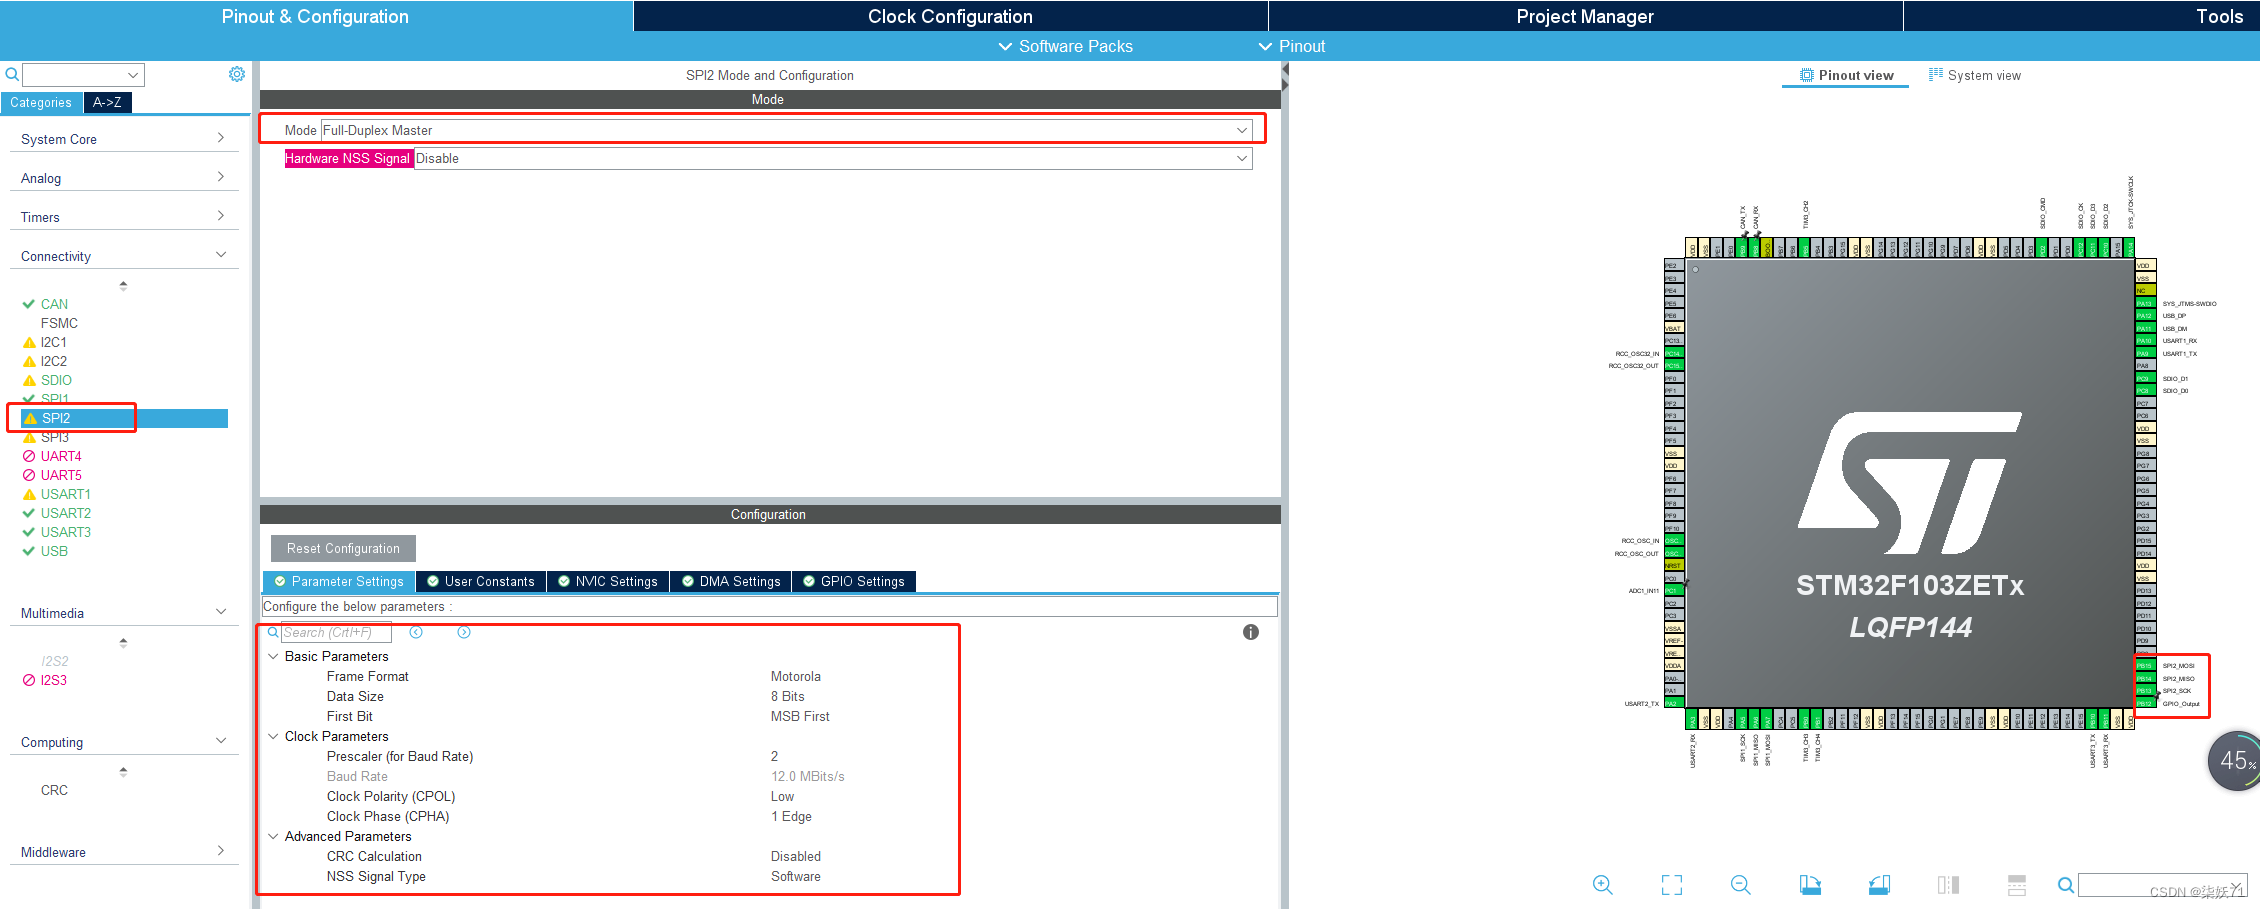
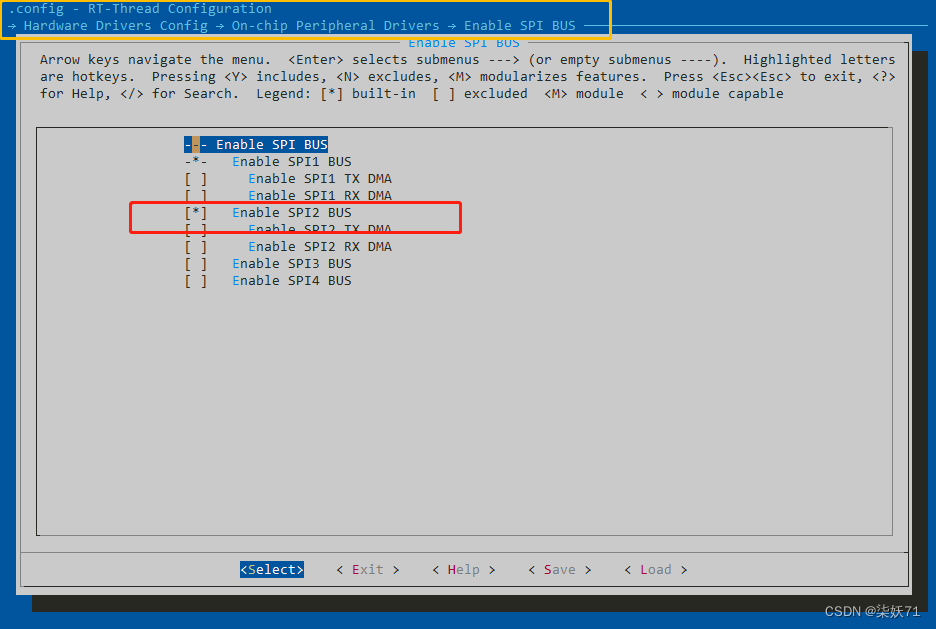
step1 配置SPI2的使能
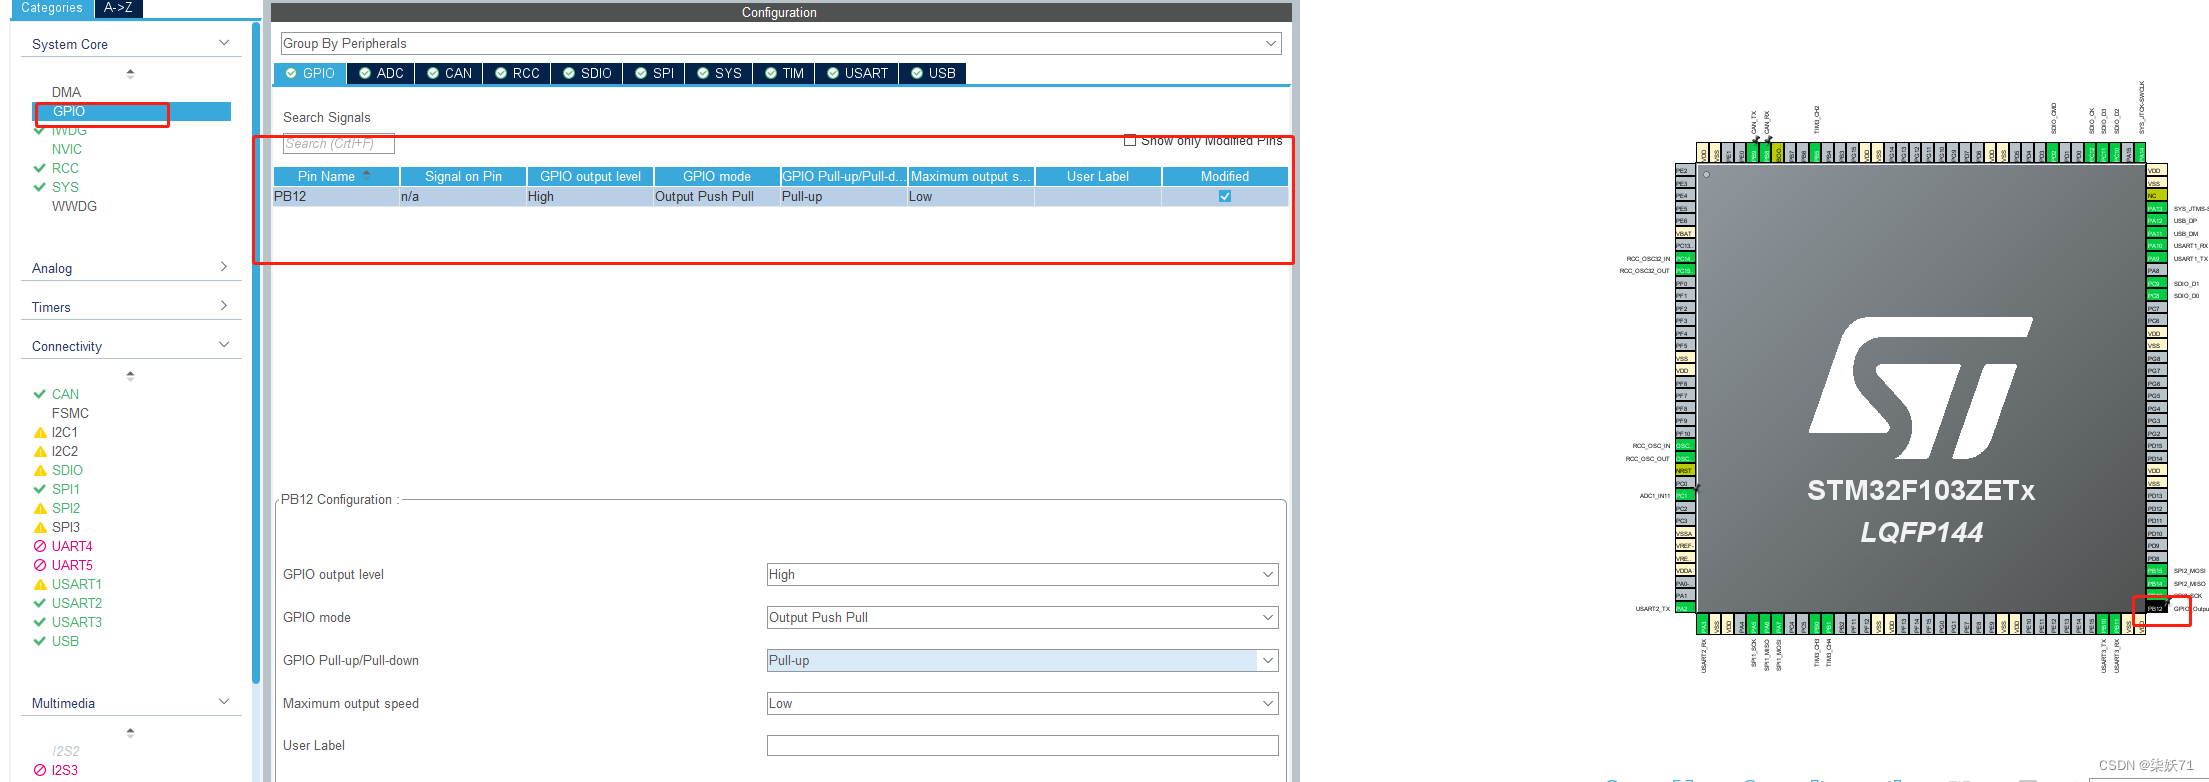
step2 配置CS引脚
step3 使用env使能SPI代码
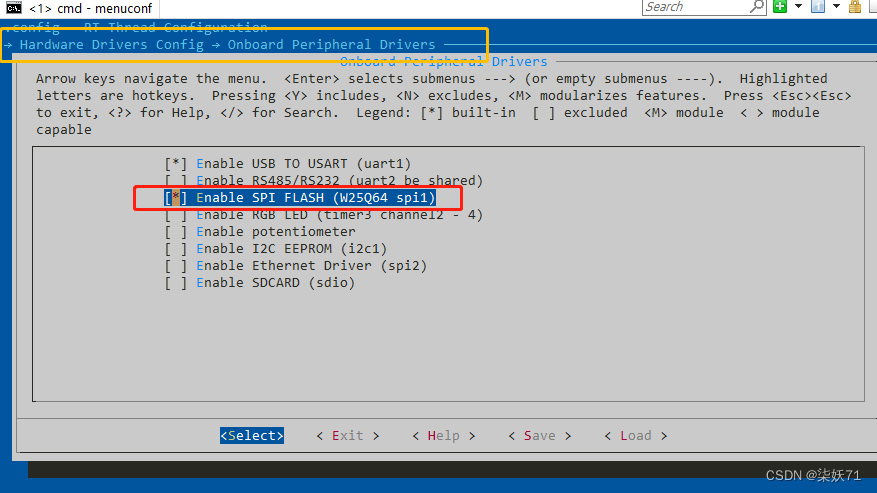
step4 使能片外flash
野火的开发板外部flash是挂在SPI1上面的,但是我的开发板是SPI2且CS引脚也不一致,所以到时候修改一下代码。
step5 使能SFUD
SFUD 是一款开源的串行 SPI Flash 通用驱动库。
SFUD简介链接
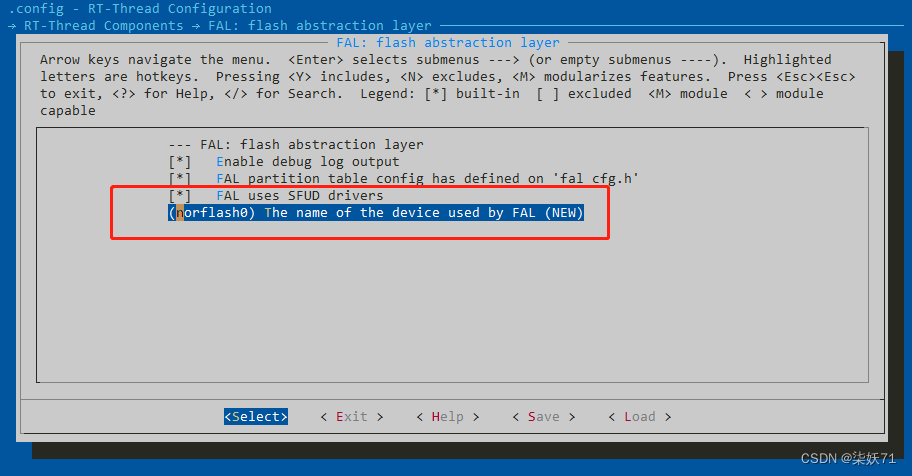
step6 添加对fal_cfg.h的修改
可以参考sample例程中文件修改。
#ifndef _FAL_CFG_H_
#define _FAL_CFG_H_

#include <rtthread.h>
#include <board.h>

extern const struct fal_flash_dev stm32_onchip_flash;
extern struct fal_flash_dev nor_flash0;
/* flash device table */
/* 添加外部flash nor_flash0 */
#define FAL_FLASH_DEV_TABLE                                          \
{                                                                    \
    &stm32_onchip_flash,                                             \
		&nor_flash0,																										 \
}
/* ====================== Partition Configuration ========================== */
#ifdef FAL_PART_HAS_TABLE_CFG
/* 添加分区表 easyflash和download区,这两个区都在外部flash上 */
/* partition table */
#define FAL_PART_TABLE                                                                      \
{                                                                                           \
    {FAL_PART_MAGIC_WROD,        "app",   "onchip_flash",       0,          496 * 1024, 0}, \
    {FAL_PART_MAGIC_WROD,        "param", "onchip_flash",       496* 1024 , 16 * 1024, 0},  \
	{FAL_PART_MAGIC_WORD, 			 "easyflash", FAL_USING_NOR_FLASH_DEV_NAME,         0, 4096*1024, 0}, \
    {FAL_PART_MAGIC_WORD,  			 "download", FAL_USING_NOR_FLASH_DEV_NAME, 				4096*1024, 4096*1024, 0}, \
}
#endif /* FAL_PART_HAS_TABLE_CFG */
#endif /* _FAL_CFG_H_ */
编译和烧录。
step7 修改 rt_hw_spi_flash_init()
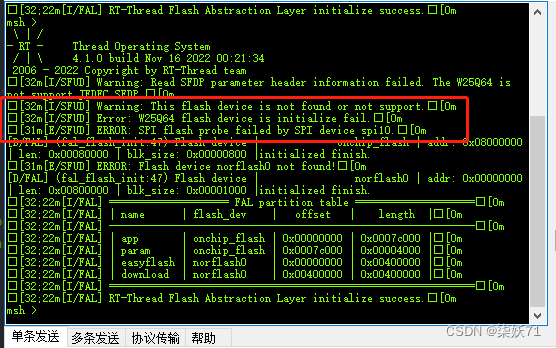
运行结果报错了,原因是野火的外部flash是挂载在spi1上面的,而我的开发板是spi2所以需要对SFUD代码进行修改。这边需要根据实际电路进行修改。
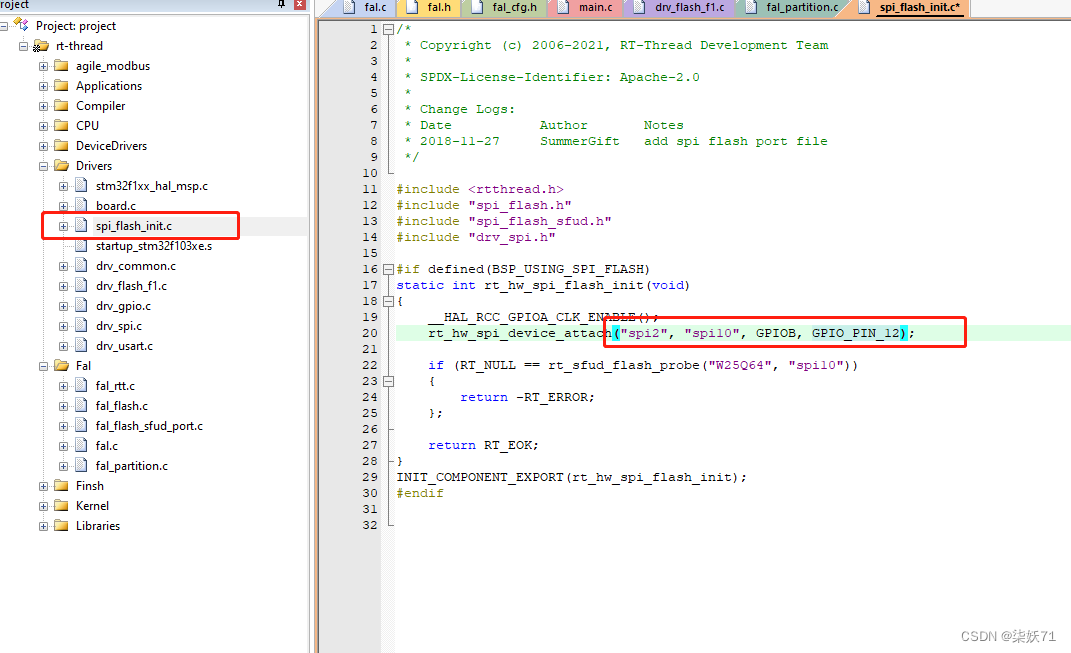
#include <rtthread.h>
#include "spi_flash.h"
#include "spi_flash_sfud.h"
#include "drv_spi.h"

#if defined(BSP_USING_SPI_FLASH)
static int rt_hw_spi_flash_init(void)
{
    __HAL_RCC_GPIOA_CLK_ENABLE();
    rt_hw_spi_device_attach("spi2", "spi10", GPIOB, GPIO_PIN_12);

    if (RT_NULL == rt_sfud_flash_probe("W25Q64", "spi10"))
    {
        return -RT_ERROR;
    };

    return RT_EOK;
}
INIT_COMPONENT_EXPORT(rt_hw_spi_flash_init);
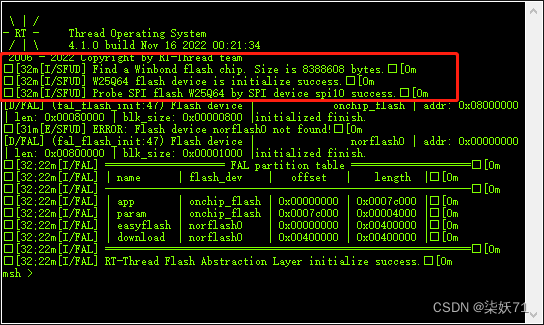
再次编译烧录,则显示正常加载外部flash。
总结
rt-thread移植fal库还是挺方便的几乎env使能配置就可以搞定了,只有fal_cfg.h配置文件需要用户根据实际情况去修改。
后续还会在这个基础上出一期easyflash移植的教程。