近期在研究USB CDC协议,使用USB Virtual Port Com功能与上位机通讯做了OTA功能。开发平台:MDK529
开发硬件:APM32F411
首先看下手册Flash分布,Flash总共8个扇区。

接下来进行Flash分区。

扇区 0 和 扇区 1做Boo区。

扇区 2做APP跳转判断区。

扇区 3到扇区 7做APP程序区。
既然分区已经分好,接下来就进行Boot代码编写。使用Virtual Port Com SDK。
打开MDK工程,进行Flash大小设置,Flash空间占用32k。勾选使用Use Micro LIB。
对main.c文件进行修改
#include "main.h"
#include "usb_device.h"
#include "gpio.h"
#include "Update.h"

void SystemClock_Config(void);
typedef void (*pFunction)(void);
pFunction Jump_To_Application;
uint32_t JumpAddress;

void Jump_To_App(uint32_t address)
{
    if (((*(__IO uint32_t*)address) & 0x2FFE0000) == 0x20000000)
    {
        JumpAddress = *(__IO uint32_t*) (address + 4);

		Jump_To_Application = (pFunction) JumpAddress;

        __set_MSP(*(__IO uint32_t*) address);

        Jump_To_Application();
    }
}

void USB_Disconnected(void)
{
	__HAL_RCC_USB_OTG_FS_FORCE_RESET();
	HAL_Delay(200);
	__HAL_RCC_USB_OTG_FS_RELEASE_RESET();

	GPIO_InitTypeDef GPIO_Initure;
	__HAL_RCC_GPIOA_CLK_ENABLE();

	GPIO_Initure.Pin = GPIO_PIN_11 | GPIO_PIN_12;
	GPIO_Initure.Mode = GPIO_MODE_OUTPUT_PP;
	GPIO_Initure.Pull = GPIO_PULLDOWN;
	GPIO_Initure.Speed = GPIO_SPEED_FREQ_HIGH;
	HAL_GPIO_Init(GPIOA, &GPIO_Initure);

	HAL_GPIO_WritePin(GPIOA, GPIO_PIN_11, GPIO_PIN_RESET);
	HAL_GPIO_WritePin(GPIOA, GPIO_PIN_12, GPIO_PIN_RESET);
	HAL_Delay(300);
}
int main(void)
{
	uint8_t R_Buff[1] = {0};
	HAL_Init();
	SystemClock_Config();

	Read_Flash_Data(R_Buff, 1, FLASH_Updata_Flag_ADDR);

	if(R_Buff[0] != 0x55)
	{
		USB_Disconnected();
		MX_GPIO_Init();
		MX_USB_DEVICE_Init();
		printf("Boot Code Start\r\n");
		printf("%s\r\n", Device_Version_Info_Str);
	}
	else
	{

	}

	while (1)
	{
		if(R_Buff[0] == 0x55)
		{
			Jump_To_App(FLASH_APP_ADDR);
		}
		else
		{
			Data_Handler();
		}
	}
}

/**
  * @brief System Clock Configuration
  * @retval None
  */
void SystemClock_Config(void)
{
  RCC_OscInitTypeDef RCC_OscInitStruct = {0};
  RCC_ClkInitTypeDef RCC_ClkInitStruct = {0};

  /** Configure the main internal regulator output voltage
  */
  __HAL_RCC_PWR_CLK_ENABLE();
  __HAL_PWR_VOLTAGESCALING_CONFIG(PWR_REGULATOR_VOLTAGE_SCALE1);

  /** Initializes the RCC Oscillators according to the specified parameters
  * in the RCC_OscInitTypeDef structure.
  */
  RCC_OscInitStruct.OscillatorType = RCC_OSCILLATORTYPE_HSE;
  RCC_OscInitStruct.HSEState = RCC_HSE_ON;
  RCC_OscInitStruct.PLL.PLLState = RCC_PLL_ON;
  RCC_OscInitStruct.PLL.PLLSource = RCC_PLLSOURCE_HSE;
  RCC_OscInitStruct.PLL.PLLM = 4;
  RCC_OscInitStruct.PLL.PLLN = 96;
  RCC_OscInitStruct.PLL.PLLP = RCC_PLLP_DIV2;
  RCC_OscInitStruct.PLL.PLLQ = 4;
  if (HAL_RCC_OscConfig(&RCC_OscInitStruct) != HAL_OK)
  {
    Error_Handler();
  }

  /** Initializes the CPU, AHB and APB buses clocks
  */
  RCC_ClkInitStruct.ClockType = RCC_CLOCKTYPE_HCLK|RCC_CLOCKTYPE_SYSCLK
                              |RCC_CLOCKTYPE_PCLK1|RCC_CLOCKTYPE_PCLK2;
  RCC_ClkInitStruct.SYSCLKSource = RCC_SYSCLKSOURCE_PLLCLK;
  RCC_ClkInitStruct.AHBCLKDivider = RCC_SYSCLK_DIV1;
  RCC_ClkInitStruct.APB1CLKDivider = RCC_HCLK_DIV2;
  RCC_ClkInitStruct.APB2CLKDivider = RCC_HCLK_DIV1;

  if (HAL_RCC_ClockConfig(&RCC_ClkInitStruct, FLASH_LATENCY_3) != HAL_OK)
  {
    Error_Handler();
  }
}

/* USER CODE BEGIN 4 */

/* USER CODE END 4 */

/**
  * @brief  This function is executed in case of error occurrence.
  * @retval None
  */
void Error_Handler(void)
{
  /* USER CODE BEGIN Error_Handler_Debug */
  /* User can add his own implementation to report the HAL error return state */
  __disable_irq();
  while (1)
  {
  }
  /* USER CODE END Error_Handler_Debug */
}

#ifdef  USE_FULL_ASSERT
/**
  * @brief  Reports the name of the source file and the source line number
  *         where the assert_param error has occurred.
  * @param  file: pointer to the source file name
  * @param  line: assert_param error line source number
  * @retval None
  */
void assert_failed(uint8_t *file, uint32_t line)
{
  /* USER CODE BEGIN 6 */
  /* User can add his own implementation to report the file name and line number,
     ex: printf("Wrong parameters value: file %s on line %d\r\n", file, line) */
  /* USER CODE END 6 */
}
#endif /* USE_FULL_ASSERT */
增加Update.c文件
#include "Update.h"


int fputc(int ch, FILE *f)
{
	while(CDC_Transmit_FS((uint8_t *)&ch, 1) == USBD_BUSY);
	return ch;
}

void Set_Device_Info(void)
{
	uint32_t deviceserial2;
	deviceserial2 = *(uint32_t *) DEVICE_ID3;

	sprintf((char *)&Device_SSID_Info, "%d", deviceserial2);
	strcpy((char *)Device_Name_Info, Device_Name_Info_Str);
	strcpy((char *)Device_Version_Info, Device_Version_Info_Str);
}


void Write_Flash(uint8_t *data, uint16_t DataLen, uint32_t Addr)
{
	uint16_t i = 0;
	uint32_t Data = 0;
	uint32_t temp = 0;

	HAL_FLASH_Unlock();
	for(i = 0; i < DataLen; i += 4)
	{
        Data = 0;
        for(uint8_t j = 0; j < 4; j++)
        {
            temp = data[i + j];
            Data |= temp << 8 * j;
        }

		if (HAL_FLASH_Program(FLASH_TYPEPROGRAM_WORD, FLASH_APP_ADDR + Addr + i, Data) == HAL_OK)
		{

		}
	}
	HAL_FLASH_Lock();
}


void Write_Updata_Flag_Flash(void)
{
    HAL_FLASH_Unlock();
    HAL_FLASH_Program(FLASH_TYPEPROGRAM_WORD, FLASH_Updata_Flag_ADDR, 0x55555555);
    HAL_FLASH_Lock();
}


void Erase_Updata_Flag_Flash(void)
{
	FLASH_EraseInitTypeDef EraseInitStruct;
	HAL_FLASH_Unlock();
	EraseInitStruct.TypeErase = FLASH_TYPEERASE_SECTORS;
	EraseInitStruct.VoltageRange = FLASH_VOLTAGE_RANGE_3;
	EraseInitStruct.Sector = UPDATA_FLAG_SECTOR;
	EraseInitStruct.NbSectors = UPDATA_FLAG_SECTOR_NUM;
	if (HAL_FLASHEx_Erase(&EraseInitStruct, &PageError) != HAL_OK)
	{

    }
    HAL_FLASH_Lock();
}

void Erase_APP_Flash(void)
{
	FLASH_EraseInitTypeDef EraseInitStruct;
	HAL_FLASH_Unlock();
	EraseInitStruct.TypeErase = FLASH_TYPEERASE_SECTORS;
	EraseInitStruct.VoltageRange = FLASH_VOLTAGE_RANGE_3;
	EraseInitStruct.Sector = UPDATA_APP_SECTOR;
	EraseInitStruct.NbSectors = UPDATA_APP_SECTOR_NUM;
	if (HAL_FLASHEx_Erase(&EraseInitStruct, &PageError) != HAL_OK)
	{

    }
    HAL_FLASH_Lock();
}

void Read_Flash_Data(uint8_t* pBuffer, uint32_t NumToRead, uint32_t ReadAddr)
{
    uint32_t i;
    for (i = 0; i < NumToRead; i++)
    {
        *((uint8_t*)pBuffer + i) = *((uint8_t*)ReadAddr + i);
    }
}
增加Update.h文件
#ifndef __UPDATE_H
#define __UPDATE_H

#include "main.h"
#include <string.h>
#include <stdbool.h>
#include <stdio.h>
#include "usbd_cdc_if.h"

#define ADDR_FLASH_SECTOR_0     ((uint32_t)0x08000000) /* Base @ of Sector 0, 16 Kbytes */
#define ADDR_FLASH_SECTOR_1     ((uint32_t)0x08004000) /* Base @ of Sector 1, 16 Kbytes */
#define ADDR_FLASH_SECTOR_2     ((uint32_t)0x08008000) /* Base @ of Sector 2, 16 Kbytes */
#define ADDR_FLASH_SECTOR_3     ((uint32_t)0x0800C000) /* Base @ of Sector 3, 16 Kbytes */
#define ADDR_FLASH_SECTOR_4     ((uint32_t)0x08010000) /* Base @ of Sector 4, 64 Kbytes */
#define ADDR_FLASH_SECTOR_5     ((uint32_t)0x08020000) /* Base @ of Sector 5, 128 Kbytes */
#define ADDR_FLASH_SECTOR_6     ((uint32_t)0x08040000) /* Base @ of Sector 6, 128 Kbytes */
#define ADDR_FLASH_SECTOR_7     ((uint32_t)0x08060000) /* Base @ of Sector 7, 128 Kbytes */

#define FLASH_Updata_Flag_ADDR	ADDR_FLASH_SECTOR_2
#define FLASH_APP_ADDR	ADDR_FLASH_SECTOR_3

#define UPDATA_FLAG_SECTOR 		FLASH_SECTOR_2
#define UPDATA_FLAG_SECTOR_NUM 	1

#define UPDATA_APP_SECTOR 		FLASH_SECTOR_3
#define UPDATA_APP_SECTOR_NUM 	3


#define         DEVICE_ID3      (UID_BASE + 0x8)
#define Device_Name_Info_Str 	"APM32F411"
#define Device_SSID_Info_Str  	"1234"
#define Device_Version_Info_Str "Boot V 1.0"

extern uint8_t Device_Name_Info[12];
extern uint8_t Device_SSID_Info[12];
extern uint8_t Device_Version_Info[12];
extern uint32_t PageError;


void Erase_APP_Flash(void);
void Erase_Updata_Flag_Flash(void);
void Write_Updata_Flag_Flash(void);
void Write_Flash(uint8_t *data, uint16_t DataLen, uint32_t Addr);
void Read_Flash_Data(uint8_t* pBuffer, uint32_t NumToRead, uint32_t ReadAddr);


void ClearRxQueue(void);
void OnDataReceived(uint8_t val);
void Data_Handler(void);

#endif
修改usbd_cdc_if.c文件如下函数即可。
#include "Update.h"

static int8_t CDC_Receive_FS(uint8_t* Buf, uint32_t *Len)
{
	/* USER CODE BEGIN 6 */
	USBD_CDC_SetRxBuffer(&hUsbDeviceFS, &Buf[0]);
	USBD_CDC_ReceivePacket(&hUsbDeviceFS);
	for(int i = 0; i < *Len; i++)
	{
		OnDataReceived(Buf[i]);
	}
	return (USBD_OK);
	/* USER CODE END 6 */
}
接下来进行APP代码修改。可以复制Boot代码进行修改。
对Flash起始地址和大小进行修改。

修改main.c文件
#include "main.h"
#include "usb_device.h"
#include "gpio.h"
#include "Update.h"

void SystemClock_Config(void);

void USB_Disconnected(void)
{
	__HAL_RCC_USB_OTG_FS_FORCE_RESET();
	HAL_Delay(200);
	__HAL_RCC_USB_OTG_FS_RELEASE_RESET();

	GPIO_InitTypeDef GPIO_Initure;
	__HAL_RCC_GPIOA_CLK_ENABLE();

	GPIO_Initure.Pin = GPIO_PIN_11 | GPIO_PIN_12;
	GPIO_Initure.Mode = GPIO_MODE_OUTPUT_PP;
	GPIO_Initure.Pull = GPIO_PULLDOWN;
	GPIO_Initure.Speed = GPIO_SPEED_FREQ_HIGH;
	HAL_GPIO_Init(GPIOA, &GPIO_Initure);

	HAL_GPIO_WritePin(GPIOA, GPIO_PIN_11, GPIO_PIN_RESET);
	HAL_GPIO_WritePin(GPIOA, GPIO_PIN_12, GPIO_PIN_RESET);
	HAL_Delay(300);
}
int main(void)
{
	SCB->VTOR = FLASH_APP_ADDR;
	HAL_Init();
	SystemClock_Config();
	USB_Disconnected();

	MX_GPIO_Init();
	MX_USB_DEVICE_Init();
	printf("APP Code Start\r\n");
	printf("%s\r\n", Device_Version_Info_Str);
	while (1)
	{
		Data_Handler();
	}
}

/**
  * @brief System Clock Configuration
  * @retval None
  */
void SystemClock_Config(void)
{
  RCC_OscInitTypeDef RCC_OscInitStruct = {0};
  RCC_ClkInitTypeDef RCC_ClkInitStruct = {0};

  /** Configure the main internal regulator output voltage
  */
  __HAL_RCC_PWR_CLK_ENABLE();
  __HAL_PWR_VOLTAGESCALING_CONFIG(PWR_REGULATOR_VOLTAGE_SCALE1);

  /** Initializes the RCC Oscillators according to the specified parameters
  * in the RCC_OscInitTypeDef structure.
  */
  RCC_OscInitStruct.OscillatorType = RCC_OSCILLATORTYPE_HSE;
  RCC_OscInitStruct.HSEState = RCC_HSE_ON;
  RCC_OscInitStruct.PLL.PLLState = RCC_PLL_ON;
  RCC_OscInitStruct.PLL.PLLSource = RCC_PLLSOURCE_HSE;
  RCC_OscInitStruct.PLL.PLLM = 4;
  RCC_OscInitStruct.PLL.PLLN = 96;
  RCC_OscInitStruct.PLL.PLLP = RCC_PLLP_DIV2;
  RCC_OscInitStruct.PLL.PLLQ = 4;
  if (HAL_RCC_OscConfig(&RCC_OscInitStruct) != HAL_OK)
  {
    Error_Handler();
  }

  /** Initializes the CPU, AHB and APB buses clocks
  */
  RCC_ClkInitStruct.ClockType = RCC_CLOCKTYPE_HCLK|RCC_CLOCKTYPE_SYSCLK
                              |RCC_CLOCKTYPE_PCLK1|RCC_CLOCKTYPE_PCLK2;
  RCC_ClkInitStruct.SYSCLKSource = RCC_SYSCLKSOURCE_PLLCLK;
  RCC_ClkInitStruct.AHBCLKDivider = RCC_SYSCLK_DIV1;
  RCC_ClkInitStruct.APB1CLKDivider = RCC_HCLK_DIV2;
  RCC_ClkInitStruct.APB2CLKDivider = RCC_HCLK_DIV1;

  if (HAL_RCC_ClockConfig(&RCC_ClkInitStruct, FLASH_LATENCY_3) != HAL_OK)
  {
    Error_Handler();
  }
}

/* USER CODE BEGIN 4 */

/* USER CODE END 4 */

/**
  * @brief  This function is executed in case of error occurrence.
  * @retval None
  */
void Error_Handler(void)
{
  /* USER CODE BEGIN Error_Handler_Debug */
  /* User can add his own implementation to report the HAL error return state */
  __disable_irq();
  while (1)
  {
  }
  /* USER CODE END Error_Handler_Debug */
}

#ifdef  USE_FULL_ASSERT
/**
  * @brief  Reports the name of the source file and the source line number
  *         where the assert_param error has occurred.
  * @param  file: pointer to the source file name
  * @param  line: assert_param error line source number
  * @retval None
  */
void assert_failed(uint8_t *file, uint32_t line)
{
  /* USER CODE BEGIN 6 */
  /* User can add his own implementation to report the file name and line number,
     ex: printf("Wrong parameters value: file %s on line %d\r\n", file, line) */
  /* USER CODE END 6 */
}
#endif /* USE_FULL_ASSERT */
如上就行OTA升级的全部配置步骤。Update.h有很多宏定义可以修改。喜欢的可以下载代码自己试试。代码链接在文章末尾。
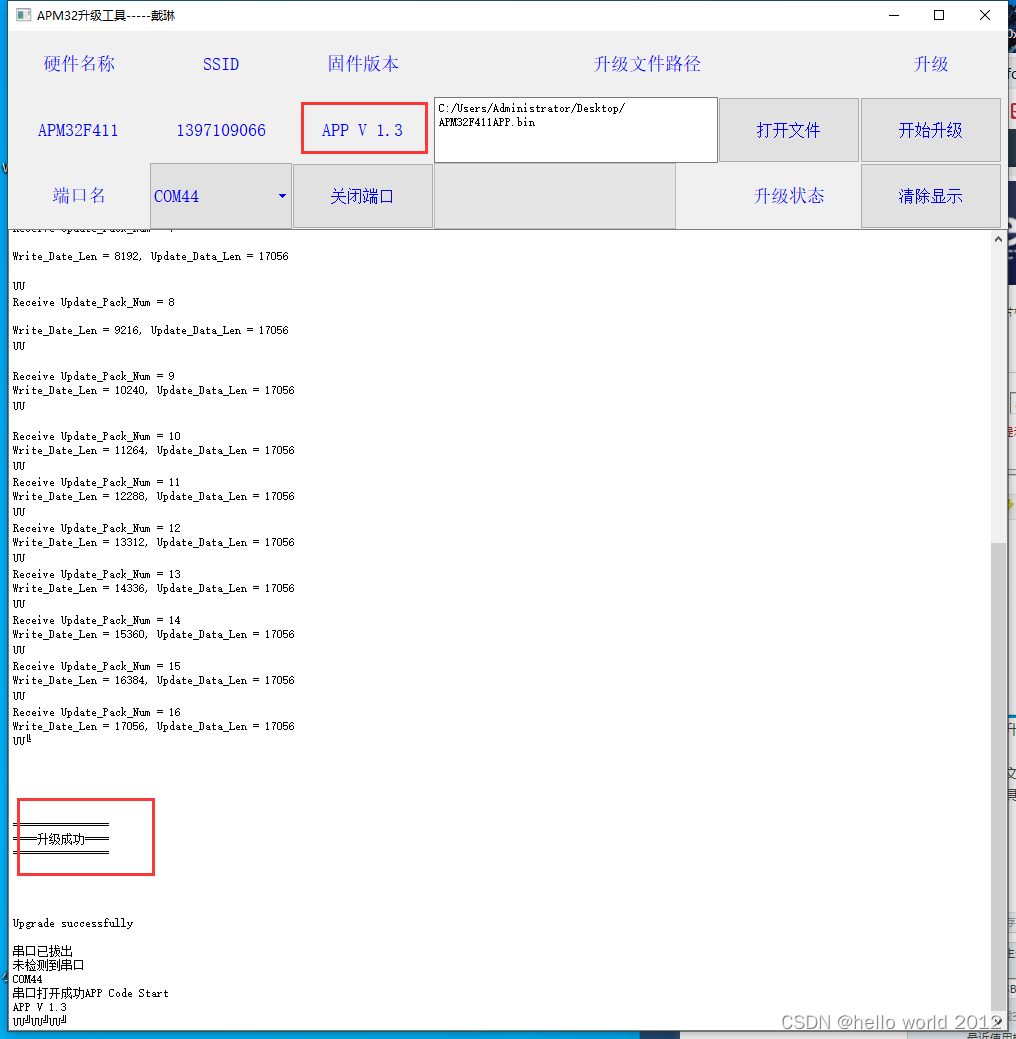
打开升级工具

打开升级文件升级后截图
APM32F411Boot源码:跳转链接
APM32F411APP源码:跳转链接
APM32F4XX升级工具:跳转链接