文章目录
- 第二章 局部图像描述子
- 2.1Harris角点检测器
- 2.2SIFT(尺度不变特征变换)
- 2.2.1兴趣点
- 2.2.2描述子
- 2.2.3检测兴趣点
第二章 局部图像描述子
本章旨在寻找图像间的对应点和对应区域。本章将介绍用于图像匹配的两种局部描述子算法。本书的很多内容中都会用到这些局部特征,它们在很多应用中都有重要作用,比如创建全景图、增强现实技术以及计算图像的三维重建。
2.1Harris角点检测器
Harris 角点检测算法(也称 Harris & Stephens 角点检测器)是一个极为简单的角点检测算法。该算法的主要思想是,如果像素周围显示存在多于一个方向的边,我们认为该点为兴趣点。该点就称为角点。我们把图像域中点 x 上的对称半正定矩阵 M I = M I ( x ) M_I=M_I(x) MI=MI(x)定义为: M I = ∇ I ∇ I T = [ I x I y ] [ I x I y ] = [ I x 2 I x I y I x I y I y 2 ] M_I=\nabla I\nabla I^T=\begin{bmatrix}I_x\\I_y\end{bmatrix}[I_xI_y]=\begin{bmatrix}I_x^2&I_xI_y\\I_xI_y&I_y^2\end{bmatrix} MI=∇I∇IT=[IxIy][IxIy]=[Ix2IxIyIxIyIy2]
选择权重矩阵 W(通常为高斯滤波器gaussian_filter),我们可以得到卷积: M ‾ i = W ∗ M i \overline{\boldsymbol{M}}_i=\boldsymbol{W}*\boldsymbol{M}_i Mi=W∗Mi
使用商数作为指示函数 det ( M ‾ i ) = M x x M y y − M x y 2 \det(\overline{M}_i)=M_{xx}M_{yy}-M_{xy}^2 det(Mi)=MxxMyy−Mxy2 t r a c e ( M ‾ i ) = M x x + M y y \mathrm{trace}(\overline{M}_i)=M_{xx}+M_{yy} trace(Mi)=Mxx+Myy r e s p o n c e = det ( M ‾ i ) trace ( M ‾ i ) 2 \mathrm{responce=}\frac{\det(\overline{M}_i)}{\operatorname{trace}\left(\overline{M}_i\right)^2} responce=trace(Mi)2det(Mi)
from scipy.ndimage import gaussian_filter
import numpy as np
from numpy import *
from PIL import Image
from matplotlib import pyplot as plt

img = Image.open('am.png')
plt.figure()
plt.axis('off')
plt.imshow(img)
plt.show()

原图为上图所示,是一个卡通人物
def compute_harris_response(im, sigma=3):
    """ 在一幅灰度图像中,对每个像素计算 Harris 角点检测器响应函数 """
    # 计算导数
    im=np.array(im.convert('L'))
    Ix = gaussian_filter(im, (sigma, sigma), (0, 1))
    Iy = gaussian_filter(im, (sigma, sigma), (1, 0))
    # 计算 Harris 矩阵的分量
    Mxx = gaussian_filter(Ix*Ix, sigma)
    Mxy = gaussian_filter(Ix*Iy, sigma)
    Myy = gaussian_filter(Iy*Iy, sigma)
    # 计算特征值和迹
    det_M = Mxx*Myy - Mxy**2
    trace_M = Mxx + Myy
    return np.divide(det_M, trace_M, out=np.zeros_like(det_M, dtype=np.float64), where=(trace_M != 0))
def plot_harris_points(image, filtered_coords):
    """ 绘制图像中检测到的角点 """
    plt.figure()
    plt.imshow(image)
    # 将坐标以*标出
    plt.plot([p[1] for p in filtered_coords],[p[0] for p in filtered_coords], '*')
    plt.axis('off')
    plt.show()
# print(img)
harrisim = compute_harris_response(img)
# harrisim_t=255*(harrisim>0.1)
# plt.figure(figsize=(8, 8))
# plt.imshow(harrisim_t)
n,m=len(harrisim),len(harrisim[0])
coords=[]
for i in range(n):
    for j in range(m):
        if harrisim[i][j]:
            coords.append([i,j])
plot_harris_points(img, coords)

从上图可以看到原图的卡通人物的基本轮廓。但是这里的点太多了,我们需要的是重要的交点,所以需要做以下筛选。
def get_harris_points(harrisim, min_dist=10, threshold=0.1):
    """ 从一幅 Harris 响应图像中返回角点。min_dist 为分割角点和图像边界的最少像素数目 """
    # 寻找高于阈值的候选角点
    corner_threshold = harrisim.max() * threshold
    harrisim_t = (harrisim > corner_threshold) * 1

    # 得到候选点的坐标
    coords = np.array(harrisim_t.nonzero()).T
    # 以及它们的 Harris 响应值
    candidate_values = [harrisim[c[0], c[1]] for c in coords]
    # 对候选点按照 Harris 响应值进行排序
    index = argsort(candidate_values)
    # 将可行点的位置保存到数组中
    allowed_locations = np.zeros(harrisim.shape)
    allowed_locations[min_dist:-min_dist, min_dist:-min_dist] = 1
    # 按照 min_distance 原则,选择最佳 Harris 点
    filtered_coords = []
    for i in index:
        if allowed_locations[coords[i, 0], coords[i, 1]] == 1:
            filtered_coords.append(coords[i])
            allowed_locations[(coords[i, 0]-min_dist):(coords[i, 0]+min_dist),
                              (coords[i, 1]-min_dist):(coords[i, 1]+min_dist)] = 0
    return filtered_coords


filtered_coords = get_harris_points(harrisim, 3, 0.05)
# plt.figure(figsize=(8, 8))
# plt.imshow(im)
# plt.plot([p[1] for p in filtered_coords],[p[0] for p in filtered_coords], '*')
# plt.show()
plot_harris_points(img, filtered_coords)

上图和上上图对比,角点数量大大减少,但是效果不减。
方法是:选取像素值高于阈值的所有图像点;再加上额外的限制,即角点之间的间隔必须大于设定的最小距离。这种方法会产生很好的角点检测结果。为了实现该算法,我们获取所有的候选像素点,以角点响应值递减的顺序排序,然后将距离已标记为角点位置过近的区域从候选像素点中删除。
其中,我们可以通过设置阈值threshold和角点之间的间隔min_dist来控制角点的数量
接下来,我们将归一化的互相关矩阵应用于 Harris 角点周围图像块,来寻找匹配对应点,
def yasuo(name1,n,name2):
    img=cv2.imread(name1)
    times=img.shape[0]/n
    m=int(img.shape[1]/times)
    print([n,m])
    img_t = np.zeros([n,m,3])
    for i in range(n):
        for j in range(m):
            for k in range(3):
                img_t[i][j][k]=img[int(i*times)][int(j*times)][k]
    img_t=img_t.astype(np.uint8)
    cv2.imwrite(name2,img_t)
    # plt_show(img,img_t)
    print(img.shape)
    print(img_t.shape)
    return img_t

import cv2
for i in range(1,3):
    name='r'+str(i)+'.jpg'
    name2='dormitory'+str(i)+'.jpg'
    img=cv2.imread(name)
    img=img[-2600:,-2300:,:]
    cv2.imwrite(name2,img)
    yasuo(name2,500,name2)
[500, 442]
(2600, 2300, 3)
(500, 442, 3)
[500, 442]
(2600, 2300, 3)
(500, 442, 3)
plt.figure(figsize=(9,5))
for i in range(1,3):
    name2='dormitory'+str(i)+'.jpg'
    img=cv2.imread(name2)
    plt.subplot(120+i)
    plt.imshow(img)
    plt.axis('off')
plt.show()

例如上图是两张宿舍部分图,我们接下来对其进行匹配。
# -*- coding: utf-8 -*-
from pylab import *
from PIL import Image

import harris


im1 = array(Image.open("dormitory1.jpg").convert("L"))
im2 = array(Image.open("dormitory2.jpg").convert("L"))


wid = 13
harrisim = harris.compute_harris_response(im1, wid)
filtered_coords1 = harris.get_harris_points(harrisim, wid+1)
d1 = harris.get_descriptors(im1, filtered_coords1, wid)

harrisim = harris.compute_harris_response(im2, wid)
filtered_coords2 = harris.get_harris_points(harrisim, wid+1)
d2 = harris.get_descriptors(im2, filtered_coords2, wid)


matches = harris.match_twosided(d1, d2)

plt.figure()
harris.plot_matches(im1, im2, filtered_coords1, filtered_coords2, matches)
plt.show()
plt.savefig('test.jpg')

该算法的结果存在一些不正确匹配。这是因为图像像素块的互相关矩阵具有较弱的描述性。实际运用中,我们通常使用更稳健的方法来处理这些对应匹配。这些描述符还有一个问题,它们不具有尺度不变性和旋转不变性,而算法中像素块的大小也会影响对应匹配的结果。
2.2SIFT(尺度不变特征变换)
SIFT(Scale-Invariant Feature Transform,尺度不变特征变换)是过去最成功的图像局部描述子之一。SIFT 特征包括兴趣点检测器和描述子。SIFT 描述子具有非常强的稳健性,这在很大程度上也是 SIFT 特征能够成功和流行的主要原因。SIFT 特征对于尺度、旋转和亮度都具有不变性,因此,它可以用于三维视角和噪声的可靠匹配。
2.2.1兴趣点
SIFT 特征使用高斯差分函数来定位兴趣点: D ( x , σ ) = [ G κ σ ( x ) − G σ ( x ) ] ∗ I ( x ) = [ G κ σ − G σ ] ∗ I = I κ σ − I σ D(\mathbf{x},\sigma)=[G_{\kappa\sigma}(\mathbf{x})-G_{\sigma}(\mathbf{x})]*I(\mathbf{x})=[G_{\kappa\sigma}-G_{\sigma}]*I=I_{\kappa\sigma}-I_{\sigma} D(x,σ)=[Gκσ(x)−Gσ(x)]∗I(x)=[Gκσ−Gσ]∗I=Iκσ−Iσ
Gσ 是上一章中介绍的二维高斯核,Iσ 是使用 Gσ 模糊的灰度图像,κ 是决定相差尺度的常数。兴趣点是在图像位置和尺度变化下 D(x,σ) 的最大值和最小值点。
2.2.2描述子
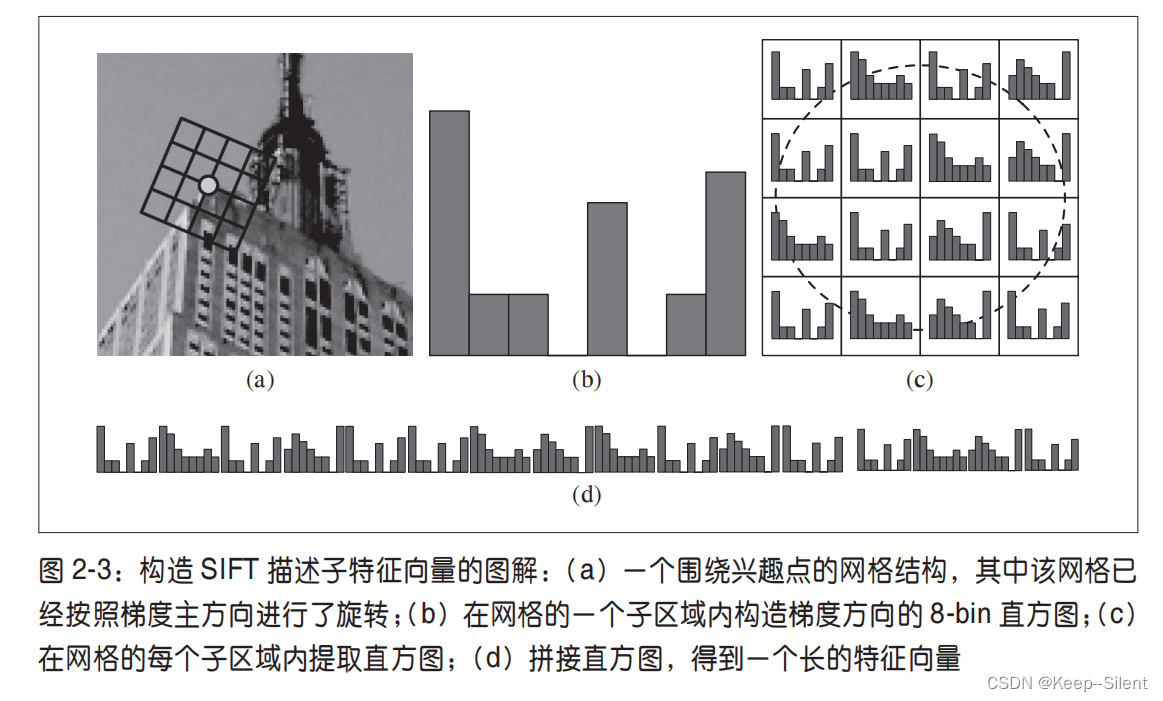
上面讨论的兴趣点(关键点)位置描述子给出了兴趣点的位置和尺度信息。为了实现旋转不变性,基于每个点周围图像梯度的方向和大小,SIFT 描述子又引入了参考方向。SIFT 描述子使用主方向描述参考方向。主方向使用方向直方图(以大小为权重)来度量。
SIFT 描述子的标准设置使用 4×4 的子区域,每个子区域使用 8 个小区间的方向直方图,会产生共128 个小区间的直方图(4×4×8=128)
2.2.3检测兴趣点
我们使用开源工具包 VLFeat 提供的二进制文件来计算图像的 SIFT 特征。VLFeat 工具包可以从 http://www.vlfeat.org/ 下载,二进制文件可以在所有主要的平台上运行。VLFeat 库是用 C 语言来写的,但是我们可以使用该库提供的命令行接口。
由于该二进制文件需要的图像格式为灰度 .pgm,所以如果图像为其他格式,我们需要首先将其转换成 .pgm 格式文件
from PIL import Image
import os
import numpy
from pylab import *


def process_image(imagename, resultname, params="--edge-thresh 10 --peak-thresh 5"):
    """ Process an image and save the results in a file. """

    if imagename[-3:] != 'pgm':
        # create a pgm file
        im = Image.open(imagename).convert('L')
        im.save('tmp.pgm')
        imagename = 'tmp.pgm'

    cmmd = str(r"D:\software\vlfeat\vlfeat-0.9.20\bin\win32\sift.exe " +
               imagename+" --output="+resultname + " "+params)
    os.system(cmmd)
    print(cmmd)
    print('processed', imagename, 'to', resultname)
读取特征属性值,然后将其以矩阵的形式返回
import chardet

def read_features_from_file(filename):
    with open(filename, 'rb') as f:
        rawdata = f.read()
        result = chardet.detect(rawdata)
        encoding = result['encoding']

    f = loadtxt(filename, encoding=encoding)
    return f[:, :4], f[:, 4:]  # 特征位置,描述子
将特征位置和描述子保存到文件中:
def write_features_to_file(filename, locs, desc):
    savetxt(filename, hstack((locs, desc)))
读取特征后,通过在图像上绘制出它们的位置,可以将其可视化:
def plot_features(im,locs,circle=False):

    def draw_circle(c,r):
        t = arange(0,1.01,0.01)*2*pi
        x = r*cos(t) + c[0]
        y = r*sin(t) + c[1]
        plt.plot(x,y,'b',linewidth=2)

    plt.imshow(im)
    if circle:
        for p in locs:
            draw_circle(p[:2],p[2])
    else:
        plt.plot(locs[:,0],locs[:,1],'ob')
imgname = 'am.png'
im1 = array(Image.open(imgname).convert('L'))
process_image(imgname, 'am.sift')
l1, d1 = read_features_from_file('am.sift')

plt.figure()
plot_features(im1, l1, circle=True)
plt.show()-
D:\software\vlfeat\vlfeat-0.9.20\bin\win32\sift.exe tmp.pgm --output=am.sift --edge-thresh 10 --peak-thresh 5
processed tmp.pgm to am.sift

分析:SIFT算法的实质是在不同的尺度空间上查找关键点(特征点),并计算出关键点的方向。SIFT所查找到的关键点是一些十分突出,不会因光照、仿射变换和噪音等因素而变化的点(如角点、边缘点、暗区的亮点及亮区的暗点等)
在运行过程中,可能会出现一些问题,参考SIFT特征提取(PCV、VLFeat)的环境配置、常见Bug及修复方案。
