Android AGP8.1.0组件化初探

前言:
前面两篇完成了从AGP4.2到 AGP8.1.0的升级,本文是由于有哥们留言说在AGP8.0中使用ARouter组件化有问题,于是趁休息时间尝试了一下,写了几个demo,发现都没有问题,跳转和传值都是正常的,这里我也是直接从groovy转换成versions-catelog的依赖方式,由于之前升级过,所以这次很顺利,几分钟就完成了,直接上代码:
1.添加统一依赖:
[versions]
agp = "8.1.0"
androidx-espresso-core = "3.4.0"
androidx-junit = "1.1.3"
org-jetbrains-kotlin-android = "1.8.0"
core-ktx = "1.10.1"
junit = "4.13.2"
androidx-test-ext-junit = "1.1.5"
espresso-core = "3.5.1"
appcompat = "1.6.1"
material = "1.9.0"
constraintlayout = "2.1.4"
mmkv = "1.3.1"
utilcodex = "1.31.1"
arouter = "1.5.2"
arouter-compiler = "1.5.2"
org-jetbrains-kotlin-kapt = "1.8.0"

[libraries]
androidx-espresso-core-3_4_0 = { module = "androidx.test.espresso:espresso-core", version.ref = "androidx-espresso-core" }
androidx-junit-1_1_3 = { module = "androidx.test.ext:junit", version.ref = "androidx-junit" }
core-ktx = { group = "androidx.core", name = "core-ktx", version.ref = "core-ktx" }
junit = { group = "junit", name = "junit", version.ref = "junit" }
androidx-test-ext-junit = { group = "androidx.test.ext", name = "junit", version.ref = "androidx-test-ext-junit" }
espresso-core = { group = "androidx.test.espresso", name = "espresso-core", version.ref = "espresso-core" }
appcompat = { group = "androidx.appcompat", name = "appcompat", version.ref = "appcompat" }
material = { group = "com.google.android.material", name = "material", version.ref = "material" }
constraintlayout = { group = "androidx.constraintlayout", name = "constraintlayout", version.ref = "constraintlayout" }
mmkv = { group = "com.tencent", name = "mmkv", version.ref = "mmkv" }
utilcodex = {group = "com.blankj",name = "utilcodex",version.ref = "utilcodex"}
arouter = {group = "com.alibaba",name = "arouter-api",version.ref = "arouter"}
arouter-compiler = {group = "com.alibaba",name = "arouter-compiler",version.ref = "arouter-compiler"}

[plugins]
com-android-library = { id = "com.android.library", version.ref = "agp" }
com-android-application = { id = "com.android.application", version.ref = "agp" }
org-jetbrains-kotlin-android = { id = "org.jetbrains.kotlin.android", version.ref = "org-jetbrains-kotlin-android" }
org-jetbrains-kotlin-kapt = {id = "org.jetbrains.kotlin.kapt",version.ref = "org-jetbrains-kotlin-kapt"}

[bundles]
2.添加lib-common组件配置:
@Suppress("DSL_SCOPE_VIOLATION")
plugins {
    alias(libs.plugins.com.android.library)
    alias(libs.plugins.org.jetbrains.kotlin.android)
    alias(libs.plugins.org.jetbrains.kotlin.kapt)
}
dependencies {
    implementation(libs.core.ktx)
    implementation(libs.appcompat)
    implementation(libs.material)
    implementation(libs.arouter)
    kapt(libs.arouter.compiler)
    testImplementation(libs.junit)
    androidTestImplementation(libs.androidx.test.ext.junit)
    androidTestImplementation(libs.espresso.core)
}

kapt {
    arguments {
        arg("AROUTER_MODULE_NAME", project.name)
    }
}
完整配置:
@Suppress("DSL_SCOPE_VIOLATION")
plugins {
    alias(libs.plugins.com.android.library)
    alias(libs.plugins.org.jetbrains.kotlin.android)
    alias(libs.plugins.org.jetbrains.kotlin.kapt)
}

android {
    namespace = "com.example.lib_cmmon"
    compileSdk = 33

    defaultConfig {
        //applicationId = "com.example.lib_cmmon"
        minSdk = 23
        targetSdk = 33
       // versionCode = 1
       // versionName = "1.0"

        testInstrumentationRunner = "androidx.test.runner.AndroidJUnitRunner"
    }

    buildTypes {
        release {
            isMinifyEnabled = false
            proguardFiles(
                getDefaultProguardFile("proguard-android-optimize.txt"),
                "proguard-rules.pro"
            )
        }
    }
    compileOptions {
        sourceCompatibility = JavaVersion.VERSION_17
        targetCompatibility = JavaVersion.VERSION_17
    }
    kotlinOptions {
        jvmTarget = "17"
    }
}

dependencies {
    implementation(libs.core.ktx)
    implementation(libs.appcompat)
    implementation(libs.material)
    implementation(libs.arouter)
    kapt(libs.arouter.compiler)
    testImplementation(libs.junit)
    androidTestImplementation(libs.androidx.test.ext.junit)
    androidTestImplementation(libs.espresso.core)
}

kapt {
    arguments {
        arg("AROUTER_MODULE_NAME", project.name)
    }
}
3.lib-common添加ARouter初始化:
/**
 * @author: njb
 * @date: 2023/8/26 22:21
 * @desc:
 */
public class BaseApp extends Application {
    @Override
    public void onCreate() {
        super.onCreate();
        initARouter();
    }

    private void initARouter() {
        ARouter.openDebug();
        ARouter.openLog();
        ARouter.init(this);
    }
}
4.添加lib-arouter组件配置:
@Suppress("DSL_SCOPE_VIOLATION")
plugins {
    alias(libs.plugins.com.android.library)
    alias(libs.plugins.org.jetbrains.kotlin.android)
    alias(libs.plugins.org.jetbrains.kotlin.kapt)
}

android {
    namespace = "com.example.lib_arouter"
    compileSdk = 33

    defaultConfig {
       // applicationId = "com.example.lib_arouter"
        minSdk = 23
        targetSdk = 33
        //versionCode = 1
       // versionName = "1.0"

        testInstrumentationRunner = "androidx.test.runner.AndroidJUnitRunner"
    }

    buildTypes {
        release {
            isMinifyEnabled = false
            proguardFiles(
                getDefaultProguardFile("proguard-android-optimize.txt"),
                "proguard-rules.pro"
            )
        }
    }
    compileOptions {
        sourceCompatibility = JavaVersion.VERSION_17
        targetCompatibility = JavaVersion.VERSION_17
    }
}

dependencies {

    implementation(libs.appcompat)
    implementation(libs.material)
    implementation(libs.constraintlayout)
    testImplementation(libs.junit)
    androidTestImplementation(libs.androidx.test.ext.junit)
    androidTestImplementation(libs.espresso.core)
    implementation(libs.arouter)
    kapt(libs.arouter.compiler)
    implementation(project(":lib-common"))
}

kapt {
    arguments {
        arg("AROUTER_MODULE_NAME", project.name)
    }
}
5.调用ARouter初始化:
/**
 * @author: njb
 * @date: 2023/8/26 22:21
 * @desc:
 */
public class ARouterApp  extends BaseApp {

    @Override
    public void onCreate() {
        super.onCreate();
    }
}
6.主模块依赖配置:
@Suppress("DSL_SCOPE_VIOLATION")
plugins {
    alias(libs.plugins.com.android.application)
    alias(libs.plugins.org.jetbrains.kotlin.android)
    alias(libs.plugins.org.jetbrains.kotlin.kapt)
}

android {
    namespace =  "com.example.writelogdemo"
    compileSdk = 33

    defaultConfig {
        applicationId  = "com.example.writelogdemo"
        minSdk = 23
        targetSdk = 33
        versionCode = 1
        versionName = "1.0"

        testInstrumentationRunner = "androidx.test.runner.AndroidJUnitRunner"
    }

    buildTypes {
        release {
            isMinifyEnabled = false
            proguardFiles(
                getDefaultProguardFile("proguard-android-optimize.txt"),
                "proguard-rules.pro"
            )
        }
    }
    compileOptions {
        sourceCompatibility = JavaVersion.VERSION_17
        targetCompatibility = JavaVersion.VERSION_17
    }
    kotlinOptions {
        jvmTarget = "17"
    }
}

dependencies {
    implementation(libs.core.ktx)
    implementation(libs.appcompat)
    implementation(libs.material)
    implementation(libs.constraintlayout)
    testImplementation(libs.junit)
    androidTestImplementation(libs.androidx.test.ext.junit)
    androidTestImplementation(libs.espresso.core)
    implementation(libs.utilcodex)
    implementation(libs.arouter)
    kapt(libs.arouter.compiler)
    implementation(project(":lib-arouter"))
    implementation(project(":lib-common"))
}
7.添加ARouter组件化配置:
7.1 引入ARouter依赖:
这里我用的是catelog方式,所以使用kapt方式
@Suppress("DSL_SCOPE_VIOLATION")
plugins {
    alias(libs.plugins.com.android.library)
    alias(libs.plugins.org.jetbrains.kotlin.android)
    alias(libs.plugins.org.jetbrains.kotlin.kapt)
}

implementation(libs.arouter)
kapt(libs.arouter.compiler)
7.2 添加模块名称配置:
kapt {
    arguments {
        arg("AROUTER_MODULE_NAME", project.name)
    }
}
7.3 主模块ARouter初始化:
/**
 * @author: njb
 * @date: 2023/8/25 22:36
 * @desc:
 */
public class LogApp extends BaseApp {
    private static LogApp mInstance;

    @Override
    public void onCreate() {
        super.onCreate();
        mInstance = this;
    }

    public static LogApp getInstance() {
        return mInstance;
    }
}
7.4 在Activity中绑定Arouter:
ARouter.getInstance().inject(this)
7.5 添加Arouter跳转和传值:
userList = arrayListOf("年龄18","John","身高180","体重60kg","性别female")
tvText.setOnClickListener {
    ARouter.getInstance().build("/test/TestSplashActivity").withString("name","test张三").withSerializable("userList",
        userList
    ).navigation()
7.6 test模块添加跳转路径和数据接收:
@Route(path = "/test/TestSplashActivity")
class TestSplashActivity : AppCompatActivity() {
val TAG = "TestARouter"
@Autowired(name = "name")
@JvmField
var name: String = ""
@Autowired(name = "userList")
@JvmField
var mList:ArrayList<String> ?= null
override fun onCreate(savedInstanceState: Bundle?) {
super.onCreate(savedInstanceState)
setContentView(R.layout.activity_test_splash)
ARouter.getInstance().inject(this)
initView()
}
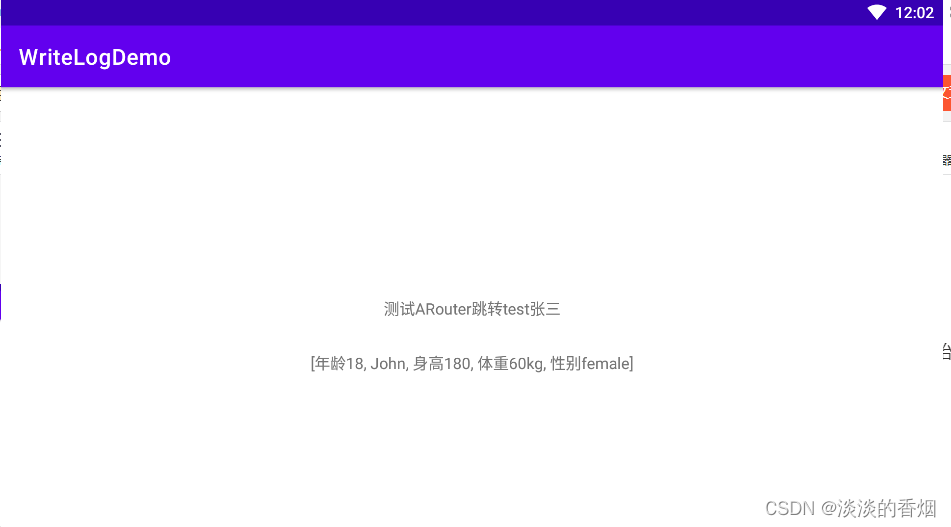
private fun initView() {
tvName.text = "测试ARouter跳转$name"
tvTextView.text = mList.toString()
}
}
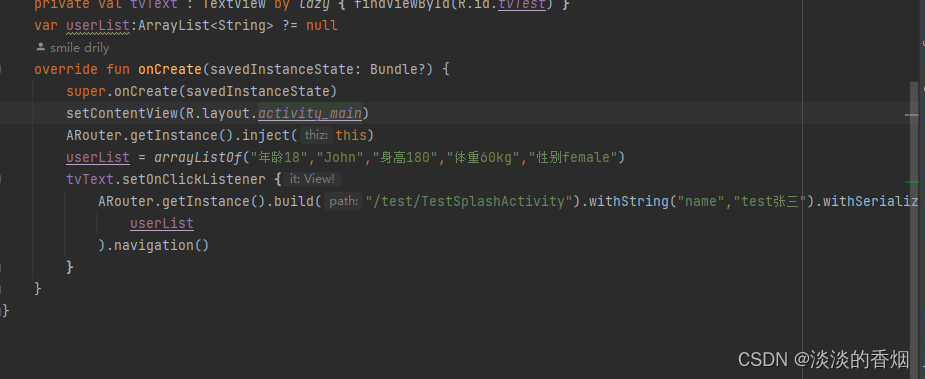
8.完整使用示例:
package com.example.writelogdemo

import androidx.appcompat.app.AppCompatActivity
import android.os.Bundle
import android.widget.TextView
import com.alibaba.android.arouter.launcher.ARouter

class MainActivity : AppCompatActivity() {
    private val tvText : TextView by lazy { findViewById(R.id.tvTest) }
    var userList:ArrayList<String> ?= null
    override fun onCreate(savedInstanceState: Bundle?) {
        super.onCreate(savedInstanceState)
        setContentView(R.layout.activity_main)
        ARouter.getInstance().inject(this)
        userList = arrayListOf("年龄18","John","身高180","体重60kg","性别female")
        tvText.setOnClickListener {
            ARouter.getInstance().build("/test/TestSplashActivity").withString("name","test张三").withSerializable("userList",
                userList
            ).navigation()
        }
    }
}
9.主模块布局:
<?xml version="1.0" encoding="utf-8"?>
<androidx.constraintlayout.widget.ConstraintLayout xmlns:android="http://schemas.android.com/apk/res/android"
    xmlns:app="http://schemas.android.com/apk/res-auto"
    xmlns:tools="http://schemas.android.com/tools"
    android:layout_width="match_parent"
    android:layout_height="match_parent"
    tools:context=".MainActivity">

    <TextView
        android:id="@+id/tvTest"
        android:layout_width="wrap_content"
        android:layout_height="wrap_content"
        android:text="Hello World!"
        app:layout_constraintBottom_toBottomOf="parent"
        app:layout_constraintEnd_toEndOf="parent"
        app:layout_constraintStart_toStartOf="parent"
        app:layout_constraintTop_toTopOf="parent" />

</androidx.constraintlayout.widget.ConstraintLayout>
10.lib-arouter测试代码:
package com.example.lib_arouter

import android.annotation.SuppressLint
import android.os.Bundle
import android.util.Log
import android.widget.TextView
import androidx.appcompat.app.AppCompatActivity
import com.alibaba.android.arouter.facade.annotation.Autowired
import com.alibaba.android.arouter.facade.annotation.Route
import com.alibaba.android.arouter.launcher.ARouter

@SuppressLint("CustomSplashScreen")
@Route(path = "/test/TestSplashActivity")
class TestSplashActivity : AppCompatActivity() {
    val TAG = "TestARouter"
    val tvName:TextView by lazy { findViewById(R.id.tv_name) }
    val tvTextView:TextView by lazy { findViewById(R.id.tv_test) }
    @Autowired(name = "name")
    @JvmField
    var name: String = ""

    @Autowired(name = "userList")
    @JvmField
    var mList:ArrayList<String> ?= null

    override fun onCreate(savedInstanceState: Bundle?) {
        super.onCreate(savedInstanceState)
        setContentView(R.layout.activity_test_splash)
        ARouter.getInstance().inject(this)
        Log.d(TAG, "测试ARouter数据传递$name$mList")
        initView()
    }

    private fun initView() {
        tvName.text = name
        tvTextView.text = mList.toString()
    }
}
11.lib-arouter布局代码:
<?xml version="1.0" encoding="utf-8"?>
<androidx.constraintlayout.widget.ConstraintLayout xmlns:android="http://schemas.android.com/apk/res/android"
    xmlns:app="http://schemas.android.com/apk/res-auto"
    xmlns:tools="http://schemas.android.com/tools"
    android:layout_width="match_parent"
    android:layout_height="match_parent"
    tools:context=".TestSplashActivity">

    <TextView
        android:id="@+id/tv_name"
        android:layout_width="wrap_content"
        android:layout_height="wrap_content"
        android:text="这是Arouter测试"
        app:layout_constraintBottom_toBottomOf="parent"
        app:layout_constraintEnd_toEndOf="parent"
        app:layout_constraintStart_toStartOf="parent"
        app:layout_constraintTop_toTopOf="parent" />

    <TextView
        android:id="@+id/tv_test"
        android:layout_width="wrap_content"
        android:layout_height="wrap_content"
        android:layout_marginTop="30dp"
        android:text="这是数组"
        app:layout_constraintEnd_toEndOf="parent"
        app:layout_constraintStart_toStartOf="parent"
        app:layout_constraintTop_toBottomOf="@id/tv_name" />

</androidx.constraintlayout.widget.ConstraintLayout>
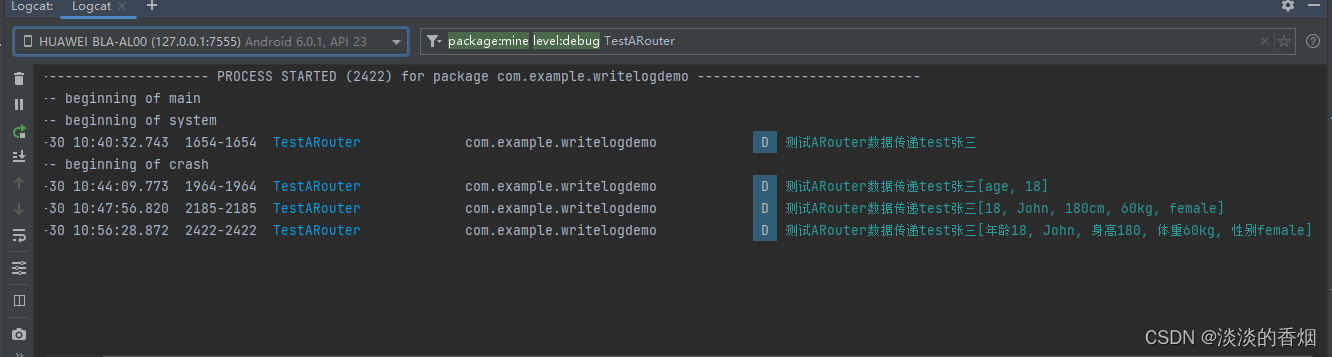
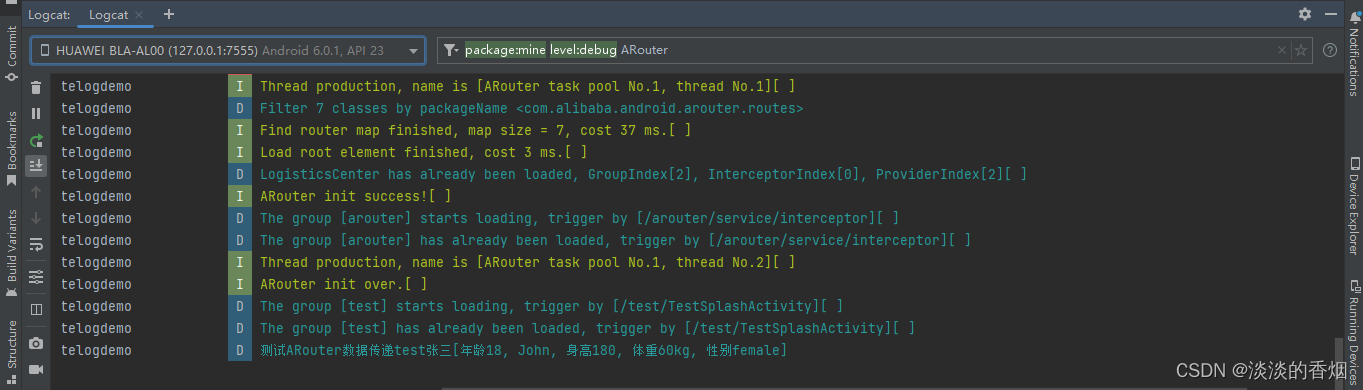
12.日志打印如下:
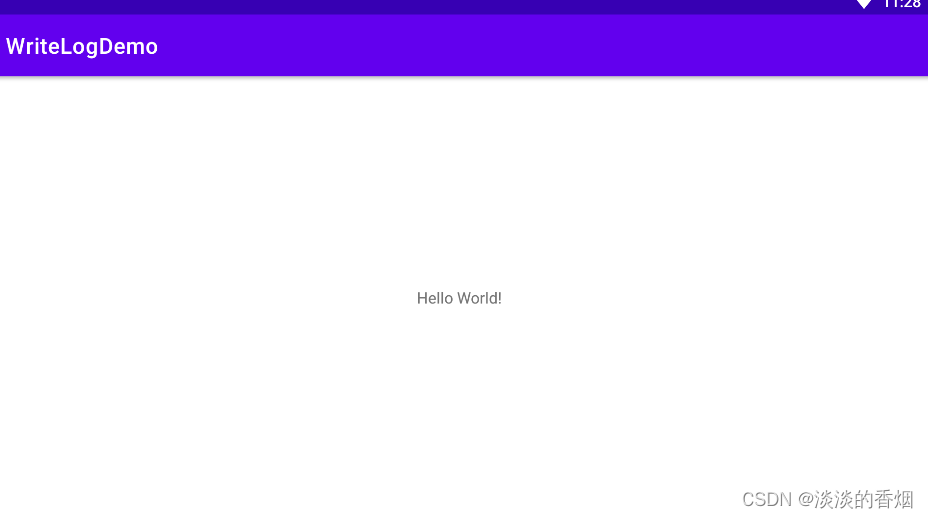
13.实现效果如下:
14.遇到问题:
14.1 测试模块配置不对
由于我是直接新建的模块,所以当作完整项目配置的,这里如果只是测试组件化需要修改配置
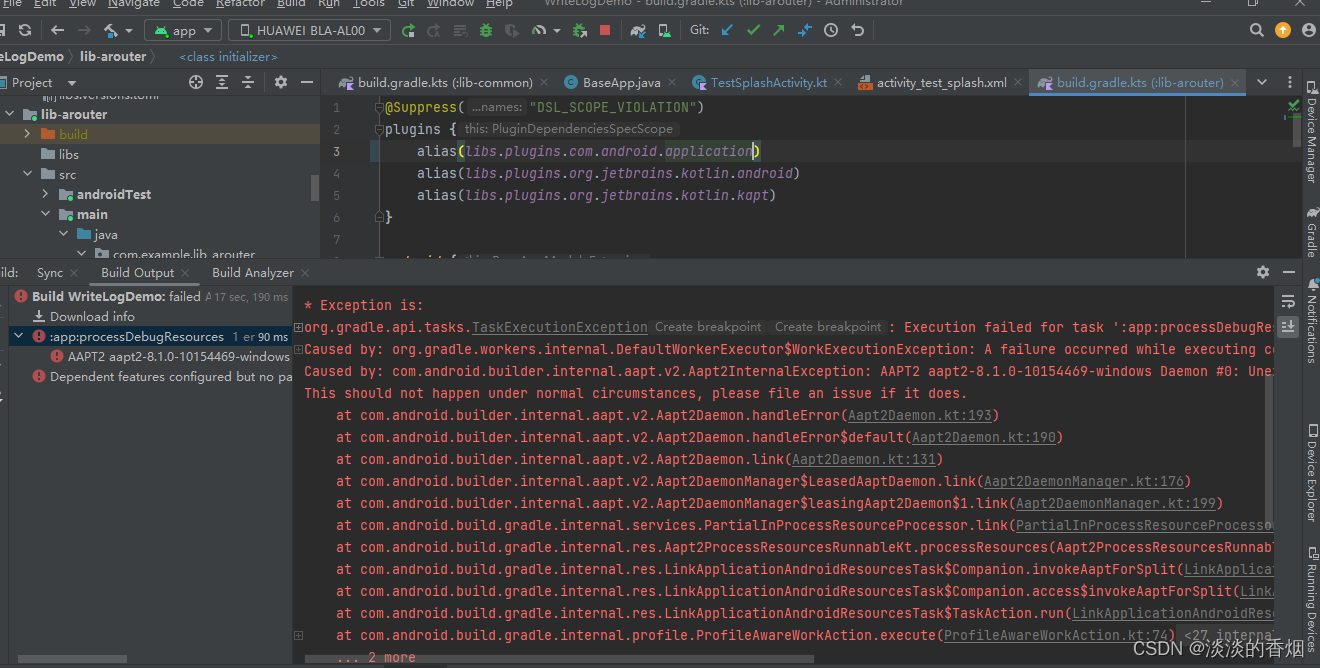
解决方法修改libs.plugins.com.android.application为libs.plugins.com.android.library
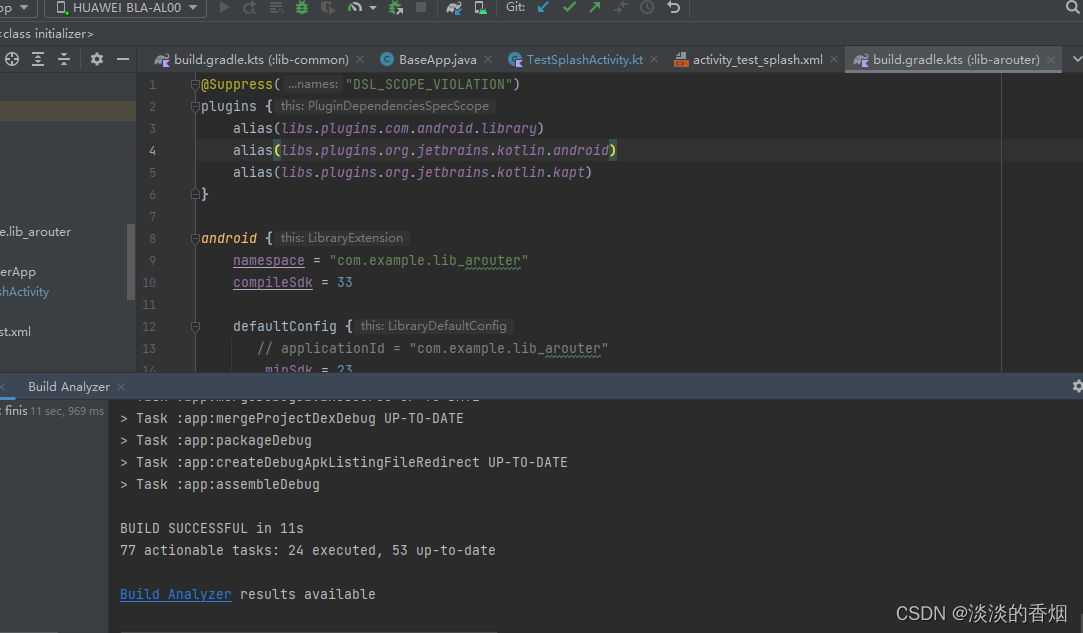
修改完成后可以正常运行:
14.2 跳转时提示path找不到
解决方法:
a.按照上面7中的步骤配置主模块和其他组件模块,一个都不能少。
b.同时在跳转时保证路径一致即可。
若配置完还有问题,请仔细检查每一步,直到正常跳转和数据传递,本人是亲自尝试了多个项目,基本上都没问题.
14.3 数据传递和接收问题
解决方法:
a.在kotlin中使用ARouter接收数据时需要使用@JvmField关键字
b.@Autowired(name = “name”),name一定要和传递时一致
c.传递数组时记得序列化,接收也是一样
15.AGP8.1.0小技巧:
15.1 在没有添加统一依赖时配置:
implementation("androidx.appcompat:appcompat:1.6.1")
implementation("com.google.android.material:material:1.9.0")
implementation("androidx.constraintlayout:constraintlayout:2.1.4")
testImplementation("junit:junit:4.13.2")
androidTestImplementation("androidx.test.ext:junit:1.1.5")
androidTestImplementation("androidx.test.espresso:espresso-core:3.5.1")
implementation("com.alibaba:arouter-api:1.5.2")
kapt("com.alibaba:arouter-compiler:1.5.2")
implementation(project(":lib-common"))
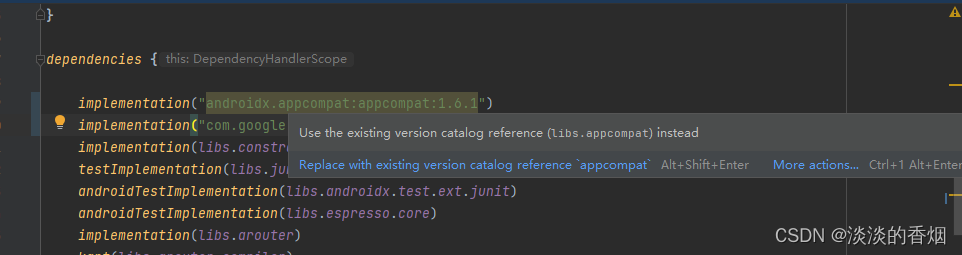
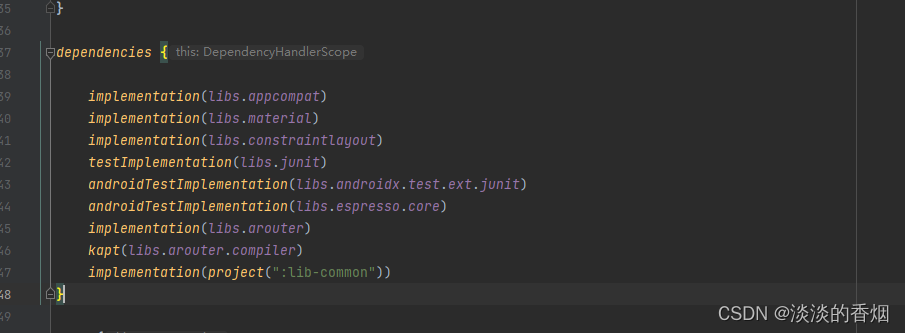
15.2 添加统一依赖库配置后:
如果添加了统一的catelog配置方式后导入依赖它会自动提示,不需要开发者手动导入,这点我感觉很爽,一键一直替换,用起来简直不要太安逸了,感兴趣的同学可以自行尝试,这里就简单举例。
16.总结:
其实本文的目的不是在于如何使用,ARouter这个很简单,相信做过组件化的同学都会,只是需要遇到问题时学会分析和调试,要不然盲目猜测是不会有结果的。开发这条路任重而道远,希望大家都能上下求索,享受这个求索的过程,痛并快乐着,也很重要,新技术出来可以尝试,也可以根据自己需要调整,不一样说非得更新用这个新技术,只要能解决问题,咋好用咋来。
17.demo地址如下:
https://gitee.com/jackning_admin/write-log-demo


![java八股文面试[多线程]——指令重排序](https://img-blog.csdnimg.cn/20201117230512973.png#pic_center)