最近想写个播放器demo,里面要用到 Looper Handler,看了很多资料都没能理解透彻,于是决定自己看看相关的源码,并在此记录心得体会,希望能够帮助到有需要的人。
本文会以 猜想 + log验证 的方式来学习 Android Looper Handler,对于一些复杂的代码会进行跳过,能够理解它们的设计原理即可。本文观点皆个人拙见,如有错误恳请赐教。
1、Looper Handler MessageQueue
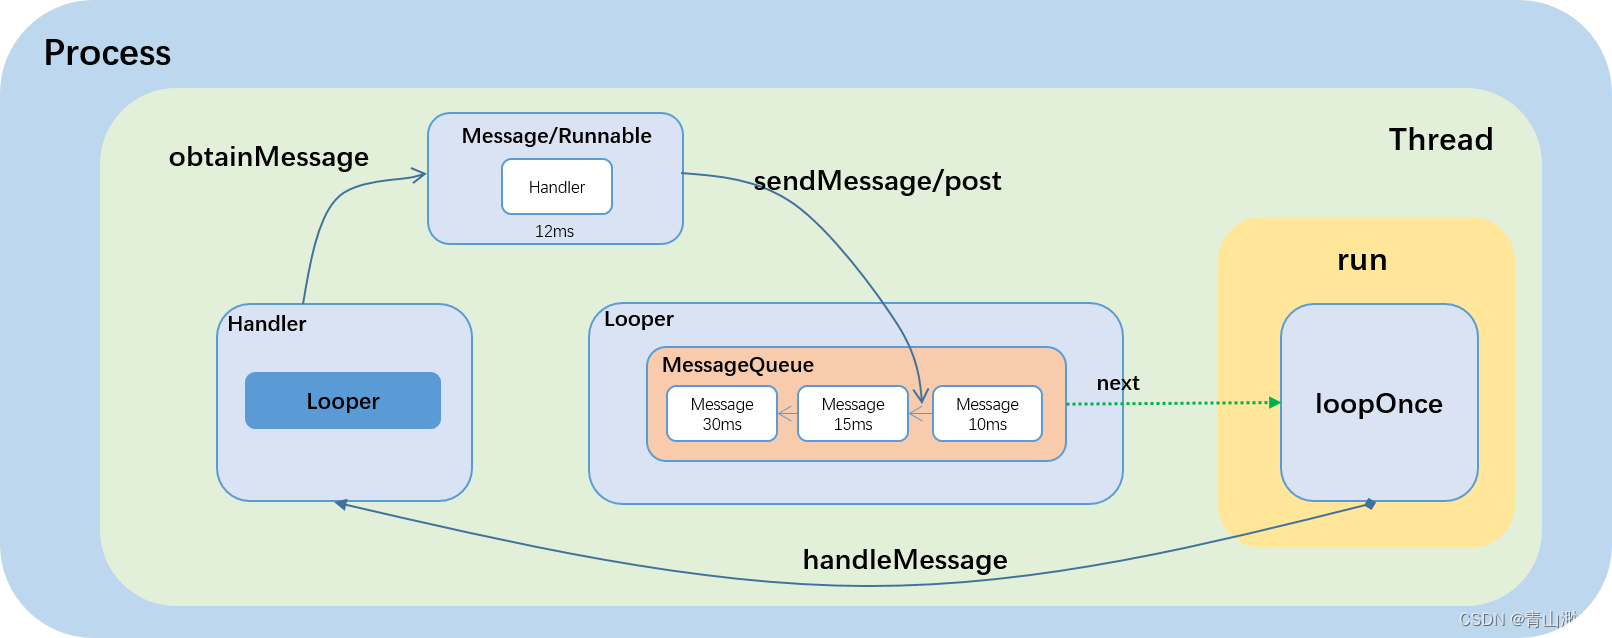
Looper 在整个消息处理机制中起着 消息等待与消息分发 的作用:
- 消息等待:Looper 阻塞程序运行,等待即将到来的消息;
- 消息分发:Looper 收到消息后,将消息分发给指定处理者在当前线程处理。
首先来看阻塞的问题,app 启动时会创建一个 Looper,并且调用 loop 函数阻塞 main 函数,这个 Looper 被称为主线程/主进程 Looper,代码参考 ActivityThread.java :
    public static void main(String[] args) {
        Trace.traceBegin(Trace.TRACE_TAG_ACTIVITY_MANAGER, "ActivityThreadMain");
        Looper.prepareMainLooper();
        Looper.loop();
    }
主线程 Looper(或者又叫 mainLooper)有着阻止程序结束的作用,这里就会引申出其他问题,为什么它阻塞了程序还能继续运行呢?
上文的消息等待作用中,我们说到 Looper 阻塞程序运行时,会等待即将到来的消息,什么消息会到来呢?
我写了一个 demo,界面上只有一个 Button,点击图标启动 app 并且点击按钮,接着我们来观察 log:
2023-08-28 22:17:51.969 6768-6768/com.example.loopertest D/MainActivity: onCreate
2023-08-28 22:17:51.993 6768-6768/com.example.loopertest D/MainActivity: onStart
2023-08-28 22:17:51.993 6768-6768/com.example.loopertest D/MainActivity: onPostCreate
2023-08-28 22:17:51.994 6768-6768/com.example.loopertest D/MainActivity: onResume
2023-08-28 22:17:51.994 6768-6768/com.example.loopertest D/MainActivity: onPostResume
2023-08-28 22:17:54.424 6768-6768/com.example.loopertest D/MainActivity: onClick
可以看到 log 的线程号和进程号相同,也就是说所有的消息都是在主线程(UI线程)/主进程中进行处理的,那 Looper 收到有 Activity 的启动事件、按钮的点击事件,引申来说主进程将会收到并处理所有的 UI 事件。
Looper 是如何接收事件并处理的呢?loop 方法中有一个死循环,不断执行 loopOnce,阻塞也在此发生:
    public static void loop() {
        for (;;) {
            if (!loopOnce(me, ident, thresholdOverride)) {
                return;
            }
        }
    }
loopOnce 中会看到一个 MessageQueue 对象,这是 Looper 所持有的消息队列,它内部维护着一个链表,消息等待也由它完成。
    private static boolean loopOnce(final Looper me,
            final long ident, final int thresholdOverride) {
        Message msg = me.mQueue.next(); // might block
        if (msg == null) {
            // No message indicates that the message queue is quitting.
            return false;
        }
        ...
        try {
            msg.target.dispatchMessage(msg);
            if (observer != null) {
                observer.messageDispatched(token, msg);
            }
            dispatchEnd = needEndTime ? SystemClock.uptimeMillis() : 0;
        }
        ....
        return true;
	}
MessageQueue.next 是一个阻塞方法,当没有消息时,它将阻塞等待,可以防止上一层 for 循环空转;有消息时就返回 Message,分发给指定的 Handler 来处理。
我们再看下 loop 循环要如何退出?从上面的代码我们可以看到,当返回的 Message 是 null 时,loopOnce 返回 false,整个 loop 循环结束。
MessageQueue.next 代码如下:
    Message next() {
		......
        for (;;) {
			......
            nativePollOnce(ptr, nextPollTimeoutMillis);
            ......
            if (mQuitting) {
                dispose();
                return null;
            }
        }
    }
这里的代码比较长,核心内容是:
- 调用 nativePollOnce 在 native 层阻塞 poll 消息;
- 将 poll 到的消息根据指定的执行时间进行排序,如果没有指定时间则按消息到底的先后顺序排序;
- 如果链表中第一条消息需要延时,则继续调用 nativePollOnce,并且设定一个超时时间;
- 将需要处理的消息返回给 loopOnce;
- 如果调用了 quit 方法,则返回 null,终止循环。
以上代码我们看到消息的获取方式是调用 nativePollOnce 进行等待,这里的 native 消息可能就是 android 系统发送给 mainLooper 的,例如触摸点击事件等等。除此之外,我们也可以主动给 mainLooper 发消息,这就需要使用 Handler 了。
我们调用 Handler 的 sendMessage 方法,最终会执行到 enqueueMessage 中:
    private boolean enqueueMessage(@NonNull MessageQueue queue, @NonNull Message msg,
            long uptimeMillis) {
        msg.target = this;
        msg.workSourceUid = ThreadLocalWorkSource.getUid();

        if (mAsynchronous) {
            msg.setAsynchronous(true);
        }
        return queue.enqueueMessage(msg, uptimeMillis);
    }
会调用 MessageQueue.enqueueMessage 将消息加入到 Message 链表中。问题来了,这里的 MessageQueue 是哪里来的?
这就需要追溯到 Handler 的构造函数,需要将一个 Looper 作为参数传递进去,MessageQueue 就是从 Looper 中获得的。
这也就意味着,每个 Handler 只能处理一个 Looper 的事务。为什么只能处理一个 Looper 的事务呢?我的理解是这样:Looper 将所有的消息或事务进行收集,接着再一条一条转发执行,虽然消息是异步发出的,但是 Handler 执行任务是同步的,这就没有了线程同步的问题。
    boolean enqueueMessage(Message msg, long when) {
        if (msg.target == null) {
            throw new IllegalArgumentException("Message must have a target.");
        }
        synchronized (this) {
            if (mQuitting) {
                IllegalStateException e = new IllegalStateException(
                        msg.target + " sending message to a Handler on a dead thread");
                Log.w(TAG, e.getMessage(), e);
                msg.recycle();
                return false;
            }

            msg.markInUse();
            msg.when = when;
            Message p = mMessages;
            boolean needWake;
            if (p == null || when == 0 || when < p.when) {
                // New head, wake up the event queue if blocked.
                msg.next = p;
                mMessages = msg;
                needWake = mBlocked;
            }
            if (needWake) {
                nativeWake(mPtr);
            }
        }
        return true;
    }
进入到 MessageQueue.enqueueMessage 后,消息会被加入到队列当中,如果当前消息队列是空的,就会调用 nativeWake 来打断 nativePollOnce 的执行,从而立即处理我们主动 post 的消息。
Looper 进行消息分发时,应该交给谁来处理呢?答案是哪个 Handler send 的消息,消息就由哪个 Handler 处理,这一点可以查看 enqueueMessage 方法。
除了用 Handler post 消息外,Message 本身也有一个 sendToTarget 方法,可以将自己发送给指定的 Handler,由 Hander 再加入到 MessageQueue 队列中,有兴趣可以阅读相关代码。
除了用 Handler sendMessage 之外,我们还常常见到用 Handler post Runnable。Runnable是什么?
被 sendMessage 发出的 Message 常常会设定有 what 信息,之后 Handler 会根据 what 来做对应的处理,代码示例如下:
        Handler handler = new Handler(getMainLooper()) {
            @Override
            public void handleMessage (Message msg) {
                switch (msg.what) {
                    case 1:
                        break;
                    default:
                        break;
                }
            }
        };
        Message msg = Message.obtain();
        msg.what = 1;
        handler.sendMessage(msg);
有的时候我们并不希望 Handler 对我们发出的消息进行识别处理,而是仅仅是想完成一项任务,这时候我们可以去 post Runnable。Runnable 会以 callback 的形式封装称为一个 Message,在分发处理时直接执行 Runnable 中所写的事务,就不需要再进入到 handleMessage 方法中了。
    public void dispatchMessage(@NonNull Message msg) {
        if (msg.callback != null) {
            handleCallback(msg);
        } else {
            if (mCallback != null) {
                if (mCallback.handleMessage(msg)) {
                    return;
                }
            }
            handleMessage(msg);
        }
    }
我们也可以 dump Looper 中的 Message,看到 MessageQueue 中的内容以及 Looper 当前的状态,以下是在 Button 的 onClick 方法中进行 dump,log 如下:
2023-08-28 23:50:15.953 7495-7495/com.example.loopertest D/MainActivity: onClick
2023-08-28 23:50:15.953 7495-7495/com.example.loopertest D/MainActivity: Looper (main, tid 2) {f4105a7}
2023-08-28 23:50:15.954 7495-7495/com.example.loopertest D/MainActivity:   Message 0: { when=-2ms callback=android.view.View$UnsetPressedState target=android.view.ViewRootImpl$ViewRootHandler }
2023-08-28 23:50:15.954 7495-7495/com.example.loopertest D/MainActivity:   (Total messages: 1, polling=false, quitting=false)
到这里,Looper Handler MessageQueue 的基本原理就讲完了,接下来我们来了解它们的实际是如何使用的。
2、How to use
2.1、Thread
在了解如何使用之前,有两点需要先注意:
- UI内容的处理只能放在主线程当中;
- 一个线程只能有一个 Looper;
第二点一个线程只能有一个 Looper,是因为每个线程只能有一处阻塞,如果有一个线程有两个 Looper,那么其中一个 Looper 的 loop 循环会被另一个 Looper 的 loop 循环所阻塞。
根据前面的内容我们了解到,app 在启动时会自动创建一个 MainLooper 用于处理 UI 相关的消息,但是在实际 app 编写中会有各种各样的任务,如果将所有的任务都放在 UI 线程中执行,那么可能就会影响 UI 事件的处理,出现 ANR 等情况。
例如我在 onCreate 中加入以下代码:
        new Handler(getMainLooper()).post(new Runnable() {
            @Override
            public void run() {
                for (int i = 0; i < 5; i++) {
                    try {
                        Log.d(LOG_TAG, "i = " + i +" thread id = " + Process.myTid());
                        sleep(1000);
                    } catch (InterruptedException e) {
                        e.printStackTrace();
                    }
                }
            }
        });
可以看到,启动的时候需要等待 Runnable 执行结束才能渲染出 UI,这显然是不太合适的。为了解决一般事务占用 UI 线程的问题,常常会在一个新的线程中来处理与 UI 不相干的事务或者一些耗时的事务。
线程 与 Looper Handler 协同使用的最简单的方式如下:
		// 问题示例
		private Handler handler;
        new Thread(new Runnable() {
            @Override
            public void run() {
                Looper.prepare();
                handler = new Handler(Looper.myLooper()) {
                    @Override
                    public void handleMessage (Message msg) {
                        switch (msg.what) {
                            case 1:
                                Log.d(LOG_TAG, "Process Message 1");
                                break;
                            default:
                                break;
                        }
                    }
                };
                Looper.loop();
            }
        }).start();
        Message msg = Message.obtain();
        msg.what = 1;
        handler.sendMessage(msg);
想要在子线程中使用 Looper Handler,我们有3件事需要做:
- 创建并启动线程;
- 在线程中创建 Looper,并且调用 Looper.loop 阻塞线程;
- 创建 Handler 并且与线程中的 Looper 相绑定;
以上代码是否有问题呢?我们将 app 跑起来看一下,呀!会有空指针的错误:
08-28 16:05:44.815  8436  8436 E AndroidRuntime: Process: com.example.loopertest, PID: 8436
08-28 16:05:44.815  8436  8436 E AndroidRuntime: java.lang.RuntimeException: Unable to start activity ComponentInfo{com.example.loopertest/com.example.loopertest.MainActivity}: java.lang.NullPointerExceptio
n: Attempt to invoke virtual method 'boolean android.os.Handler.sendMessage(android.os.Message)' on a null object reference
冷静分析!这是因为 线程启动 会和 sendMessage 并列执行,当执行到 sendMessage 时,handler 可能还没有创建,所以会出现空指针的错误。解决办法是在 sendMessage 之前加一个 delay,保证 handler 已经被创建:
		// 解决办法
        Message msg = Message.obtain();
        msg.what = 1;
        try {
            Thread.sleep(1000);
        } catch (InterruptedException e) {
            e.printStackTrace();
        }
        handler.sendMessage(msg);
这时候可能有人要问了,我为什么不在线程外部先创建 Looper,然后在线程内部调用 Looper.loop 呢?好问题,还记得我们之前说过一个线程只能有一个 Looper 吗,外部是主线程,如果在外部创建,主线程就会有两个 Looper 了。来看 Looper 的声明:
public final class Looper {
	static final ThreadLocal<Looper> sThreadLocal = new ThreadLocal<Looper>();
	private static Looper sMainLooper;  // guarded by Looper.class
    public static void prepare() {
        prepare(true);
    }

    private static void prepare(boolean quitAllowed) {
        if (sThreadLocal.get() != null) {
            throw new RuntimeException("Only one Looper may be created per thread");
        }
        sThreadLocal.set(new Looper(quitAllowed));
    }
sMainLooper 是一个静态变量,意味着我们的进程中只能存在一个 MainLooper,也就是我们所说的主线程 Looper;另外java还提供了一种线程的局部静态变量 sThreadLocal ,保证每个线程的静态变量是不同的。
prepare方法用于在线程中创建 Looper,如果一个线程中调用两次 prepare,那么就会抛出异常了,这也印证了我们上文所说的一个线程只能有一个 Looper。
这时候可能又有人要问了,为什么我不在不在外面创建 Handler 实例,然后将 Thread 的 Looper 与 Handler 绑定呢?不错,我们来试试:
    class MyThread extends Thread {
        @Override
        public void run() {
            Looper.prepare();
            Looper.loop();
        }

        Looper getLooper() {
            return Looper.myLooper();
        }
    }

	private MyThread myThread;
    myThread = new MyThread();
    myThread.start();
    handler = new Handler(myThread.getLooper()) {
        @Override
        public void handleMessage (Message msg) {
            switch (msg.what) {
                case 1:
                    Log.d(LOG_TAG, "Process Message 1");
                    break;
                default:
                    break;
            }
        }
    };
    Message msg = Message.obtain();
    msg.what = 1;
    handler.sendMessage(msg);
实际跑起来结果如下,没有问题!以后就这么用了
2023-08-29 21:27:16.583 9284-9284/com.example.loopertest D/MainActivity: Process Message 1
2.2、HandlerThread
是不是要为我们的机智鼓个掌呢?稍等!android 好像已经实现了我们所想的方法,这就是 HandlerThread!HandlerThread 简直就和我们的想法一模一样,所以用法也是一模一样!这里给出示例,就不再多做解释了。
        handlerThread = new HandlerThread("Test HandlerThread");
        handlerThread.start();
        Message msg = Message.obtain();
        msg.what = 1;
        new Handler(handlerThread.getLooper()) {
            @Override
            public void handleMessage (Message msg) {
                switch (msg.what) {
                    case 1:
                        Log.d(LOG_TAG, "Process Message 1");
                        break;
                    default:
                        break;
                }
            }
        }.sendMessage(msg);
2023-08-29 00:15:51.853 8743-8743/com.example.loopertest D/MainActivity: onCreate
2023-08-29 00:15:51.871 8743-8858/com.example.loopertest D/MainActivity: Process Message 1
2023-08-29 00:15:51.871 8743-8743/com.example.loopertest D/MainActivity: onStart
2023-08-29 00:15:51.872 8743-8743/com.example.loopertest D/MainActivity: onPostCreate
2023-08-29 00:15:51.872 8743-8743/com.example.loopertest D/MainActivity: onResume
2023-08-29 00:15:51.872 8743-8743/com.example.loopertest D/MainActivity: onPostResume
2.3、线程间互发消息
我们可能经常会听到 子线程往主线程发送消息,主线程往子线程发送消息,子线程往子线程发送消息,一看到这么多情况是不是有点晕?
其实这三种互发消息的原理是一致的,还记得我们上文说过,Handler 创建时要与一个 Looper 绑定:
public Handler(@NonNull Looper looper) {
	this(looper, null, false);
}
绑定 Looper 之后,Handler 只能处理绑定的 Looper 分发的消息了,那绑定的 Looper 中的消息怎么来的?除了 native 发送的消息外,我们是不是可以调用与 Looper 绑定的 Handler 来发送消息?
也就是说,要让消息在指定 Looper 线程中执行,只要调用与该线程 Looper 绑定的 Handler 的 post / sendMessage 方法。
就是这么简单!
2.4、Looper 如何停止
这里要谈一谈网上讲的最多的内存泄漏的问题,首先给个示例(不知道我理解的对不对哈):
我们在 onCreate 方法中增加以下代码,打开 app 后立刻关闭
        new Handler(getMainLooper()).postDelayed(new Runnable() {
            @Override
            public void run() {
                for (int i = 0; i < 5; i++) {
                    try {
                        Log.d(LOG_TAG, "i = " + i +" thread id = " + Process.myTid());
                        sleep(1000);
                    } catch (InterruptedException e) {
                        e.printStackTrace();
                    }
                }
            }
        }, 5000);
可以看到以下现象:
2023-08-29 21:51:30.568 9599-9599/com.example.loopertest D/MainActivity: onCreate
2023-08-29 21:51:30.586 9599-9599/com.example.loopertest D/MainActivity: onStart
2023-08-29 21:51:30.587 9599-9599/com.example.loopertest D/MainActivity: onPostCreate
2023-08-29 21:51:30.587 9599-9599/com.example.loopertest D/MainActivity: onResume
2023-08-29 21:51:30.587 9599-9599/com.example.loopertest D/MainActivity: onPostResume
2023-08-29 21:51:31.783 9599-9599/com.example.loopertest D/MainActivity: onKeyDown keyCode = 4
2023-08-29 21:51:31.873 9599-9599/com.example.loopertest D/MainActivity: onPause
2023-08-29 21:51:32.399 9599-9599/com.example.loopertest D/MainActivity: onStop
2023-08-29 21:51:32.399 9599-9599/com.example.loopertest D/MainActivity: onDestroy
2023-08-29 21:51:35.624 9599-9599/com.example.loopertest D/MainActivity: i = 0 thread id = 9599
2023-08-29 21:51:36.635 9599-9599/com.example.loopertest D/MainActivity: i = 1 thread id = 9599
2023-08-29 21:51:37.677 9599-9599/com.example.loopertest D/MainActivity: i = 2 thread id = 9599
2023-08-29 21:51:38.701 9599-9599/com.example.loopertest D/MainActivity: i = 3 thread id = 9599
2023-08-29 21:51:39.744 9599-9599/com.example.loopertest D/MainActivity: i = 4 thread id = 9599
嘿!明明已经调用了 onDestroy 了,为什么还能打印出循环内容呢?不知道这是不是其他博文中所说的内存泄漏,退出 activity 时仍占用着 activity 的资源,导致资源无法正常释放?
网上的一些解法是将 Handler 声明为静态类,这里我并不认为这是好的解法。
退出程序或者 activity 时,Looper 所在的线程正在运行,我们正常是需要停止线程的。由于 Looper.loop 正在阻塞运行,我们要调用 Looper.quit 或者 Looper.quitSafely 退出死循环。
这里我要提出一个问题,调用了 quit / quitSafely 后,Looper 就真的停止了吗?
答案是否定的,Looper 并不一定会立即停止,它需要执行完当前的任务才能停止!如果当前任务是一个耗时任务,那么会等他执行完 Looper 才会真正停止。
我们所要做的是什么呢?
- 把耗时工作放到 Looper 中执行时添加打断机制;
- ativity 结束时调用 Looper.quit;
- 调用 Thread.join 阻塞等待线程结束;
我觉得这样资源可以正常释放结束,不知道我理解的是否正确。接下来用 HandlerThread 给出一个示例:
在 onCreate 和 onDestroy 中添加以下代码:
	protected void onCreate(Bundle savedInstanceState) {
        handlerThread = new HandlerThread("Test HandlerThread quit");
        handlerThread.start();
        Message msg = Message.obtain();
        msg.what = 1;
        new Handler(handlerThread.getLooper()).post(new Runnable() {
            @Override
            public void run() {
                int i = 0;
                while (i < 10) {
                    try {
                        Log.d(LOG_TAG, "i = " + i +" thread id = " + Process.myTid());
                        sleep(1000);
                    } catch (InterruptedException e) {
                        e.printStackTrace();
                    }
                    i++;
                }
            }
        });
    }

    protected void onStop() {
        Log.d(LOG_TAG, "onStop");
        super.onStop();
        handlerThread.quitSafely();
    }
启动 app 后立刻退出 app,可以看到我们已经调用了 quitSafely,线程仍然没有立即停止,资源没有正常释放:
2023-08-29 22:43:24.101 10559-10559/com.example.loopertest D/MainActivity: onCreate
2023-08-29 22:43:24.203 10559-10586/com.example.loopertest D/MainActivity: i = 0 thread id = 10586
2023-08-29 22:43:24.207 10559-10559/com.example.loopertest D/MainActivity: onStart
2023-08-29 22:43:24.210 10559-10559/com.example.loopertest D/MainActivity: onPostCreate
2023-08-29 22:43:24.211 10559-10559/com.example.loopertest D/MainActivity: onResume
2023-08-29 22:43:24.212 10559-10559/com.example.loopertest D/MainActivity: onPostResume
2023-08-29 22:43:25.205 10559-10586/com.example.loopertest D/MainActivity: i = 1 thread id = 10586
2023-08-29 22:43:26.004 10559-10559/com.example.loopertest D/MainActivity: onKeyDown keyCode = 4
2023-08-29 22:43:26.207 10559-10586/com.example.loopertest D/MainActivity: i = 2 thread id = 10586
2023-08-29 22:43:26.231 10559-10559/com.example.loopertest D/MainActivity: onPause
2023-08-29 22:43:26.765 10559-10559/com.example.loopertest D/MainActivity: onStop
2023-08-29 22:43:26.766 10559-10559/com.example.loopertest D/MainActivity: onDestroy
2023-08-29 22:43:27.208 10559-10586/com.example.loopertest D/MainActivity: i = 3 thread id = 10586
2023-08-29 22:43:28.242 10559-10586/com.example.loopertest D/MainActivity: i = 4 thread id = 10586
2023-08-29 22:43:29.258 10559-10586/com.example.loopertest D/MainActivity: i = 5 thread id = 10586
2023-08-29 22:43:30.275 10559-10586/com.example.loopertest D/MainActivity: i = 6 thread id = 10586
2023-08-29 22:43:31.293 10559-10586/com.example.loopertest D/MainActivity: i = 7 thread id = 10586
2023-08-29 22:43:32.308 10559-10586/com.example.loopertest D/MainActivity: i = 8 thread id = 10586
2023-08-29 22:43:33.348 10559-10586/com.example.loopertest D/MainActivity: i = 9 thread id = 10586
我们在 quitSafely 后面加上 join,可以看到退出程序时,onStop 阻塞在 join 的位置上等待线程结束:
2023-08-29 22:43:56.616 10618-10618/com.example.loopertest D/MainActivity: onCreate
2023-08-29 22:43:56.745 10618-10644/com.example.loopertest D/MainActivity: i = 0 thread id = 10644
2023-08-29 22:43:56.748 10618-10618/com.example.loopertest D/MainActivity: onStart
2023-08-29 22:43:56.749 10618-10618/com.example.loopertest D/MainActivity: onPostCreate
2023-08-29 22:43:56.750 10618-10618/com.example.loopertest D/MainActivity: onResume
2023-08-29 22:43:56.750 10618-10618/com.example.loopertest D/MainActivity: onPostResume
2023-08-29 22:43:57.746 10618-10644/com.example.loopertest D/MainActivity: i = 1 thread id = 10644
2023-08-29 22:43:58.748 10618-10644/com.example.loopertest D/MainActivity: i = 2 thread id = 10644
2023-08-29 22:43:59.240 10618-10618/com.example.loopertest D/MainActivity: onKeyDown keyCode = 4
2023-08-29 22:43:59.354 10618-10618/com.example.loopertest D/MainActivity: onPause
2023-08-29 22:43:59.750 10618-10644/com.example.loopertest D/MainActivity: i = 3 thread id = 10644
2023-08-29 22:43:59.863 10618-10618/com.example.loopertest D/MainActivity: onStop
2023-08-29 22:44:00.784 10618-10644/com.example.loopertest D/MainActivity: i = 4 thread id = 10644
2023-08-29 22:44:01.797 10618-10644/com.example.loopertest D/MainActivity: i = 5 thread id = 10644
2023-08-29 22:44:02.840 10618-10644/com.example.loopertest D/MainActivity: i = 6 thread id = 10644
2023-08-29 22:44:03.881 10618-10644/com.example.loopertest D/MainActivity: i = 7 thread id = 10644
2023-08-29 22:44:04.922 10618-10644/com.example.loopertest D/MainActivity: i = 8 thread id = 10644
2023-08-29 22:44:05.926 10618-10644/com.example.loopertest D/MainActivity: i = 9 thread id = 10644
2023-08-29 22:44:06.948 10618-10618/com.example.loopertest D/MainActivity: onDestroy
我们再给线程退出加上一个条件:
        new Handler(handlerThread.getLooper()).post(new Runnable() {
            @Override
            public void run() {
                int i = 0;
                while (i < 10) {
                    if (isQuit)
                        break;
                    try {
                        Log.d(LOG_TAG, "i = " + i +" thread id = " + Process.myTid());
                        sleep(1000);
                    } catch (InterruptedException e) {
                        e.printStackTrace();
                    }
                    i++;
                }
            }
        });
可以看到,我们点击返回键退出 app 时,程序可以正常退出,并且子线程没有再打印出内容了,这样是不是就不会有内存泄漏了呢。
2023-08-29 22:48:03.391 10748-10748/com.example.loopertest D/MainActivity: onCreate
2023-08-29 22:48:03.525 10748-10773/com.example.loopertest D/MainActivity: i = 0 thread id = 10773
2023-08-29 22:48:03.528 10748-10748/com.example.loopertest D/MainActivity: onStart
2023-08-29 22:48:03.529 10748-10748/com.example.loopertest D/MainActivity: onPostCreate
2023-08-29 22:48:03.530 10748-10748/com.example.loopertest D/MainActivity: onResume
2023-08-29 22:48:03.530 10748-10748/com.example.loopertest D/MainActivity: onPostResume
2023-08-29 22:48:04.525 10748-10773/com.example.loopertest D/MainActivity: i = 1 thread id = 10773
2023-08-29 22:48:05.527 10748-10773/com.example.loopertest D/MainActivity: i = 2 thread id = 10773
2023-08-29 22:48:06.528 10748-10773/com.example.loopertest D/MainActivity: i = 3 thread id = 10773
2023-08-29 22:48:06.733 10748-10748/com.example.loopertest D/MainActivity: onKeyDown keyCode = 4
2023-08-29 22:48:06.854 10748-10748/com.example.loopertest D/MainActivity: onPause
2023-08-29 22:48:07.399 10748-10748/com.example.loopertest D/MainActivity: onStop
2023-08-29 22:48:07.531 10748-10748/com.example.loopertest D/MainActivity: onDestroy
好了,关于 Android Looper Handler 机制就分析到这里,如果觉得这篇文章有帮助,还请不要吝啬点赞关注哦,再见!
