项目特点:
1.使用手工加盐算法代替明文,提高用户隐私安全性
2.登录功能的验证使用了拦截器
3.支持分布式 Session存储和缓存都放到了Redis里面
具体实现步骤
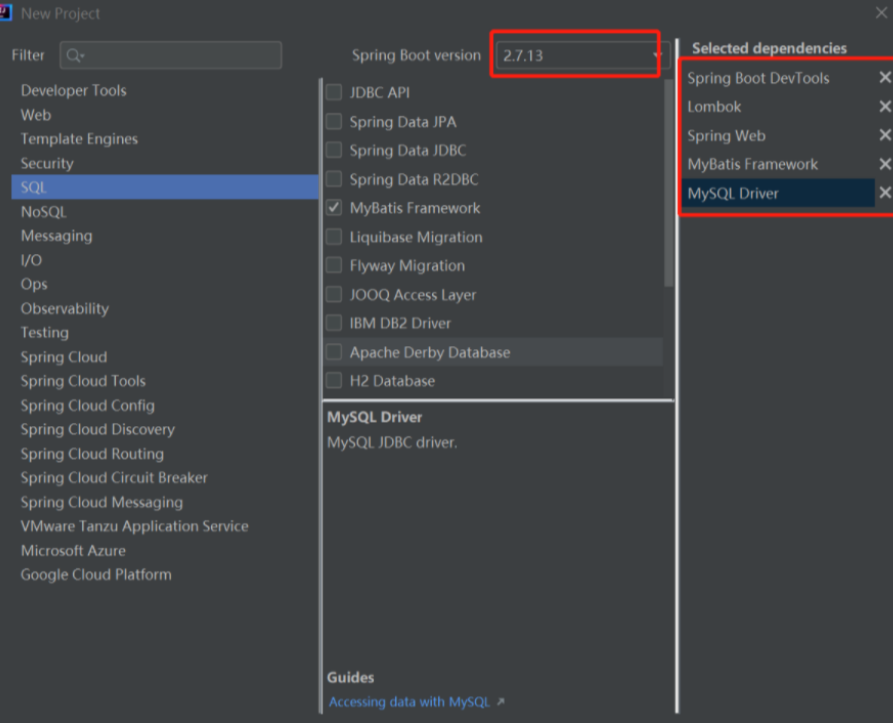
1.创建一个SSM项目
2.准备项目
先删除项目中无用的文件和目录

引入前端页面(resources-static)

添加项目常用配置(在resources下创建一个application.yml,并删除application.properties)
在我的gitee的代码片段中复制SSM常用配置
# 配置数据库的连接字符串

spring:
  datasource:
    url: jdbc:mysql://127.0.0.1/mycnblog?characterEncoding=utf8
    username: root
    password: 123456
    driver-class-name: com.mysql.cj.jdbc.Driver

# 设置 Mybatis 的 xml 保存路径

mybatis:
  mapper-locations: classpath:mapper/*Mapper.xml
  configuration: # 配置打印 MyBatis 执行的 SQL
    log-impl: org.apache.ibatis.logging.stdout.StdOutImpl
# 配置打印 MyBatis 执行的 SQL
logging:
  level:
    com:
      example:
        demo: debug
复制后注意!看我们所使用的数据库名字是否为mycnblog 密码是否正确
3.初始化数据库
-- 创建数据库
drop database if exists mycnblog;
create database mycnblog DEFAULT CHARACTER SET utf8mb4;

-- 使用数据数据
use mycnblog;

-- 创建表[用户表]
drop table if exists  userinfo;
create table userinfo(
    id int primary key auto_increment,
    username varchar(100) not null,
    password varchar(32) not null,
    photo varchar(500) default '',
    createtime datetime default current_timestamp,
    updatetime datetime default current_timestamp,
    `state` int default 1
) default charset 'utf8mb4';

-- 创建文章表
drop table if exists  articleinfo;
create table articleinfo(
    id int primary key auto_increment,
    title varchar(100) not null,
    content text not null,
    createtime datetime default current_timestamp,
    updatetime datetime default current_timestamp,
    uid int not null,
    rcount int not null default 1,
    `state` int default 1
)default charset 'utf8mb4';

-- 添加一个用户信息
INSERT INTO `mycnblog`.`userinfo` (`id`, `username`, `password`, `photo`, `createtime`, `updatetime`, `state`) VALUES
(1, 'admin', 'admin', '', '2021-12-06 17:10:48', '2021-12-06 17:10:48', 1);

-- 文章添加测试数据
insert into articleinfo(title,content,uid)
    values('Java','Java正文',1);
4.创建项目分层
先建这几个 后面再有需要再建

5.添加统一的返回类型
先在demo下建一个公共包(common)公共类(AjaxResult)
前端和后端使用ajax交互,返回统一的结果 :AjaxResult
//AjaxResult.java
package com.example.demo.common;

import lombok.Data;

import java.io.Serializable;

/**
 * 统一数据格式返回
 * implements Serializable 实现序列化
 */
@Data
public class AjaxResult implements Serializable {
    //状态码
    private Integer code;
    //状态码的描述信息
    private String msg;
    //返回的数据 不知道返回的数据类型是啥 所以使用Object
    private Object data;

    /**
     * 操作成功返回的结果
     */
    public static AjaxResult success(Object data){
        AjaxResult result = new AjaxResult();
        result.setCode(200);
        result.setMsg("");
        result.setData(data);
        return result;
    }
    //进行方法的重载 自定义code
    public static AjaxResult success(int code, Object data){
        AjaxResult result = new AjaxResult();
        result.setCode(code);
        result.setMsg("");
        result.setData(data);
        return result;
    }
    public static AjaxResult success(int code, String msg, Object data){
        AjaxResult result = new AjaxResult();
        result.setCode(code);
        result.setMsg(msg);
        result.setData(data);
        return result;
    }

    /**
     * 返回失败的结果
     */
    public static AjaxResult fail(int code, String msg){
        AjaxResult result = new AjaxResult();
        result.setCode(code);
        result.setMsg(msg);
        result.setData(null);
        return result;
    }
    public static AjaxResult fail(int code, String msg, Object data){
        AjaxResult result = new AjaxResult();
        result.setCode(code);
        result.setMsg(msg);
        result.setData(data);
        return result;
    }
}

//ResponseAdvice.java
package com.example.demo.config;

import com.example.demo.common.AjaxResult;
import com.fasterxml.jackson.databind.ObjectMapper;
import lombok.SneakyThrows;
import org.springframework.beans.factory.annotation.Autowired;
import org.springframework.core.MethodParameter;
import org.springframework.http.MediaType;
import org.springframework.http.server.ServerHttpRequest;
import org.springframework.http.server.ServerHttpResponse;
import org.springframework.web.bind.annotation.ControllerAdvice;
import org.springframework.web.servlet.mvc.method.annotation.ResponseBodyAdvice;

/**
 * 实现统一数据返回的保底类
 * 说明:在返回数据之前,检测数据的类型是否为统一的对象;如果不是,封装成统一的对象
 */
@ControllerAdvice
public class ResponseAdvice implements ResponseBodyAdvice {
    @Autowired
    private ObjectMapper objectMapper;
    /**
     * 开关,如果是true的时候,才能调用beforeBodyWrite
     */
    @Override
    public boolean supports(MethodParameter returnType, Class converterType) {
        return true;
    }

    /**
     *对数据格式进行校验和封装
     */
    @SneakyThrows
    @Override
    public Object beforeBodyWrite(Object body, MethodParameter returnType, MediaType selectedContentType, Class selectedConverterType, ServerHttpRequest request, ServerHttpResponse response) {
        if(body instanceof AjaxResult) return body;
        if(body instanceof String){
            //先把body封装成统一的对象,因其为String类型,再把它转为json类型
            return objectMapper.writeValueAsString(AjaxResult.success(body));

        }
        return AjaxResult.success(body);
    }
}
6.实现用户的注册功能
前端代码
1.非空校验
2.判断两次密码是否一致
3.ajax提交请求
#在head中增加jquery
<script src="js/jquery.min.js"></script>
#在提交按钮中添加onclick
<button id="submit" onclick="mysub()">提交</button><script>
//提交注册事件
function mysub(){
//1.非空校验
var username = jQuery("#username");
var password = jQuery("#password");
var password2 = jQuery("#password2");
if(username.val()==""){
alert("请先输入用户名!");
return;
}
if(password.val()==""){
alert("请先输入密码!");
return;
}
if(password2.val()==""){
alert("请先输入确认密码!");
return;
}
//2.判断两次密码是否一致
if(password.val() != password2.val()){
alert("两次输入的密码不一致,请先检查!");
return;
}
//3.ajax提交请求
jQuery.ajax({
url:"/user/reg",
type:"POST",
data:{"username":username.val(),"password":password.val()},
success:function(result) {
//响应的结果
if(result!=null && result.code==200 &&result.data==1){
//执行成功
if(confirm("恭喜注册成功!是否要跳转至登陆页面?")){
location.href = "/login.html";
}
}else{
alert("抱歉执行失败,请稍后再试!");
}
}
});
}
</script>前端页面修改完代码不生效,此时极大的概率是缓存
1.先清空idea的缓存,删除项目目录下的target文件夹,然后重启项目
2.强制刷新浏览器
3.如果前两步还没有解决缓存问题,那么尝试给url添加上一个没有意义的参数 比如?v=1
ajax技术
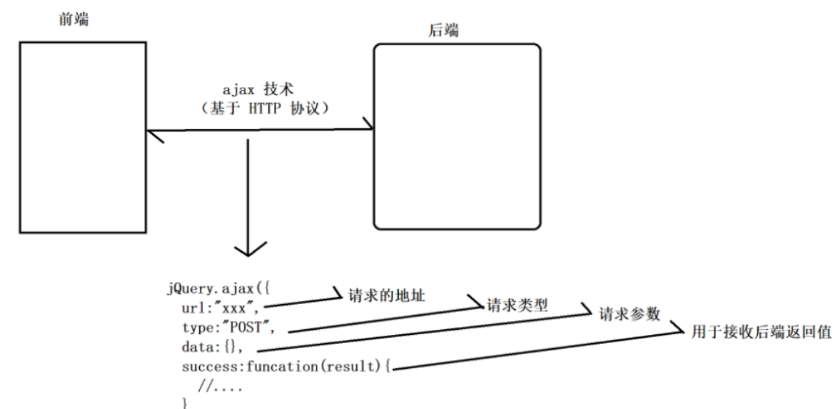
后端代码
后端代码写的时候注意顺序!一个调用一个 因此我们先在UserMapper.java/ArticleMapper.java中写,再在对应的*Mapper.xml中写SQL语句,再在*Service.java中写这个方法,最后再在*Controller.java中写具体的实现!后面的后端代码基本都是这个顺序写
//demo-entity-UserInfo.java
package com.example.demo.entity;
import lombok.Data;
import java.time.LocalDateTime;
@Data
public class UserInfo {
//Integer 比int的兼容性更好
private Integer id;
private String username;
private String password;
private String photo;
private LocalDateTime createtime;
private LocalDateTime updatetime;
private Integer state;
}
//mapper-UserMapper.java
package com.example.demo.mapper;
import com.example.demo.entity.UserInfo;
import org.apache.ibatis.annotations.Mapper;
@Mapper
public interface UserMapper {
//注册
int reg(UserInfo userInfo);
}
//resources-mapper-UserMapper.xml
<?xml version="1.0" encoding="UTF-8"?>
<!DOCTYPE mapper PUBLIC "-//mybatis.org//DTD Mapper 3.0//EN" "http://mybatis.org/dtd/mybatis-3-mapper.dtd">
<mapper namespace="com.example.demo.mapper.UserMapper">
<insert id="reg">
insert into userinfo(username,password) values(#{username},#{password})
</insert>
</mapper>
//service-UserService.java
package com.example.demo.service;
import com.example.demo.entity.UserInfo;
import com.example.demo.mapper.UserMapper;
import org.springframework.stereotype.Service;
import javax.annotation.Resource;
@Service
public class UserService {
@Resource
private UserMapper userMapper;
public int reg(UserInfo userInfo) {
return userMapper.reg(userInfo);
}
}
//controller-UserController.java
package com.example.demo.controller;
import com.example.demo.common.AjaxResult;
import com.example.demo.entity.UserInfo;
import com.example.demo.service.UserService;
import org.springframework.beans.factory.annotation.Autowired;
import org.springframework.util.StringUtils;
import org.springframework.web.bind.annotation.RequestMapping;
import org.springframework.web.bind.annotation.RestController;
@RestController
@RequestMapping("/user")
public class UserController {
@Autowired
private UserService userService;
@RequestMapping("/reg")
public AjaxResult reg(UserInfo userInfo) {
//非空校验和参数有效性校验
if(userInfo == null || !StringUtils.hasLength(userInfo.getUsername())||
!StringUtils.hasLength(userInfo.getPassword())) {
return AjaxResult.fail(-1,"非法参数");
}
return AjaxResult.success(userService.reg(userInfo));
}
}7.根据用户查询userinfo对象
前端代码
#在head中增加jquery
<script src="js/jquery.min.js"></script>
#在提交按钮中添加onclick
<button id="submit" onclick="mysub()">提交</button>
<script>
function mysub() {
//1.非空校验
var username = jQuery("#username");
var password = jQuery("#password");
if(username.val()==""){
alert("请先输入用户名!");
username.focus();
return;
}
if(password.val()==""){
alert("请先输入密码!");
password.focus();
return;
}
//2.ajax请求登录接口
jQuery.ajax({
url:"/user/login",
type:"POST",
data:{"username":username.val(),"password":password.val()},
success:function(result){
if(result!=null && result.code==200 && result.data!=null){
//登陆成功
location.href = "myblog_list.html";
}else{
alert("抱歉登陆失败,用户名或密码输入错误,请重试");
}
}
});
}
</script>后端代码
//在UserMapper.java中加入getUserByName方法
package com.example.demo.mapper;

import com.example.demo.entity.UserInfo;
import org.apache.ibatis.annotations.Mapper;
import org.apache.ibatis.annotations.Param;

@Mapper
public interface UserMapper {

    //注册
    int reg(UserInfo userInfo);

    /**
     * 登陆 根据用户查询userinfo对象
     * 说明:只传username 在UserController里进行password的比对
     */
    UserInfo getUserByName(@Param("username") String username);

}

#在UserMapper.xml中添加select操作
<?xml version="1.0" encoding="UTF-8"?>
<!DOCTYPE mapper PUBLIC "-//mybatis.org//DTD Mapper 3.0//EN" "http://mybatis.org/dtd/mybatis-3-mapper.dtd">
<mapper namespace="com.example.demo.mapper.UserMapper">
    <insert id="reg">
        insert into userinfo(username,password) values(#{username},#{password})
    </insert>

    <select id="getUserByName" resultType="com.example.demo.entity.UserInfo">
        select * from userinfo where username=#{username}
    </select>
</mapper>
//在UserService中加入getUserByName()方法,并返回username
package com.example.demo.service;

import com.example.demo.entity.UserInfo;
import com.example.demo.mapper.UserMapper;
import org.springframework.stereotype.Service;

import javax.annotation.Resource;

@Service
public class UserService {

    @Resource
    private UserMapper userMapper;

    public int reg(UserInfo userInfo) {
        return userMapper.reg(userInfo);
    }

    public UserInfo getUserByName(String username){
        return userMapper.getUserByName(username);
    }
}

//在UserController中添加login方法,并传入用户名和密码
在UserController中的login方法里 将用户存储到session中,不然之后的删除博客等操作无法进行
@RequestMapping("/login")
    public AjaxResult login(HttpServletRequest request, String username, String password) {
        //1.非空校验
        if(!StringUtils.hasLength(username)|| !StringUtils.hasLength(password))  {
            return AjaxResult.fail(-1,"非法请求");
        }
        //2.查询数据库
        UserInfo userInfo = userService.getUserByName(username);
        if(userInfo != null && userInfo.getId() > 0){
            //有效的用户名 两个密码是否相同
            if(password.equals(userInfo.getPassword())){
                //登陆成功
                //将用户存储到session中
                HttpSession session = request.getSession();
                session.setAttribute(AppVariable.USER_SESSION_KEY,userInfo);
                userInfo.setPassword("");//返回前端之前,隐藏敏感(密码)信息
                return AjaxResult.success(userInfo);
            }
        }
        return AjaxResult.success(0,null);

    }

//在common下建立一个全局变量类 AppVariable.java
public class AppVariable {
    public static final String USER_SESSION_KEY = "USER_SESSION_KEY";

}
8.拦截器
先写一个拦截器LoginInterceptor,这个拦截器要实现HandlerInterceptor(拦截管理器)的接口,里面去实现preHandle的方法
然后要把prehandle加到全项目的全局配置文件中
//config-LoginInterceptor.java
package com.example.demo.config;

import com.example.demo.common.AppVariable;
import org.springframework.web.servlet.HandlerInterceptor;

import javax.servlet.http.HttpServletRequest;
import javax.servlet.http.HttpServletResponse;
import javax.servlet.http.HttpSession;

/**
 * 登录拦截器
 */
public class LoginInterceptor implements HandlerInterceptor {
    /**
     * true -> 用户已登录
     * false ->用户未登录
     */
    @Override
    public boolean preHandle(HttpServletRequest request, HttpServletResponse response, Object handler) throws Exception {
        //如果有与当前的request相关联的HttpSession,则返回该HttpSession;如果没有则返回null;
        HttpSession session =request.getSession(false);
        if(session!=null &&session.getAttribute(AppVariable.USER_SESSION_KEY) != null){
            //用户已登录
            return true;
        }
        //调整到登陆页面
        response.sendRedirect("/login.html");
        return false;
    }
}

//在系统的配置文件中配置拦截规则
//在config下建AppConfig.java 实现一个WebMvcConfigurer的配置文件
package com.example.demo.config;

import org.springframework.context.annotation.Configuration;
import org.springframework.web.servlet.config.annotation.InterceptorRegistry;
import org.springframework.web.servlet.config.annotation.WebMvcConfigurer;

@Configuration
public class AppConfig implements WebMvcConfigurer {
    @Override
    public void addInterceptors(InterceptorRegistry registry) {
        registry.addInterceptor(new LoginInterceptor())
                .addPathPatterns("/**")
                .excludePathPatterns("/css/**")
                .excludePathPatterns("/editor.md/**")
                .excludePathPatterns("/img/**")
                .excludePathPatterns("/js/**")
                .excludePathPatterns("/login.html")
                .excludePathPatterns("/reg.html")
                .excludePathPatterns("/blog_list.html")
                .excludePathPatterns("/blog_content.html")
                .excludePathPatterns("/user/login")
                .excludePathPatterns("/user/reg");


    }
}
注意:此时的session是借助cookie储存到cookie中的 后期会部署到Redis上
9.我的博客列表页
获得左侧个人信息
前端代码
#在head中增加jquery
<script src="js/jquery.min.js"></script>
更改这两处 实现动态赋值

 <script>
        function showInfo(){
            jQuery.ajax({
                url:"/user/showinfo",
                type:"POST",
                data:{},
                success:function(result){
                    if(result != null && result.code == 200){
                        jQuery("#username").text(result.data.username);
                        jQuery("#artCount").text(result.data.artCount);
                    }else{
                        alert("个人信息加载失败,请重新刷新再试");
                    }
                }
            });
        }
        showInfo();
</script>
后端代码
//此处对应博客列表articleinfo 因此在demo-mapper下建ArticleMapper.java
package com.example.demo.mapper;

import org.apache.ibatis.annotations.Mapper;
import org.apache.ibatis.annotations.Param;

@Mapper
public interface ArticleMapper {
    int getArtCountByUid(@Param("uid") Integer uid);
}
#因此在resources-mapper下建ArticleMapper.xml
<?xml version="1.0" encoding="UTF-8"?>
<!DOCTYPE mapper PUBLIC "-//mybatis.org//DTD Mapper 3.0//EN" "http://mybatis.org/dtd/mybatis-3-mapper.dtd">
<mapper namespace="com.example.demo.mapper.ArticleMapper">

    <select id="getArtCountByUid" resultType="Integer">
        select count(*) from articleinfo where uid = 1;
    </select>
</mapper>
此时生成一个单元测试 进行测试
package com.example.demo.mapper;

import org.junit.jupiter.api.Test;
import org.springframework.beans.factory.annotation.Autowired;
import org.springframework.boot.test.context.SpringBootTest;

import javax.annotation.Resource;

import static org.junit.jupiter.api.Assertions.*;

@SpringBootTest
class ArticleMapperTest {

    @Resource
    private ArticleMapper articleMapper;

    @Test
    void getArtCountByUid() {
        int result = articleMapper.getArtCountByUid(1);
        System.out.println("文章总数: "+result);
    }
}
可以看到这里文章总数为1 因此ArticleMapper没有问题,接着写
//demo-controller-UserController.java
@Autowired
    private ArticleService articleService;
此时返回的数据不再是基础数据类型,而是articlecount,因此新建vo-UserinfoVO.java 展示的一个对象
package com.example.demo.vo;

import com.example.demo.entity.UserInfo;
import lombok.Data;

@Data
public class UserinfoVO extends UserInfo {
    private Integer artCount;//此人发表的文章总数
}
接着在demo-controller-UserController里写
1.得到当前登录用户(从session中获取 )
2.得到用户发表的文章总数
但是此处的session不是只在我的博客列表页进行获取
//在demo-common下建UserSessionUtils.java
package com.example.demo.common;

import com.example.demo.entity.UserInfo;

import javax.servlet.http.HttpServletRequest;
import javax.servlet.http.HttpSession;

/**
 * 当前登陆用户相关的操作
 */
public class UserSessionUtils {
    /**
     * 得到当前的登录用户
     * @param request
     * @return
     */
    public static UserInfo getUser(HttpServletRequest request){
        HttpSession session = request.getSession(false);
        if(session != null &&
            session.getAttribute(AppVariable.USER_SESSION_KEY) != null){
            //说明用户已正常登录
            return (UserInfo) session.getAttribute(AppVariable.USER_SESSION_KEY);
        }
        return null;
    }
}

//demo-controller-UserController.java
@RequestMapping("/showinfo")
    public AjaxResult showInfo(HttpServletRequest request){
        UserinfoVO userinfoVO = new UserinfoVO();
        //1.得到当前登录用户(从session中获取 )
        UserInfo userInfo = UserSessionUtils.getUser(request);
        if(userInfo ==null){
            return AjaxResult.fail(-1,"非法请求");
        }
        //Spring提供的深克隆方法
        BeanUtils.copyProperties(userInfo,userinfoVO);
        //2.得到用户发表的文章总数
        userinfoVO.setArtCount(articleService.getArtCountByUid(userInfo.getId()));
        return AjaxResult.success(userinfoVO);
    }
获得我的文章列表数据
获取我的文章列表要不要传uid给后端?
不需要传递任何参数,并且是一定不能传参的
前端代码
<script>
function getMyArtList(){
jQuery.ajax({
url:"/art/mylist",
type:"POST",
data:{},
success:function(result) {
if(result != null && result.code==200){
//有两种情况,一种是发表了文章,一种是没有发表任何文章
if(result.data!=null && result.data.length()>0){
//此用户发表文章了
var artListDiv ="";
for(var i=0;i<result.data.length;i++){
var artItem = result.data[i];
artListDiv += '<div class="blog">';
artListDiv += '<div class="title">'+artItem.title+'</div>';
artListDiv += '<div class="date">'+artItem.updatetime+'</div>';
artListDiv += '<div class="desc">';
artListDiv += artItem.content;
artListDiv += '</div>';
artListDiv += '<a href="blog_content.html?id='+
artItem.id + '" class="detail">查看全文 >></a> ';
artListDiv += '<a href="blog_edit.html?id='+
artItem.id + '" class="detail">修改 >></a> ';
artListDiv += '<a href="javascript:myDel('+
artItem.id+');" class="detail">删除 >></a>';
artListDiv += '</div>';
}
jQuery("#artDiv").html(artListDiv);
}else{
//此用户未发表文章
jQuery("#artDiv").html("<h3>暂无文章</h3>");
}
}else{
alert("查询文章列表出错,请重试!");
}
}
});
}
getMyArtList();
</script>后端代码
//建一个实体类 Articleinfo.java
package com.example.demo.entity;

import lombok.Data;

import java.time.LocalDateTime;

@Data
public class Articleinfo {
    private Integer id;
    private String title;
    private String content;
    private Data createtime;
    private Data updatetime;
    private Integer uid;
    private Integer rcount;
    private Integer state;
}

//在AriticleMapper.java里添加getMyList方法
package com.example.demo.mapper;

import com.example.demo.entity.Articleinfo;
import org.apache.ibatis.annotations.Mapper;
import org.apache.ibatis.annotations.Param;

import java.util.List;

@Mapper
public interface ArticleMapper {
    int getArtCountByUid(@Param("uid") Integer uid);

    List<Articleinfo> getMyList(@Param("uid") Integer uid);
}

//在AriticleMapper.xml里添加
<select id="getMyList" resultType="com.example.demo.entity.Articleinfo">
        select * from articleinfo where uid =#{uid};
</select>
//ArticleService.java
public class ArticleService {
    @Resource
    private ArticleMapper articleMapper;

    public int getArtCountByUid(Integer uid){
        return articleMapper.getArtCountByUid(uid);
    }

    public List<Articleinfo> getMyList(Integer uid) {
        return articleMapper.getMyList(uid);
    }
}
//controller-ArticleController.java
package com.example.demo.controller;

import com.example.demo.common.AjaxResult;
import com.example.demo.common.UserSessionUtils;
import com.example.demo.entity.Articleinfo;
import com.example.demo.entity.UserInfo;
import com.example.demo.service.ArticleService;
import org.springframework.beans.factory.annotation.Autowired;
import org.springframework.web.bind.annotation.RequestMapping;
import org.springframework.web.bind.annotation.RestController;

import javax.servlet.http.HttpServletRequest;
import java.util.List;

@RestController
@RequestMapping("/art")
public class ArticleController {

    @Autowired
    private ArticleService articleService;

    @RequestMapping("/mylist")
    public AjaxResult getMyList(HttpServletRequest request){
        UserInfo userInfo = UserSessionUtils.getUser(request);
        if(userInfo == null){
            return AjaxResult.fail(-1,"非法请求");
        }
        List<Articleinfo> list = articleService.getMyList(userInfo.getId());
        return  AjaxResult.success(list);
    }
}
SpringBoot时间格式化
1.通过配置文件,设置全局的时间格式化
#在application.yml里的spring中设置jaskson
# 配置数据库的连接字符串

spring:
  jackson:
jackson:
    date-format: 'yyyy-MM-dd HH:mm:ss'
    time-zone: 'GMT+8'
  datasource:
    url: jdbc:mysql://127.0.0.1/mycnblog?characterEncoding=utf8
    username: root
    password: "zy19991227"
    driver-class-name: com.mysql.cj.jdbc.Driver
注意事项:此配置对LocalDateTime/LocalDate,需要使用Date数据类型
2.使用@JsonFormat注解
@Data
public class Articleinfo {
    private Integer id;
    private String title;
    private String content;
    @JsonFormat(pattern = "yyyy-MM-dd HH:mm:ss", timezone = "GMT+8")
    private LocalDateTime createtime;
    @JsonFormat(pattern = "yyyy-MM-dd HH:mm:ss", timezone = "GMT+8")
    private LocalDateTime updatetime;
    private Integer uid;
    private Integer rcount;
    private Integer state;
}
删除文章操作
前端代码
<script>
        getMyArtList();
        // 删除文章
        function myDel(id){
            if(confirm("确实删除?")){
                // 删除文章
                jQuery.ajax({
                    url:"art/del",
                    type:"POST",
                    data:{"id":id},
                    success:function(result){
                        if(result!=null && result.code==200 && result.data==1){
                            alert("恭喜:删除成功!");
                            // 刷新当前页面
                            location.href = location.href;
                        }else{
                            alert("抱歉:删除失败,请重试!");
                        }
                    }
                });
            }
        }
</script>
后端代码
//ArticleMapper.java中加入del方法
@Mapper
public interface ArticleMapper {
    int getArtCountByUid(@Param("uid") Integer uid);

    List<Articleinfo> getMyList(@Param("uid") Integer uid);

    int del(@Param("id") Integer id,@Param("uid") Integer uid);
}
//ArticleMapper.xml加入sql语句
<delete id="del">
        delete from articleinfo where id=#{id} and uid=#{uid}
</delete>
//ArticleService.java中加入del方法
public int del(Integer id,Integer uid){
        return articleMapper.del(id,uid);
}
注销功能(公共模块)
前端代码
<script>
 //退出登录
        function logout(){
            if(confirm("确认注销?")){
                jQuery.ajax({
                    url:"user/logout",
                    type:"POST",
                    data:{},
                    success:function(result){
                        if(result!=null && result.code ==200){
                            localhost.href = '/login.html';
                        }
                    }
                });
            }
        }
</script>
后端代码
//UserController.java
@RequestMapping("/logout")
    public AjaxResult logout(HttpSession session){
        session.removeAttribute(AppVariable.USER_SESSION_KEY);
        return AjaxResult.success(1);
    }
测试
同时登陆zhangsan和admin用户,zhangsan用户点击注销
确认是否注销成功? 看注销后的张三能否删除admin用户的文章 不能
10.文章详情页
实现思路:
1.从url中得到文章id
2.从后端查询当前文章的详情信息(以及uid)
3.根据上一步查询的uid查询用户的信息
4.请求后端接口实现阅读量+1
获取当前url参数的公共方法并查询文章详情
前端代码
//在blog_content.html中修改
<script>
//获取当前url参数的公共方法
            function getUrlValue(key){
                // ex:?id=1&v=2
                var params = location.search;
                if(params.length>1){
                    // ex:id=1&v=2
                    params = location.search.substring(1);
                    var paramArr = params.split("&");
                    for(var i=0;i<paramArr.length;i++){
                        var kv = paramArr[i].split("=");
                            if(kv[0]==key){
                            // 是我要查询的参数
                            return kv[1];
                        }
                    }
                }
                return "";
            }
            //查询文章详情
            function getArtDetail(id){
                if(id==""){
                    alert("非法参数!");
                    return;
                }
                jQuery.ajax({
                    url:"art/detail",
                    type:"POST",
                    data:{"id":id},
                    success:function(result){
                        if(result!=null && result.code==200){
                            jQuery("#title").html(result.data.title);
                            jQuery("#updatetime").html(result.data.updatetime);
                            jQuery("#rcount").html(result.data.rcount);
                            initEdit(result.data.content);
                            // 得到用户 id
                            showUser(result.data.uid);
                        }else{
                            alert("查询失败,请重试!");
                        }
                    }
                });
            }
            getArtDetail(getUrlValue("id"));
</script>
后端代码
//ArticleMapper.java中加入getDetail方法
Articleinfo getDetail(@Param("id") Integer id);
#ArticleMapper.xml中加入SQL语句
<select id="getDetail" resultType="com.example.demo.entity.Articleinfo">
        select * from articleinfo where id=#{id}
</select>
//ArticleService.java中加入getDetail方法
public Articleinfo getDetail(Integer id) {
        return articleMapper.getDetail(id);
}
!!!注意此处需要在AppConfig.java拦截器中开放一个接口
//因为我们还有个所有人的博客列表页,从那里进入博客详情页也是ok的
.excludePathPatterns("/art/detail")
根据上一步查询的uid查询用户的信息
前端代码
<script>
    // 查询用户的详情信息
            function showUser(id){
                jQuery.ajax({
                    url:"/user/getuserbyid",
                    type:"POST",
                    data:{"id":id},
                    success:function(result){
                        if(result!=null && result.code==200 && result.data.id>0){
                            jQuery("#username").text(result.data.username);
                            jQuery("#artCount").text(result.data.artCount);
                        }else{
                            alert("抱歉:查询用户信息失败,请重试!");
                        }
                    }
                });
            }
</script>
后端代码
//根据id获取用户 UserMapper.java
UserInfo getUserById(@Param("id") Integer id);
#UserMapper.xml中加入SQL语句
<select id="getUserById" resultType="com.example.demo.entity.UserInfo">
        select * from userinfo where id=#{id}
</select>
//UserService.java中加入getUserById方法
public UserInfo getUserById(Integer id){
        return userMapper.getUserById(id);
}
//UserController.java中加入getUserById方法
@RequestMapping("/getuserbyid")
    public AjaxResult getUserById(Integer id){
        if(id==null || id <= 0){
            //无效参数
            return AjaxResult.fail(-1,"非法参数");
        }
        UserInfo userinfo = userService.getUserById(id);
        if(userinfo == null || userinfo.getId() <=0){
            //无效参数
            return AjaxResult.fail(-1,"非法参数");
        }
        //取出userinfo中的敏感信息 密码
        userinfo.setPassword("");
        UserinfoVO userinfoVO = new UserinfoVO();
        BeanUtils.copyProperties(userinfo,userinfoVO);
        //查询当前用户发表的文章数
        userinfoVO.setArtCount(articleService.getArtCountByUid(id));
        return AjaxResult.success(userinfoVO);
    }
!!!注意此处需要在AppConfig.java拦截器中开放一个接口
因为文章列表页针对所有由用户开放
.excludePathPatterns("/user/getuserbyid")请求后端接口实现阅读量+1
实现思路1:
先查询文章的阅读量,然后再+1设置到数据库中
实现思路2:
将两步合二为一,update article set rcount=rcount+1 where id =xxx
前端代码
<script>
    // 阅读量 +1
            function updataRCount(){
                // 先得到文章 id
                var id = getUrlValue("id");
                if(id!=""){
                    jQuery.ajax({
                        url:"/art/incr-rcount",
                        type:"POST",
                        data:{"id":id},
                        success:function(result){}
                    });
                }
            }
            updataRCount();
</script>
后端代码
//ArticleMapper.java中定义incrRCount
int incrRCount(@Param("id") Integer id);
#ArticleMapper.xml中更新SQL语句
<update id="incrRCount">
        update articleinfo set rcount=rcount+1 where id=#{id}
</update>
//ArticleService.java中定义incrRCount方法
public int incrRCount(Integer id){
        return articleMapper.incrRCount(id);
}
//ArticleController.java中定义incrRCount方法
@RequestMapping("/incr-rcount")
    public AjaxResult incrRCount(Integer id){
        if(id != null && id > 0){
            return  AjaxResult.success(articleService.incrRCount(id));
        }
        return AjaxResult.success(-1,"未知错误");
    }
!!!注意此处需要在AppConfig.java拦截器中开放一个接口 否则出现302错误
.excludePathPatterns("/user/incr-rcount")11.增加文章页
前端代码
//blog_add.html
<script>
// 提交
        function mysub(){
            if(confirm("确认提交?")){
                // 1.非空效验
                var title = jQuery("#title");
                if(title.val()==""){
                    alert("请先输入标题!");
                    title.focus();
                    return;
                }
                if(editor.getValue()==""){
                    alert("请先输入文章内容!");
                    return;
                }
                // 2.请求后端进行博客添加操作
                jQuery.ajax({
                    url:"/art/add",
                    type:"POST",
                    data:{"title":title.val(),"content":editor.getValue()},
                    success:function(result){
                        if(result!=null && result.code==200 && result.data==1){
                            if(confirm("恭喜:文章添加成功!是否继续添加文章?")){
                                // 刷新当前页面
                                location.href = location.href;
                            }else{
                                location.href = "/myblog_list.html";
                            }
                        }else{
                            alert("抱歉,文章添加失败,请重试!");
                        }
                    }
                });
            }
</script>
后端代码
//ArticleMapper.java
int add(Articleinfo articleinfo);
#ArticleMapper.xml中添加SQL语句
<insert id="add">
    insert into articleinfo(title,content,uid) values(#{title},#{content},#{uid})
</insert>
//ArticleService.java中定义 add方法
public int add(Articleinfo articleinfo){
        return articleMapper.add(articleinfo);
}
ArticleController.java中定义 add方法
@RequestMapping("/add")
    public AjaxResult add(HttpServletRequest request, Articleinfo articleinfo){
        //1.非空校验
        if(articleinfo == null || !StringUtils.hasLength(articleinfo.getTitle()) ||
                !StringUtils.hasLength(articleinfo.getContent())){
            //非法参数
            return AjaxResult.fail(-1,"非法参数");
        }
        //2.数据库添加操作
        //a.得到当前登陆用户的id
        UserInfo userInfo = UserSessionUtils.getUser(request);
        if(userInfo == null || userInfo.getId() <= 0){
            //无效的登录用户
            return AjaxResult.fail(-2,"无效的登录用户");
        }
        articleinfo.setUid(userInfo.getId());
        //b.添加数据库并返回结果
        return AjaxResult.success(articleService.add(articleinfo));
    }
12.修改文章页
1.得到文章id
2.去后端查询文章的详情信息并设置到页面上
3.进行文章修改操作(调用后台)
得到文章id并将文章详情显示到页面
前端代码
<script>
// 文章初始化
        function initArt(){
            // 得到当前页面 url 中的参数 id(文章id)
            id = getUrlValue("id");
            if(id==""){
                alert("无效参数");
                location.href = "myblog_list.html";
                return;
            }
            // 请求后端,查询文章的详情信息
            jQuery.ajax({
                url:"art/detail",
                type:"POST",
                data:{"id":id},
                success:function(result){
                    if(result!=null && result.code==200){
                        jQuery("#title").val(result.data.title);
                        initEdit(result.data.content);
                    }else{
                        alert("查询失败,请重试!");
                    }
                }
            });
        }
        initArt();
</script>
修改文章
前端代码
<script>
function mysub(){
            // 1.非空效验
            var title = jQuery("#title");
            if(title.val()==""){
                alert("请先输入标题!");
                title.focus();
                return;
            }
            if(editor.getValue()==""){
                alert("请先输入正文!");
                return;
            }
            // 2.进行修改操作
            jQuery.ajax({
                url:"/art/update",
                type:"POST",
                data:{"id":id,"title":title.val(),"content":editor.getValue()},
                success:function(result){
                    if(result!=null && result.code==200 && result.data==1){
                        alert("恭喜:修改成功!");
                        location.href = "myblog_list.html";
                    }else{
                        alert("抱歉:操作失败,请重试!");
                    }
                }
            });
        }
</script>
后端代码
//ArticleMapper.java
int update(Articleinfo articleinfo);
#ArticleMapper.xml中添加SQL语句
<update id="update">
        update articleinfo set title=#{title},content=#{content},updatetime=#{updatetime}
            where id=#{id} and uid=#{uid}
</update>
//ArticleService.java中定义 update方法
public int update(Articleinfo articleinfo){
        return articleMapper.update(articleinfo);
}
//ArticleController.java中定义 update方法
@RequestMapping("/update")
    public AjaxResult update(HttpServletRequest request, Articleinfo articleinfo){
        //1.非空校验
        if(articleinfo == null || !StringUtils.hasLength(articleinfo.getTitle()) ||
                !StringUtils.hasLength(articleinfo.getContent())||
                articleinfo.getId() ==null){
            //非法参数
            return AjaxResult.fail(-1,"非法参数");
        }
        //2.得到当前用户id
        UserInfo userInfo = UserSessionUtils.getUser(request);
        if(userInfo == null && userInfo.getId() == null){
            //无效用户
            return AjaxResult.fail(-2,"无效用户");
        }
        //核心代码!!(解决了修改文章归属人判定的问题)
        articleinfo.setUid(userInfo.getId());
        articleinfo.setUpdatetime(LocalDateTime.now());
        return AjaxResult.success(articleService.update(articleinfo));
    }
13.密码加盐算法
为什么要进行加盐加密?
1.铭文不行,会泄露隐私
2.传统的MD5有规律可循,虽然不可逆,但是有规律可循,可以被暴力破解
【彩虹表:记录了几乎所有字符串的MD5】
3.加盐加密
随机,没有规律可言
加盐实现思路
每次调用方法的时候产生盐值(唯一)+密码 = 最终密码
最终密码还使用MD5加密,但是没关系,此时的MD5没有规律
使用UUID实现唯一密码
解密思路
需要两个密码:
1.需要验证的密码(用户输入的密码)
2.最终加密的密码(存在数据库中的密码)
核心思想:得到盐值 这个盐值会放到最终密码的某个位置
最终密码格式(65位):盐值(32位)$加密后的密码(32位)
难以解密的原因:没有绝对安全的密码,解密者不知道加密的规律,就算你知道我的加盐的密码,但是构造彩虹表是需要时间的,一个密码就需要构建一个彩虹表,但是数据库中有成千上万的彩虹表,破解成本极高
验证密码的伪代码:
已知:用户输入的明文密码、此用户在数据库存储的最终密码=盐值$加密后的密码
1.从最终密码中得到盐值
2.将用户输入的明文密码+盐值进行加密操作=加密后的密码
3.使用 盐值$加密后的密码 生成数据库存储的密码
4.对比生成的最终密码和数据库最终的密码是否相等
如果相等,那么用户名和密码就是对的,反之密码输入错误
后端代码
package com.example.demo.common;

import org.springframework.util.DigestUtils;
import org.springframework.util.StringUtils;

import java.util.UUID;

public class PasswordUtils {
    /**
     * 1.加盐并生成密码
     * @param password 明文密码
     * @return 保存到数据库中的密码
     */
    public static  String encrypt(String password){
        //a.产生盐值(UUID生成的36位,有4位-,因此删去后为32位)
        String salt = UUID.randomUUID().toString().replace("-","");
        //b.生成加盐之后的密码
        String saltPassword = DigestUtils.md5DigestAsHex((salt+password).getBytes());
        //c.生成最终密码(保存到数据库中的密码)【约定:盐值(32位)+$+加密后的密码(32位)】
        String finalPassword = salt + "$" + saltPassword;
        return finalPassword;
    }

    /**
     * 2.生成加盐密码(步骤1的重载)
     * @param password 明文
     * @param salt 固定的盐值
     * @return 最终密码
     */
    public static String encrypt(String password,String salt){
        //a.生成一个加盐后的密码
        String saltPassword = DigestUtils.md5DigestAsHex((salt+password).getBytes());
        //b.生成最终的密码【约定:盐值(32位)+$+加密后的密码(32位)】
        String finalPassword = salt + "$" + saltPassword;
        return finalPassword;
    }

    /**
     * 3.验证密码
     * @param inputPassword 用户输入的明文密码
     * @param finalPassword 数据库保存的最终密码
     * @return
     */
    public static boolean check(String inputPassword,String finalPassword){
        if(StringUtils.hasLength(inputPassword) && StringUtils.hasLength(finalPassword) &&
                finalPassword.length() == 65){
            //a.得到盐值
            String salt = finalPassword.split("\\$")[0];
            //b.使用之前加密的步骤,将明文密码和已经得到的盐值进行加密,生成最终的密码
            String confirmPassword = PasswordUtils.encrypt(inputPassword,salt);
            //c.对比两个最终密码是否相同
            return confirmPassword.equals(finalPassword);
        }
        return false;
    }

/*    public static void main(String[] args) {
        String password = "admin";
        String finalPassword = PasswordUtils.encrypt(password);
        System.out.println("加密" + finalPassword);
        //对比
*//*        String inputPassword = "12345";
        System.out.println("对比 "+ inputPassword
                +"是否等于" + password + "->" +PasswordUtils.check(inputPassword,finalPassword));*//*
        String inputPassword2 = "admin";
        System.out.println("对比 "+ inputPassword2
                +"是否等于" + password + "->" +PasswordUtils.check(inputPassword2,finalPassword));
    }*/
}
测试
public static void main(String[] args) {
        String password = "123456";
        String finalPassword = PasswordUtils.encrypt(password);
        System.out.println("加密" + finalPassword);

        //对比
        String inputPassword = "12345";
        System.out.println("对比 "+ inputPassword
                +"是否等于" + password + "->" +PasswordUtils.check(inputPassword,finalPassword));
        String inputPassword2 = "123456";
        System.out.println("对比 "+ inputPassword2
                +"是否等于" + password + "->" +PasswordUtils.check(inputPassword2,finalPassword));
    }
将数据库明文密码加密
update userinfo set password='12ad512af18f426e8e2248a17d8f2f92$40ffec117f74b4bf2a3fc0a849b7e0db';在UserController.java的login方法中更改
if(password.equals(userInfo.getPassword()))
if(PasswordUtils.check(password,userInfo.getPassword())
在UserController.java的reg方法中更改
//密码加盐处理
userInfo.setPassword(PasswordUtils.encrypt(userInfo.getPassword()));
14.使用Spring Security 进行加盐和验证实现步骤
1.引入Spring Security 框架
<dependency>
            <groupId>org.springframework.boot</groupId>
            <artifactId>spring-boot-starter-security</artifactId>
</dependency>
只用其类库,不用自动注入等功能
2.排除Spring Security自动加载
启动类中加这样一句话
@SpringBootApplication(exclude = {SecurityAutoConfiguration.class})3.调用Spring Security加盐和验证
测试
package com.example.demo;

import org.junit.jupiter.api.Test;
import org.springframework.boot.test.context.SpringBootTest;
import org.springframework.security.crypto.bcrypt.BCryptPasswordEncoder;
import org.springframework.util.DigestUtils;

@SpringBootTest
class DemoApplicationTests {

    @Test
    void contextLoads() {
        BCryptPasswordEncoder passwordEncoder = new BCryptPasswordEncoder();
        String password = "123456";
        String finalPassword = passwordEncoder.encode(password);
        System.out.println("第1次加密:" + finalPassword);
        System.out.println("第2次加密:" + passwordEncoder.encode(password));
        System.out.println("第3次加密:" + passwordEncoder.encode(password));
        // 验证
        String inputPassword = "12345";
        System.out.println("错误密码比对结果:" +
                (passwordEncoder.matches(inputPassword, finalPassword)));
        String inputPassword2 = "123456";
        System.out.println("正确密码比对结果:" +
                (passwordEncoder.matches(inputPassword2, finalPassword)));

    }


/*    public static void main(String[] args) {
        String password = "123456";
        String mdString = DigestUtils.md5DigestAsHex(password.getBytes());
        System.out.println(mdString);
    }*/
}
15.所有博客列表页
分页页面
分页关键实现分析:
前端:当前页面【每页显示条数固定显示最大2条】
后端:当前页码、每页显示最大条数
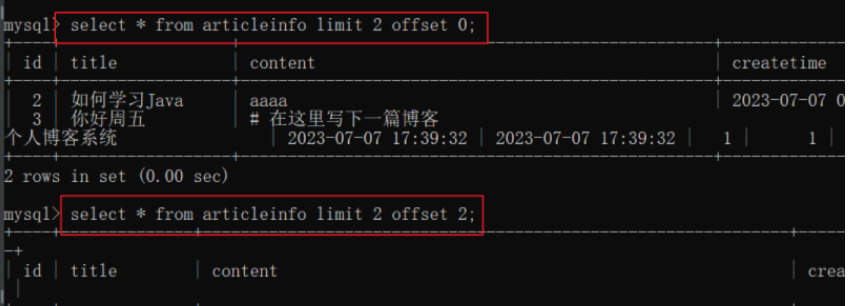
公式:(当前页码n-1)*每页显示最大条数psize =offset
后端代码
//ArticleMapper.java
List<Articleinfo> getListByPage(@Param("psize") Integer psize,
                                    @Param("offsize") Integer offsize);
<select id="getListByPage" resultType="com.example.demo.entity.Articleinfo">
        select * from articleinfo limit #{psize} offset #{offsize}
</select>
单元测试
package com.example.demo.mapper;

import com.example.demo.entity.Articleinfo;
import org.junit.jupiter.api.Test;
import org.springframework.beans.factory.annotation.Autowired;
import org.springframework.boot.test.context.SpringBootTest;

import javax.annotation.Resource;

import java.util.List;

import static org.junit.jupiter.api.Assertions.*;

@SpringBootTest
class ArticleMapperTest {

    @Resource
    private ArticleMapper articleMapper;

    @Test
    void getArtCountByUid() {
        int result = articleMapper.getArtCountByUid(1);
        System.out.println("文章总数: "+result);
    }

    @Test
    void getListByPage() {
        List<Articleinfo> list = articleMapper.getListByPage(3,0);
        System.out.println(list);
        System.out.println("-------------- ");
        List<Articleinfo> list2 = articleMapper.getListByPage(3,3);
        System.out.println(list);
    }
}

//ArticleService.java中定义 getListByPage方法
public List<Articleinfo> getListByPage(Integer psize,Integer offsize){
        return articleMapper.getListByPage(psize,offsize);
    }
//ArticleController.java中定义 getListByPage方法
/**
     *查询列表根据分页
     * @param pindex 当前页码(从1开始)
     * @param psize 每页显示条数
     * @return
     */
    @RequestMapping("/listbypage")
    public AjaxResult getListByPage(Integer pindex, Integer psize){
        //1.参数校正
        if(pindex == null || pindex <= 1){
            pindex = 1;
        }
        if(psize == null || psize <= 1){
            psize = 2;
        }
        //分页公式的值 = (当前页码n-1)*每页显示最大条数psize
        int offsize = (pindex - 1) * psize;
        List<Articleinfo> list = articleService.getListByPage(psize,offsize);
        return AjaxResult.success(list);
    }
前端代码
<!DOCTYPE html>
<html lang="en">
<head>
<meta charset="UTF-8">
<meta http-equiv="X-UA-Compatible" content="IE=edge">
<meta name="viewport" content="width=device-width, initial-scale=1.0">
<title>博客列表</title>
<link rel="stylesheet" href="css/list.css">
<link rel="stylesheet" href="css/blog_list.css">
<style>
.nav{
position: fixed;
top: 0;
left: 0;
right: 0;
height: 50px;
}
.container{
padding-top: 80px;
height: auto;
}
.container-right{
width: auto;
}
.blog-pagnation-wrapper{
height: 40px;
margin: 16px 0;
text-align: center;
}
.blog-pagnation-item{
display: inline-block;
padding: 8px;
border: 1px solid #d0d0d5;
color: #333;
}
.blog-pagnation-item:hover{
background: #4e4eeb;
color: #fff;
}
.blog-pagnation-item.actvie{
background: #4e4eeb;
color: #fff;
}
</style>
<script src="js/jquery.min.js"></script>
<script src="js/common.js"></script>
</head>
<body>
<!-- 导航栏 -->
<div class="nav">
<img src="img/logo2.jpg" alt="">
<span class="title">我的博客系统</span>
<!-- 用来占据中间位置 -->
<span class="spacer"></span>
<a href="blog_list.html">主页</a>
<a href="blog_edit.html">写博客</a>
<a href="login.html">登陆</a>
</div>
<!-- 版心 -->
<div class="container">
<!-- 右侧内容详情 -->
<div class="container-right" style="width: 100%;">
<div id="artListDiv">
</div>
<hr>
<div class="blog-pagnation-wrapper">
<button onclick="goFirstPage()" class="blog-pagnation-item">首页</button>
<button onclick="goBeforePage()" class="blog-pagnation-item">上一页</button>
<button onclick="goNextPage()" class="blog-pagnation-item">下一页</button>
<button onclick="goLastPage()" class="blog-pagnation-item">末页</button>
</div>
</div>
</div>
<script>
// 当前页码
var pindex = 1;
// 每页显示条数
var psize = 2;
// 最大页数
var pcount =1;
// 1.先尝试得到当前 url 中的页码
pindex = (getUrlValue("pindex")==""?1:getUrlValue("pindex"));
// 2.查询后端接口得到当前页面的数据,进行展示
function initPage(){
jQuery.ajax({
url:"/art/listbypage",
type:"POST",
data:{"pindex":pindex,"psize":psize},
success:function(result){
if(result!=null && result.code==200 && result.data.list.length>0){
var artListHtml = "";
for(var i=0;i<result.data.list.length;i++){
var articleinfo = result.data.list[i];
artListHtml +='<div class="blog">';
artListHtml +='<div class="title">'+articleinfo.title+'</div>';
artListHtml +='<div class="date">'+articleinfo.updatetime+'</div>';
artListHtml +='<div class="desc">'+articleinfo.content+'</div>';
artListHtml +='<a href="blog_content.html?id='+ articleinfo.id
+'" class="detail">查看全文 >></a>';
artListHtml +='</div>';
}
jQuery("#artListDiv").html(artListHtml);
pcount = result.data.pcount;
}
}
});
}
initPage();
// 跳转到首页
function goFirstPage(){
if(pindex<=1){
alert("当前已经在首页了");
return;
}
location.href = "blog_list.html";
}
// 点击上一页按钮
function goBeforePage(){
if(pindex<=1){
alert("当前已经在首页了");
return;
}
pindex = parseInt(pindex) -1;
location.href ="blog_list.html?pindex="+pindex;
}
function goNextPage(){
if(pindex>=pcount){
alert("已经在末页了");
return;
}
pindex = parseInt(pindex)+1;
location.href ="blog_list.html?pindex="+pindex;
}
function goLastPage(){
if(pindex>=pcount){
alert("已经在末页了");
return;
}
location.href ="blog_list.html?pindex="+pcount;
}
</script>
</body>
</html>获取文章总条数
后端代码
//ArticleMapper.java
int getCount();
#ArticleMapper.xml
<select id="getCount" resultType="Integer">
        select count(*) from articleinfo;
</select>
//ArticleService.java
public int getCount() {
       return articleMapper.getCount();
}
//ArticleController.java
/**
     *查询列表根据分页
     * @param pindex 当前页码(从1开始)
     * @param psize 每页显示条数
     * @return
     */
    @RequestMapping("/listbypage")
    public AjaxResult getListByPage(Integer pindex, Integer psize){
        //1.参数校正
        if(pindex == null || pindex <= 1){
            pindex = 1;
        }
        if(psize == null || psize <= 1){
            psize = 2;
        }
        //分页公式的值 = (当前页码n-1)*每页显示最大条数psize
        int offsize = (pindex - 1) * psize;
        //文章列表数据
        List<Articleinfo> list = articleService.getListByPage(psize,offsize);
        //当前列表总共多少页
        //a.总共多少条数据
        int totalCount = articleService.getCount();
        //b.总条数/psize(每页显示条数)
        double pcountdb = totalCount / (psize * 1.0);
        //c.使用进一法得到总页数
        int pcount = (int)Math.ceil(pcountdb);
        HashMap<String,Object> result = new HashMap<>();
        result.put("list",list);
        result.put("pcount",pcount);
        return AjaxResult.success(result);
    }