1. 实验目的
- 熟悉静态路由与BFD联动的应用场景
- 掌握静态路由与BFD联动的配置
2. 实验拓扑

想要华为数通配套实验拓扑和配置笔记的朋友们点赞+关注,评论区留下邮箱发给你
3. 实验步骤
1)配置IP地址
AR1的配置
<Huawei>system-view
Enter system view, return user view with Ctrl+Z.
[Huawei]undo info-center enable
Info: Information center is disabled.
[Huawei]sysname AR1
[AR1]interface g0/0/0
[AR1-GigabitEthernet0/0/0]ip address 12.1.1.1 24
[AR1-GigabitEthernet0/0/0]quit
[AR1]interface g0/0/1
[AR1-GigabitEthernet0/0/1]ip address 13.1.1.1 24
[AR1-GigabitEthernet0/0/1]quit
[AR1]interface LoopBack 0
[AR1-LoopBack0]ip address 1.1.1.1 32
[AR1-LoopBack0]quit
AR2的配置
<Huawei>system-view
Enter system view, return user view with Ctrl+Z.
[Huawei]undo info-center enable
Info: Information center is disabled.
[Huawei]sysname AR2
[AR2]interface g0/0/1
[AR2-GigabitEthernet0/0/1]ip address 12.1.1.2 24
[AR2-GigabitEthernet0/0/1]quit
[AR2]interface g0/0/0
[AR2-GigabitEthernet0/0/0]ip address 24.1.1.2 24
[AR2-GigabitEthernet0/0/0]quit
AR3的配置
<Huawei>system-view
Enter system view, return user view with Ctrl+Z.
[Huawei]undo info-center enable
Info: Information center is disabled.
[Huawei]sysname AR3
[AR3]interface g0/0/0
[AR3-GigabitEthernet0/0/0]ip address 13.1.1.3 24
[AR3-GigabitEthernet0/0/0]quit
[AR3]interface g0/0/1
[AR3-GigabitEthernet0/0/1]ip address 34.1.1.3 24
[AR3-GigabitEthernet0/0/1]quit
AR4的配置
<Huawei>system-view
Enter system view, return user view with Ctrl+Z.
[Huawei]undo info-center enable
Info: Information center is disabled.
[Huawei]sysname AR4
[AR4]interface g0/0/1
[AR4-GigabitEthernet0/0/1]ip address 24.1.1.4 24
[AR4-GigabitEthernet0/0/1]quit
[AR4]interface g0/0/0
[AR4-GigabitEthernet0/0/0]ip address 34.1.1.4 24
[AR4-GigabitEthernet0/0/0]quit
[AR4]interface LoopBack 0
[AR4-LoopBack0]ip address 4.4.4.4 32
[AR4-LoopBack0]quit
想要华为数通配套实验拓扑和配置笔记的朋友们点赞+关注,评论区留下邮箱发给你
2)在AR1与AR2之间建立BFD会话,并与静态路由绑定,实现故障快速检测和路径快速收敛。
AR1的配置
[AR1]bfd //全局使能BFD功能,并进入BFD全局视图
[AR1]bfd 102 bind peer-ip 12.1.1.2 interface g0/0/0 //配置一个名字为102的BFD会话,使用12.1.1.2对绑定本端接口g0/0/0接口的单跳链路进行检测
[AR1-bfd-session-102]discriminator local 100 //BFD会话的本地标识符为100
[AR1-bfd-session-102]discriminator remote 200 //BFD会话的远端标识符为200
[AR1-bfd-session-102]commit //提交配置
AR2的配置
[AR2]bfd
[AR2-bfd]quit
[AR2]bfd 201 bind peer-ip 12.1.1.1 interface g0/0/1
[AR2-bfd-session-201]discriminator local 200
[AR2-bfd-session-201]discriminator remote 100
[AR2-bfd-session-201]commit
3)配置静态路由
AR1的配置:
[AR1]ip route-static 4.4.4.4 32 12.1.1.2 track bfd-session 102
[AR1]ip route-static 4.4.4.4 32 13.1.1.3 preference 100
AR2的配置
[AR2]ip route-static 1.1.1.1 32 12.1.1.1
[AR2]ip route-static 4.4.4.4 32 24.1.1.4
AR3的配置
[AR3]ip route-static 1.1.1.1 32 13.1.1.1
[AR3]ip route-static 4.4.4.4 32 34.1.1.4
AR4的配置
[AR4]ip route-static 1.1.1.1 32 24.1.1.2
[AR4]ip route-static 1.1.1.1 32 34.1.1.3
4)实验调试
在AR1上访问4.4.4.4
[AR1]ping -a 1.1.1.1 4.4.4.4
PING 4.4.4.4: 56 data bytes, press CTRL_C to break
Reply from 4.4.4.4: bytes=56 Sequence=1 ttl=254 time=30 ms
Reply from 4.4.4.4: bytes=56 Sequence=2 ttl=254 time=30 ms
Reply from 4.4.4.4: bytes=56 Sequence=3 ttl=254 time=30 ms
Reply from 4.4.4.4: bytes=56 Sequence=4 ttl=254 time=30 ms
Reply from 4.4.4.4: bytes=56 Sequence=5 ttl=254 time=20 ms
--- 4.4.4.4 ping statistics ---
5 packet(s) transmitted
5 packet(s) received
0.00% packet loss
round-trip min/avg/max = 20/28/30 ms
通过以上输出可以看到1.1.1.1可以访问4.4.4.4
在AR1上tracert 4.4.4.4
<AR1>tracert -a 1.1.1.1 4.4.4.4
traceroute to 4.4.4.4(4.4.4.4), max hops: 30 ,packet length: 40,press CTRL_C to break
1 12.1.1.2 40 ms 50 ms 50 ms
2 24.1.1.4 30 ms 30 ms 40 ms
在R2的g0/0/1口抓包查看BFD包文
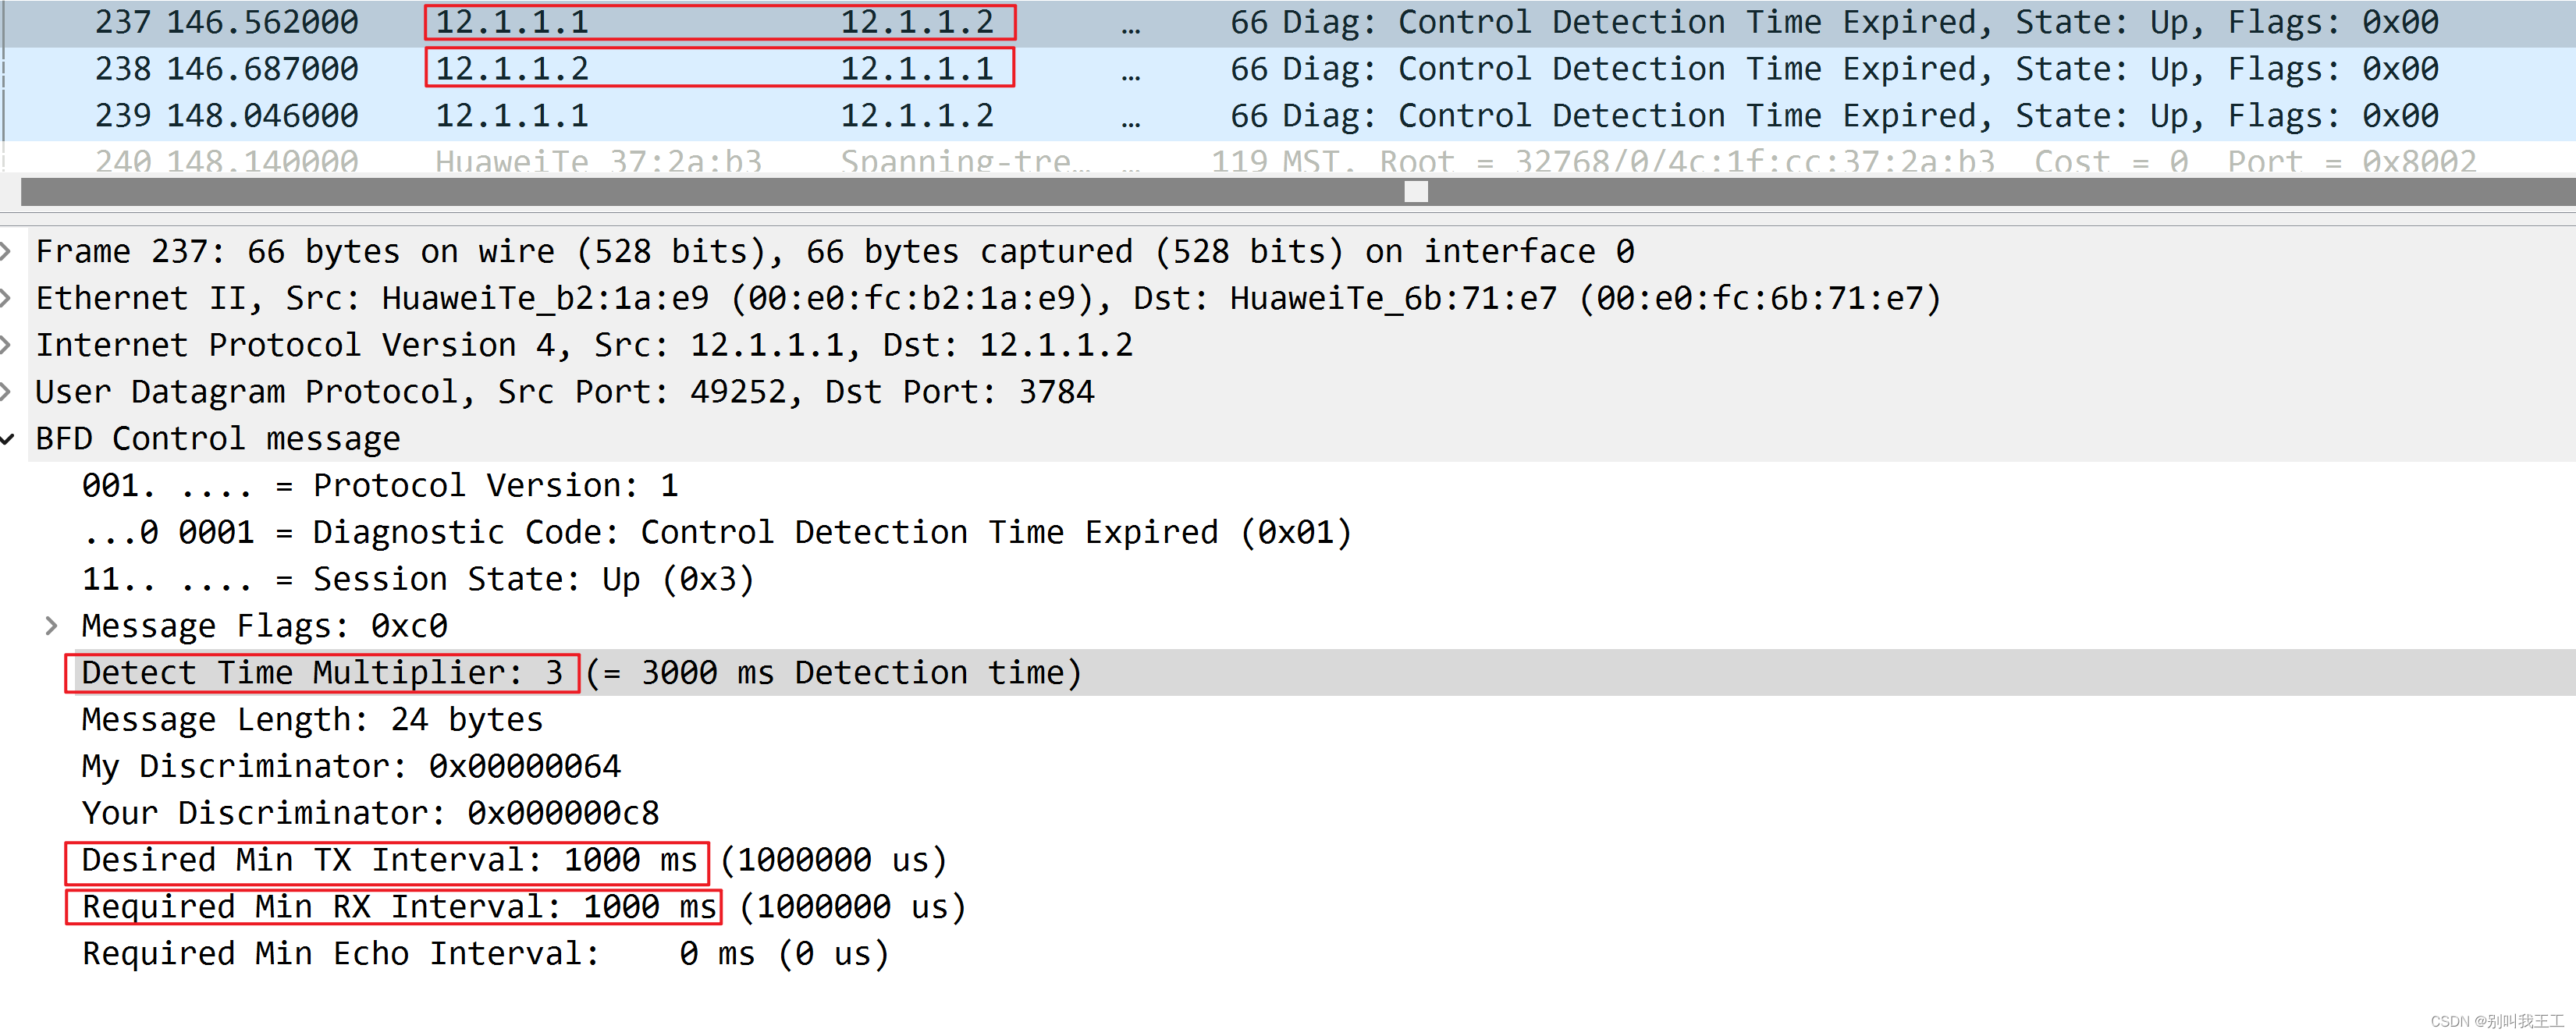
默认情况下:BFD的缺省参数台下:
发送间隔1000毫秒
接收间隔1000毫秒
本地检测倍数3
在AR1上查看BFD信息
[AR1]display bfd session all verbose
----------------------------------------------------------------------------
Session MIndex : 512 (One Hop) State : Up Name : 102 // bfd会话状态为up
----------------------------------------------------------------------------
Local Discriminator : 100 Remote Discriminator : 200
Session Detect Mode : Asynchronous Mode Without Echo Function
BFD Bind Type : Interface(GigabitEthernet0/0/0)
Bind Session Type : Static //静态bfd
Bind Peer IP Address : 12.1.1.2
NextHop Ip Address : 12.1.1.2
Bind Interface : GigabitEthernet0/0/0
FSM Board Id : 0 TOS-EXP : 7
Min Tx Interval (ms) : 1000 Min Rx Interval (ms) : 1000
Actual Tx Interval (ms): 1000 Actual Rx Interval (ms): 1000
Local Detect Multi : 3 Detect Interval (ms) : 3000 //故障检测间隔
Echo Passive : Disable Acl Number : -
Destination Port : 3784 TTL : 255
Proc Interface Status : Disable Process PST : Disable
WTR Interval (ms) : -
Active Multi : 3
Last Local Diagnostic : Control Detection Time Expired
Bind Application : No Application Bind
Session TX TmrID : - Session Detect TmrID : -
Session Init TmrID : - Session WTR TmrID : -
Session Echo Tx TmrID : -
PDT Index : FSM-0 | RCV-0 | IF-0 | TOKEN-0
Session Description : -
----------------------------------------------------------------------------
Total UP/DOWN Session Number : 1/0
关闭AR2的g0/0/1口,然后tracert 4.4.4.4
[AR2]interface g0/0/1
[AR2-GigabitEthernet0/0/1]shutdown
[AR2-GigabitEthernet0/0/1]quit
<AR1>tracert -a 1.1.1.1 4.4.4.4
traceroute to 4.4.4.4(4.4.4.4), max hops: 30 ,packet length: 40,press CTRL_C to break
1 13.1.1.3 30 ms 20 ms 20 ms
2 34.1.1.4 30 ms 40 ms 20 ms
一旦AR1与AR2之间的链路产生了问题,3S就可以切换到另一条链路上去
想要华为数通配套实验拓扑和配置笔记的朋友们点赞+关注,评论区留下邮箱发给你!
