目录
一、Bean注解标记和扫描 (IoC)
二、组件(Bean)作用域和周期方法注解
三、Bean属性赋值:引用类型自动装配 (DI)
四、Bean属性赋值:基本类型属性赋值 (DI)
一、Bean注解标记和扫描 (IoC)
一、注解方式介绍
1.注解介绍
和 XML 配置文件一样,注解本身并不能执行,注解本身仅仅只是做一个标记,具体的功能是框架检测到注解标记的位置,然后针对这个位置按照注解标记的功能来执行具体操作。
本质上:所有一切的操作都是 Java 代码来完成的,XML 和注解只是告诉框架中的 Java 代码如何执行。
2.扫描理解
Spring 为了知道程序员在哪些地方标记了什么注解,就需要通过扫描的方式,来进行检测。然后根据注解进行后续操作。
相关依赖包:
<dependencies>
    <!--spring context依赖-->
    <!--当你引入Spring Context依赖之后,表示将Spring的基础依赖引入了-->
    <dependency>
        <groupId>org.springframework</groupId>
        <artifactId>spring-context</artifactId>
        <version>6.0.6</version>
    </dependency>

    <!--junit5测试-->
    <dependency>
        <groupId>org.junit.jupiter</groupId>
        <artifactId>junit-jupiter-api</artifactId>
        <version>5.3.1</version>
    </dependency>
</dependencies>
注解方式
Spring 提供了以下多个注解,这些注解可以直接标注在 Java 类上,将它们定义成 Spring Bean。
| 注解 | 说明 |
|---|---|
| @Component | 该注解用于描述 Spring 中的 Bean,它是一个泛化的概念,仅仅表示容器中的一个组件(Bean),并且可以作用在应用的任何层次,例如 Service 层、Dao 层等。 使用时只需将该注解标注在相应类上即可。 |
| @Repository | 该注解用于将数据访问层(Dao 层)的类标识为 Spring 中的 Bean,其功能与 @Component 相同。 |
| @Service | 该注解通常作用在业务层(Service 层),用于将业务层的类标识为 Spring 中的 Bean,其功能与 @Component 相同。 |
| @Controller | 该注解通常作用在控制层(如SpringMVC 的 Controller),用于将控制层的类标识为 Spring 中的 Bean,其功能与 @Component 相同。 |
对于Spring使用IOC容器管理这些组件来说没有区别,也就是语法层面没有区别。所以@Controller、@Service、@Repository这三个注解只是给开发人员看的,让我们能够便于分辨组件的作用。
注意:虽然它们本质上一样,但是为了代码的可读性、程序结构严谨!我们肯定不能随便胡乱标记。
使用案例(省略xml配置):
package com.alphamilk;

import org.springframework.stereotype.Component;

@Component(value = "common")
public class CommonComponent {

}
package com.alphamilk;
import org.junit.jupiter.api.Test;
import org.springframework.context.support.ClassPathXmlApplicationContext;
public class test {
@Test
public void Test(){
// 创建Ioc容器
ClassPathXmlApplicationContext classPathXmlApplicationContext = new ClassPathXmlApplicationContext("Spring.xml");
// 获取组件
CommonComponent commonCompent = (CommonComponent) classPathXmlApplicationContext.getBean("common");
// 输出组件
System.out.println(commonCompent);
}
}

二、配置文件介绍
配置文件范围
1.普通配置扫描包
<?xml version="1.0" encoding="UTF-8"?>
<beans xmlns="http://www.springframework.org/schema/beans"
       xmlns:xsi="http://www.w3.org/2001/XMLSchema-instance"
       xmlns:context="http://www.springframework.org/schema/context"
       xsi:schemaLocation="http://www.springframework.org/schema/beans http://www.springframework.org/schema/beans/spring-beans.xsd http://www.springframework.org/schema/context https://www.springframework.org/schema/context/spring-context.xsd">
    <!-- 配置自动扫描的包 -->
    <!-- 1.包要精准,提高性能!
         2.会扫描指定的包和子包内容
         3.多个包可以使用,分割 例如: com.atguigu.controller,com.atguigu.service等
    -->
    <context:component-scan base-package="com.atguigu.components"/>

</beans>
2.指定包,但是排除注解
<?xml version="1.0" encoding="UTF-8"?>
<beans xmlns="http://www.springframework.org/schema/beans"
       xmlns:xsi="http://www.w3.org/2001/XMLSchema-instance"
       xmlns:context="http://www.springframework.org/schema/context"
       xsi:schemaLocation="http://www.springframework.org/schema/beans http://www.springframework.org/schema/beans/spring-beans.xsd http://www.springframework.org/schema/context https://www.springframework.org/schema/context/spring-context.xsd">

    <!-- context:exclude-filter标签:指定排除规则 -->
    <!-- type属性:指定根据什么来进行排除,annotation取值表示根据注解来排除 -->
    <!-- expression属性:指定排除规则的表达式,对于注解来说指定全类名即可 -->
    <context:component-scan base-package="com.alphamilk" >
        <context:exclude-filter type="annotation" expression="org.springframework.stereotype.Component"/>
    </context:component-scan>
</beans>
3.指定包,包含注解
<?xml version="1.0" encoding="UTF-8"?>
<beans xmlns="http://www.springframework.org/schema/beans"
       xmlns:xsi="http://www.w3.org/2001/XMLSchema-instance"
       xmlns:context="http://www.springframework.org/schema/context"
       xsi:schemaLocation="http://www.springframework.org/schema/beans http://www.springframework.org/schema/beans/spring-beans.xsd http://www.springframework.org/schema/context https://www.springframework.org/schema/context/spring-context.xsd">
    <!-- 仅扫描 = 关闭默认规则 + 追加规则 -->
    <!-- use-default-filters属性:取值false表示关闭默认扫描规则 -->
    <context:component-scan base-package="com.alphamilk" use-default-filters="false">
        <context:include-filter type="annotation" expression="org.springframework.stereotype.Component"/>
    </context:component-scan>
</beans>
组件BeanName问题
在我们使用 XML 方式管理 bean 的时候,每个 bean 都有一个唯一标识——id 属性的值,便于在其他地方引用。现在使用注解后,每个组件仍然应该有一个唯一标识。
默认情况:
类名首字母小写就是 bean 的 id。例如:SoldierController 类对应的 bean 的 id 就是 soldierController。
使用value属性指定名字
总结
- 注解方式IoC只是标记哪些类要被Spring管理
- 最终,我们还需要XML方式或者后面讲解Java配置类方式指定注解生效的包
- **现阶段配置方式为 注解 (标记)+ XML(扫描)
二、组件(Bean)作用域和周期方法注解
一、周期方法:
1.1周期方法概念
我们可以在组件类中定义方法,然后当IoC容器实例化和销毁组件对象的时候进行调用!这两个方法我们成为生命周期方法!
类似于Servlet的init/destroy方法,我们可以在周期方法完成初始化和释放资源等工作。
1.2周期方法声明
public class BeanOne {

  //周期方法要求: 方法命名随意,但是要求方法必须是 public void 无形参列表
  @PostConstruct  //注解制指定初始化方法
  public void init() {
    // 初始化逻辑
  }
}
public class BeanTwo {

  @PreDestroy //注解指定销毁方法
  public void cleanup() {
    // 释放资源逻辑
  }
}
二、组件作用域配置
1.1 Bean作用域概念
<bean 标签声明Bean,只是将Bean的信息配置给SpringIoC容器!
在IoC容器中,这些<bean标签对应的信息转成Spring内部 BeanDefinition 对象,BeanDefinition 对象内,包含定义的信息(id,class,属性等等)!
这意味着,BeanDefinition与类概念一样,SpringIoC容器可以可以根据BeanDefinition对象反射创建多个Bean对象实例。
具体创建多少个Bean的实例对象,由Bean的作用域Scope属性指定!
1.2 作用域可选值
| 取值 | 含义 | 创建对象的时机 | 默认值 |
|---|---|---|---|
| singleton | 在 IOC 容器中,这个 bean 的对象始终为单实例 | IOC 容器初始化时 | 是 |
| prototype | 这个 bean 在 IOC 容器中有多个实例 | 获取 bean 时 | 否 |
在WebApplicationContext中较为特殊,其scope多了两个取值
| 取值 | 含义 | 创建对象的时机 | 默认值 |
|---|---|---|---|
| request | 请求范围内有效的实例 | 每次请求 | 否 |
| session | 会话范围内有效的实例 | 每次会话 | 否 |
作用域配置
//以下二选一
@Scope(scopeName = ConfigurableBeanFactory.SCOPE_SINGLETON)//默认单例模式
@Scope(scopeName = ConfigurableBeanFactory.SCOPE_PROTOTYPE)//多例模式
@Component(value = "common")
public class CommonComponent {

    @PostConstruct
    public void init(){
        System.out.println("通过注解@PostConstruct执行初始化阶段");
    }
    @PreDestroy
    public void destory(){
        System.out.println("通过注解@PreDestroy注解实现销毁阶段执行");
    };
}
注意:在多例模式下,组件只会调用@PostConstruct init初始化生命周期,无法调用@PreDestroy实现的销毁生命周期
三、Bean属性赋值:引用类型自动装配 (DI)
设定场景
-
SoldierController 需要 SoldierService
-
SoldierService 需要 SoldierDao
-
同时在各个组件中声明要调用的方法。
SoldierController中声明方法
package com.alphamilk.Ioc3;

import org.springframework.beans.factory.annotation.Autowired;
import org.springframework.stereotype.Controller;

@Controller(value = "tianDog")
public class SoldierController {
// 相当于xml配置中<property 对应组件的装配
    //自动装配注解(DI) :1.ioc容器中查找符合类型的组件对象 2.设置给当前属性(di)
    @Autowired
    private SoldierService soldierService;

    public void getMessage() {
        soldierService.getMessage();
    }

}
自动装配实现
-
前提
参与自动装配的组件(需要装配、被装配)全部都必须在IoC容器中。
注意:不区分IoC的方式!XML和注解都可以!
-
@Autowired注解
在成员变量上直接标记@Autowired注解即可,不需要提供setXxx()方法。以后我们在项目中的正式用法就是这样。
自动装配流程
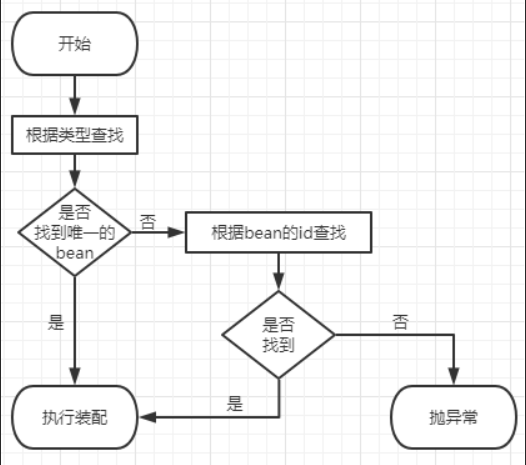
佛系装配
给 @Autowired 注解设置 required = false 属性表示:能装就装,装不上就不装。但是实际开发时,基本上所有需要装配组件的地方都是必须装配的,用不上这个属性。
@Controller(value = "tianDog")
public class SoldierController {

    // 给@Autowired注解设置required = false属性表示:能装就装,装不上就不装
    @Autowired(required = false)
    private ISoldierService soldierService;
不推荐佛系装配,如果调用组件时候佛系装配没有内容,则会报空指针异常。
自动装配的三种场景
-
ioc容器中有一个接口对应的实现类对象时,可以直接进行正常调用。
-
当ioc容器中没有默认类型的bean时,可以通过@Autowired注解进行装配。默认情况下,至少要求存在一个与被注入类型匹配的bean,否则会报错。另外,也可以使用@Qualifier注解指定具体的bean进行装配。
-
当同一个类型存在多个对应的组件时,自动装配@Autowired也会报错,无法确定选择哪个bean。
-
解决方案1:可以通过在成员属性上使用@Qualifier注解,并指定需要装配的bean的id。此时,@Autowired会根据成员属性名进行查找并装配对应的bean。
-
解决方案2:可以结合@Autowired和@Qualifier注解的使用,通过@Qualifier(value = "beanId")指定获取特定的bean进行装配。注意,@Qualifier注解必须与@Autowired注解一起使用。
优化:如果觉得@AutoWired和@Qualifier一起使用非常麻烦,也可以使用 @Resource(name)的方式实现同样的效果。
四、Bean属性赋值:基本类型属性赋值 (DI)
对于基本类型属性的赋值有两种方式
1.直接赋值
2.通过@Value标签赋值
package ioc04;

import org.springframework.beans.factory.annotation.Value;
import org.springframework.stereotype.Component;

@Component
public class JavaBean {
//    方案1:直接赋值
    private String name = "黄飞宏";
    private  int age =19;
//    通过注解配置
    @Value("翻斗大街翻斗花园,翻斗小区一号")
    private String Adress;
}



![[matlab]matlab配置mingw64编译器](https://img-blog.csdnimg.cn/670dca82206f4d4e9a3ce799b27ab248.png)
