1、背景介绍
项目需要在系统下预留一段连续物理地址空间供FPGA启动DMA直接写入,这样提高读写带宽。目前有两种方式可以实现该需求。
注意:前提是操作系统将内存空间访问权限全部放开,否则无法预留空间。
2、实现方法
方式一:
直接修改grub.cfg,添加memmap参数从内存的物理地址开始预留需要的空间,如下:
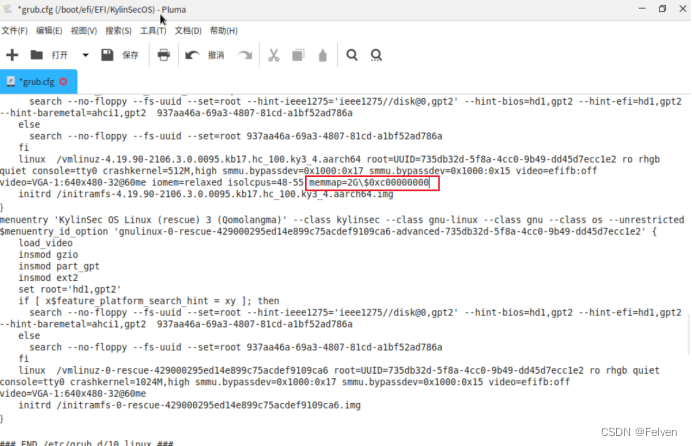
上图中圈出来的0xc00000000这段内存地址是BIOS里面配置的,八通道32G的FT2000+内存物理地址分配如下:
	memory@0 {
		device_type = "memory";
		reg = <0x000 0x00000000 0x002 0x00000000>;
		numa-node-id = <0>;
	};

	memory@1 {
		device_type = "memory";
		reg = <0x002 0x00000000 0x002 0x00000000>;
		numa-node-id = <1>;
	};

	memory@2 {
		device_type = "memory";
		reg = <0x004 0x00000000 0x002 0x00000000>;
		numa-node-id = <2>;
	};

	memory@3 {
		device_type = "memory";
		reg = <0x006 0x00000000 0x002 0x00000000>;
		numa-node-id = <3>;
	};

	memory@4 {
		device_type = "memory";
		reg = <0x008 0x00000000 0x002 0x00000000>;
		numa-node-id = <4>;
	};

	memory@5 {
		device_type = "memory";
		reg = <0x00A 0x00000000 0x002 0x00000000>;
		numa-node-id = <5>;
	};

	memory@6 {
		device_type = "memory";
		reg = <0x00C 0x00000000 0x002 0x00000000>;
		numa-node-id = <6>;
	};

	memory@7 {
		device_type = "memory";
		reg = <0x00E 0x00000000 0x002 0x00000000>;
		numa-node-id = <7>;
	};
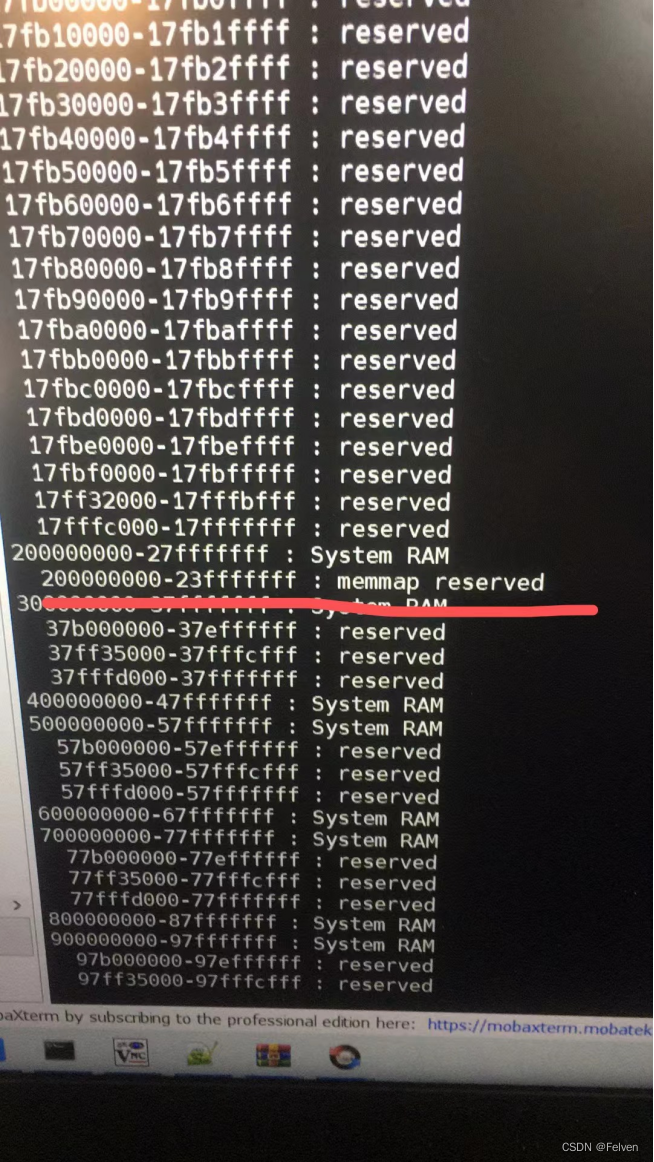
重启后通过cat /proc/iomem就能查看是否预留成功,成功会有显示
注:下图只是示例,不是预留的0xc00000000这个地址
方式一的优点:在操作系统启动阶段就预留好,每次都能预留成功,方法简单
缺点:这段内存无法被系统识别,应用只能通过devmem方式去使用,无法使用malloc等其他方式分配使用,浪费空间。
方式二:
采用cma方式预留,bios中需要首先预留一段内存空间,并添加一个cma设备,地址、大小都需要指定好
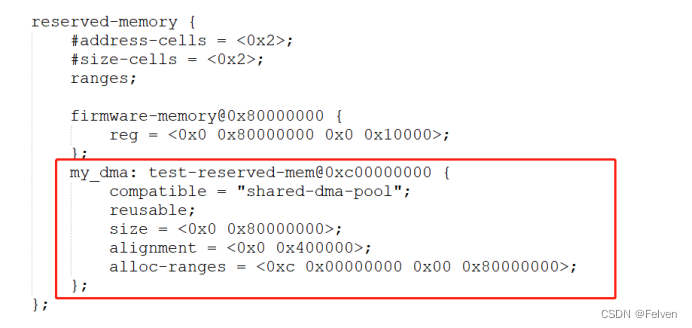
添加设备
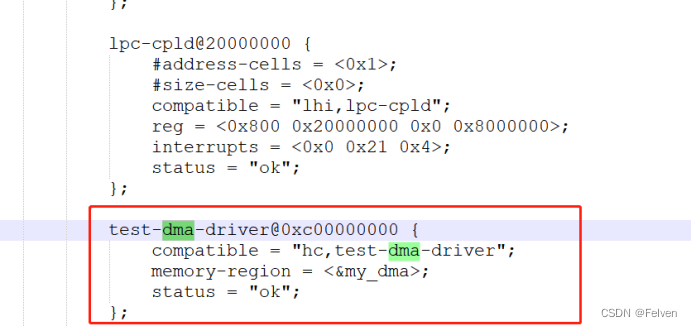
这么做的目的就是让cma分配空间时从预留的这段内存中去分配。
然后添加驱动程序,上电加载驱动,代码如下,驱动中可以修改预留大小
#include <linux/types.h>
#include <linux/module.h>
#include <linux/init.h>
#include <linux/platform_device.h>
#include <linux/of.h>
#include <linux/of_device.h>
#include <linux/device.h>
#include <asm/io.h>
#include <linux/io.h>
#include <linux/kernel.h>
#include <linux/spinlock.h>
#include <linux/of_gpio.h>
#include <linux/of_address.h>
#include <linux/of_irq.h>
#include <linux/of_platform.h>
#include <linux/types.h>
#include <linux/delay.h>
#include <linux/fs.h>
#include <linux/uaccess.h>
#include <linux/spinlock.h>
#include <linux/poll.h>
#include <linux/of_reserved_mem.h>
#include <linux/dma-mapping.h>

#define ALLOC_SIZE (2048*1024*1024UL) //分配大小设置

dma_addr_t dma_phy_addr = 0;
unsigned int *buffer = NULL;
static struct device *mdev;

static int test_dma_probe(struct platform_device *pdev)
{
	int ret;

	printk("into test_dma_probe\n");
	mdev = &pdev->dev;

	dma_set_mask_and_coherent(&pdev->dev, DMA_BIT_MASK(64));
    ret = of_reserved_mem_device_init(&pdev->dev);
	if (ret) {
		printk("test_dma_probe of_reserved_mem_device_init err: %d\n", ret);
		return 0;
	}

	buffer = dma_alloc_coherent(&pdev->dev, ALLOC_SIZE, &dma_phy_addr, GFP_KERNEL);
	if (!buffer) {
		dev_err(&pdev->dev, "dma_alloc_coherent buffer allocation failed\n");
		return 0;
	}

	printk("dma_phy_addr=%llx\n", dma_phy_addr);
	printk("dma_phy_addr=%p\n", buffer);


    return 0;
}


static const struct of_device_id test_of_match[] = {
    { .compatible = "hc,test-dma-driver"},
    {}
};
MODULE_DEVICE_TABLE(of, test_of_match);

static struct platform_driver test_dma_driver = {
	.driver		= {
		.name	= "test_dma_mem",
                .of_match_table = of_match_ptr(test_of_match),
        },
	.probe		= test_dma_probe,
};


static int __init test_dma_init(void)
{
    int ret;

    ret = platform_driver_register(&test_dma_driver);
    if (ret)
    {
        pr_info("platform_driver_register fail\n");
        return 0;
    }

    pr_info("platform_driver_register success 0x%x \n",ret);
 	return 0;

}

static void __exit test_dma_exit(void)
{
	if (dma_phy_addr) {
		printk("--free dma mem\n");
		dma_free_coherent(mdev, ALLOC_SIZE, buffer, dma_phy_addr);
	}

	platform_driver_unregister(&test_dma_driver);
    printk("dma test exit successed\n");
}

module_init(test_dma_init);
module_exit(test_dma_exit);

MODULE_AUTHOR("test");
MODULE_DESCRIPTION("test dma driver");
MODULE_LICENSE("GPL");
Makefile如下:
# SPDX-License-Identifier: GPL-2.0

obj-m	+=test-dma-driver.o

KDIR=/lib/modules/$(shell uname -r)/build

all:
	make -C $(KDIR) M=$(PWD) modules

clean:
	make -C $(KDIR) M=$(PWD) clean
系统启动后能看到这里是reserved内存空间
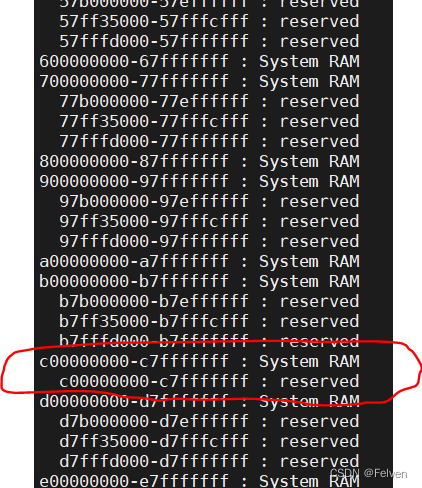

驱动加载之后能看到预留成功


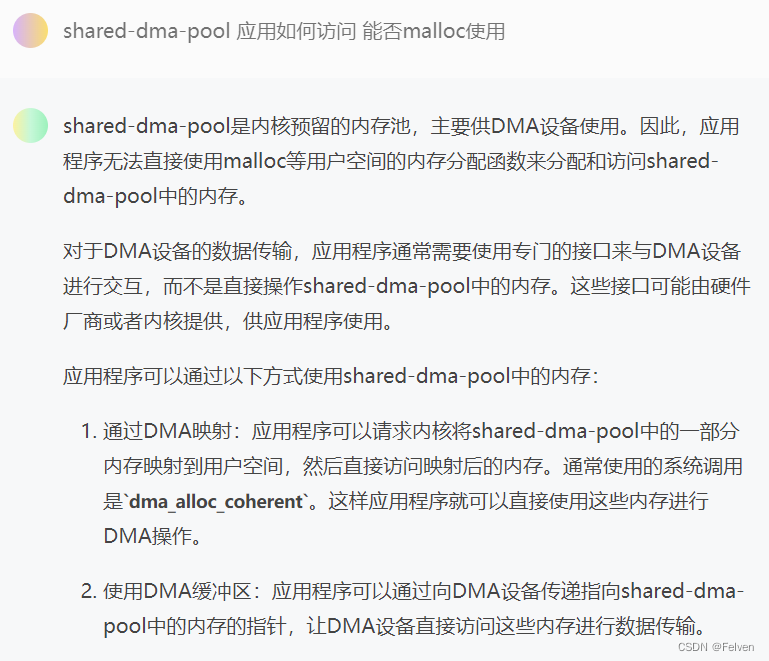
方式二的优点:cma方式如果不加载驱动那就不会预留空间,这样就避免内存浪费,虽然无法使用malloc方式访问,但可以用dma方式访问,如下:
同时用户可以通过脚本的方式在系统启动后这个阶段来指定哪些设备需要加载驱动,哪些不需要加载驱动,比较灵活,不像方式一那样是系统启动过程中预留,必须要修改启动文件才能修改
缺点:需要在bios的设备树中指定分配的起始地址和大小,如果换了地址就需要更改bios


