[oneAPI] 基于BERT预训练模型的英文文本蕴含任务
- Intel® DevCloud for oneAPI 和 Intel® Optimization for PyTorch
- 基于BERT预训练模型的英文文本蕴含任务
- 语料介绍
- 数据集构建
- 模型训练
- 结果
- 参考资料
比赛:https://marketing.csdn.net/p/f3e44fbfe46c465f4d9d6c23e38e0517
Intel® DevCloud for oneAPI:https://devcloud.intel.com/oneapi/get_started/aiAnalyticsToolkitSamples/
Intel® DevCloud for oneAPI 和 Intel® Optimization for PyTorch
我们在Intel® DevCloud for oneAPI平台上构建了我们的实验环境,充分利用了其完全虚拟化的特性,使我们能够专注于模型的开发和优化,无需烦心底层环境的配置和维护。为了进一步提升我们的实验效果,我们充分利用了Intel® Optimization for PyTorch,将其应用于我们的PyTorch模型中,从而实现了高效的优化。

基于BERT预训练模型的英文文本蕴含任务
自然语言推理(简称NLI)是自然语言处理领域的一个重要任务,而多种文本蕴含(Textual Entailment)是其一个具体的子任务。MNLI(MultiNLI)是一个广泛使用的NLI数据集,旨在评估模型对于文本蕴含关系的理解能力。
在MNLI任务中,给定一个前提句子(premise)和一个假设句子(hypothesis),模型需要判断假设句子是否可以从前提句子中推断出来。这涉及到三种类别的关系:蕴含(entailment)、中性(neutral)和矛盾(contradiction)。例如,对于前提句子 “A cat is sitting on the couch.” 和假设句子 “A cat is on a piece of furniture.”,模型应该判断这两个句子之间的关系是蕴含。
MNLI的任务设计具有挑战性,要求模型不仅仅理解句子的字面含义,还需要进行逻辑推理和上下文理解。解决MNLI任务对于构建具有深层次语义理解能力的自然语言处理模型具有重要意义,可以应用于问答系统、文本理解和语义推理等领域。
基于BERT的文本蕴含(文本对分类)任务实质上是对一个文本序列进行分类。只是按照BERT模型的思想,文本对分类任务在数据集的构建过程中需要通过Segment Embedding来区分前后两个不同的序列。换句话说,与普通的单文本分类任务相比,文本对的分类任务在构建模型输入上发生了变换。
语料介绍
在这里,我们使用到的是论文中所提到的MNLI(The Multi-Genre Natural Language Inference Corpus, 多类型自然语言推理数据库)自然语言推断任务数据集。也就是给定前提(premise)语句和假设(hypothesis)语句,任务是预测前提语句是否包含假设(蕴含, entailment),与假设矛盾(矛盾,contradiction)或者两者都不(中立,neutral)。
{"annotator_labels": ["entailment", "neutral", "entailment", "neutral", "entailment"], "genre": "oup", "gold_label": "entailment", "pairID": "82890e", "promptID": "82890", "sentence1": " From Home Work to Modern Manufacture", "sentence1_binary_parse": "( From ( ( Home Work ) ( to ( Modern Manufacture ) ) ) )", "sentence1_parse": "(ROOT (PP (IN From) (NP (NP (NNP Home) (NNP Work)) (PP (TO to) (NP (NNP Modern) (NNP Manufacture))))))", "sentence2": "Modern manufacturing has changed over time.", "sentence2_binary_parse": "( ( Modern manufacturing ) ( ( has ( changed ( over time ) ) ) . ) )", "sentence2_parse": "(ROOT (S (NP (NNP Modern) (NN manufacturing)) (VP (VBZ has) (VP (VBN changed) (PP (IN over) (NP (NN time))))) (. .)))" }
{"annotator_labels": ["neutral", "neutral", "entailment", "neutral", "neutral"], "genre": "nineeleven", "gold_label": "neutral", "pairID": "16525n", "promptID": "16525", "sentence1": "They were promptly executed.", "sentence1_binary_parse": "( They ( ( were ( promptly executed ) ) . ) )", "sentence1_parse": "(ROOT (S (NP (PRP They)) (VP (VBD were) (VP (ADVP (RB promptly)) (VBN executed))) (. .)))", "sentence2": "They were executed immediately upon capture.", "sentence2_binary_parse": "( They ( ( were ( ( executed immediately ) ( upon capture ) ) ) . ) )", "sentence2_parse": "(ROOT (S (NP (PRP They)) (VP (VBD were) (VP (VBN executed) (ADVP (RB immediately)) (PP (IN upon) (NP (NN capture))))) (. .)))"}
由于该数据集同时也可用于其它任务中,因此除了我们需要的前提和假设两个句子和标签之外,还有每个句子的语法解析结构等等。在这里,下载完成数据后只需要执行项目中的format.py脚本即可将原始数据划分成训练集、验证集和测试集。格式化后的数据形式如下所示:
From Home Work to Modern Manufacture_!_Modern manufacturing has changed over time._!_1
They were promptly executed._!_They were executed immediately upon capture._!_2
数据集构建
定义一个类,并在类的初始化过程中根据训练语料完成字典的构建等工作
class LoadSingleSentenceClassificationDataset:
    def __init__(self,
                 vocab_path='./vocab.txt',  #
                 tokenizer=None,
                 batch_size=32,
                 max_sen_len=None,
                 split_sep='\n',
                 max_position_embeddings=512,
                 pad_index=0,
                 is_sample_shuffle=True
                 ):

        """

        :param vocab_path: 本地词表vocab.txt的路径
        :param tokenizer:
        :param batch_size:
        :param max_sen_len: 在对每个batch进行处理时的配置;
                            当max_sen_len = None时,即以每个batch中最长样本长度为标准,对其它进行padding
                            当max_sen_len = 'same'时,以整个数据集中最长样本为标准,对其它进行padding
                            当max_sen_len = 50, 表示以某个固定长度符样本进行padding,多余的截掉;
        :param split_sep: 文本和标签之前的分隔符,默认为'\t'
        :param max_position_embeddings: 指定最大样本长度,超过这个长度的部分将本截取掉
        :param is_sample_shuffle: 是否打乱训练集样本(只针对训练集)
                在后续构造DataLoader时,验证集和测试集均指定为了固定顺序(即不进行打乱),修改程序时请勿进行打乱
                因为当shuffle为True时,每次通过for循环遍历data_iter时样本的顺序都不一样,这会导致在模型预测时
                返回的标签顺序与原始的顺序不一样,不方便处理。

        """
        self.tokenizer = tokenizer
        self.vocab = build_vocab(vocab_path)
        self.PAD_IDX = pad_index
        self.SEP_IDX = self.vocab['[SEP]']
        self.CLS_IDX = self.vocab['[CLS]']
        # self.UNK_IDX = '[UNK]'

        self.batch_size = batch_size
        self.split_sep = split_sep
        self.max_position_embeddings = max_position_embeddings
        if isinstance(max_sen_len, int) and max_sen_len > max_position_embeddings:
            max_sen_len = max_position_embeddings
        self.max_sen_len = max_sen_len
        self.is_sample_shuffle = is_sample_shuffle

    @cache
    def data_process(self, filepath, postfix='cache'):
        """
        将每一句话中的每一个词根据字典转换成索引的形式,同时返回所有样本中最长样本的长度
        :param filepath: 数据集路径
        :return:
        """
        raw_iter = open(filepath, encoding="utf8").readlines()
        data = []
        max_len = 0
        for raw in tqdm(raw_iter, ncols=80):
            line = raw.rstrip("\n").split(self.split_sep)
            s, l = line[0], line[1]
            tmp = [self.CLS_IDX] + [self.vocab[token] for token in self.tokenizer(s)]
            if len(tmp) > self.max_position_embeddings - 1:
                tmp = tmp[:self.max_position_embeddings - 1]  # BERT预训练模型只取前512个字符
            tmp += [self.SEP_IDX]
            tensor_ = torch.tensor(tmp, dtype=torch.long)
            l = torch.tensor(int(l), dtype=torch.long)
            max_len = max(max_len, tensor_.size(0))
            data.append((tensor_, l))
        return data, max_len

    def load_train_val_test_data(self, train_file_path=None,
                                 val_file_path=None,
                                 test_file_path=None,
                                 only_test=False):
        postfix = str(self.max_sen_len)
        test_data, _ = self.data_process(filepath=test_file_path, postfix=postfix)
        test_iter = DataLoader(test_data, batch_size=self.batch_size,
                               shuffle=False, collate_fn=self.generate_batch)
        if only_test:
            return test_iter
        train_data, max_sen_len = self.data_process(filepath=train_file_path,
                                                    postfix=postfix)  # 得到处理好的所有样本
        if self.max_sen_len == 'same':
            self.max_sen_len = max_sen_len
        val_data, _ = self.data_process(filepath=val_file_path,
                                        postfix=postfix)
        train_iter = DataLoader(train_data, batch_size=self.batch_size,  # 构造DataLoader
                                shuffle=self.is_sample_shuffle, collate_fn=self.generate_batch)
        val_iter = DataLoader(val_data, batch_size=self.batch_size,
                              shuffle=False, collate_fn=self.generate_batch)
        return train_iter, test_iter, val_iter

    def generate_batch(self, data_batch):
        batch_sentence, batch_label = [], []
        for (sen, label) in data_batch:  # 开始对一个batch中的每一个样本进行处理。
            batch_sentence.append(sen)
            batch_label.append(label)
        batch_sentence = pad_sequence(batch_sentence,  # [batch_size,max_len]
                                      padding_value=self.PAD_IDX,
                                      batch_first=False,
                                      max_len=self.max_sen_len)
        batch_label = torch.tensor(batch_label, dtype=torch.long)
        return batch_sentence, batch_label


class LoadPairSentenceClassificationDataset(LoadSingleSentenceClassificationDataset):
    def __init__(self, **kwargs):
        super(LoadPairSentenceClassificationDataset, self).__init__(**kwargs)
        pass

    @cache
    def data_process(self, filepath, postfix='cache'):
        """
        将每一句话中的每一个词根据字典转换成索引的形式,同时返回所有样本中最长样本的长度
        :param filepath: 数据集路径
        :return:
        """
        raw_iter = open(filepath).readlines()
        data = []
        max_len = 0
        for raw in tqdm(raw_iter, ncols=80):
            line = raw.rstrip("\n").split(self.split_sep)
            s1, s2, l = line[0], line[1], line[2]
            token1 = [self.vocab[token] for token in self.tokenizer(s1)]
            token2 = [self.vocab[token] for token in self.tokenizer(s2)]
            tmp = [self.CLS_IDX] + token1 + [self.SEP_IDX] + token2
            if len(tmp) > self.max_position_embeddings - 1:
                tmp = tmp[:self.max_position_embeddings - 1]  # BERT预训练模型只取前512个字符
            tmp += [self.SEP_IDX]
            seg1 = [0] * (len(token1) + 2)  # 2 表示[CLS]和中间的[SEP]这两个字符
            seg2 = [1] * (len(tmp) - len(seg1))
            segs = torch.tensor(seg1 + seg2, dtype=torch.long)
            tensor_ = torch.tensor(tmp, dtype=torch.long)
            l = torch.tensor(int(l), dtype=torch.long)
            max_len = max(max_len, tensor_.size(0))
            data.append((tensor_, segs, l))
        return data, max_len

    def generate_batch(self, data_batch):
        batch_sentence, batch_seg, batch_label = [], [], []
        for (sen, seg, label) in data_batch:  # 开始对一个batch中的每一个样本进行处理。
            batch_sentence.append(sen)
            batch_seg.append((seg))
            batch_label.append(label)
        batch_sentence = pad_sequence(batch_sentence,  # [batch_size,max_len]
                                      padding_value=self.PAD_IDX,
                                      batch_first=False,
                                      max_len=self.max_sen_len)  # [max_len,batch_size]
        batch_seg = pad_sequence(batch_seg,  # [batch_size,max_len]
                                 padding_value=self.PAD_IDX,
                                 batch_first=False,
                                 max_len=self.max_sen_len)  # [max_len, batch_size]
        batch_label = torch.tensor(batch_label, dtype=torch.long)
        return batch_sentence, batch_seg, batch_label
模型训练
TaskForPairSentenceClassification的模块来完成分类模型的微调训练任务。
首先,我们需要定义一个ModelConfig类来对分类模型中的超参数进行管理,代码如下所示:
class BertConfig(object):
    """Configuration for `BertModel`."""

    def __init__(self,
                 vocab_size=21128,
                 hidden_size=768,
                 num_hidden_layers=12,
                 num_attention_heads=12,
                 intermediate_size=3072,
                 pad_token_id=0,
                 hidden_act="gelu",
                 hidden_dropout_prob=0.1,
                 attention_probs_dropout_prob=0.1,
                 max_position_embeddings=512,
                 type_vocab_size=2,
                 initializer_range=0.02):
        """Constructs BertConfig.
        Args:
          vocab_size: Vocabulary size of `inputs_ids` in `BertModel`.
          hidden_size: Size of the encoder layers and the pooler layer.
          num_hidden_layers: Number of hidden layers in the Transformer encoder.
          num_attention_heads: Number of attention heads for each attention layer in
            the Transformer encoder.
          intermediate_size: The size of the "intermediate" (i.e., feed-forward)
            layer in the Transformer encoder.
          hidden_act: The non-linear activation function (function or string) in the
            encoder and pooler.
          hidden_dropout_prob: The dropout probability for all fully connected
            layers in the embeddings, encoder, and pooler.
          attention_probs_dropout_prob: The dropout ratio for the attention
            probabilities.
          max_position_embeddings: The maximum sequence length that this model might
            ever be used with. Typically set this to something large just in case
            (e.g., 512 or 1024 or 2048).
          type_vocab_size: The vocabulary size of the `token_type_ids` passed into
            `BertModel`.
          initializer_range: The stdev of the truncated_normal_initializer for
            initializing all weight matrices.
        """
        self.vocab_size = vocab_size
        self.hidden_size = hidden_size
        self.num_hidden_layers = num_hidden_layers
        self.num_attention_heads = num_attention_heads
        self.hidden_act = hidden_act
        self.intermediate_size = intermediate_size
        self.pad_token_id = pad_token_id
        self.hidden_dropout_prob = hidden_dropout_prob
        self.attention_probs_dropout_prob = attention_probs_dropout_prob
        self.max_position_embeddings = max_position_embeddings
        self.type_vocab_size = type_vocab_size
        self.initializer_range = initializer_range

    @classmethod
    def from_dict(cls, json_object):
        """Constructs a `BertConfig` from a Python dictionary of parameters."""
        config = BertConfig(vocab_size=None)
        for (key, value) in six.iteritems(json_object):
            config.__dict__[key] = value
        return config

    @classmethod
    def from_json_file(cls, json_file):
        """Constructs a `BertConfig` from a json file of parameters."""
        """从json配置文件读取配置信息"""
        with open(json_file, 'r') as reader:
            text = reader.read()
        logging.info(f"成功导入BERT配置文件 {json_file}")
        return cls.from_dict(json.loads(text))

    def to_dict(self):
        """Serializes this instance to a Python dictionary."""
        output = copy.deepcopy(self.__dict__)
        return output

    def to_json_string(self):
        """Serializes this instance to a JSON string."""
        return json.dumps(self.to_dict(), indent=2, sort_keys=True) + "\n"
最后,我们只需要再定义一个train()函数来完成模型的训练即可,代码如下:
def train(config):
    model = BertForSentenceClassification(config,
                                          config.pretrained_model_dir)
    model_save_path = os.path.join(config.model_save_dir, 'model.pt')
    if os.path.exists(model_save_path):
        loaded_paras = torch.load(model_save_path)
        model.load_state_dict(loaded_paras)
        logging.info("## 成功载入已有模型,进行追加训练......")
    model = model.to(config.device)
    optimizer = torch.optim.Adam(model.parameters(), lr=config.learning_rate)

    '''
    Apply Intel Extension for PyTorch optimization against the model object and optimizer object.
    '''
    model, optimizer = ipex.optimize(model, optimizer=optimizer)

    model.train()
    bert_tokenize = BertTokenizer.from_pretrained(
        model_config.pretrained_model_dir).tokenize
    data_loader = LoadPairSentenceClassificationDataset(
        vocab_path=config.vocab_path,
        tokenizer=bert_tokenize,
        batch_size=config.batch_size,
        max_sen_len=config.max_sen_len,
        split_sep=config.split_sep,
        max_position_embeddings=config.max_position_embeddings,
        pad_index=config.pad_token_id)
    train_iter, test_iter, val_iter = \
        data_loader.load_train_val_test_data(config.train_file_path,
                                             config.val_file_path,
                                             config.test_file_path)
    lr_scheduler = get_scheduler(name='linear',
                                 optimizer=optimizer,
                                 num_warmup_steps=int(len(train_iter) * 0),
                                 num_training_steps=int(config.epochs * len(train_iter)))
    max_acc = 0
    for epoch in range(config.epochs):
        losses = 0
        start_time = time.time()
        for idx, (sample, seg, label) in enumerate(train_iter):
            sample = sample.to(config.device)  # [src_len, batch_size]
            label = label.to(config.device)
            seg = seg.to(config.device)
            padding_mask = (sample == data_loader.PAD_IDX).transpose(0, 1)
            loss, logits = model(
                input_ids=sample,
                attention_mask=padding_mask,
                token_type_ids=seg,
                position_ids=None,
                labels=label)
            optimizer.zero_grad()
            loss.backward()
            lr_scheduler.step()
            optimizer.step()
            losses += loss.item()
            acc = (logits.argmax(1) == label).float().mean()
            if idx % 10 == 0:
                logging.info(f"Epoch: {epoch}, Batch[{idx}/{len(train_iter)}], "
                             f"Train loss :{loss.item():.3f}, Train acc: {acc:.3f}")
        end_time = time.time()
        train_loss = losses / len(train_iter)
        logging.info(f"Epoch: {epoch}, Train loss: "
                     f"{train_loss:.3f}, Epoch time = {(end_time - start_time):.3f}s")
        if (epoch + 1) % config.model_val_per_epoch == 0:
            acc = evaluate(val_iter, model, config.device, data_loader.PAD_IDX)
            logging.info(f"Accuracy on val {acc:.3f}")
            if acc > max_acc:
                max_acc = acc
                torch.save(model.state_dict(), model_save_path)
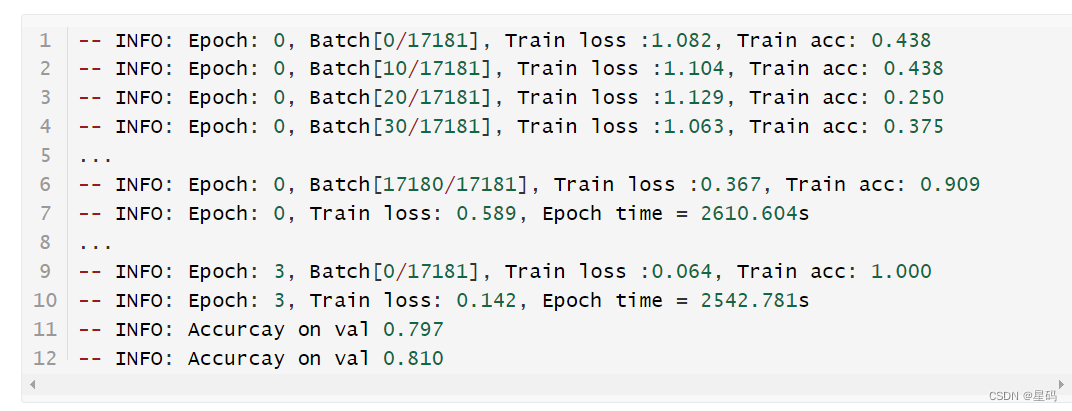
结果
参考资料
基于BERT预训练模型的英文文本蕴含任务: https://www.ylkz.life/deeplearning/p10407402/


