简介
我们在:Android入门第47天-Fragment的基本使用 中使用Fragment制作了一个类首页底部含4个按钮的界面。今天的课程我们要做的是把第47天里的代码中一部分共用的东西抽象到res/values/themes.xml文件中。另外我们使用RadioGroup天然的只有一个可以被选中来代替原先的TextView做的底部4个按钮以及它们的点击事件。

在原有教程代码上的修改点
- 由于我们使用的是RadioGroup,因此所有的用于表示按钮点下去和正常态时相应的selector中有一个state_selected="true"的全部改为state_checked="true",如下图中这些selector的xml文件中,所有的state_selected都要改成state_checked;
- APP打开时默认选择第一个提醒按钮被按下去原来教程中用的是performClick现在改用setChecked(true)来代替;
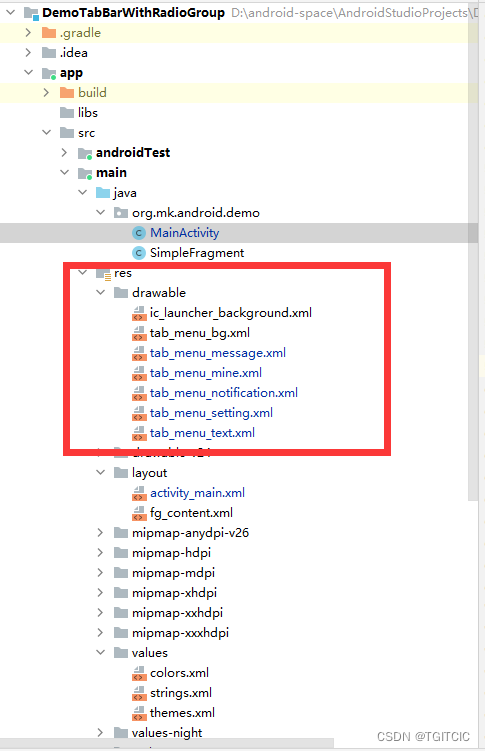
全代码
把一些common的style抽象出来
抽象出定义每一个按钮点下去和没有被点下去时“文字”的效果到底用的哪个selector xml以及每个按钮在被点下去和没被点下去时背景色变换的这些描述,我们全部抽象到src/res/values/themes.xml文件中。
<resources xmlns:tools="http://schemas.android.com/tools">
    <!-- Base application theme. -->
    <style name="Theme.DemoTabBarWithRadioGroup" parent="Theme.MaterialComponents.DayNight.DarkActionBar">
        <!-- Primary brand color. -->
        <item name="colorPrimary">@color/purple_500</item>
        <item name="colorPrimaryVariant">@color/purple_700</item>
        <item name="colorOnPrimary">@color/white</item>
        <!-- Secondary brand color. -->
        <item name="colorSecondary">@color/teal_200</item>
        <item name="colorSecondaryVariant">@color/teal_700</item>
        <item name="colorOnSecondary">@color/black</item>
        <!-- Status bar color. -->
        <item name="android:statusBarColor">?attr/colorPrimaryVariant</item>
        <!-- Customize your theme here. -->
    </style>
    <style name="tab_menu_item">
        <item name="android:layout_width">0dp</item>
        <item name="android:layout_weight">1</item>
        <item name="android:layout_height">match_parent</item>
        <item name="android:background">@drawable/tab_menu_bg</item>
        <item name="android:button">@null</item>
        <item name="android:gravity">center</item>
        <item name="android:paddingTop">3dp</item>
        <item name="android:textColor">@drawable/tab_menu_text</item>
        <item name="android:textSize">18sp</item>
    </style>
</resources>
src/res/values/String.xml文件
内容和之前一章一样不变
<resources>
    <string name="app_name">DemoTabBarWithRadioGroup</string>
    <string name="tab_menu_alert">提醒</string>
    <string name="tab_menu_profile">信息</string>
    <string name="tab_menu_pay">我的</string>
    <string name="tab_menu_setting">设置</string>
</resources>
src/res/values/colors.xml文件
内容和之前一章一样不变
<?xml version="1.0" encoding="utf-8"?>
<resources>
    <color name="purple_200">#FFBB86FC</color>
    <color name="purple_500">#FF6200EE</color>
    <color name="purple_700">#FF3700B3</color>
    <color name="teal_200">#FF03DAC5</color>
    <color name="teal_700">#FF018786</color>
    <color name="black">#FF000000</color>
    <color name="white">#FFFFFFFF</color>
    <color name="bg_black">#000000</color>
    <color name="bg_white">#FFFFFF</color>
    <color name="bg_topbar">#FCFCFC</color>
    <color name="bg_gray">#00F1F1F1</color>
    <color name="transparent">#00FFFFFF</color>
    <color name="text_gray">#8D7A71</color>
    <color name="text_white">#FFFFFF</color>
    <color name="text_yellow">#FFC800</color>
    <color name="text_topbar">#694E42</color>
    <color name="div_white">#E5E5E5</color>
</resources>
activity_main.xml文件
巨大变化,变成了RadioGroup的写法了。
<?xml version="1.0" encoding="utf-8"?>
<RelativeLayout xmlns:android="http://schemas.android.com/apk/res/android"
    xmlns:tools="http://schemas.android.com/tools"
    android:layout_width="match_parent"
    android:layout_height="match_parent"
    android:background="@color/bg_gray"
    tools:context=".MainActivity">

    <RelativeLayout
        android:id="@+id/ly_top_bar"
        android:layout_width="match_parent"
        android:layout_height="48dp"
        android:background="@color/bg_topbar">

        <TextView
            android:id="@+id/txt_topbar"
            android:layout_width="match_parent"
            android:layout_height="match_parent"
            android:layout_centerInParent="true"
            android:gravity="center"
            android:text="信息"
            android:textColor="@color/text_topbar"
            android:textSize="18sp" />

        <View
            android:layout_width="match_parent"
            android:layout_height="2px"
            android:layout_alignParentBottom="true"
            android:background="@color/div_white" />

    </RelativeLayout>

    <RadioGroup
        android:id="@+id/rg_tab_bar"
        android:layout_width="match_parent"
        android:layout_height="56dp"
        android:layout_alignParentBottom="true"
        android:background="@color/bg_white"
        android:orientation="horizontal">

        <RadioButton
            android:id="@+id/rb_notification"
            style="@style/tab_menu_item"
            android:drawableTop="@drawable/tab_menu_notification"
            android:text="@string/tab_menu_alert" />

        <RadioButton
            android:id="@+id/rb_message"
            style="@style/tab_menu_item"
            android:drawableTop="@drawable/tab_menu_message"
            android:text="@string/tab_menu_profile" />

        <RadioButton
            android:id="@+id/rb_better"
            style="@style/tab_menu_item"
            android:drawableTop="@drawable/tab_menu_mine"
            android:text="@string/tab_menu_pay" />

        <RadioButton
            android:id="@+id/rb_setting"
            style="@style/tab_menu_item"
            android:drawableTop="@drawable/tab_menu_setting"
            android:text="@string/tab_menu_setting"/>

    </RadioGroup>

    <View
        android:id="@+id/div_tab_bar"
        android:layout_width="match_parent"
        android:layout_height="2px"
        android:layout_above="@id/rg_tab_bar"
        android:background="@color/div_white" />

    <FrameLayout
        android:id="@+id/ly_content"
        android:layout_width="match_parent"
        android:layout_height="match_parent"
        android:layout_above="@id/div_tab_bar"
        android:layout_below="@id/ly_top_bar"></FrameLayout>

</RelativeLayout>
Fragment
fg_content.xml
无任何变化。
SimpleFragment.java
无任何变化
MainActivity.java
package org.mk.android.demo;

import androidx.appcompat.app.AppCompatActivity;
import android.app.FragmentManager;
import android.app.FragmentTransaction;

import android.os.Bundle;
import android.widget.RadioButton;
import android.widget.RadioGroup;

public class MainActivity extends AppCompatActivity implements RadioGroup.OnCheckedChangeListener{

    private RadioGroup rg_tab_bar;
    private RadioButton rb_notification;

    //Fragment Object
    private SimpleFragment fg1,fg2,fg3,fg4;
    private FragmentManager fManager;

    @Override
    protected void onCreate(Bundle savedInstanceState) {
        super.onCreate(savedInstanceState);
        setContentView(R.layout.activity_main);
        fManager = getFragmentManager();
        rg_tab_bar = (RadioGroup) findViewById(R.id.rg_tab_bar);
        rg_tab_bar.setOnCheckedChangeListener(this);
        //应用一进入自动获取第一个单选按钮,并设置其为选中状态
        rb_notification = (RadioButton) findViewById(R.id.rb_notification);
        rb_notification.setChecked(true);
    }
    @Override
    public void onCheckedChanged(RadioGroup group, int checkedId) {
        FragmentTransaction fTransaction = fManager.beginTransaction();
        hideAllFragment(fTransaction);
        switch (checkedId){
            case R.id.rb_notification:
                if(fg1 == null){
                    fg1 = new SimpleFragment();
                    String content = "第一个Fragment";
                    Bundle bd = new Bundle();
                    bd.putString("content", content);
                    fg1.setArguments(bd);
                    fTransaction.add(R.id.ly_content,fg1);
                }else{
                    fTransaction.show(fg1);
                }
                break;
            case R.id.rb_message:
                if(fg2 == null){
                    fg2 = new SimpleFragment();
                    String content = "第二个Fragment";
                    Bundle bd = new Bundle();
                    bd.putString("content", content);
                    fg2.setArguments(bd);
                    fTransaction.add(R.id.ly_content,fg2);
                }else{
                    fTransaction.show(fg2);
                }
                break;
            case R.id.rb_better:
                if(fg3 == null){
                    fg3 = new SimpleFragment();
                    String content = "第三个Fragment";
                    Bundle bd = new Bundle();
                    bd.putString("content", content);
                    fg3.setArguments(bd);
                    fTransaction.add(R.id.ly_content,fg3);
                }else{
                    fTransaction.show(fg3);
                }
                break;
            case R.id.rb_setting:
                if(fg4 == null){
                    fg4 = new SimpleFragment();
                    String content = "第四个Fragment";
                    Bundle bd = new Bundle();
                    bd.putString("content", content);
                    fg4.setArguments(bd);
                    fTransaction.add(R.id.ly_content,fg4);
                }else{
                    fTransaction.show(fg4);
                }
                break;
        }
        fTransaction.commit();
    }

    //隐藏所有Fragment
    private void hideAllFragment(FragmentTransaction fragmentTransaction){
        if(fg1 != null)fragmentTransaction.hide(fg1);
        if(fg2 != null)fragmentTransaction.hide(fg2);
        if(fg3 != null)fragmentTransaction.hide(fg3);
        if(fg4 != null)fragmentTransaction.hide(fg4);
    }
}
运行后效果和第47天中所讲一样,请自己动一下手吧。





![[附源码]Python计算机毕业设计高校师资管理系统Django(程序+LW)](https://img-blog.csdnimg.cn/5ca321e12ab94bdfbecf0a4bdcca02f8.png)

