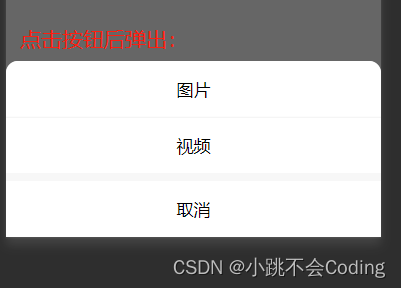
1.需求:
可以上传图片和视频,并且都可以删除,图片可以预览。
2.效果图

3.代码:
 <template>
 	<!-- 上传start -->
 	<view style="display: flex; flex-wrap: wrap;">
 		<view class="update-file">
 			<!--图片-->
 			<view v-for="(item,index) in imageList" :key="index">
 				<view class="upload-box">
 					<image class="preview-file" :src="hostUrl+item" @tap="previewImage(item)"></image>
 					<view class="remove-icon" @tap="delect(index)">
 						X
 						<!-- <image src="../../static/images/del.png" class="del-icon" mode=""></image> -->
 					</view>
 				</view>
 			</view>

 			<!--视频-->
 			<view v-for="(item1, index1) in srcVideo" :key="index1">
 				<view class="upload-box">
 					<video class="preview-file" :src="item1"></video>
 					<view class="remove-icon" @tap="delectVideo(index1)">
						X
 						<!-- <image src="../../static/images/del.png" class="del-icon" mode=""></image> -->
 					</view>
 				</view>
 			</view>

			<!--按钮-->
 			<view v-if="VideoOfImagesShow" @tap="chooseVideoImage" class="upload-btn">
 				<!-- <image src="../../static/images/jia.png" style="width:30rpx;height:30rpx;" mode=""></image> -->
 				<view class="btn-text">上传</view>
 			</view>
 		</view>
 	</view>
 	<!-- 上传 end -->
 </template>
 <script>
 	var sourceType = [
 		['camera'],
 		['album'],
 		['camera', 'album']
 	];
 	export default {
 		data() {
 			return {
 				hostUrl: this.$api.hostImages,
 				// 上传图片视频
 				VideoOfImagesShow: true, // 页面图片或视频数量超出后,拍照按钮隐藏
 				imageList: [], //存放图片的地址
 				srcVideo: [], //视频存放的地址
 				sourceType: ['拍摄', '相册', '拍摄或相册'],
 				sourceTypeIndex: 2,
 				cameraList: [{
 					value: 'back',
 					name: '后置摄像头',
 					checked: 'true'
 				}, {
 					value: 'front',
 					name: '前置摄像头'
 				}],
 				cameraIndex: 0, //上传视频时的数量
 				//上传图片和视频
 				uploadFiles: [],
 			}
 		},
 		onUnload() {
 			// 上传
 			this.imageList = [];
 			this.sourceTypeIndex = 2;
 			this.sourceType = ['拍摄', '相册', '拍摄或相册'];
 		},
 		methods: {
 			//点击上传图片或视频
 			chooseVideoImage() {
 				uni.showActionSheet({
 					title: '选择上传类型',
 					itemList: ['图片', '视频'],
 					success: res => {
 						console.log(res);
 						if (res.tapIndex == 0) {
 							this.chooseImages();
 						} else {
 							this.chooseVideo();
 						}
 					}
 				});
 			},
 			//上传图片
 			chooseImages() {
 				uni.chooseImage({
 					count: 9, //默认是9张
 					sizeType: ['original', 'compressed'], //可以指定是原图还是压缩图,默认二者都有
 					sourceType: ['album', 'camera'], //从相册选择
 					success: res => {
 						console.log(res, 'ddddsss')
 						let imgFile = res.tempFilePaths;

 						imgFile.forEach(item => {
 							uni.uploadFile({
 								url: this.$api.host + this.$url.upload, //仅为示例,非真实的接口地址
 								method: "POST",
 								header: {
 									token: uni.getStorageSync('localtoken')
 								},
 								filePath: item,
 								name: 'file',
 								success: (result) => {
 									let res = JSON.parse(result.data)
 									console.log('打印res:', res)
 									if (res.code == 200) {
 										this.imageList = this.imageList.concat(res
 											.initialPreview[0]);
 										console.log(this.imageList, '上传图片成功')

 										if (this.imageList.length >= 9) {
 											this.VideoOfImagesShow = false;
 										} else {
 											this.VideoOfImagesShow = true;
 										}
 									} else {
 										uni.showToast({
 											title: res.msg,
 											icon: 'none'
 										})
 									}
 								}
 							})
 						})

 					}
 				})
 			},

 			//上传视频
 			chooseVideo(index) {
 				uni.chooseVideo({
 					maxDuration: 60, //拍摄视频最长拍摄时间,单位秒。最长支持 60 秒
 					count: 9,
 					camera: this.cameraList[this.cameraIndex].value, //'front'、'back',默认'back'
 					sourceType: sourceType[this.sourceTypeIndex],
 					success: res => {
 						let videoFile = res.tempFilePath;

 						uni.showLoading({
 							title: '上传中...'
 						});
 						uni.uploadFile({
 							url: this.$api.host + this.$url.uploadfile, //上传文件接口地址
 							method: "POST",
 							header: {
 								token: uni.getStorageSync('localtoken')
 							},
 							filePath: videoFile,
 							name: 'file',
 							success: (result) => {
 								uni.hideLoading();
 								let res = JSON.parse(result.data)
 								if (res.code == 200) {
 									this.srcVideo = this.srcVideo.concat(res.data[0].data);
 									if (this.srcVideo.length == 9) {
 										this.VideoOfImagesShow = false;
 									}
 								} else {
 									uni.showToast({
 										title: res.msg,
 										icon: 'none'
 									})
 								}
 							},
 							fail: (error) => {
 								uni.hideLoading();
 								uni.showToast({
 									title: error,
 									icon: 'none'
 								})
 							}
 						})
 					},
 					fail: (error) => {
 						uni.hideLoading();
 						uni.showToast({
 							title: error,
 							icon: 'none'
 						})
 					}
 				})
 			},

 			//预览图片
 			previewImage: function(item) {
 				console.log('预览图片', item)
 				uni.previewImage({
 					current: item,
 					urls: this.imageList
 				});
 			},

 			// 删除图片
 			delect(index) {
 				uni.showModal({
 					title: '提示',
 					content: '是否要删除该图片',
 					success: res => {
 						if (res.confirm) {
 							this.imageList.splice(index, 1);
 						}
 						if (this.imageList.length == 4) {
 							this.VideoOfImagesShow = false;
 						} else {
 							this.VideoOfImagesShow = true;
 						}
 					}
 				});
 			},
 			// 删除视频
 			delectVideo(index) {
 				uni.showModal({
 					title: '提示',
 					content: '是否要删除此视频',
 					success: res => {
 						if (res.confirm) {
 							this.srcVideo.splice(index, 1);
 						}
 						if (this.srcVideo.length == 4) {
 							this.VideoOfImagesShow = false;
 						} else {
 							this.VideoOfImagesShow = true;
 						}
 					}
 				});
 			},
 			// 上传 end
 		}
 	}
 </script>

 <style scoped lang="scss">
 	// 上传
 	.update-file {
 		margin-left: 10rpx;
 		height: auto;
 		display: flex;
 		justify-content: space-between;
 		flex-wrap: wrap;
 		margin-bottom: 5rpx;

 		.del-icon {
 			width: 44rpx;
 			height: 44rpx;
 			position: absolute;
 			right: 10rpx;
 			top: 12rpx;
 		}

 		.btn-text {
 			color: #606266;
 		}

 		.preview-file {
 			width: 200rpx;
 			height: 200rpx;
 			border: 1px solid #e0e0e0;
 			border-radius: 10rpx;
 		}

 		.upload-box {
 			position: relative;
 			width: 200rpx;
 			height: 200rpx;
 			margin: 0 10rpx 20rpx 0;

 		}

 		.remove-icon {
 			position: absolute;
 			right: -10rpx;
 			top: -10rpx;
 			z-index: 1000;
 			width: 30rpx;
 			height: 30rpx;
 		}

 		.upload-btn {
 			width: 200rpx;
 			height: 200rpx;
 			border-radius: 10rpx;
 			background-color: #f4f5f6;
 			display: flex;
 			justify-content: center;
 			align-items: center;
 		}
 	}
 	.guide-view {
 		margin-top: 30rpx;
 		display: flex;

 		.guide-text {
 			display: flex;
 			flex-direction: column;
 			justify-content: space-between;
 			padding-left: 20rpx;

 			.guide-text-price {
 				padding-bottom: 10rpx;
 				color: #ff0000;
 				font-weight: bold;
 			}
 		}
 	}
 	.service-process {
 		background-color: #ffffff;
 		padding: 20rpx;
 		padding-top: 30rpx;
 		margin-top: 30rpx;
 		border-radius: 10rpx;
 		padding-bottom: 30rpx;

 		.title {
 			text-align: center;
 			margin-bottom: 20rpx;
 		}
 	}
 	.form-view-parent {
 		border-radius: 20rpx;
 		background-color: #FFFFFF;
 		padding: 0rpx 20rpx;

 		.form-view {
 			background-color: #FFFFFF;
 			margin-top: 20rpx;
 		}

 		.form-view-textarea {
 			margin-top: 20rpx;
 			padding: 20rpx 0rpx;

 			.upload-hint {
 				margin-top: 10rpx;
 				margin-bottom: 10rpx;
 			}
 		}
 	}


 	.bottom-class {
 		margin-bottom: 60rpx;
 	}

 	.bottom-btn-class {
 		padding-bottom: 1%;

 		.bottom-hint {
 			display: flex;
 			justify-content: center;
 			padding-bottom: 20rpx;

 		}
 	}
 </style>