ITraffic-monitor-for-mac
ITraffic-monitor-for-mac 在 Mac 状态栏上显示进程流量的监视器,在windows我们的流量可以通过电脑管家或者360进行显示,在进行网络编程的时候,这个确实帮了不少忙,但是咱Mac下,显示网络状况就没有那么方便了,但是我们可以在mac下的监视中找到网络的监控,但是这个藏得太深,ITraffic-monitor-for-mac就是为了这个需求而生的,ITraffic-monitor-for-mac大部分的代码采用的是swift语言,工程代码量并不大,很适合刚开始学习swift语言的同学。
github上的地址在这里。
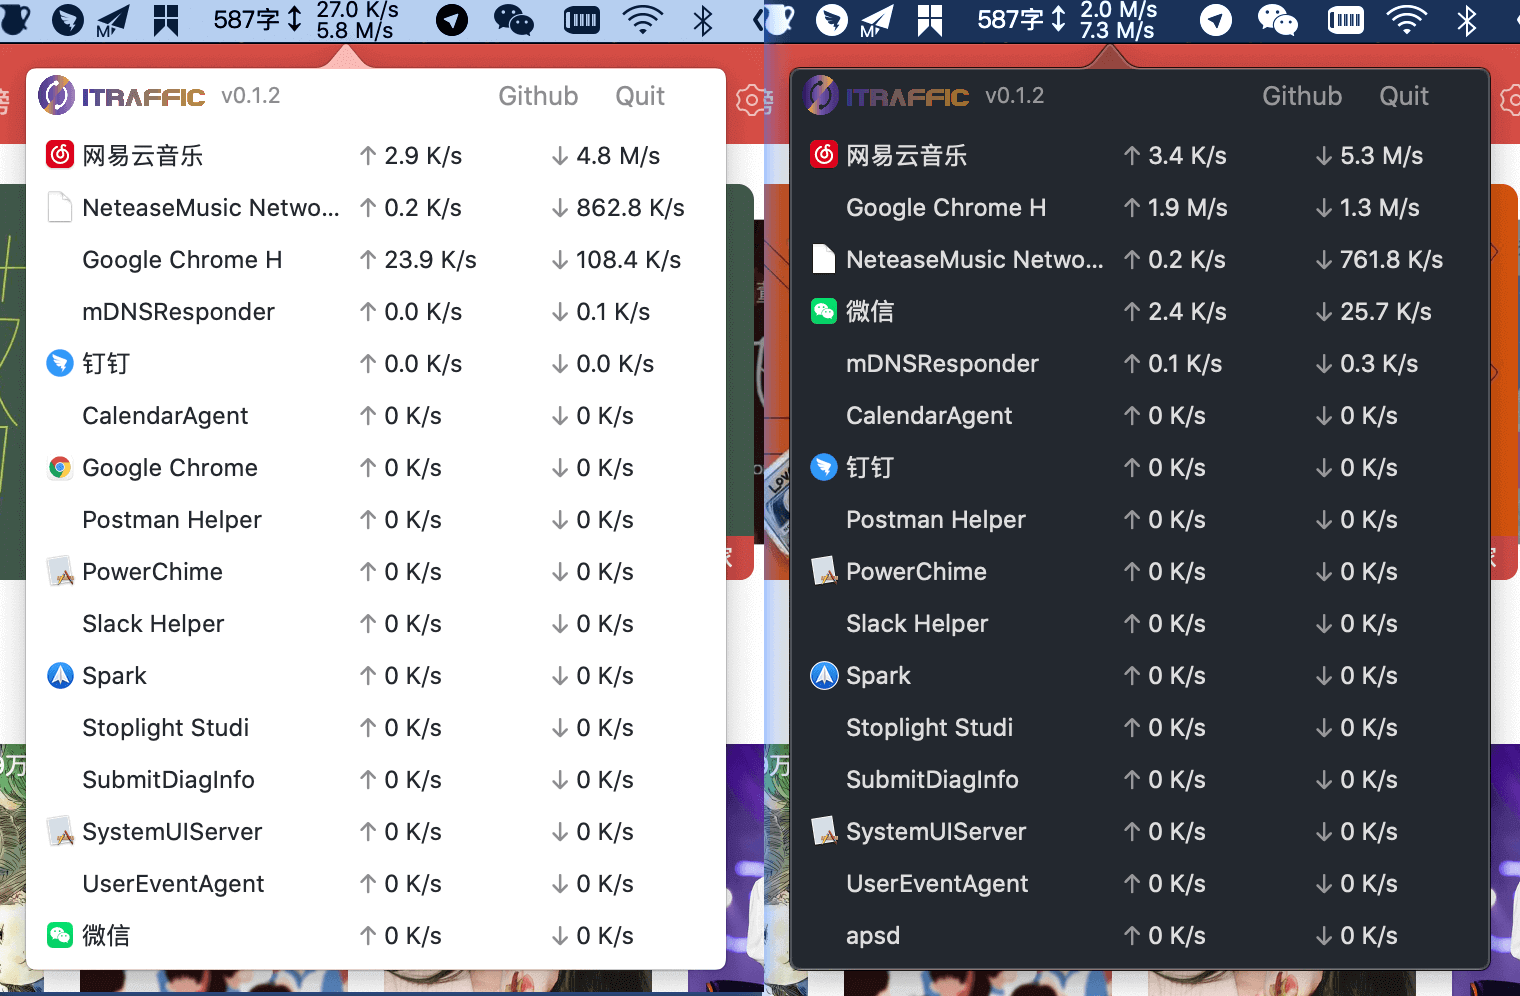
看看这个软件,对流量的监控是不是很方便,是不是很windows化。
安装
macOS 版本应该 >= 10.15,因为项目使用 swiftUI,安装的方式比较简单,直接下载app就可以进行mac下的安装,地址在这里。
如果使用brew:
rew install itraffic
更新:
brew update && brew upgrade itraffic
我们来看看具体实现的代码。
代码分析
能把网络的监控展示成这么方便,确实是挺好用的,这个最主要的部分是ui的部分和网络监控部分。
public func startListenNetwork() {
        let duration = 2
        let nettopPath = Bundle.main.path(forResource: "nettop-line", ofType: nil)!
        let task = shellPipe("\"\(nettopPath)\" -P -d -L 0 -J bytes_in,bytes_out -t external -s \(duration) -c") { [self] output in
            tryToMakeAppSleepDeep()

            let rows = output.components(separatedBy: "|SPLIT|").map { String($0) }

            var totalInBytes = 0
            var totalOutBytes = 0
            let entities: [ProcessEntity] = rows.map { self.parser(text: $0, duration: duration) }.compactMap { entity-> ProcessEntity? in
                if (entity == nil) {
                    return nil;
                }
                totalInBytes += entity?.inBytes ?? 0
                totalOutBytes += entity?.outBytes ?? 0
                return entity
            }
            DispatchQueue.main.async {
                self.statusDataModel.update(totalInBytes: totalInBytes, totalOutBytes: totalOutBytes)
                self.viewModel.updateData(newItems: entities)
            }
        }
        task.resume()
    }
开始进行监控,可以看出,他使用的是nettop-line 这个开源项目,地址在这里。
从nettop-line 中读回来了网络信息,再对网络信息进行处理。
func parser(text: String, duration: Int) -> ProcessEntity? {
        let item = text.split(separator: ",")
        if item.count < 3 {
            return nil
        }
        let inBytes = (Int(item[1]) ?? 0) / duration
        let outBytes = (Int(item[2]) ?? 0) / duration

        let nameAndPid = item[0].split(separator: ".")
        let pid = nameAndPid[nameAndPid.count - 1]
        var name = nameAndPid
        name.removeLast()

        return ProcessEntity(pid: Int(pid) ?? 0, name: name.joined(separator: "."), inBytes: inBytes, outBytes: outBytes)
    }

    @discardableResult
    func shellPipe(_ args: String..., onData: ((String) -> Void)? = nil, didTerminate: (() -> Void)? = nil) -> Process {
        let task = Process()
        let pipe = Pipe()

        task.standardOutput = pipe
        task.standardInput = Pipe()
        task.executableURL = URL(fileURLWithPath: "/bin/bash")
        task.arguments = ["-c"] + args

        var buffer = Data()
        let outHandle = pipe.fileHandleForReading
        var str = ""
        var data = Data()
        outHandle.readabilityHandler = { _ in
            data = outHandle.availableData

            if data.count > 0 {
                buffer += data
                str = String(data: buffer, encoding: String.Encoding.utf8) ?? ""
                if str.last?.isNewline == true {
                    buffer.removeAll()
                    onData?(str)
                }
                outHandle.waitForDataInBackgroundAndNotify() // todo it seems that memory leak here. Not sure how to fix it now.
            } else {
                buffer.removeAll()
            }
        }
        outHandle.waitForDataInBackgroundAndNotify()

        task.terminationHandler = { _ in
            try? outHandle.close()
            didTerminate?()
        }

        DispatchQueue(label: "shellPipe-\(UUID().uuidString)", qos: .background, attributes: .concurrent).async {
            do {
                try task.run()
            } catch {
                print("shell pipe executed with error", error)
            }
        }

        return task
    }
shellPipe 中执行命令行,通过命令行获取网络的信息。
对ITraffic-monitor-for-mac 的分析就简单的写到这里,有兴趣的话可以进行他的ui代码的学习。








![[附源码]Nodejs计算机毕业设计基于的餐厅管理系统Express(程序+LW)](https://img-blog.csdnimg.cn/89cfee27fe99439588602cd9fb55ae8f.png)

