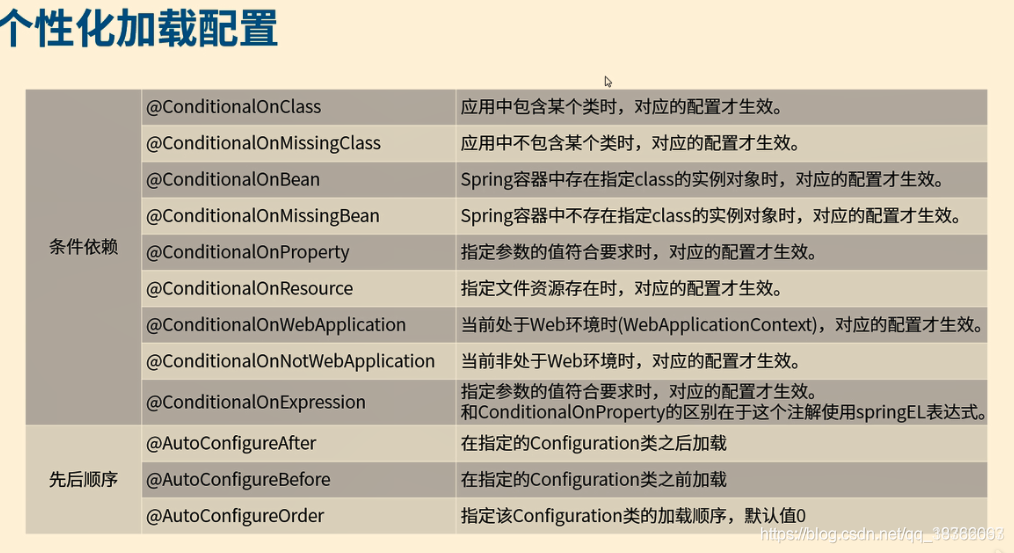
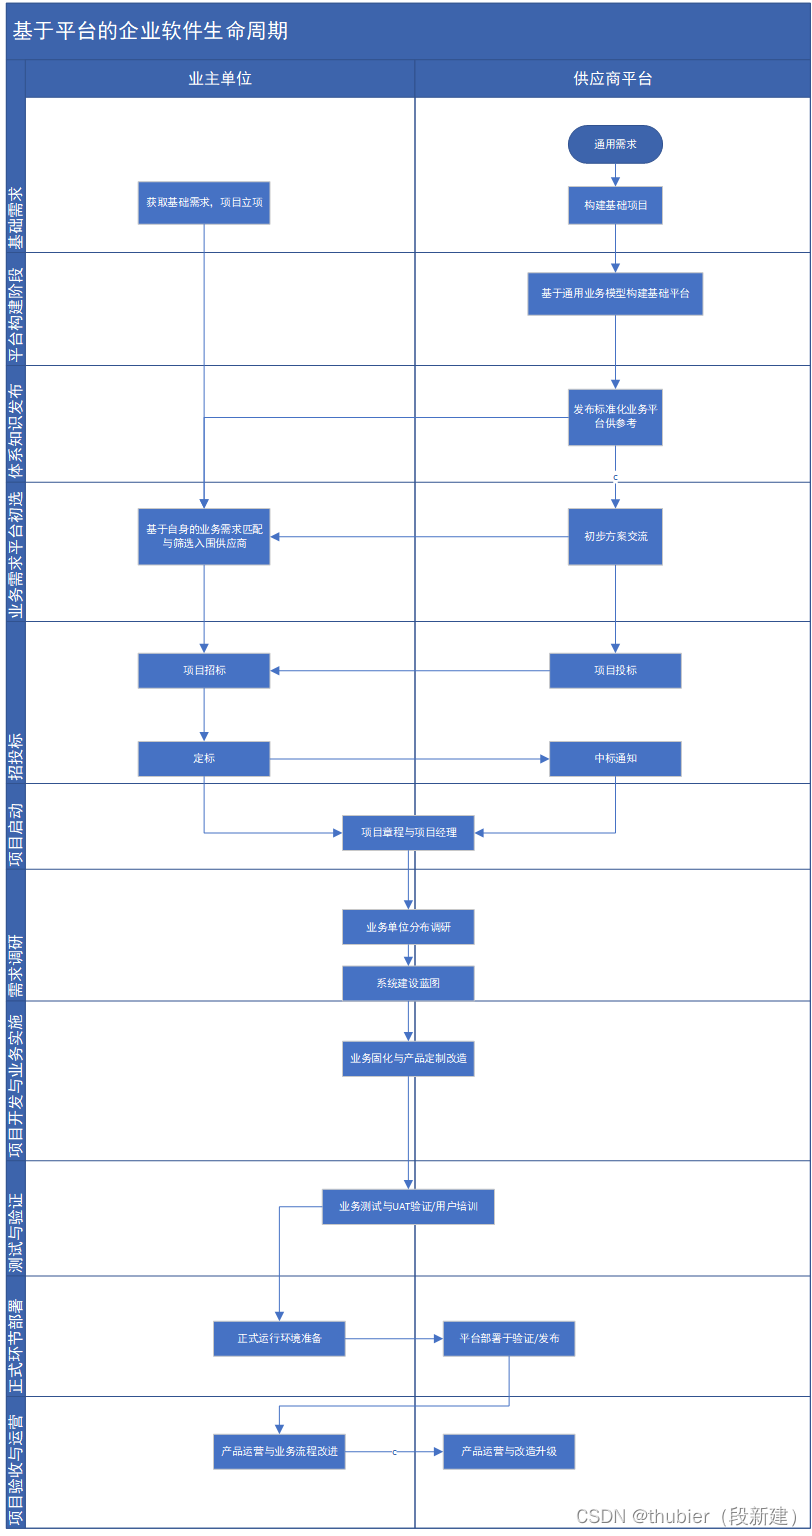
ArduPilot开源飞控之飞行模式
- 1. 源由
- 2. 飞行模式-已实现
- 3. 飞行模式-设计
- 3.1 模式初始化(`init`)
- 3.2 模式退出(`exit`)
- 3.3 模式任务(`run`)
- 3.4 模式切换场景
- 3.4.1 上电初始化
- 3.4.2 `EKF FAILSAFE`触发
- 3.4.3 `do_failsafe_action FAILSAFE`触发
- 3.4.4 `AP_Avoidance_Copter`触发
- 3.4.5 Crash触发
- 3.4.6 围栏设置触发
- 3.4.7 RC遥控触发
- 3.4.8 MAVLink触发
- 3.4.9 飞行模式内部逻辑触发
- 3.4.10 heli触发
- 3.4.11 MavLink_FrSkySPort
- 4. 新增飞行模式
- Step 1:新增模式名称
- Step 2:定义基本接口
- Step 3:补充基本接口实现
- Step 4:添加类实例
- Step 5:添加模式映射
- Step 6:设置默认飞行模式
- Step 7:地面站配置参数修改
- 5. 总结
- 6. 参考资料
1. 源由
ArduPilot开源飞控有各种飞行模式,比如:stablize/acro/auto/guided 等等。基于这些飞行模式,用户可以根据需要选择合适的飞行计划。
- 花飞、竞速:可以直接采用acro手动模式
- 任务、航点:可以选择auto飞行模式
- 异常情况:可以选择诸如RTL飞行模式,自动返航
- 等等
本章节将会针对飞行模式来整理下ArduPilot在飞行模式上的强大功能,以及整合用户自定义的步骤。
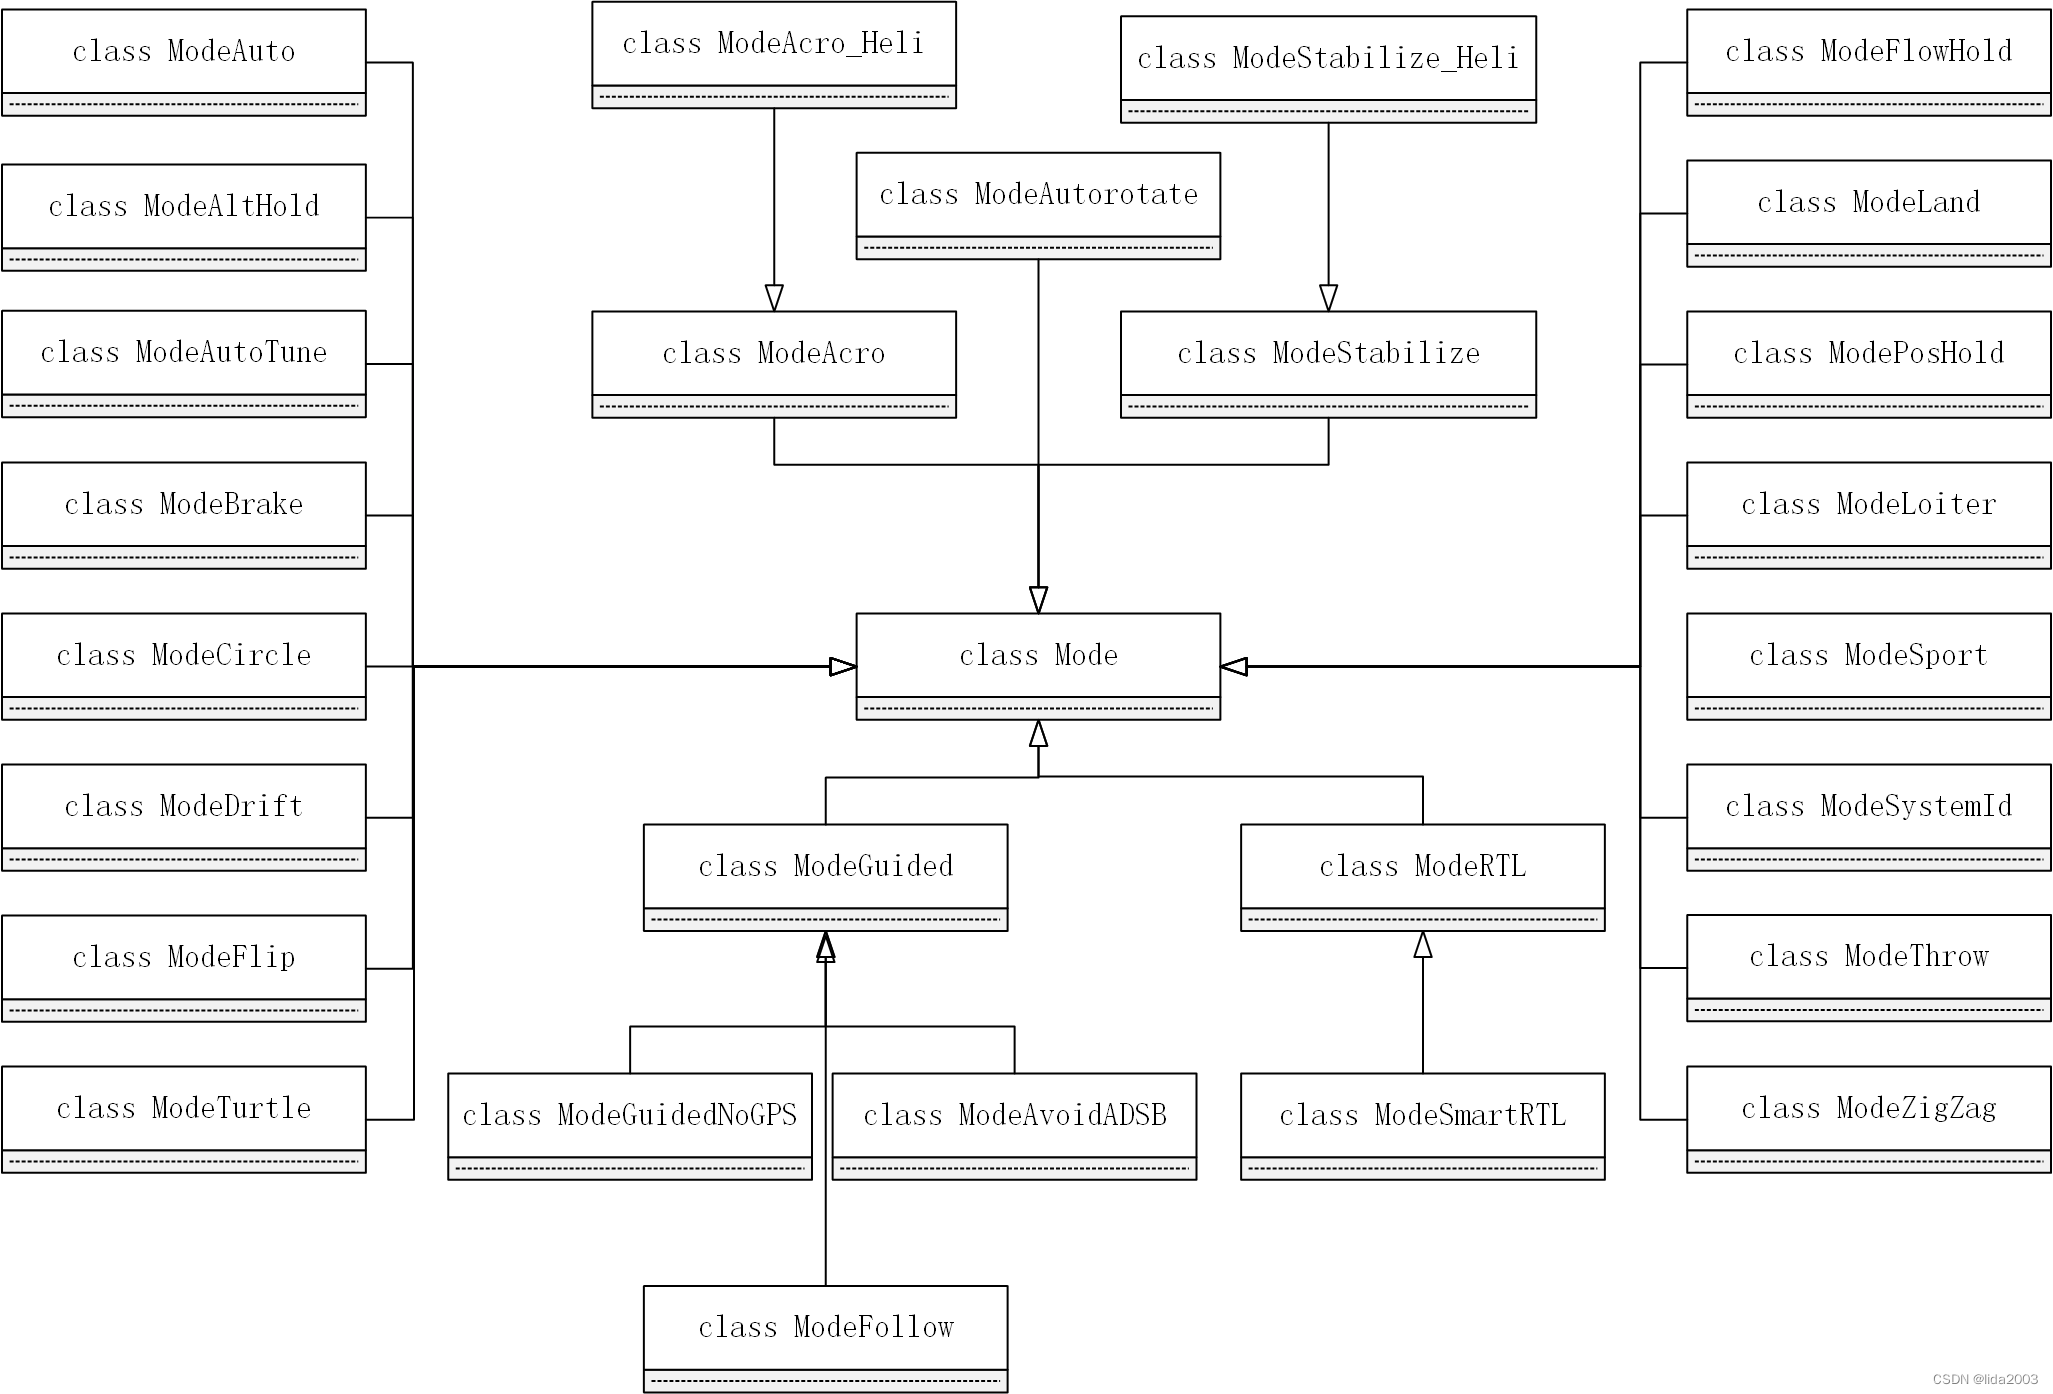
2. 飞行模式-已实现
多旋翼飞行器ArduPilot已经实现的飞行模式如下所述:
    // Auto Pilot Modes enumeration
    enum class Number : uint8_t {
        STABILIZE =     0,  // manual airframe angle with manual throttle
        ACRO =          1,  // manual body-frame angular rate with manual throttle
        ALT_HOLD =      2,  // manual airframe angle with automatic throttle
        AUTO =          3,  // fully automatic waypoint control using mission commands
        GUIDED =        4,  // fully automatic fly to coordinate or fly at velocity/direction using GCS immediate commands
        LOITER =        5,  // automatic horizontal acceleration with automatic throttle
        RTL =           6,  // automatic return to launching point
        CIRCLE =        7,  // automatic circular flight with automatic throttle
        LAND =          9,  // automatic landing with horizontal position control
        DRIFT =        11,  // semi-autonomous position, yaw and throttle control
        SPORT =        13,  // manual earth-frame angular rate control with manual throttle
        FLIP =         14,  // automatically flip the vehicle on the roll axis
        AUTOTUNE =     15,  // automatically tune the vehicle's roll and pitch gains
        POSHOLD =      16,  // automatic position hold with manual override, with automatic throttle
        BRAKE =        17,  // full-brake using inertial/GPS system, no pilot input
        THROW =        18,  // throw to launch mode using inertial/GPS system, no pilot input
        AVOID_ADSB =   19,  // automatic avoidance of obstacles in the macro scale - e.g. full-sized aircraft
        GUIDED_NOGPS = 20,  // guided mode but only accepts attitude and altitude
        SMART_RTL =    21,  // SMART_RTL returns to home by retracing its steps
        FLOWHOLD  =    22,  // FLOWHOLD holds position with optical flow without rangefinder
        FOLLOW    =    23,  // follow attempts to follow another vehicle or ground station
        ZIGZAG    =    24,  // ZIGZAG mode is able to fly in a zigzag manner with predefined point A and point B
        SYSTEMID  =    25,  // System ID mode produces automated system identification signals in the controllers
        AUTOROTATE =   26,  // Autonomous autorotation
        AUTO_RTL =     27,  // Auto RTL, this is not a true mode, AUTO will report as this mode if entered to perform a DO_LAND_START Landing sequence
        TURTLE =       28,  // Flip over after crash

        // Mode number 127 reserved for the "drone show mode" in the Skybrush
        // fork at https://github.com/skybrush-io/ardupilot
    };
其相互之间的关系,如图所示:
3. 飞行模式-设计
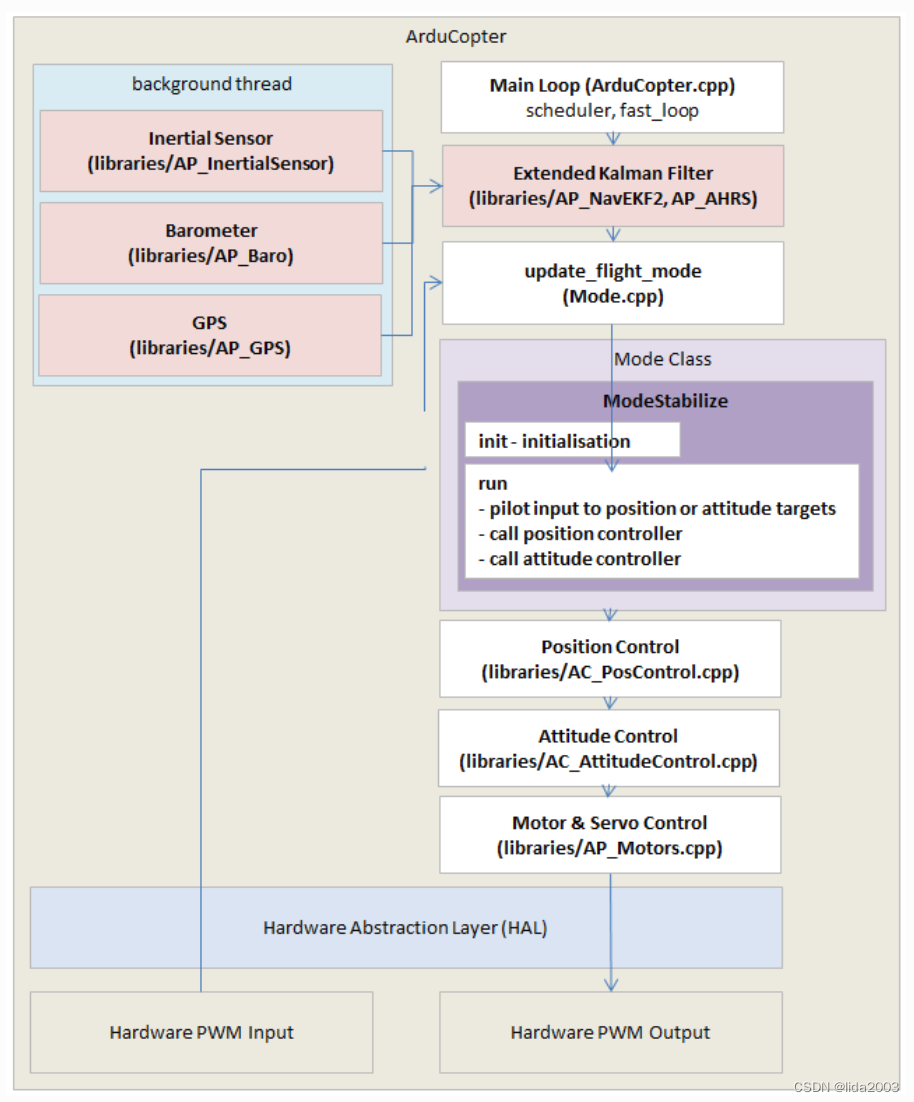
飞行模式主要是通过以下三个函数来实现飞行模式下,动态飞行应用:
- 模式初始化(
init) - 模式任务(
run) - 模式退出(
exit)
3.1 模式初始化(init)
首先,需要完成新模式的初始化过程。
Copter::set_mode
 └──> new_flightmode->init  // e.g. ModeAcro::init
3.2 模式退出(exit)
其次,完成老模式的去初始化,退出之前的模式。
Copter::set_mode
 └──> Copter::exit_mode
     └──> old_flightmode->exit
3.3 模式任务(run)
最后,就是动态运行飞行模式,使用各个内部模块协调处理和应对各种飞行过程中遇到的问题,实现安全飞行。
Copter::update_flight_mode
 └──> flightmode->run
3.4 模式切换场景
ArduPilot飞控系统中模式切换出现的场景涉及很多点位,每个点位都可能出现切换异常,此时,系统将会进行一些默认和失败的异常处理。
这里通过代码,简单的罗列了各种可能发生的场景:
- 上电初始化
EKF FAILSAFE触发do_failsafe_action FAILSAFE触发AP_Avoidance_Copter触发
3.4.1 上电初始化
init_ardupilot
 └──> Copter::set_mode
     └──> new_flightmode->init  //e.g. ModeStabilize::init
3.4.2 EKF FAILSAFE触发
Copter::ekf_check // 10Hz task
 └──> Copter::failsafe_ekf_event
     └──> Copter::set_mode
3.4.3 do_failsafe_action FAILSAFE触发
do_failsafe_action涉及较多的场景,这里不再赘述了,详见:ArduPilot开源飞控之do_failsafe_action
- Copter::set_mode_RTL_or_land_with_pause
- Copter::set_mode_SmartRTL_or_land_with_pause
- Copter::set_mode_SmartRTL_or_RTL
- Copter::set_mode_auto_do_land_start_or_RTL
- Copter::set_mode_brake_or_land_with_pause
- Copter::set_mode_land_with_pause
3.4.4 AP_Avoidance_Copter触发
AP_Avoidance_Copter主要是避障传感器的应用
Copter::avoidance_adsb_update  // 10Hz task
 └──> AP_Avoidance::update
     ├──> AP_Avoidance::check_startup
     │   └──> <> AP_Avoidance::deinit
     │       └──> <> AP_Avoidance_Copter::handle_recovery
     │           └──> <> AP_Avoidance_Copter::set_mode_else_try_RTL_else_LAND
     │               └──> Copter::set_mode
     └──> AP_Avoidance::handle_avoidance_local
         ├──> AP_Avoidance_Copter::handle_avoidance
         │   ├──> <> Copter::set_mode
         │   ├──> <> AP_Avoidance_Copter::handle_avoidance_vertical
         │   │   └──> AP_Avoidance_Copter::check_flightmode
         │   │       └──> Copter::set_mode
         │   ├──> <> AP_Avoidance_Copter::handle_avoidance_horizontal
         │   │   └──> AP_Avoidance_Copter::check_flightmode
         │   │       └──> Copter::set_mode
         │   └──> <> AP_Avoidance_Copter::handle_avoidance_perpendicular
         │       └──> AP_Avoidance_Copter::check_flightmode
         │           └──> Copter::set_mode
		 │
         └──> <> AP_Avoidance_Copter::handle_recovery
             └──> AP_Avoidance_Copter::set_mode_else_try_RTL_else_LAND
                 └──> Copter::set_mode
3.4.5 Crash触发
当发生Crash时,直接设置飞行模式为LAND。
Copter::motors_output // FAST_TASK
 └──> <> AP_AdvancedFailsafe_Copter::terminate_vehicle
     └──> <g2.afs.should_crash_vehicle()> copter.set_mode(Mode::Number::LAND, ModeReason::TERMINATE)
3.4.6 围栏设置触发
当满足围栏设置条件时,根据围栏触发设置,变更飞行模式。
Copter::fence_check
 └──> <> Copter::set_mode
3.4.7 RC遥控触发
根据遥控器设置,触发飞行模式变更。
- RC_Channel_Copter::mode_switch_changed
- RC_Channel_Copter::do_aux_function_change_mode
- RC_Channel_Copter::do_aux_function
3.4.8 MAVLink触发
MAVLink命令触发飞行模式的变更。
- GCS_MAVLINK::_set_mode_common
- GCS_MAVLINK_Copter::handle_command_int_do_reposition
- GCS_MAVLINK_Copter::handle_command_long_packet
3.4.9 飞行模式内部逻辑触发
由于飞行模式可以认为是一种应用,根据应用场景,有些模式会根据需要进行模式切换。
比如:
- ModeBrake::run
- ModeFlip::run
- ModeLand::nogps_run
- ModeRTL::climb_start
- ModeRTL::descent_run
- ToyMode::update
- ToyMode::set_and_remember_mode
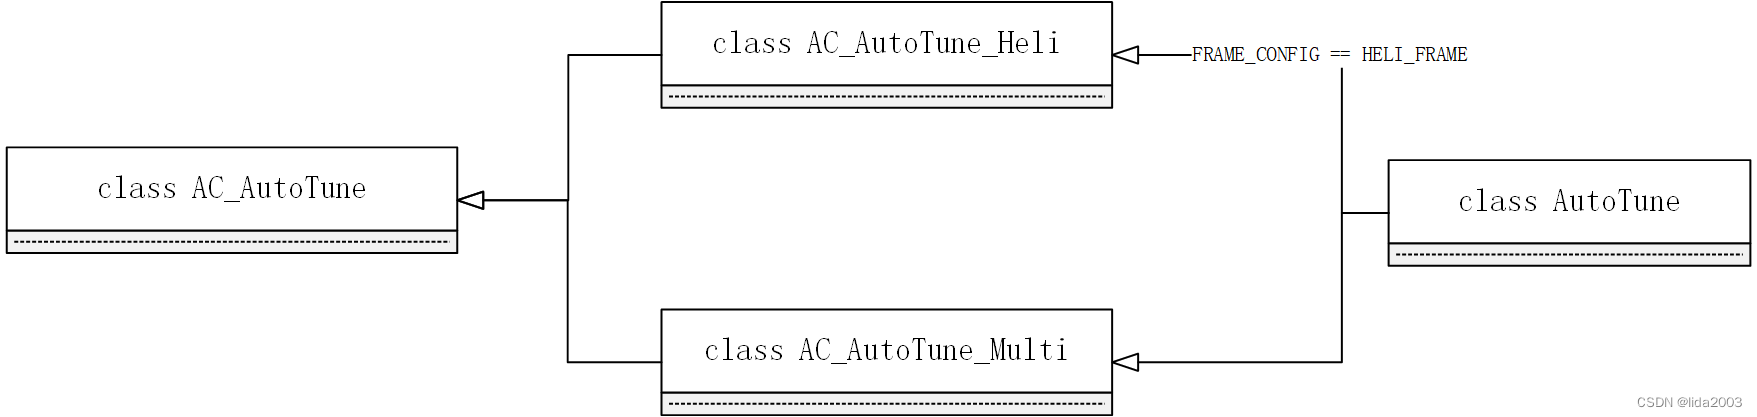
3.4.10 heli触发
FRAME_CONFIG == HELI_FRAME 直升机模型作为多旋翼是一种特殊的情况,这里单独有一个类对应处理。
Copter::heli_update_autorotation //  FAST_TASK
 └──> <> Copter::set_mode
3.4.11 MavLink_FrSkySPort
MavLink_FrSkySPort遥控有一个MAVLink的API接口,参考:ArduPilot开源代码之RCInput
注:这部分内容尚不太明朗,目前没有发现遥控器可以通过该协议设置飞控模式。如果有对此了解的朋友,请留言,谢谢!
4. 新增飞行模式
梳理下关于新增一个飞行模式的步骤,详细可参考:Adding a New Flight Mode to Copter
注:请注意,接下去的描述将会以RTL模式为例。
Step 1:新增模式名称
为新模式选择一个名称,并将其添加到modes.h中control_mode_t枚举的底部。这里以RTL为例。
// Auto Pilot Modes enumeration
enum class Number {
    STABILIZE =     0,  // manual airframe angle with manual throttle
    ACRO =          1,  // manual body-frame angular rate with manual throttle
    ALT_HOLD =      2,  // manual airframe angle with automatic throttle
    AUTO =          3,  // fully automatic waypoint control using mission commands
    GUIDED =        4,  // fully automatic fly to coordinate or fly at velocity/direction using GCS immediate commands
    LOITER =        5,  // automatic horizontal acceleration with automatic throttle
    RTL =           6,  // automatic return to launching point
    CIRCLE =        7,  // automatic circular flight with automatic throttle
    LAND =          9,  // automatic landing with horizontal position control
    DRIFT =        11,  // semi-automous position, yaw and throttle control
    SPORT =        13,  // manual earth-frame angular rate control with manual throttle
    FLIP =         14,  // automatically flip the vehicle on the roll axis
    AUTOTUNE =     15,  // automatically tune the vehicle's roll and pitch gains
    POSHOLD =      16,  // automatic position hold with manual override, with automatic throttle
    BRAKE =        17,  // full-brake using inertial/GPS system, no pilot input
    THROW =        18,  // throw to launch mode using inertial/GPS system, no pilot input
    AVOID_ADSB =   19,  // automatic avoidance of obstacles in the macro scale - e.g. full-sized aircraft
    GUIDED_NOGPS = 20,  // guided mode but only accepts attitude and altitude
    SMART_RTL =    21,  // SMART_RTL returns to home by retracing its steps
    FLOWHOLD  =    22,  // FLOWHOLD holds position with optical flow without rangefinder
    FOLLOW    =    23,  // follow attempts to follow another vehicle or ground station
    ZIGZAG    =    24,  // ZIGZAG mode is able to fly in a zigzag manner with predefined point A and point B
    SYSTEMID  =    25,  // System ID mode produces automated system identification signals in the controllers
    AUTOROTATE =   26,  // Autonomous autorotation
};
Step 2:定义基本接口
为mode.h中的模式定义一个新的类。复制类似的现有模式的类定义并更改类名可能是最简单的(即复制并重命名“class ModeStabilize”为“class ModeNewMode”)。新类应该继承自Mode类,并实现run()、name()和name4()以及可选的init()。
public:
   // inherit constructor
   using Mode::Mode;
   bool init(bool ignore_checks) override;
   void run() override;

protected:
   const char *name() const override { return "NEWMODE"; }
   const char *name4() const override { return "NEWM"; }
注:其他需要的接口,请根据需求自行添加,建议参考已有的飞行模式代码。
Step 3:补充基本接口实现
基于类似的模式(如mode_stabilize.cpp或mode_loiter.cpp)创建一个新的mode_.cpp文件。这个新文件可能会实现init()方法,该方法将在首次进入该模式时调用。如果可以进入模式,则此功能应返回true,如果不能,则返回false。
- mode_rtl.cpp的
init和run方法。
// rtl_init - initialise rtl controller
bool ModeRTL::init(bool ignore_checks)
{
    if (!ignore_checks) {
        if (!AP::ahrs().home_is_set()) {
            return false;
        }
    }
    // initialise waypoint and spline controller
    wp_nav->wp_and_spline_init(g.rtl_speed_cms);
    _state = SubMode::STARTING;
    _state_complete = true; // see run() method below
    terrain_following_allowed = !copter.failsafe.terrain;
    // reset flag indicating if pilot has applied roll or pitch inputs during landing
    copter.ap.land_repo_active = false;

    // this will be set true if prec land is later active
    copter.ap.prec_land_active = false;

#if AC_PRECLAND_ENABLED
    // initialise precland state machine
    copter.precland_statemachine.init();
#endif

    return true;
}
// rtl_run - runs the return-to-launch controller
// should be called at 100hz or more
void ModeRTL::run(bool disarm_on_land)
{
    if (!motors->armed()) {
        return;
    }

    // check if we need to move to next state
    if (_state_complete) {
        switch (_state) {
        case SubMode::STARTING:
            build_path();
            climb_start();
            break;
        case SubMode::INITIAL_CLIMB:
            return_start();
            break;
        case SubMode::RETURN_HOME:
            loiterathome_start();
            break;
        case SubMode::LOITER_AT_HOME:
            if (rtl_path.land || copter.failsafe.radio) {
                land_start();
            } else {
                descent_start();
            }
            break;
        case SubMode::FINAL_DESCENT:
            // do nothing
            break;
        case SubMode::LAND:
            // do nothing - rtl_land_run will take care of disarming motors
            break;
        }
    }

    // call the correct run function
    switch (_state) {

    case SubMode::STARTING:
        // should not be reached:
        _state = SubMode::INITIAL_CLIMB;
        FALLTHROUGH;

    case SubMode::INITIAL_CLIMB:
        climb_return_run();
        break;

    case SubMode::RETURN_HOME:
        climb_return_run();
        break;

    case SubMode::LOITER_AT_HOME:
        loiterathome_run();
        break;

    case SubMode::FINAL_DESCENT:
        descent_run();
        break;

    case SubMode::LAND:
        land_run(disarm_on_land);
        break;
    }
}
Step 4:添加类实例
通过搜索“ModeAcro”,然后在下面的某个地方添加新模式,在Copter.h中实例化新模式类。
#if MODE_ACRO_ENABLED == ENABLED
#if FRAME_CONFIG == HELI_FRAME
    ModeAcro_Heli mode_acro;
#else
    ModeAcro mode_acro;
#endif
#endif
    ModeAltHold mode_althold;
#if MODE_AUTO_ENABLED == ENABLED
    ModeAuto mode_auto;
#endif
#if AUTOTUNE_ENABLED == ENABLED
    ModeAutoTune mode_autotune;
#endif
#if MODE_BRAKE_ENABLED == ENABLED
    ModeBrake mode_brake;
#endif
#if MODE_CIRCLE_ENABLED == ENABLED
    ModeCircle mode_circle;
#endif
#if MODE_DRIFT_ENABLED == ENABLED
    ModeDrift mode_drift;
#endif
#if MODE_FLIP_ENABLED == ENABLED
    ModeFlip mode_flip;
#endif
#if MODE_FOLLOW_ENABLED == ENABLED
    ModeFollow mode_follow;
#endif
#if MODE_GUIDED_ENABLED == ENABLED
    ModeGuided mode_guided;
#endif
    ModeLand mode_land;
#if MODE_LOITER_ENABLED == ENABLED
    ModeLoiter mode_loiter;
#endif
#if MODE_POSHOLD_ENABLED == ENABLED
    ModePosHold mode_poshold;
#endif
#if MODE_RTL_ENABLED == ENABLED
    ModeRTL mode_rtl;
#endif
Step 5:添加模式映射
在mode.cpp中,将新模式添加到mode_from_mode_num()函数中,以创建模式编号和类实例之间的映射。
// return the static controller object corresponding to supplied mode
Mode *Copter::mode_from_mode_num(const Mode::Number mode)
{
    Mode *ret = nullptr;

    switch (mode) {
#if MODE_ACRO_ENABLED == ENABLED
        case Mode::Number::ACRO:
            ret = &mode_acro;
            break;
#endif

        case Mode::Number::STABILIZE:
            ret = &mode_stabilize;
            break;

        case Mode::Number::ALT_HOLD:
            ret = &mode_althold;
            break;

#if MODE_AUTO_ENABLED == ENABLED
        case Mode::Number::AUTO:
            ret = &mode_auto;
            break;
#endif

#if MODE_CIRCLE_ENABLED == ENABLED
        case Mode::Number::CIRCLE:
            ret = &mode_circle;
            break;
#endif

#if MODE_LOITER_ENABLED == ENABLED
        case Mode::Number::LOITER:
            ret = &mode_loiter;
            break;
#endif

#if MODE_GUIDED_ENABLED == ENABLED
        case Mode::Number::GUIDED:
            ret = &mode_guided;
            break;
#endif

        case Mode::Number::LAND:
            ret = &mode_land;
            break;

#if MODE_RTL_ENABLED == ENABLED
        case Mode::Number::RTL:
            ret = &mode_rtl;
            break;
#endif

#if MODE_DRIFT_ENABLED == ENABLED
        case Mode::Number::DRIFT:
            ret = &mode_drift;
            break;
#endif
Step 6:设置默认飞行模式
将新飞行模式添加到config.h中FLIGHT_MODE_1~FLIGHT_MODE_6,使用新模式的编号,如:RTL。
//
// FLIGHT_MODE
//

#ifndef FLIGHT_MODE_1
 # define FLIGHT_MODE_1                  Mode::Number::STABILIZE
#endif
#ifndef FLIGHT_MODE_2
 # define FLIGHT_MODE_2                  Mode::Number::STABILIZE
#endif
#ifndef FLIGHT_MODE_3
 # define FLIGHT_MODE_3                  Mode::Number::STABILIZE
#endif
#ifndef FLIGHT_MODE_4
 # define FLIGHT_MODE_4                  Mode::Number::STABILIZE
#endif
#ifndef FLIGHT_MODE_5
 # define FLIGHT_MODE_5                  Mode::Number::STABILIZE
#endif
#ifndef FLIGHT_MODE_6
 # define FLIGHT_MODE_6                  Mode::Number::RTL
#endif
Step 7:地面站配置参数修改
选择将飞行模式添加到mavlink/ardupilotmega.xml中的COPTER_mode枚举中,因为一些地面站可能会使用此枚举自动填充可用飞行模式列表。
    <enum name="COPTER_MODE">
      <description>A mapping of copter flight modes for custom_mode field of heartbeat.</description>
      <entry value="0" name="COPTER_MODE_STABILIZE"/>
      <entry value="1" name="COPTER_MODE_ACRO"/>
      <entry value="2" name="COPTER_MODE_ALT_HOLD"/>
      <entry value="3" name="COPTER_MODE_AUTO"/>
      <entry value="4" name="COPTER_MODE_GUIDED"/>
      <entry value="5" name="COPTER_MODE_LOITER"/>
      <entry value="6" name="COPTER_MODE_RTL"/>
      <entry value="7" name="COPTER_MODE_CIRCLE"/>
      <entry value="9" name="COPTER_MODE_LAND"/>
      <entry value="11" name="COPTER_MODE_DRIFT"/>
      <entry value="13" name="COPTER_MODE_SPORT"/>
      <entry value="14" name="COPTER_MODE_FLIP"/>
      <entry value="15" name="COPTER_MODE_AUTOTUNE"/>
      <entry value="16" name="COPTER_MODE_POSHOLD"/>
      <entry value="17" name="COPTER_MODE_BRAKE"/>
      <entry value="18" name="COPTER_MODE_THROW"/>
      <entry value="19" name="COPTER_MODE_AVOID_ADSB"/>
      <entry value="20" name="COPTER_MODE_GUIDED_NOGPS"/>
      <entry value="21" name="COPTER_MODE_SMART_RTL"/>
      <entry value="22" name="COPTER_MODE_FLOWHOLD"/>
      <entry value="23" name="COPTER_MODE_FOLLOW"/>
      <entry value="24" name="COPTER_MODE_ZIGZAG"/>
      <entry value="25" name="COPTER_MODE_SYSTEMID"/>
      <entry value="26" name="COPTER_MODE_AUTOROTATE"/>
      <entry value="27" name="COPTER_MODE_AUTO_RTL"/>
    </enum>
5. 总结
本章重点讨论了:
- 梳理了当前ArduPilot已经实现的飞行模式,给出了飞行模式之间的类继承关系。
- 通过飞行模式的设计,从类实现原理上给出了重要的框架实现接口。
- 从切换场景角度阐述了飞行模式复杂性,从而更好的解释了类继承关系的重要性。
- 最后,给出了新增自定义飞行模式的方法。
希望,能够通过初步的研读内容,能为后续新增自定义飞控飞行模式带来便捷性。
6. 参考资料
【1】ArduPilot开源飞控系统之简单介绍
【2】ArduPilot之开源代码Task介绍
【3】ArduPilot飞控启动&运行过程简介
【4】ArduPilot开源代码之AP_RCProtocol_CRSF
【5】无人机跟随一维高度避障场景–逻辑分析
【6】ArduPilot开源飞控之do_failsafe_action
【7】ArduPilot开源代码之RCInput