这一次我们来做一个通义千问的项目
1.申请和开通
1.1.文字识别开通
首先,打开文字识别_OCR 文字识别_图片识别文字_数据智能-阿里云 (aliyun.com)页面并登陆阿里云账号,点击![]() ,文字识别服务。接下来在RAM 访问控制 (aliyun.com)页面申请一个AccessKey并牢记。
,文字识别服务。接下来在RAM 访问控制 (aliyun.com)页面申请一个AccessKey并牢记。
1.2.通义千问申请
打开API详情_灵积模型服务-阿里云帮助中心 (aliyun.com),选择申请体验,点击同意,即可申请体验。通过以后,打开API-KEY管理 (aliyun.com),创建一个apikey并牢记
2.计算器的制作
首先打开阿里云盘分享,下载所需要的文件,之后运行bat文件,安装所需模块。
import PySimpleGUI as sg
#引入模块PySimpleGUI
a=""
#创建变量来保存计算公式
layout=[
    [sg.In(key="-I-",disabled=True,size=(18, None))],
    [sg.T(key="-T-")],
    [sg.B("c",key="c",size=(2,2)),sg.B("(",key="(",size=(2,2)),sg.B(")",key=")",size=(2,2)),sg.B("**",key="**",size=(2,2))],
    [sg.B("7",key="7",size=(2,2)),sg.B("8",key="8",size=(2,2)),sg.B("9",key="9",size=(2,2)),sg.B("+",key="+",size=(2,2))],
    [sg.B("4",key="4",size=(2,2)),sg.B("5",key="5",size=(2,2)),sg.B("6",key="6",size=(2,2)),sg.B("-",key="-",size=(2,2))],
    [sg.B("1",key="1",size=(2,2)),sg.B("2",key="2",size=(2,2)),sg.B("3",key="3",size=(2,2)),sg.B("*",key="*",size=(2,2))],
    [sg.B(".",key=".",size=(2,2)),sg.B("0",key="0",size=(2,2)),sg.B("=",key="=",size=(2,2)),sg.B("/",key="/",size=(2,2))]


    ]
#界面布局创建
if 1==1:
    window=sg.Window('计算器',layout,grab_anywhere=True,disable_minimize=True,keep_on_top=True)
    #创建界面

    while True:
        event,values=window.read()
        #刷新
        if event==None:
            break
        #窗口关闭
        if event=="1" or "2" or "3" or "4" or "5" or "6" or "7" or "8" or "9" or "0":
            window["-I-"].update(value=a+event)
            a=a+event
        if event=="c":
            window["-I-"].update(value="")
            a=""
        #清空数据
        if event=="=":
            qqqq=str(a)
            qqq=a.replace("=","")
            # window["-TT-"].update(qqqq)
            # b=f'window["-T-"].update('+qqqq+qqq+')'
            try:
                qls="qls="+qqq
                exec(qls)
                print(qls)
                window["-T-"].update(qqqq+str(qls))

            except Exception as e:
                print(e)
                window["-T-"].update("你输入的计算方式有问题")

            window["-I-"].update(value="")


            a=""
            #计算和更新
3.制作翻译程序
这个翻译调用的是有道的api,先在命令行输入pip install urllib,之后开始调用
from urllib import request
import urllib
import re
import PySimpleGUI as sg
try:
    #翻译核心程序
    def fanyi(key):


        header={"User-Agent":" Mozilla/5.0 (Windows NT 10.0; Win64; x64) AppleWebKit/537.36 (KHTML, like Gecko) Chrome/108.0.0.0 Safari/537.36 Edg/108.0.1462.54"}
        url="http://fanyi.youdao.com/translate?smartresult=dict&smartresult=rule"

        formdata={}
        formdata['i'] = key
        formdata['from'] = 'AUTO'
        formdata['to'] = 'AUTO'
        formdata['smartresult'] = 'dict'
        formdata['client'] =  'fanyideskweb'
        formdata['salt'] = '15821157689747'
        formdata['sign'] = 'd5a392995c28c285198043f7111d1d00'
        formdata['ts'] = '1582115768974'
        formdata['bv'] = 'ec579abcd509567b8d56407a80835950'
        formdata['doctype'] = 'json'
        formdata['version'] = '2.1'
        formdata['keyfrom'] = 'fanyi.web'
        formdata['action'] = 'FY_BY_CLICKBUTTION'
        data = urllib.parse.urlencode(formdata).encode('utf-8')
        req=request.Request(url,data=data,headers=header)
        resp=request.urlopen(req).read().decode()
        pat=r'"tgt":"(.*?)"}]]'
        result=re.findall(pat,resp)

        return result[0]


        #图形化界面设计
    layout = [[sg.T('欢迎来到翻译系统V2', key='-TXT-')],
    [sg.T('原文', key='-TXT-')],
          [sg.Input(key='-IN-', size=(20,1)),
                 sg.B("翻译",key='-B-')
                 ]]


    window = sg.Window('翻译系统v2', layout)

    while True:
        event, values = window.read()

        if event ==None:
            break
        elif event == '-B-':
            a=fanyi(values["-IN-"])
            sg.popup("翻译是",a,title="翻译成功")
    window.close()
except Exception as e:
    sg.popup("出现错误,错误码",e,title="出现错误")

    window.close()
4.制作图片转文字
图片转文字(阿里云示例代码)
# -*- coding: utf-8 -*-
# This file is auto-generated, don't edit it. Thanks.
import os
import sys
import json
from typing import List
import re
from alibabacloud_ocr_api20210707.client import Client as ocr_api20210707Client
from alibabacloud_tea_openapi import models as open_api_models
from alibabacloud_darabonba_stream.client import Client as StreamClient
from alibabacloud_ocr_api20210707 import models as ocr_api_20210707_models
from alibabacloud_tea_util import models as util_models
from alibabacloud_tea_util.client import Client as UtilClient


class Sample:
    def __init__(self):
        pass

    @staticmethod
    def create_client(
        access_key_id: str,
        access_key_secret: str,
    ) -> ocr_api20210707Client:
        """
        使用AK&SK初始化账号Client
        @param access_key_id:
        @param access_key_secret:
        @return: Client
        @throws Exception
        """
        config = open_api_models.Config(
            # 必填,您的 AccessKey ID,
            access_key_id="你的AccessKey ID",
            # 必填,您的 AccessKey Secret,
            access_key_secret="你的AccessKey Secre"
        )
        # Endpoint 请参考 https://api.aliyun.com/product/ocr-api
        config.endpoint = f'ocr-api.cn-hangzhou.aliyuncs.com'
        return ocr_api20210707Client(config)

    @staticmethod
    def main(
        img,args: List[str],
    ) -> None:
        # 请确保代码运行环境设置了环境变量 ALIBABA_CLOUD_ACCESS_KEY_ID 和 ALIBABA_CLOUD_ACCESS_KEY_SECRET。
        # 工程代码泄露可能会导致 AccessKey 泄露,并威胁账号下所有资源的安全性。以下代码示例使用环境变量获取 AccessKey 的方式进行调用,仅供参考,建议使用更安全的 STS 方式,更多鉴权访问方式请参见:https://help.aliyun.com/document_detail/378659.html
        client = Sample.create_client('你的AccessKey ID', '你的AccessKey Secre')
        # 需要安装额外的依赖库,直接点击下载完整工程即可看到所有依赖。
        body_stream = StreamClient.read_from_file_path(img)
        recognize_general_request = ocr_api_20210707_models.RecognizeGeneralRequest(
            url='',
            body=body_stream
        )
        runtime = util_models.RuntimeOptions()
        try:
            # 复制代码运行请自行打印 API 的返回值
            aa=str(client.recognize_general_with_options(recognize_general_request, runtime))

            r=re.compile(r'"content":"(.|\n)*","height"')
            bbbb=r.search(aa).group()
            bbbb=bbbb.strip('"content":"')
            bbbb=bbbb.strip('","height"')
            return bbbb
        except Exception as error:
            # 如有需要,请打印 error
            UtilClient.assert_as_string(error)

    @staticmethod
    async def main_async(
        args: List[str],
    ) -> None:
        # 请确保代码运行环境设置了环境变量 ALIBABA_CLOUD_ACCESS_KEY_ID 和 ALIBABA_CLOUD_ACCESS_KEY_SECRET。
        # 工程代码泄露可能会导致 AccessKey 泄露,并威胁账号下所有资源的安全性。以下代码示例使用环境变量获取 AccessKey 的方式进行调用,仅供参考,建议使用更安全的 STS 方式,更多鉴权访问方式请参见:https://help.aliyun.com/document_detail/378659.html
        client = Sample.create_client(os.environ['ALIBABA_CLOUD_ACCESS_KEY_ID'], os.environ['ALIBABA_CLOUD_ACCESS_KEY_SECRET'])
        # 需要安装额外的依赖库,直接点击下载完整工程即可看到所有依赖。
        body_stream = StreamClient.read_from_file_path(r"")
        recognize_general_request = ocr_api_20210707_models.RecognizeGeneralRequest(
            url='',
            body=body_stream
        )
        runtime = util_models.RuntimeOptions()
        try:
            # 复制代码运行请自行打印 API 的返回值
            await client.recognize_general_with_options_async(recognize_general_request, runtime)
        except Exception as error:
            # 如有需要,请打印 error

            UtilClient.assert_as_string(error.message)


if __name__ == '__main__':
    # Sample.main(r"C:\Users\wq546\Desktop\0.png",sys.argv[1:])
    pass
5.制作核心程序(通义千问)
引入模块
import imgtostr
import webbrowser as web
import sys
import PySimpleGUI as sg
import dashscope
from dashscope import Generation
from http import HTTPStatus
import json
调用计算器
def jisuanqi():

    if 1==1:
        import importlib
        if 'jsq' in sys.modules:
            del sys.modules["jsq"]
        import jsq
调用翻译
def fanyi():
    if 1==1:
        import importlib
        if 'fy' in sys.modules:
            del sys.modules["fy"]
        import fy
重点!调用通义千问(阿里云官方文档的示例有差不多的)
def qianwen(a):


    if 1==1:


        response = Generation.call(
            model='qwen-v1',
            prompt=a,
            api_key='你的阿里云灵积大模型apikey'
        )
        # The response status_code is HTTPStatus.OK indicate success,
        # otherwise indicate request is failed, you can get error code
        # and message from code and message.
        if response.status_code == HTTPStatus.OK:
            print(response.output["text"])
            return response.output["text"]  # The output text
            # print(response.usage)  # The usage information
        else:
            print(response.code)  # The error code.
            print(response.message)  # The error message.
主程序和播放回答
def main():
    #页面设计
    c=0
    import PySimpleGUI as sg
    layout=[

        [sg.T("                                                                                                                               "),sg.Text("欢迎来到便携工具",relief='ridge',border_width=5,font=('华文彩云',15))],
        [sg.T("通义千问")],
        [sg.T("问题"),sg.InputText(key="-W-",size=(100, None)),sg.B("提问",key="-TT-"),sg.InputText(key="-IMG-",disabled=False,size=(30, None)),sg.T("图片内容"),sg.FileBrowse("读取",target='-IMG-',file_types=(("ALL Files","*.png"),("ALL Files","*.jpg"),)),sg.B("加入",key="-WIMG-")],
        [sg.B("播放",key="-BF-"),sg.In("",disabled=True,key="-HD-",size=(160, None))],
        [sg.Button('计算器',key="-JSQ-"),sg.Button('翻译',key="-FY-"),sg.B("退出",key='-EXIT-')]
        ]

    if 1==1:
        window=sg.Window('便携工具',layout)

        while True:
            event,values=window.read()
            if event=="-BF-":
                                # coding=utf-8
                #
                # Installation instructions for pyaudio:
                # APPLE Mac OS X
                #   brew install portaudio
                #   pip install pyaudio
                # Debian/Ubuntu
                #   sudo apt-get install python-pyaudio python3-pyaudio
                #   or
                #   pip install pyaudio
                # CentOS
                #   sudo yum install -y portaudio portaudio-devel && pip install pyaudio
                # Microsoft Windows
                #   python -m pip install pyaudio

                import dashscope
                import sys
                import pyaudio
                from dashscope.api_entities.dashscope_response import SpeechSynthesisResponse
                from dashscope.audio.tts import ResultCallback, SpeechSynthesizer, SpeechSynthesisResult

                dashscope.api_key='你的阿里云灵积大模型apikey'

                class Callback(ResultCallback):
                    _player = None
                    _stream = None

                    def on_open(self):
                        print('Speech synthesizer is opened.')
                        self._player = pyaudio.PyAudio()
                        self._stream = self._player.open(
                            format=pyaudio.paInt16,
                            channels=1,
                            rate=48000,
                            output=True)

                    def on_complete(self):
                        print('Speech synthesizer is completed.')

                    def on_error(self, response: SpeechSynthesisResponse):
                        print('Speech synthesizer failed, response is %s' % (str(response)))

                    def on_close(self):
                        print('Speech synthesizer is closed.')
                        self._stream.stop_stream()
                        self._stream.close()
                        self._player.terminate()

                    def on_event(self, result: SpeechSynthesisResult):
                        if result.get_audio_frame() is not None:
                            print('audio result length:', sys.getsizeof(result.get_audio_frame()))
                            self._stream.write(result.get_audio_frame())

                        if result.get_timestamp() is not None:
                            print('timestamp result:', str(result.get_timestamp()))

                callback = Callback()
                SpeechSynthesizer.call(model='sambert-zhichu-v1',
                                       text=values["-HD-"],
                                       sample_rate=48000,
                                       format='pcm',
                                       callback=callback)
            if event==None:
                break
            if event=="-EXIT-":
                break
            if event=="-TT-":
                # if values["-IMG-"]!="":
                #     img=values["-IMG-"]
                #     text=imgtostr.Sample.main(img,sys.argv[1:])
                #     huida=qianwen(text)
                #     window["-HD-"].update(value=huida)
                #     window["-IMG-"].update("")
                # else:
                huida=qianwen(values["-W-"])
                window["-HD-"].update(value=huida)
            if event=="-JSQ-":

                jisuanqi()
            if event=="-FY-":
                fanyi()
            if event=="-WK-":
                wangke()
            if event=="-WIMG-":
                img=values["-IMG-"]
                text=imgtostr.Sample.main(img,sys.argv[1:])
                window["-W-"].update(value=text)

        window.close()
运行程序
main()现在运行一下看看吧!
如果看介绍麻烦,可以直接复制核心程序的代码
import imgtostr
import webbrowser as web
import sys
import PySimpleGUI as sg
import dashscope
from dashscope import Generation
from http import HTTPStatus
import json

def jisuanqi():

    if 1==1:
        import importlib
        if 'jsq' in sys.modules:
            del sys.modules["jsq"]
        import jsq


def fanyi():
    if 1==1:
        import importlib
        if 'fy' in sys.modules:
            del sys.modules["fy"]
        import fy

def qianwen(a):


    if 1==1:


        response = Generation.call(
            model='qwen-v1',
            prompt=a,
            api_key='你的阿里云灵积大模型apikey'
        )
        # The response status_code is HTTPStatus.OK indicate success,
        # otherwise indicate request is failed, you can get error code
        # and message from code and message.
        if response.status_code == HTTPStatus.OK:
            print(response.output["text"])
            return response.output["text"]  # The output text
            # print(response.usage)  # The usage information
        else:
            print(response.code)  # The error code.
            print(response.message)  # The error message.
def main():

    c=0
    import PySimpleGUI as sg
    layout=[

        [sg.T("                                                                                                                               "),sg.Text("欢迎来到便携工具",relief='ridge',border_width=5,font=('华文彩云',15))],
        [sg.T("通义千问")],
        [sg.T("问题"),sg.InputText(key="-W-",size=(100, None)),sg.B("提问",key="-TT-"),sg.InputText(key="-IMG-",disabled=False,size=(30, None)),sg.T("图片内容"),sg.FileBrowse("读取",target='-IMG-',file_types=(("ALL Files","*.png"),("ALL Files","*.jpg"),)),sg.B("加入",key="-WIMG-")],
        [sg.B("播放",key="-BF-"),sg.In("",disabled=True,key="-HD-",size=(160, None))],
        [sg.Button('计算器',key="-JSQ-"),sg.Button('翻译',key="-FY-"),sg.B("退出",key='-EXIT-')]
        ]

    if 1==1:
        window=sg.Window('便携工具',layout)

        while True:
            event,values=window.read()
            if event=="-BF-":
                                # coding=utf-8
                #
                # Installation instructions for pyaudio:
                # APPLE Mac OS X
                #   brew install portaudio
                #   pip install pyaudio
                # Debian/Ubuntu
                #   sudo apt-get install python-pyaudio python3-pyaudio
                #   or
                #   pip install pyaudio
                # CentOS
                #   sudo yum install -y portaudio portaudio-devel && pip install pyaudio
                # Microsoft Windows
                #   python -m pip install pyaudio

                import dashscope
                import sys
                import pyaudio
                from dashscope.api_entities.dashscope_response import SpeechSynthesisResponse
                from dashscope.audio.tts import ResultCallback, SpeechSynthesizer, SpeechSynthesisResult

                dashscope.api_key='你的阿里云灵积大模型apikey'

                class Callback(ResultCallback):
                    _player = None
                    _stream = None

                    def on_open(self):
                        print('Speech synthesizer is opened.')
                        self._player = pyaudio.PyAudio()
                        self._stream = self._player.open(
                            format=pyaudio.paInt16,
                            channels=1,
                            rate=48000,
                            output=True)

                    def on_complete(self):
                        print('Speech synthesizer is completed.')

                    def on_error(self, response: SpeechSynthesisResponse):
                        print('Speech synthesizer failed, response is %s' % (str(response)))

                    def on_close(self):
                        print('Speech synthesizer is closed.')
                        self._stream.stop_stream()
                        self._stream.close()
                        self._player.terminate()

                    def on_event(self, result: SpeechSynthesisResult):
                        if result.get_audio_frame() is not None:
                            print('audio result length:', sys.getsizeof(result.get_audio_frame()))
                            self._stream.write(result.get_audio_frame())

                        if result.get_timestamp() is not None:
                            print('timestamp result:', str(result.get_timestamp()))

                callback = Callback()
                SpeechSynthesizer.call(model='sambert-zhichu-v1',
                                       text=values["-HD-"],
                                       sample_rate=48000,
                                       format='pcm',
                                       callback=callback)
            if event==None:
                break
            if event=="-EXIT-":
                break
            if event=="-TT-":
                # if values["-IMG-"]!="":
                #     img=values["-IMG-"]
                #     text=imgtostr.Sample.main(img,sys.argv[1:])
                #     huida=qianwen(text)
                #     window["-HD-"].update(value=huida)
                #     window["-IMG-"].update("")
                # else:
                huida=qianwen(values["-W-"])
                window["-HD-"].update(value=huida)
            if event=="-JSQ-":

                jisuanqi()
            if event=="-FY-":
                fanyi()
            if event=="-WK-":
                wangke()
            if event=="-WIMG-":
                img=values["-IMG-"]
                text=imgtostr.Sample.main(img,sys.argv[1:])
                window["-W-"].update(value=text)

        window.close()

main()
'''
img=values["-IMG-"]
                text=imgtostr.Sample.main(img,sys.argv[1:])
                huida=qianwen(text)
                window["-HD-"].update(value=huida)
'''
结尾
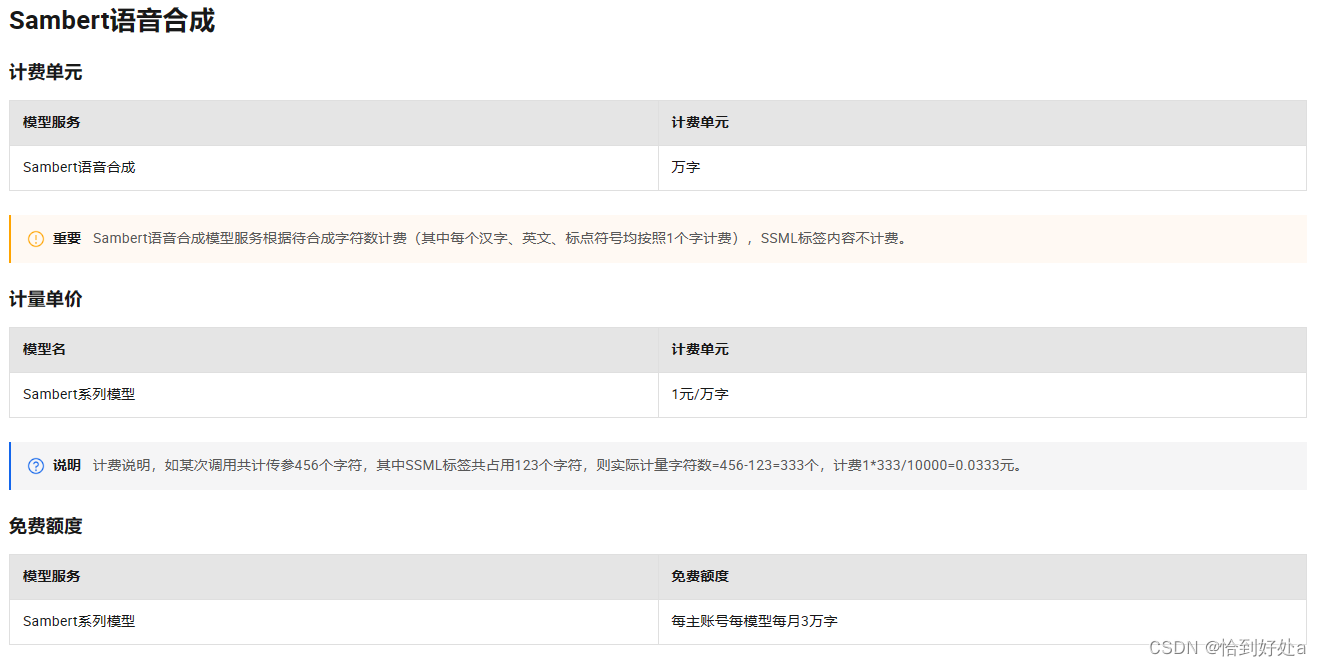
效果不错吧?这里温馨提示一下:如果你用多了是要收费的哦!通义千问计费标准(1个token=一个汉字或者3-4个英文字母)

文字识别200次,否则需要购买资源包
 语音合成每月三万字,否则1元一万字
注意不要用多啦!
这个内容就到这里,再见啦!





![金盘 微信管理平台 getsysteminfo 未授权访问漏洞[2023-HW]](https://img-blog.csdnimg.cn/ff6b56e346b04e28a28dd014e77f4e67.png)


![【C++题解】[2020普及组模拟题]wgy的JX语言](https://img-blog.csdnimg.cn/3d53c79916284bdeb173fd51e64c2617.png)
