为了帮助更加方便的进行漏洞挖掘工作,前面我们通过了几篇文章详解的给大家介绍了动态调试技术、过反调试技术、Hook技术、过反Hook技术、抓包技术等,掌握了这些可以很方便的开展App漏洞挖掘工作,而最后我们还需要掌握一定的脱壳技巧,进行进一步助力我们漏洞挖掘的效率,本文主要介绍Android App加壳中的整体dex加壳,帮助大家掌握加壳的原理和脱壳的各种技能。
本文第二节主要讲述Android启动流程和加壳原理
本文第三节主要介绍整体加壳的实现
本文第四节主要讲当下脱壳点的概念
本文第五节讲述现有的脱壳技巧
(1)Android系统启动流程
我们要彻底的了解App加壳原理,首先我们从了解App的启动流程出发,先于App启动之前,Android系统是启动最早,下面我们来详细查看一下Android系统的启动过程:

我在Xposed源码定制一文中详细的讲解了Android的启动流程,简单来说就是:

| 1 | 加载BootLoader --> 初始化内核 --> 启动init进程 --> init进程fork出Zygote进程 --> Zygote进程fork出SystemServer进程
|
我们就了解了最后Zygote进程fork出第一个进程:SystemServer进程,SystemServer主要完成了以下工作:

android app安装
首先这里我们先介绍一下PackageManagerService,其主要是完成Android中应用程序安装的服务,我们了解的Android应用程序安装的方式:
| 1 2 3 4 | · 系统启动时安装,没有安装界面
· 第三方应用安装,有安装界面,也是我们最熟悉的方式
· ADB命令安装,没有安装界面
· 通过各类应用市场安装,没有安装界面
|
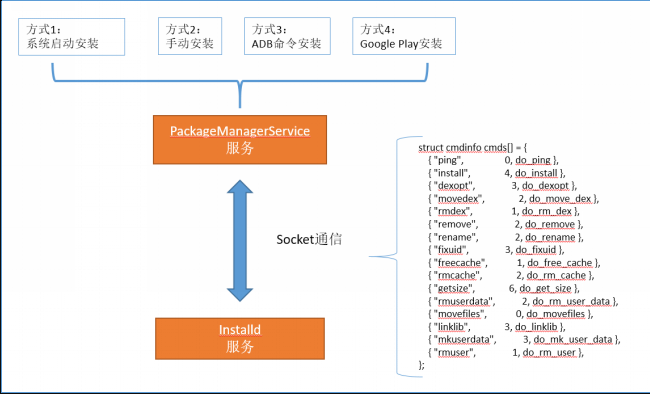
虽然安装方式不同,但是最后四种方式都是通过PackageManagerService服务来完成应用程序的安装。而PackageManagerService服务则通过与Installd服务通信,发送具体的指令来执行应用程序的安装、卸载等工作
| 1 2 3 4 5 6 | public static final IPackageManager main(Context context, Installer installer,
boolean factoryTest, boolean onlyCore) {
PackageManagerService m = new PackageManagerService(context, installer, factoryTest, onlyCore);
ServiceManager.addService("package", m);
return m;
}
|
应用程序在安装时涉及到如下几个重要目录:

我们了解完App的安装流程是由PackageManagerService,同理SystemServer启动了一个更加重要的服务ActivityManagerService, 而AMS其中很重要的一个作用就是启动Launcher进程,具体是怎么启动的,大家可以参考文章:Android系统启动流程(四)Launcher启动过程与系统启动流程,这里就不再详细讲解,而进入Launcher进程,我们就进入了App启动的流程。
(2)App启动流程
Android系统启动的最后一步是启动一个Home应用程序,这个应用程序用来显示系统中已经安装的应用程序,这个Home应用程序就叫做Launcher。应用程序Launcher在启动过程中会请求PackageManagerService返回系统中已经安装的应用程序的信息,并将这些信息封装成一个快捷图标列表显示在系统屏幕上,这样用户可以通过点击这些快捷图标来启动相应的应用程序
前面我们描述了AMS将Launcher启动,然后进入App启动流程,这里参考文章:ActivityThread的理解和APP的启动过程

| 1 2 3 4 5 6 7 8 | (1)点击桌面APP图标时,Launcher的startActivity()方法,通过Binder通信,调用system_server进程中AMS服务的startActivity方法,发起启动请求
(2)system_server进程接收到请求后,向Zygote进程发送创建进程的请求
(3)Zygote进程fork出App进程,并执行ActivityThread的main方法,创建ActivityThread线程,初始化MainLooper,主线程Handler,同时初始化ApplicationThread用于和AMS通信交互
(4)App进程,通过Binder向sytem_server进程发起attachApplication请求,这里实际上就是APP进程通过Binder调用sytem_server进程中AMS的attachApplication方法,AMS的attachApplication方法的作用是将ApplicationThread对象与AMS绑定
(5)system_server进程在收到attachApplication的请求,进行一些准备工作后,再通过binder IPC向App进程发送handleBindApplication请求(初始化Application并调用onCreate方法)和scheduleLaunchActivity请求(创建启动Activity)
(6)App进程的binder线程(ApplicationThread)在收到请求后,通过handler向主线程发送BIND_APPLICATION和LAUNCH_ACTIVITY消息,这里注意的是AMS和主线程并不直接通信,而是AMS和主线程的内部类ApplicationThread通过Binder通信,ApplicationThread再和主线程通过Handler消息交互。
(7)主线程在收到Message后,创建Application并调用onCreate方法,再通过反射机制创建目标Activity,并回调Activity.onCreate()等方法
(8)到此,App便正式启动,开始进入Activity生命周期,执行完onCreate/onStart/onResume方法,UI渲染后显示APP主界面
|
到这里,我们的大致弄清了APP的启动流程,而这里我们就进入了加壳中十分重要的地方ActivityTread
(3)ActivityThread启动流程
寒冰大佬在FART:ART环境下基于主动调用的自动化脱壳方案 一文中讲述了ActivityThread.main()是进入App世界的大门,并由此展开了对加壳原理的讲述
同理接下来,我们开始进行源码分析,了解ActivityThread的具体操作:
xref/frameworks/base/core/java/android/app/ActivityThread.java
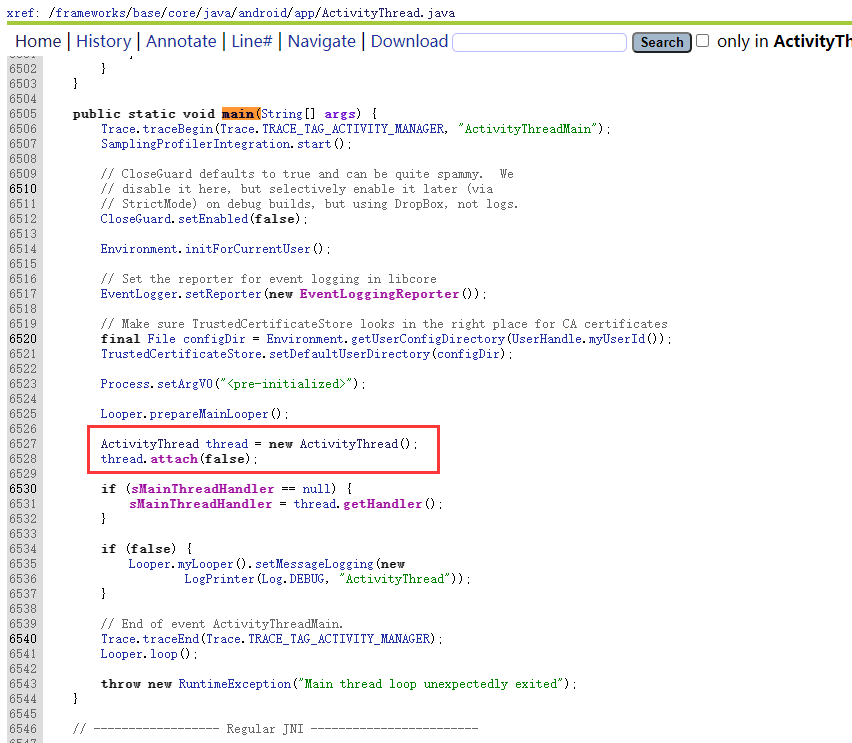
根据寒冰大佬描述,在ActivityThread完成实例化操作,调用thread.attach(false)完成一系列初始化准备工作,最后主线程进入消息循环,等待接收来自系统的消息。当收到系统发送来的bindapplication的进程间调用时,调用函数handlebindapplication来处理该请求
| 1 2 3 4 5 6 7 8 9 10 | public void handleMessage(Message msg) {
****
case BIND_APPLICATION:
Trace.traceBegin(Trace.TRACE_TAG_ACTIVITY_MANAGER, "bindApplication");
AppBindData data = (AppBindData)msg.obj;
handleBindApplication(data);
Trace.traceEnd(Trace.TRACE_TAG_ACTIVITY_MANAGER);
break;
****
}
|
在处理消息过程,很很明显进入了handlebindapplication函数
这里我再用寒冰大佬文章的内容:
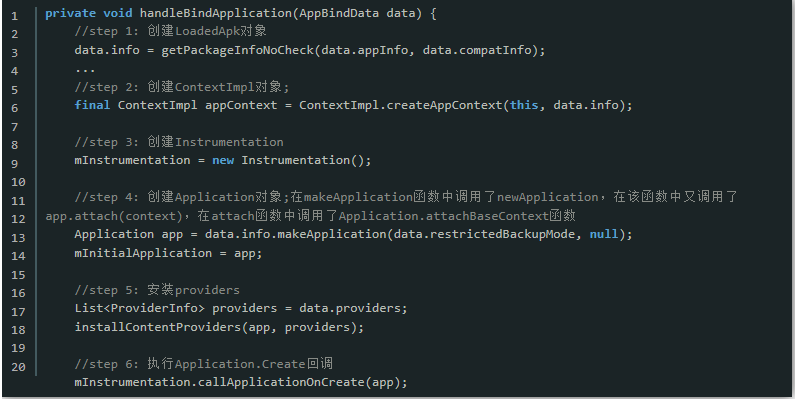
我们定位第四步,Application进行实例化,然后进入makeApplication
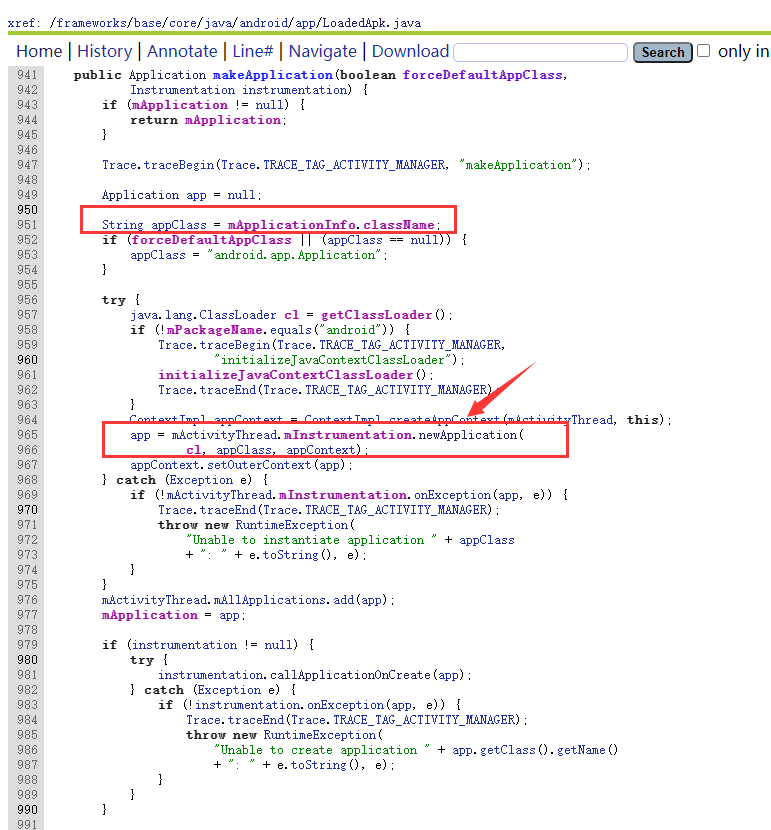
然后我们进入newApplication

这里我们可以看见完成了两件事:
| 1 2 | (1)完成了Application的实例化
(2)并调用Application.attach()函数
|
然后我们继续进入Application.attach()函数

这里我们就进一步调用了attachBaseContext()方法
最后回到handlebindapplication中执行第6步,进入callApplicationOnCreate()函数
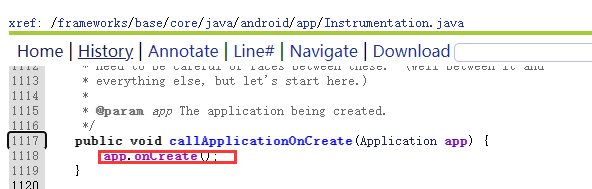
就执行了Application.onCreate()方法
总结:
| 1 2 3 4 | 从上可知, App的运行流程是
初始化————>Application的构造函数————>Application.attachBaseContext()————>Application.onCreate()函数
最后才会进入MainActivity中的attachBaseContext函数、onCreate函数
所以加壳厂商要在程序正式执行前,也就是上面的流程中进行动态加载和类加载器的修正,这样才能对加密的dex进行释放,而一般的1厂商往往选择在Application中的attachBaseContext或onCreate函数进行
|
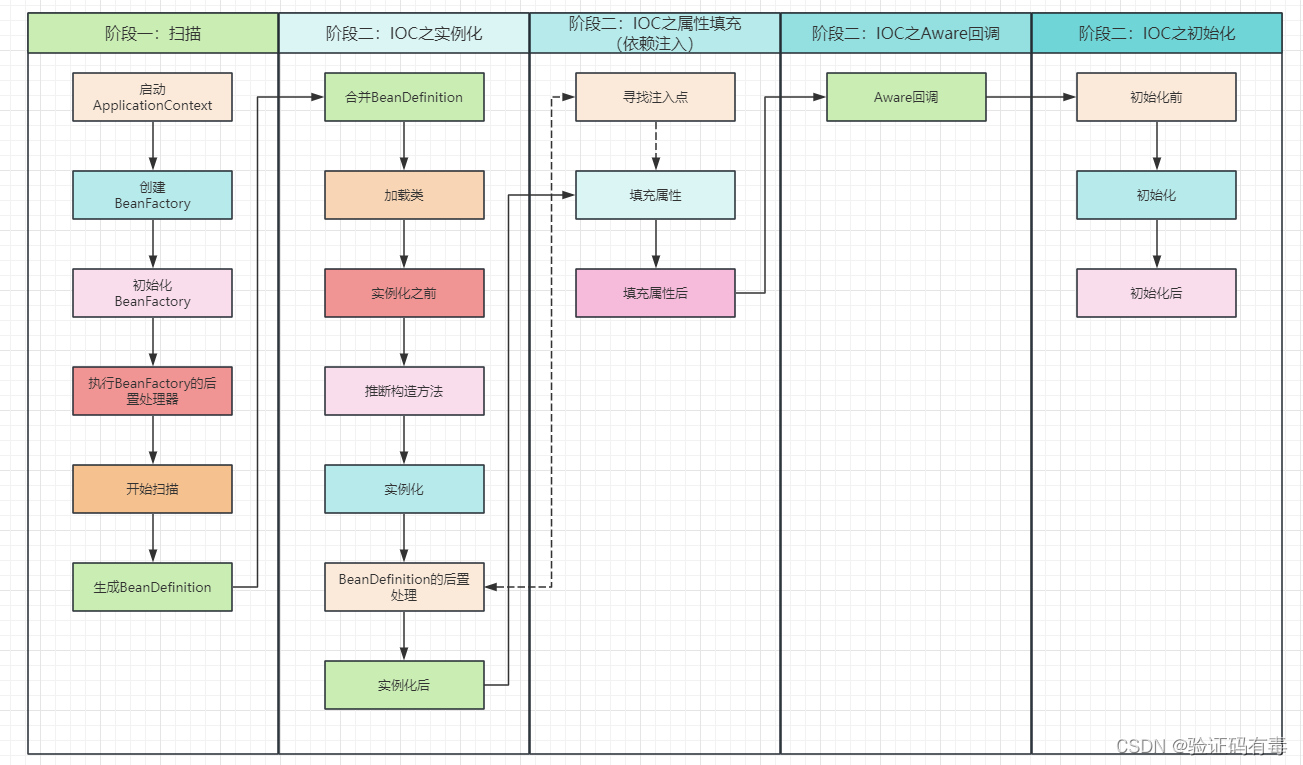
这里我附上网上一个大佬的详细执行流程图:

(1)整体加壳原理
Dex整体加壳可以理解为在加密的源Apk程序外面有套上了一层外壳,简单过程为:


如何对App进行加一层外壳呢,这里就需要应用动态加载的原理,关于动态加载和类加载器,我在上篇文章中有详细讲解:Android加壳脱壳学习(1)——动态加载和类加载机制详解
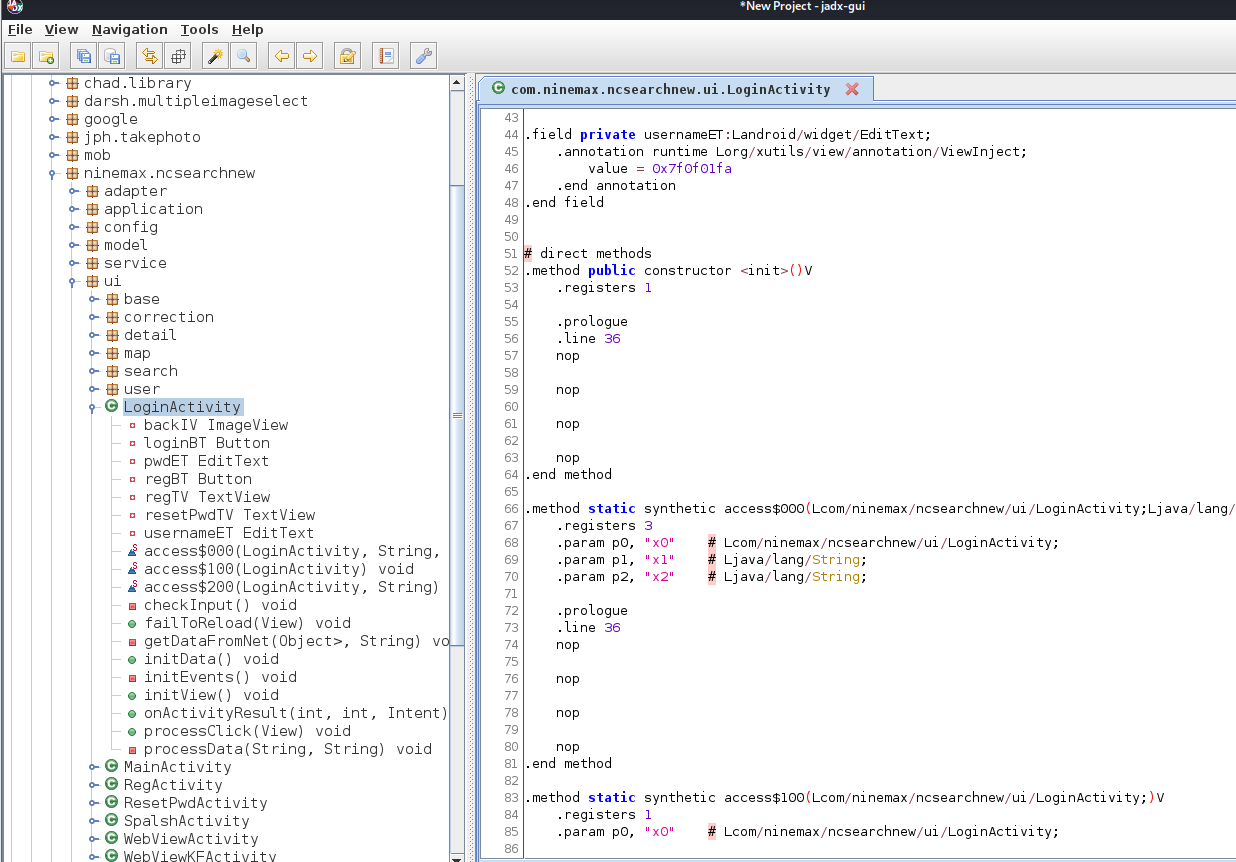
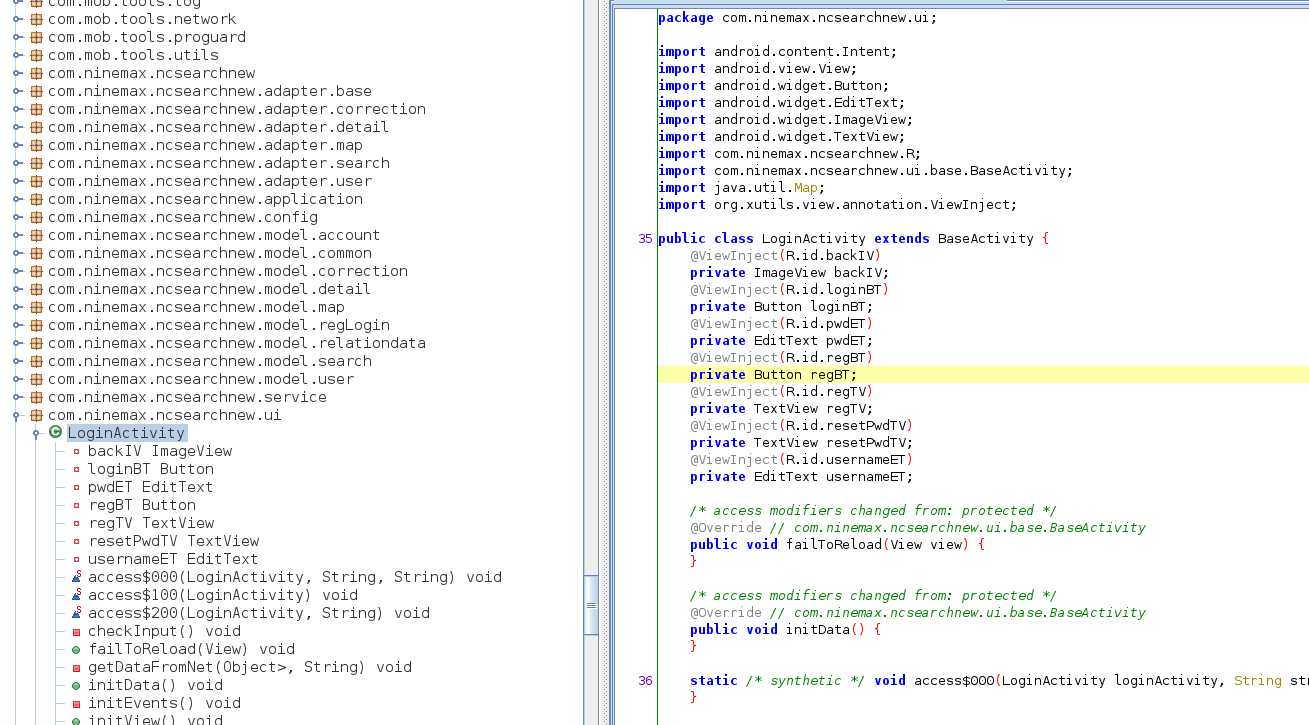
这里我们可以用一个案例来进一步讲述,我们打开一个整体加壳的样本
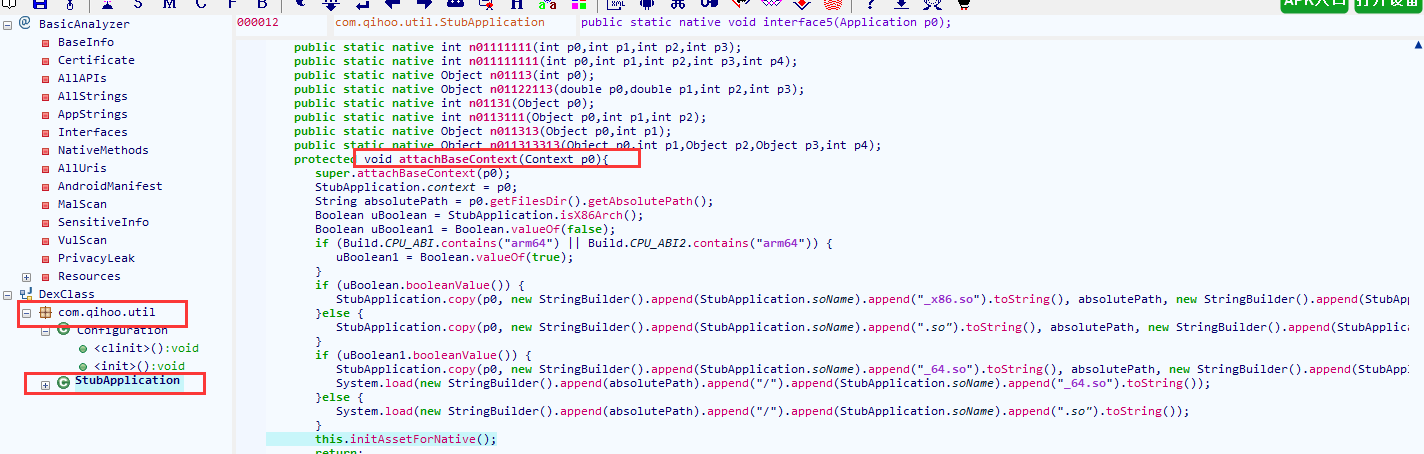
我们很明显看见,除了一个代理类Application,其他相关的代码信息都无法发现
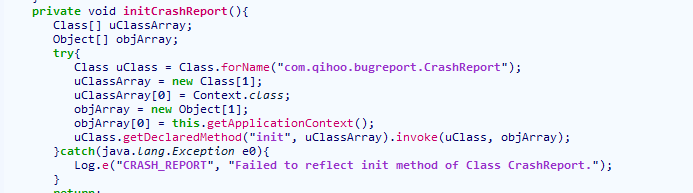
在代理类中反射调用了一些方法,很显然我们解析出的结果都无法查找,很明显就说明在Application.attchBaseContext()和Application.onCreate()中必须要完成对源加密的dex的动态加载和解密
结合上面的描述,App加载应用解析时就是这个流程:
| 1 2 3 4 5 6 | (1)BootClassLoader加载系统核心库
(2)PathClassLoader加载APP自身dex
(3)进入APP自身组件,解析AndroidManifest.xml,然后查找Application代理
(4)调用声明Application的attachBaseContext()对源程序进行动态加载或解密
(5)调用声明Application的onCreate()对源程序进行动态加载或解密
(6)进入MainActivity中的attachBaseContext(),然后进入onCreate()函数,执行源程序代码
|
(2)类加载器的修正
上面我们已经很清晰的了解了壳加载的流程,我们很明显的意识到一个问题,我们从头到尾都是用PathClassLoader来加载dex,而上篇文章我在讲类加载器的过程中说过

| 1 2 3 4 5 6 7 8 | Android中的ClassLoader类型分为系统ClassLoader和自定义ClassLoader。其中系统ClassLoader包括3种是BootClassLoader、DexClassLoader、PathClassLoader
(1)BootClassLoader:Android平台上所有Android系统启动时会使用BootClassLoader来预加载常用的类
(2)BaseDexClassLoader:实际应用层类文件的加载,而真正的加载委托给pathList来完成
(3)DexClassLoader:可以加载dex文件以及包含dex的压缩文件(apk,dex,jar,zip),可以安装一个未安装的apk文件,一般为自定义类加载器
(4)PathClassLoader:可以加载系统类和应用程序的类,通常用来加载已安装的apk的dex文件
补充:
Android 提供的原生加载器叫做基础类加载器,包括:BootClassLoader,PathClassLoader,DexClassLoader,InMemoryDexClassLoader(Android 8.0 引入),DelegateLastClassLoader(Android 8.1 引入)
|
我们要想动态加载dex文件必须使用自定义的DexClassLoader,那我们直接使用DexClassLoader进行加载就可以么,很显然不行,还是会报异常
| 1 | DexClassLoader加载的类是没有组件生命周期的,即DexClassLoader即使通过对APK的动态加载完成了对组件类的加载,当系统启动该组件时,依然会出现加载类失败的异常
|
所以我们要想使用DexClassLoader进行动态加载dex,我们需要进行类加载器的修正
当前实现类加载器的修正,主要有两种方案:
| 1 2 | (1)替换系统组件类加载器为我们的DexClassLoader,同时设置DexClassLoader的parent为系统组件加载器
(2)打破原有的双亲委派关系,在系统组件类加载器PathClassLoader和BootClassLoader的中间插入我们自己的DexClassLoader
|
<1>类加载器替换
怎么去替换系统的类加载器了,这就和我们上面分析的ActivityThread中LoadedApk有关了,LoadedApk主要负责加载一个Apk程序,我们进一步分析源码

很明显,我们可以想到我们通过反射获取mclassLoader,然后使用我们的DexClassLoader进行替换,不就可以成功的让DexClassLoader拥有生命周期了么
源码实现:
| 1 2 3 4 5 6 | 总结:
(1)获取ActivityThread实例
(2)通过反射获取类加载器
(3)获取LoadedApk
(4)获取mClassLoader系统类加载器
(5)替换自定义类加载器为系统类加载器
|
| 1 2 3 4 5 6 7 8 9 10 11 12 13 14 15 16 17 18 19 20 21 22 23 24 25 26 27 28 29 30 31 32 33 34 35 36 37 | public static void replaceClassLoader(Context context,ClassLoader dexClassLoader){
ClassLoader pathClassLoader = MainActivity.class.getClassLoader();
try {
//1.获取ActivityThread实例
Class ActivityThread = pathClassLoader.loadClass("android.app.ActivityThread");
Method currentActivityThread = ActivityThread.getDeclaredMethod("currentActivityThread");
Object activityThreadObj = currentActivityThread.invoke(null);
//2.通过反射获得类加载器
//final ArrayMap<String, WeakReference<LoadedApk>> mPackages = new ArrayMap<>();
Field mPackagesField = ActivityThread.getDeclaredField("mPackages");
mPackagesField.setAccessible(true);
//3.拿到LoadedApk
ArrayMap mPackagesObj = (ArrayMap) mPackagesField.get(activityThreadObj);
String packagename = context.getPackageName();
WeakReference wr = (WeakReference) mPackagesObj.get(packagename);
Object LoadApkObj = wr.get();
//4.拿到mclassLoader
Class LoadedApkClass = pathClassLoader.loadClass("android.app.LoadedApk");
Field mClassLoaderField = LoadedApkClass.getDeclaredField("mClassLoader");
mClassLoaderField.setAccessible(true);
Object mClassLoader =mClassLoaderField.get(LoadApkObj);
Log.e("mClassLoader",mClassLoader.toString());
//5.将系统组件ClassLoader给替换
mClassLoaderField.set(LoadApkObj,dexClassLoader);
}
catch (ClassNotFoundException e) {
e.printStackTrace();
} catch (NoSuchMethodException e) {
e.printStackTrace();
} catch (IllegalAccessException e) {
e.printStackTrace();
} catch (InvocationTargetException e) {
e.printStackTrace();
} catch (NoSuchFieldException e) {
e.printStackTrace();
}
}
|
<2>类加载器插入
还有一种方案,动态加载中我们讲述了类加载器的双亲委派机制,就是说我们的类加载器刚拿到类,并不会直接进行加载,而是先判断自己是否加载,如果没有加载则给自己的父类,父类再给父类,所以我们让DexClassLoader成为PathClassLoader的父类,这样就可以解决DexClassLoader生命周期的问题
| 1 2 3 | 总结:
(1)将DexClassloader父节点设置为BootClassLoader
(2)将PathClassLoader父节点设置为DexClassloader
|
代码实现:
| 1 2 3 4 5 6 7 8 9 10 11 12 13 14 15 | public static void replaceClassLoader(Context context, ClassLoader dexClassLoader){
//将pathClassLoader父节点设置为DexClassLoader
ClassLoader pathClassLoaderobj = context.getClassLoader();
Class<ClassLoader> ClassLoaderClass = ClassLoader.class;
try {
Field parent = ClassLoaderClass.getDeclaredField("parent");
parent.setAccessible(true);
parent.set(pathClassLoaderobj,dexClassLoader);
} catch (NoSuchFieldException e) {
e.printStackTrace();
} catch (IllegalAccessException e) {
e.printStackTrace();
}
}
|
完成壳加载器的修正后,我们就可以正常的加载dex了
前面我们详细讲述了App运行机制和整体加壳的实现机制,下面我们就按照前面的讲述,来实现一个简单的整体加壳案例
实验准备:

这就是我们的源程序,源程序运行,我们会在日志中看见我们打印的信息,然后我们生成dex文件
(1)准备工作
将dex文件上传sdcard,并给应用设置存储权限


(2)编写代理类
我们首先编写代理类,模仿上面的加壳应用

然后我们设置AndroidManifest.xml中的代理类别

然后我们选择在attachBaseContext或onCreate中对我们的dex进行动态加载和类加载器修正即可,因为这里我们源dex并未进行加密,所以也无需解密的过程
然后加入导入类的Activity

(3)动态加载
我们进行动态加载classes.dex

然后使用上面的一种方法进行类加载器修正

然后运行

运行成功,说明我们的整体加壳成功
上面我们已经理解了APP加壳的基本原理,下面我们进一步来学习如何进行脱壳,Android APP脱壳绕不开DexFile、ArtMethod两个概念,这两个在脱壳中扮演的至关重要的地位,无数的脱壳点都是从其演变而来。
我们在分析脱壳点过程中,首先就需要明白Dex加载的基本流程

| 1 2 3 | DexPathList:该类主要用来查找Dex、SO库的路径,并这些路径整体呈一个数组
Element:根据多路径的分隔符“;”将dexPath转换成File列表,记录所有的dexFile
DexFile:用来描述Dex文件,Dex的加载以及Class的查找都是由该类调用它的native方法完成的
|
我们依次来分析这个过程中的源码
DexPathList
| 1 2 3 4 5 6 7 8 | /libcore/dalvik/src/main/java/dalvik/system/DexPathList.java
public DexPathList(ClassLoader definingContext, String dexPath,
String librarySearchPath, File optimizedDirectory) {
**********************
this.dexElements = makeDexElements(splitDexPath(dexPath), optimizedDirectory,
suppressedExceptions, definingContext);
**********************
}
|
makeDexElements
| 1 2 3 4 5 6 | private static Element[] makeDexElements(List<File> files, File optimizedDirectory,
List<IOException> suppressedExceptions, ClassLoader loader) {
**********************
DexFile dex = loadDexFile(file, optimizedDirectory, loader, elements);
**********************
}
|
loadDexFile
| 1 2 3 4 5 6 7 8 9 10 | private static DexFile loadDexFile(File file, File optimizedDirectory, ClassLoader loader,
Element[] elements)
throws IOException {
if (optimizedDirectory == null) {
return new DexFile(file, loader, elements);
} else {
String optimizedPath = optimizedPathFor(file, optimizedDirectory);
return DexFile.loadDex(file.getPath(), optimizedPath, 0, loader, elements);
}
}
|
loadDex
| 1 2 3 4 | static DexFile loadDex(String sourcePathName, String outputPathName,
int flags, ClassLoader loader, DexPathList.Element[] elements) throws IOException {
return new DexFile(sourcePathName, outputPathName, flags, loader, elements);
}
|
DexFile
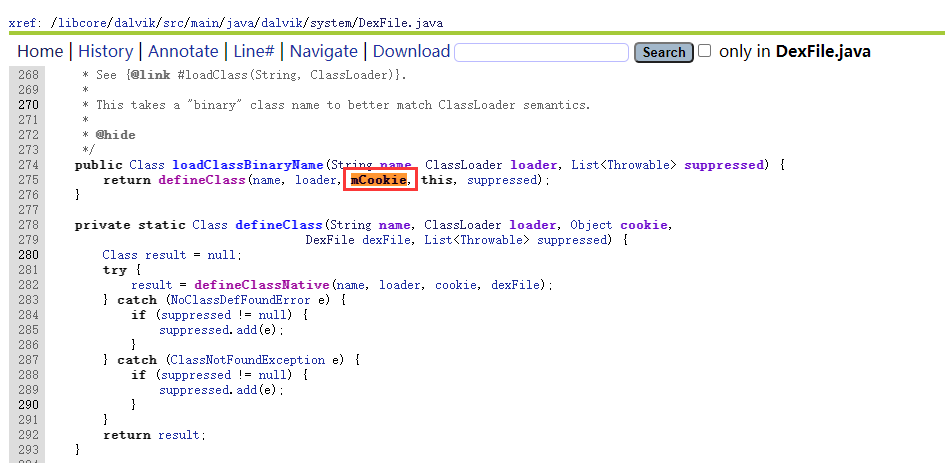
| 1 2 3 4 5 6 7 | /libcore/dalvik/src/main/java/dalvik/system/DexFile.java
DexFile(String fileName, ClassLoader loader, DexPathList.Element[] elements) throws IOException {
mCookie = openDexFile(fileName, null, 0, loader, elements);
mInternalCookie = mCookie;
mFileName = fileName;
//System.out.println("DEX FILE cookie is " + mCookie + " fileName=" + fileName);
}
|
这里出现的mCookie,mCookie在C/C++层中是DexFile的指针,我们在下面详细讲解
openDexFile
| 1 2 3 4 5 6 7 8 9 10 11 | private static Object openDexFile(String sourceName, String outputName, int flags,
ClassLoader loader, DexPathList.Element[] elements) throws IOException {
// Use absolute paths to enable the use of relative paths when testing on host.
return openDexFileNative(new File(sourceName).getAbsolutePath(),
(outputName == null)
? null
: new File(outputName).getAbsolutePath(),
flags,
loader,
elements);
}
|
这里就进入了C/C++层
openDexFileNative
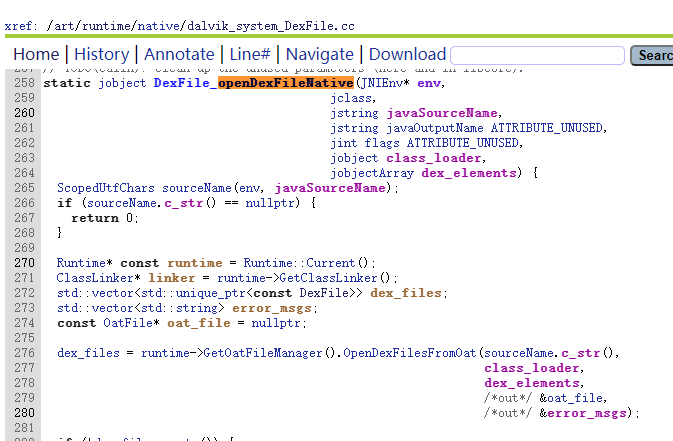
为了节约篇幅,我们快速分析,中间再经过一些函数
| 1 2 3 4 | OpenDexFilesFromOat()
MakeUpToDate()
GenerateOatFileNoChecks()
Dex2Oat()
|
最后进进入了Dex2Oat,这就进入了Dex2Oat的编译流程
反之如果我们在下面Dex2Oat的流程中通过Hook相关方法或execv或execve导致dex2oat失败,我们就会返回到OpenDexFilesFromOat
OpenDexFilesFromOat
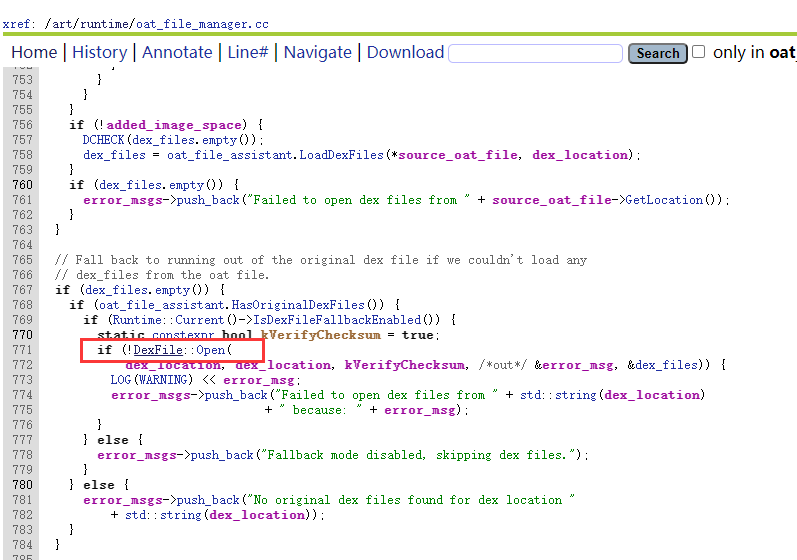
会先在HasOriginalDexFiles里尝试加载我们的Dex,也就是说,倘若我们的壳阻断了dex2oat的编译流程,然后又调用了DexFile的Open函数。
DexFile::Open

校验dex的魔术字字段,然后调用DexFile::OpenFile
DexFile::OpenFile
| 1 2 3 4 5 6 7 8 9 10 11 12 13 14 15 16 17 18 | /art/runtime/dex_file.cc
std::unique_ptr<const DexFile> DexFile::OpenFile(int fd,
const std::string& location,
bool verify,
bool verify_checksum,
std::string* error_msg) {
**************************************
std::unique_ptr<DexFile> dex_file = OpenCommon(map->Begin(),
map->Size(),
location,
dex_header->checksum_,
kNoOatDexFile,
verify,
verify_checksum,
error_msg);
**************************************
}
|
OpenCommon

最后又再次回到DexFile类,这里我们的dex文件加载基本流程分析完毕
Dex2oat是google公司为了提高编译效率的一种机制,从Android8.0开始实施,一些加壳厂商实现抽取壳往往会禁用Dex2oat,而针对整体加壳没有禁用的Dex2Oat也成为了脱壳点
Exec
| 1 2 3 4 5 6 7 8 9 10 11 | /art/runtime/exec_utils.cc
bool Exec(std::vector<std::string>& arg_vector, std::string* error_msg) {
int status = ExecAndReturnCode(arg_vector, error_msg);
if (status != 0) {
const std::string command_line(android::base::Join(arg_vector, ' '));
*error_msg = StringPrintf("Failed execv(%s) because non-0 exit status",
command_line.c_str());
return false;
}
return true;
}
|
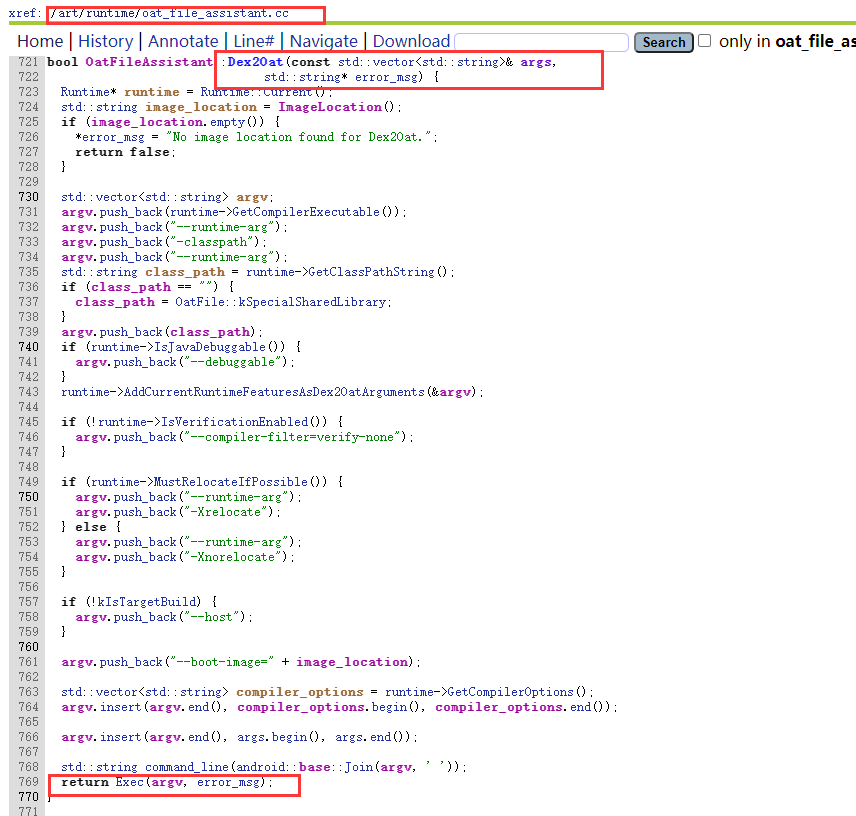
ExecAndReturnCode
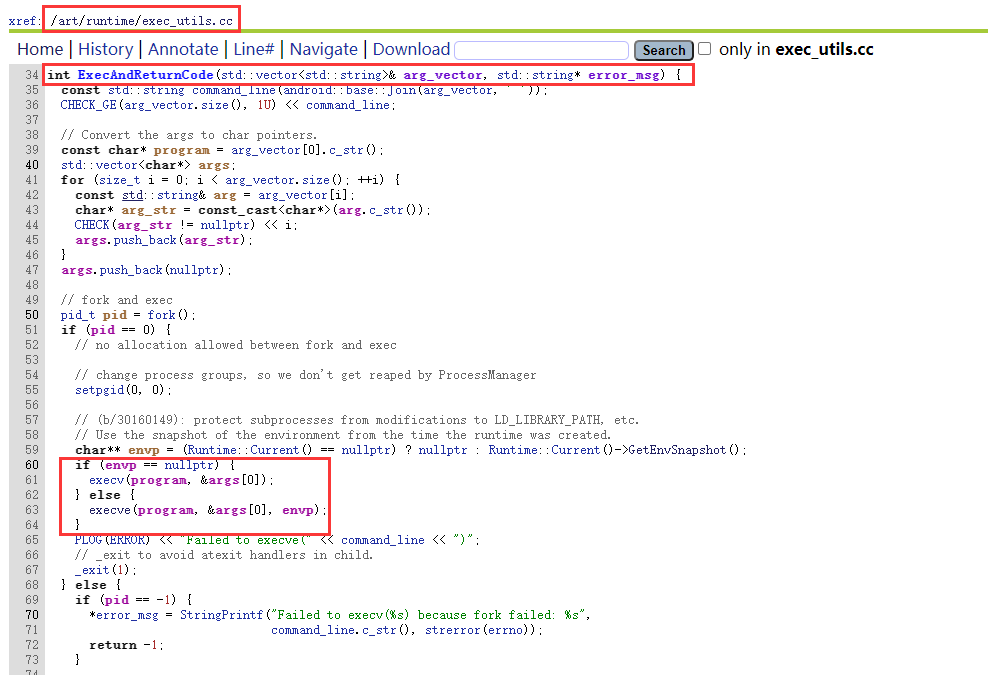
而我们就可以通过Hook execv或execve来禁用Dex2Oat,而如果我们不禁用dex2oat,execve函数是用来调用dex2oat的二进制程序实现对dex文件的加载,我们这时候找到dex2oat.cc这个文件,找到main函数
| 1 2 3 4 5 6 7 | /art/dex2oat/dex2oat.cc
int main(int argc, char** argv) {
int result = static_cast<int>(art::Dex2oat(argc, argv));
if (!art::kIsDebugBuild && (RUNNING_ON_MEMORY_TOOL == 0)) {
_exit(result);
}
return result;
|
这里我们调用了Dex2oat
Dex2Oat
| 1 2 3 4 5 6 7 8 9 10 11 12 | /art/dex2oat/dex2oat.cc
static dex2oat::ReturnCode Dex2oat(int argc, char** argv) {
**************************************
dex2oat::ReturnCode setup_code = dex2oat->Setup();
dex2oat::ReturnCode result;
if (dex2oat->IsImage()) {
result = CompileImage(*dex2oat);
} else {
result = CompileApp(*dex2oat);
}
**************************************
}
|
Dex2oat中会对dex文件进行逐个类逐个函数的编译,setup()函数完成对dex的加载
然后顺序执行,就会进入CompileApp
编译过程中会按照逐个函数进行编译,就会进入CompileMethod

到这里Dex2oat的基本流程就分析完毕
要理解DexFile为什么如此重要,首先我们要清除Android APP的类加载流程。Android的类加载一般分为两类隐式加载和显式加载
| 1 2 3 4 5 6 7 8 9 | 1.隐式加载:
(1)创建类的实例,也就是new一个对象
(2)访问某个类或接口的静态变量,或者对该静态变量赋值
(3)调用类的静态方法
(4)反射Class.forName("android.app.ActivityThread")
(5)初始化一个类的子类(会首先初始化子类的父类)
2.显示加载:
(1)使用LoadClass()加载
(2)使用forName()加载
|
我们详细看一下显示加载:
| 1 2 3 | Class.forName 和 ClassLoader.loadClass加载有何不同:
(1)ClassLoader.loadClass也能加载一个类,但是不会触发类的初始化(也就是说不会对类的静态变量,静态代码块进行初始化操作)
(2)Class.forName这种方式,不但会加载一个类,还会触发类的初始化阶段,也能够为这个类的静态变量,静态代码块进行初始化操作
|
我们在详细来看一下在类加载过程中的流程:
java层

我们可以发现类加载中关键的DexFile,该类用来描述Dex文件,所以我们的脱壳对象就是DexFile
这里从DexFile进入Native层中,还有一个关键的字段就是mCookie
后面我们详细的介绍mCookie的作用
我们进一步分析,进入Native层
Native层
/art/runtime/native/[dalvik_system_DexFile.cc

| 1 | ConvertJavaArrayToDexFiles对cookie进行了处理
|

通过这里的分析,我们可以知道mCooike转换为C/C++层指针后,就是dexfile的索引
我们继续分析DefineClass
| 1 2 3 4 5 6 7 8 9 10 11 | art/runtime/class_linker.cc
mirror::Class* ClassLinker::DefineClass(Thread* self,
const char* descriptor,
size_t hash,
Handle<mirror::ClassLoader> class_loader,
const DexFile& dex_file,
const DexFile::ClassDef& dex_class_def) {
***************
LoadClass(self, *new_dex_file, *new_class_def, klass);
***************
}
|
LoadClass
| 1 2 3 4 5 6 7 8 9 10 11 | art/runtime/class_linker.cc
void ClassLinker::LoadClass(Thread* self,
3120 const DexFile& dex_file,
3121 const DexFile::ClassDef& dex_class_def,
3122 Handle<mirror::Class> klass) {
3123 const uint8_t* class_data = dex_file.GetClassData(dex_class_def);
3124 if (class_data == nullptr) {
3125 return; // no fields or methods - for example a marker interface
3126 }
3127 LoadClassMembers(self, dex_file, class_data, klass);
3128}
|
LoadClassMembers
| 1 2 3 4 5 6 7 8 9 10 | art/runtime/class_linker.cc
void ClassLinker::LoadClassMembers(Thread* self,
const DexFile& dex_file,
const uint8_t* class_data,
Handle<mirror::Class> klass) {
***************
LoadMethod(dex_file, it, klass, method);
LinkCode(this, method, oat_class_ptr, class_def_method_index);
***************
}
|
LoadMethod
| 1 2 3 4 5 6 | art/runtime/class_linker.cc
void ClassLinker::LoadMethod(const DexFile& dex_file,
const ClassDataItemIterator& it,
Handle<mirror::Class> klass,
ArtMethod* dst) {
}
|
LinkCode
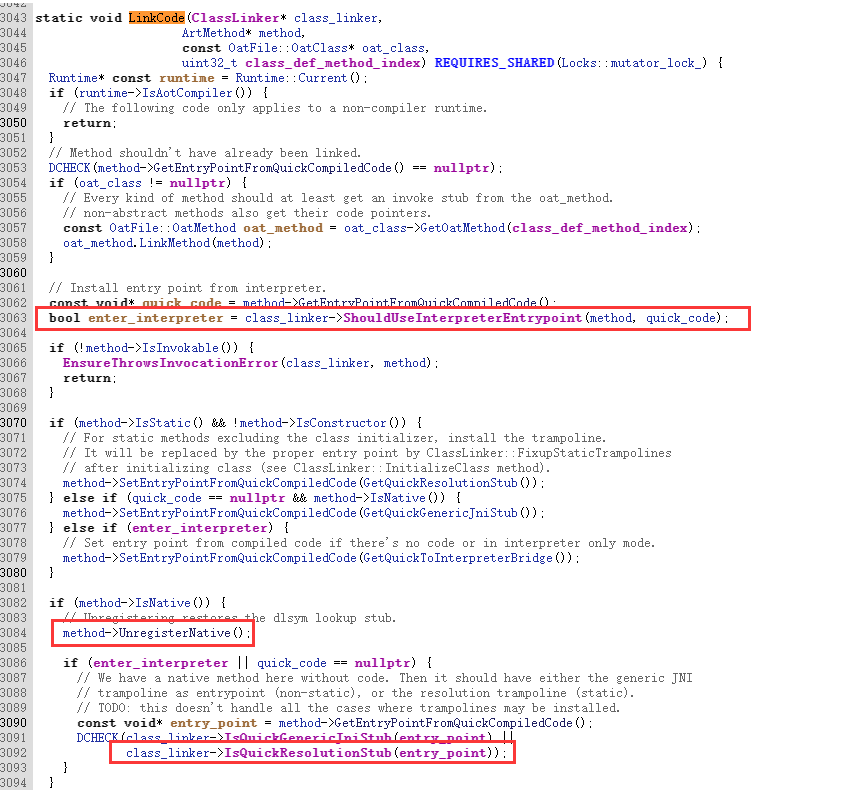
我们可以发现这里就进入了从linkcode后就进入了解释器中,并对是否进行dex2oat进行了判断,我们直接进入解释器中继续分析
我们知道Art解释器分为两种:解释模式下和quick模式下,而我们又知道Android8.0开始进行dex2oat
| 1 2 3 | 如果壳没有禁用dex2oat,那类中的初始化函数运行在解释器模式下
如果壳禁用dex2oat,dex文件中的所有函数都运行在解释器模式下
则类的初始化函数运行在解释器模式下
|
所以一般的加壳厂商会禁用掉dex2oat,这样可以是所有的函数都运行在解释模式下,所以一些脱壳点选在dex2oat流程中,可能针对禁用dex2oat的情况并不使用,我们这里主要针对整体加壳,就不展开讲述,最后我们得知解释器中会运行在Execute下
Execute
| 1 2 3 4 5 6 7 8 9 10 11 12 13 | art/runtime/interpreter/interpreter.cc
static inline JValue Execute(
Thread* self,
const DexFile::CodeItem* code_item,
ShadowFrame& shadow_frame,
JValue result_register,
bool stay_in_interpreter = false) REQUIRES_SHARED(Locks::mutator_lock_){
***************
ArtMethod *method = shadow_frame.GetMethod();
***************
}
|
这里我们大致分析完成了类加载的思路
前面我们分析了很多,对dex加载、类加载等都已经有了一个很详细的了解,而最终一切的核心就是DexFile,DexFile就是我们脱壳所关注的重点,寒冰大佬在拨云见日:安卓APP脱壳的本质以及如何快速发现ART下的脱壳点中提到,在ART下只要获得了DexFile对象,那么我们就可以得到该dex文件在内存中的起始地址和大小,进而完成脱壳。
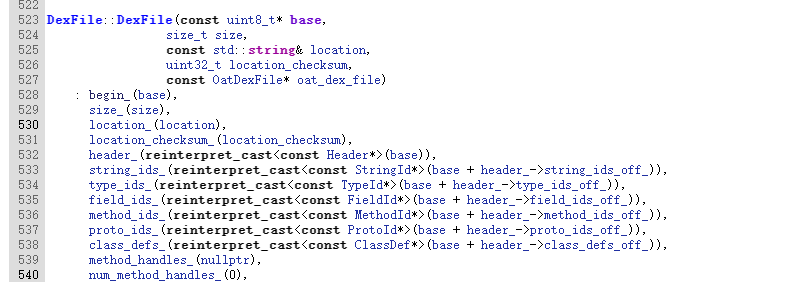
我们先查看一些DexFile的结构体

只要我们能获得起始地址begin和大小size,就可以成功的将dex文件脱取下来,这里我们记得DexFile含有虚函数表,所以根据C++布局,要偏移一个指针

而DexFile类还给我们提供了方便的API

这样只要我们找到函数中有DexFile对象,就可以通过调用API来进一步dump dex文件,由此按照寒冰大佬的思想,大量的脱壳点由此产生
(1)直接查找法
我们通过直接在Android源码中搜索DexFile,就可以获得海量的脱壳点

我们通过在IDA中搜索libart.so导出的DexFile,同样可以获得大量的脱壳点

(2)间接查找法
这里就是寒冰大佬在文章中提到的通过ArtMethod对象的getDexFile()获取到ArtMethod所属的DexFile对象的这种一级间接法,通过Thread的getCurrentMethod()函数首先获取到ArtMethod或者通过ShadowFrame的getMethod获取到ArtMethod对象,然后再通过getDexFile获取到ArtMethod对象所属的DexFile的二级间接法。
| 1 2 | getDexFile()
getMethod()
|
上面我们已经详细分析了DexFile的文件结构,我们知道通过ArtMethod可以获得DexFile,那么为啥又要单独提ArtMethod呢,因为ArtMethod在抽取壳和VMP等壳中扮演了重要的角色
ArtMethod结构体

我们通过ArtMethod可以获得codeitem的偏移和方法索引,熟悉dex结构的朋友知道codeitem就是代码实际的值,而codeitem则再后续加壳技术扮演了至关重要的地址,而且ArtMethod还有非常丰富的方法,可以帮助大家实现很多功能,所以在脱壳工作中也是十分重要的
前面分析了很多,最后无非整体加壳的脱壳方案落脚在DexFile的关键对象上,由此产生了一些常用的方法

工欲善其事必先利其器,整体加壳已经很多年,不少的大佬们都开发了很多非常好用的工具,我们在自己掌握原理过程时,平时工作中也可以使用很多大佬的开发工具,这里随便举几个自己经常用的工具,这里我对各个大佬的脱壳工具进行了一个梳理

(1)FRIDA-DEXDump
这是葫芦娃大佬开发的针对整体加壳的工具,主要通过frida技术,文章参考:深入 FRIDA-DEXDump 中的矛与盾,该工具的特点是一般的hook方案通过直接搜索DEX的头文件dex.035来定位dex的起始地址,但是后来不少公司对头文件的魔术字段进行了抹除,这样针对没有文件头的 DEX 文件,该工具通过map_off 找到 DEX 的 map_list, 通过解析它,并得到类型为 TYPE_MAP_LIST 的条目计算出文件的大小和起始地址,也很好的提供了一种解决思路。
使用方法:
FRIDA-DEXDump使用十分的简单,详细参考github:FRIDA-DEXDump
这里引用一张大佬星球的使用流程图,非常详细,快速进行脱壳

我们简单演示一下,这里结合objection一起使用

然后再次打开脱下来的dex,即可
(2)FDex2
Fdex2主要是利用Android7.0及版本以下的特殊API getDex()来进行脱壳,原本是基于Xposed的模块,不过掌握原理后,大家可以使用各种Hook框架去实现,参考链接:安卓xposed脱壳工具FDex2
(3)其他工具
针对整体壳的脱壳工具有很多,无非是针对各种脱壳点再采用不同的方法,其原理是殊途同归,而基于源码定制的Fart、youpk等等针对整体加壳壳都可以基本实现完全的脱壳,而且抽取壳也有着很好的效果,下面我们就依次来讲述具体的脱壳方法原理,各种脱壳工具如下图所示:

我们前面知道了,只要函数中包含DexFile对象,我们就可以通过Hook技术拿到对象,然后取到begin和size,从而进行脱壳,市面上使用较多的无非是Xposed和frida,我平时使用frida较为方便,这里也用frida和大家演示:
首先我们使用GDA识别加壳程序

很明显是进行了整体加壳,有没其他加壳暂时不知道,我们先进行脱壳
找到脱壳点
通过IDA打开libart.so,搜索DexFile,我们可以找到海量的脱壳点

我们就随便找一个包含DexFile的脱壳函数,然后记录符号值

然后我们编写hook脚本
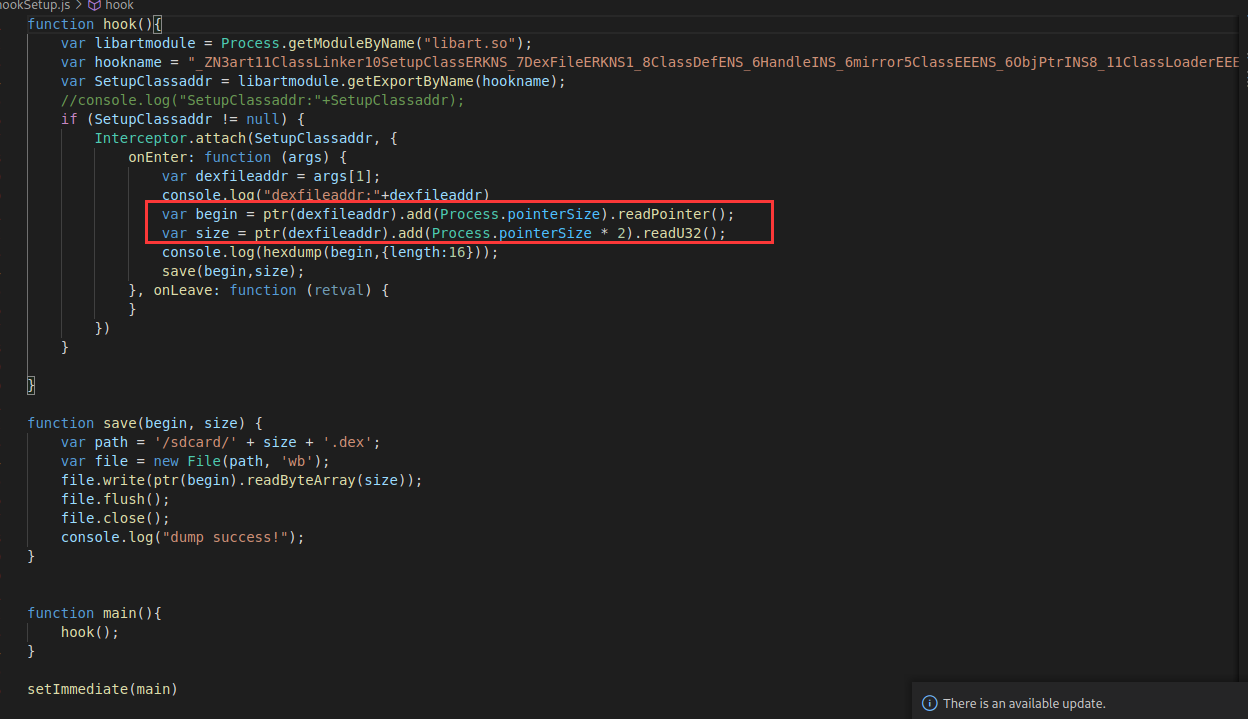
| 1 | 这里之所以获取begin加上一个指针,是因为我们前面讲了dexfile含有一个虚函数地址,所以加上一个指针偏移
|
然后启动frida_server

附加进程进行dump,这里我们存在sdcard下面,所以需要提前赋予sdcard权限
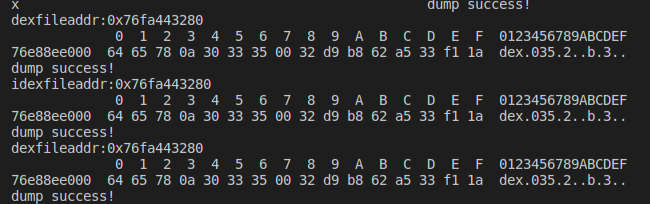
这里就脱壳成功

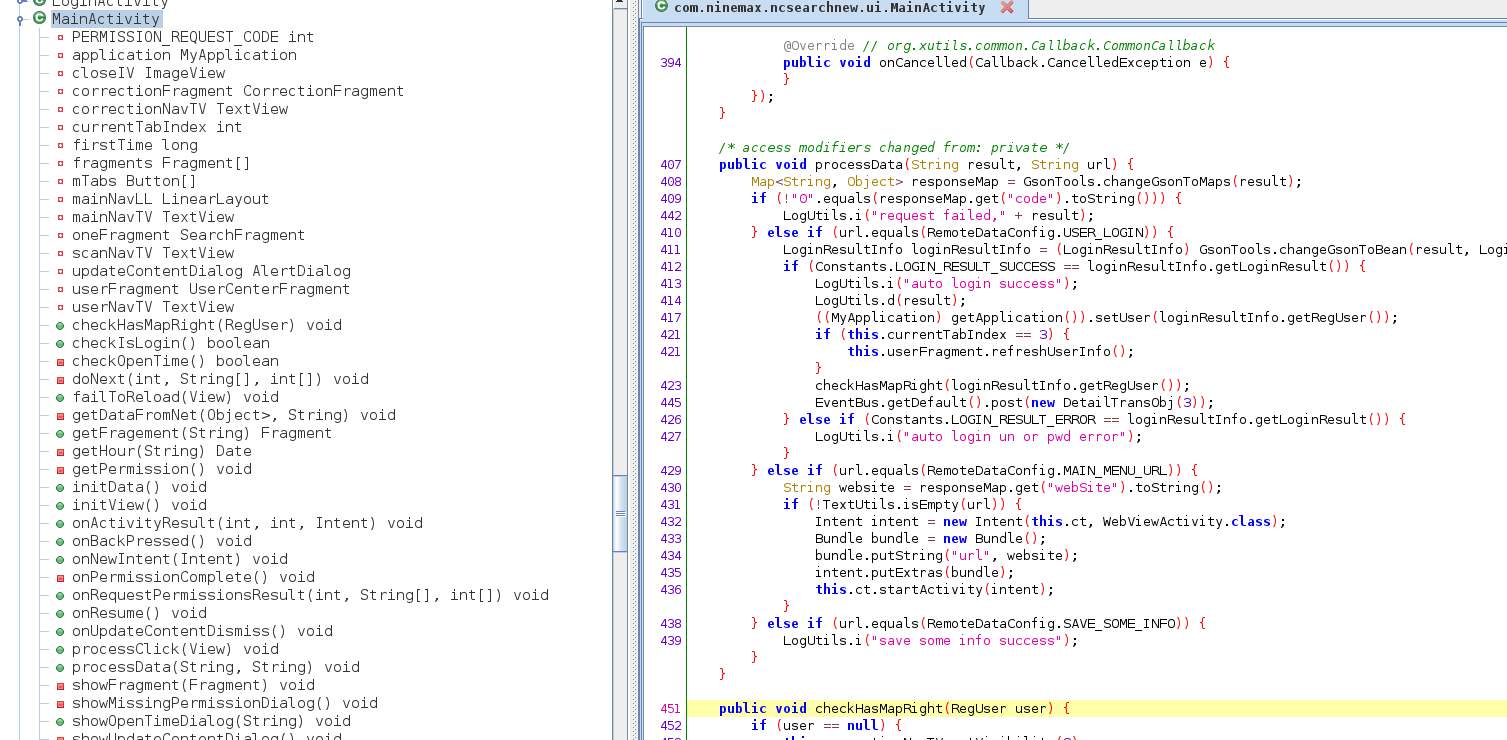
然后我们打开相应的dex
此时说明我们整体脱壳成功,不过应用还有抽取壳,这个不是本文解决的内容
插桩脱壳法,就是在Android源码里面定位到相应的脱壳点,然后插入相应的代码,重新编译源码生成系统镜像,最后就可以使用定制的系统进行脱壳
我们在源码编译(1)——Android6.0源码编译详解中已经讲述了如何编译源码,接下来我们进行插桩脱壳
同理、还是定位脱壳点,我们还是随便定位一个脱壳点LoadMethod 然后进行插桩

| 1 2 3 4 5 6 7 8 9 10 11 12 13 14 | //add
char dexfilepath[100]=0;
memset(dexfilepath,0,100);
sprintf(dexfilepath,"%d_%zu_LoadMethod.dex",getpid(),dex_file.Size());
int dexfd = open(dexfilepathm,O_CREAT|O_RDWR,666);
if(dexfd>0){
int result = write(dexfd,dex_file.Begin(),dex_file.Size());
if(result>0){
close(dexfd);
LOG(WARNING)<<"LoadMethod"<<dexfilepath;
}
}
//add
|
同理我们在execute同样插桩此段代码,最后进行编译,编译成功
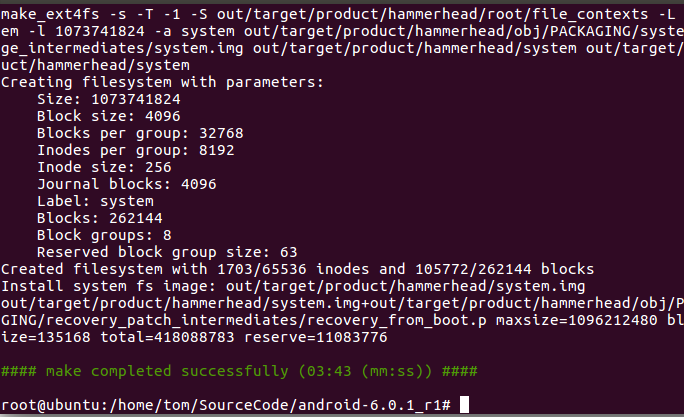
然后给程序授权sdcard权限,再次启动应用,就可以看见脱取的dex文件就保存在sdcard目录下

再次将sdcard下dex文件打开,这里我们已经看见了8732435这个文件,再次打开脱取成功
反射脱壳法的核心思想就是利用前面我们提到的mCooike值
| 1 2 3 4 5 6 7 8 9 10 11 12 13 14 15 16 17 18 19 20 21 | 核心思路:反射 + mCookie
步骤:
1、找到加固apk的任一class,一般选择主Application或Activity
2、通过该类找到对应的Classloader
3、通过该Classloader找到BaseDexClassLoader
4、通过BaseDexClassLoader找到其字段DexPathList
5、通过DexPathList找到其变量Element数组dexElements
6、迭代该数组,该数组内部包含DexFile结构
7、通过DexFile获取其变量mCookie和mFileName
至此我们已经获取了mCookie
对该mCookie的解释:
#1、4.4以下好像,mCookie对应的是一个int值,该值是指向native层内存中的dexfile的指针
#2、5.0是一个long值,该值指向native层std::vector<const DexFile*>* 指针,注意这里有多个dex,你需要找到你要的
#3、8.0,该值也是一个long型的值,指向底层vector,但是vector下标0是oat文件,从1开始是dex文件
// 至于你手机是那个版本,如果没有落入我上面描述的,你需要自己看看代码
8、根据mCookie对应的值做转换,最终你能找到dexfile内存指针
9、把该指针转换为dexfile结构,通过findClassDef来匹配你所寻找的dex是你要的dex
10、dump写文件
|
综述mCookie是在native层就是dexfile的指针,我们利用反射原理来获取mCookie,从而就可以进行脱壳了,这里我们同样使用frida演示:
编写hook代码

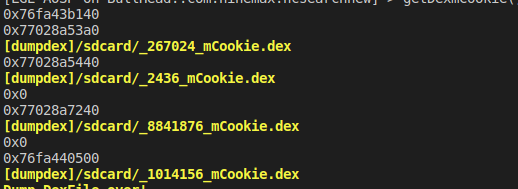
我们看见了和上面同样大小的8841876_mCookie.dex

使用工具打开,发现同样脱壳成功
所谓动态调试法,核心原理和上面一样,就是我们在动态调试的过程中找到DexFile的起始地址和大小,然后执行脚本进行dump
首先选取脱壳点,我们还是选择DexFile::DexFile
动态调试的步骤我在前面的文章中已经做了详细的讲解,不会的朋友去看前面的文章
首先我们启动android_server

然后我们附加上进程


然后我们打开libart.so,并定位到DexFile::DexFile
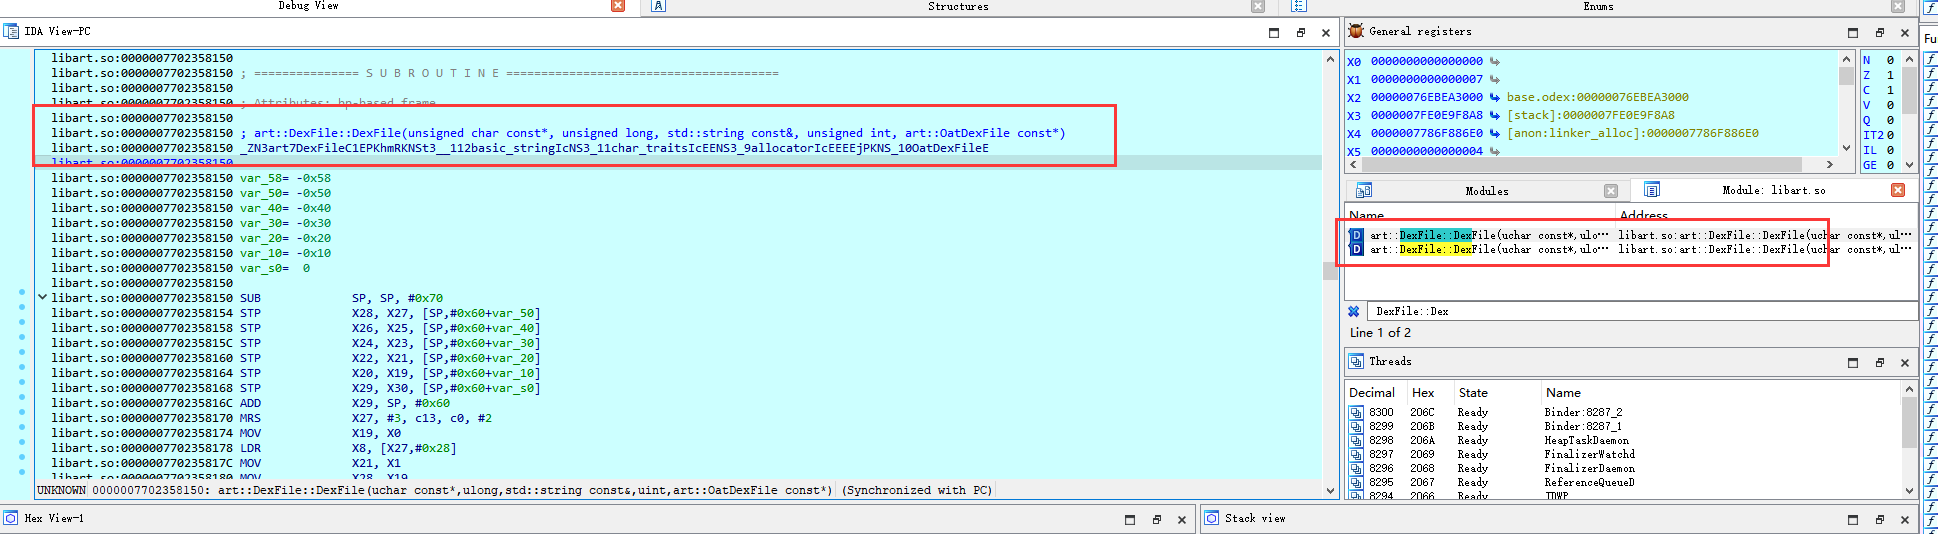
然后在该函数下断点,然后F9过来

此处我们就可以很明显看到X1就是我们的起始地址,X4是我们的偏移值
编写脚本进行hook
| 1 2 3 4 5 6 7 8 9 10 11 | static main(void){
auto fp, begin, end, dexbyte;
fp = fopen("d:\\dump.dex", "wb+");
begin = 0x76FCD93020;
end = begin + 0x7EEC5600;
for ( dexbyte = begin; dexbyte<end;dexbyte++)
{
fputc(Byte(dexbyte), fp);
}
}
|

直接运行run
然后我们查看dump.dex文件


我们可以发现这里是代理类,还没有到我们想要的dex,我们再次F9,再次到这里,地址再次改变,再次结合长度来计算,我们每次计算可以取小点值,先试一下

发现还是不是,我们需要不停测试直到dump出dex为此
这里大家可以下去按照此方法尝试,或者换一个脱壳点来尝试
所谓特殊的API脱壳法就是通过Android自身提供的API来获得Dex,这主要是参考Fdex2,前面我们讲了Fdex2主要是利用Android7.0及以下提供了getDex()和getBytes()两个API,我们可以直接可以获得class对象,然后直接调用这两个API


编写hook代码:

| 1 2 3 4 | 1.使用frida枚举所有Classloader
2.确定正确的ClassLoader并获取目标类的Class对象
3.通过Class对象获取得到dex对象
4.通过dex对象获取内存字节流并保存
|
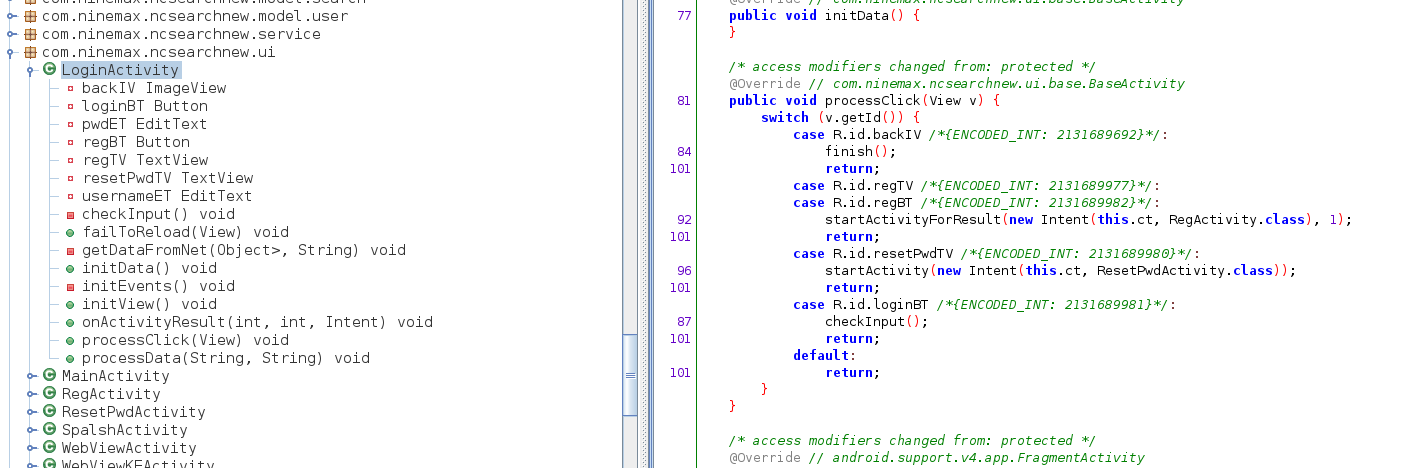
然后我们查看程序的类对象,随便dump一个类对象


然后我们再次用工具打开

发现就可以成功的dump
通过这种方式,我们发现神奇的事我们还可以抽取壳的情况,比如我们之前为空类

我们明显可以发现这里是采用了函数抽取的技术,一般的一代壳dump方案是无法解决抽取壳的,我们使用特殊API方法

再次打开,成功dump
这其实主要是抽取壳的一个回填时机的问题,这个详细放在以后抽取壳中讲解
本文总结了当下dex整体加壳的基本原理,和常用的一些脱壳方案,并一一进行复现,还有一些文件监控法等,由于我平时用的很少就没列举了,复现实验过程中由于涉及到不同的实验,所以我用了Android 6.0 Android 7.0 Android 8.0三台机器进行实验,所以大家可以注意下对应的方法和其Android版本,这里彻底解决了整体加壳的脱壳方案,到这里可以掌握脱壳、抓包、Hook、反Hook、反调、反签等基本手段,这样在进行Android App漏洞挖掘过程中将事半功倍。后面我将继续讲解Android App漏洞中的XSS漏洞、Sql注入漏洞、文件上传漏洞、端口扫描漏洞、WebView漏洞等。
脱壳脚本相关样本会放在github,所有的脱壳脚本和工具和上传知识星球
github:github
| 1 2 3 4 | https://bbs.pediy.com/thread-252630.htm#msg_header_h2_4
https://bbs.pediy.com/thread-254555.htm#msg_header_h2_4
https://www.anquanke.com/post/id/221905?display=mobile
https://www.qj301.com/news/317.html
|