引入pom
		<!--二维码依赖-->
		<dependency>
			<groupId>com.google.zxing</groupId>
			<artifactId>core</artifactId>
			<version>3.3.3</version>
		</dependency>
		<dependency>
			<groupId>com.google.zxing</groupId>
			<artifactId>javase</artifactId>
			<version>3.3.3</version>
		</dependency>
		<dependency>
			<groupId>org.projectlombok</groupId>
			<artifactId>lombok</artifactId>
			<version>1.18.28</version>
			<scope>provided</scope>
		</dependency>
核心方法
    private static final int QRCODE_SIZE = 320; // 二维码尺寸,宽度和高度均是320
    private static final String FORMAT_TYPE = "PNG"; // 二维码图片类型

    /**
     * 获取二维码图片
     *
     * @param dataStr    二维码内容
     * @param needLogo   是否需要添加logo
     * @param bottomText 底部文字       为空则不显示
     * @return
     */
    @SneakyThrows
    public static BufferedImage getQRCodeImage(String dataStr, boolean needLogo, String bottomText) {
        if (dataStr == null) {
            throw new RuntimeException("未包含任何信息");
        }
        HashMap<EncodeHintType, Object> hints = new HashMap<>();
        hints.put(EncodeHintType.CHARACTER_SET, "utf-8");    //定义内容字符集的编码
        hints.put(EncodeHintType.ERROR_CORRECTION, ErrorCorrectionLevel.L);        //定义纠错等级
        hints.put(EncodeHintType.MARGIN, 1);
        QRCodeWriter qrCodeWriter = new QRCodeWriter();
        BitMatrix bitMatrix = qrCodeWriter.encode(dataStr, BarcodeFormat.QR_CODE, QRCODE_SIZE, QRCODE_SIZE, hints);

        int width = bitMatrix.getWidth();
        int height = bitMatrix.getHeight();
        int tempHeight = height;
        if (StringUtils.hasText(bottomText)) {
            tempHeight = tempHeight + 12;
        }
        BufferedImage image = new BufferedImage(width, tempHeight, BufferedImage.TYPE_INT_RGB);
        for (int x = 0; x < width; x++) {
            for (int y = 0; y < height; y++) {
                image.setRGB(x, y, bitMatrix.get(x, y) ? 0xFF000000 : 0xFFFFFFFF);
            }
        }
        // 判断是否添加logo
        if (needLogo) {
            insertLogoImage(image);
        }
        // 判断是否添加底部文字
        if (StringUtils.hasText(bottomText)) {
            addFontImage(image, bottomText);
        }
        return image;
    }

    /**
     * 插入logo图片
     *
     * @param source 二维码图片
     * @throws Exception
     */
    private static void insertLogoImage(BufferedImage source) throws Exception {
        // 默认logo放于resource/static/目录下
        ClassPathResource classPathResource = new ClassPathResource("static/xbk.jpg");
        InputStream inputStream = classPathResource.getInputStream();
        if (inputStream == null || inputStream.available() == 0) {
            return;
        }
        Image src = ImageIO.read(inputStream);
        int width = 30;
        int height = 30;

        Image image = src.getScaledInstance(width, height, Image.SCALE_SMOOTH);
        BufferedImage tag = new BufferedImage(width, height, BufferedImage.TYPE_INT_RGB);
        Graphics g = tag.getGraphics();
        g.drawImage(image, 0, 0, null); // 绘制缩小后的图
        g.dispose();
        src = image;

        // 插入LOGO
        Graphics2D graph = source.createGraphics();
        int x = (QRCODE_SIZE - width) / 2;
        int y = (QRCODE_SIZE - height) / 2;
        graph.drawImage(src, x, y, width, height, null);
        Shape shape = new RoundRectangle2D.Float(x, y, width, width, 6, 6);
        graph.setStroke(new BasicStroke(3f));
        graph.draw(shape);
        graph.dispose();
    }

    private static void addFontImage(BufferedImage source, String declareText) {
        //生成image
        int defineWidth = QRCODE_SIZE;
        int defineHeight = 20;
        BufferedImage textImage = new BufferedImage(defineWidth, defineHeight, BufferedImage.TYPE_INT_RGB);
        Graphics2D g2 = (Graphics2D) textImage.getGraphics();
        //开启文字抗锯齿
        g2.setRenderingHint(RenderingHints.KEY_TEXT_ANTIALIASING,   RenderingHints.VALUE_TEXT_ANTIALIAS_ON);
        g2.setBackground(Color.WHITE);
        g2.clearRect(0, 0, defineWidth, defineHeight);
        g2.setPaint(Color.BLACK);
        FontRenderContext context = g2.getFontRenderContext();
        //部署linux需要注意 linux无此字体会显示方块,传入null选择默认字体
        Font font = new Font(null, Font.BOLD, 15);
        g2.setFont(font);
        LineMetrics lineMetrics = font.getLineMetrics(declareText, context);
        FontMetrics fontMetrics = FontDesignMetrics.getMetrics(font);
        float offset = (defineWidth - fontMetrics.stringWidth(declareText)) / 2;
        float y = (defineHeight + lineMetrics.getAscent() - lineMetrics.getDescent() - lineMetrics.getLeading()) / 2;
        g2.drawString(declareText, (int) offset, (int) y);

        Graphics2D graph = source.createGraphics();
        //开启文字抗锯齿
        graph.setRenderingHint(RenderingHints.KEY_TEXT_ANTIALIASING,   RenderingHints.VALUE_TEXT_ANTIALIAS_ON);
        //添加image
        int width = textImage.getWidth(null);
        int height = textImage.getHeight(null);

        Image src = textImage;
        graph.drawImage(src, 0, QRCODE_SIZE - 8, width, height, Color.WHITE, null);
        graph.dispose();
    }
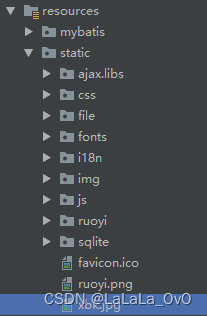
其中logo图片存放的路径为:resource/static/
调用
import lombok.SneakyThrows;
import org.springframework.stereotype.Controller;
import org.springframework.web.bind.annotation.GetMapping;
import org.springframework.web.bind.annotation.RequestMapping;
import org.springframework.web.bind.annotation.ResponseBody;
import sun.misc.BASE64Encoder;

import javax.imageio.ImageIO;
import javax.servlet.ServletOutputStream;
import javax.servlet.http.HttpServletResponse;
import java.awt.image.BufferedImage;
import java.io.ByteArrayOutputStream;
import java.util.HashMap;
import java.util.Map;

@Controller
@RequestMapping("/qrcode")
public class QrCodeController {

    //1、生成带logo和底部文字得二维码
    @SneakyThrows
    @GetMapping("/getQrCode1")
    public void getQrCode1(HttpServletResponse response) {
        String content="test";
        String bottomTxt="01";
        ServletOutputStream os = response.getOutputStream();
        BufferedImage bufferedImage = QRCodeUtil.getQRCodeImage(content,true,bottomTxt);
        response.setContentType("image/png");
        ImageIO.write(bufferedImage,"png",os);
    }
    //2、生成不带logo和带底部文字的二维码
    @SneakyThrows
    @GetMapping("/getQrCode2")
    public void getQrCode2(HttpServletResponse response) {
        String content="test";
        ServletOutputStream os = response.getOutputStream();
        BufferedImage bufferedImage = QRCodeUtil.getQRCodeImage(content,false,null);
        response.setContentType("image/png");
        ImageIO.write(bufferedImage,"png",os);
    }
    //3、生成默认带logo不带底部文字得二维码
    @SneakyThrows
    @GetMapping("/getQrCode3")
    public void getQrCode3(HttpServletResponse response) {
        String content="test";
        ServletOutputStream os = response.getOutputStream();
        BufferedImage bufferedImage = QRCodeUtil.getQRCodeImage(content,true,null);
        response.setContentType("image/png");
        ImageIO.write(bufferedImage,"png",os);
    }
    //3、生成不带logo带底部文字得二维码
    @SneakyThrows
    @GetMapping("/getQrCode4")
    public void getQrCode4(HttpServletResponse response) {
        String content="test";
        String bottomTxt="01";
        ServletOutputStream os = response.getOutputStream();
        BufferedImage bufferedImage = QRCodeUtil.getQRCodeImage(content,false,bottomTxt);
        response.setContentType("image/png");
        ImageIO.write(bufferedImage,"png",os);
    }

    //5、生成不带logo带底部文字的二维码,返回base64
    @SneakyThrows
    @GetMapping("/getQrCode5")
    @ResponseBody
    public Object getQrCode5() {
        String content="test";
        String bottomTxt="01";
        BufferedImage bufferedImage = QRCodeUtil.getQRCodeImage(content,false,bottomTxt);
        ByteArrayOutputStream baos = new ByteArrayOutputStream();//io流
            ImageIO.write(bufferedImage, "png", baos);//写入流中
        byte[] bytes = baos.toByteArray();//转换成字节
        BASE64Encoder encoder = new BASE64Encoder();
        String png_base64 = encoder.encodeBuffer(bytes).trim();//转换成base64串
        png_base64 = png_base64.replaceAll("\n", "").replaceAll("\r", "");//删除 \r\n
        String generateQrCode="data:image/jpg;base64," + png_base64;
        Map<String,String> map = new HashMap<>();
        map.put("generateQrCode",generateQrCode);
        return map;
    }

}