文章目录
- IOC容器
- IOC容器和beans的介绍
- 实例化 Bean
- BeanFactory:
- ApplicationContext
- 容器概述
- 配置元数据
- 实例化容器
- 组合基于xml的配置元数据
- 使用容器
- bean的概述
- 命名bean
- 别名的使用
- 实例化bean
- 构造函数实例化
- 静态工厂实例化
- 实例工厂方法
- bean 在运行时的实际类型
- 依赖
- 依赖注入
IOC容器
IOC容器和beans的介绍
IOC 容器是 Spring 框架的核心部分之一,它负责管理和维护应用程序中的对象(beans)
“Inversion of Control” 指的是将对象的创建、组装和依赖关系的管理权从应用程序代码转移到框架中
实例化 Bean
IOC 容器有两种主要的实现:
BeanFactory:
这是 Spring 最基本的容器,提供了最简单的 bean 容器功能。它延迟初始化 beans,即只有在请求时才会实际创建和初始化 bean。这对于资源消耗较大的 bean 非常有用。
ApplicationContext
这是 BeanFactory 的子接口,提供了更多的功能,如国际化支持、事件传播、AOP 功能等。ApplicationContext 在启动时会预先实例化和初始化 beans,以便在应用程序运行期间能够更快地访问和使用它们
容器概述
高水平概括
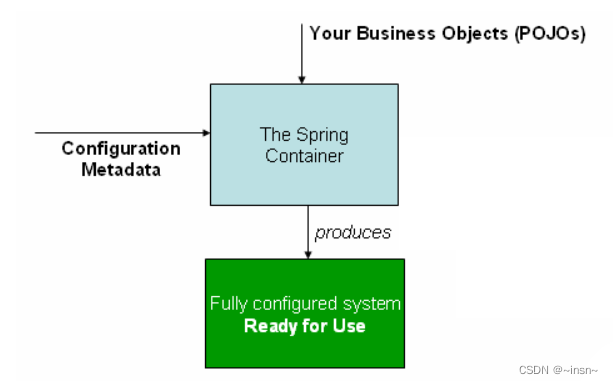
配置元数据
XML 配置文件:
<bean id="userService" class="com.example.UserService">
    <property name="userRepository" ref="userRepository" />
</bean>
注解
使用 @Component 注解将一个类标记为一个 Spring bean:
@Component
public class UserService {
    // ...
}
Java 配置类:
@Configuration
public class AppConfig {
    @Bean
    public UserService userService() {
        return new UserService();
    }
}
实例化容器
ApplicationContext context = new ClassPathXmlApplicationContext("services.xml", "daos.xml");
<?xml version="1.0" encoding="UTF-8"?>
<beans xmlns="http://www.springframework.org/schema/beans"
    xmlns:xsi="http://www.w3.org/2001/XMLSchema-instance"
    xsi:schemaLocation="http://www.springframework.org/schema/beans
        https://www.springframework.org/schema/beans/spring-beans.xsd">

    <!-- services -->

    <bean id="petStore" class="org.springframework.samples.jpetstore.services.PetStoreServiceImpl">
        <property name="accountDao" ref="accountDao"/>
        <property name="itemDao" ref="itemDao"/>
        <!-- additional collaborators and configuration for this bean go here -->
    </bean>

    <!-- more bean definitions for services go here -->

</beans>
组合基于xml的配置元数据
模块化配置:
可以将不同的模块分开定义在不同的 XML 文件中。每个模块可以有自己的配置文件,其中定义了与该模块相关的 beans 和依赖关系。然后,在主配置文件中通过 元素引入这些模块的配置文件
所有位置路径都相对于执行导入的定义文件,
<beans xmlns="http://www.springframework.org/schema/beans"
       xmlns:xsi="http://www.w3.org/2001/XMLSchema-instance"
       xsi:schemaLocation="http://www.springframework.org/schema/beans http://www.springframework.org/schema/beans/spring-beans.xsd">

    <import resource="services.xml"/>
    <import resource="resources/messageSource.xml"/>
    前导斜杠会被忽略。然而,考虑到这些路径是相对的,最好不要使用斜杠
    <import resource="/resources/themeSource.xml"/>

    <!-- Define additional beans or configurations -->
</beans>
Profile 切换:
你可以使用 Spring 的 Profile 功能,在不同的环境或条件下切换配置
<beans profile="development">
    <!-- Define beans and configurations for development environment -->
</beans>

<beans profile="production">
    <!-- Define beans and configurations for production environment -->
</beans>
使用容器
意味着在 Spring 框架中如何使用容器来管理和组织你的应用程序的组件
- 定义 Beans:
- 获取 Beans:
//1
ApplicationContext context = new AnnotationConfigApplicationContext(AppConfig.class);
UserService userService = context.getBean(UserService.class);

//2
ApplicationContext context = new ClassPathXmlApplicationContext("services.xml", "daos.xml");
//petStore是xml文件中的一个id
PetStoreService service = context.getBean("petStore", PetStoreService.class);
List<String> userList = service.getUsernameList();


//3
GenericApplicationContext context = new GenericApplicationContext();
new XmlBeanDefinitionReader(context).loadBeanDefinitions("services.xml", "daos.xml");
context.refresh();
- 依赖注入:Spring 容器负责处理 beans 之间的依赖关系。你可以通过构造函数注入、setter 方法注入或字段注入等方式
- 生命周期管理:
bean的概述
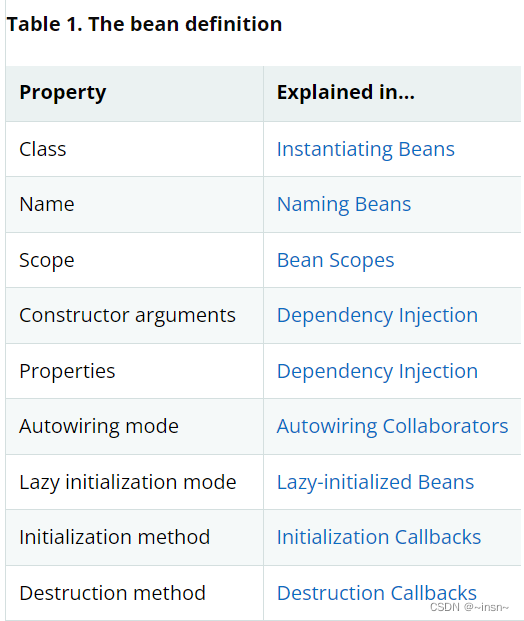
命名bean
确保 bean 的名称是唯一的,以便在容器中准确引用
- xml
Bean 的名称用于在**容器中引用、获取和识别 beans。**可以通过多种方式指定 bean 的名称
id一定是唯一的
<bean id="userService" class="com.example.UserService" />


name 属性可以指定多个名称,使用逗号或分号分隔。
<bean name="userBean,userService" class="com.example.UserService" />
- java:
可以使用 @Component 注解来为 bean 分配一个默认名称,该名称是类名的小写字母开头的形式。
@Component
public class UserService {
    // ...
}


使用 Qualifier 注解:
@Autowired
@Qualifier("userService")
private UserService userService;


使用 Java 配置类:
@Configuration
public class AppConfig {
    @Bean
    public UserService userService() {
        return new UserService();
    }
}
别名的使用
- xml
<bean id="userService" class="com.example.UserService" />
<alias name="userService" alias="userManagementService" />

引用别名
<bean id="anotherBean" class="com.example.AnotherBean">
    <property name="userService" ref="userManagementService" />
</bean>
2.AliasFor
这要求使用 @AliasFor 注解的类和 bean 必须具有相同的注解类型
@AliasFor("userService")
@Component("userManagementService")
public class UserManagementService {
    // ...
}
实例化bean
构造函数实例化
通过调用类的构造函数来完成的
 你可以使用 <constructor-arg> 元素来指定构造函数的参数值
<bean id="user" class="com.example.User">
   <constructor-arg value="John" />
   <constructor-arg value="Doe" />
</bean>
静态工厂实例化
public class UserFactory {
   private UserFactory() {
       // private constructor to prevent direct instantiation
   }

   public static User createUser(String firstName, String lastName) {
       return new User(firstName, lastName);
   }
}
指定工厂类
<bean id="user" class="com.example.UserFactory" factory-method="createUser">
这是值
   <constructor-arg value="John" />
   <constructor-arg value="Doe" />
</bean>
实例工厂方法
public class UserFactory {
    public User createUser(String firstName, String lastName) {
        return new User(firstName, lastName);
    }
}
指定
<bean id="userFactory" class="com.example.UserFactory" />

<bean id="user" factory-bean="userFactory" factory-method="createUser">
    <constructor-arg value="John" />
    <constructor-arg value="Doe" />
</bean>
bean 在运行时的实际类型
Bean 类型和代理:用bean类型的和代理的类型
getClass() 方法:返回对象的实际运行时类,要注意,如果有代理存在,这个方法返回的可能是代理类的类型。
AopProxyUtils.ultimateTargetClass() 方法:这个方法会遍历代理链,找到最终的目标类。
目的:你可能需要了解对象的实际类型,特别是在处理代理、动态代理、AOP 等情况时。这有助于你更好地理解对象的行为和工作原理
依赖
依赖注入
Spring 框架的核心概念之一,它用于管理和注入对象之间的依赖关系。依赖注入的目的是降低组件之间的耦合度
- 构造函数
@Component
public class UserService {
    private UserRepository userRepository;

    @Autowired
    public UserService(UserRepository userRepository) {
        this.userRepository = userRepository;
    }

    // ...


package examples;

public class ExampleBean {

    // Fields omitted

    @ConstructorProperties({"years", "ultimateAnswer"})
    public ExampleBean(int years, String ultimateAnswer) {
        this.years = years;
        this.ultimateAnswer = ultimateAnswer;
使用xml
public class ThingOne {

    public ThingOne(ThingTwo thingTwo, ThingThree thingThree) {
        // ...
    }
}


}
<beans>
    <bean id="beanOne" class="x.y.ThingOne">
        <constructor-arg ref="beanTwo"/>
        <constructor-arg ref="beanThree"/>
    </bean>

    <bean id="beanTwo" class="x.y.ThingTwo"/>

    <bean id="beanThree" class="x.y.ThingThree"/>
</beans>

也可以指定类型
<bean id="exampleBean" class="examples.ExampleBean">
    <constructor-arg type="int" value="7500000"/>
    <constructor-arg type="java.lang.String" value="42"/>
</bean>

指定index
<bean id="exampleBean" class="examples.ExampleBean">
    <constructor-arg index="0" value="7500000"/>
    <constructor-arg index="1" value="42"/>
</bean>

指定名字
<bean id="exampleBean" class="examples.ExampleBean">
    <constructor-arg name="years" value="7500000"/>
    <constructor-arg name="ultimateAnswer" value="42"/>
</bean>
- Setter 方法注入
@Component
public class UserService {
    private UserRepository userRepository;

    @Autowired
    public void setUserRepository(UserRepository userRepository) {
        this.userRepository = userRepository;
    }

    // ...
}
setter与constructor

因此对于**强制依赖项使用构造函数**,而对于**可选依赖项使用setter方法**或配置方法是一条很好的经验法则。**注意,在setter方法上使用@Required注释可以使属性成为required依赖项**
- 字段注入
@Component
public class UserService {

    @Autowired
    private UserRepository userRepository;

    // ...
}
