Spring Cloud Feign MultipartFile文件上传踩坑之路总结
一、前端文件上传
文件上传组件用的是ant-design的a-upload组件,我的界面如下所示:
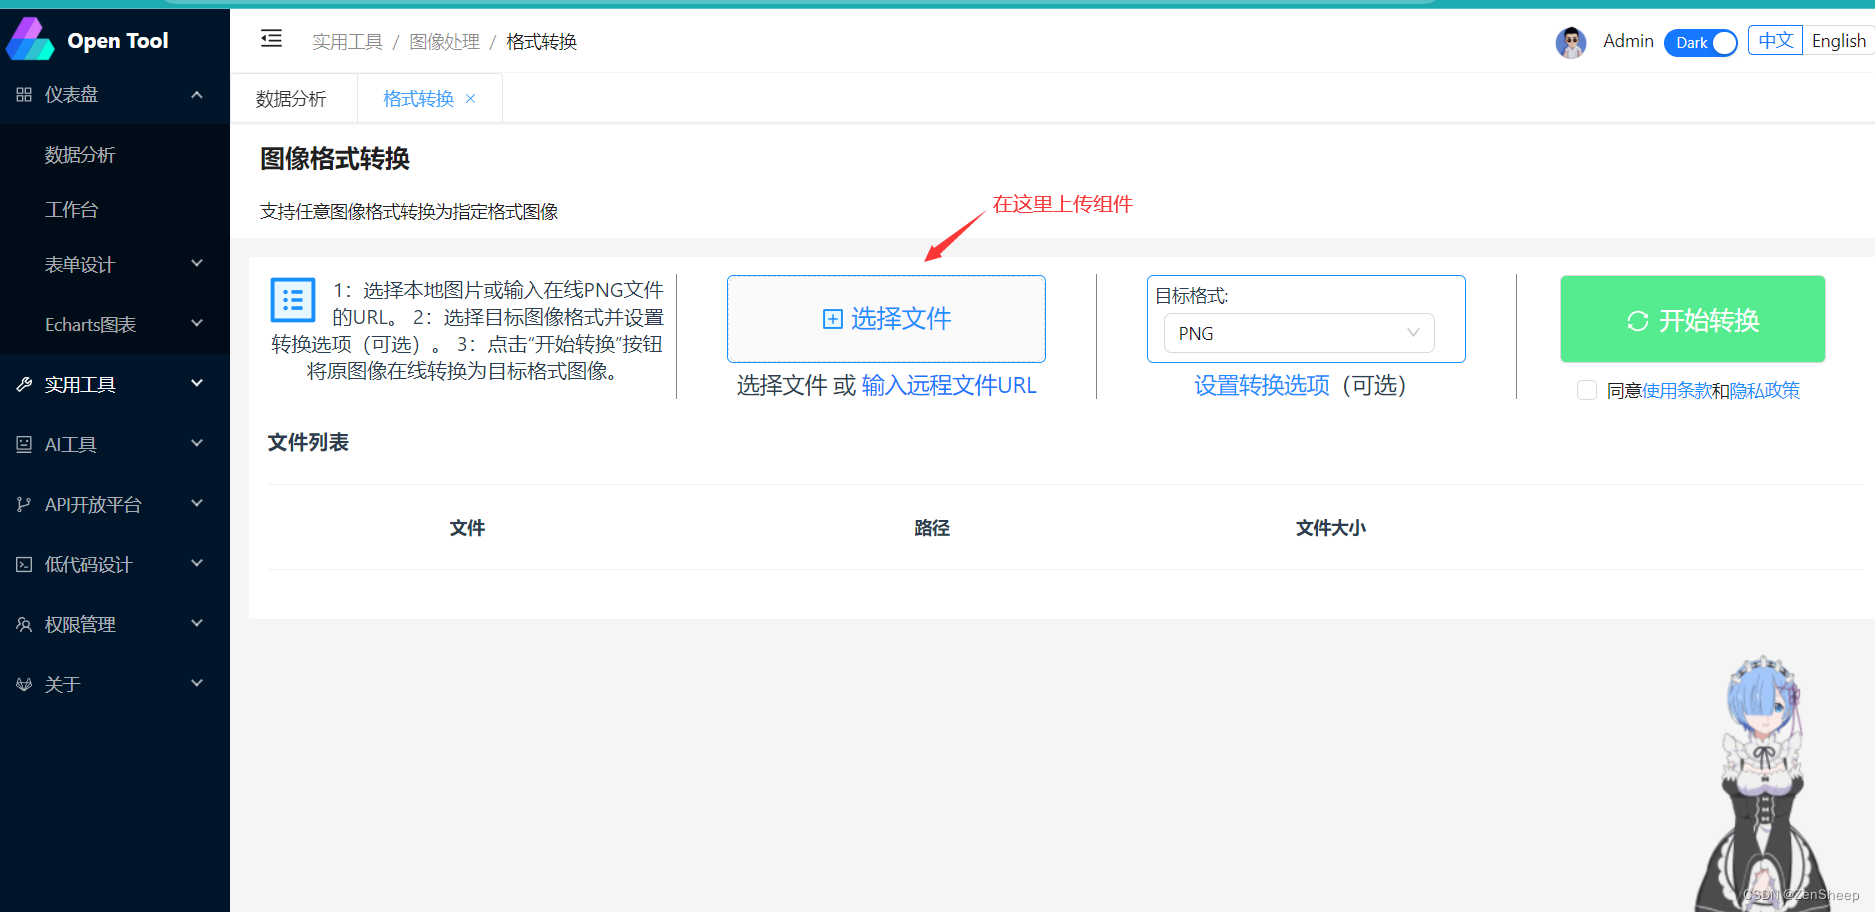
文件上传请求API:
FileUtils.js
import axios from "axios"

const uploadApi = ({file, URL, onUploadProgress}) => {
    const formData = new FormData()
    formData.append('file', file)
    return axios.post(URL, formData, {headers:{
        'Content-type': 'multipart/form-data',
      },
      onUploadProgress // 上传进度回调函数 onUploadProgress(ev))
    })
}

export default uploadApi;
需要注意的只有FileUtils.js定义的uploadApi请求函数,其中URL为后端请求接口(“/imageConvert/upload”),文件上传方法必须定义为POST,在headers加入’Content-type’: ‘multipart/form-data’,后端即可用@RequestParam或者@RequestPart + MultipartFile 来接受文件。
FileUpload.vue(无关紧要,用法大致相同,看你自己需求,这里只是提供一个参考范例)
// 自定义文件上传公共函数
// e - 上传组件返回的上传实例,里面包括 file,和一些组件方法
// e.file - 上传的文件实例对象
const customUpload = e => {
    let curFile = fileList.value.filter(item => item.uid == e.file.uid)[0]
    curFile.status = 'uploading'
    uploadApi({
        file: e.file,
        URL: '/imageConvert/upload',
        // uid: 'admin',  // 需要更改为用户id,待修改
        onUploadProgress: ev => {
            // ev - axios 上传进度实例,上传过程触发多次
            // ev.loaded 当前已上传内容的大小,ev.total - 本次上传请求内容总大小
            // console.log(ev);
            const percent = (ev.loaded / ev.total) * 100;
            // 计算出上传进度,调用组件进度条方法
            e.onProgress({ percent });
        }
    })
        .then(res => {
            let curFile = fileList.value.filter(item => item.uid == e.file.uid)[0]
            curFile.response = res.data
            if(res.data.code == 400) {
                curFile.status = 'error'
                curFile['error'] = curFile.response.msg
                console.error(`文件${curFile.name}上传失败:${res.data.msg}`)
            } else {
                // 通知组件该文件上传成功
                curFile.status = 'done'
                curFile.url = res.data.data
                curFile.thumbUrl = res.data.data
                console.log(`文件${curFile.name}上传成功`, curFile.url);
            }
        })
        .catch(err => {
            let curFile = fileList.value.filter(item => item.uid == e.file.uid)[0]
            curFile.status = 'error'
            curFile['error'] = '文件传输失败'
            console.log('上传失败', err);
        })
}
二、后端处理
后端框架我这里使用的是Spring Cloud,将文件处理统一定义为一个单独模块,通过Feign为其他业务模块提供服务。
服务提供者
Controller
这里注意要在@PostMapping加入MediaType.MULTIPART_FORM_DATA_VALUEMediaType.MULTIPART_FORM_DATA_VALUE,并且参数使用@RequestPart来接受参数
@RefreshScope
@RestController
@RequestMapping("/oss/file")
public class OSSFileController {
    @Autowired
    private IOSSService ossService;

    /**
     * 文件上传,入参可以根据具体业务进行添加
     * @param file 文件
     * @return 响应结果
     */
    @PostMapping( value = "/upload", consumes = MediaType.MULTIPART_FORM_DATA_VALUE)
    public String uploadFile(@RequestPart("file") MultipartFile file, @RequestParam("storagePath") String storagePath) {
        return ossService.uploadFile(file, storagePath);
    }
}
Service(文件存储方式跟Feign没关系,可忽略)
收到文件后我们将其保存在aliyun-oss文件服务器中:
如何将文件保存在aliyun-oss具体请参考:Spring Boot 集成阿里云 OSS 进行文件存储
或者可以使用file.transferTo(File file)保存至本地
**
 * OSS服务类
 * / @Author: ZenSheep
 * / @Date: 2023/8/10 16:05
 */
@Service
public class OSSService implements IOSSService {
    @Autowired
    private OSS ossClient;

    @Autowired
    private OSSConfiguration ossConfiguration;

    /**
     * 上传文件到阿里云 OSS 服务器
     * 链接:https://help.aliyun.com/document_detail/oss/sdk/java-sdk/upload_object.html?spm=5176.docoss/user_guide/upload_object
     *
     * @param file 文件
     * @param storagePath 文件存储路径
     * @return 文件存储完整路径
     */
    @Override
    public String uploadFile(MultipartFile file, String storagePath) {
        String url = "";
        try {
            // UUID生成文件名,防止重复
            String fileName = "";
            String baseName = OSSFileUtils.getBaseName(OSSFileUtils.getBaseName(file.getOriginalFilename()));
            InputStream inputStream = file.getInputStream();
            // 创建ObjectMetadata,设置用户自定义的元数据以及HTTP头,比如内容长度,ETag等
            ObjectMetadata objectMetadata = new ObjectMetadata();
            objectMetadata.setContentLength(inputStream.available());
            objectMetadata.setCacheControl("no-cache");
            objectMetadata.setHeader("Pragma", "no-cache");
            objectMetadata.setContentType(OSSFileUtils.getcontentType(file.getOriginalFilename()));
            objectMetadata.setContentDisposition("inline;filename=" + baseName);
            fileName = storagePath + "/" + UUID.randomUUID().toString() + "/"  + file.getOriginalFilename();
            // 上传文件:调用ossClient的putObject方法完成文件上传,并返回文件名
            ossClient.putObject(ossConfiguration.getBucketName(), fileName, inputStream, objectMetadata);
            // 设置签名URL过期时间,单位为毫秒。
            Date expiration = new Date(new Date().getTime() + 3600 * 1000);
            // 生成以GET方法访问的签名URL,访客可以直接通过浏览器访问相关内容。
            url = ossClient.generatePresignedUrl(ossConfiguration.getBucketName(), fileName, expiration).toString();
        } catch (IOException e) {
            e.printStackTrace();
        }

        return url;
    }
}
Feign
引入依赖:
        <!-- SpringCloud Openfeign -->
        <dependency>
            <groupId>org.springframework.cloud</groupId>
            <artifactId>spring-cloud-starter-openfeign</artifactId>
        </dependency>
RemoteFileService
这里同样需要注意:@PostMapping需要加入consumes = MediaType.MULTIPART_FORM_DATA_VALUE,参数传递用@RequestPart(“file”)
import org.springframework.cloud.openfeign.FeignClient;
import org.springframework.http.MediaType;
import org.springframework.web.bind.annotation.PostMapping;
import org.springframework.web.bind.annotation.RequestParam;
import org.springframework.web.bind.annotation.RequestPart;
import org.springframework.web.multipart.MultipartFile;

/**
 * File Feign: 提供File的远程服务
 * / @Author: ZenSheep
 * / @Date: 2023/8/14 18:48
 */
@FeignClient(name = "opentool-system", contextId="remote-file")
public interface RemoteFileService {
    @PostMapping(value = "/oss/file/upload", consumes = MediaType.MULTIPART_FORM_DATA_VALUE)
    String uploadFile(@RequestPart("file") MultipartFile file, @RequestParam("storagePath") String storagePath);
}
服务消费者
Controller
/**
 * 图像转换控制类
 * / @Author: ZenSheep
 * / @Date: 2023/8/14 18:59
 */
@RefreshScope
@RestController
@RequestMapping("/imageConvert")
public class ImageConvertController {
    @Autowired
    IImageConvertService iImageConvertService;
    @PostMapping("/upload")
    public R<?> uploadFile(@RequestPart("file") MultipartFile file) {
        return R.ok(iImageConvertService.uploadFile(file, "ImageConvert/images"));
    }
}
Service(在这里调用feign服务)
/**
 * 图像转换服务类
 * / @Author: ZenSheep
 * / @Date: 2023/8/14 18:53
 */
@Service
public class ImageConvertService implements IImageConvertService {
    @Autowired
    private RemoteFileService remoteFileService;

    @Override
    public String uploadFile(MultipartFile file, String storagePath) {
       return remoteFileService.uploadFile(file, storagePath);
    }
}
ok,到这一步我们的工作就完成了,测试一下:
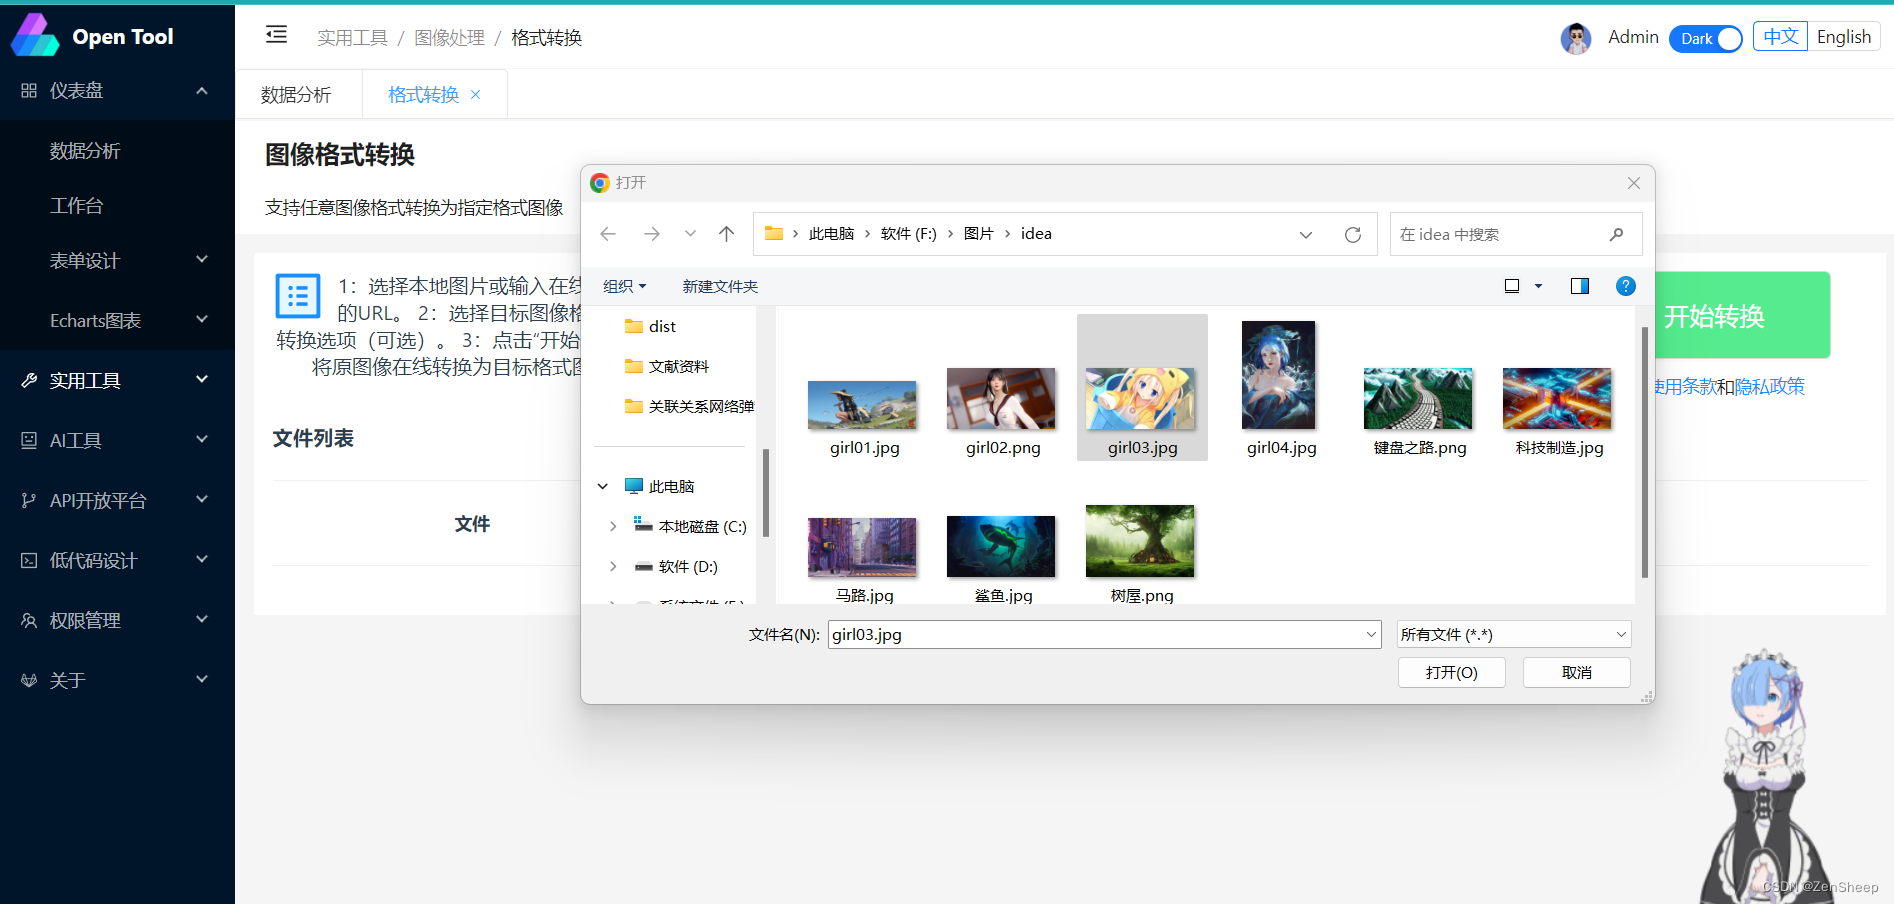
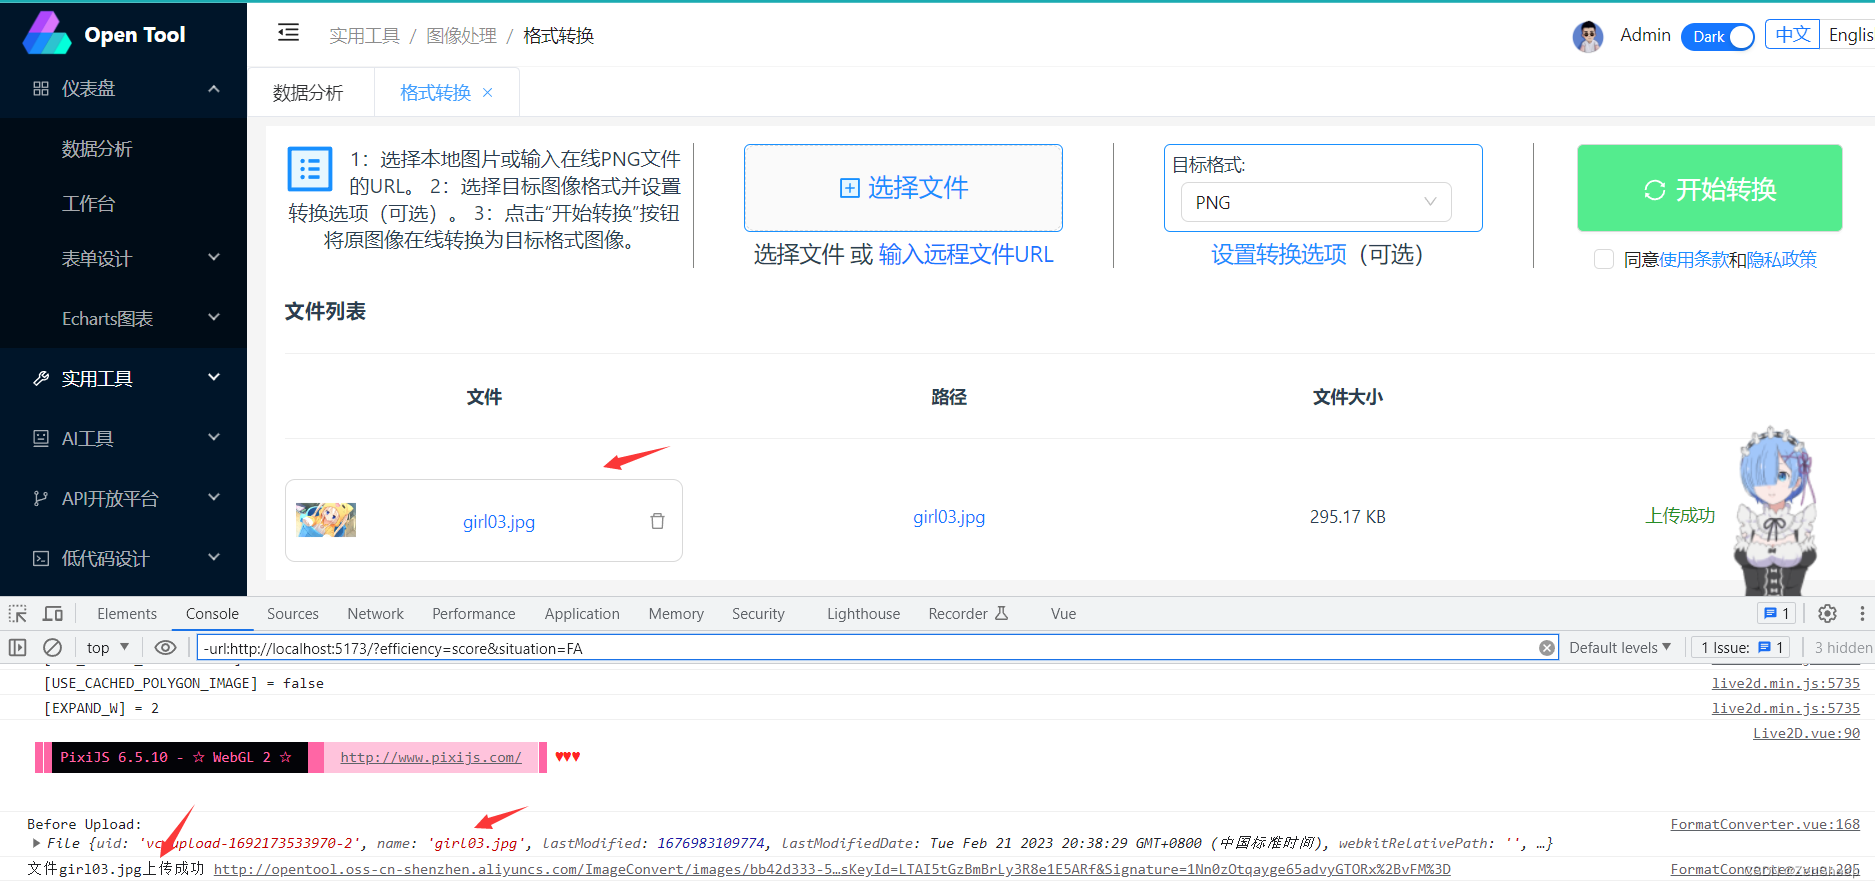
可以看到我们的文件已经成功上传,并成功保存至目标服务器返回了一个文件存储url,有什么不懂的可以在评论区问我,哪里讲的不对请大佬轻喷,我也是第一次做文件传输。

![[计算机入门] 设置屏幕分辨率](https://img-blog.csdnimg.cn/67e0e85044aa45d38b81bc96ef02663d.png)
![[自学记录06|*百人计划]Gamma矫正与线性工作流](https://img-blog.csdnimg.cn/img_convert/fb9053fca186cfaba119a681ab098e7a.jpeg)


