文章目录
- 一、前言
- 二、快速开始
- 2.1 基本搭建
- 2.2 测试是否成功
- 2.3 其他部分
- 日志
- 测试
- 异步启动
- 三、SOFABoot的模块化开发
- 3.1 基于Spring上下文的隔离
- 3.2 Root Application Context
- 3.3 模块并行化启动
- 3.4 JVM服务与RPC服务的发布与引用
- 3.5 模块配置
- Module-Name
- Require-Module
- Spring-Parent
- Module-Profile
- 3.6 JVM 服务发布与引用实例
- 3.6.1 facade模块声明接口
- 3.6.2 provide中实现接口与基本配置
- 3.6.3 consumer基本配置
- 3.6.4 BootRun基本配置
- 3.6.5 XML方式发布与引用
- 3.6.6 注解方式发布与引用
- 3.6.6.1 通过XML管理
- 3.6.6.2 @Bean方式
- 3.6.6.3 多接口
- 3.6.7 代码方式发布与引用
- 参考文档
一、前言
SOFABoot 是蚂蚁金服开源的基于 Spring Boot 的研发框架。
具体可见
- SOFABoot
- SOFABoot官方文档
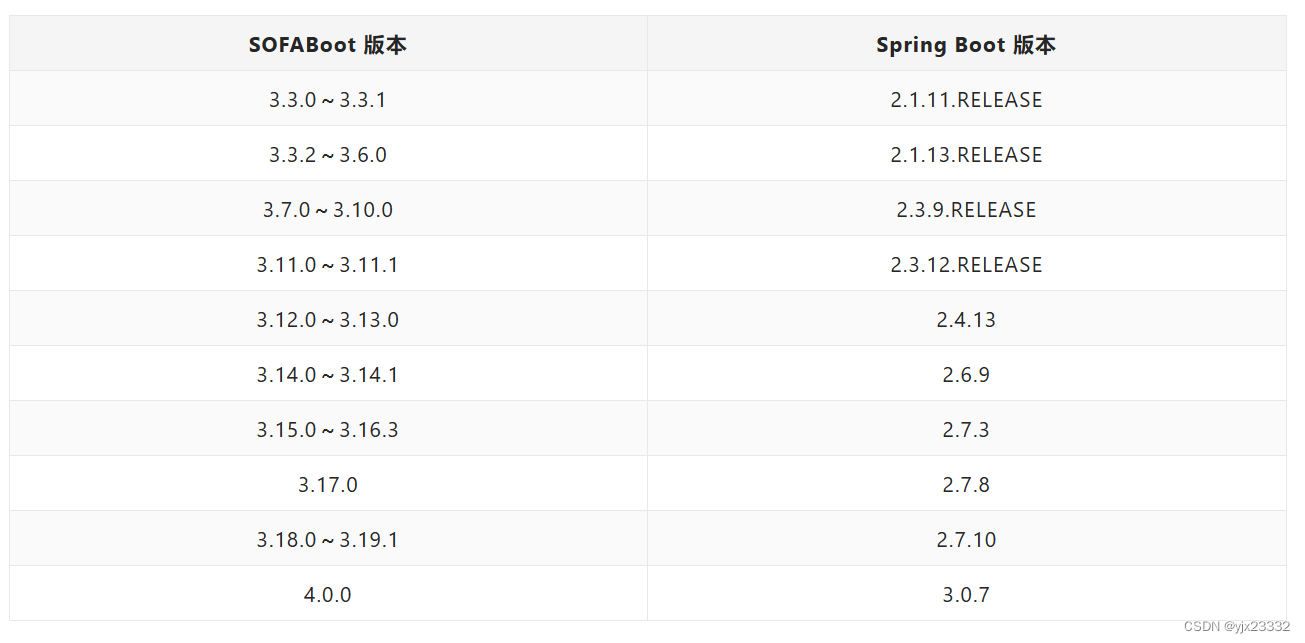
版本关系
二、快速开始
2.1 基本搭建
依官方文档所言,为顺利从中央仓库拉取 SNAPSHOT 包我们在Maven的setting.xml中加入如下配置:
<profile>
    <id>default</id>
    <activation>
        <activeByDefault>true</activeByDefault>
    </activation>
    <repositories>
        <repository>
            <snapshots>
                <enabled>true</enabled>
            </snapshots>
            <id>maven-snapshot</id>
            <url>https://oss.sonatype.org/content/repositories/snapshots</url>
        </repository>
    </repositories>
    <pluginRepositories>
        <pluginRepository>
            <snapshots>
                <enabled>true</enabled>
            </snapshots>
            <id>maven-snapshot</id>
            <url>https://oss.sonatype.org/content/repositories/snapshots</url>
        </pluginRepository>
    </pluginRepositories>
</profile>
创建Maven项目
以如下依赖为参考
<?xml version="1.0" encoding="UTF-8"?>
<project xmlns="http://maven.apache.org/POM/4.0.0"
         xmlns:xsi="http://www.w3.org/2001/XMLSchema-instance"
         xsi:schemaLocation="http://maven.apache.org/POM/4.0.0 http://maven.apache.org/xsd/maven-4.0.0.xsd">
    <modelVersion>4.0.0</modelVersion>

    <groupId>org.example</groupId>
    <artifactId>test</artifactId>
    <version>1.0-SNAPSHOT</version>

    <properties>
        <maven.compiler.source>8</maven.compiler.source>
        <maven.compiler.target>8</maven.compiler.target>
    </properties>

    <parent>
        <groupId>com.alipay.sofa</groupId>
        <artifactId>sofaboot-dependencies</artifactId>
        <version>2.3.1</version>
    </parent>


    <dependencies>
        <dependency>
            <groupId>com.alipay.sofa</groupId>
            <artifactId>healthcheck-sofa-boot-starter</artifactId>
        </dependency>

        <dependency>
            <groupId>org.springframework.boot</groupId>
            <artifactId>spring-boot-starter-web</artifactId>
        </dependency>
    </dependencies>

    <build>
        <plugins>
            <plugin>
                <groupId>org.springframework.boot</groupId>
                <artifactId>spring-boot-maven-plugin</artifactId>
            </plugin>
        </plugins>
        <resources>
            <resource>
                <directory>src/main/java</directory>
                <includes>
                    <include>**/*.xml</include>
                </includes>
            </resource>
            <resource>
                <directory>src/main/resources</directory>
                <includes>
                    <include>**/*.properties</include>
                    <include>**/*.xml</include>
                    <include>**/*.yml</include>
                </includes>
            </resource>
        </resources>
    </build>
</project>
同SpringBoot一样,完成MainApplication的创建,然后运行
可参考Spring Boot2——基本使用(笔记)
package com.test;

import org.springframework.boot.SpringApplication;
import org.springframework.boot.autoconfigure.SpringBootApplication;

@SpringBootApplication
public class MainApplication {
    public static void main(String[] args){
        SpringApplication.run(MainApplication.class,args);
    }
}
依据滚网,加入如下配置一下yml文件:
server:
  port: 8080
spring:
  application:
    name: testApplication
logging:
  path: ./logs
2.2 测试是否成功
- 查询如下网址,SOFABoot 中使用 Maven 插件生成的版本信息汇总
http://localhost:8080/sofaboot/versions
(在SOFABoot 3.x 中调整了 endpoint 路径,sofaboot/versions 更改为 actuator/versions)
点击直接查询(3.x 前)
点击直接查询(3.x 后)
[
    {
        "GroupId": "com.alipay.sofa",
        "Doc-Url": "https://github.com/alipay/sofa-boot",
        "ArtifactId": "infra-sofa-boot-starter",
        "Bulit-Time": "2018-04-18T22:19:09+0800",
        "Commit-Time": "2018-04-18T22:07:52+0800",
        "Commit-Id": "466f0e039b250ff7b201dc693eec7fa07eb21ad7",
        "Version": "2.3.1"
    }
]
- 查询如下网址,查看应用 Readiness Check 的状况
http://localhost:8080/health/readiness
(在 SOFABoot 3.x 中调整了 endpoint 路径,health/readiness 更改为 actuator/readiness)
点击直接查询(3.x 前)
点击直接查询(3.x 后)
{
    "status": "UP",
    "sofaBootComponentHealthCheckInfo": {
        "status": "UP"
    },
    "springContextHealthCheckInfo": {
        "status": "UP"
    },
    "DiskSpaceHealthIndicator": {
        "status": "UP",
        "total": 53685972992,
        "free": 47562289152,
        "threshold": 10485760
    }
}
status: “UP” ,表示应用 Readiness Check 健康的。
- 使用如下查询,查看应用的运行时健康状态
http://localhost:8080/health
(在 SOFABOOT 3.X 中调整了 endpoint 路径,/health 更改为 /actuator/health)
点击直接查询(3.x 前)
点击直接查询(3.x 后)
2.3 其他部分
日志
日志文件结构如下
./logs
├── health-check
│   ├── sofaboot-common-default.log
│   └── sofaboot-common-error.log
├── infra
│   ├── common-default.log
│   └── common-error.log
└── spring.log
测试
在不使用SOFABoot的类隔离能力时,可以不使用SOFABoot的测试包。即,原来的测试包。
但如果要使用类隔离能力的时候,我们必须使用如下引用。(类隔离能力见后文)
<dependency>
    <groupId>com.alipay.sofa</groupId>
    <artifactId>test-sofa-boot-starter</artifactId>
</dependency>
对应的单元测试注解为:
@SofaBootRunner
@SofaJUnit4Runner
可参考Spring官网-Test scope dependencies
使用如下
		<dependency>
            <groupId>com.alipay.sofa</groupId>
            <artifactId>test-sofa-boot-starter</artifactId>
            <scope>test</scope>
        </dependency>
        <dependency>
            <groupId>org.springframework.boot</groupId>
            <artifactId>spring-boot-starter-test</artifactId>
            <scope>test</scope>
        </dependency>
package com.test;

import org.junit.Test;
import org.junit.runner.RunWith;
import org.slf4j.Logger;
import org.slf4j.LoggerFactory;
import org.springframework.boot.test.context.SpringBootTest;
import org.springframework.test.context.junit4.SpringRunner;

@RunWith(SpringRunner.class) //SpringJUnit4ClassRunner.class 也可以
@SpringBootTest(classes = MainApplication.class, webEnvironment = SpringBootTest.WebEnvironment.DEFINED_PORT)
public class test {

    private static Logger log = LoggerFactory.getLogger(test.class);

    @Test
    public void UnitTest(){
        int a = 33;
        log.info("你好{}",a);
    }
}

Spring:SpringRunner 和 SpringJUnit4ClassRunner
异步启动
SOFABoot 在 v2.6.0 开始提供异步初始化 Spring Bean 能力,引入如下 Starter 即可:
<dependency>
    <groupId>com.alipay.sofa</groupId>
    <artifactId>runtime-sofa-boot-starter</artifactId>
</dependency>
三、SOFABoot的模块化开发
官网的文档中,项目分为如下4个模块。官方样例下载地址-sofa-boot-guides
.
│
├── service-facade
│
├── service-provider
│
├── service-consumer
│
└── sofa-boot-run
- service-facade: 演示 JVM 服务发布与引用的 API 包
- service-provider: 演示 XML 方式、Annotation 方式、API 方式发布 JVM 服务
- service-consumer: 演示 XML 方式、Annotation 方式、API 方式引用 JVM 服务
- sofa-boot-run: 启动包含 SOFABoot 模块的 SOFA Boot 应用
3.1 基于Spring上下文的隔离
常见的模块化形式:
- 基于代码组织上的模块化:
- 在开发期,将不同功能的代码放在不同 Java 工程下,在编译期被打进不同 jar 包
- 在运行期,所有 Java 类都在一个 classpath 下,没做任何隔离
- 基于 Spring 上下文隔离的模块化:
- 借用 Spring 上下文来做不同功能模块的隔离,在开发期和编译期,代码和配置也会分在不同 Java 工程中,但在运行期,不同模块间的 Spring Bean 相互不可见
- DI(Dependency Injection,依赖注入)只在同一个上下文内部发生,但是所有的 Java 类还是在同一个 ClassLoader 下;
- 基于 ClassLoader 隔离的模块化:
- 借用 ClassLoader 来做隔离,每个模块都有独立的 ClassLoader,模块与模块之间的 classpath 不同
SOFABoot 模块化开发属于模块化形式 —— 基于 Spring 上下文隔离的模块化。每个 SOFABoot 模块使用独立的 Spring 上下文,避免不同 SOFABoot 模块间的 BeanId 冲突,有效降低企业级多模块开发时团队间的沟通成本。
取自 蚂蚁金服的业务系统模块化之模块化隔离方案
我们常常见到一个系统中的模块会按照如下的方式进行分层,如下图中的左边部分所示,一个系统就简单地分为 Web 层、Service 层、DAL 层。
当这个系统承载的业务变多了之后,系统可能演化成上图中右边的这种方式。在上图的右边的部分中,一个系统承载了两个业务,一个是 Cashier(收银台),另一个是 Pay(支付),这两个业务可能会有一些依赖的关系,Cashier 需要调用 Pay 提供的能力去做支付。

但是在这种模块化的方案里面,Spring 的上下文依然是同一个,类也没有任何做隔离,这就意味着,Pay Service 这个模块里面的任何的一个 Bean,都可以被 Cashier Service 这个模块所依赖。极端的情况下,可能会出现下面这种情况:
- Cashier Service 错误地调用了 Pay Service 中的一个内部的 Bean,造成了两个模块之间的紧耦合。
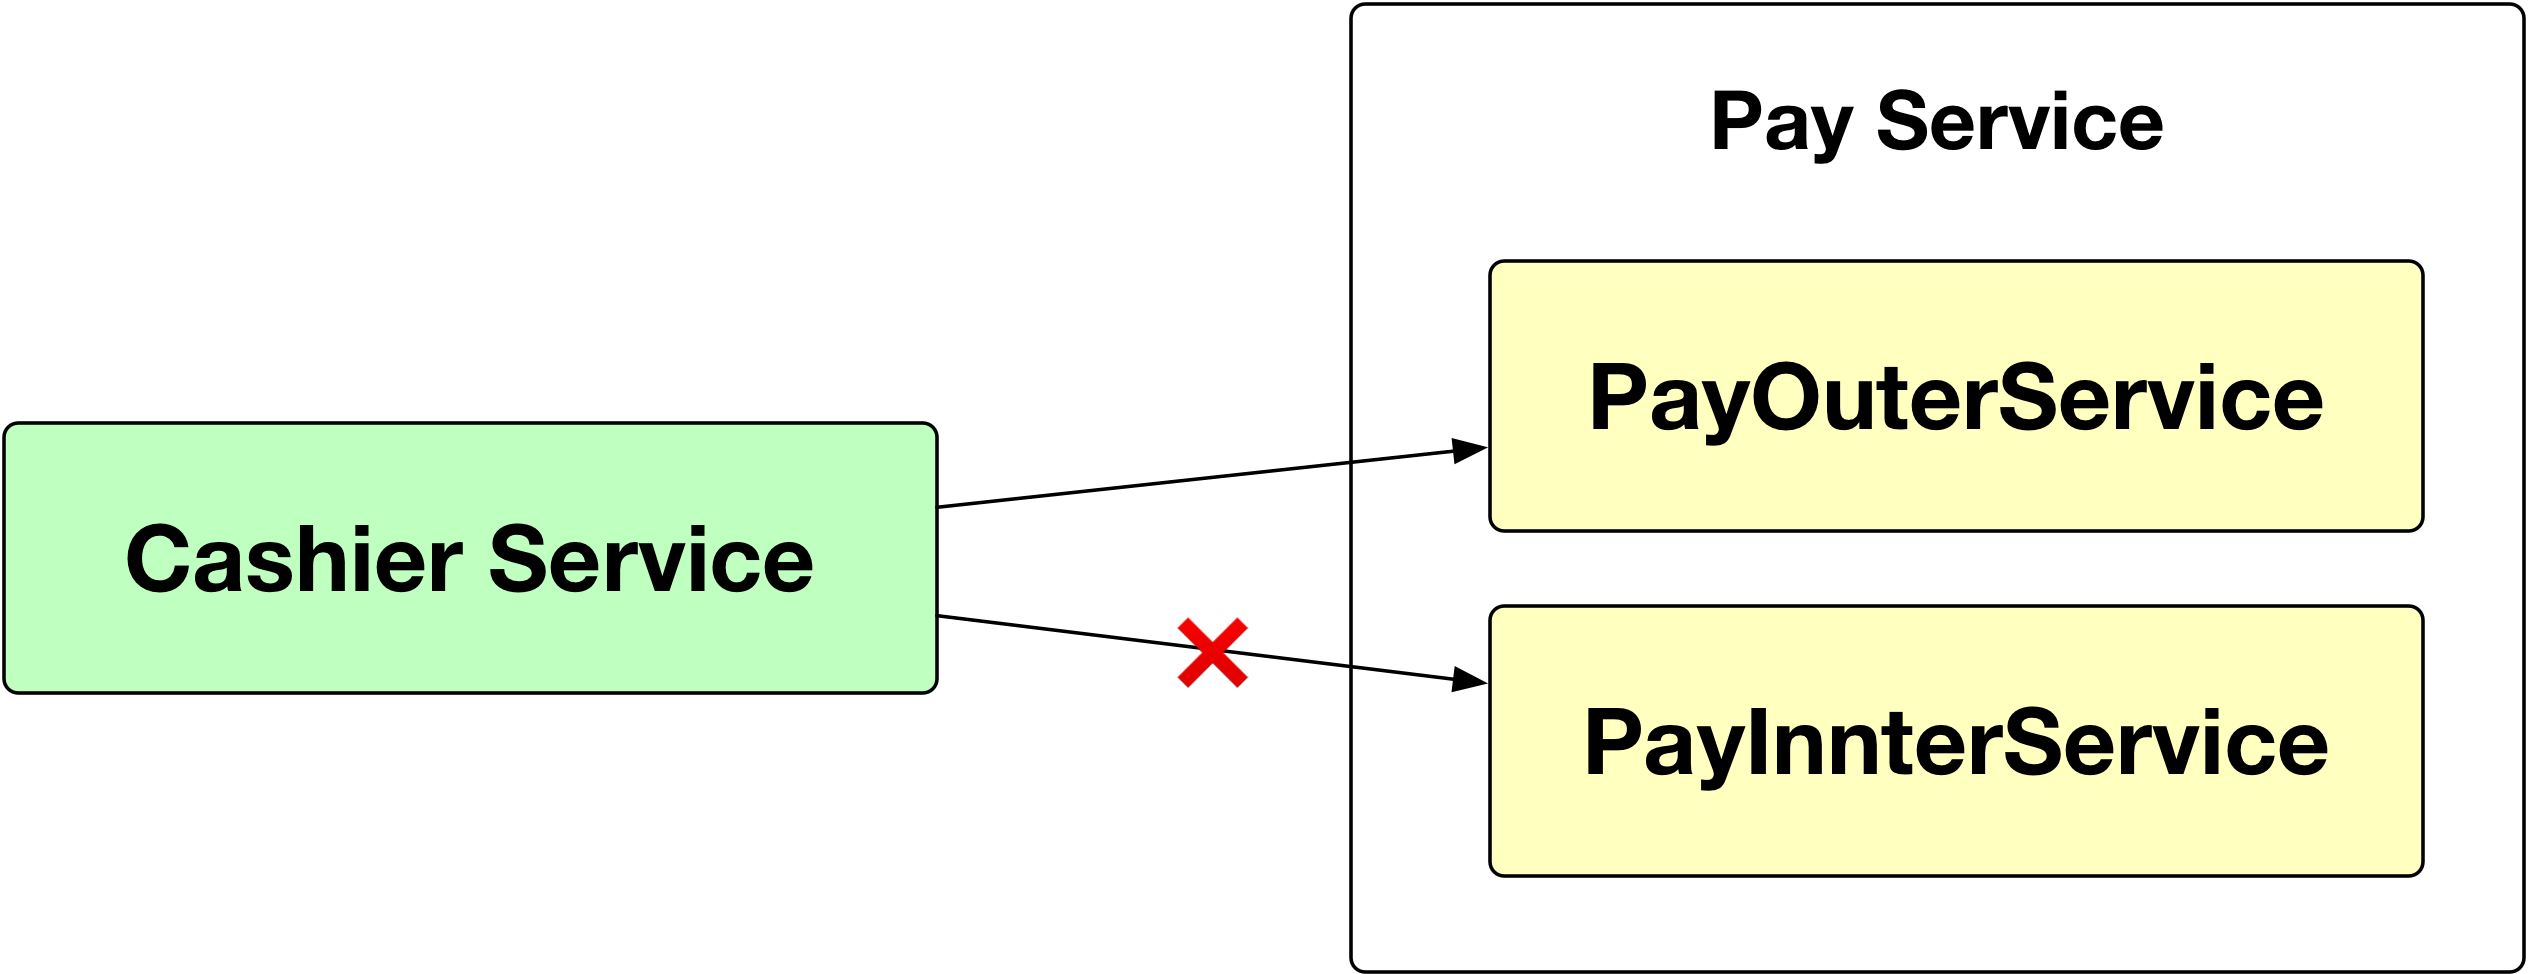
SOFA的模块化如下

可以看到每一个小模块单独有一个Spring上下文.通过这种方式将他们强制分开,而不是同之前一样,由开发者自觉遵守。

以 SOFABoot 模块为单元的模块化方式为开发者提供了以下功能:
- 运行时,每个 SOFABoot 模块的 Spring 上下文是隔离的,模块间定义的 Bean 不会相互影响
- 每个 SOFABoot 模块是功能完备且自包含的,可以很容易在不同的 SOFABoot 应用中进行模块迁移和复用,只需将 SOFABoot 模块整个拷贝过去,调整 Maven 依赖,即可运行。
3.2 Root Application Context
SOFABoot 应用运行时,本身会产生一个 Spring Context,我们把它叫做 Root Application Context,它是每个 SOFABoot 模块创建的 Spring Context 的 Parent。
这样设计的目的是为了保证每个 SOFABoot 模块的 Spring Context 都能发现 Root Application Context 中创建的 Bean,这样当应用新增 Starter 时,不仅 Root Application Context 能够使用 Starter 中新增的 Bean,每个 SOFABoot 模块的 Spring Context 也能使用这些 Bean。
也就是一些全局的Bean。
3.3 模块并行化启动
每个 SOFABoot 模块都是独立的 Spring 上下文,多个 SOFABoot 模块支持并行化启动,与 Spring Boot 的单 Spring 上下文模式相比,模块并行化启动能够加快应用的启动速度。
3.4 JVM服务与RPC服务的发布与引用
上下文隔离后,模块与模块间的 Bean 无法直接注入,模块间需要通过 SOFA 服务进行通信,目前SOFABoot 提供了两种形式的服务发布和引用,用于解决不同级别的模块间调用的问题:
- JVM 服务发布和引用:解决一个 SOFABoot 应用内部各个 SOFABoot 模块之间的调用问题, JVM 服务发布与引用
- RPC 服务发布和引用:解决多个 SOFABoot 应用之间的远程调用问题,RPC 服务发布与引用。
3.5 模块配置
S O F A B o o t 模 块 = 普 通 的 J a r 包 + S O F A B o o t 特 有 的 配 置 SOFABoot 模块 = 普通的 Jar 包 + SOFABoot 特有的配置 SOFABoot模块=普通的Jar包+SOFABoot特有的配置
共有4种配置文件
Module-Name = com.alipay.test.biz.service.impl
Spring-Parent = com.alipay.test.common.dal
Require-Module = com.alipay.test.biz.shared
Module-Profile = dev
Module-Name
Module-Name 是 SOFABoot 模块的名称,也是 SOFABoot 模块的唯一标示符。
在一个 SOFABoot 应用中,一个SOFABoot 模块的 Module-Name 必须和其他的 SOFABoot 模块的 Module-Name 不一样。
需要注意的一点是,一个 SOFABoot 应用运行时的 SOFABoot 模块,不仅仅只包含本应用的模块,还包括依赖了其他应用的 SOFABoot 模块,确定是否唯一的时候需要把这些 SOFABoot 模块也考虑进去。
其实就是配置的服务的实现,通过com.alipay.test.biz.service.impl,就很容易发现,其实就是xxxServiceImpl

因为在SOFABoot中,它们被分在了不同的Spring上下文。通过配置文件指定接口的实现。
Require-Module
Require-Module 用于定义模块之间的依赖顺序,值是以逗号分隔的 SOFABoot 模块名列表,比如上面的配置中,就表示本模块依赖于 com.alipay.test.biz.shared 模块。
对于这种依赖关系的处理,SOFABoot 会将 com.alipay.test.biz.shared 模块在本模块之前启动,即com.alipay.test.biz.shared 模块将先启动 Spring 上下文。
一般情况下,是不需要为模块定义 Require-Module 的,只有当模块的 Spring 上下文的启动依赖于另一个模块的 Spring 上下文的启动时,才需要定义 Require-Module。
举一个例子,如果你在 A 模块中发布了一个 SOFA JVM Service。在 B 模块的某一个 Bean 的 init 方法里面,需要使用 SOFA Reference 调用这个 JVM Service。假设 B 模块在 A 模块之前启动了,那么 B 模块的 Bean 就会因为 A 模块的 JVM Service 没有发布而 init 失败,导致 Spring 上下文启动失败。这个时候,我们就可以使用 Require-Module 来强制 A 模块在 B 模块之前启动。
Spring-Parent
在 SOFABoot 应用中,每一个 SOFABoot 模块都是一个独立的 Spring 上下文,并且这些 Spring 上下文之间是相互隔离的。
虽然这样的模块化方式可以带来诸多好处,但是,在某些场景下还是会有一些不便,这个时候,你可以通过 Spring-Parent 来打通两个 SOFABoot 模块的 Spring 上下文。
Spring-Parent 属性可以配置一个模块的名称,比如上面的配置中,就将 com.alipay.test.common.dal 的 Spring 上下文设置为当前模块的 Spring 上下文的父 Spring 上下文。
由于 Spring 的限制,一个模块的 Spring-Parent 只能有一个模块。关于 Spring 的父上下文的作用可以看 Spring 的 BeanFactory 的说明:Interface BeanFactory
Module-Profile
支持 SOFABoot Profile 能力,详情参考- SOFABoot Profile
也就是配置运行环境(dev、test、product),当处于对应的环境时,模块就会启动,或者说激活。
3.6 JVM 服务发布与引用实例
有三种方式,可参考 JVM 服务发布与引用
- XML 方式
- Annotation 方式
- 编程 API 方式
对于同一个服务,不能混用XML与Annotation方式
我们可以依据分类创建如下结构,下图是官方样例中的内容。

- boot:启动模块,含有MainApplication与控制层
- facade:Service接口所在
- provide:Service方法实现
- consumer:引用Service,让其可被作为Bean使用
我们另建一个项目。

在上图pom.xml文件中加入如下代码
	<?xml version="1.0" encoding="UTF-8"?>
<project xmlns="http://maven.apache.org/POM/4.0.0"
         xmlns:xsi="http://www.w3.org/2001/XMLSchema-instance"
         xsi:schemaLocation="http://maven.apache.org/POM/4.0.0 http://maven.apache.org/xsd/maven-4.0.0.xsd">
    <modelVersion>4.0.0</modelVersion>

    <groupId>org.example</groupId>
    <artifactId>sofaBootTest</artifactId>
    <packaging>pom</packaging>
    <version>1.0-SNAPSHOT</version>
    <modules>
        <module>service-consumer</module>
        <module>service-provider</module>
        <module>sofa-boot-run</module>
        <module>service-facade</module>
    </modules>


    <properties>
        <maven.compiler.source>8</maven.compiler.source>
        <maven.compiler.target>8</maven.compiler.target>
        <maven.surefire.plugin>2.21.0</maven.surefire.plugin>
    </properties>

    <parent>
        <groupId>com.alipay.sofa</groupId>
        <artifactId>sofaboot-dependencies</artifactId>
        <version>3.2.0</version>
    </parent>

    <dependencyManagement>
        <dependencies>
            <dependency>
                <groupId>com.alipay.sofa</groupId>
                <artifactId>isle-sofa-boot-starter</artifactId>
                <version>3.2.0</version>
            </dependency>
            <dependency>
                <groupId>org.example</groupId>
                <artifactId>service-provider</artifactId>
                <version>${project.version}</version>
            </dependency>
            <dependency>
                <groupId>org.example</groupId>
                <artifactId>service-facade</artifactId>
                <version>${project.version}</version>
            </dependency>
            <dependency>
                <groupId>org.example</groupId>
                <artifactId>service-consumer</artifactId>
                <version>${project.version}</version>
            </dependency>
            <dependency>
                <groupId>org.example</groupId>
                <artifactId>sofa-boot-run</artifactId>
                <version>${project.version}</version>
            </dependency>
        </dependencies>
    </dependencyManagement>
    <build>
        <plugins>
            <plugin>
                <groupId>org.springframework.boot</groupId>
                <artifactId>spring-boot-maven-plugin</artifactId>
            </plugin>
        </plugins>
    </build>

    <profiles>
        <profile>
            <id>jdk8</id>
            <activation>
                <jdk>1.8</jdk>
            </activation>
            <build>
                <plugins>
                    <plugin>
                        <groupId>org.apache.maven.plugins</groupId>
                        <artifactId>maven-surefire-plugin</artifactId>
                        <version>${maven.surefire.plugin}</version>
                        <dependencies>
                            <dependency>
                                <groupId>org.ow2.asm</groupId>
                                <artifactId>asm</artifactId>
                                <version>6.2</version>
                            </dependency>
                        </dependencies>
                        <configuration>
                            <reuseForks>false</reuseForks>
                        </configuration>
                    </plugin>
                </plugins>
            </build>
        </profile>

        <profile>
            <id>jdk11</id>
            <activation>
                <jdk>11</jdk>
            </activation>
            <build>
                <plugins>
                    <plugin>
                        <groupId>org.apache.maven.plugins</groupId>
                        <artifactId>maven-surefire-plugin</artifactId>
                        <version>${maven.surefire.plugin}</version>
                        <dependencies>
                            <dependency>
                                <groupId>org.ow2.asm</groupId>
                                <artifactId>asm</artifactId>
                                <version>6.2</version>
                            </dependency>
                        </dependencies>
                        <configuration>
                            <reuseForks>false</reuseForks>
                            <argLine>-Djdk.attach.allowAttachSelf --add-opens
                                java.base/jdk.internal.loader=ALL-UNNAMED
                            </argLine>
                        </configuration>
                    </plugin>
                </plugins>
            </build>
        </profile>
    </profiles>
</project>
3.6.1 facade模块声明接口
于facade模块中创建一个服务
package com.facadeTest;

public interface SampleService {
    String message();
}
3.6.2 provide中实现接口与基本配置
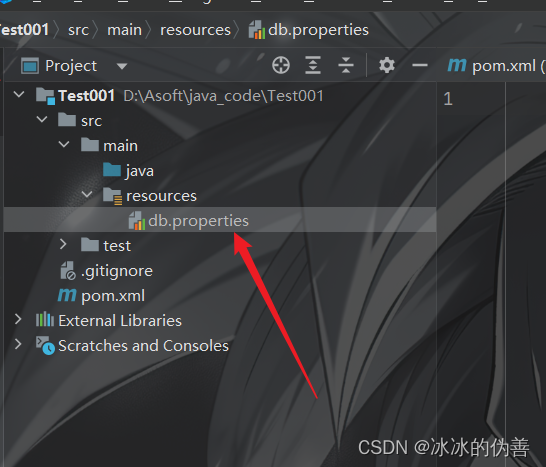
创建 sofa-module.properties 文件如图

并在文件中,添加如下配置,为我们模块的命名
Module-Name=com.service-provider
3.6.3 consumer基本配置
同理伪consumer创建一个sofa-module.properties 文件。
Module-Name=com.service-consumer
Require-Module=com.service-provider
在 sofa-module.properties 文件中需要指定 Require-Module,保证 service-provider 模块在 service-consumer 模块之前刷新。
3.6.4 BootRun基本配置
我们在BootRun中创建好SpringBoot的基本架构

导入如下文件即可:
	 <dependencies>
        <dependency>
            <groupId>org.springframework.boot</groupId>
            <artifactId>spring-boot-starter-web</artifactId>
        </dependency>

        <dependency>
            <groupId>com.alipay.sofa</groupId>
            <artifactId>healthcheck-sofa-boot-starter</artifactId>
        </dependency>

        <dependency>
            <groupId>com.alipay.sofa</groupId>
            <artifactId>test-sofa-boot-starter</artifactId>
            <scope>test</scope>
        </dependency>
        <dependency>
            <groupId>org.springframework.boot</groupId>
            <artifactId>spring-boot-starter-test</artifactId>
            <scope>test</scope>
        </dependency>

        <dependency>
            <groupId>com.alipay.sofa</groupId>
            <artifactId>isle-sofa-boot-starter</artifactId>
        </dependency>
        <dependency>
            <groupId>org.example</groupId>
            <artifactId>service-provider</artifactId>
        </dependency>
        <dependency>
            <groupId>org.example</groupId>
            <artifactId>service-facade</artifactId>
        </dependency>
        <dependency>
            <groupId>org.example</groupId>
            <artifactId>service-consumer</artifactId>
        </dependency>
    </dependencies>
	<build>
        <plugins>
            <!-- http://docs.spring.io/spring-boot/docs/current/maven-plugin/usage.html -->
            <plugin>
                <groupId>org.springframework.boot</groupId>
                <!-- http://docs.spring.io/spring-boot/docs/current/maven-plugin/usage.html -->
                <artifactId>spring-boot-maven-plugin</artifactId>
                <version>1.4.2.RELEASE</version>
                <configuration>
                    <!-- executable fat jar -->
                    <outputDirectory>../target/boot</outputDirectory>
                    <classifier>executable</classifier>
                </configuration>
                <executions>
                    <execution>
                        <goals>
                            <goal>repackage</goal>
                        </goals>
                    </execution>
                </executions>
            </plugin>
        </plugins>
    </build>
另外注意一定要yml或者properties文件配置应用名和日志路径,否则会报错。(可见第二部分)
package com.sofaBootRun;

import com.alipay.sofa.runtime.api.annotation.SofaReference;
import com.facadeTest.SampleService;
import org.junit.Assert;
import org.junit.Test;
import org.junit.runner.RunWith;
import org.springframework.boot.test.context.SpringBootTest;
import org.springframework.test.context.junit4.SpringRunner;

@RunWith(SpringRunner.class)
@SpringBootTest(classes = MainApplication.class, webEnvironment = SpringBootTest.WebEnvironment.DEFINED_PORT)
public class test {

    @SofaReference(uniqueId = "sampleService")
    private SampleService sampleJvmService;

   @SofaReference(uniqueId = "annotationImpl")
    private SampleService sampleJvmServiceAnnotationImpl;

   @SofaReference(uniqueId = "serviceClientImpl")
    private SampleService sampleJvmServiceClientImpl;

    @Test
    public void test() {
        Assert.assertEquals("Hello, jvm service xml implementation.", sampleJvmService.message());
        Assert.assertEquals("Hello, jvm service annotation implementation.",
                sampleJvmServiceAnnotationImpl.message());
        Assert.assertEquals("Hello, jvm service service client implementation.",
                sampleJvmServiceClientImpl.message());
    }
}
3.6.5 XML方式发布与引用
我们首先于provide模块中实现该接口
package com.providerTest;


import com.facadeTest.SampleService;

public class SampleServiceImpl implements SampleService {
    private String message;

    public String getMessage() {
        return message;
    }

    public void setMessage(String message) {
        this.message = message;
    }

    @Override
    public String message() {
        System.out.println(message);
        return message;
    }
}
在provider服务里面,同Spring,创建如下格式文档 service-provider.xml

并加入如下内容,将对象放入Bean中
<beans xmlns="http://www.springframework.org/schema/beans"
       xmlns:xsi="http://www.w3.org/2001/XMLSchema-instance"
       xmlns:sofa="http://sofastack.io/schema/sofaboot"
       xsi:schemaLocation="http://www.springframework.org/schema/beans http://www.springframework.org/schema/beans/spring-beans.xsd
            http://sofastack.io/schema/sofaboot http://sofastack.io/schema/sofaboot.xsd"
       default-autowire="byName">
    <bean id="sampleService" class="com.providerTest.SampleServiceImpl">
        <property name="message" value="Hello, jvm service xml implementation."/>
    </bean>

    <sofa:service ref="sampleService" interface="com.facadeTest.SampleService">
        <sofa:binding.jvm/>
    </sofa:service>
</beans>
与Spring相同,注意ID和ref里面的一致性。
在consumer里面,同前输入如下内容,然后通过 SOFA 提供的 Spring 扩展标签来将上面的 Bean 发布成一个 SOFA JVM 服务
<?xml version="1.0" encoding="UTF-8"?>
<beans xmlns="http://www.springframework.org/schema/beans"
       xmlns:xsi="http://www.w3.org/2001/XMLSchema-instance"
       xmlns:sofa="http://sofastack.io/schema/sofaboot"
       xmlns:context="http://www.springframework.org/schema/context"
       xsi:schemaLocation="http://www.springframework.org/schema/beans http://www.springframework.org/schema/beans/spring-beans.xsd
            http://sofastack.io/schema/sofaboot http://sofastack.io/schema/sofaboot.xsd"
       default-autowire="byName">
    <sofa:reference id="sampleServiceRef" interface="com.facadeTest.SampleService">
        <sofa:binding.jvm/>
    </sofa:reference>
</beans>
如果有多个实现,需要配置unique-id,比如如下方式在SOFABoot层面将两个Bean关联:
<sofa:service interface="com.alipay.sofa.runtime.test.service.SampleService" ref="sampleService" unique-id="ss2">
       <sofa:binding.jvm/>
</sofa:service>

<sofa:reference interface="com.alipay.sofa.runtime.test.service.SampleService" id="sampleService" unique-id="ss2">
</sofa:reference>
3.6.6 注解方式发布与引用
3.6.6.1 通过XML管理
于provider处增加一实现
package com.providerTest;

import com.alipay.sofa.runtime.api.annotation.SofaService;
import com.facadeTest.SampleService;

@SofaService(uniqueId = "annotationImpl")
public class SampleJvmServiceAnnotationImpl implements SampleService {
    @Override
    public String message() {
        String message = "Hello, jvm service annotation implementation.";
        System.out.println(message);
        return message;
    }
}
将 SampleJvmServiceAnnotationImpl 配置成一个 Spring Bean:
<beans xmlns="http://www.springframework.org/schema/beans"
       xmlns:xsi="http://www.w3.org/2001/XMLSchema-instance"
       xmlns:sofa="http://sofastack.io/schema/sofaboot"
       xsi:schemaLocation="http://www.springframework.org/schema/beans http://www.springframework.org/schema/beans/spring-beans.xsd
            http://sofastack.io/schema/sofaboot http://sofastack.io/schema/sofaboot.xsd"
       default-autowire="byName">

    <bean id="sampleJvmServiceAnnotation" class="com.providerTest.SampleJvmServiceAnnotationImpl"/>
</beans>
不在需要于Consumer中配置,使用时只需要
@SofaReference
3.6.6.2 @Bean方式
自 SOFABoot v2.6.0 及 v3.1.0 版本起可使用
通过如下方式,我们可以直接注入Bean中
之前的XML配置也可以使用该方式`
需要注意,不同包中,其SpringBoot注解不会生效
可以用一下方式解决
在Main所在项目将其导入
可以使用@Import注解
@SpringBootApplication
@Import(com.providerTest.SampleSofaServiceConfiguration.class)
public class MainApplication {
    public static void main(String[] args){
        SpringApplication.run(MainApplication.class,args);
    }
}
在Main部分所在项目将其扫入
@SpringBootApplication(scanBasePackageClasses = com.providerTest.SampleSofaServiceConfiguration.class)
public class MainApplication {
    public static void main(String[] args){
        SpringApplication.run(MainApplication.class,args);
    }
}
provider部分
package com.providerTest;

import com.alipay.sofa.runtime.api.annotation.SofaService;
import com.facadeTest.SampleService;
import org.springframework.context.annotation.Bean;
import org.springframework.context.annotation.Configuration;

@Configuration
public class SampleSofaServiceConfiguration {
    @Bean("sampleSofaService")
    @SofaService(uniqueId = "annotationImpl")
    SampleService service() {
        return new SampleService() {
            @Override
            public String message() {
                return "Hello, jvm service annotation implementation.";
            }
        };
    }
}
3.6.6.3 多接口
通过如下方式,指定抽象接口
@SofaService(interfaceType=SampleInterface.class)
public class SampleImpl implements SampleInterface, Serializable {
   public void test() {

   }
}
3.6.7 代码方式发布与引用
consumer和provider服务需要加入如下包:
		<dependency>
            <groupId>com.alipay.sofa</groupId>
            <artifactId>runtime-sofa-boot-starter</artifactId>
        </dependency>
provider
package com.providerTest;

import com.alipay.sofa.runtime.api.aware.ClientFactoryAware;
import com.alipay.sofa.runtime.api.client.ClientFactory;
import com.alipay.sofa.runtime.api.client.ServiceClient;
import com.alipay.sofa.runtime.api.client.param.ServiceParam;
import com.facadeTest.SampleService;

public class PublishServiceWithClient implements ClientFactoryAware {
    private ClientFactory clientFactory;

    public void init() {
        ServiceClient serviceClient = clientFactory.getClient(ServiceClient.class);
        ServiceParam serviceParam = new ServiceParam();
        serviceParam.setInstance(new SampleServiceImpl(
            "Hello, jvm service service client implementation."));
        serviceParam.setInterfaceType(SampleService.class);
        serviceParam.setUniqueId("serviceClientImpl");
        serviceClient.service(serviceParam);
    }

    @Override
    public void setClientFactory(ClientFactory clientFactory) {
        this.clientFactory = clientFactory;
    }
}
放入Spring中
<beans xmlns="http://www.springframework.org/schema/beans"
       xmlns:xsi="http://www.w3.org/2001/XMLSchema-instance"
       xmlns:sofa="http://sofastack.io/schema/sofaboot"
       xsi:schemaLocation="http://www.springframework.org/schema/beans http://www.springframework.org/schema/beans/spring-beans.xsd
            http://sofastack.io/schema/sofaboot http://sofastack.io/schema/sofaboot.xsd"
       default-autowire="byName">
    <bean id="publishServiceWithClient" class="com.providerTest.PublishServiceWithClient" init-method="init"/>
</beans>
consumer
package com.consumerTest;

import com.alipay.sofa.runtime.api.aware.ClientFactoryAware;
import com.alipay.sofa.runtime.api.client.ClientFactory;
import com.alipay.sofa.runtime.api.client.ReferenceClient;
import com.alipay.sofa.runtime.api.client.param.ReferenceParam;
import com.facadeTest.SampleService;


public class JvmServiceConsumer implements ClientFactoryAware {
    private ClientFactory    clientFactory;

    public void init() {
        ReferenceClient referenceClient = clientFactory.getClient(ReferenceClient.class);
        ReferenceParam<SampleService> referenceParam = new ReferenceParam<SampleService>();
        referenceParam.setInterfaceType(SampleService.class);
        referenceParam.setUniqueId("serviceClientImpl");
        SampleService sampleJvmServiceClientImpl = referenceClient.reference(referenceParam);
        sampleJvmServiceClientImpl.message();
    }

    public void setClientFactory(ClientFactory clientFactory) {
        this.clientFactory = clientFactory;
    }
}
放入Spring中
<?xml version="1.0" encoding="UTF-8"?>
<beans xmlns="http://www.springframework.org/schema/beans"
       xmlns:xsi="http://www.w3.org/2001/XMLSchema-instance"
       xmlns:sofa="http://sofastack.io/schema/sofaboot"
       xmlns:context="http://www.springframework.org/schema/context"
       xsi:schemaLocation="http://www.springframework.org/schema/beans http://www.springframework.org/schema/beans/spring-beans.xsd
            http://sofastack.io/schema/sofaboot http://sofastack.io/schema/sofaboot.xsd"
       default-autowire="byName">


    <bean id="consumer" class="com.consumerTest.JvmServiceConsumer" init-method="init" />
</beans>
参考文档
SOFABoot
SOFABoot官方文档
蚂蚁金服的业务系统模块化之模块化隔离方案