😀前言
本篇是Spring 声明式事务系列的最后一篇介绍了Spring事务的隔离级别介绍说明
🏠个人主页:尘觉主页

🧑个人简介:大家好,我是尘觉,希望我的文章可以帮助到大家,您的满意是我的动力😉😉
在csdn获奖荣誉: 🏆csdn城市之星2名
💓Java全栈群星计划top前5
🤗 端午大礼包获得者
💕欢迎大家:这里是CSDN,我总结知识的地方,欢迎来到我的博客,感谢大家的观看🥰
如果文章有什么需要改进的地方还请大佬不吝赐教 先在次感谢啦😊
文章目录
- 🥰事务的隔离级别
- 😍事务隔离级别说明
- ● 事务隔离级别的概念在这篇博客
- ● 事务隔离级别说明
- 😊事务隔离级别的设置和测试
- 测试事务的隔离级别
- 完成测试
- 修改 GoodsService.java , 测试 READ_COMMITTED 隔离级别情况
- 完成测试
- 😋事务的超时回滚
- ● 基本介绍
- ● 基本语法
- 超时回滚-代码实现
- 测试 TxTest.java, 增加测试方法
- 注意
- 😄总结
- Spring 声明式事务系类文章
🥰事务的隔离级别
😍事务隔离级别说明
● 事务隔离级别的概念在这篇博客
【数据库和jdbc】
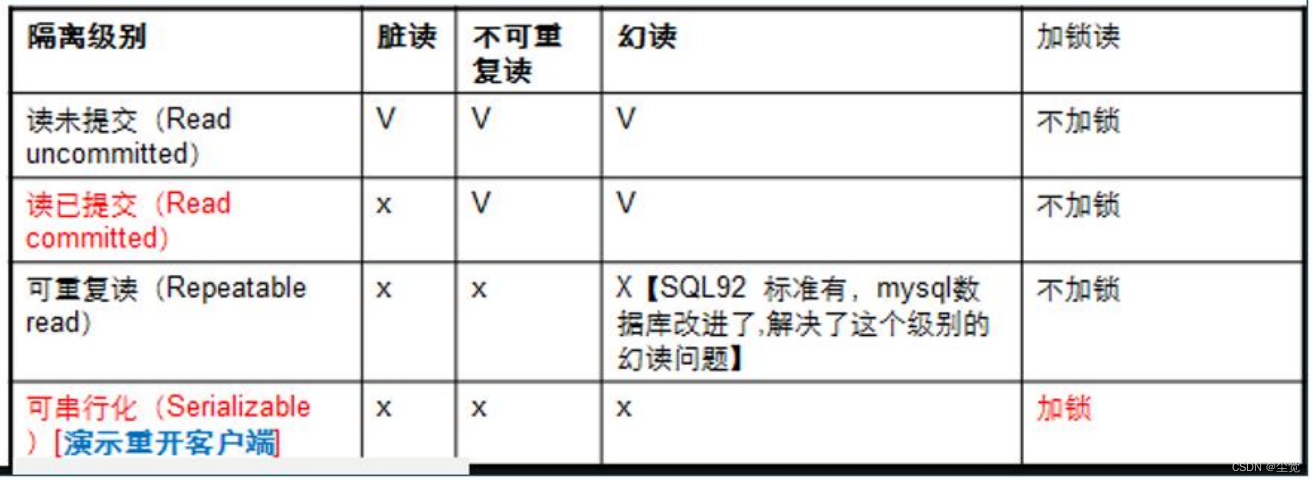
● 事务隔离级别说明
-
默认的隔离级别, 就是 mysql 数据库默认的隔离级别 一般为 REPEATABLE_READ
-
看源码可知 Isolation.DEFAULT 是 :Use the default isolation level of the underlying datastore
-
查看数据库默认的隔离级别 SELECT @@global.tx_isolation
😊事务隔离级别的设置和测试
- 修改 GoodsService.java , 先测默认隔离级别,增加方法 buyGoodsByTxISOLATIO

测试事务的隔离级别
- 默认的隔离级别, 就是 mysql 数据库默认的隔离级别 一般为 REPEATABLE_READ
- 看源码可知 Use the default isolation level of the underlying datastore
public enum Isolation {
< p>
Use the default isolation level of the underlying datastore.
All other levels correspond to the JDBC isolation levels.
@see java.sql.Connection
DEFAULT(TransactionDefinition.ISOLATION_DEFAULT)}
- 查看数据库默认的隔离级别 SELECT @@global.tx_isolation
@Transactional(propagation = Propagation.REQUIRES_NEW)
public void buyGoodsByTxISOLATION(int user_id, int goods_id, int num) {
//查询到商品价格
Float goods_price = goodsDao.queryPriceById(goods_id);
System.out.println("第一次读取的价格 = " + goods_price);
//测试一下隔离级别,在同一个事务中,查询一下价格
goods_price = goodsDao.queryPriceById(goods_id);
System.out.println("第二次读取的价格 = " + goods_price);
}
完成测试
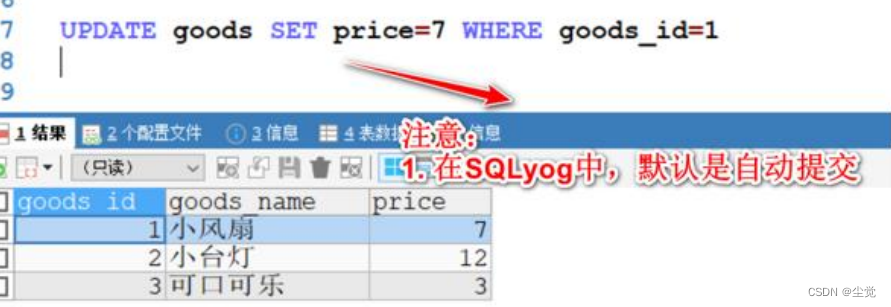
修改TxTest增 加测试方法, 默认隔离级别下, 两次读取到的价格是一样的,不会受到 SQLyog 修改影响
@Test
public void buyGoodsByTxISOLATIONTest() {
ApplicationContext ioc = new ClassPathXmlApplicationContext("tx_ioc.xml");
GoodsService bean = ioc.getBean(GoodsService.class);
bean.buyGoodsByTxISOLATION(1, 1, 1);
System.out.println("------ok--------");
}
修改 GoodsService.java , 测试 READ_COMMITTED 隔离级别情况

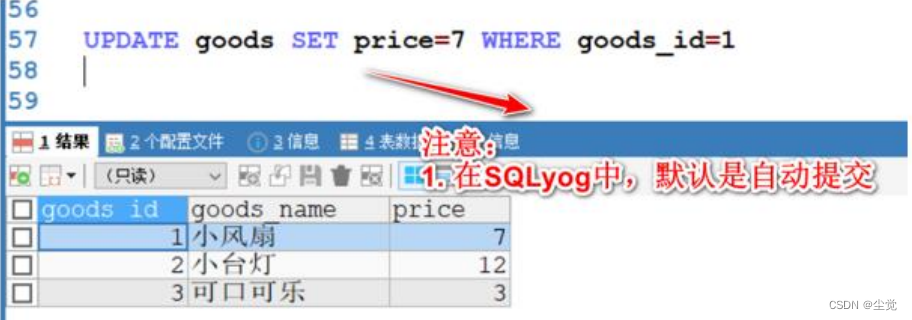
完成测试
使用前面已经创建好的测试方法, 在 READ_COMMITTED 隔离级别 下, 两次 读取到的价格会受到 SQLyog 修改
@Test
public void buyGoodsByTxISOLATIONTest() {
    ApplicationContext ioc = new ClassPathXmlApplicationContext("tx_ioc.xml");
        GoodsService bean = ioc.getBean(GoodsService.class);
        bean.buyGoodsByTxISOLATION(1, 1, 1);
        System.out.println("------ok--------");
}
😋事务的超时回滚
● 基本介绍
- 如果一个事务执行的时间超过某个时间限制,就让该事务回滚。
- 可以通过设置事务超时回顾来实现
● 基本语法

超时回滚-代码实现
修改 GoodsService.java ,增加 buyGoodsByTxTimeout()
@Transactional(timeout = 2)
public void buyGoodsByTxTimeout(int user_id, int goods_id, int num) {
//查询到商品价格
Float goods_price = goodsDao.queryPriceById02(goods_id);
//购买商品,减去余额
goodsDao.updateBalance02(user_id, goods_price * num);
System.out.println("====超时 start====");
try {
Thread.sleep(4000);
} catch (InterruptedException e) {
e.printStackTrace();
}
System.out.println("====超时 end====");
//更新库存
goodsDao.updateAmount02(goods_id, num);
}
测试 TxTest.java, 增加测试方法

@Test
public void buyGoodsByTxTimeoutTest() {
    ApplicationContext ioc = new ClassPathXmlApplicationContext("tx_ioc.xml");
        GoodsService bean = ioc.getBean(GoodsService.class);
        bean.buyGoodsByTxTimeout(1, 1, 1);
        System.out.println("------ok--------");
}
注意
上面所有的xml配置是
<?xml version="1.0" encoding="UTF-8"?>
<beans xmlns="http://www.springframework.org/schema/beans"
       xmlns:xsi="http://www.w3.org/2001/XMLSchema-instance"
       xmlns:context="http://www.springframework.org/schema/context" xmlns:tx="http://www.springframework.org/schema/tx"
       xsi:schemaLocation="http://www.springframework.org/schema/beans http://www.springframework.org/schema/beans/spring-beans.xsd http://www.springframework.org/schema/context https://www.springframework.org/schema/context/spring-context.xsd http://www.springframework.org/schema/tx http://www.springframework.org/schema/tx/spring-tx.xsd">

    <!--配置要扫描的包-->
    <context:component-scan base-package="com.spring.tx.dao"/>
    <context:component-scan base-package="com.spring.tx.service"/>

    <!--引入外部的jdbc.properties文件-->
    <context:property-placeholder location="classpath:jdbc.properties"/>
    <!--配置数据源对象-DataSoruce-->
    <bean class="com.mchange.v2.c3p0.ComboPooledDataSource" id="dataSource">
        <!--给数据源对象配置属性值-->
        <property name="user" value="${jdbc.user}"/>
        <property name="password" value="${jdbc.pwd}"/>
        <property name="driverClass" value="${jdbc.driver}"/>
        <property name="jdbcUrl" value="${jdbc.url}"/>
    </bean>

    <!--配置JdbcTemplate对象-->
    <bean class="org.springframework.jdbc.core.JdbcTemplate" id="jdbcTemplate">
        <!--给JdbcTemplate对象配置dataSource-->
        <property name="dataSource" ref="dataSource"/>
    </bean>

    <!--配置事务管理器-对象
    1. DataSourceTransactionManager 这个对象是进行事务管理-debug源码
    2. 一定要配置数据源属性,这样指定该事务管理器 是对哪个数据源进行事务控制
    -->
    <bean class="org.springframework.jdbc.datasource.DataSourceTransactionManager" id="transactionManager">
        <property name="dataSource" ref="dataSource"/>
    </bean>

    <!--配置启动基于注解的声明式事务管理功能-->
    <tx:annotation-driven transaction-manager="transactionManager"/>
</beans>
😄总结
- mysql 数据库默认的隔离级别 一般为 REPEATABLE_READ
- 查看数据库默认的隔离级别 SELECT @@global.tx_isolation
配置启动基于注解的声明式事务管理功能为
< t x:annotation-driven transaction-manager=“transactionManager”/>
Spring 声明式事务系类文章
第一篇-> 什么是Spring 声明式事务详细讲解_尘觉的博客-CSDN博客
第二篇->Spring 声明式事务机制_尘觉的博客-CSDN博客
😁热门专栏推荐
想学习vue的可以看看这个
java基础合集
数据库合集
redis合集
nginx合集
linux合集
等等等还有许多优秀的合集在主页等着大家的光顾感谢大家的支持
🤔欢迎大家加入我的社区 尘觉社区
文章到这里就结束了,如果有什么疑问的地方请指出,诸佬们一起来评论区一起讨论😁
希望能和诸佬们一起努力,今后我们一起观看感谢您的阅读🍻
如果帮助到您不妨3连支持一下,创造不易您们的支持是我的动力🤞

