Top
NSD DBA DAY07
- 案例1:MySQL一主一从
- 案例2:配置一主多从结构
- 案例3:数据读写分离
1 案例1:MySQL一主一从
1.1 问题
- 数据库服务器192.168.88.53配置为主数据库服务器
- 数据库服务器192.168.88.54配置为从数据库服务器
- 客户端192.168.88.50测试配置
1.2 方案
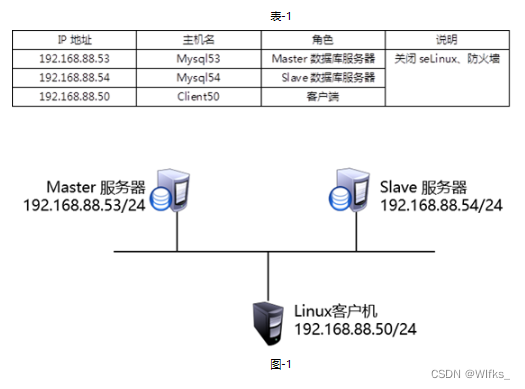
准备3台新的服务器,角色如表-1所示。
表-1

实验拓扑如图-1所示

图-1
1.3 步骤
实现此案例需要按照如下步骤进行。
步骤一:数据库服务器192.168.88.53配置为主数据库服务器
1)启用binlog日志
- [root@mysql53 ~]# yum -y install mysql-server mysql
- [root@mysql53 ~]# systemctl start mysqld
- [root@mysql53 ~]# vim /etc/my.cnf.d/mysql-server.cnf
- [mysqld]
- server-id=53
- log-bin=mysql53
- :wq
- [root@mysql53 ~]# systemctl restart mysqld
2)用户授权
- [root@mysql53 ~]# mysql
- mysql> create user repluser@"%" identified by "123qqq...A";
- Query OK, 0 rows affected (0.11 sec)
- mysql> grant replication slave on *.* to repluser@"%";
- Query OK, 0 rows affected (0.09 sec)
3)查看日志信息
- mysql> show master status;
- +----------------+----------+--------------+------------------+-------------------+
- | File | Position | Binlog_Do_DB | Binlog_Ignore_DB | Executed_Gtid_Set |
- +----------------+----------+--------------+------------------+-------------------+
- | mysql53.000001 | 667 | | | |
- +----------------+----------+--------------+------------------+-------------------+
- 1 row in set (0.00 sec)
步骤二:数据库服务器192.168.88.54配置为从数据库服务
1)指定server-id 并重启数据库服务
- [root@mysql54 ~]# yum -y install mysql-server mysql
- [root@mysql54 ~]# systemctl start mysqld
- [root@mysql54 ~]# vim /etc/my.cnf.d/mysql-server.cnf
- [mysqld]
- server-id=54
- :wq
- [root@mysql54 ~]# systemctl restart mysqld
2)登陆服务指定主服务器信息
- [root@mysql54 ~]# mysql
- mysql> change master to master_host="192.168.88.53" , master_user="repluser" , master_password="123qqq...A" ,master_log_file="mysql53.000001" , master_log_pos=667;
- Query OK, 0 rows affected, 8 warnings (0.34 sec)
- mysql> start slave ; //启动slave进程
- Query OK, 0 rows affected, 1 warning (0.04 sec)
- mysql> show slave status \G //查看状态信息
- *************************** 1. row ***************************
- Slave_IO_State: Waiting for source to send event
- Master_Host: 192.168.88.53
- Master_User: repluser
- Master_Port: 3306
- Connect_Retry: 60
- Master_Log_File: mysql53.000001
- Read_Master_Log_Pos: 667
- Relay_Log_File: mysql54-relay-bin.000002
- Relay_Log_Pos: 322
- Relay_Master_Log_File: mysql53.000001
- Slave_IO_Running: Yes //IO线程
- Slave_SQL_Running: Yes //SQL线程
- Replicate_Do_DB:
- Replicate_Ignore_DB:
- Replicate_Do_Table:
- Replicate_Ignore_Table:
- Replicate_Wild_Do_Table:
- Replicate_Wild_Ignore_Table:
- Last_Errno: 0
- Last_Error:
- Skip_Counter: 0
- Exec_Master_Log_Pos: 667
- Relay_Log_Space: 533
- Until_Condition: None
- Until_Log_File:
- Until_Log_Pos: 0
- Master_SSL_Allowed: No
- Master_SSL_CA_File:
- Master_SSL_CA_Path:
- Master_SSL_Cert:
- Master_SSL_Cipher:
- Master_SSL_Key:
- Seconds_Behind_Master: 0
- Master_SSL_Verify_Server_Cert: No
- Last_IO_Errno: 0
- Last_IO_Error:
- Last_SQL_Errno: 0
- Last_SQL_Error:
- Replicate_Ignore_Server_Ids:
- Master_Server_Id: 53
- Master_UUID: 38c02165-005e-11ee-bd2d-525400007271
- Master_Info_File: mysql.slave_master_info
- SQL_Delay: 0
- SQL_Remaining_Delay: NULL
- Slave_SQL_Running_State: Replica has read all relay log; waiting for more updates
- Master_Retry_Count: 86400
- Master_Bind:
- Last_IO_Error_Timestamp:
- Last_SQL_Error_Timestamp:
- Master_SSL_Crl:
- Master_SSL_Crlpath:
- Retrieved_Gtid_Set:
- Executed_Gtid_Set:
- Auto_Position: 0
- Replicate_Rewrite_DB:
- Channel_Name:
- Master_TLS_Version:
- Master_public_key_path:
- Get_master_public_key: 0
- Network_Namespace:
- 1 row in set, 1 warning (0.00 sec)
- mysql>
- [zhangsan@localhost ~]$
步骤三:客户端192.168.88.50测试配置
1)在主服务器添加用户,给客户端连接使用
- [root@mysql53 ~]# mysql
- mysql> create user plj@"%" identified by "123456";
- Query OK, 0 rows affected (0.14 sec)
- mysql> grant all on gamedb.* to plj@"%" ;
- Query OK, 0 rows affected (0.12 sec)
- mysql>
2)客户端连接主服务器存储数据
- [root@mysql50 ~]# mysql -h192.168.88.53 -uplj -p123456
- mysql> create database gamedb;
- Query OK, 1 row affected (0.24 sec)
- mysql> create table gamedb.user(name char(10) , class char(3));
- Query OK, 0 rows affected (1.71 sec)
- mysql> insert into gamedb.user values ("yaya","nsd");
- Query OK, 1 row affected (0.14 sec)
- mysql> select * from gamedb.user;
- +------+-------+
- | name | class |
- +------+-------+
- | yaya | nsd |
- +------+-------+
- 1 row in set (0.01 sec)
- mysql>
3)客户端连接从服务器查看数据
-e 命令行下执行数据库命令
- [root@mysql50 ~]# mysql -h192.168.88.54 -uplj -p123456 –e ‘select * from gamedb.user’
- +------+-------+
- | name | class |
- +------+-------+
- | yaya | nsd |
- +------+-------+
- [root@mysql54 ~]#
2 案例2:配置一主多从结构
2.1 问题
1)基于案例1,把结构配置为一主多从结构
- 配置192.168.88.55为192.168.88.53主机的从服务器
- 客户端测试配置。
2.2 方案
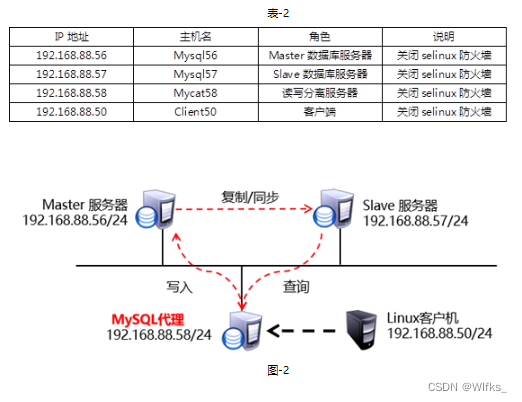
准备新的服务器,要求如表-2所示。
表-2

实验拓扑如图-2所示。

图-2

2.3 步骤
实现此案例需要按照如下步骤进行。
步骤一:配置192.168.88.55为192.168.88.53主机的从服务器
1)指定MySQL55主机的server-id 并重启数据库服务
- [root@mysql55 ~]# yum -y install mysql-server mysql
- [root@mysql55 ~]# systemctl start mysqld
- [root@mysql55 ~]# vim /etc/my.cnf.d/mysql-server.cnf
- [mysqld]
- server-id=55
- :wq
- [root@mysql55 ~]# systemctl restart mysqld
2)确保与主服务器数据一致。
- //在mysql53执行备份命令前查看日志名和偏移量 ,mysql55 在当前查看到的位置同步数据
- [root@mysql53 ~]# mysql -e 'show master status'
- +----------------+----------+--------------+------------------+-------------------+
- | File | Position | Binlog_Do_DB | Binlog_Ignore_DB | Executed_Gtid_Set |
- +----------------+----------+--------------+------------------+-------------------+
- | mysql53.000002 | 156 | | | |
- +----------------+----------+--------------+------------------+-------------------+
- [root@mysql53 ~]#
- //在主服务器存做完全备份
- [root@mysql53 ~]# mysqldump -B gamedb > /root/gamedb.sql
- //主服务器把备份文件拷贝给从服务器mysql55
- [root@mysql53 ~]# scp /root/gamedb.sql root@192.168.88.55:/root/
- [root@mysql55 ~]# mysql < /root/gamedb.sql
3)在MySQL55主机指定主服务器信息
- [root@mysql55 ~]# mysql
- mysql> change master to master_host="192.168.88.53" , master_user="repluser" , master_password="123qqq...A" , master_log_file="mysql53.000002" , master_log_pos=156;
- Query OK, 0 rows affected, 8 warnings (0.44 sec)
- 注意:日志名和偏移量 要写 在mysql53主机执行完全备份之前查看到的日志名和偏移量
- mysql> start slave; //启动slave进程
- Query OK, 0 rows affected, 1 warning (0.02 sec)
- //查看状态信息
- mysql> show slave status \G
- *************************** 1. row ***************************
- Slave_IO_State: Waiting for source to send event
- Master_Host: 192.168.88.53
- Master_User: repluser
- Master_Port: 3306
- Connect_Retry: 60
- Master_Log_File: mysql53.000002
- Read_Master_Log_Pos: 156
- Relay_Log_File: mysql55-relay-bin.000002
- Relay_Log_Pos: 322
- Relay_Master_Log_File: mysql53.000002
- Slave_IO_Running: Yes //正常
- Slave_SQL_Running: Yes //正常
- Replicate_Do_DB:
- Replicate_Ignore_DB:
- Replicate_Do_Table:
- Replicate_Ignore_Table:
- Replicate_Wild_Do_Table:
- Replicate_Wild_Ignore_Table:
- Last_Errno: 0
- Last_Error:
- Skip_Counter: 0
- Exec_Master_Log_Pos: 156
- Relay_Log_Space: 533
- Until_Condition: None
- Until_Log_File:
- Until_Log_Pos: 0
- Master_SSL_Allowed: No
- Master_SSL_CA_File:
- Master_SSL_CA_Path:
- Master_SSL_Cert:
- Master_SSL_Cipher:
- Master_SSL_Key:
- Seconds_Behind_Master: 0
- Master_SSL_Verify_Server_Cert: No
- Last_IO_Errno: 0
- Last_IO_Error:
- Last_SQL_Errno: 0
- Last_SQL_Error:
- Replicate_Ignore_Server_Ids:
- Master_Server_Id: 53
- Master_UUID: 38c02165-005e-11ee-bd2d-525400007271
- Master_Info_File: mysql.slave_master_info
- SQL_Delay: 0
- SQL_Remaining_Delay: NULL
- Slave_SQL_Running_State: Replica has read all relay log; waiting for more updates
- Master_Retry_Count: 86400
- Master_Bind:
- Last_IO_Error_Timestamp:
- Last_SQL_Error_Timestamp:
- Master_SSL_Crl:
- Master_SSL_Crlpath:
- Retrieved_Gtid_Set:
- Executed_Gtid_Set:
- Auto_Position: 0
- Replicate_Rewrite_DB:
- Channel_Name:
- Master_TLS_Version:
- Master_public_key_path:
- Get_master_public_key: 0
- Network_Namespace:
- 1 row in set, 1 warning (0.00 sec)
- //添加客户端访问时使用的用户
- mysql> create user plj@"%" identified by "123456";
- Query OK, 0 rows affected (0.08 sec)
- mysql> grant all on gamedb.* to plj@"%" ;
- Query OK, 0 rows affected (0.04 sec)
- Mysql>
步骤二:客户端测试配置
1)在client50 连接主服务器mysql53 存储数据
- //连接主服务器存储数据
- [root@mysql50 ~]# mysql -h192.168.88.53 -uplj -p123456
- mysql> insert into gamedb.user values("tt","aid");
- Query OK, 1 row affected (0.14 sec)
- mysql> insert into gamedb.user values("mm","uid");
- Query OK, 1 row affected (0.13 sec)
2)在client50 分别连接2个从服务器查看数据
- //连接从服务器54查看数据
- [root@mysql50 ~]# mysql -h192.168.88.54 -uplj -p123456 -e 'select * from gamedb.user'
- mysql: [Warning] Using a password on the command line interface can be insecure.
- +------+-------+
- | name | class |
- +------+-------+
- | yaya | nsd |
- | tt | aid |
- | mm | uid |
- +------+-------+
- //连接从服务器55查看数据
- [root@mysql50 ~]# mysql -h192.168.88.55 -uplj -p123456 -e 'select * from gamedb.user'
- mysql: [Warning] Using a password on the command line interface can be insecure.
- +------+-------+
- | name | class |
- +------+-------+
- | yaya | nsd |
- | tt | aid |
- | mm | uid |
- +------+-------+
- [root@mysql50 ~]#
3 案例3:数据读写分离
3.1 问题
- 搭建一主一从结构
- 配置MyCAT服务器
- 配置读写分离
- 测试配置
3.2 方案
准备新的虚拟机,如表-2所示
表-2

实验拓扑如图-2所示

图-2
3.3 步骤
实现此案例需要按照如下步骤进行。
步骤一:搭建一主一从结构
因为数据的查询和存储分别访问不同的数据库服务器,所以要通过主从同步来保证负责读访问的服务与负责写访问的服务器数据一致。
1)配置主数据库服务器
- [root@mysql56 ~]# yum -y install mysql-server mysql
- [root@mysql56 ~]# systemctl start mysqld
- //启用binlog日志
- [root@mysql56 ~]# vim /etc/my.cnf.d/mysql-server.cnf
- [mysqld]
- server-id=56
- log-bin=mysql56
- :wq
- [root@mysql56 ~]# systemctl restart mysqld
- //用户授权
- [root@mysql56 ~]# mysql
- mysql> create user repluser@"%" identified by "123qqq...A";
- Query OK, 0 rows affected (0.11 sec)
- mysql> grant replication slave on *.* to repluser@"%" ;
- Query OK, 0 rows affected (0.08 sec)
- //查看日志信息
- mysql> show master status;
- +----------------+----------+--------------+------------------+-------------------+
- | File | Position | Binlog_Do_DB | Binlog_Ignore_DB | Executed_Gtid_Set |
- +----------------+----------+--------------+------------------+-------------------+
- | mysql56.000001 | 667 | | | |
- +----------------+----------+--------------+------------------+-------------------+
- 1 row in set (0.00 sec)
2)配置从数据库服务器
- //指定server-id 并重启数据库服务
- [root@mysql57 ~]# yum -y install mysql-server mysql
- [root@mysql57 ~]# systemctl start mysqld
- [root@mysql57 ~]# vim /etc/my.cnf.d/mysql-server.cnf
- [mysqld]
- server-id=57
- :wq
- [root@mysql57 ~]# systemctl restart mysqld
- //管理员登陆,指定主服务器信息
- [root@mysql57 ~]# mysql
- mysql> change master to master_host="192.168.88.56" , master_user="repluser" , master_password="123qqq...A" , master_log_file="mysql56.000001",master_log_pos=667;
- Query OK, 0 rows affected, 8 warnings (0.54 sec)
- //启动slave进程
- mysql> start slave;
- Query OK, 0 rows affected, 1 warning (0.03 sec)
- //查看状态信息
- mysql> show slave status \G
- *************************** 1. row ***************************
- Slave_IO_State: Waiting for source to send event
- Master_Host: 192.168.88.56
- Master_User: repluser
- Master_Port: 3306
- Connect_Retry: 60
- Master_Log_File: mysql56.000001
- Read_Master_Log_Pos: 667
- Relay_Log_File: mysql57-relay-bin.000002
- Relay_Log_Pos: 322
- Relay_Master_Log_File: mysql56.000001
- Slave_IO_Running: Yes //IO线程
- Slave_SQL_Running: Yes //SQL线程
- Replicate_Do_DB:
- Replicate_Ignore_DB:
- Replicate_Do_Table:
- Replicate_Ignore_Table:
- Replicate_Wild_Do_Table:
- Replicate_Wild_Ignore_Table:
- Last_Errno: 0
- Last_Error:
- Skip_Counter: 0
- Exec_Master_Log_Pos: 667
- Relay_Log_Space: 533
- Until_Condition: None
- Until_Log_File:
- Until_Log_Pos: 0
- Master_SSL_Allowed: No
- Master_SSL_CA_File:
- Master_SSL_CA_Path:
- Master_SSL_Cert:
- Master_SSL_Cipher:
- Master_SSL_Key:
- Seconds_Behind_Master: 0
- Master_SSL_Verify_Server_Cert: No
- Last_IO_Errno: 0
- Last_IO_Error:
- Last_SQL_Errno: 0
- Last_SQL_Error:
- Replicate_Ignore_Server_Ids:
- Master_Server_Id: 56
- Master_UUID: e0ab8dc4-0109-11ee-87e7-525400ad7ed3
- Master_Info_File: mysql.slave_master_info
- SQL_Delay: 0
- SQL_Remaining_Delay: NULL
- Slave_SQL_Running_State: Replica has read all relay log; waiting for more updates
- Master_Retry_Count: 86400
- Master_Bind:
- Last_IO_Error_Timestamp:
- Last_SQL_Error_Timestamp:
- Master_SSL_Crl:
- Master_SSL_Crlpath:
- Retrieved_Gtid_Set:
- Executed_Gtid_Set:
- Auto_Position: 0
- Replicate_Rewrite_DB:
- Channel_Name:
- Master_TLS_Version:
- Master_public_key_path:
- Get_master_public_key: 0
- Network_Namespace:
- 1 row in set, 1 warning (0.00 sec)
步骤二:配置mycat服务器
1)拷贝软件到mycat58主机
- [root@server1 ~]# scp /linux-soft/s3/mycat2-1.21-release-jar-with-dependencies.jar root@192.168.88.58:/root/
- [root@server1 ~]# scp /linux-soft/s3/mycat2-install-template-1.21.zip root@192.168.88.58:/root/
2)安装mycat软件
- //安装jdk
- [root@mycat58 upload]# yum -y install java-1.8.0-openjdk.x86_64
- //安装解压命令
- [root@mycat58 upload]# which unzip || yum -y install unzip
- //安装mycat
- [root@mycat58 upload]# unzip mycat2-install-template-1.21.zip
- [root@mycat58 upload]# mv mycat /usr/local/
- //安装依赖
- [root@mycat58 upload]# cp mycat2-1.21-release-jar-with-dependencies.jar /usr/local/mycat/lib/
- //修改权限
- [root@mycat58 upload]# chmod -R 777 /usr/local/mycat/
3)定义客户端连接mycat服务使用用户及密码:
- [root@mycat58 ~]# vim /usr/local/mycat/conf/users/root.user.json
- {
- "dialect":"mysql",
- "ip":null,
- "password":"654321", 密码
- "transactionType":"proxy",
- "username":"mycat" 用户名
- }
- :wq
- 定义连接的数据库服务器
- [root@mycat58 ~]# vim /usr/local/mycat/conf/datasources/prototypeDs.data
- {
- "dbType":"mysql",
- "idleTimeout":60000,
- "initSqls":[],
- "initSqlsGetConnection":true,
- "instanceType":"READ_WRITE",
- "maxCon":1000,
- "maxConnectTimeout":3000,
- "maxRetryCount":5,
- "minCon":1,
- "name":"prototypeDs",
- "password":"123456", 密码
- "type":"JDBC",
- "url":"jdbc:mysql://localhost:3306/mysql?useUnicode=true&serverTimezone=Asia/Shanghai&characterEncoding=UTF-8", 连接本机的数据库服务
- "user":"plj", 用户名
- "weight":0
- }
- :wq
5)在mycat58主机运行数据库服务
- [root@mycat58 ~]# yum -y install mysql-server mysql 安装软件
- [root@mycat58 ~]# systemctl start mysqld 启动服务
- [root@mycat58 ~]# mysql 连接服务
- mysql> create user plj@"%" identified by "123456"; 创建plj用户
- Query OK, 0 rows affected (0.05 sec)
- mysql> grant all on *.* to plj@"%" ; 授予权限
- Query OK, 0 rows affected (0.39 sec)
- mysql> exit 断开连接
- Bye
- [root@mycat58 ~]#
6)启动mycat服务
- [root@mycat58 ~]# /usr/local/mycat/bin/mycat help
- Usage: /usr/local/mycat/bin/mycat { console | start | stop | restart | status | dump }
- [root@mycat58 ~]# /usr/local/mycat/bin/mycat start
- Starting mycat2...
- //半分钟左右 能看到端口
- [root@mycat58 ~]# netstat -utnlp | grep 8066
- tcp6 0 0 :::8066 :::* LISTEN 57015/java
- [root@mycat58 ~]#
7) 连接mycat服务
- [root@mycat58 ~]# mysql -h127.0.0.1 -P8066 -umycat -p654321
- mysql> show databases;
- +--------------------+
- | `Database` |
- +--------------------+
- | information_schema |
- | mysql |
- | performance_schema |
- +--------------------+
- 3 rows in set (0.11 sec)
- Mysql>
步骤三:配置读写分离
1)添加数据源:连接mycat服务后做如下操作
- //连接mycat服务
- [root@mycat58 ~]# mysql -h127.0.0.1 -P8066 -umycat -p654321
- //添加mysql56数据库服务器
- MySQL> /*+ mycat:createdatasource{
- "name":"whost56", "url":"jdbc:mysql://192.168.88.56:3306","user":"plja","password":"123456"}*/;
- Query OK, 0 rows affected (0.25 sec)
- //添加mysql57数据库服务器
- Mysql>/*+ mycat:createdatasource{
- "name":"rhost57", "url":"jdbc:mysql://192.168.88.57:3306","user":"plja","password":"123456"}*/;
- //查看数据源
- mysql> /*+mycat:showDataSources{}*/ \G
- *************************** 1. row ***************************
- NAME: whost56
- USERNAME: plja
- PASSWORD: 123456
- MAX_CON: 1000
- MIN_CON: 1
- EXIST_CON: 0
- USE_CON: 0
- MAX_RETRY_COUNT: 5
- MAX_CONNECT_TIMEOUT: 30000
- DB_TYPE: mysql
- URL: jdbc:mysql://192.168.88.56:3306?serverTimezone=Asia/Shanghai&useUnicode=true&characterEncoding=UTF-8&autoReconnect=true
- WEIGHT: 0
- INIT_SQL:
- INIT_SQL_GET_CONNECTION: true
- INSTANCE_TYPE: READ_WRITE
- IDLE_TIMEOUT: 60000
- DRIVER: {
- CreateTime:"2023-06-02 17:01:14",
- ActiveCount:0,
- PoolingCount:0,
- CreateCount:0,
- DestroyCount:0,
- CloseCount:0,
- ConnectCount:0,
- Connections:[
- ]
- }
- TYPE: JDBC
- IS_MYSQL: true
- *************************** 2. row ***************************
- NAME: rhost57
- USERNAME: plja
- PASSWORD: 123456
- MAX_CON: 1000
- MIN_CON: 1
- EXIST_CON: 0
- USE_CON: 0
- MAX_RETRY_COUNT: 5
- MAX_CONNECT_TIMEOUT: 30000
- DB_TYPE: mysql
- URL: jdbc:mysql://192.168.88.57:3306?useUnicode=true&serverTimezone=Asia/Shanghai&characterEncoding=UTF-8&autoReconnect=true
- WEIGHT: 0
- INIT_SQL:
- INIT_SQL_GET_CONNECTION: true
- INSTANCE_TYPE: READ_WRITE
- IDLE_TIMEOUT: 60000
- DRIVER: {
- CreateTime:"2023-06-02 17:01:14",
- ActiveCount:0,
- PoolingCount:0,
- CreateCount:0,
- DestroyCount:0,
- CloseCount:0,
- ConnectCount:0,
- Connections:[
- ]
- }
- TYPE: JDBC
- IS_MYSQL: true
- *************************** 3. row ***************************
- NAME: prototypeDs
- USERNAME: plj
- PASSWORD: 123456
- MAX_CON: 1000
- MIN_CON: 1
- EXIST_CON: 0
- USE_CON: 0
- MAX_RETRY_COUNT: 5
- MAX_CONNECT_TIMEOUT: 3000
- DB_TYPE: mysql
- URL: jdbc:mysql://localhost:3306/mysql?serverTimezone=Asia/Shanghai&useUnicode=true&characterEncoding=UTF-8&autoReconnect=true
- WEIGHT: 0
- INIT_SQL:
- INIT_SQL_GET_CONNECTION: true
- INSTANCE_TYPE: READ_WRITE
- IDLE_TIMEOUT: 60000
- DRIVER: {
- CreateTime:"2023-06-02 17:01:14",
- ActiveCount:0,
- PoolingCount:0,
- CreateCount:0,
- DestroyCount:0,
- CloseCount:0,
- ConnectCount:0,
- Connections:[
- ]
- }
- TYPE: JDBC
- IS_MYSQL: true
- 3 rows in set (0.00 sec)
- mysql>
- //添加的数据源以文件的形式保存在安装目录下
- [root@mycat58 conf]# ls /usr/local/mycat/conf/datasources/
- prototypeDs.datasource.json rhost57.datasource.json whost56.datasource.json
- [root@mycat58 conf]#
2)配置数据库服务器添加plja用户
- //在master服务器添加
- [root@mysql56 ~]# mysql
- mysql> create user plja@"%" identified by "123456";
- Query OK, 0 rows affected (0.06 sec)
- mysql> grant all on *.* to plja@"%";
- Query OK, 0 rows affected (0.03 sec)
- mysql>exit
- [root@mysql56 ~]#
- //在slave服务器查看是否同步成功
- [root@mysql57 ~]# mysql -e 'select user , host from mysql.user where user="plja"'
- +------+------+
- | user | host |
- +------+------+
- | plja | % |
- +------+------+
- [root@mysql57 ~]#
3)创建集群,连接mycat服务后做如下配置:
- [root@mycat58 ~]# mysql -h127.0.0.1 -P8066 -umycat -p654321
- //创建集群
- mysql>/*!mycat:createcluster{
- "name":"rwcluster",
- "masters":["whost56"],
- "replicas":["rhost57"]
- }*/ ;
- Mysql>
- //查看集群信息
- mysql> /*+ mycat:showClusters{}*/ \G
- *************************** 1. row ***************************
- NAME: rwcluster
- SWITCH_TYPE: SWITCH
- MAX_REQUEST_COUNT: 2000
- TYPE: BALANCE_ALL
- WRITE_DS: whost56
- READ_DS: whost56,rhost57
- WRITE_L: io.mycat.plug.loadBalance.BalanceRandom$1
- READ_L: io.mycat.plug.loadBalance.BalanceRandom$1
- AVAILABLE: true
- *************************** 2. row ***************************
- NAME: prototype
- SWITCH_TYPE: SWITCH
- MAX_REQUEST_COUNT: 200
- TYPE: BALANCE_ALL
- WRITE_DS: prototypeDs
- READ_DS: prototypeDs
- WRITE_L: io.mycat.plug.loadBalance.BalanceRandom$1
- READ_L: io.mycat.plug.loadBalance.BalanceRandom$1
- AVAILABLE: true
- 2 rows in set (0.00 sec)
- mysql>
- //创建的集群以文件的形式保存在目录下
- [root@mycat58 conf]# ls /usr/local/mycat/conf/clusters/
- prototype.cluster.json rwcluster.cluster.json
- [root@mycat58 conf]#
4)指定主机角色
- //修改master角色主机仅负责写访问
- [root@mycat58 ~]# vim /usr/local/mycat/conf/datasources/whost56.datasource.json
- {
- "dbType":"mysql",
- "idleTimeout":60000,
- "initSqls":[],
- "initSqlsGetConnection":true,
- "instanceType":"WRITE", 仅负责写访问
- "logAbandoned":true,
- "maxCon":1000,
- "maxConnectTimeout":30000,
- "maxRetryCount":5,
- "minCon":1,
- "name":"whost56",
- "password":"123456",
- "queryTimeout":0,
- "removeAbandoned":false,
- "removeAbandonedTimeoutSecond":180,
- "type":"JDBC",
- "url":"jdbc:mysql://192.168.88.56:3306?serverTimezone=Asia/Shanghai&useUnicode=true&characterEncoding=UTF-8&autoReconnect=true",
- "user":"plja",
- "weight":0
- }
- :wq
- //修改slave角色主机仅负责读访问
- [root@mycat58 ~]# vim /usr/local/mycat/conf/datasources/rhost57.datasource.json
- {
- "dbType":"mysql",
- "idleTimeout":60000,
- "initSqls":[],
- "initSqlsGetConnection":true,
- "instanceType":"READ",仅负责读访问
- "logAbandoned":true,
- "maxCon":1000,
- "maxConnectTimeout":30000,
- "maxRetryCount":5,
- "minCon":1,
- "name":"rhost57",
- "password":"123456",
- "queryTimeout":0,
- "removeAbandoned":false,
- "removeAbandonedTimeoutSecond":180,
- "type":"JDBC",
- "url":"jdbc:mysql://192.168.88.57:3306?serverTimezone=Asia/Shanghai&useUnicode=true&characterEncoding=UTF-8&autoReconnect=true",
- "user":"plja",
- "weight":0
- }
- :wq
5)修改读策略
- [root@mycat58 ~]# vim /usr/local/mycat/conf/clusters/rwcluster.cluster.json
- {
- "clusterType":"MASTER_SLAVE",
- "heartbeat":{
- "heartbeatTimeout":1000,
- "maxRetryCount":3,
- "minSwitchTimeInterval":300,
- "showLog":false,
- "slaveThreshold":0.0
- },
- "masters":[
- "whost56"
- ],
- "maxCon":2000,
- "name":"rwcluster",
- "readBalanceType":"BALANCE_ALL_READ",
- "replicas":[
- "rhost57"
- ],
- "switchType":"SWITCH"
- }
- :wq
- //重启mycat服务
- [root@mycat58 ~]# /usr/local/mycat/bin/mycat restart
- Stopping mycat2...
- Stopped mycat2.
- Starting mycat2...
- [root@mycat58 ~]#
步骤四:测试配置
思路如下:
- 连接mycat服务建库
- 指定存储数据使用的集群
- 连接mycat服务建表
- 客户端连接mycat服务执行select 或 insert
具体操作如下:
- [root@mycat58 ~]# mysql -h127.0.0.1 -P8066 -umycat -p654321
- mysql> create database testdb;
- Query OK, 0 rows affected (0.30 sec)
- mysql> exit
- Bye
- //指定testdb库存储数据使用的集群
- [root@mycat58 ~]# vim /usr/local/mycat/conf/schemas/testdb.schema.json
- {
- "customTables":{},
- "globalTables":{},
- "normalProcedures":{},
- "normalTables":{},
- "schemaName":"testdb",
- "targetName":"rwcluster", 添加此行,之前创建的集群名rwcluster
- "shardingTables":{},
- "views":{}
- }
- :wq
- [root@mycat58 ~]# /usr/local/mycat/bin/mycat restart
- Stopping mycat2...
- Stopped mycat2.
- Starting mycat2...
- [root@mycat58 ~]#
- //连接mycat服务建表插入记录
- [root@client50 ~]# mysql -h192.168.88.58 -P8066 -umycat -p654321
- mysql> create table testdb.user (name varchar(10) , password varchar(10));
- Query OK, 0 rows affected (0.45 sec)
- mysql> insert into testdb.user values("yaya","123456");
- Query OK, 1 row affected (0.20 sec)
- mysql> select * from testdb.user;
- +------+----------+
- | name | password |
- +------+----------+
- | yaya | 123456 |
- +------+----------+
- 1 row in set (0.01 sec)
- mysql>
测试读写分离
- //在从服务器本机插入记录,数据仅在从服务器有,主服务器没有
- [root@mysql57 ~]# mysql -e 'insert into testdb.user values ("yayaA","654321")'
- [root@mysql57 ~]# mysql -e 'select * from testdb.user'
- +-------+----------+
- | name | password |
- +-------+----------+
- | yaya | 123456 |
- | yayaA | 654321 |
- +-------+----------+
- [root@mysql57 ~]#
- //主服务器数据不变,日志偏移量不不变
- [root@mysql56 ~]# mysql -e 'select * from testdb.user'
- +------+----------+
- | name | password |
- +------+----------+
- | yaya | 123456 |
- +------+----------+
- [root@mysql56 ~]# mysql -e 'show master status'
- +----------------+----------+--------------+------------------+-------------------+
- | File | Position | Binlog_Do_DB | Binlog_Ignore_DB | Executed_Gtid_Set |
- +----------------+----------+--------------+------------------+-------------------+
- | mysql56.000002 | 4514 | | | |
- +----------------+----------+--------------+------------------+-------------------+
- [root@mysql56 ~]#
- //客户端连接mycat服务读/写数据
- [root@client50 ~]# mysql -h192.168.88.58 -P8066 -umycat -p654321
- mysql> select * from testdb.user; 查看到的是2条记录的行
- +-------+----------+
- | name | password |
- +-------+----------+
- | yaya | 123456 |
- | yayaA | 654321 |
- +-------+----------+
- 2 rows in set (0.04 sec)
- mysql> insert into testdb.user values("yayaB","123456"); 插入记录
- Query OK, 1 row affected (0.06 sec)
- mysql> select * from testdb.user;
- +-------+----------+
- | name | password |
- +-------+----------+
- | yaya | 123456 |
- | yayaB | 123456 |
- +-------+----------+
- 2 rows in set (0.01 sec)
- mysql>
- //在主服务器查看数据和日志偏移量
- [root@mysql56 ~]# mysql -e 'select * from testdb.user'
- +-------+----------+
- | name | password |
- +-------+----------+
- | yaya | 123456 |
- | yayaB | 123456 |
- +-------+----------+
- [root@mysql56 ~]# mysql -e 'show master status'
- +----------------+----------+--------------+------------------+-------------------+
- | File | Position | Binlog_Do_DB | Binlog_Ignore_DB | Executed_Gtid_Set |
- +----------------+----------+--------------+------------------+-------------------+
- | mysql56.000002 | 4807 | | | |
- +----------------+----------+--------------+------------------+-------------------+
- [root@mysql56 ~]#
- //客户端连接mycat服务查看到的是3条记录
- [root@client50 ~]# mysql -h192.168.88.58 -P8066 -umycat -p654321 -e 'select * from testdb.user'
- mysql: [Warning] Using a password on the command line interface can be insecure.
- +-------+----------+
- | name | password |
- +-------+----------+
- | yaya | 123456 |
- | yayaA | 654321 |
- | yayaB | 123456 |
- +-------+----------+
- [root@client50 ~]#