- Spring Cloud Alibaba
- 介绍
- 主要功能
- 组件
- 注册中心
- 脚手架
- 创建实例
- 使用RestTemplate实现微服务调用
- 使用openfeign实现微服务调用
- 负载均衡的使用
- 创建多实例
- 修改负载均衡
Spring Cloud Alibaba
介绍
官方文档:
https://spring.io/projects/spring-cloud-alibaba
https://gitee.com/mirrors/Spring-Cloud-Alibaba
https://github.com/alibaba/spring-cloud-alibaba/blob/2.2.x/README-zh.md
主要功能
- 服务限流降级:默认支持 WebServlet、WebFlux, OpenFeign、RestTemplate、Spring Cloud
Gateway, Zuul, Dubbo 和 RocketMQ 限流降级功能的接入,可以在运行时通过控制台实时修
改限流降级规则,还支持查看限流降级 Metrics 监控。 - 服务注册与发现:适配 Spring Cloud 服务注册与发现标准,默认集成了 Ribbon 的支持。
- 分布式配置管理:支持分布式系统中的外部化配置,配置更改时自动刷新。
- 消息驱动能力:基于 Spring Cloud Stream 为微服务应用构建消息驱动能力。
- 分布式事务:使用 @GlobalTransactional 注解, 高效并且对业务零侵入地解决分布式事务问题。
- 阿里云对象存储:阿里云提供的海量、安全、低成本、高可靠的云存储服务。支持在任何应用、任何时间、任何地点存储和访问任意类型的数据。
- 分布式任务调度:提供秒级、精准、高可靠、高可用的定时(基于 Cron 表达式)任务调度服务。同时提供分布式的任务执行模型,如网格任务。网格任务支持海量子任务均匀分配到所有
Worker(schedulerx-client)上执行。 - 阿里云短信服务:覆盖全球的短信服务,友好、高效、智能的互联化通讯能力,帮助企业迅速搭建客户触达通道。
组件
- Sentinel:把流量作为切入点,从流量控制、熔断降级、系统负载保护等多个维度保护服务的稳
定性。 - Nacos:一个更易于构建云原生应用的动态服务发现、配置管理和服务管理平台。
- RocketMQ:一款开源的分布式消息系统,基于高可用分布式集群技术,提供低延时的、高可靠
的消息发布与订阅服务。 - Dubbo:Apache Dubbo™ 是一款高性能 Java RPC 框架
- Seata:阿里巴巴开源产品,一个易于使用的高性能微服务分布式事务解决方案。
- Alibaba Cloud ACM:一款在分布式架构环境中对应用配置进行集中管理和推送的应用配置中心
产品。 - Alibaba Cloud OSS: 阿里云对象存储服务(Object Storage Service,简称 OSS),是阿里云提
供的海量、安全、低成本、高可靠的云存储服务。您可以在任何应用、任何时间、任何地点存储和
访问任意类型的数据。 - Alibaba Cloud SchedulerX: 阿里中间件团队开发的一款分布式任务调度产品,提供秒级、精
准、高可靠、高可用的定时(基于 Cron 表达式)任务调度服务。 - Alibaba Cloud SMS: 覆盖全球的短信服务,友好、高效、智能的互联化通讯能力,帮助企业迅速
搭建客户触达通道。
注册中心
Nacos是一个更易于构建云原生应用的动态服务发现、配置管理和服务管理平台。它是 Spring
Cloud Alibaba 组件之一,负责服务注册发现和服务配置,可以这样认为nacos=eureka+config。
https://github.com/alibaba/nacos/releases
可以从https://github.com/alibaba/nacos/releases下载nacos-server-$version.zip包。

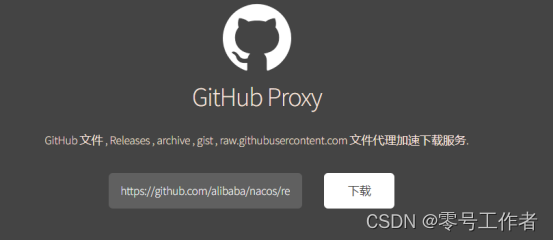
如果下载很慢,找个代理
https://ghproxy.com/
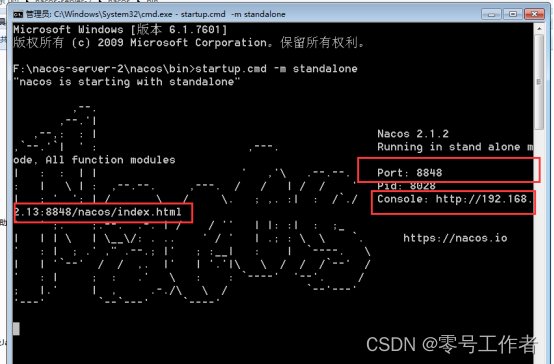
Windows下载解压后(.zip),直接点击bin/startup.cmd -m standalone就可以了。
Nacos默认是集群模式cluster,可以startup.cmd属性MODE为单机模式standalone.
注意安装目录不能有中文,不能有空格等其他符号.
Nacos提供了一个可视化的操作平台,安装好之后,在浏览器中输入(http://localhost:8848/nacos (opens new window))就可以访问了,默认的用户名和密码都是nacos
http://localhost:8848/nacos/index.html
脚手架
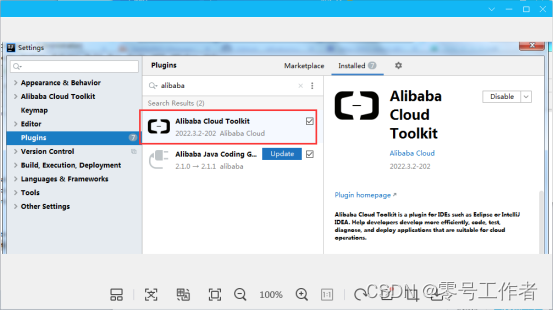
创建实例
新建一个项目或者新建一个module
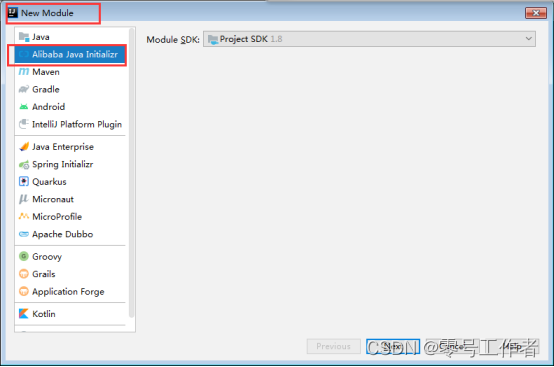
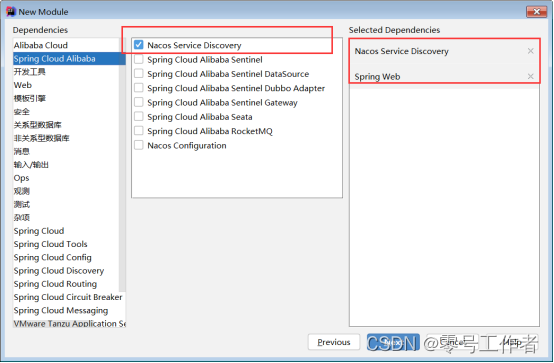
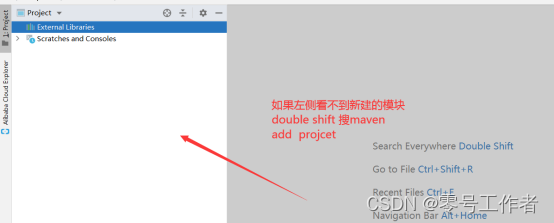
配置 application.properties
# 应用名称
spring.application.name=democonsumer

# 应用服务 WEB 访问端口
server.port=8091

# Nacos帮助文档:  https://nacos.io/zh-cn/docs/concepts.html
# Nacos认证信息
spring.cloud.nacos.discovery.username=nacos
spring.cloud.nacos.discovery.password=nacos
# Nacos 服务发现与注册配置,其中子属性 server-addr 指定 Nacos 服务器主机和端口
spring.cloud.nacos.discovery.server-addr=172.16.2.39:8848
# 注册到 nacos 的指定 namespace,默认为 public
spring.cloud.nacos.discovery.namespace=public
关键配置!!
使用脚手架生成的代码自带 nacosdiscovery 目录和NacosDiscoveryConfiguration 文件,如果你没有使用脚手架,可以手动添加配置
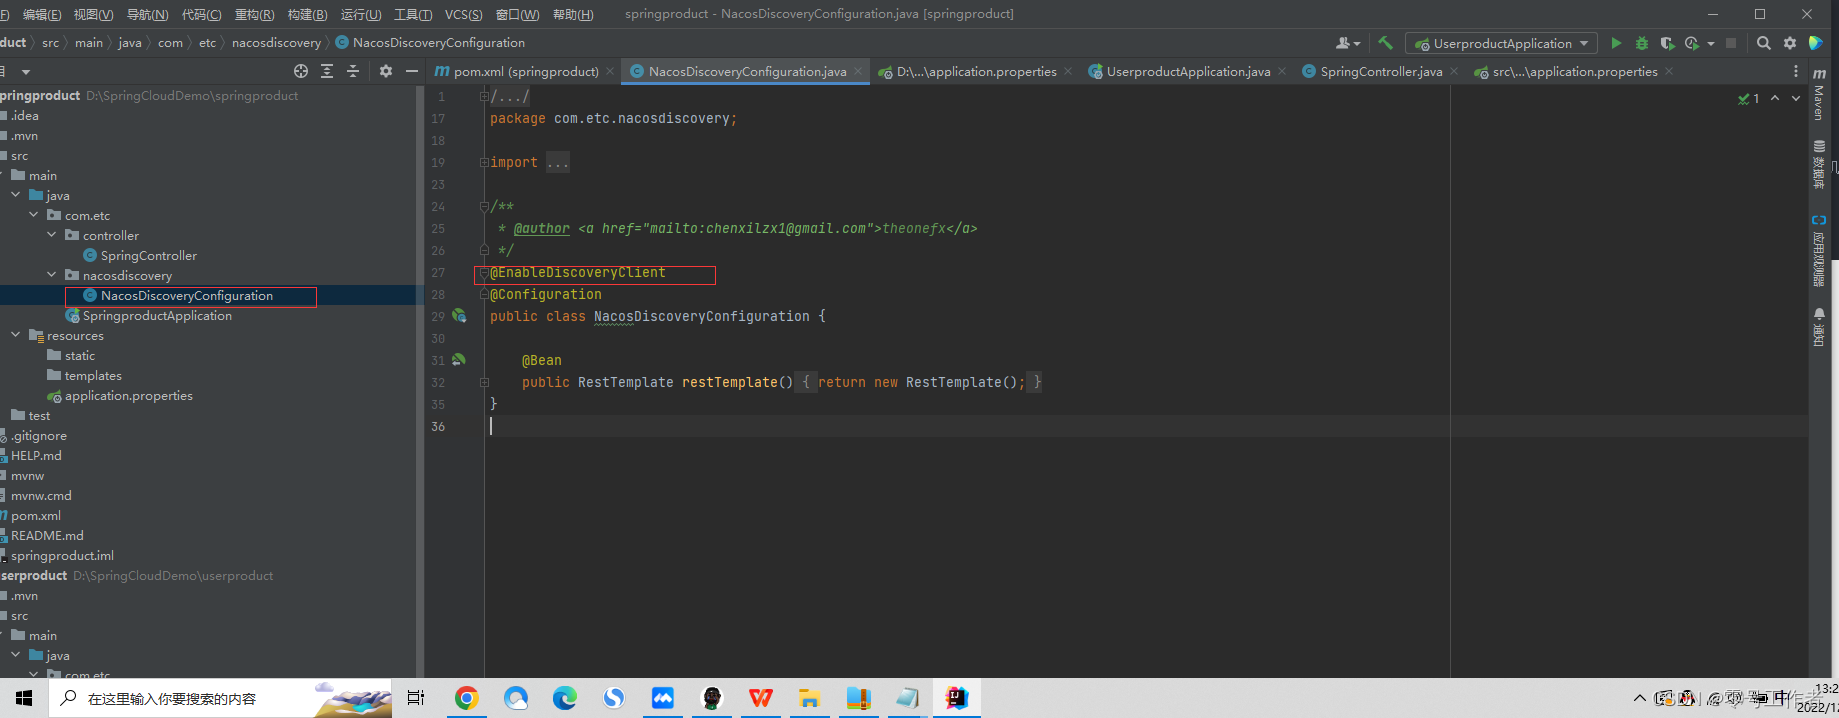
手动在启动类前配置注解
import org.springframework.boot.SpringApplication;
import org.springframework.boot.autoconfigure.SpringBootApplication;

@SpringBootApplication
@EnableDiscoveryClient //让注册中心可以发现
public class SpringproductApplication {

    public static void main(String[] args) {
        SpringApplication.run(SpringproductApplication.class, args);
    }

}
查看 nacos Web端

使用RestTemplate实现微服务调用
配置RestTemplate
import org.springframework.boot.web.client.RestTemplateBuilder;
import org.springframework.context.annotation.Bean;
import org.springframework.context.annotation.Configuration;
import org.springframework.web.client.RestTemplate;

@Configuration
public class RestTemplateConfig {

    @Bean
    public RestTemplate getRestTemplate(RestTemplateBuilder builder){
        return builder.build();
    }
}
微服务控制器
import lombok.extern.slf4j.Slf4j;
import org.springframework.beans.factory.annotation.Autowired;
import org.springframework.cloud.client.ServiceInstance;
import org.springframework.cloud.client.discovery.DiscoveryClient;
import org.springframework.web.bind.annotation.GetMapping;
import org.springframework.web.bind.annotation.PathVariable;
import org.springframework.web.bind.annotation.RequestMapping;
import org.springframework.web.bind.annotation.RestController;
import org.springframework.web.client.RestTemplate;


import java.util.Random;
import java.util.UUID;

@RestController
@RequestMapping("microproduct")
@Slf4j
public class ProductController {

    @Autowired
    private RestTemplate restTemplate;

    @Autowired
    DiscoveryClient discoveryClient;


    @GetMapping("user/{userid}")
    public String getUser(@PathVariable("userid") Integer userid){

        ServiceInstance demouser = discoveryClient.getInstances("demouser").get(0);
        String url = demouser.getHost()+":"+demouser.getPort();
        String object = restTemplate.getForObject("http://"+url + "/user/" + userid, String.class);
        return object;
    }
}
使用openfeign实现微服务调用
-
Feign是Spring Cloud提供的一个声明式的伪Http客户端, 它使得调用远程服务就像调用本地服务一样简单, 只需要创建一个接口并添加一个注解即可。
-
Feign是Netflix开发的声明式、模板化的HTTP客户端, Feign可以帮助我们更快捷、优雅地调用HTTP API。
-
在Spring Cloud中,使用Feign非常简单——创建一个接口,并在接口上添加一些注解,代码就完成了。Feign支持多种注解,例如Feign自带的注解或者JAX-RS注解等。
-
Spring Cloud对Feign进行了增强,使Feign支持了Spring MVC注解,并整合了Ribbon和Eureka,从而让Feign的使用更加方便。注意老版本支持Ribbon,而新版本需要单独引入spring cloud loadbalancer.
-
Spring Cloud Feign是基于Netflix feign实现,整合了Spring Cloud Ribbon和Spring Cloud Hystrix,除了提供这两者的强大功能外,还提供了一种声明式的Web服务客户端定义的方式。
-
Spring Cloud Feign帮助我们定义和实现依赖服务接口的定义。在Spring Cloud feign的实现下,只需要创建一个接口并用注解方式配置它,即可完成服务提供方的接口绑定,简化了在使用Spring Cloud Ribbon时自行封装服务调用客户端的开发量。
-
Spring Cloud Feign具备可插拔的注解支持,支持Feign注解、JAX-RS注解和Spring MVC的注解。
添加依赖
<!-- https://mvnrepository.com/artifact/org.springframework.cloud/spring-cloud-starter-openfeign -->
<dependency>
    <groupId>org.springframework.cloud</groupId>
    <artifactId>spring-cloud-starter-openfeign</artifactId>
    <version>3.1.4</version>
</dependency>

<dependency>
    <groupId>org.springframework.cloud</groupId>
    <artifactId>spring-cloud-starter-loadbalancer</artifactId>
    <version>3.1.4</version>
</dependency>
在启动类上添加支持
import org.springframework.boot.SpringApplication;
import org.springframework.boot.autoconfigure.SpringBootApplication;
import org.springframework.cloud.openfeign.EnableFeignClients;

@SpringBootApplication
@EnableFeignClients //启动我们的OpenFeign支持

public class MicroproductApplication {

    public static void main(String[] args) {
        SpringApplication.run(MicroproductApplication.class, args);
    }

}
创建服务接口,使用feign实现对微服务的调用
mport com.etc.entity.Users;
import org.springframework.cloud.openfeign.FeignClient;
import org.springframework.web.bind.annotation.GetMapping;
import org.springframework.web.bind.annotation.PathVariable;

/**
 * 1.  @FeignClient("microusers") 指定了要调用的目标微服务名称
 * 2.  定义抽象方法,语法参数参考users的微服务.同时方法前面有GetMapping直接使用
 */
@FeignClient("microusers")
public interface UserService {
	//定位目标路径
    //可以直接写springmvc注解语法,间接调用microusers的方法
    @GetMapping("users/{userid}")
    Users getById(@PathVariable("userid") Integer userid);
}
创建控制器完成调用
import com.etc.entity.Users;
import com.etc.microproduct.UserService;
import feign.Target;
import lombok.extern.slf4j.Slf4j;
import org.springframework.beans.factory.annotation.Autowired;
import org.springframework.cloud.client.ServiceInstance;
import org.springframework.cloud.client.discovery.DiscoveryClient;
import org.springframework.web.bind.annotation.GetMapping;
import org.springframework.web.bind.annotation.PathVariable;
import org.springframework.web.bind.annotation.RestController;
import org.springframework.web.client.RestTemplate;

/**
 * 商品的微服务的控制器中去访问microusers的微服务
 */
@RestController
@Slf4j
public class GoodController {


    //声明UserService接口对象
    @Autowired
    private UserService userService;

    /**
     *
     * @param userid
     * @return
     */

    @GetMapping("goodsfeign/{userid}")
    public String getUserByIdAndFeign(@PathVariable("userid") Integer userid) {
        Users users = userService.getById(userid);
        log.info("micro-product-GoodsController getUserByIdAndFeign  :  " + users);
        log.info("micro-product-GoodsController getUserByIdAndFeign :  " + userService);

        return users.toString();
    }

}
负载均衡的使用
理解: 负载(访问请求,工作任务)按照一定的规则(轮询 ,随机,其他自定义算法)分摊到多个操作单元(服务器组件,某个微服务)。
Spring Cloud Alibaba 官方文档:https://docs.spring.io/spring-cloud-commons/docs/current/reference/html/#spring-cloud-loadbalancer
创建多实例
使用一个项目代码创建多个实例,动态分配端口
配置文件:每次运行实例的时候,端口是随机的
import org.springframework.context.annotation.Bean;
import org.springframework.context.annotation.Configuration;

@org.springframework.context.annotation.Configuration
public class BalanceConfig {
    @org.springframework.context.annotation.Bean
    public org.springframework.boot.web.server.WebServerFactoryCustomizer<org.springframework.boot.web.server.ConfigurableWebServerFactory> webServerFactoryCustomizer(){
        return new org.springframework.boot.web.server.WebServerFactoryCustomizer<org.springframework.boot.web.server.ConfigurableWebServerFactory>() {
            @Override
            public void customize(org.springframework.boot.web.server.ConfigurableWebServerFactory factory) {
                int port = org.springframework.util.SocketUtils.findAvailableTcpPort(8081, 8999);
                factory.setPort(port);
                System.getProperties().put("server.port", port);

            }
        };
    }

}
修改启动配置信息
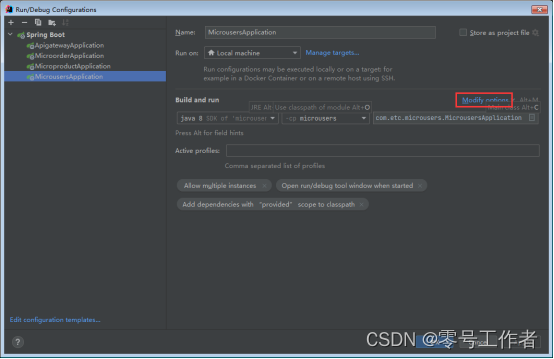
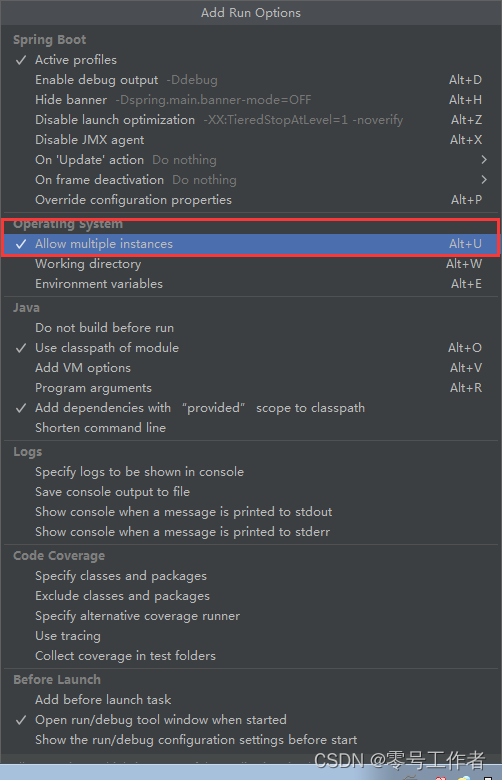
此时,启动多个实例,在控制台查看
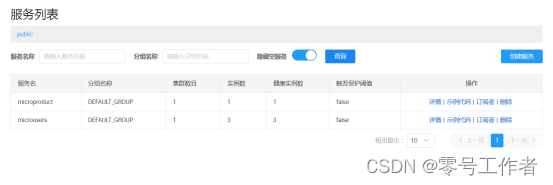
多实例创建完成,负载均衡也已经开启,默认负载均衡为轮询
修改负载均衡
在Spring Cloud Commons中提供了大量的与服务治理相关的抽象接口,包括DiscoveryClient、LoadBalancerClient等。从LoadBalancerClient接口的命名中,可以看出这是一个负载均衡客户端的抽象定义
LoadBalancerClient为springcloud提供的负载均衡器客户端。
如果针对某些业务需要精确到某个服务提供者或者遍历所有的服务提供者,那么可以通过LoadBalancerClient去获得。
public interface LoadBalancerClient extends ServiceInstanceChooser {

   /**
    * Executes request using a ServiceInstance from the LoadBalancer for the specified
    * service.
    * @param serviceId The service ID to look up the LoadBalancer.
    * @param request Allows implementations to execute pre and post actions, such as
    * incrementing metrics.
    * @param <T> type of the response
    * @throws IOException in case of IO issues.
    * @return The result of the LoadBalancerRequest callback on the selected
    * ServiceInstance.
    */
   <T> T execute(String serviceId, LoadBalancerRequest<T> request) throws IOException;

   /**
    * Executes request using a ServiceInstance from the LoadBalancer for the specified
    * service.
    * @param serviceId The service ID to look up the LoadBalancer.
    * @param serviceInstance The service to execute the request to.
    * @param request Allows implementations to execute pre and post actions, such as
    * incrementing metrics.
    * @param <T> type of the response
    * @throws IOException in case of IO issues.
    * @return The result of the LoadBalancerRequest callback on the selected
    * ServiceInstance.
    */
   <T> T execute(String serviceId, ServiceInstance serviceInstance, LoadBalancerRequest<T> request) throws IOException;

   /**
    * Creates a proper URI with a real host and port for systems to utilize. Some systems
    * use a URI with the logical service name as the host, such as
    * http://myservice/path/to/service. This will replace the service name with the
    * host:port from the ServiceInstance.
    * @param instance service instance to reconstruct the URI
    * @param original A URI with the host as a logical service name.
    * @return A reconstructed URI.
    */
   URI reconstructURI(ServiceInstance instance, URI original);

}
ServiceInstance choose(String serviceId):根据传入的服务名serviceId,从负载均衡器中挑选一个对应服务的实例。
T execute(String serviceId, LoadBalancerRequest request) throws IOException:使用从负载均衡器中挑选出的服务实例来执行请求内容。
URI reconstructURI(ServiceInstance instance, URI original):为系统构建一个合适的“host:port”形式的URI。在分布式系统中,我们使用逻辑上的服务名称作为host来构建URI(替代服务实例的“host:port”形式)进行请求.

官方文档介绍了其他负载均衡的使用

配置随机负载均衡
1.定义配置文件
import org.springframework.cloud.client.ServiceInstance;
import org.springframework.cloud.loadbalancer.core.RandomLoadBalancer;
import org.springframework.cloud.loadbalancer.core.ReactorLoadBalancer;
import org.springframework.cloud.loadbalancer.core.ServiceInstanceListSupplier;
import org.springframework.cloud.loadbalancer.support.LoadBalancerClientFactory;
import org.springframework.context.annotation.Bean;
import org.springframework.core.env.Environment;

public class CustomLoadBalancerConfiguration {

    @Bean
    ReactorLoadBalancer<ServiceInstance> randomLoadBalancer(Environment environment,
                                                            LoadBalancerClientFactory loadBalancerClientFactory) {
        String name = environment.getProperty(LoadBalancerClientFactory.PROPERTY_NAME);
        return new RandomLoadBalancer(loadBalancerClientFactory
                .getLazyProvider(name, ServiceInstanceListSupplier.class),
                name);
    }
}
2.启动类添加注解
在项目启动类上添加@LoadBalancerClient注解:name值一定要使用服务端配置的服务名(spring.application.name),通过configuration指定自定义的配置类.class。
import com.etc.microproduct.config.CustomLoadBalancerConfiguration;
import com.etc.microproduct.nacosdiscovery.NacosDiscoveryConfiguration;
import org.springframework.boot.SpringApplication;
import org.springframework.boot.autoconfigure.SpringBootApplication;
import org.springframework.cloud.client.loadbalancer.reactive.ReactiveLoadBalancer;
import org.springframework.cloud.loadbalancer.annotation.LoadBalancerClient;
import org.springframework.cloud.openfeign.EnableFeignClients;

@SpringBootApplication
@EnableFeignClients //启动我们的OpenFeign支持
//2 添加并指定 LoadBalancerClient
@LoadBalancerClient(name = "microusers",configuration = CustomLoadBalancerConfiguration.class)
public class MicroproductApplication {

    public static void main(String[] args) {
        SpringApplication.run(MicroproductApplication.class, args);
    }

}
此时,不再是轮询了,而是随机的机制
以上是针对于openfeign和loadbalancer的,
那么对RestTempalte来说呢?
可以参考openfeign的官方代码
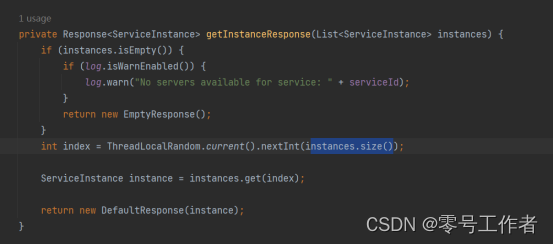
做修改之后
@GetMapping("goods/{userid}")
public String getUserById(@PathVariable("userid") Integer userid) {

    //模拟一下客户端的随机调用实例的操作
    //拿到所有的实例

    List<ServiceInstance> instances = discoveryClient.getInstances("microusers");

    //生成一个随机值
    int index = new Random().nextInt(instances.size());

   // ServiceInstance microusers = discoveryClient.getInstances("microusers").get(0);
    //将生成的随机数放在get参数位置,得到一个实例
    ServiceInstance microusers = instances.get(index);
    String url = microusers.getHost() + ":" + microusers.getPort();

    //调用的是user微服务 rest方式来调用
    //@GetMapping("users/{userid}")
    ///使用了RestTempalte/Feign(OpenFeign)
    Object object = restTemplate.getForObject("http://" + url + "/users/"+userid, String.class);
    log.info("micro-product-GoodsController:  "+object);

    return object.toString();
}
RestTemplate 方式实现随机机制







![[ Linux ] 线程控制(线程创建,等待,终止)](https://img-blog.csdnimg.cn/img_convert/3ef43f0c877a63973d4790bea1d146ed.png)
