手势识别系列文章目录
手势识别是一种人机交互技术,通过识别人的手势动作,从而实现对计算机、智能手机、智能电视等设备的操作和控制。
1. opencv实现手部追踪(定位手部关键点)
2.opencv实战项目 实现手势跟踪并返回位置信息(封装调用)
3.手势识别-手势音量控制(opencv)
4.opencv实战项目 手势识别-手势控制鼠标
5.opencv实战项目 手势识别-手部距离测量
6.opencv实战项目 手势识别-实现尺寸缩放效果
未完待续
目录
手势识别系列文章目录
1.HandTraqckModule模块
2、主模块
本项目是使用了谷歌开源的框架mediapipe,里面有非常多的模型提供给我们使用,例如面部检测,身体检测,手部检测等
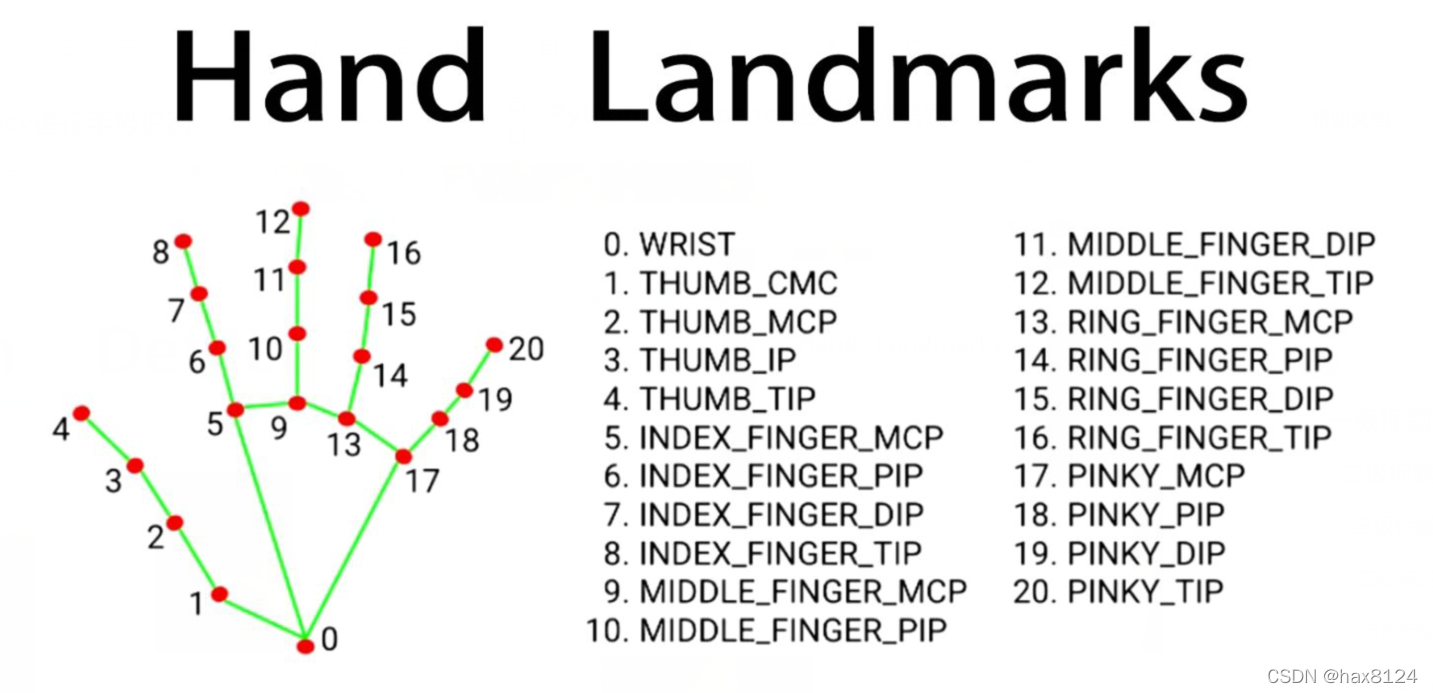
代码需要用到opencv HandTraqckModule模块 mediapipe模块
1.HandTraqckModule模块
如下:
定义 HandDetector 类,用于检测手势并提取相关信息:
class HandDetector:
    def __init__(self, mode=False, maxHands=2, detectionCon=0.5, minTrackCon=0.5):
        # 初始化函数,设置参数
        self.mode = mode
        self.maxHands = maxHands
        self.detectionCon = detectionCon
        self.minTrackCon = minTrackCon
        # 初始化 Mediapipe 模块和相关对象
        self.mpHands = mp.solutions.hands
        self.hands = self.mpHands.Hands(static_image_mode=self.mode, max_num_hands=self.maxHands,
                                        min_detection_confidence=self.detectionCon, min_tracking_confidence=self.minTrackCon)
        self.mpDraw = mp.solutions.drawing_utils
        self.tipIds = [4, 8, 12, 16, 20]
        self.fingers = []
        self.lmList = []
findHands 函数:在图像中找到手部,并返回手部信息以及绘制的图像。
    def findHands(self, img, draw=True, flipType=True):
        # 找到手部,并绘制相关信息
        imgRGB = cv2.cvtColor(img, cv2.COLOR_BGR2RGB)
        self.results = self.hands.process(imgRGB)
        allHands = []

        # 处理每个检测到的手
        if self.results.multi_hand_landmarks:
            for handType, handLms in zip(self.results.multi_handedness, self.results.multi_hand_landmarks):
                # 提取手部关键点和边界框信息
                myHand = {}
                mylmList = []
                xList = []
                yList = []

                for id, lm in enumerate(handLms.landmark):
                    px, py = int(lm.x * w), int(lm.y * h)
                    mylmList.append([px, py])
                    xList.append(px)
                    yList.append(py)

                # 计算边界框信息
                xmin, xmax = min(xList), max(xList)
                ymin, ymax = min(yList), max(yList)
                boxW, boxH = xmax - xmin, ymax - ymin
                bbox = xmin, ymin, boxW, boxH
                cx, cy = bbox[0] + (bbox[2] // 2), bbox[1] + (bbox[3] // 2)

                myHand["lmList"] = mylmList
                myHand["bbox"] = bbox
                myHand["center"] = (cx, cy)

                # 根据手的方向进行翻转
                if flipType:
                    if handType.classification[0].label == "Right":
                        myHand["type"] = "Left"
                    else:
                        myHand["type"] = "Right"
                else:
                    myHand["type"] = handType.classification[0].label
                allHands.append(myHand)

                # 绘制手部信息
                if draw:
                    self.mpDraw.draw_landmarks(img, handLms, self.mpHands.HAND_CONNECTIONS)
                    cv2.rectangle(img, (bbox[0] - 20, bbox[1] - 20), (bbox[0] + bbox[2] + 20, bbox[1] + bbox[3] + 20),
                                  (255, 0, 255), 2)
                    cv2.putText(img, myHand["type"], (bbox[0] - 30, bbox[1] - 30), cv2.FONT_HERSHEY_PLAIN,
                                2, (255, 0, 255), 2)
        if draw:
            return allHands, img
        else:
            return allHands
fingersUp 函数:检测手指的状态,返回一个列表表示手指是否抬起。
    def fingersUp(self, myHand):
        # 检测手指状态,返回列表表示手指是否抬起
        myHandType = myHand["type"]
        myLmList = myHand["lmList"]
        if self.results.multi_hand_landmarks:
            fingers = []

            # 大拇指
            if myHandType == "Right":
                if myLmList[self.tipIds[0]][0] > myLmList[self.tipIds[0] - 1][0]:
                    fingers.append(1)
                else:
                    fingers.append(0)
            else:
                if myLmList[self.tipIds[0]][0] < myLmList[self.tipIds[0] - 1][0]:
                    fingers.append(1)
                else:
                    fingers.append(0)

            # 其他四指
            for id in range(1, 5):
                if myLmList[self.tipIds[id]][1] < myLmList[self.tipIds[id] - 2][1]:
                    fingers.append(1)
                else:
                    fingers.append(0)
        return fingers
findDistance 函数:计算两点间的距离,可选是否在图像上绘制。
    def findDistance(self, p1, p2, img=None):
        # 计算两点间的距离,可绘制在图像上
        x1, y1 = p1
        x2, y2 = p2
        cx, cy = (x1 + x2) // 2, (y1 + y2) // 2
        length = math.hypot(x2 - x1, y2 - y1)
        info = (x1, y1, x2, y2, cx, cy)
        if img is not None:
            cv2.circle(img, (x1, y1), 15, (255, 0, 255), cv2.FILLED)
            cv2.circle(img, (x2, y2), 15, (255, 0, 255), cv2.FILLED)
            cv2.line(img, (x1, y1), (x2, y2), (255, 0, 255), 3)
            cv2.circle(img, (cx, cy), 15, (255, 0, 255), cv2.FILLED)
            return length, info, img
        else:
            return length, info
HandTraqckModule模块整体代码
"""
Hand Tracking Module
"""

import cv2
import mediapipe as mp
import math


class HandDetector:
    """
    Finds Hands using the mediapipe library. Exports the landmarks
    in pixel format. Adds extra functionalities like finding how
    many fingers are up or the distance between two fingers. Also
    provides bounding box info of the hand found.
    """

    def __init__(self, mode=False, maxHands=2, detectionCon=0.5, minTrackCon=0.5):
        """
        :param mode: In static mode, detection is done on each image: slower
        :param maxHands: Maximum number of hands to detect
        :param detectionCon: Minimum Detection Confidence Threshold
        :param minTrackCon: Minimum Tracking Confidence Threshold
        """
        self.mode = mode
        self.maxHands = maxHands
        self.detectionCon = detectionCon
        self.minTrackCon = minTrackCon

        self.mpHands = mp.solutions.hands
        self.hands = self.mpHands.Hands(static_image_mode=self.mode, max_num_hands=self.maxHands,
                                        min_detection_confidence=self.detectionCon, min_tracking_confidence = self.minTrackCon)
        self.mpDraw = mp.solutions.drawing_utils
        self.tipIds = [4, 8, 12, 16, 20]
        self.fingers = []
        self.lmList = []

    def findHands(self, img, draw=True, flipType=True):
        """
        Finds hands in a BGR image.
        :param img: Image to find the hands in.
        :param draw: Flag to draw the output on the image.
        :return: Image with or without drawings
        """
        imgRGB = cv2.cvtColor(img, cv2.COLOR_BGR2RGB)
        self.results = self.hands.process(imgRGB)
        allHands = []
        h, w, c = img.shape
        if  self.results.multi_hand_landmarks:
            for handType,handLms in zip(self.results.multi_handedness,self.results.multi_hand_landmarks):
                myHand={}
                ## lmList
                mylmList = []
                xList = []
                yList = []
                for id, lm in enumerate(handLms.landmark):
                    px, py = int(lm.x * w), int(lm.y * h)
                    mylmList.append([px, py])
                    xList.append(px)
                    yList.append(py)

                ## bbox
                xmin, xmax = min(xList), max(xList)
                ymin, ymax = min(yList), max(yList)
                boxW, boxH = xmax - xmin, ymax - ymin
                bbox = xmin, ymin, boxW, boxH
                cx, cy = bbox[0] + (bbox[2] // 2), \
                         bbox[1] + (bbox[3] // 2)

                myHand["lmList"] = mylmList
                myHand["bbox"] = bbox
                myHand["center"] =  (cx, cy)

                if flipType:
                    if handType.classification[0].label =="Right":
                        myHand["type"] = "Left"
                    else:
                        myHand["type"] = "Right"
                else:myHand["type"] = handType.classification[0].label
                allHands.append(myHand)

                ## draw
                if draw:
                    self.mpDraw.draw_landmarks(img, handLms,
                                               self.mpHands.HAND_CONNECTIONS)
                    cv2.rectangle(img, (bbox[0] - 20, bbox[1] - 20),
                                  (bbox[0] + bbox[2] + 20, bbox[1] + bbox[3] + 20),
                                  (255, 0, 255), 2)
                    cv2.putText(img,myHand["type"],(bbox[0] - 30, bbox[1] - 30),cv2.FONT_HERSHEY_PLAIN,
                                2,(255, 0, 255),2)
        if draw:
            return allHands,img
        else:
            return allHands

    def findPosition(self, img, handNo=0, draw=True):
        """
        Finds landmarks of a single hand and puts them in a list
        in pixel format. Also finds the bounding box around the hand.
        :param img: main image to find hand in
        :param handNo: hand id if more than one hand detected
        :param draw: Flag to draw the output on the image.
        :return: list of landmarks in pixel format; bounding box
        """

        xList = []
        yList = []
        bbox = []
        bboxInfo = []
        self.lmList = []
        if self.results.multi_hand_landmarks:
            myHand = self.results.multi_hand_landmarks[handNo]
            for id, lm in enumerate(myHand.landmark):
                h, w, c = img.shape
                px, py = int(lm.x * w), int(lm.y * h)
                xList.append(px)
                yList.append(py)
                self.lmList.append([px, py])
                if draw:
                    cv2.circle(img, (px, py), 5, (255, 0, 255), cv2.FILLED)
            xmin, xmax = min(xList), max(xList)
            ymin, ymax = min(yList), max(yList)
            boxW, boxH = xmax - xmin, ymax - ymin
            bbox = xmin, ymin, boxW, boxH
            cx, cy = bbox[0] + (bbox[2] // 2), \
                     bbox[1] + (bbox[3] // 2)
            bboxInfo = {"id": id, "bbox": bbox, "center": (cx, cy)}

            if draw:
                cv2.rectangle(img, (bbox[0] - 20, bbox[1] - 20),
                              (bbox[0] + bbox[2] + 20, bbox[1] + bbox[3] + 20),
                              (0, 255, 0), 2)

        return self.lmList, bboxInfo

    def fingersUp(self,myHand):
        """
        Finds how many fingers are open and returns in a list.
        Considers left and right hands separately
        :return: List of which fingers are up
        """
        myHandType =myHand["type"]
        myLmList = myHand["lmList"]
        if self.results.multi_hand_landmarks:
            fingers = []
            # Thumb
            if myHandType == "Right":
                if myLmList[self.tipIds[0]][0] > myLmList[self.tipIds[0] - 1][0]:
                    fingers.append(1)
                else:
                    fingers.append(0)
            else:
                if myLmList[self.tipIds[0]][0] < myLmList[self.tipIds[0] - 1][0]:
                    fingers.append(1)
                else:
                    fingers.append(0)

            # 4 Fingers
            for id in range(1, 5):
                if myLmList[self.tipIds[id]][1] < myLmList[self.tipIds[id] - 2][1]:
                    fingers.append(1)
                else:
                    fingers.append(0)
        return fingers

    def findDistance(self,p1, p2, img=None):
        """
        Find the distance between two landmarks based on their
        index numbers.
        :param p1: Point1
        :param p2: Point2
        :param img: Image to draw on.
        :param draw: Flag to draw the output on the image.
        :return: Distance between the points
                 Image with output drawn
                 Line information
        """

        x1, y1 = p1
        x2, y2 = p2
        cx, cy = (x1 + x2) // 2, (y1 + y2) // 2
        length = math.hypot(x2 - x1, y2 - y1)
        info = (x1, y1, x2, y2, cx, cy)
        if img is not None:
            cv2.circle(img, (x1, y1), 15, (255, 0, 255), cv2.FILLED)
            cv2.circle(img, (x2, y2), 15, (255, 0, 255), cv2.FILLED)
            cv2.line(img, (x1, y1), (x2, y2), (255, 0, 255), 3)
            cv2.circle(img, (cx, cy), 15, (255, 0, 255), cv2.FILLED)
            return length,info, img
        else:
            return length, info


def main():
    cap = cv2.VideoCapture(0)
    detector = HandDetector(detectionCon=0.8, maxHands=2)
    while True:
        # Get image frame
        success, img = cap.read()
        # Find the hand and its landmarks
        hands, img = detector.findHands(img)  # with draw
        # hands = detector.findHands(img, draw=False)  # without draw

        if hands:
            # Hand 1
            hand1 = hands[0]
            lmList1 = hand1["lmList"]  # List of 21 Landmark points
            bbox1 = hand1["bbox"]  # Bounding box info x,y,w,h
            centerPoint1 = hand1['center']  # center of the hand cx,cy
            handType1 = hand1["type"]  # Handtype Left or Right

            fingers1 = detector.fingersUp(hand1)

            if len(hands) == 2:
                # Hand 2
                hand2 = hands[1]
                lmList2 = hand2["lmList"]  # List of 21 Landmark points
                bbox2 = hand2["bbox"]  # Bounding box info x,y,w,h
                centerPoint2 = hand2['center']  # center of the hand cx,cy
                handType2 = hand2["type"]  # Hand Type "Left" or "Right"

                fingers2 = detector.fingersUp(hand2)

                # Find Distance between two Landmarks. Could be same hand or different hands
                length, info, img = detector.findDistance(lmList1[8], lmList2[8], img)  # with draw
                # length, info = detector.findDistance(lmList1[8], lmList2[8])  # with draw
        # Display
        cv2.imshow("Image", img)
        cv2.waitKey(1)


if __name__ == "__main__":
    main()
2、主模块
原理:
-
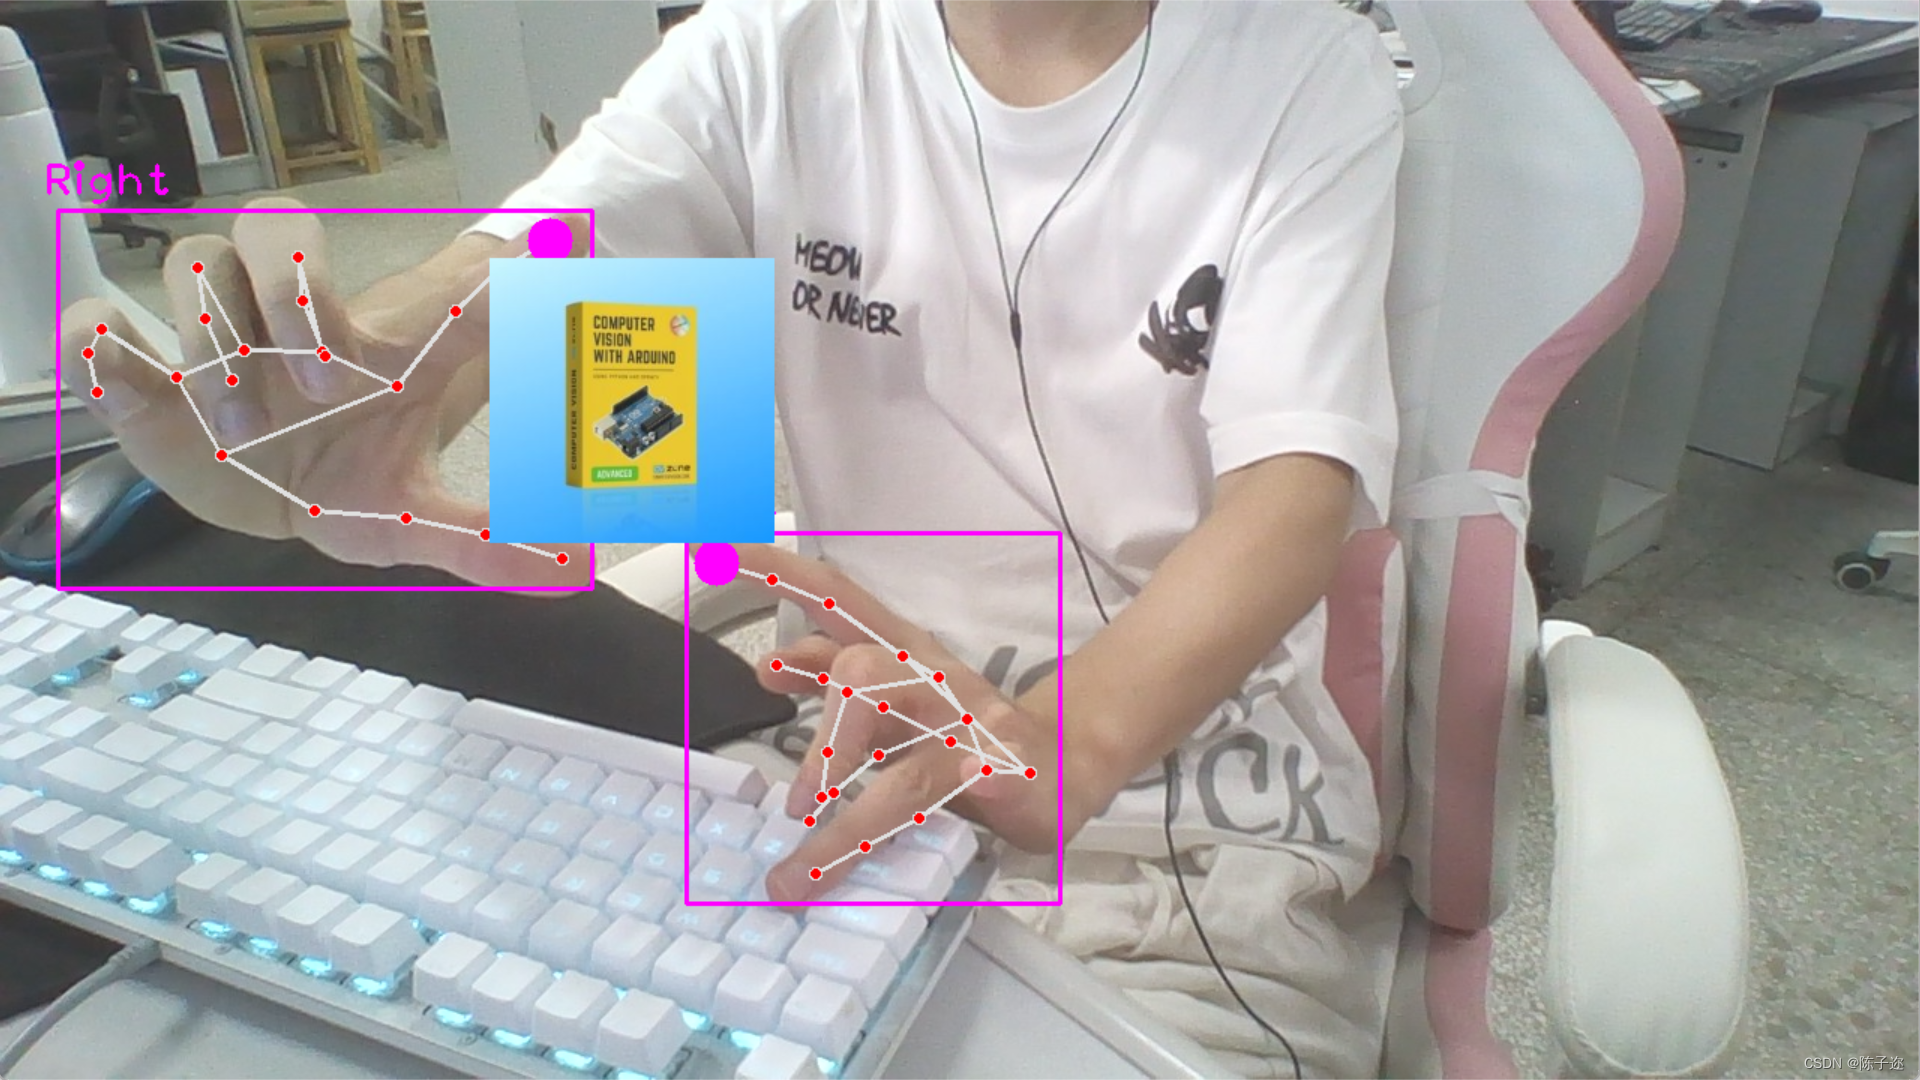
当检测到两只手时,并且两只手的拇指和食指都抬起时,通过计算拇指指尖之间的距离来获取初始距离
startDist。 -
当两只手的拇指和食指都抬起时,计算当前拇指指尖之间的距离,并根据距离变化来调整缩放因子
scale。这个变化可以通过当前距离减去初始距离得到。 -
根据计算得到的
scale值,调整图像的尺寸,将另一张图像按照scale进行缩放。
这样,当你用两只手的拇指和食指模拟捏取的动作时,可以实现图像的放大和缩小效果。两只手之间的距离越大,图像缩小得越多;两只手之间的距离越小,图像放大得越多。
这个应用可以在许多场景中使用,比如在展示图像、视频播放或地图应用中,通过手势来实现图像的交互式缩放效果。这个示例,展示了手势识别在图像处理和交互中的潜在应用。
导入所需的库:
import cv2
from HandTrackingModule import *
配置摄像头,创建手势检测器对象:
cap = cv2.VideoCapture(0)
cap.set(3, 1280)  # 设置摄像头的宽度
cap.set(4, 720)   # 设置摄像头的高度

detector = HandDetector(detectionCon=0.8)  # 创建手势检测器对象,设置检测置信度阈值
定义变量用于手势缩放操作:
startDist = None  # 用于存储初始距离
scale = 0  # 缩放值
cx, cy = 500, 500  # 缩放中心的坐标
进入主循环,读取视频帧并执行手势识别和图像操作:
while True:
    success, img = cap.read()  # 读取视频帧
    hands, img = detector.findHands(img)  # 手势检测

    # 读取一张图像用于操作
    img1 = cv2.imread("cvarduino.jpg")

    if len(hands) == 2:
        # 如果检测到两只手
        if detector.fingersUp(hands[0]) == [1, 1, 0, 0, 0] and \
                detector.fingersUp(hands[1]) == [1, 1, 0, 0, 0]:

            lmList1 = hands[0]["lmList"]  # 第一只手的关键点列表
            lmList2 = hands[1]["lmList"]  # 第二只手的关键点列表

            # 计算两个手指尖之间的距离作为缩放参考
            if startDist is None:
                length, info, img = detector.findDistance(lmList1[8], lmList2[8], img)
                startDist = length

            length, info, img = detector.findDistance(lmList1[8], lmList2[8], img)
            scale = int((length - startDist) // 2)  # 计算缩放值
            cx, cy = info[4:]  # 获取缩放中心的坐标
            print(scale)  # 打印缩放值
    else:
        startDist = None

    try:
        h1, w1, _ = img1.shape
        newH, newW = ((h1 + scale) // 2) * 2, ((w1 + scale) // 2) * 2
        img1 = cv2.resize(img1, (newW, newH))

        # 在指定位置绘制缩放后的图像
        img[cy - newH // 2:cy + newH // 2, cx - newW // 2:cx + newW // 2] = img1
    except:
        pass

    cv2.imshow("Image", img)  # 显示处理后的图像
    cv2.waitKey(1)  # 等待按键
主模块
全部代码:
import cv2
# from cvzone.HandTrackingModule import HandDetector
from HandTrackingModule import *
cap = cv2.VideoCapture(0)
cap.set(3, 1280)
cap.set(4, 720)

detector = HandDetector(detectionCon=0.8)
startDist = None
scale = 0
cx, cy = 500,500
while True:
    success, img = cap.read()
    hands, img = detector.findHands(img)
    img1 = cv2.imread("cvarduino.jpg")

    if len(hands) == 2:
        # print('Zoom Gesture')
        # print(detector.fingersUp(hands[0]),detector.fingersUp(hands[1]))
        if detector.fingersUp(hands[0]) == [1, 1, 0, 0, 0] and \
                detector.fingersUp(hands[1]) == [1, 1, 0, 0, 0]:

            # print('zhenque ')
            lmList1 = hands[0]["lmList"]
            lmList2 = hands[1]["lmList"]
            # point 8 is the tip of the index finger
            if startDist is None:
                length, info, img = detector.findDistance(lmList1[8], lmList2[8], img)
                # print(length)
                startDist = length

            length, info, img = detector.findDistance(lmList1[8], lmList2[8], img)
            scale = int((length - startDist) // 2)
            cx, cy = info[4:]
            print(scale)
    else:
        startDist = None

    try:
        h1, w1, _= img1.shape
        newH, newW = ((h1+scale)//2)*2, ((w1+scale)//2)*2
        img1 = cv2.resize(img1, (newW,newH))

        img[cy-newH//2:cy+ newH//2, cx-newW//2:cx+ newW//2] = img1
    except:
        pass

    cv2.imshow("Image", img)
    cv2.waitKey(1)
有遇到的问题欢迎评论区留言!
