Fast SAM与YOLOV8检测模型一起使用
VX 搜索”晓理紫“ 关注并回复yolov8+fastsam获取核心代码
晓理紫
1 使用场景
实例分割数据集的获取要比检测数据的获取更加困难,在已有检测模型不想从新标注分割数据进行训练但是又想获取相关物体的mask信息以便从像素级别对物体进行操作,这时就可以把检测模型与FastSAM模型配合进行时候实现分割的效果。
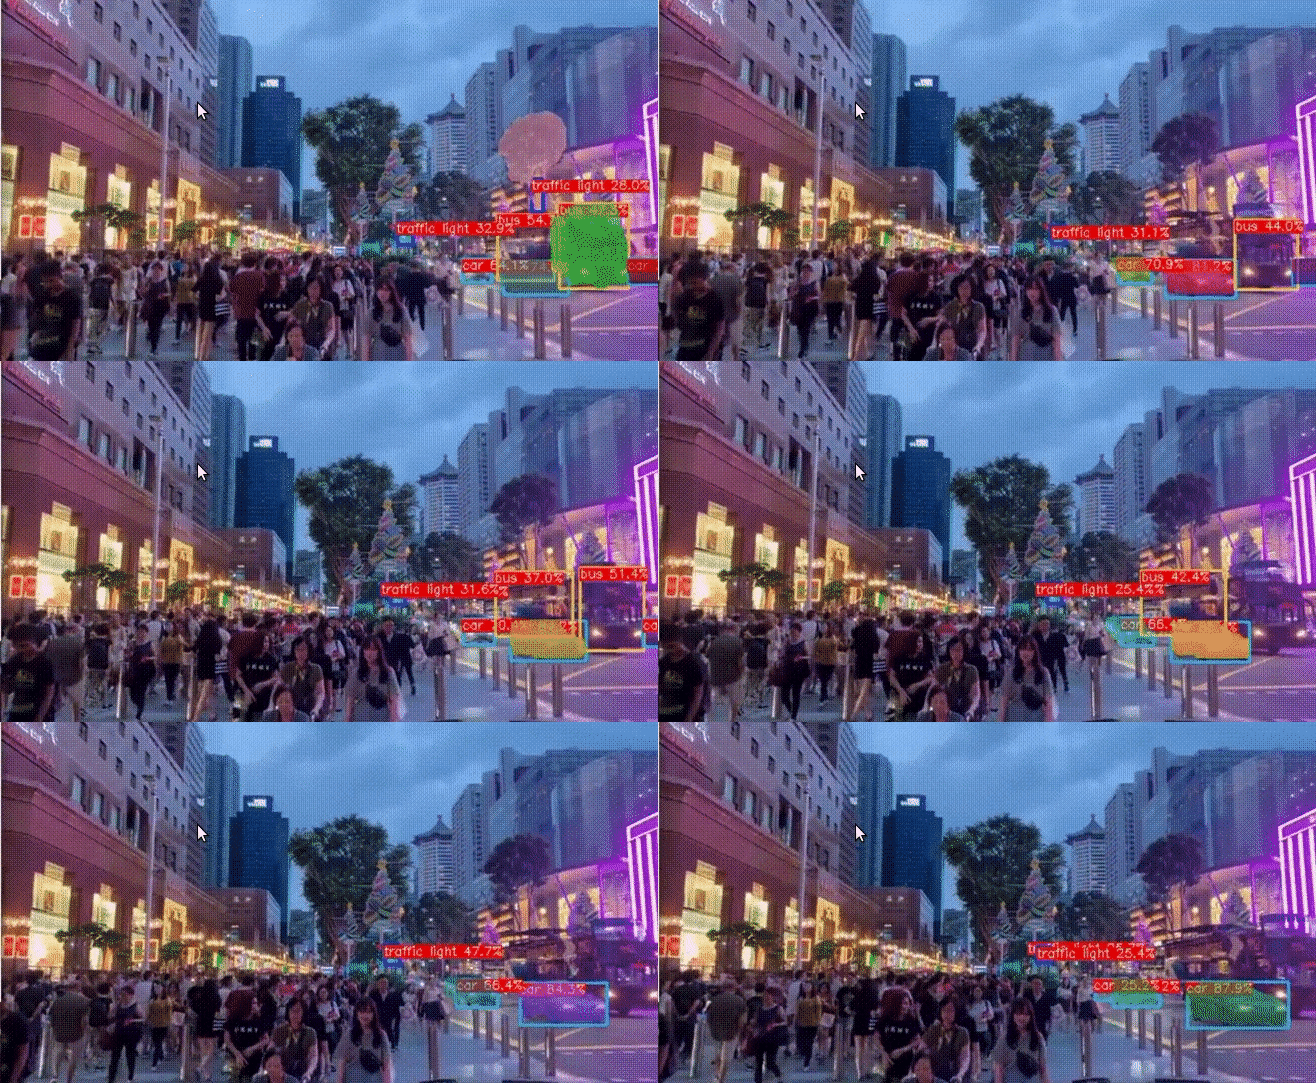
2 检测加分割效果
2.1 检测+分割
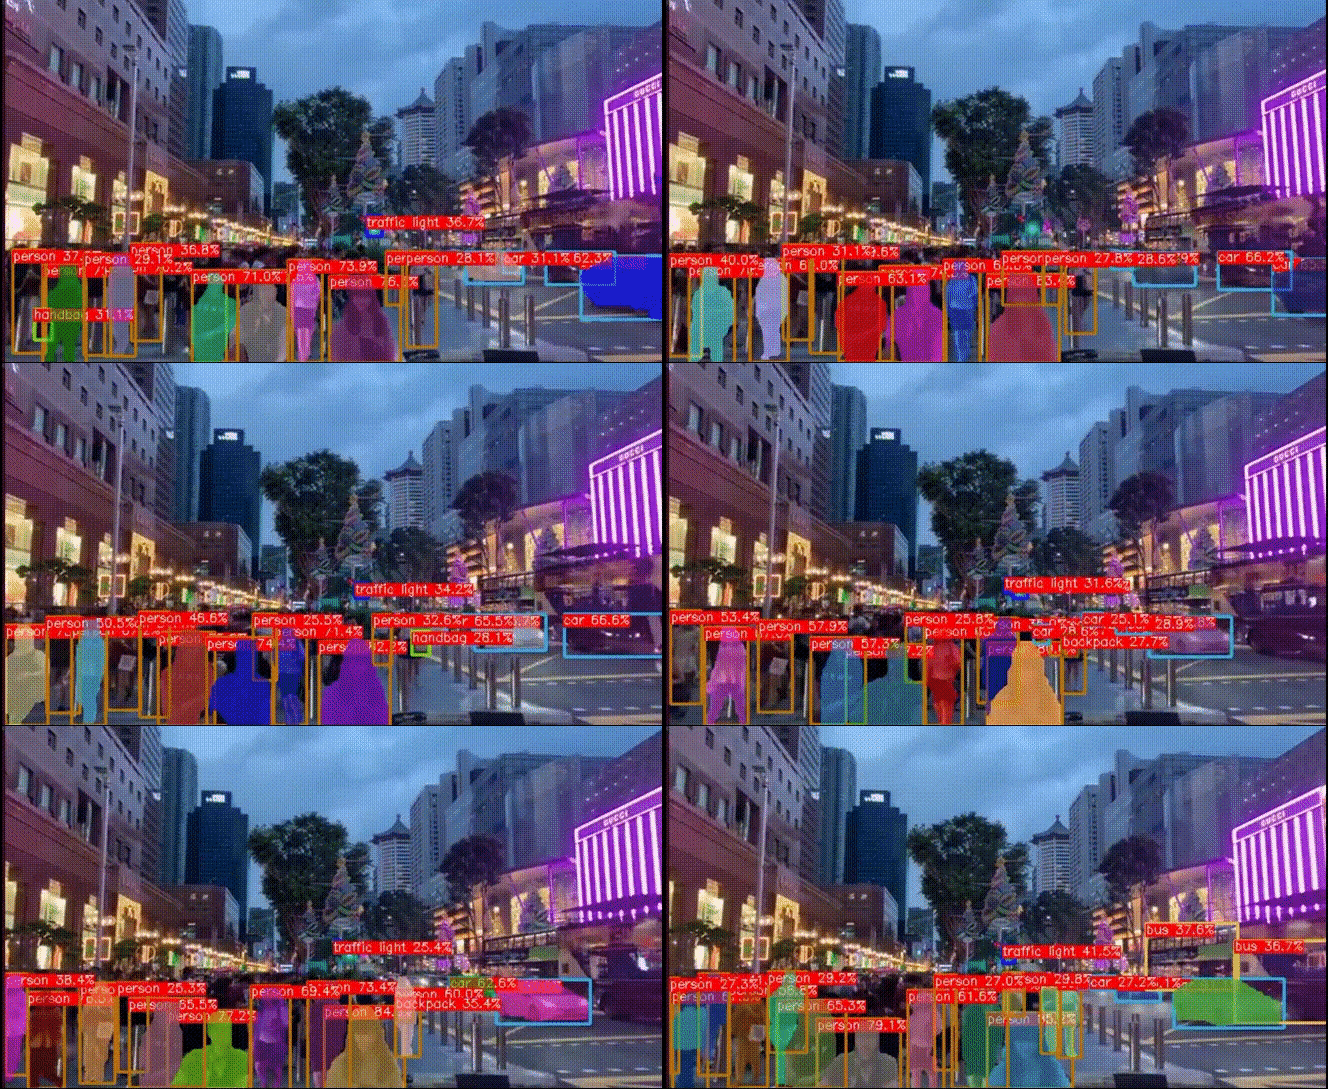
2.2 分割指定物体(分割交通灯,汽车,公交车)
3 部署使用
3.1 检测模型
这里使用的检测模型使用YOLOV8,使用TensorRT对YOLOV8进行部署
- 部署条件
安装YOLOv8环境,可按照git进行配置
需要配置TensorRt相关环境,需要有显卡,安装驱动,CUDA以及TensorRT
需要把原始权重模型转为trt模型
2.2 trt模型转换
trt模型转换有多种方式,本文采用的是先把pt模型转成onnx模型参考,再把onnx通过trtexec工具进行转换。转换命令如下:
yolo mode=export model=yolov8s.pt  format=onnx dynamic=False
trtexec --onnx=yolov8.onnx --saveEngine=yolov8.engine
注意: trtexec -h查看帮助,转fp16或者int8等参数
部署核心代码
模型转换完成以后,剩下的就是部署推理。部署推理里面最为重要也是最难搞的是数据解析部分。其中模型加载是很标准的流程,当然我这里不一定是标准的。
- 加载模型并初始化核心代码
  cudaSetDevice(DEVICE);
  INPUT_W = input_w;
  INPUT_H = input_h;
  in_size = 1 * 3 * INPUT_W * INPUT_H;
  w = INPUT_W;
  h = INPUT_H;
  std::ifstream file(engine_file_path, std::ios::binary);
  assert(file.good());
  file.seekg(0, std::ios::end);
  auto size = file.tellg();
  std::ostringstream fmt;

  file.seekg(0, std::ios::beg);
  char *trtModelStream = new char[size];
  assert(trtModelStream);
  file.read(trtModelStream, size);
  file.close();
  initLibNvInferPlugins(&this->gLogger, "");
  this->runtime = nvinfer1::createInferRuntime(this->gLogger);
  assert(this->runtime != nullptr);

  this->engine = this->runtime->deserializeCudaEngine(trtModelStream, size);
  assert(this->engine != nullptr);

  this->context = this->engine->createExecutionContext();

  assert(this->context != nullptr);
  cudaStreamCreate(&this->stream);
  const nvinfer1::Dims input_dims =
      this->engine->getBindingDimensions(this->engine->getBindingIndex(INPUT));
  this->in_size = get_size_by_dims(input_dims);
  CHECK(cudaMalloc(&this->buffs[0], this->in_size * sizeof(float)));

  this->context->setBindingDimensions(0, input_dims);
  const int32_t num_dets_idx = this->engine->getBindingIndex(NUM_DETS);
  const nvinfer1::Dims num_dets_dims =
      this->context->getBindingDimensions(num_dets_idx);
  this->out_sizes[num_dets_idx - NUM_INPUT].first =
      get_size_by_dims(num_dets_dims);
  this->out_sizes[num_dets_idx - NUM_INPUT].second =
      DataTypeToSize(this->engine->getBindingDataType(num_dets_idx));

  const int32_t bboxes_idx = this->engine->getBindingIndex(BBOXES);
  const nvinfer1::Dims bboxes_dims =
      this->context->getBindingDimensions(bboxes_idx);

  this->out_sizes[bboxes_idx - NUM_INPUT].first = get_size_by_dims(bboxes_dims);
  this->out_sizes[bboxes_idx - NUM_INPUT].second =
      DataTypeToSize(this->engine->getBindingDataType(bboxes_idx));

  const int32_t scores_idx = this->engine->getBindingIndex(SCORES);
  const nvinfer1::Dims scores_dims =
      this->context->getBindingDimensions(scores_idx);
  this->out_sizes[scores_idx - NUM_INPUT].first = get_size_by_dims(scores_dims);
  this->out_sizes[scores_idx - NUM_INPUT].second =
      DataTypeToSize(this->engine->getBindingDataType(scores_idx));

  const int32_t labels_idx = this->engine->getBindingIndex(LABELS);
  const nvinfer1::Dims labels_dims =
      this->context->getBindingDimensions(labels_idx);
  this->out_sizes[labels_idx - NUM_INPUT].first = get_size_by_dims(labels_dims);
  this->out_sizes[labels_idx - NUM_INPUT].second =
      DataTypeToSize(this->engine->getBindingDataType(labels_idx));

  for (int i = 0; i < NUM_OUTPUT; i++) {
    const int osize = this->out_sizes[i].first * out_sizes[i].second;
    CHECK(cudaHostAlloc(&this->outputs[i], osize, 0));
    CHECK(cudaMalloc(&this->buffs[NUM_INPUT + i], osize));
  }
  if (warmup) {
    for (int i = 0; i < 10; i++) {
      size_t isize = this->in_size * sizeof(float);
      auto *tmp = new float[isize];

      CHECK(cudaMemcpyAsync(this->buffs[0], tmp, isize, cudaMemcpyHostToDevice,
                            this->stream));
      this->xiaoliziinfer();
    }
  }
模型加载以后,就可以送入数据进行推理
- 送入数据并推理
  float height = (float)image.rows;
  float width = (float)image.cols;

  float r = std::min(INPUT_H / height, INPUT_W / width);

  int padw = (int)std::round(width * r);
  int padh = (int)std::round(height * r);

  if ((int)width != padw || (int)height != padh) {
    cv::resize(image, tmp, cv::Size(padw, padh));
  } else {
    tmp = image.clone();
  }

  float _dw = INPUT_W - padw;
  float _dh = INPUT_H - padh;

  _dw /= 2.0f;
  _dh /= 2.0f;
  int top = int(std::round(_dh - 0.1f));
  int bottom = int(std::round(_dh + 0.1f));
  int left = int(std::round(_dw - 0.1f));
  int right = int(std::round(_dw + 0.1f));
  cv::copyMakeBorder(tmp, tmp, top, bottom, left, right, cv::BORDER_CONSTANT,
                     PAD_COLOR);
  cv::dnn::blobFromImage(tmp, tmp, 1 / 255.f, cv::Size(), cv::Scalar(0, 0, 0),
                         true, false, CV_32F);
  CHECK(cudaMemcpyAsync(this->buffs[0], tmp.ptr<float>(),
                        this->in_size * sizeof(float), cudaMemcpyHostToDevice,
                        this->stream));
  this->context->enqueueV2(buffs.data(), this->stream, nullptr);
  for (int i = 0; i < NUM_OUTPUT; i++) {
    const int osize = this->out_sizes[i].first * out_sizes[i].second;
    CHECK(cudaMemcpyAsync(this->outputs[i], this->buffs[NUM_INPUT + i], osize,
                          cudaMemcpyDeviceToHost, this->stream));
  }
  cudaStreamSynchronize(this->stream);
推理以后就可以获取数据并进行解析
- 数据获取并进行解析
  int *num_dets = static_cast<int *>(this->outputs[0]);
  auto *boxes = static_cast<float *>(this->outputs[1]);
  auto *scores = static_cast<float *>(this->outputs[2]);
  int *labels = static_cast<int *>(this->outputs[3]);
  for (int i = 0; i < num_dets[0]; i++) {
    float *ptr = boxes + i * 4;
    Object obj;
    float x0 = *ptr++ - this->dw;
    float y0 = *ptr++ - this->dh;
    float x1 = *ptr++ - this->dw;
    float y1 = *ptr++ - this->dh;

    x0 = clamp(x0 * this->ratio, 0.f, this->w);
    y0 = clamp(y0 * this->ratio, 0.f, this->h);
    x1 = clamp(x1 * this->ratio, 0.f, this->w);
    y1 = clamp(y1 * this->ratio, 0.f, this->h);
    if (!filterClass.empty() &&
        std::find(filterClass.begin(), filterClass.end(), int(*(labels + i))) ==
            filterClass.end())
      continue;
    if (x0 < 0 || y0 < 0 || x1 > this->w || y1 > this->h || (x1 - x0) <= 0 ||
        (y1 - y0) <= 0)
      continue;
    obj.rect.x = x0;
    obj.rect.y = y0;
    obj.rect.width = x1 - x0;
    obj.rect.height = y1 - y0;
    obj.prob = *(scores + i);
    obj.label = *(labels + i);
    obj.pixelBox.push_back(std::vector<float>{x0, y0});
    obj.pixelBox.push_back(std::vector<float>{x1, y1});
    obj.pixelBoxCent = std::vector<float>{(x0 + x1) / 2, (y0 + y1) / 2};
    obj.className = CLASS_NAMES[int(obj.label)];
    const std::vector<float> box = {x0, y0, x1, y1};
    cv::Mat maskmat;
- 获取对应物体mask(前提已经使用FastSAM进行推理)
  float boxarea = (box[2] - box[0]) * (box[3] - box[1]);
  std::tuple<float, float, float, float> mapkey;
  float maxIoU = FLT_MIN;
  for (auto mapdata : boxMaskMat) {
    cv::Mat maskmat = mapdata.second;
    if (maskmat.rows == 0 || maskmat.cols == 0)
      continue;
    float orig_masks_area = cv::sum(maskmat)[0];
    cv::Rect roi(box[0], box[1], box[2] - box[0], box[3] - box[1]);
    cv::Mat temmask = maskmat(roi);
    float masks_area = cv::sum(temmask)[0];
    float union_arrea = boxarea + orig_masks_area - masks_area;
    float IoUs = masks_area / union_arrea;
    if (IoUs > maxIoU) {
      maxIoU = IoUs;
      mapkey = mapdata.first;
    }
  }
  mask = boxMaskMat[mapkey].clone();
- 对物体进行过滤
这里对物体进行过滤,主要采取的方式是在检测模块获取物体信息时对物体标签进行过滤。
3.2 FastSAM分割模型
FastSAM分割模型的部署可以参考这篇。
3.3效果视频
效果视频
3 核心代码
晓理紫记录学习!

![[python]RuntimeError: Can‘t decrement id ref count (unable to close file...](https://img-blog.csdnimg.cn/62244b912ed4481bb1e7b90ebfa3371d.png)
