thread
本质封装操作系统的库
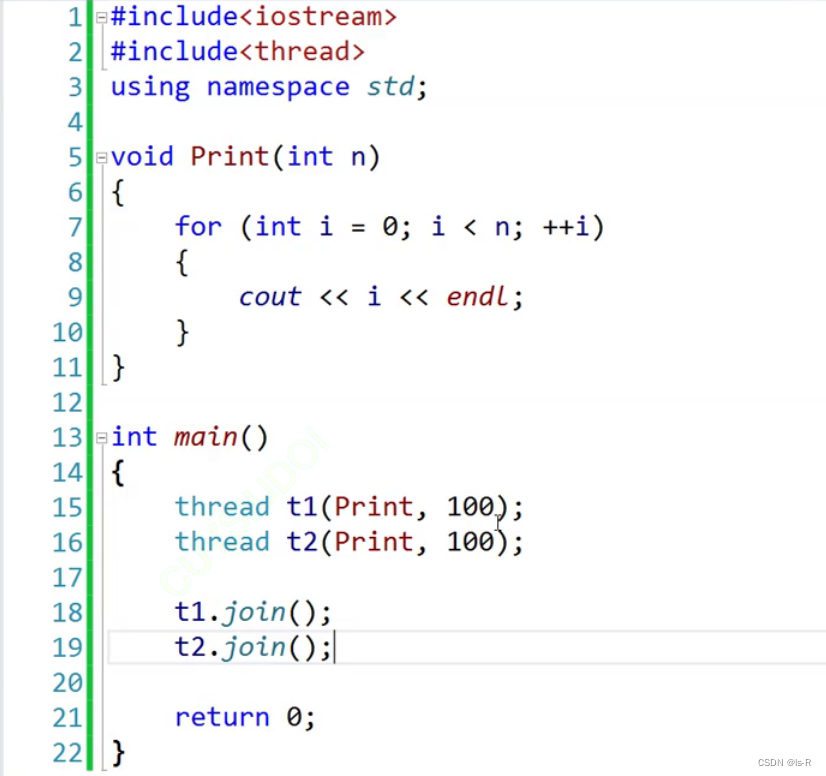


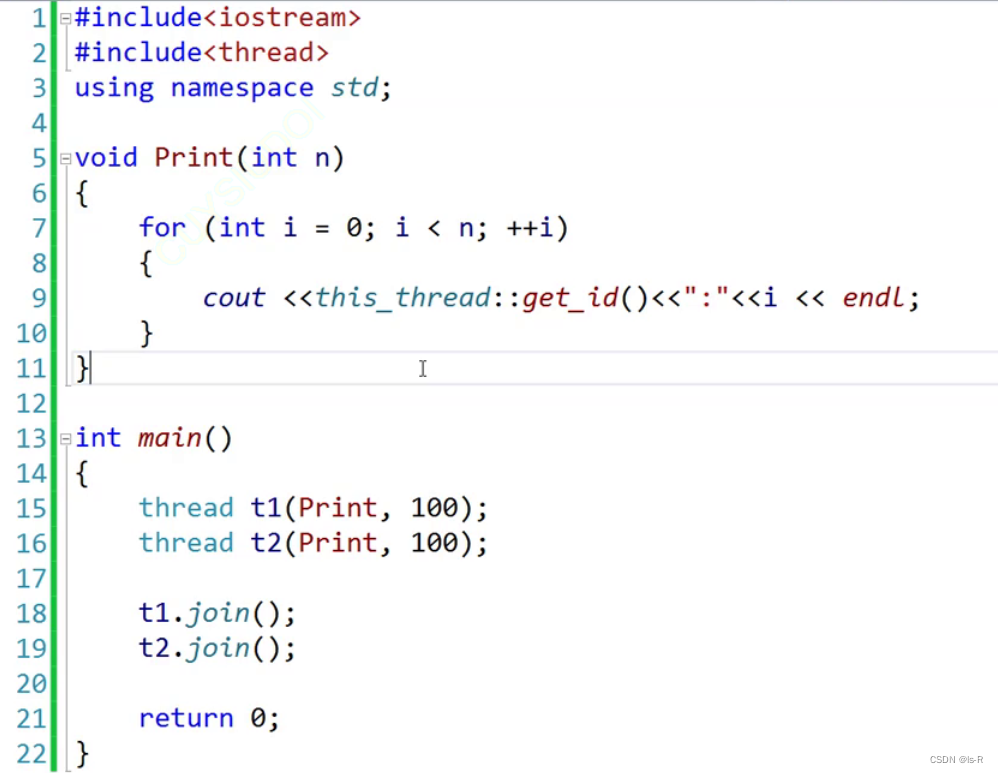
事实证明,两个线程在cpu中交错运行
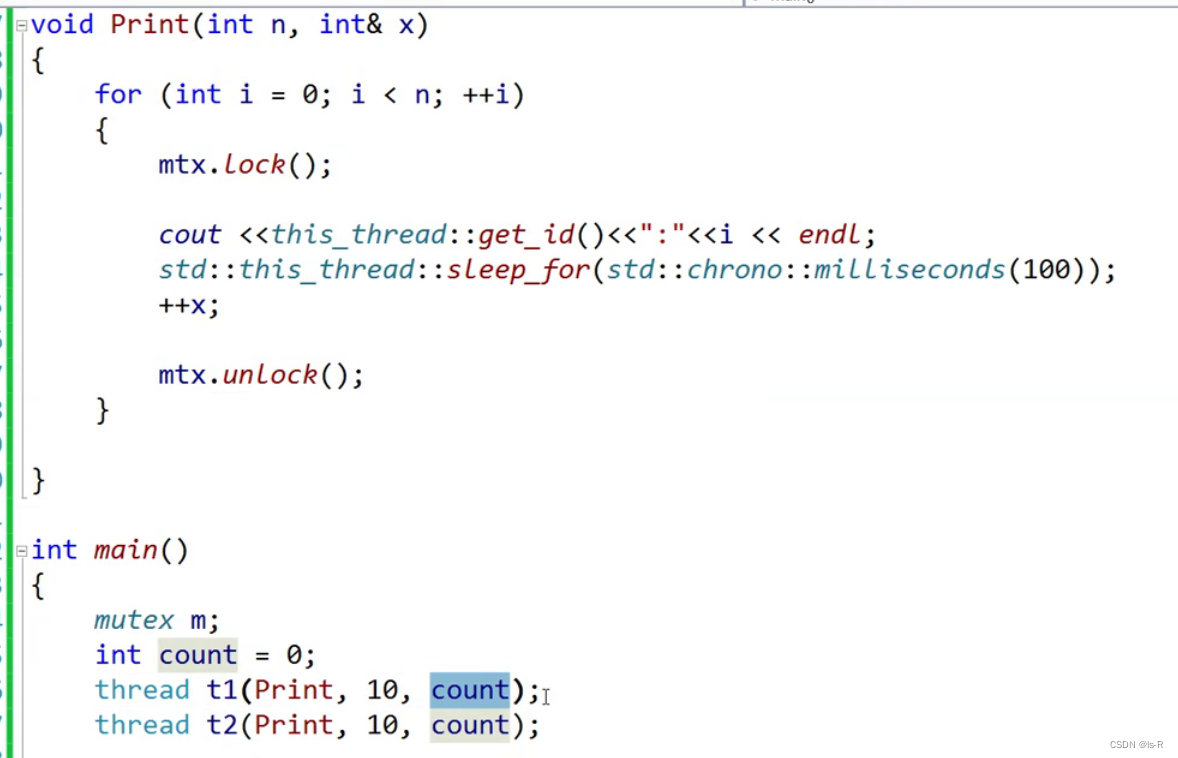
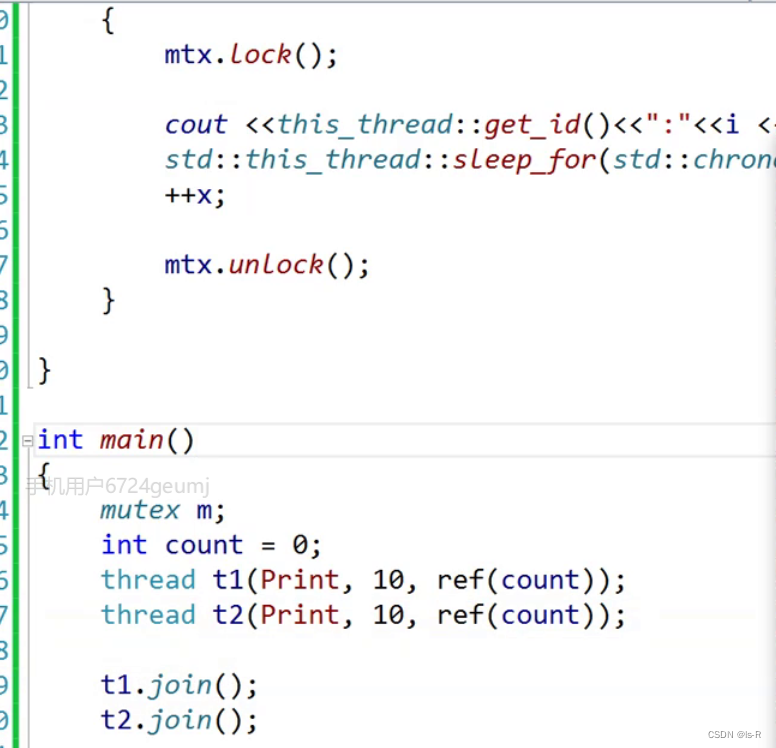
thread传参为模板参数,应用折叠,都会变成左值,所以count还是0

sleep_until
在C++中,没有直接的sleep_until函数,但可以使用std::this_thread::sleep_until来实现类似的功能。std::this_thread::sleep_until函数可以让当前线程休眠,直到指定的时间点。
下面是一个示例代码,演示了如何使用std::this_thread::sleep_until函数来实现休眠直到指定的时间点:
#include <iostream>
#include <chrono>
#include <thread>

int main() {
    // 获取当前时间点
    std::chrono::system_clock::time_point now = std::chrono::system_clock::now();

    // 设置休眠时间为当前时间点加上5秒
    std::chrono::system_clock::time_point sleep_time = now + std::chrono::seconds(5);

    // 休眠直到指定的时间点
    std::this_thread::sleep_until(sleep_time);

    // 输出休眠结束后的时间点
    std::cout << "Finished sleeping at " << std::chrono::system_clock::now() << std::endl;

    return 0;
}
在上述代码中,我们首先使用std::chrono::system_clock::now()获取当前时间点。然后,我们设置休眠时间为当前时间点加上5秒,即now + std::chrono::seconds(5)。接下来,我们使用std::this_thread::sleep_until函数休眠直到指定的时间点。
运行上述代码,将会在休眠5秒后输出休眠结束后的时间点。
请注意,std::this_thread::sleep_until函数接受一个std::chrono::time_point类型的参数,表示要休眠直到的时间点。因此,可以使用std::chrono库中的各种时间表示类型来指定休眠的时间点,如std::chrono::system_clock::time_point、std::chrono::steady_clock::time_point等。
sleep_for
相对时间休眠
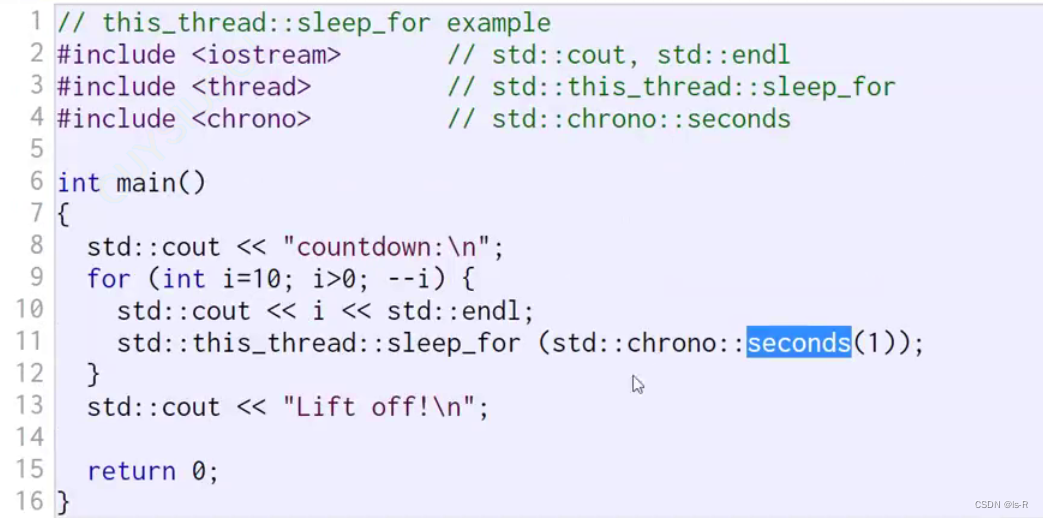
std::this_thread::sleep_for是一个C++标准库中的函数,用于使当前线程休眠指定的时间段。
下面是一个示例代码,演示了如何使用std::this_thread::sleep_for函数来使当前线程休眠指定的时间段:
#include <iostream>
#include <chrono>
#include <thread>

int main() {
    // 休眠2秒
    std::chrono::seconds sleep_duration(2);
    std::this_thread::sleep_for(sleep_duration);

    std::cout << "Finished sleeping for 2 seconds" << std::endl;

    return 0;
}
在上述代码中,我们使用std::chrono::seconds类型创建了一个表示2秒的时间段对象sleep_duration。然后,我们使用std::this_thread::sleep_for函数将当前线程休眠2秒。
运行上述代码,将会在休眠2秒后输出"Finished sleeping for 2 seconds"。
请注意,std::this_thread::sleep_for函数接受一个std::chrono::duration类型的参数,表示要休眠的时间段。std::chrono::duration是一个模板类,可以用于表示各种时间单位的时间段,如秒、毫秒、微秒等。可以使用std::chrono库中的各种时间表示类型来创建时间段对象,如std::chrono::seconds、std::chrono::milliseconds、std::chrono::microseconds等。
get_id
可以使用std::this_thread::get_id函数来获取当前线程的唯一标识符

this_thread
std::this_thread是C++标准库中的一个命名空间,其中定义了一些与当前线程相关的函数和类型。
下面是std::this_thread命名空间中一些常用的函数和类型:
std::this_thread::get_id(): 返回当前线程的唯一标识符,类型为std::thread::id。std::this_thread::yield(): 提示线程调度器将当前线程放弃,以便其他线程有机会运行。std::this_thread::sleep_for(): 使当前线程休眠指定的时间段。std::this_thread::sleep_until(): 使当前线程休眠直到指定的时间点。std::this_thread::hardware_concurrency(): 返回当前系统支持的并发线程数。
此外,std::this_thread命名空间还包含了一些与线程相关的类型,如std::thread::id表示线程的唯一标识符。
以下是一个示例代码,演示了如何使用std::this_thread命名空间中的一些函数:
#include <iostream>
#include <chrono>
#include <thread>

int main() {
    // 获取当前线程的标识符
    std::thread::id thread_id = std::this_thread::get_id();
    std::cout << "Thread ID: " << thread_id << std::endl;

    // 提示线程调度器将当前线程放弃
    std::this_thread::yield();

    // 使当前线程休眠1秒
    std::this_thread::sleep_for(std::chrono::seconds(1));

    // 获取当前系统支持的并发线程数
    unsigned int num_threads = std::this_thread::hardware_concurrency();
    std::cout << "Number of concurrent threads supported: " << num_threads << std::endl;

    return 0;
}
在上述代码中,我们使用std::this_thread::get_id函数获取当前线程的标识符,并使用std::cout输出。然后,我们使用std::this_thread::yield函数提示线程调度器将当前线程放弃。接下来,我们使用std::this_thread::sleep_for函数使当前线程休眠1秒。最后,我们使用std::this_thread::hardware_concurrency函数获取当前系统支持的并发线程数,并使用std::cout输出。
运行上述代码,将会输出当前线程的标识符、休眠1秒后的时间点以及当前系统支持的并发线程数。
mutex
互斥锁
不加锁会出现x的同时相加
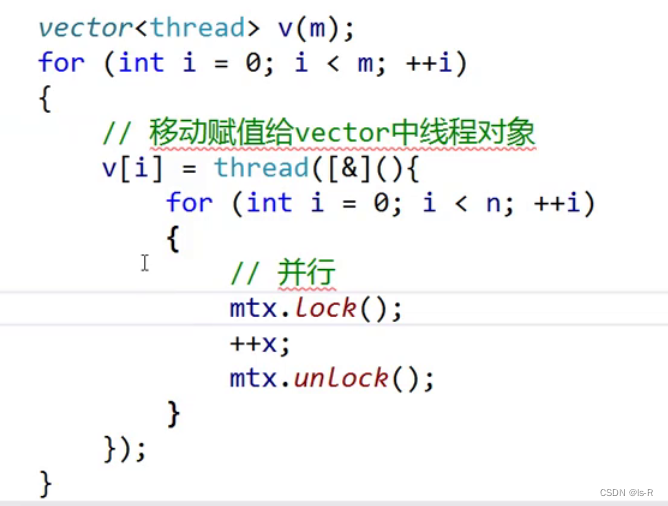
加在循环内部 并行
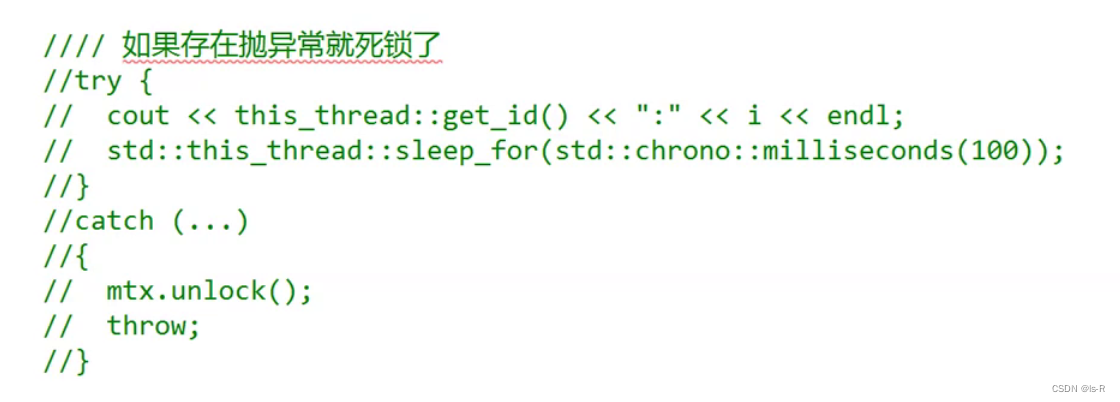
锁中间比较怕抛异常会导致死锁
加在外部 串行
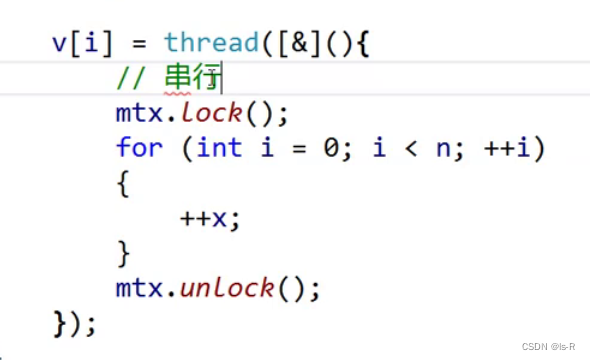
此例子理论,并行快,实际串行比较快在此程序中,上面慢在线程切换,申请锁和解锁花费了大量的时间,实际工作时间确非常少
解决死锁问题:try
解决死锁问题:RAII
#include <iostream>
#include <mutex>
#include <vector>
#include <atomic>
using namespace std;
//RAII
template<class Lock>
class LockGuard
{
public:
	LockGuard(Lock& lk)
		:_lock(lk)
	{
		cout << "thread:" << this_thread::get_id() << "加锁" << endl;
		_lock.lock();
	}
	~LockGuard()
	{
		cout << "thread:" << this_thread::get_id() << "解锁" << endl;
		_lock.unlock();
	}
private:
	Lock& _lock;
};


int main()
{
	mutex mtx;
	atomic<int> x = 0;
	int n = 100;
	int m;
	cin >> m;
	vector<thread> v(m);
	for (int i = 0; i < m; i++)
	{  //移动赋值给vector中的线程
		v[i] = thread([&]() {
		for (int i = 0; i < n; ++i)
			{
				//mtx.lock();
				LockGuard<mutex> lk(mtx);
				//库里面的
				//lock_guard<mutex> lk(mtx);
				std::cout << this_thread::get_id() << ":" << i << endl;
				std::this_thread::sleep_for(std::chrono::milliseconds(100));
				++x;
				//mtx.unlock();
			}
			});
	}
	for (auto& t : v)
	{
		t.join();
	}
	std::cout << x << endl;
	return 0;
}
try_lock
返回一个bool值,有人锁返回false
ref
强制让接收的地方变成左值引用
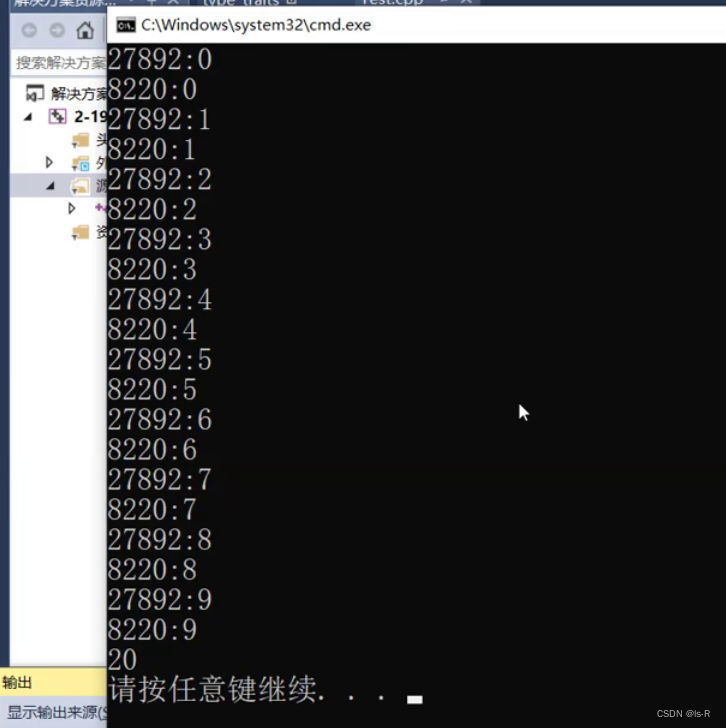
使用lambda可有同样效果
#include <iostream>
#include <mutex>
using namespace std;

int main()
{
	mutex mtx;
	int x = 0;
	int n = 10;
	thread t1([&]() {
		for (int i = 0; i < n; ++i)
		{
			mtx.lock();

			cout << this_thread::get_id() << ":" << i << endl;
			std::this_thread::sleep_for(std::chrono::milliseconds(100));
			++x;
			mtx.unlock();
		}
		});
	thread t2([&]() {
		for (int i = 0; i < n; ++i)
		{
			mtx.lock();

			cout << this_thread::get_id() << ":" << i << endl;
			std::this_thread::sleep_for(std::chrono::milliseconds(100));
			++x;
			mtx.unlock();
		}
		});

	t1.join();
	t2.join();
	cout << x << endl;
	return 0;
}
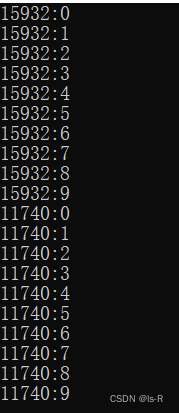

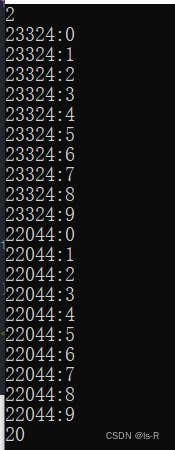
也可以用vector创建多个对象
#include <iostream>
#include <mutex>
#include <vector>
using namespace std;

int main()
{
	mutex mtx;
	int x = 0;
	int n = 10;
	int m;
	cin >> m;
	vector<thread> v;
	v.resize(m);
	//也可以不用reszie
	//vector<thread> v(m);
	for (int i = 0; i < m; i++)
	{  //移动赋值给vector中的线程
		v[i] = thread([&]() {
		for (int i = 0; i < n; ++i)
			{
				mtx.lock();

				std::cout << this_thread::get_id() << ":" << i << endl;
				std::this_thread::sleep_for(std::chrono::milliseconds(100));
				++x;
				mtx.unlock();
			}
			});
	}
	for (auto& t : v)
	{
		t.join();
	}
	std::cout << x << endl;
	return 0;
}
原子操作cas
CAS(Compare and Swap)是一种原子操作,用于在多线程环境中实现对共享变量的原子更新。CAS操作包括两个步骤:比较和交换。
在C++中,可以使用std::atomic模板类来实现CAS操作。std::atomic提供了一系列原子操作函数,其中包括compare_exchange_weak和compare_exchange_strong函数,用于实现CAS操作。
下面是一个示例代码,演示了如何使用CAS操作来更新共享变量:
#include <iostream>
#include <atomic>

int main() {
    std::atomic<int> value(0);

    int expected = 0;
    int new_value = 1;

    // 使用CAS操作尝试将value的值从expected更新为new_value
    bool success = value.compare_exchange_weak(expected, new_value);

    if (success) {
        std::cout << "CAS operation succeeded" << std::endl;
    } else {
        std::cout << "CAS operation failed" << std::endl;
    }

    return 0;
}
在上述代码中,我们首先创建了一个std::atomic<int>对象value,并将其初始值设置为0。然后,我们定义了两个变量expected和new_value,分别表示期望的值和要更新的新值。
接下来,我们使用value.compare_exchange_weak(expected, new_value)函数尝试将value的值从expected更新为new_value。如果CAS操作成功,compare_exchange_weak函数会返回true,否则返回false。
最后,我们根据CAS操作的结果输出相应的消息。
请注意,CAS操作是一种无锁的并发控制机制,可以避免使用互斥锁带来的性能开销。但需要注意的是,CAS操作并不是适用于所有情况,它在某些场景下可能存在ABA问题等特定限制。因此,在使用CAS操作时需要仔细考虑其适用性和正确性。
并行,

#include <atomic>
#include <iostream>
#include <mutex>
#include <vector>
#include <atomic>
using namespace std;

int main()
{
	mutex mtx;
	atomic<int> x = 0;
	int n = 1000000;
	int m;
	cin >> m;
	vector<thread> v;
	v.resize(m);
	for (int i = 0; i < m; i++)
	{  //移动赋值给vector中的线程
		v[i] = thread([&]() {
		for (int i = 0; i < n; ++i)
			{
				//mtx.lock();

				//std::cout << this_thread::get_id() << ":" << i << endl;
				//std::this_thread::sleep_for(std::chrono::milliseconds(100));
				++x;
				//mtx.unlock();
			}
			});
	}
	for (auto& t : v)
	{
		t.join();
	}
	std::cout << x << endl;
	return 0;
}

yield
条件没有准备好,让出去cpu
俩个线程交错打印1-100,一个打印奇数,一个打印偶数
//俩个线程交错打印1-100,一个打印奇数,一个打印偶数
int main()
{
	int i = 0;
	int n = 100;
	thread t1([&]() {
		while(i < n)
		{
			while (i % 2 != 0)
			{
				this_thread::yield();
			}
			cout << this_thread::get_id() << ":" << i << endl;
			i += 1;
		}
		});
	thread t2([&]() {
		while(i < n)
		{
			while (i % 2 == 0)
			{
				this_thread::yield();
			}
			cout << this_thread::get_id() << ":" << i << endl;
			i += 1;
		}
		});
	t1.join();
	t2.join();
	return 0;
}
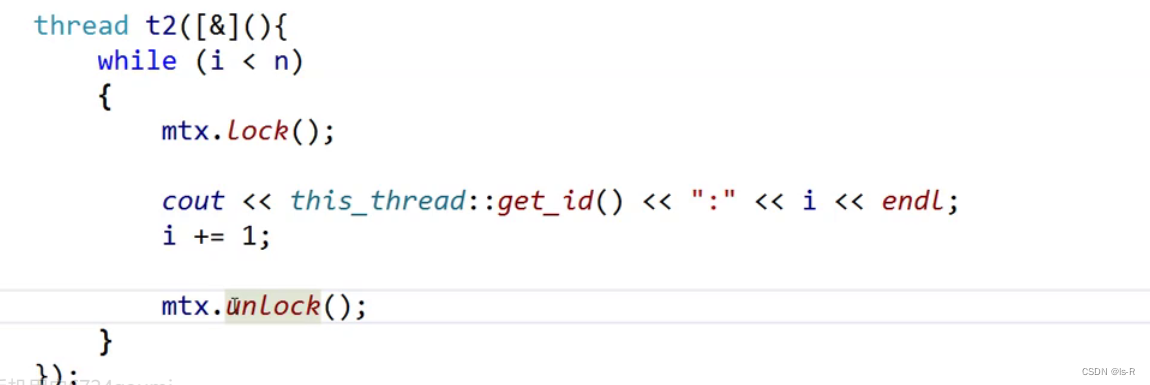
也可以这样,但是这样写会有隐患:中间一旦停顿就会有线程连续运行。或者线程二创建的慢了一点也会有连续运行
使用wait和unique_wait ,一定是t2先运行
#include <iostream>
#include <mutex>
#include <vector>
#include <atomic>
using namespace std;


//俩个线程交错打印1-100,一个打印奇数,一个打印偶数
int main()
{
	mutex mtx;
	condition_variable cv;
	bool ready = true;
	int i = 0;
	int n = 100;
	thread t1([&]() {
		while(i < n)
		{
			unique_lock<mutex> lock(mtx);
			cv.wait(lock, [&ready]() {return !ready; });

			cout << this_thread::get_id() << ":" << i << endl;
			i += 1;
			ready = true;

			cv.notify_one();
		}
		});
	thread t2([&]() {
		while(i < n)
		{
			unique_lock<mutex> lock(mtx);
			cv.wait(lock, [&ready]() {return ready; });

			cout << this_thread::get_id() << ":" << i << endl;
			i += 1;
			ready = false;

			cv.notify_one();
		}
		});

	this_thread::sleep_for(chrono::seconds(3));
	cout << "t1: " << t1.get_id() << endl;
	cout << "t2: " << t2.get_id() << endl;
	t1.join();
	t2.join();
	return 0;
}
14664:0
15912:1
14664:2
15912:3
14664:4
15912:5
14664:6
15912:7
14664:8
15912:9
14664:10
15912:11
14664:12
15912:13
14664:14
15912:15
14664:16
15912:17
14664:18
15912:19
14664:20
15912:21
14664:22
15912:23
14664:24
15912:25
14664:26
15912:27
14664:28
15912:29
14664:30
15912:31
14664:32
15912:33
14664:34
15912:35
14664:36
15912:37
14664:38
15912:39
14664:40
15912:41
14664:42
15912:43
14664:44
15912:45
14664:46
15912:47
14664:48
15912:49
14664:50
15912:51
14664:52
15912:53
14664:54
15912:55
14664:56
15912:57
14664:58
15912:59
14664:60
15912:61
14664:62
15912:63
14664:64
15912:65
14664:66
15912:67
14664:68
15912:69
14664:70
15912:71
14664:72
15912:73
14664:74
15912:75
14664:76
15912:77
14664:78
15912:79
14664:80
15912:81
14664:82
15912:83
14664:84
15912:85
14664:86
15912:87
14664:88
15912:89
14664:90
15912:91
14664:92
15912:93
14664:94
15912:95
14664:96
15912:97
14664:98
15912:99
14664:100
t1: 15912
t2: 14664

F:\as\c++\1\thread\Debug\thread.exe (进程 8952)已退出,代码为 0。
按任意键关闭此窗口. . .
share_ptr的线程是安全的吗
std::shared_ptr是C++标准库中提供的智能指针类型之一,用于管理动态分配的对象的生命周期。std::shared_ptr提供了引用计数的机制,可以在多个指针之间共享所管理的对象。
在多线程环境下,std::shared_ptr的线程安全性取决于对其访问的同步措施。如果多个线程同时访问同一个std::shared_ptr对象,而且至少有一个线程对其进行写操作(例如重置、交换、析构等),那么就需要使用适当的同步机制来保证线程安全。
一种常见的同步机制是使用互斥锁(std::mutex)来保护对std::shared_ptr的访问。通过在对std::shared_ptr进行读写操作时加锁和解锁,可以确保在同一时间只有一个线程能够对其进行修改。这样可以避免多个线程同时对引用计数进行修改,从而保证线程安全。
另一种线程安全的方式是使用std::atomic模板类来管理引用计数。std::atomic提供了原子操作,可以确保对引用计数的修改是原子的,从而避免竞争条件和数据竞争。
需要注意的是,只有对std::shared_ptr对象本身的访问需要进行同步,而对于所管理的对象的访问则不需要。std::shared_ptr内部会自动管理引用计数,并在引用计数为零时销毁所管理的对象。
下面是一个示例代码,演示了如何使用互斥锁来保证std::shared_ptr的线程安全:
#include <iostream>
#include <memory>
#include <mutex>
#include <thread>

std::shared_ptr<int> sharedData;  // 共享的std::shared_ptr
std::mutex mtx;  // 互斥锁

void threadFunc() {
    std::lock_guard<std::mutex> lock(mtx);  // 加锁

    if (sharedData) {
        // 对共享数据进行操作
        *sharedData += 1;
        std::cout << "Thread ID: " << std::this_thread::get_id() << ", Value: " << *sharedData << std::endl;
    }
}

int main() {
    sharedData = std::make_shared<int>(0);

    std::thread t1(threadFunc);
    std::thread t2(threadFunc);

    t1.join();
    t2.join();

    return 0;
}
在上述代码中,我们首先定义了一个全局的std::shared_ptr<int>对象sharedData,用于多个线程之间共享数据。同时,我们还定义了一个std::mutex对象mtx,用于保护对sharedData的访问。
在threadFunc函数中,我们首先使用std::lock_guard来对mtx进行加锁,以确保同一时间只有一个线程能够访问共享数据。然后,我们对sharedData进行操作,这里只是简单地将其值加1,并输出线程ID和新的值。
在main函数中,我们首先使用std::make_shared来创建一个初始值为0的sharedData对象。然后,我们创建两个线程t1和t2,分别执行threadFunc函数。最后,我们等待两个线程执行完成,然后退出程序。
通过使用互斥锁来保护对sharedData的访问,我们可以确保在同一时间只有一个线程能够修改共享数据,从而保证了线程安全性。## 懒汉和饿汉的线程安全问题
懒汉模式和饿汉模式的线程安全问题
懒汉模式和饿汉模式是两种常见的单例模式实现方式。在多线程环境下,它们都存在线程安全问题,需要采取适当的措施来解决。
懒汉模式指的是在首次使用时创建单例对象,而饿汉模式指的是在类加载时就创建单例对象。下面分别介绍它们的线程安全问题以及解决方法:
-
懒汉模式的线程安全问题:
在懒汉模式中,如果多个线程同时访问到单例对象还未创建的情况下,可能会导致多个线程都创建了单例对象,从而破坏了单例的唯一性。这是因为懒汉模式没有进行任何的同步措施。解决方法:
- 使用互斥锁(
std::mutex)来保护对单例对象的访问,通过在创建单例对象时加锁和解锁,确保只有一个线程能够创建单例对象。但是这种方式会引入锁的开销,可能影响性能。 - 使用双重检查锁(Double-Checked Locking)来减少加锁的次数。在加锁前后都进行一次检查,以减少锁的开销。但是需要注意的是,双重检查锁需要使用原子操作来保证线程安全。
- 使用互斥锁(
-
饿汉模式的线程安全问题:
在饿汉模式中,单例对象在类加载时就被创建,因此不存在多个线程同时创建单例对象的问题。但是,如果单例对象的创建过程比较耗时,可能会导致程序启动时的延迟。解决方法:
- 将单例对象的创建过程延迟到首次使用时。可以使用懒汉模式来实现延迟加载,通过在懒汉模式中使用互斥锁或双重检查锁来保证线程安全。
需要注意的是,以上解决方法都是基于互斥锁或原子操作来保证线程安全的。另外,C++11引入了std::call_once函数,可以更方便地实现单例模式的线程安全。std::call_once可以保证在多线程环境下只执行一次指定的函数,可以用来延迟创建单例对象。
互斥锁
- 互斥锁示例:
#include <iostream>
#include <mutex>

class Singleton {
private:
    static Singleton* instance;
    static std::mutex mtx;

    Singleton() {}

public:
    static Singleton* getInstance() {
        std::lock_guard<std::mutex> lock(mtx);
        if (instance == nullptr) {
            instance = new Singleton();
        }
        return instance;
    }
};

Singleton* Singleton::instance = nullptr;
std::mutex Singleton::mtx;

int main() {
    Singleton* s1 = Singleton::getInstance();
    Singleton* s2 = Singleton::getInstance();

    std::cout << "s1 address: " << s1 << std::endl;
    std::cout << "s2 address: " << s2 << std::endl;

    return 0;
}
在上述代码中,我们使用了一个静态变量instance来保存单例对象,同时使用了一个静态互斥锁mtx来保护对instance的访问。在getInstance函数中,我们首先使用std::lock_guard来对mtx进行加锁,以确保同一时间只有一个线程能够创建单例对象。然后,我们检查instance是否为空,如果为空,则创建一个新的单例对象。最后,我们返回instance指针。
双检查加锁
- 双重检查锁示例:
#include <iostream>
#include <mutex>

class Singleton {
private:
    static Singleton* instance;
    static std::mutex mtx;

    Singleton() {}

public:
    static Singleton* getInstance() {
        if (instance == nullptr) {
            std::lock_guard<std::mutex> lock(mtx);
            if (instance == nullptr) {
                instance = new Singleton();
            }
        }
        return instance;
    }
};

Singleton* Singleton::instance = nullptr;
std::mutex Singleton::mtx;

int main() {
    Singleton* s1 = Singleton::getInstance();
    Singleton* s2 = Singleton::getInstance();

    std::cout << "s1 address: " << s1 << std::endl;
    std::cout << "s2 address: " << s2 << std::endl;

    return 0;
}
在上述代码中,我们在getInstance函数中进行了双重检查。首先,我们检查instance是否为空,如果为空,则加锁并再次检查instance是否为空。这样可以减少加锁的次数,提高性能。注意,双重检查锁需要使用原子操作来保证线程安全。在C++11之前,可以使用std::atomic来实现原子操作。
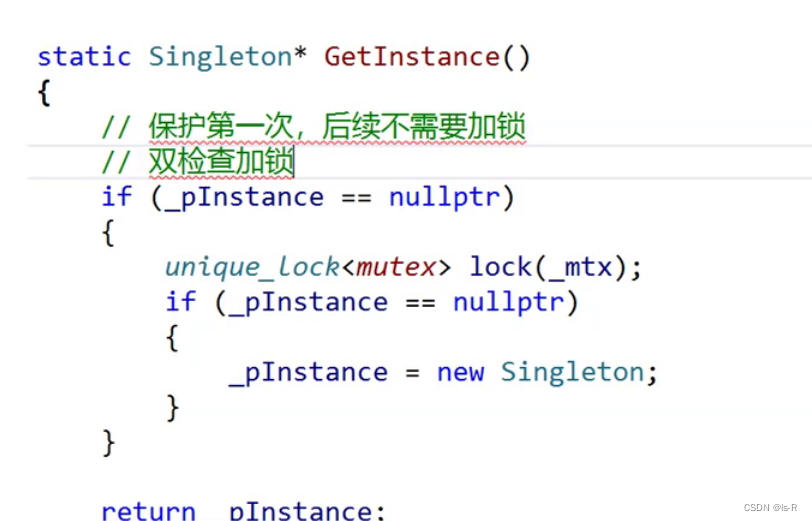
在上述代码中,双重检查锁的原子操作是对instance指针的赋值操作。具体来说,在双重检查锁的第二个检查中,当instance为空时,使用互斥锁进行加锁,然后再次检查instance是否为空,并在加锁的临界区内进行赋值操作。这个赋值操作需要保证原子性,以确保只有一个线程能够成功创建单例对象。
在示例代码中,这个原子操作是由互斥锁std::mutex提供的。通过加锁和解锁操作,互斥锁保证了对instance的赋值操作是原子的,即同一时间只有一个线程能够执行这个操作。这样就保证了线程安全性,避免了多个线程同时创建单例对象的问题。
内存栅栏
内存栅栏(Memory Barrier),也称为内存屏障,是一种硬件或软件机制,用于控制指令的执行顺序和内存访问的可见性。它可以确保在某个点之前的所有操作都完成,同时也可以防止在某个点之后的操作提前执行。
内存栅栏有两个主要的作用:
-
顺序一致性(Sequential Consistency):内存栅栏可以保证在栅栏之前的所有操作都完成后,栅栏之后的操作才能开始执行。这样可以确保指令的执行顺序和程序的逻辑顺序一致,避免了乱序执行带来的问题。
-
内存可见性(Memory Visibility):内存栅栏可以确保在栅栏之前的所有写操作都对其他线程可见。这样可以保证在多线程环境下,一个线程对共享数据的修改在栅栏之前对其他线程可见,避免了数据不一致的问题。
内存栅栏的使用可以提高多线程程序的正确性和性能。在并发编程中,内存栅栏通常与原子操作、互斥锁等同步机制一起使用,以确保线程之间的协调和数据的一致性。
下面是一个简单的例子,说明内存栅栏的作用:
#include <iostream>
#include <atomic>
#include <thread>

std::atomic<int> x = {0};
std::atomic<int> y = {0};
int data = 0;

void thread1() {
    x.store(1, std::memory_order_relaxed);
    std::atomic_thread_fence(std::memory_order_release);
    y.store(1, std::memory_order_relaxed);
}

void thread2() {
    while (y.load(std::memory_order_relaxed) != 1) {
        std::this_thread::yield();
    }
    std::atomic_thread_fence(std::memory_order_acquire);
    std::cout << "data: " << data << std::endl;
    std::cout << "x: " << x.load(std::memory_order_relaxed) << std::endl;
}

int main() {
    std::thread t1(thread1);
    std::thread t2(thread2);
    t1.join();
    t2.join();
    return 0;
}
在这个例子中,有两个线程t1和t2。线程t1首先将x设置为1,然后在一个内存栅栏之后将y设置为1。线程t2在一个循环中等待y被设置为1,然后通过一个内存栅栏获取x的值并输出。
在这个例子中,内存栅栏的作用是确保t1中的写操作在t2中可见。在t1中,通过内存栅栏std::atomic_thread_fence(std::memory_order_release),它保证在栅栏之前的所有写操作都在栅栏之后的操作之前完成。在t2中,通过内存栅栏std::atomic_thread_fence(std::memory_order_acquire),它保证在栅栏之前的所有读操作都在栅栏之后的操作之后执行。
如果没有内存栅栏,t2可能会在y.load()之前读取到1,但在x.load()之前读取到0,导致输出结果不一致。通过使用内存栅栏,我们可以确保在t2中读取y之后,x的值已经被t1写入,并且在t2中读取x之前,y的值已经被t1写入,从而保证了输出结果的一致性。


