Opencv将数据保存到xml、yaml / 从xml、yaml读取数据
- Opencv提供了读写
xml、yaml的类实现:
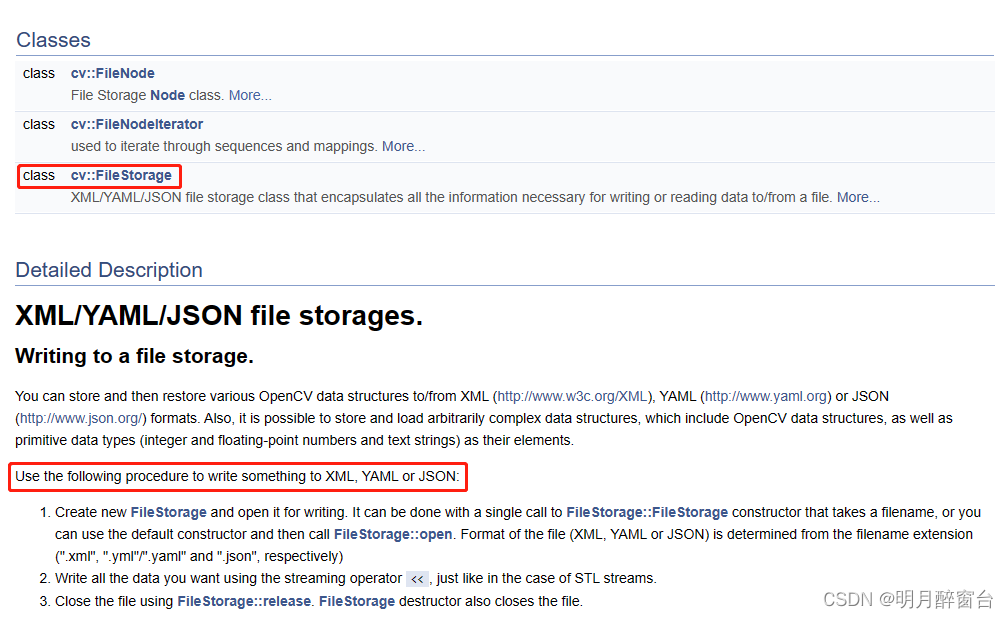
- 本文重点参考:https://blog.csdn.net/cd_yourheart/article/details/122705776?spm=1001.2014.3001.5506,并将给出文件读写的具体使用实例。
1. 官方例程
1.1 写数据
#include "opencv2/core.hpp"
#include <time.h>
using namespace cv;
int main(int, char** argv)
{
     FileStorage fs("test.yml", FileStorage::WRITE);
     fs << "frameCount" << 5;
     time_t rawtime; time(&rawtime);
     fs << "calibrationDate" << asctime(localtime(&rawtime));
     Mat cameraMatrix = (Mat_<double>(3,3) << 1000, 0, 320, 0, 1000, 240, 0, 0, 1);
     Mat distCoeffs = (Mat_<double>(5,1) << 0.1, 0.01, -0.001, 0, 0);
     fs << "cameraMatrix" << cameraMatrix << "distCoeffs" << distCoeffs;
     fs << "features" << "[";
     for( int i = 0; i < 3; i++ )
     {
         int x = rand() % 640;
         int y = rand() % 480;
         uchar lbp = rand() % 256;
         fs << "{:" << "x" << x << "y" << y << "lbp" << "[:";
         for( int j = 0; j < 8; j++ )
             fs << ((lbp >> j) & 1);
             fs << "]" << "}";
     }
     fs << "]";
     fs.release();
     return 0;
}
output :
%YAML:1.0
frameCount: 5
calibrationDate: "Fri Jun 17 14:09:29 2011\n"
cameraMatrix: !!opencv-matrix
 rows: 3
 cols: 3
 dt: d
 data: [ 1000., 0., 320., 0., 1000., 240., 0., 0., 1. ]
distCoeffs: !!opencv-matrix
 rows: 5
 cols: 1
 dt: d
 data: [ 1.0000000000000001e-01, 1.0000000000000000e-02,
 -1.0000000000000000e-03, 0., 0. ]
features:
 - { x:167, y:49, lbp:[ 1, 0, 0, 1, 1, 0, 1, 1 ] }
 - { x:298, y:130, lbp:[ 0, 0, 0, 1, 0, 0, 1, 1 ] }
 - { x:344, y:158, lbp:[ 1, 1, 0, 0, 0, 0, 1, 0 ] }
1.2 读数据
FileStorage fs2("test.yml", FileStorage::READ);

// first method: use (type) operator on FileNode.
int frameCount = (int)fs2["frameCount"];
String date;

// second method: use FileNode::operator >>
fs2["calibrationDate"] >> date;
Mat cameraMatrix2, distCoeffs2;
fs2["cameraMatrix"] >> cameraMatrix2;
fs2["distCoeffs"] >> distCoeffs2;
cout << "frameCount: " << frameCount << endl
 << "calibration date: " << date << endl
 << "camera matrix: " << cameraMatrix2 << endl
 << "distortion coeffs: " << distCoeffs2 << endl;
FileNode features = fs2["features"];
FileNodeIterator it = features.begin(), it_end = features.end();
int idx = 0;
std::vector<uchar> lbpval;

// iterate through a sequence using FileNodeIterator
for( ; it != it_end; ++it, idx++ )
{
     cout << "feature #" << idx << ": ";
     cout << "x=" << (int)(*it)["x"] << ", y=" << (int)(*it)["y"] << ", lbp: (";

     // you can also easily read numerical arrays using FileNode >> std::vector operator.
     (*it)["lbp"] >> lbpval;
     for( int i = 0; i < (int)lbpval.size(); i++ )
         cout << " " << (int)lbpval[i];
         cout << ")" << endl;
}
fs2.release();
2. 读写xml
#include <iostream>
#include "opencv2/opencv.hpp"

using namespace std;

#define WRITE_OR_READ

int main() {
//===========将数据写入到xml文件中================
#ifdef WRITE_OR_READ
    string name = "insomnia";
    int age = 18;
    float height = 1.83;
    char sex = 'M';
    cv::Mat matrix_eye = cv::Mat::eye(3, 3, CV_64F);

    cv::FileStorage fs("./test.xml", cv::FileStorage::WRITE);//会覆盖当前文件,不存在则新建文件
    if (fs.isOpened())
    {
        fs << "name" << name << "age" << age << "height" << height << "sex" << sex;//可以连续写入
        fs << "matrix_eye" << matrix_eye;//也可以依次写入
        fs.release();//release after used
    }
//===========从xml文件中读取数据================
#else
    string name;
    int age;
    float height;
    char sex;
    cv::Mat matrix_eye;

    cv::FileStorage fs("./test.xml", cv::FileStorage::READ);
    if (fs.isOpened()) {
        fs["name"] >> name;
        fs["age"] >> age;
        fs["height"] >> height;
        int temp;
        fs["sex"] >> temp;//这里不能直接读到char,所以转换了一下
        sex = (char)temp;
        fs["matrix_eye"] >> matrix_eye;

        fs.release();

        cout << "name: " << name << endl;
        cout << "age: " << age << endl;
        cout << "height: " << height << endl;
        cout << "sex: " << sex << endl;
        cout << "matrix_eye: " << endl << matrix_eye << endl;

        cout << "matrix_eye.size().height: " << matrix_eye.size().height << endl;
        cout << "matrix_eye.at<double>(1, 0): " << matrix_eye.at<double>(1, 0) << endl;
    }
#endif

    return 0;
}
将数据写入到xml文件后,打开查看一下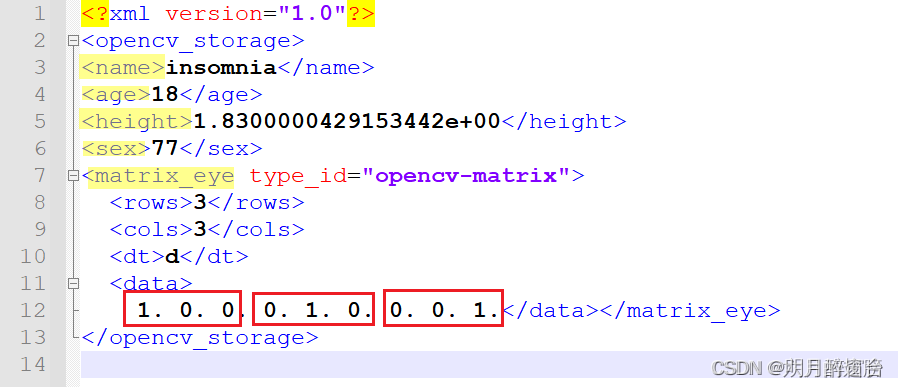
格式是自动生成的,只是将数据填充了进去。可以看到第一行是xml版本信息,不用考虑。第二行和最后一行是最外层的标签。
然后所有保存的数据都是一个并列的关系,同等级。只是像Mat这种数据类型,又有细分属性而已。
从xml文件中读取一下数据,看下输出结果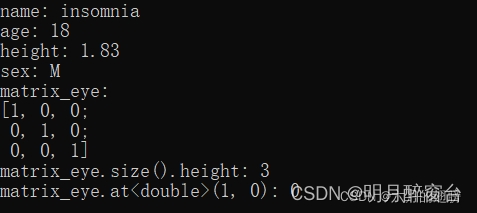
3. 读写yaml
#include<opencv2/opencv.hpp>
#include<iostream>

using namespace std;
using namespace cv;

//#define WRITE_OR_READ

int main()
{
#ifdef WRITE_OR_READ
	//1.创建文件
	cv::FileStorage fwrite("./test.yaml", cv::FileStorage::WRITE);
	//2.写入数据
	string name = "insomnia";
	int age = 18;
	float height = 1.83;
	char sex = 'M';
	cv::Mat matrix_eye = cv::Mat::eye(3, 3, CV_64F);
	fwrite << "name " << name;
	fwrite << "age " << age;
	fwrite << "height " << height;
	fwrite << "sex " << sex;
	fwrite << "matrix_eye " << matrix_eye;
	//3.关闭文件
	fwrite.release();
	return 0;
#else
	//1.读取文件指针
	string strSettingsFile = "./test.yaml";
	cv::FileStorage fread(strSettingsFile.c_str(), cv::FileStorage::READ);

	//2.判断是否打开成功
	if (!fread.isOpened())
	{
		cout << "Failed to open settings file at: " << strSettingsFile << endl;
		return 0;
	}
	else cout << "success to open file at: " << strSettingsFile << endl;

	//3.打开文件后读取数据
	string name;
	int age;
	float height;
	char sex;
	cv::Mat matrix_eye;

	fread["name"] >> name;
	fread["age"] >> age;
	fread["height"] >> height;
	int temp;
	fread["sex"] >> temp;
	sex = (char)temp;
	fread["matrix_eye"] >> matrix_eye;
	cout << "name=" << name << endl;
	cout << "age=" << age << endl;
	cout << "height=" << height << endl;
	cout << "sex=" << sex << endl;
	cout << "matrix_eye=" << endl << matrix_eye << endl;

	cout << matrix_eye.size().height << endl;

	//4.关闭文件
	fread.release();
	return 0;
#endif

}
保存的yaml文件
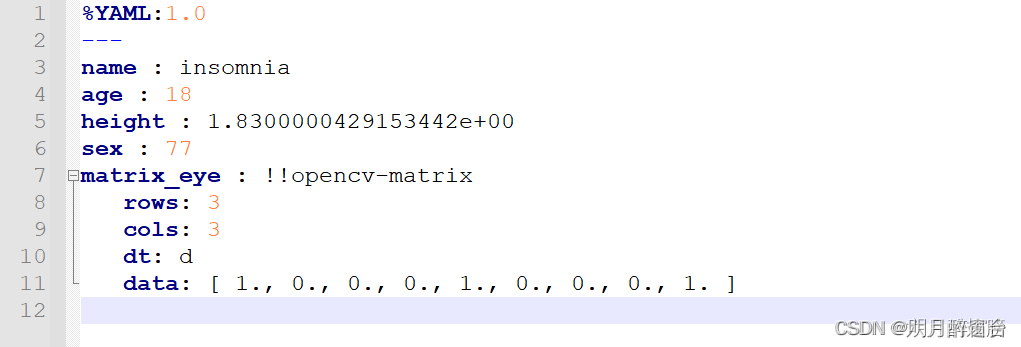
读取文件的结果
4. 保存矩阵与点集
//写数据
cv::FileStorage fs;
std::string label_ = "abc.xml";
fs.open(label_.c_str(), cv::FileStorage::WRITE);

std::string str_ = "image" + std::to_string(i+1);
cv::Mat _pts(p_result); //p_result define:std::vector<cv::Point2f>p_result;
fs << str_ << _pts;
fs.release();

//**************************
//读数据
cv::FileStorage fs;
fs.open( "abc.xml", cv::FileStorage::READ);
cv::Mat m_pts;
fs[str] >> m_pts;
std::vector<cv::Point2f>pts;
for (int i = 1; i < m_pts.rows; ++i)
{
	cv::Point2f _pt(m_pts.ptr<float>(i, 0)[0], m_pts.ptr<float>(i, 0)[1]);
	pts.push_back(_pt);
	std::cout << _pt << "\n";
}
![Android多渠道打包+自动签名工具 [原创]](https://img-blog.csdnimg.cn/003ca8b31e2a46e8ba5152dc353a09c2.png)



![linux鲁班猫代码初尝试[编译镜像][修改根文件系统重编译]](https://img-blog.csdnimg.cn/56f79db9e6c94541afc4f36b13c7f429.png)

