从Mybatis到Mybatis-Plus
- Mybatis的入门
- Mybatis的配置解析
- 核心配置文件
- 分页配置
- 注解开发
- mybatis的执行流程
- 多对一
- 一对多
- 动态SQL
- mybatis 的缓存
- Mybatis-plus
- 快速入门
- mybatis-plus的框架结构图
- 分页查询和删除
- 执行SQL分析打印
- 条件构造器Wrapper
- 代码生成器
Mybatis的入门
环境,jdk11,maven3.8.1,mysql8.0
MyBatis 是一款优秀的持久层框架,它支持自定义 SQL、存储过程以及高级映射。MyBatis 免除了几乎所有的JDBC 代码以及设置参数和获取结果集的工作。MyBatis 可以通过简单的 XML 或注解来配置和映射原始类型、接口和 Java POJO为数据库中的记录。
mybatis3中文文档
导入maven依赖
		<dependency>
            <groupId>junit</groupId>
            <artifactId>junit</artifactId>
            <version>4.13</version>
        </dependency>

		<dependency>
            <groupId>org.mybatis</groupId>
            <artifactId>mybatis</artifactId>
            <version>3.5.7</version>
        </dependency>

        <dependency>
            <groupId>mysql</groupId>
            <artifactId>mysql-connector-java</artifactId>
            <version>8.0.25</version>
        </dependency>
MybatisUtils 获取 从XML中构建 SqlSessionFactory
public class MybatisUtils {

    private static SqlSessionFactory sqlSessionFactory;

    static {
        try {
            String resource = "mybatis-config.xml";
            InputStream inputStream = Resources.getResourceAsStream(resource);
            sqlSessionFactory = new SqlSessionFactoryBuilder().build(inputStream);
        } catch (IOException e) {
            e.printStackTrace();
        }
    }

    public static SqlSession getSqlSession(){
        return sqlSessionFactory.openSession();
    }
}
mybatis-config.xml
<?xml version="1.0" encoding="UTF-8" ?>
<!DOCTYPE configuration
PUBLIC "-//mybatis.org//DTD Config 3.0//EN"
"http://mybatis.org/dtd/mybatis-3-config.dtd">
<configuration>
<environments default="development">
<environment id="development">
<transactionManager type="JDBC"/>
<dataSource type="POOLED">
<property name="driver" value="com.mysql.cj.jdbc.Driver"/>
<property name="url" value="jdbc:mysql://localhost:3306/mybatis?useSSL=false&useUnicode=true&characterEncoding=UTF-8&allowPublicKeyRetrieval=true"/>
<property name="username" value="root"/>
<property name="password" value="123456"/>
</dataSource>
</environment>
</environments>
<mappers>
<mapper resource="com/mao/dao/UserMapper.xml"></mapper>
</mappers>
</configuration>
UserMapper 也就是UserDao层的接口
public interface UserMapper {
    // 查询全部用户 getUserList
    List<User> getUserlist();
}
编写对应的xml文件,编写sql语句
<?xml version="1.0" encoding="UTF-8" ?>
<!DOCTYPE mapper
        PUBLIC "-//mybatis.org//DTD Mapper 3.0//EN"
        "http://mybatis.org/dtd/mybatis-3-mapper.dtd">

<mapper namespace="com.mao.dao.UserMapper">
    <select id="getUserlist" resultType="com.mao.pojo.User">
        select * from user;
    </select>
</mapper>
测试类
    @Test
    public void test(){
        SqlSession sqlSession = MybatisUtils.getSqlSession();
        UserMapper mapper = sqlSession.getMapper(UserMapper.class);
        List<User> userList = mapper.getUserlist();
        for (User user : userList) {
            System.out.println(user);
        }
        sqlSession.close();
    }
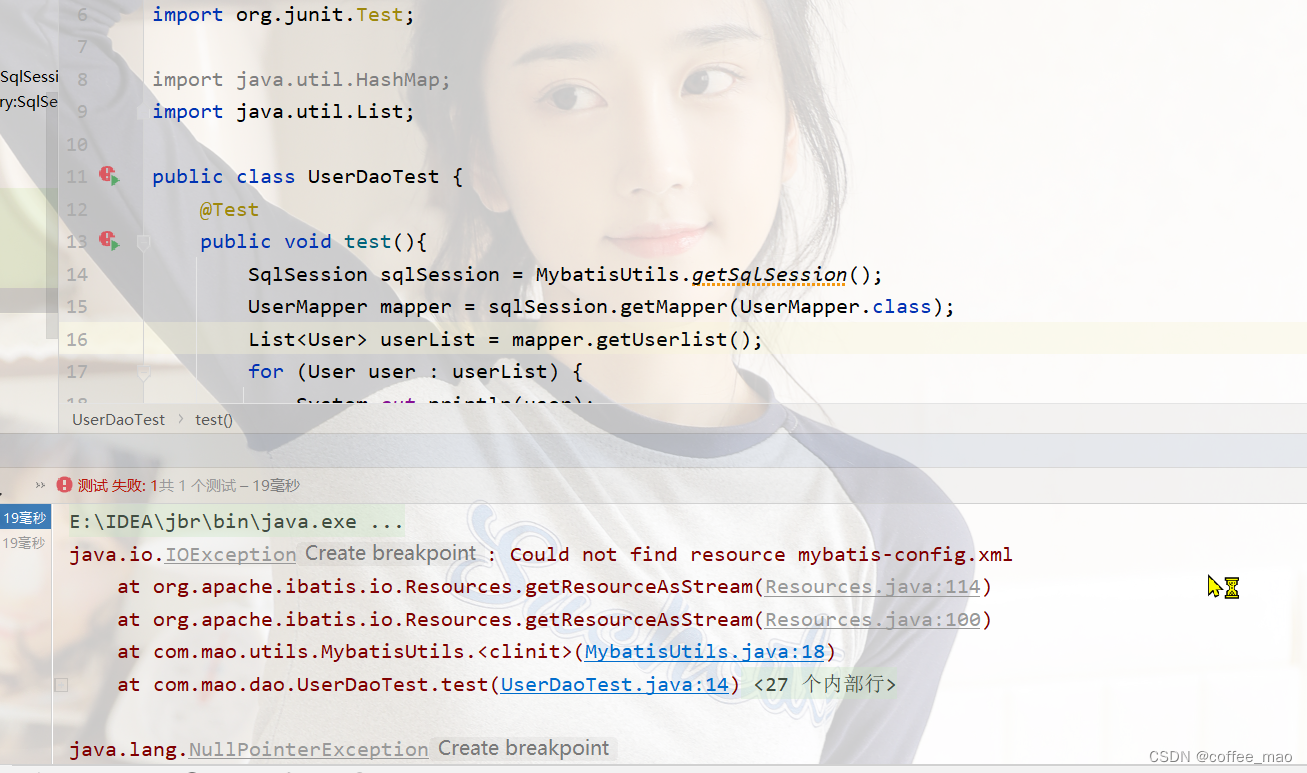
存在问题,maven 的资源过滤问题
java.io.IOException: Could not find resource mybatis-config.xml
	at org.apache.ibatis.io.Resources.getResourceAsStream(Resources.java:114)
	at org.apache.ibatis.io.Resources.getResourceAsStream(Resources.java:100)
	at com.mao.utils.MybatisUtils.<clinit>(MybatisUtils.java:18)
	at com.mao.dao.UserDaoTest.test(UserDaoTest.java:14)
解决问题,就是maven的资源导出问题
    <build>
        <resources>
            <resource>
                <directory>src/main/resources</directory>
                <includes>
                    <include>**/*.properties</include>
                    <include>**/*.xml</include>
                </includes>
                <filtering>true</filtering>
            </resource>
            <resource>
                <directory>src/main/java</directory>
                <includes>
                    <include>**/*.properties</include>
                    <include>**/*.xml</include>
                </includes>
                <filtering>true</filtering>
            </resource>
        </resources>
    </build>
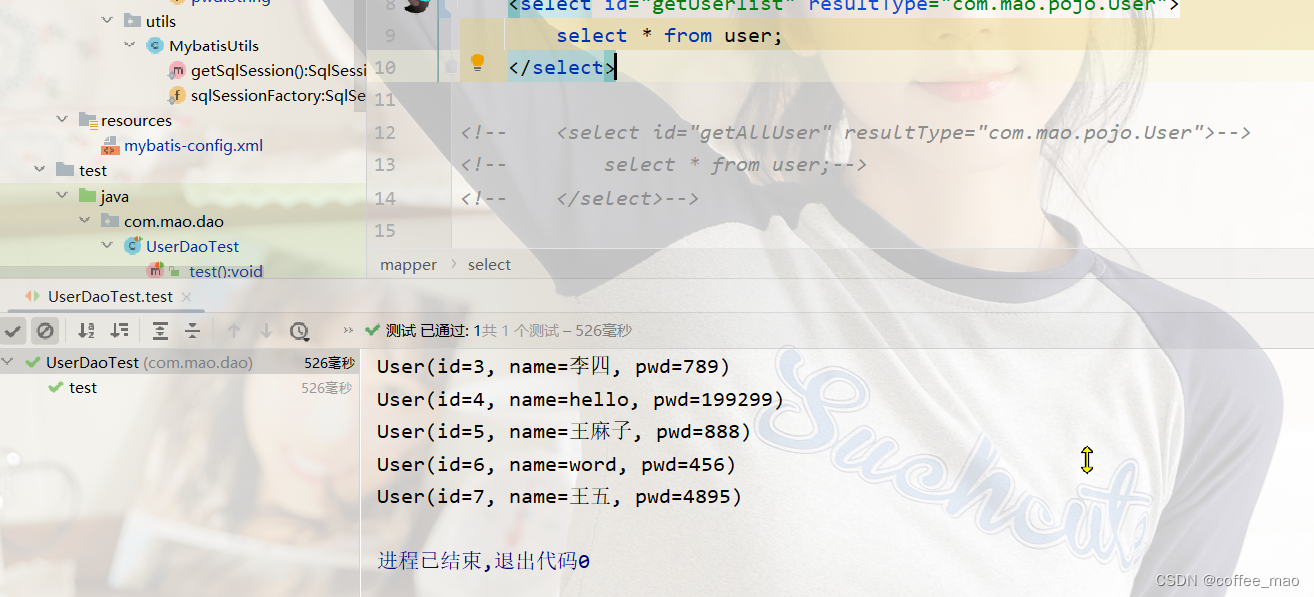
发现结果,可以正常查询。
根据id查询用户
接口方法
// 根据id查询用户
    User getUserById(int id);
mapper的SQL语句
    <select id="getUserById" parameterType="int" resultType="com.mao.pojo.User">
        select * from user where id = #{id}
    </select>
测试类
    @Test
    public void testById(){
        SqlSession sqlSession = MybatisUtils.getSqlSession();
        UserMapper mapper = sqlSession.getMapper(UserMapper.class);
        User user = mapper.getUserById(1);
        System.out.println(user);
        sqlSession.close();
    }
通过Map集合设置条件查询
接口方法
User getUserByMap(Map<String,Object> map);
SQL编写
    <select id="getUserByMap" parameterType="map" resultType="com.mao.pojo.User">
        select * from user where id = #{MapId} and name = #{name};
    </select>
测试类
    @Test
    public void getUserByMap(){
        SqlSession sqlSession = MybatisUtils.getSqlSession();
        UserMapper mapper = sqlSession.getMapper(UserMapper.class);
        HashMap<String, Object> map = new HashMap<String, Object>();
        map.put("MapId",1);
        map.put("name","mao");
        User userByMap = mapper.getUserByMap(map);
        System.out.println(userByMap);
        sqlSession.close();
    }
Mybatis的配置解析
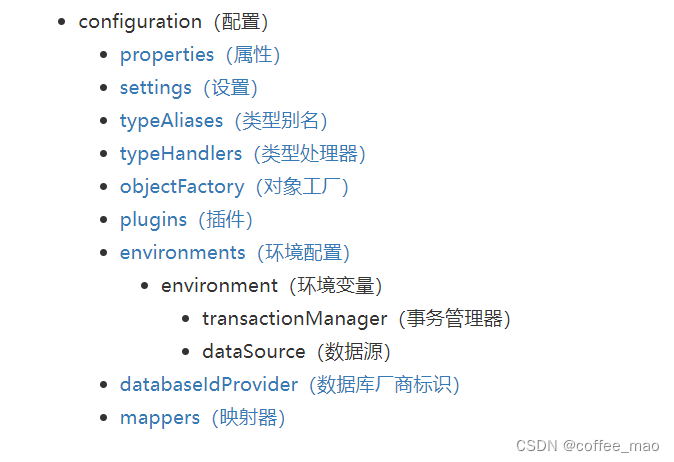
核心配置文件
自定义db.properties
driver=com.mysql.cj.jdbc.Driver
url=jdbc:mysql://localhost:3306/mybatis?useSSL=false&useUnicode=true&characterEncoding=UTF-8&allowPublicKeyRetrieval=true
username=root
password=123456
在mybatis-config.xml中加入db.properties 的属性导入,引入外部配置文件,也可以指定属性导入。优先外部的配置文件。
    <properties resource="db.properties">
        <property name="username" value="root"/>
    </properties>
typeAliases标签指向实体包的别名指向,可以通过注解@Alias("")标记,也可以通过 <typeAlias type="com.mao.pojo.User" alias="User"/>指定实体类的别名。
typeAliases中的package 会将该包下面的所有类的名字开头字母小写作为resultType的传入参数
<?xml version="1.0" encoding="UTF-8" ?>
<!DOCTYPE configuration
        PUBLIC "-//mybatis.org//DTD Config 3.0//EN"
        "http://mybatis.org/dtd/mybatis-3-config.dtd">


<configuration>

    <properties resource="db.properties">
        <property name="username" value="root"/>
    </properties>

    <typeAliases>
<!--        <typeAlias type="com.mao.pojo.User" alias="User"/>-->
        <package name="com.mao.pojo"/>
    </typeAliases>

    <environments default="development">
        <environment id="development">
            <transactionManager type="JDBC"/>
            <dataSource type="POOLED">
                <property name="driver" value="${driver}"/>
                <property name="url" value="${url}"/>
                <property name="username" value="${username}"/>
                <property name="password" value="${password}"/>
            </dataSource>
        </environment>
    </environments>

    <mappers>
        <mapper resource="com/mao/dao/UserMapper.xml"></mapper>
    </mappers>

</configuration>
设置里面的mapUnderscoreToCamelCase,用于驼峰命名的转换
cacheEnabled开启mybatis的缓存
通过class绑定mapper进行注册,接口和mapper配置文件必须同名并且在同一个包下
<mapper class="com.mao.dao.UserMapper"></mapper>
指定包扫描实现注入绑定
<package name="com.mao.dao"/>
实体类和数据库的字段不对应,建立一个resultMap对不同的字段进行映射
    <resultMap id="UserMap" type="com.mao.pojo.User">
        <result column="pwd" property="paswword"></result>
    </resultMap>
    <select id="getUserList" resultMap="UserMap">
        select * from user;
    </select>
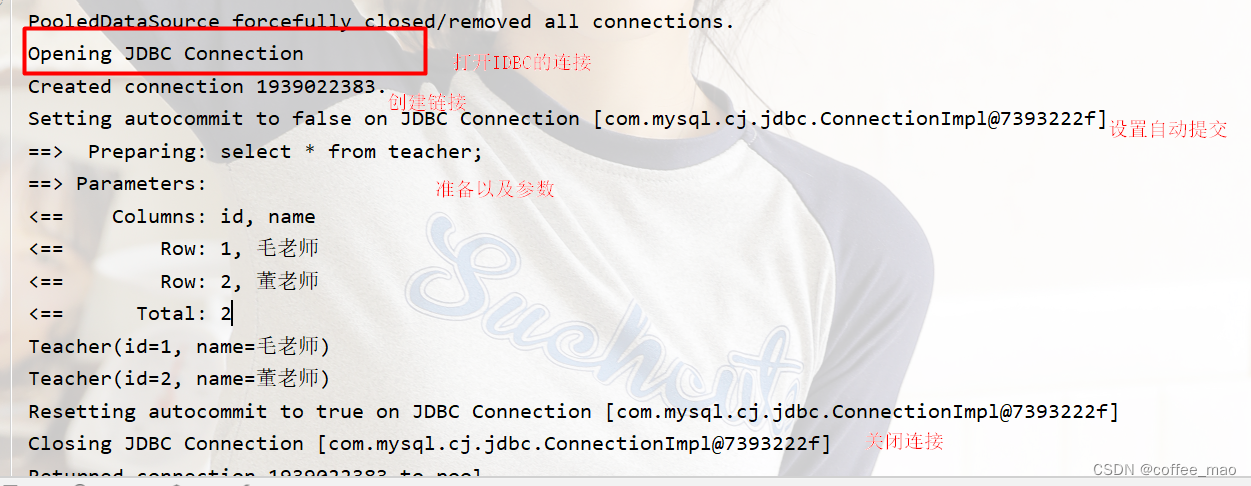
开启日志
    <settings>
        <setting name="logImpl" value="STDOUT_LOGGING"/>
    </settings>
log4j日志开启
导入依赖
        <dependency>
            <groupId>log4j</groupId>
            <artifactId>log4j</artifactId>
            <version>1.2.16</version>
        </dependency>
mybatis核心配置文件中开启log4j的配置,
    <settings>
        <setting name="logImpl" value="LOG4J"/>
    </settings>
log4j.properties 的属性配置文件
### set log levels ###
log4j.rootLogger = DEBUG , C , D , E

### console ###
log4j.appender.C = org.apache.log4j.ConsoleAppender
log4j.appender.C.Target = System.out
log4j.appender.C.layout = org.apache.log4j.PatternLayout
log4j.appender.C.layout.ConversionPattern = [mybatis_study][%p] [%-d{yyyy-MM-dd HH\:mm\:ss}] %C.%M(%L) | %m%n

### log file ###
log4j.appender.D = org.apache.log4j.DailyRollingFileAppender
log4j.appender.D.File = ../logs/mybatis_study.log
log4j.appender.D.Append = true
log4j.appender.D.Threshold = INFO
log4j.appender.D.layout = org.apache.log4j.PatternLayout
log4j.appender.D.layout.ConversionPattern = [mybatis_study][%p] [%-d{yyyy-MM-dd HH\:mm\:ss}] %C.%M(%L) | %m%n

### exception ###
log4j.appender.E = org.apache.log4j.DailyRollingFileAppender
log4j.appender.E.File = ../logs/mybatis_study_error.log
log4j.appender.E.Append = true
log4j.appender.E.Threshold = ERROR
log4j.appender.E.layout = org.apache.log4j.PatternLayout
log4j.appender.E.layout.ConversionPattern = [mybatis_study][%p] [%-d{yyyy-MM-dd HH\:mm\:ss}] %C.%M(%L) | %m%n

###mybatis show sql###
log4j.logger.com.ibatis=debug
log4j.logger.com.ibatis.common.jdbc.SimpleDataSource=debug
log4j.logger.com.ibatis.common.jdbc.ScriptRunner=debug
log4j.logger.com.ibatis.sqlmap.engine.impl.SqlMapClientDelegate=debug

log4j.logger.java.sql.Connection=debug
log4j.logger.java.sql.Statement=debug
log4j.logger.java.sql.PreparedStatement=debug
当前类的日志对象
static Logger logger = Logger.getLogger(UserDaoTest.class);
使用
logger.info("进入testTeacher");

分页配置
UserMapper接口
List<User> getUserByLimit(Map<String,Integer> map);
UserMapper.xml 配置文件的编写
    <resultMap id="UserMap" type="helloUser">
        <result column="id" property="id"/>
        <result column="name" property="name"/>
        <result column="pwd" property="password"/>
    </resultMap>
    <select id="getUserByLimit" parameterType="map" resultMap="UserMap">
        select * from user limit #{startIndex},#{pageSize};
    </select>
测试类
    @Test
    public void getUserByLimit(){
        SqlSession sqlSession = MybatisUtils.getSqlSession();
        UserMapper mapper = sqlSession.getMapper(UserMapper.class);
        HashMap<String, Integer> map = new HashMap<>();
        map.put("startIndex",1);
        map.put("pageSize",3);
        List<User> userList = mapper.getUserByLimit(map);
        for (User user : userList) {
            System.out.println(user);
        }
        sqlSession.close();
    }
RowBounds分页查询,原因SQL 语言自动提供了分页的功能,但是mybatis提供了这个工具类,采用了面向对象编程的思想,但是效率不如SQL语句高。
接口
List<User> getUserByRowBounds();
mapper配置文件
<select id="getUserByRowBounds" resultMap="UserMap">
        select * from user;
    </select>
测试类,传入mapper的配置文件的位置信息
@Test
    public void getUserByRowBounds(){
        SqlSession sqlSession = MybatisUtils.getSqlSession();

        RowBounds rowBounds = new RowBounds(1, 2);

        List<User> userList = sqlSession.selectList("com.mao.dao.UserMapper.getUserByRowBounds",null,rowBounds);
        for (User user : userList) {
            System.out.println(user);
        }
        sqlSession.close();
    }
注解开发
通过注解查询,直接在接口定义的方法上,通过注解编写SQL语句,实现功能
@Select("select * from user")
    List<User> getUserByAnnotation();
测试类,直接使用
    @Test
    public void getUserByAnnotation(){
        SqlSession sqlSession = MybatisUtils.getSqlSession();
        UserMapper mapper = sqlSession.getMapper(UserMapper.class);
        List<User> userList = mapper.getUserByAnnotation();
        for (User user : userList) {
            System.out.println(user);
        }
        sqlSession.close();
    }
对应的接口文件直接通过注解编写对应的SQL语句,实现对应的功能
    @Select("select * from teacher where id = #{tid}")
    Teacher getTeacher(@Param("tid") int id);
测试方法
    @Test
    public void getTeacher(){
        SqlSession sqlSession = MybatisUtils.getSqlSession();
        TeacherMapper mapper = sqlSession.getMapper(TeacherMapper.class);
        Teacher teacher = mapper.getTeacher(1);
        System.out.println(teacher);
        sqlSession.close();
    }
mybatis的执行流程
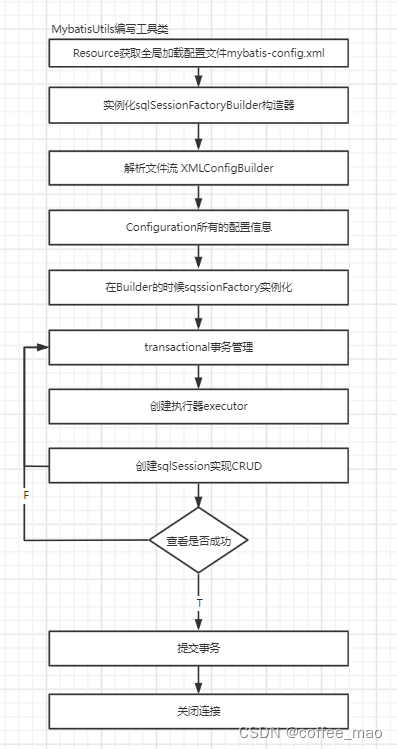
mybatis 的执行流程,通过Resources加载配置文件,SqlSessionFactoryBuilder的工厂建造者实例化工厂构造器,在工厂构造器中解析XMLConfigBuilder的文件流,在Configuration中的配置信息,在Builder的时候进行sqlSessionFactory的实例化,进行事务管理,创建执行器,创建sqlSession的对象,实现基本的CRUD,查看是否成功,进行事务的提交或者回滚,最后关闭连接
多对一
<?xml version="1.0" encoding="UTF-8" ?>
<!DOCTYPE configuration
        PUBLIC "-//mybatis.org//DTD Config 3.0//EN"
        "http://mybatis.org/dtd/mybatis-3-config.dtd">
<configuration>

    <properties resource="db.properties">
        <property name="username" value="root"/>
    </properties>

<!--    <settings>-->
<!--        <setting name="logImpl" value="STDOUT_LOGGING"/>-->
<!--    </settings>-->

<!--    <typeAlias type="com.mao.pojo.User" alias="User"/>-->

    <typeAliases>
        <package name="com.mao.pojo"/>
    </typeAliases>

    <environments default="development">
        <environment id="development">
            <transactionManager type="JDBC"/>
            <dataSource type="POOLED">
                <property name="driver" value="${driver}"/>
                <property name="url" value="${url}"/>
                <property name="username" value="${username}"/>
                <property name="password" value="${password}"/>
            </dataSource>
        </environment>
    </environments>

    <mappers>
<!--     only one   <mapper resource="com/mao/dao/UserMapper.xml"></mapper>-->
        <mapper class="com.mao.dao.UserMapper"></mapper>
        <mapper class="com.mao.dao.TeacherMapper"></mapper>
        <mapper class="com.mao.dao.StudentMapper"></mapper>
    </mappers>

</configuration>
两个表
CREATE TABLE `student` (
  `id` int NOT NULL,
  `name` varchar(10) DEFAULT NULL,
  `pwd` varchar(25) NOT NULL,
  `tid` int DEFAULT NULL,
  PRIMARY KEY (`id`),
  KEY `fktid` (`tid`),
  CONSTRAINT `fktid` FOREIGN KEY (`tid`) REFERENCES `teacher` (`id`)
) ENGINE=InnoDB DEFAULT CHARSET=utf8mb4 COLLATE=utf8mb4_0900_ai_ci;


CREATE TABLE `teacher` (
  `id` int NOT NULL,
  `name` varchar(10) DEFAULT NULL,
  PRIMARY KEY (`id`)
) ENGINE=InnoDB DEFAULT CHARSET=utf8mb4 COLLATE=utf8mb4_0900_ai_ci;
UserMapper.xml 在学生的配置文件实现多对一
通过子查询进行查询
多个学生有同一个老师
@Data
@AllArgsConstructor
@NoArgsConstructor
public class Student {
    private int id;
    private String name;
    // 学生需要关联以老师 n : 1 associate
    private Teacher teacher;
    // 1: n  collection  一个老师 有多个学生
    private int tid;
}
查询所有的学生信息,根据学生的tid,找到对应的老师
public List<Student> getStudent();
mapper配置文件的编写
    <select id="getTeacher2" resultType="Teacher">
        select * from teacher where id = #{id};
    </select>

    <resultMap id="StudentTeacher" type="Student">
        <result property="id" column="id"/>
        <result property="name" column="name"/>
<!--        复杂查询根据tid查询到teacher-->
        <association property="teacher" column="tid" javaType="Teacher" select="getTeacher2"/>
    </resultMap>

    <select id="getStudent" resultMap="StudentTeacher">
        select * from student;
    </select>
测试方法
    @Test
    public void testStudent(){
        SqlSession sqlSession = MybatisUtils.getSqlSession();
        StudentMapper mapper = sqlSession.getMapper(StudentMapper.class);
        List<Student> studentList = mapper.getStudent();
        for (Student student : studentList) {
            System.out.println(student);
        }
        sqlSession.close();
    }
按照结果嵌套处理,对字段取别名的单行sql解决
接口方法
public List<Student> getStudent2();
mapper的映射文件
    <resultMap id="StudentTeacher2" type="Student">
        <result property="id" column="sid"/>
        <result property="name" column="sname"/>
        <association property="teacher" javaType="Teacher">
            <result property="name" column="tname"></result>
        </association>
    </resultMap>

    <select id="getStudent2" resultMap="StudentTeacher2">
        select s.id sid,s.name sname,t.name tname
        from student s,teacher t
        where s.tid = t.id;
    </select>
测试方法
    @Test
    public void testStudent2(){
        SqlSession sqlSession = MybatisUtils.getSqlSession();
        StudentMapper mapper = sqlSession.getMapper(StudentMapper.class);
        List<Student> studentList = mapper.getStudent2();
        for (Student student : studentList) {
            System.out.println(student);
        }
        sqlSession.close();
    }

一对多
TeacherMapper.xml在老师的mapper的配置文件中实现一对多
一个老师对应多个学生
分析,需要在教师的实体类中加入一个学生集合的属性,学生具有老师的tid
@Data
@AllArgsConstructor
@NoArgsConstructor
public class Teacher {
    private int id;
    private String name;
    // 老师  一对多
    private List<Student> students;
}
相关子查询
接口方法
Teacher getTeacher4(@Param("tid") int id);
mapper配置文件
    <select id="getTeacher4" resultMap="TeacherStudent2">
        select * from teacher where id = #{tid};
    </select>

    <resultMap id="TeacherStudent2" type="Teacher">
        <collection property="students" javaType="ArrayList" ofType="Student" select="getStudentByTeacherId" column="id"/>
    </resultMap>

    <select id="getStudentByTeacherId" resultType="Student">
        select * from student where tid = #{tid};
    </select>
测试方法
    @Test
    public void getTeacher3(){
        SqlSession sqlSession = MybatisUtils.getSqlSession();
        TeacherMapper mapper = sqlSession.getMapper(TeacherMapper.class);
        Teacher teacher = mapper.getTeacher3(2);
        System.out.println(teacher);
        sqlSession.close();
    }
关联查询,一行SQL进行解决
接口方法
Teacher getTeacher3(@Param("tid") int id);
mapper的配置文件
    <select id="getTeacher3" resultMap="TeacherStudent">
        select s.id sid, s.name sname, t.name tname,t.id tid
        from student s, teacher t
        where s.tid = t.id and t.id = #{tid};
    </select>

    <resultMap id="TeacherStudent" type="Teacher">
        <result property="id" column="tid"></result>
        <result property="name" column="tname"></result>

        <collection property="students" ofType="Student">
            <result property="id" column="sid"></result>
            <result property="name" column="sname"></result>
            <result property="tid" column="tid"></result>
        </collection>
    </resultMap>
测试方法
    @Test
    public void getTeacher4(){
        SqlSession sqlSession = MybatisUtils.getSqlSession();
        TeacherMapper mapper = sqlSession.getMapper(TeacherMapper.class);
        Teacher teacher = mapper.getTeacher4(1);
        System.out.println(teacher);
        sqlSession.close();
    }
动态SQL
动态sql就是根据不同的条件生成不同的sql语句
- if
- choose (when, otherwise)
- trim (where, set)
- foreach
建立数据库表
CREATE TABLE `blog` (
  `id` varchar(50) NOT NULL COMMENT '博客id',
  `title` varchar(100) NOT NULL COMMENT '博客标题',
  `author` varchar(30) NOT NULL COMMENT '作者',
  `create_time` datetime NOT NULL COMMENT '创作时间',
  `views` int NOT NULL COMMENT '浏览量'
) ENGINE=InnoDB DEFAULT CHARSET=utf8;
mybatis配置标准日志输出,开启下划线的驼峰命名转换,不然日期输出为null
	<settings>
        <setting name="logImpl" value="STDOUT_LOGGING"/>
        <setting name="mapUnderscoreToCamelCase" value="true"/>
    </settings>
实体类,通过lombok的插件快速简单的生成有参无参构造,tostring和get,set方法
@Data
@AllArgsConstructor
@NoArgsConstructor
public class Blog {
    private String id;
    private String title;
    private String author;
    private Date createTime;
    private int views;
}
IdUtils 的工具类,实现id的随机生成UUID,并且简化随机id
public class IdUtils {
    public static String getId(){
        return UUID.randomUUID().toString().replaceAll("-","");
    }

    @Test
    public void testId(){
        System.out.println(IdUtils.getId());
    }
}
增加博客,接口方法
int addBlog(Blog blog);
mapper配置文件
    <insert id="addBlog" parameterType="blog">
        insert into blog(id,title,author,create_time,views)
        values (#{id},#{title},#{author},#{createTime},#{views});
    </insert>
测试方法
    @Test
    public void addBlog(){
        SqlSession sqlSession = MybatisUtils.getSqlSession();
        BlogMapper mapper = sqlSession.getMapper(BlogMapper.class);

        Blog blog = new Blog();

        blog.setId(IdUtils.getId());
        blog.setTitle("红楼梦");
        blog.setAuthor("曹雪芹");
        blog.setCreateTime(new Date());
        blog.setViews(1000);
        mapper.addBlog(blog);

        blog.setId(IdUtils.getId());
        blog.setTitle("西游记");
        blog.setAuthor("吴承恩");
        blog.setCreateTime(new Date());
        blog.setViews(1234);
        mapper.addBlog(blog);

        blog.setId(IdUtils.getId());
        blog.setTitle("三国演义");
        blog.setAuthor("罗贯中");
        blog.setCreateTime(new Date());
        blog.setViews(4567);
        mapper.addBlog(blog);

        sqlSession.commit();
        sqlSession.close();

    }
if查询博客的接口方法,实现传入参数或者没有参数的传入方式,但是SQL只有一条,实现SQL的动态变化
List<Blog> ifQueryBlog(Map map);
if查询博客的mapper配置文件
    <sql id="if-title-author">
        <if test="title != null">
            title = #{title},
        </if>
        <if test="author != null">
            and author = #{author}
        </if>
    </sql>
    <select id="ifQueryBlog" parameterType="map" resultType="blog">
        select * from blog
        <where>
            <include refid="if-title-author"></include>
        </where>

        <if test="title != null">
            and title = #{title}
        </if>
        <if test="author != null">
            and author = #{author}
        </if>
    </select>
测试方法
    @Test
    public void ifQueryBlog(){
        SqlSession sqlSession = MybatisUtils.getSqlSession();
        BlogMapper mapper = sqlSession.getMapper(BlogMapper.class);

        HashMap map = new HashMap();


//        map.put("title","西游记");
        map.put("author","曹雪芹");
        List<Blog> blogs = mapper.ifQueryBlog(map);

        for (Blog blog : blogs) {
            System.out.println(blog);
        }
        sqlSession.close();
    }
choose查询接口方法,不想使用所有的条件,而只是想从多个条件中选择一个使用。
List<Blog> ifQueryBlog(Map map);
mapper的配置文件SQL语句
<select id="chooseQueryBlog" parameterType="map" resultType="blog">
        select * from blog
        <where>
            <!--            <if test="title != null">-->
            <!--                and title = #{title}-->
            <!--            </if>-->
            <!--            <if test="author != null">-->
            <!--                and author = #{author}-->
            <!--            </if>-->

            <choose>
                <when test="title != null">
                    title = #{title}
                </when>
                <when test="author != null">
                    and author = #{author}
                </when>
                <otherwise>
                    and views = #{views}
                </otherwise>
            </choose>
        </where>
    </select>
测试方法
    @Test
    public void ChooseQueryBlog(){
        SqlSession sqlSession = MybatisUtils.getSqlSession();
        BlogMapper mapper = sqlSession.getMapper(BlogMapper.class);

        HashMap map = new HashMap();


//        map.put("title","西游记");
//        map.put("author","吴承恩");
        map.put("views",1234);
        List<Blog> blogs = mapper.chooseQueryBlog(map);

        for (Blog blog : blogs) {
            System.out.println(blog);
        }
        sqlSession.close();
    }
更新博客的接口方法
int updateBlog(Map map);
编写对应的mapper的配置文件
    <update id="updateBlog" parameterType="map">
        update blog
            <set>
                <if test="title != null">
                    title = #{title},
                </if>
                <if test="author != null">
                    author = #{author}
                </if>
            </set>
        where id = #{id}
    </update>
测试方法
    @Test
    public void updateBlog(){
        SqlSession sqlSession = MybatisUtils.getSqlSession();
        BlogMapper mapper = sqlSession.getMapper(BlogMapper.class);

        HashMap map = new HashMap();

//        map.put("title","xiao黄书");
        map.put("author","毛文星");
        //map.put("views",1111);
        map.put("id","f9f530f3ccc34ccbaf8e96493bbce727");
        mapper.updateBlog(map);
        sqlSession.commit();

        sqlSession.close();
    }
foreach遍历查询接口方法,对集合进行遍历(尤其是在构建 IN 条件语句的时候)。查询多个id的时候进行返回,ids是一个集合,可以通过map再次封装,进行查询
List<Blog> foreachQueryBlog(Map map);
对应的mapper的配置文件
<select id="foreachQueryBlog" parameterType="map" resultType="blog">
    select * from blog
<where>
    <foreach collection="ids" item="id" open="and (" close=")" separator="or">
        id = #{id}
    </foreach>
</where>

</select>
测试方法
    @Test
    public void foreachQueryBlog(){
        SqlSession sqlSession = MybatisUtils.getSqlSession();
        BlogMapper mapper = sqlSession.getMapper(BlogMapper.class);

        HashMap map = new HashMap();
        ArrayList<Integer> ids = new ArrayList<>();
        ids.add(1);
        ids.add(3);
        map.put("ids",ids);
        List<Blog> blogs = mapper.foreachQueryBlog(map);

        for (Blog blog : blogs) {
            System.out.println(blog);
        }
        sqlSession.close();
    }

mybatis 的缓存
MyBatis 内置了一个强大的事务性查询缓存机制,它可以非常方便地配置和定制。 为了使它更加强大而且易于配置,我们对 MyBatis 3 中的缓存实现进行了许多改进。
默认情况下,只启用了本地的会话缓存,它仅仅对一个会话中的数据进行缓存。 要启用全局的二级缓存,只需要在你的 SQL 映射文件中添加一行:
<cache/>
缓存使用的效果
- 映射语句文件中的所有 select 语句的结果将会被缓存。
- 映射语句文件中的所有 insert、update 和 delete 语句会刷新缓存。
- 缓存会使用LRU算法来清除不需要的缓存。
- 缓存不会定时进行刷新(也就是说,没有刷新间隔)。
- 缓存会保存列表或对象(无论查询方法返回哪种)的 1024 个引用。
- 缓存会被视为读/写缓存,这意味着获取到的对象并不是共享的,可以安全地被调用者修改,而不干扰其他调用者或线程所做的潜在修改。
缓存只作用于 cache 标签所在的映射文件中的语句。如果你混合使用Java API和 XML 映射文件,在共用接口中的语句将不会被默认缓存。你需要使用 @CacheNamespaceRef 注解指定缓存作用域。
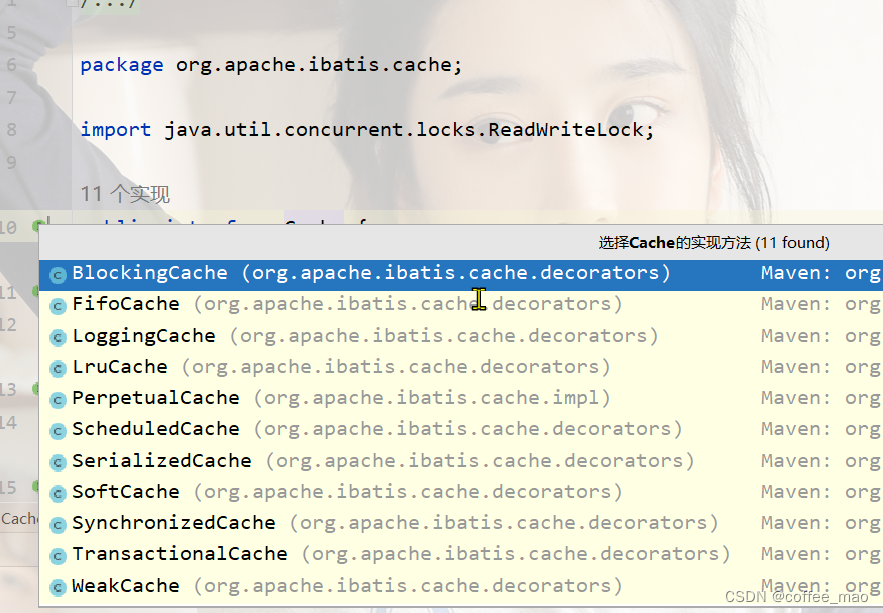
缓存策略
public interface Cache {
    String getId();

    void putObject(Object var1, Object var2);

    Object getObject(Object var1);

    Object removeObject(Object var1);

    void clear();

    int getSize();

    default ReadWriteLock getReadWriteLock() {
        return null;
    }
}
开启缓存
<?xml version="1.0" encoding="UTF-8" ?>
<!DOCTYPE mapper
        PUBLIC "-//mybatis.org//DTD Mapper 3.0//EN"
        "http://mybatis.org/dtd/mybatis-3-mapper.dtd">

<mapper namespace="com.mao.dao.UserMapper">
    <cache
            eviction="FIFO"
            flushInterval="60000"
            size="512"
            readOnly="true"/>
</mapper>
一级缓存就是本地缓存,与数据库同一次会话期间查询到的数据存放到本地缓存中。以后如果需要获取相同的数据,直接从缓存中获取,不需要走数据库了。只在一次的sqlSession中有效,就是获取到连接到关闭连接的期间有效
由于一级缓存的作用域太低了,所以诞生了二级缓存,二级缓存也就叫做全局缓存。是namespace级别的缓存,一个名称空间,对应一个二级缓存。
- 一条会话查询一条数据,这个数据就放入到会话的一级缓存中
- 会话关闭,一级缓存就消失了,但是一级缓存就会保存到二级缓存中
- 新的会话信息就会从二级缓存中获取内容
- 不同的
mapper文件查出的数据会存放在自己对应的缓存中
Mybatis-plus
官网地址 Mybatis-plus
优点
无侵入:只做增强不做改变,引入它不会对现有工程产生影响,如丝般顺滑损耗小:启动即会自动注入基本 CURD,性能基本无损耗,直接面向对象操作强大的 CRUD 操作:内置通用 Mapper、通用 Service,仅仅通过少量配置即可实现单表大-部分 CRUD 操作,更有强大的条件构造器,满足各类使用需求支持 Lambda 形式调用:通过 Lambda 表达式,方便的编写各类查询条件,无需再担心字段写错支持主键自动生成:支持多达 4 种主键策略(内含分布式唯一 ID 生成器 - Sequence),可自由配置,完美解决主键问题支持 ActiveRecord 模式:支持 ActiveRecord 形式调用,实体类只需继承 Model 类即可进行强大的 CRUD 操作支持自定义全局通用操作:支持全局通用方法注入( Write once, use anywhere )
内置代码生成器:采用代码或者 Maven 插件可快速生成 Mapper 、 Model 、 Service Controller 层代码,支持模板引擎,更有超多自定义配置等您来使用内置分页插件:基于 MyBatis 物理分页,开发者无需关心具体操作,配置好插件之后,写分页等同于普通 List 查询分页插件支持多种数据库:支持 MySQL、MariaDB、Oracle、DB2、H2、HSQL、SQLite、Postgre、SQLServer 等多种数据库内置性能分析插件:可输出 SQL 语句以及其执行时间,建议开发测试时启用该功能,能快速揪出慢查询内置全局拦截插件:提供全表 delete 、 update 操作智能分析阻断,也可自定义拦截规则,预防误操作
快速入门
引入 Spring Boot Starter 父工程
    <parent>
        <groupId>org.springframework.boot</groupId>
        <artifactId>spring-boot-starter-parent</artifactId>
        <version>2.7.4</version>
        <relativePath/>
    </parent>
引入其他的依赖
    <dependencies>
        <!--spring-boot-starter-->
        <dependency>
            <groupId>org.springframework.boot</groupId>
            <artifactId>spring-boot-starter</artifactId>
        </dependency>
        <!--spring-boot-starter-web-->
        <dependency>
            <groupId>org.springframework.boot</groupId>
            <artifactId>spring-boot-starter-web</artifactId>
        </dependency>
        <dependency>
            <groupId>org.springframework.boot</groupId>
            <artifactId>spring-boot-starter-test</artifactId>
        </dependency>
        <!--mysql-connector-java-->
        <dependency>
            <groupId>mysql</groupId>
            <artifactId>mysql-connector-java</artifactId>
        </dependency>
        <!--lombok-->
        <dependency>
            <groupId>org.projectlombok</groupId>
            <artifactId>lombok</artifactId>
        </dependency>
        <!--mybatis-plus-->
        <dependency>
            <groupId>com.baomidou</groupId>
            <artifactId>mybatis-plus-boot-starter</artifactId>
            <version>3.0.5</version>
        </dependency>
        <!--单元测试-->
        <dependency>
            <groupId>junit</groupId>
            <artifactId>junit</artifactId>
            <scope>test</scope>
        </dependency>
        <!--druid数据源-->
        <dependency>
            <groupId>com.alibaba</groupId>
            <artifactId>druid</artifactId>
            <version>1.2.4</version>
        </dependency>
    </dependencies>
配置文件配置端口,数据库连接和连接池
server:
  port: 80

spring:
  datasource:
    username: root
    password: 123456
    url: jdbc:mysql://localhost:3306/ems?useSSL=false&useUnicode=true&characterEncoding=utf-8&serverTimeZone=GMT%2B8
    driver-class-name: com.mysql.cj.jdbc.Driver
    type: com.alibaba.druid.pool.DruidDataSource
编写dao层的接口
@Mapper
public interface UserDao extends BaseMapper<User> {

}
测试方法
@SpringBootTest
@RunWith(SpringRunner.class)
public class SampleTest {
    @Autowired
    private UserDao userDao;

    @Test
    public void testSelect() {
        System.out.println(("----- selectAll method test ------"));
        List<User> userList = userDao.selectList(null);
        userList.forEach(System.out::println);
    }
}
出现空指针异常,是因为在测试的类上加上@RunWith(SpringRunner.class)注解即可
java.lang.NullPointerException
	at com.mao.test.SampleTest.testSelect(SampleTest.java:28)
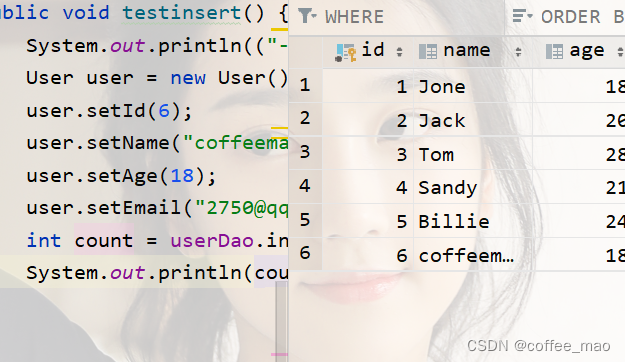
测试插入
    @Test
    public void testinsert() {
        System.out.println(("----- insert method test ------"));
        User user = new User();
        user.setId(6);
        user.setName("coffeemao");
        user.setAge(18);
        user.setEmail("2750@qq.com");
        int count = userDao.insert(user);
        System.out.println(count);
    }
插入成功
mybatis-plus配置日志
mybatis-plus:
  configuration:
    log-impl: org.apache.ibatis.logging.stdout.StdOutImpl
思考,因为自己并没有编写sql语句,没有编写dao对应的xml文件,为什么可以查出数据呢?
因为自己编写的Dao接口继承了BaseMapper<T>在这个接口内部编写好了很多的方法
	int insert(T var1); // 插入

	int deleteById(Serializable var1); // 根据id删除

    int deleteByMap(@Param("cm") Map<String, Object> var1);  // 根据传入的map删除

    int delete(@Param("ew") Wrapper<T> var1);

    int deleteBatchIds(@Param("coll") Collection<? extends Serializable> var1);

    int updateById(@Param("et") T var1);

    int update(@Param("et") T var1, @Param("ew") Wrapper<T> var2);

    T selectById(Serializable var1);

    List<T> selectBatchIds(@Param("coll") Collection<? extends Serializable> var1);

    List<T> selectByMap(@Param("cm") Map<String, Object> var1);

    T selectOne(@Param("ew") Wrapper<T> var1);

    Integer selectCount(@Param("ew") Wrapper<T> var1);

    List<T> selectList(@Param("ew") Wrapper<T> var1);

    List<Map<String, Object>> selectMaps(@Param("ew") Wrapper<T> var1);

    List<Object> selectObjs(@Param("ew") Wrapper<T> var1);

    IPage<T> selectPage(IPage<T> var1, @Param("ew") Wrapper<T> var2);

    IPage<Map<String, Object>> selectMapsPage(IPage<T> var1, @Param("ew") Wrapper<T> var2);
id的自动生成
https://www.cnblogs.com/haoxinyue/p/5208136.html
数据库插入的id默认值,全局唯一id,默认的ID_WORK
主键自增策略,mybatis-plus使用的是雪花算法
UUID,自增id
nowflake是Twitter开源的分布式ID生成算法,结果是一个long型的ID。其核心思想是:使用41bit作为毫秒数,10bit作为机器的ID(5个bit是数据中心,5个bit的机器ID),12bit作为毫秒内的流水号(意味着每个节点在每毫秒可以产生 4096 个 ID),最后还有一个符号位,永远是0。具体实现的代码可以参看https://github.com/twitter/snowflake。雪花算法支持的TPS可以达到419万左右
mybatis-plus包下的主键自增类型
使用
@Data
@AllArgsConstructor
@NoArgsConstructor
public class User {
    @TableId(type = IdType.ID_WORKER)
    private Integer id;
    private String name;
    private Integer age;
    private String email;
}
注意导入到mybatis-plus的依赖是
        <dependency>
            <groupId>com.baomidou</groupId>
            <artifactId>mybatis-plus-boot-starter</artifactId>
            <version>3.0.5</version>
        </dependency>
源码
package com.baomidou.mybatisplus.annotation;

public enum IdType {
    AUTO(0),// 主键自增
    NONE(1),// 不使用
    INPUT(2),// 输入
    ID_WORKER(3), // 默认的方式
    UUID(4),// 全局唯一标识符
    ID_WORKER_STR(5); // ID_WORKER变为字符串

    private int key;

    private IdType(int key) {
        this.key = key;
    }

    public int getKey() {
        return this.key;
    }
}
如果导入的是
        <dependency>
            <groupId>com.baomidou</groupId>
            <artifactId>mybatis-plus-boot-starter</artifactId>
            <version>3.5.2</version>
        </dependency>
默认的属性也就不同了,因此还是要看版本信息以及源码
package com.baomidou.mybatisplus.annotation;

public enum IdType {
    AUTO(0),
    NONE(1),
    INPUT(2),
    ASSIGN_ID(3),
    ASSIGN_UUID(4);

    private final int key;

    private IdType(int key) {
        this.key = key;
    }

    public int getKey() {
        return this.key;
    }
}
配置
@SpringBootApplication
@MapperScan("com.mao.test.dao")
public class TestApplicaton {
    public static void main(String[] args) {
        SpringApplication.run(TestApplicaton.class,args);
    }
}
注解
@TableName
描述:表名注解,标识实体类对应的表
使用位置:实体类
@TableId
描述:主键注解
使用位置:实体类主键字段
@TableField
描述:字段注解(非主键)
@Version
描述:乐观锁注解、标记 @Version 在字段上
@TableName("user")
public class User {
    @TableId(type = IdType.ID_WORKER)
    private Integer id;
    private String name;
    private Integer age;
    private String email;
}
更新操作,实现根据id进行更新,自动更新,动态SQL
    @Test
    public void testUpdate() {
        System.out.println(("----- update method test ------"));
        User user = new User();
        user.setId(6);
        user.setName("coffeemao");
        user.setAge(20);
        user.setEmail("123456@qq.com");
        int count = userDao.updateById(user);
        System.out.println(count);
    }
sql的拼接

数据库级别的日期自动填充
CREATE TABLE `user` (
  `id` bigint NOT NULL COMMENT '主键ID',
  `name` varchar(30) DEFAULT NULL COMMENT '姓名',
  `age` int DEFAULT NULL COMMENT '年龄',
  `email` varchar(50) CHARACTER SET utf8mb4 COLLATE utf8mb4_0900_ai_ci DEFAULT NULL COMMENT '邮箱',
  `gmt_create` datetime DEFAULT CURRENT_TIMESTAMP COMMENT '创建时间',
  `gmt_modified` datetime DEFAULT CURRENT_TIMESTAMP ON UPDATE CURRENT_TIMESTAMP COMMENT '修改时间',
  PRIMARY KEY (`id`)
) ENGINE=InnoDB DEFAULT CHARSET=utf8mb4 COLLATE=utf8mb4_0900_ai_ci;
修改之后,达到预期,实现创建时候获取日期,修改时候更新日期,但是这些都是基于数据库的表的操作,在实际开发情况中,不允许对数据库表进行修改,因此,需要引入代码级别的更新时间信息。

代码级别对时间信息进行无侵入的加入
实体类
@TableName("user")
public class User {
    private Integer id;
    private String name;
    private Integer age;
    private String email;
    @TableField(fill = FieldFill.INSERT)
    private Date gmtCreate;
    @TableField(fill = FieldFill.INSERT_UPDATE)
    private Date gmtModified;
}
编写处理区进行注解的处理
@Slf4j
@Component
public class MetaDataHandler implements MetaObjectHandler {
    @Override
    public void insertFill(MetaObject metaObject) {
        log.info("start insert fill ......");
        this.setFieldValByName("gmtCreate",new Date(),metaObject);
        this.setFieldValByName("gmtModified",new Date(),metaObject);
    }

    @Override
    public void updateFill(MetaObject metaObject) {
        log.info("start update fill ......");
        this.setFieldValByName("gmtModified",new Date(),metaObject);
    }
}
再次测试发现成功
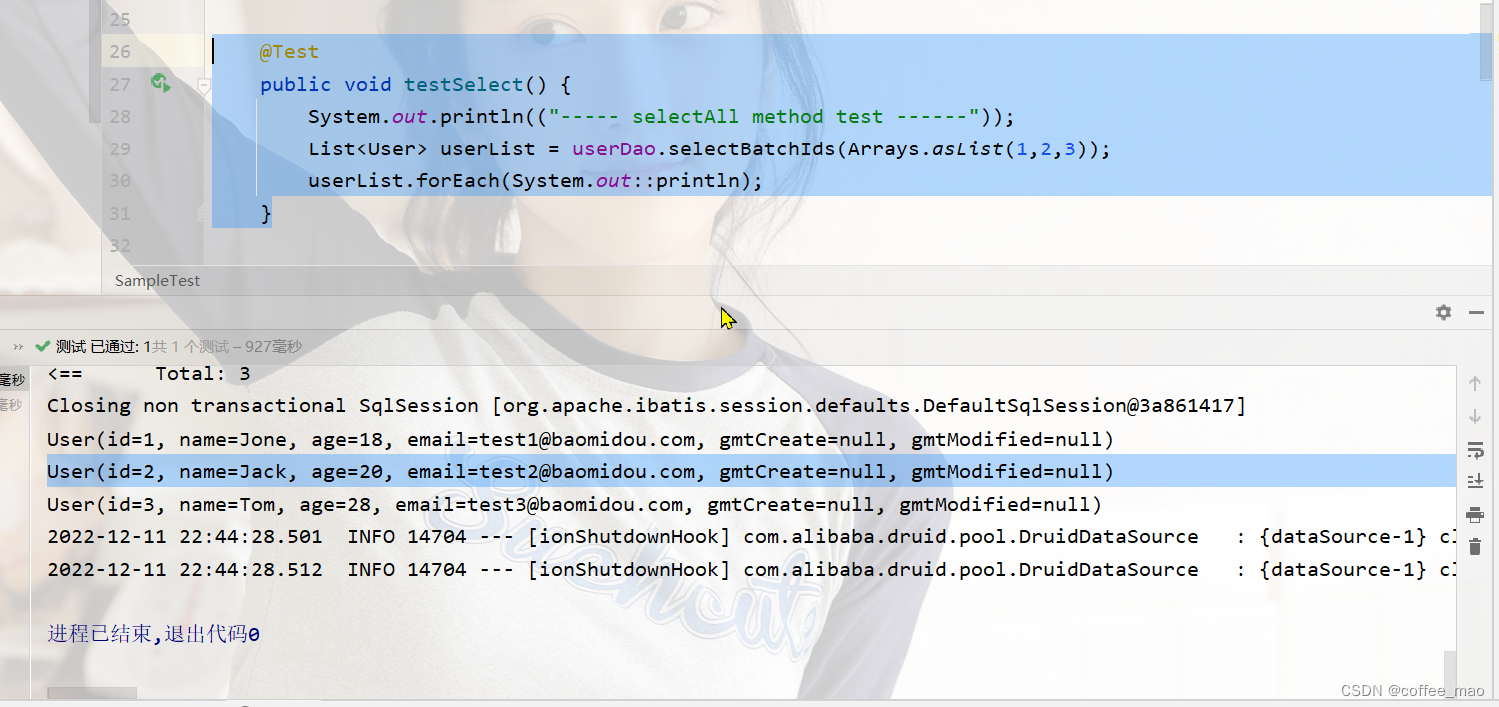
批量查询
    @Test
    public void testSelect() {
        System.out.println(("----- selectAll method test ------"));
        List<User> userList = userDao.selectBatchIds(Arrays.asList(1,2,3));
        userList.forEach(System.out::println);
    }
加入版本信息的字段,并且修改实体类,版本信息乐观锁的基本实现。
@TableName("user")
public class User {
    @TableId(type = IdType.AUTO)
    private Integer id;
    private String name;
    private Integer age;
    private String email;
    @TableField(fill = FieldFill.INSERT)
    private Date gmtCreate;
    @TableField(fill = FieldFill.INSERT_UPDATE)
    private Date gmtModified;
    @Version
    private Integer version;
}
编写mybatis-plus的配置文件,注入到IOC容器中
@MapperScan("com.mao.test.dao")
@EnableTransactionManagement
@Configuration
public class MybatisPlusConfig {
	/**
     * 旧版
     */
    @Bean
    public OptimisticLockerInterceptor optimisticLockerInterceptor() {
        return new OptimisticLockerInterceptor();
    }
    /**
     * 新版
     */
    @Bean
    public MybatisPlusInterceptor mybatisPlusInterceptor() {
        MybatisPlusInterceptor mybatisPlusInterceptor = new MybatisPlusInterceptor();
        mybatisPlusInterceptor.addInnerInterceptor(new OptimisticLockerInnerInterceptor());
        return mybatisPlusInterceptor;
    }
}
测试类 ,测试情况是正确的时候,版本信息正确修改
    @Test
    public void testUpdate() {
        System.out.println(("----- update method test ------"));
        User user = new User();
        user.setId(6);
        user.setName("张三");
        user.setAge(20);
        user.setEmail("123456@qq.com");
        int count = userDao.updateById(user);
        System.out.println(count);
    }
并发情况下,出现的情况,A线程对2号用户进行修改,但是没有提交进行修改,B线程也对2号用户进行了修改,进行了修改,直接进行了提交,再对A进程的修改信息进行了提交,结果A进程的提交没有成功
    @Test
    public void testVersion() {
        User user = userDao.selectById(2);
        user.setName("李四");
        user.setAge(20);
        user.setEmail("987654@qq.com");

        // 还没有修改,插队操作
        User user1 = userDao.selectById(2);
        user1.setName("王五");
        user1.setAge(18);
        user1.setEmail("000000@qq.com");
        userDao.updateById(user1);

        userDao.updateById(user);
    }

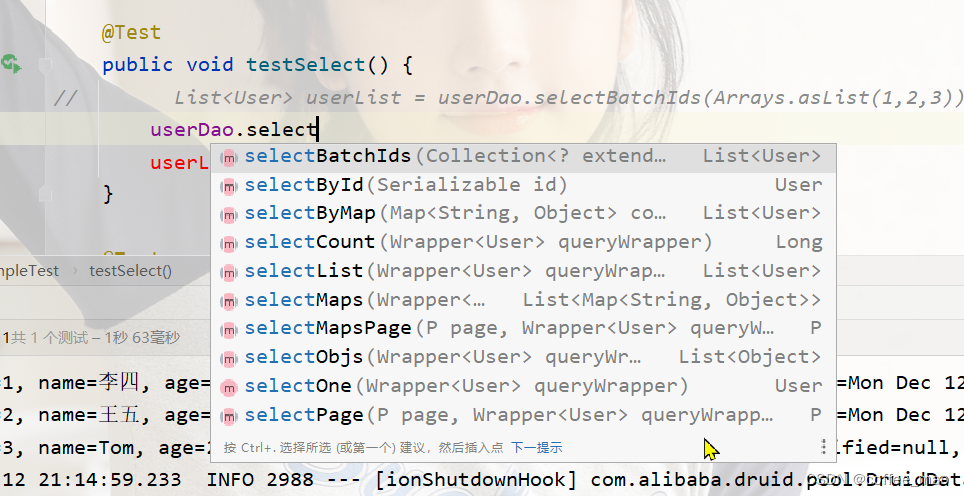
查询有同过id的集合进行查询,指定id进行查询,通过Map进行封装属性按照条件进行查询等等
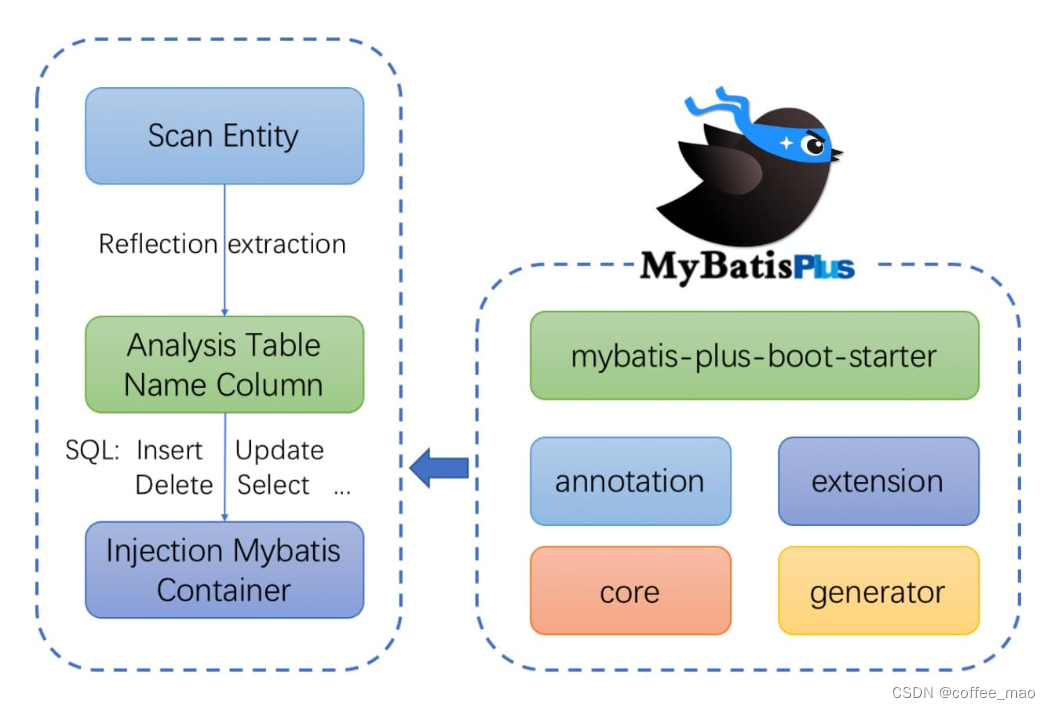
mybatis-plus的框架结构图
分页查询和删除
添加分页插件
@MapperScan("com.mao.test.dao")
@EnableTransactionManagement
@Configuration
public class MybatisPlusConfig {
    @Bean
    public MybatisPlusInterceptor mybatisPlusInterceptor() {
        MybatisPlusInterceptor mybatisPlusInterceptor = new MybatisPlusInterceptor();
        // 添加乐观锁
        mybatisPlusInterceptor.addInnerInterceptor(new OptimisticLockerInnerInterceptor());
        //添加分页
        mybatisPlusInterceptor.addInnerInterceptor(new PaginationInnerInterceptor(DbType.MYSQL));

        return mybatisPlusInterceptor;
    }
}
使用page分页对象,进行测试
    @Test
    public void testSelect() {
        Page<User> page = new Page<>(1,3);
        userDao.selectPage(page, null);
        page.getRecords().forEach(System.out::println);
    }

删除6号用户
    @Test
    public void testdelete() {
        int count = userDao.deleteById(6);
        System.out.println(count);
    }
逻辑删除,添加逻辑删除的字段,deleted,其中0表示未删除,1表示已删除
数据库添加,实体类添加,配置文件修改

实体类添加字段信息
    @TableLogic
    private Integer deleted;
mybatis-plus配置,0表示未删除,1表示已经删除
mybatis-plus:
  configuration:
    log-impl: org.apache.ibatis.logging.stdout.StdOutImpl
  global-config:
    db-config:
      logic-delete-field: flag
      logic-delete-value: 1
      logic-not-delete-value: 0
测试
    @Test
    public void testdelete() {
        int count = userDao.deleteById(5);
        System.out.println(count);
    }

查询全部,发现查询出来的都是逻辑未删除的用户
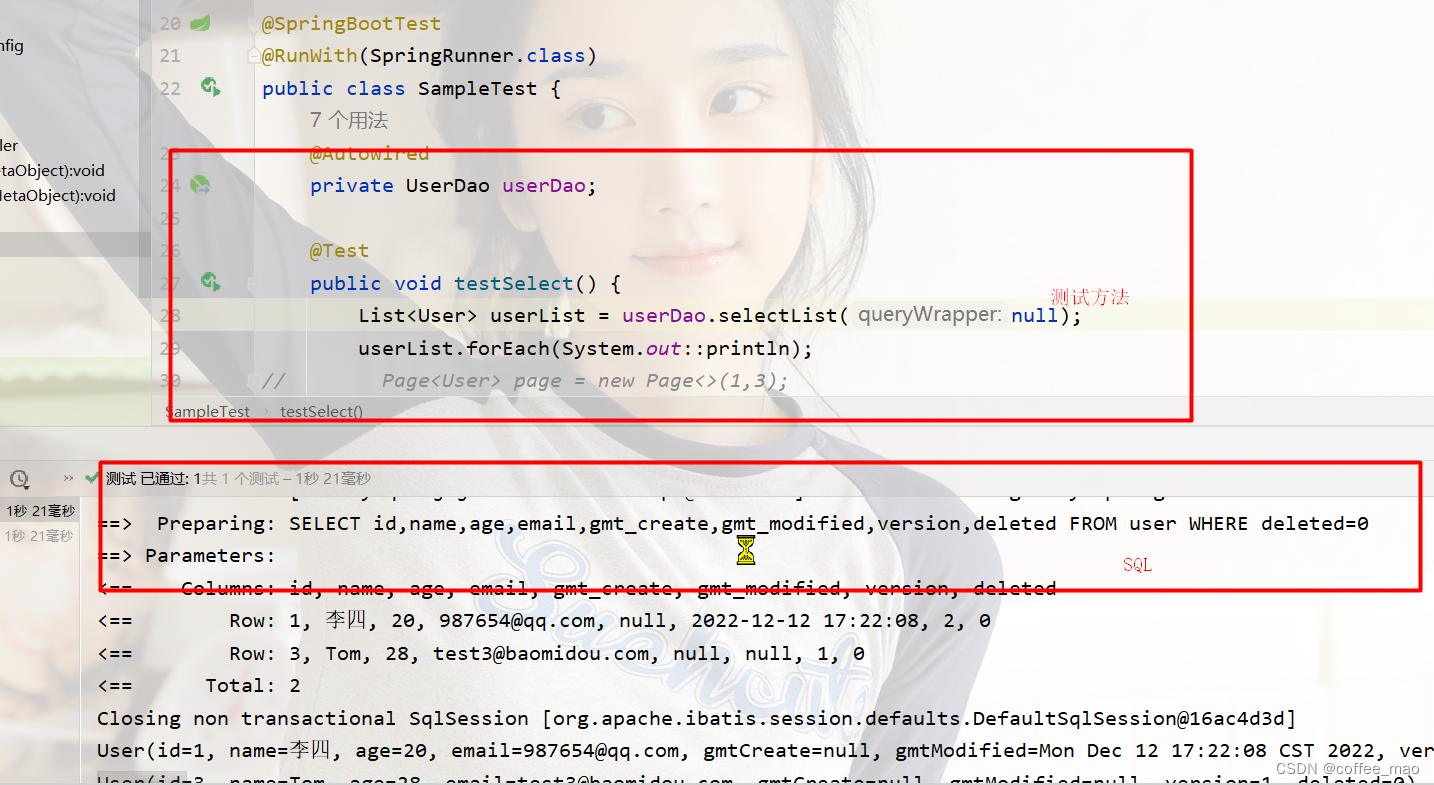
执行SQL分析打印
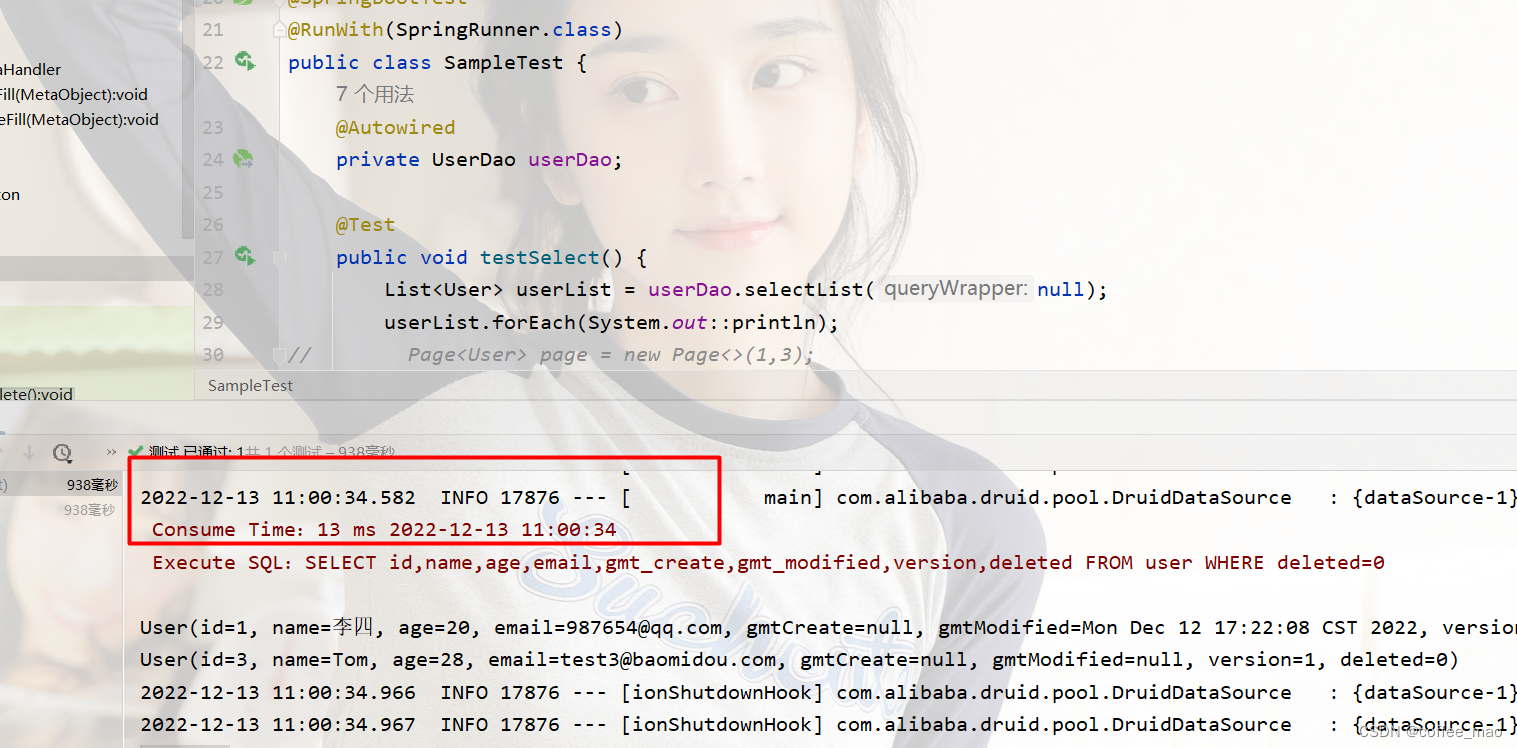
在开发过程中遇到的慢sql。进行测试! druid,
作用:性能分析拦截器,用于输出每条 SQL 语句及其执行时间
MyBatisPlus也提供性能分析插件,如果超过这个时间就停止运行!
导入依赖
        <!-- p6spy 依赖引入 -->
        <dependency>
            <groupId>p6spy</groupId>
            <artifactId>p6spy</artifactId>
            <version>3.9.1</version>
        </dependency>
application.yml
spring:
  datasource:
    username: root
    password: 123456
    url: jdbc:p6spy:mysql://localhost:3306/ems?useSSL=false&useUnicode=true&characterEncoding=utf-8&serverTimeZone=GMT%2B8
    type: com.alibaba.druid.pool.DruidDataSource
    driver-class-name: com.p6spy.engine.spy.P6SpyDriver
spy.properties 配置
#3.2.1以上使用
modulelist=com.baomidou.mybatisplus.extension.p6spy.MybatisPlusLogFactory,com.p6spy.engine.outage.P6OutageFactory
# 自定义日志打印
logMessageFormat=com.baomidou.mybatisplus.extension.p6spy.P6SpyLogger
#日志输出到控制台
appender=com.baomidou.mybatisplus.extension.p6spy.StdoutLogger
# 设置 p6spy driver 代理
deregisterdrivers=true
# 取消JDBC URL前缀
useprefix=true
# 配置记录 Log 例外,可去掉的结果集有error,info,batch,debug,statement,commit,rollback,result,resultset.
excludecategories=info,debug,result,commit,resultset
# 日期格式
dateformat=yyyy-MM-dd HH:mm:ss
# 是否开启慢SQL记录
outagedetection=true
# 慢SQL记录标准 2 秒
outagedetectioninterval=2
测试方法
    @Test
    public void testSelect() {
        List<User> userList = userDao.selectList(null);
        userList.forEach(System.out::println);
    }
条件构造器Wrapper
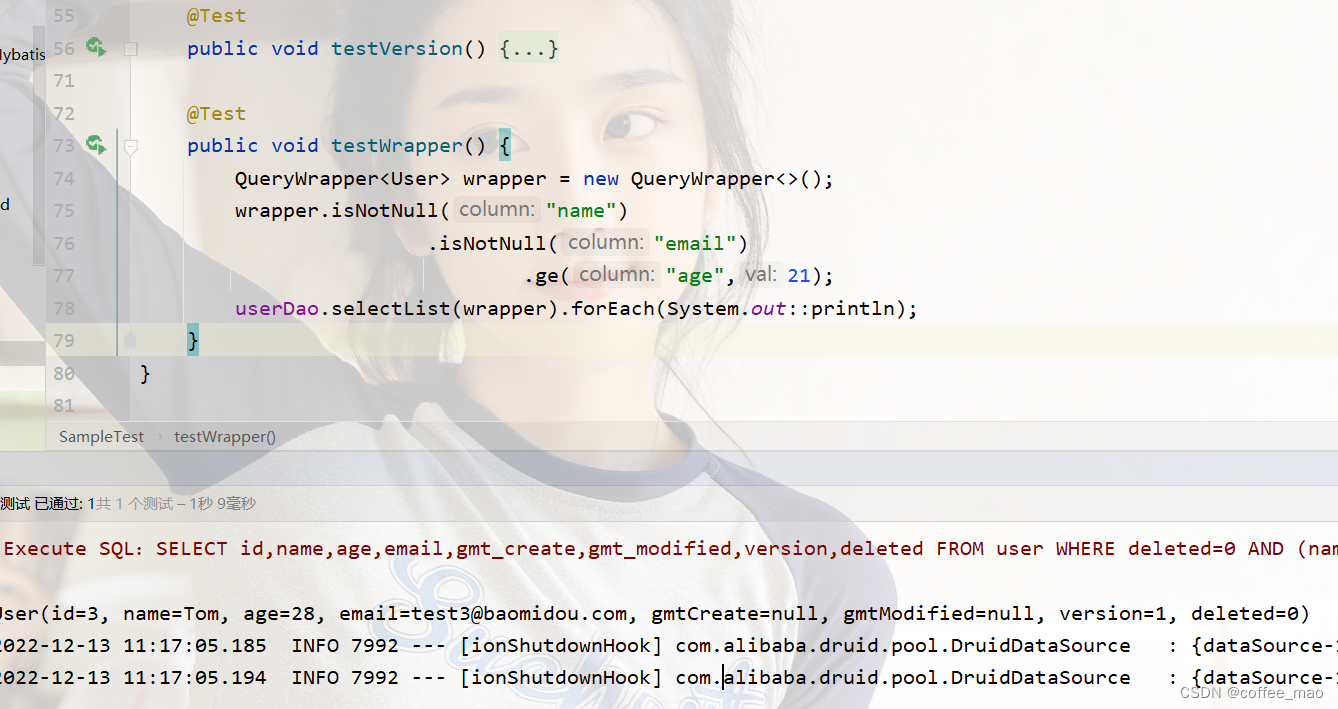
复杂的条件查询,查询name属性不为null,email属性不为null,age属性大于等于21
    @Test
    public void testWrapper() {
        QueryWrapper<User> wrapper = new QueryWrapper<>();
        wrapper.isNotNull("name")
                        .isNotNull("email")
                                .ge("age",21);
        userDao.selectList(wrapper).forEach(System.out::println);
    }
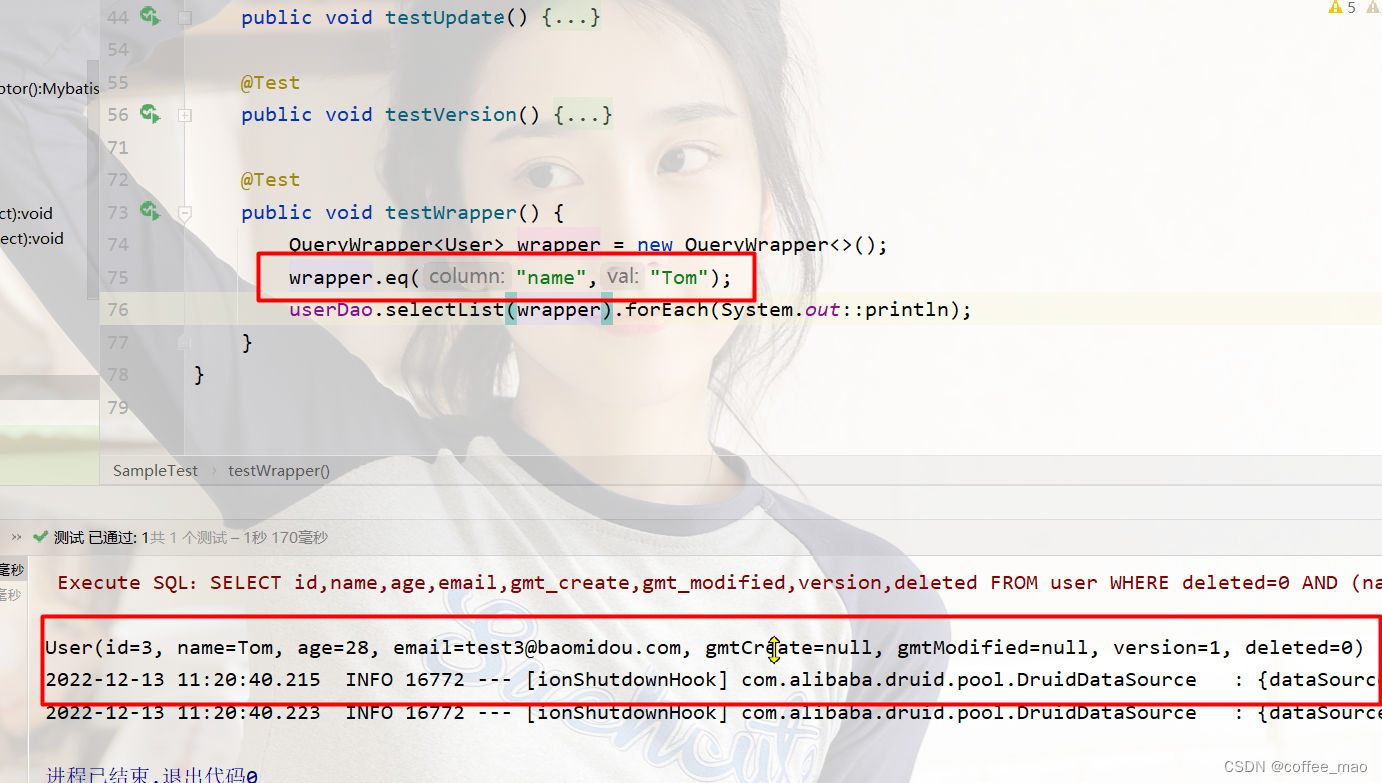
查找姓名为Tom
    @Test
    public void testWrapper() {
        QueryWrapper<User> wrapper = new QueryWrapper<>();
        wrapper.eq("name","Tom");
        userDao.selectList(wrapper).forEach(System.out::println);
    }
查找年龄区间在20到25的用户
    @Test
    public void testWrapper() {
        QueryWrapper<User> wrapper = new QueryWrapper<>();
        wrapper.between("age",20,25);
        userDao.selectList(wrapper).forEach(System.out::println);
    }
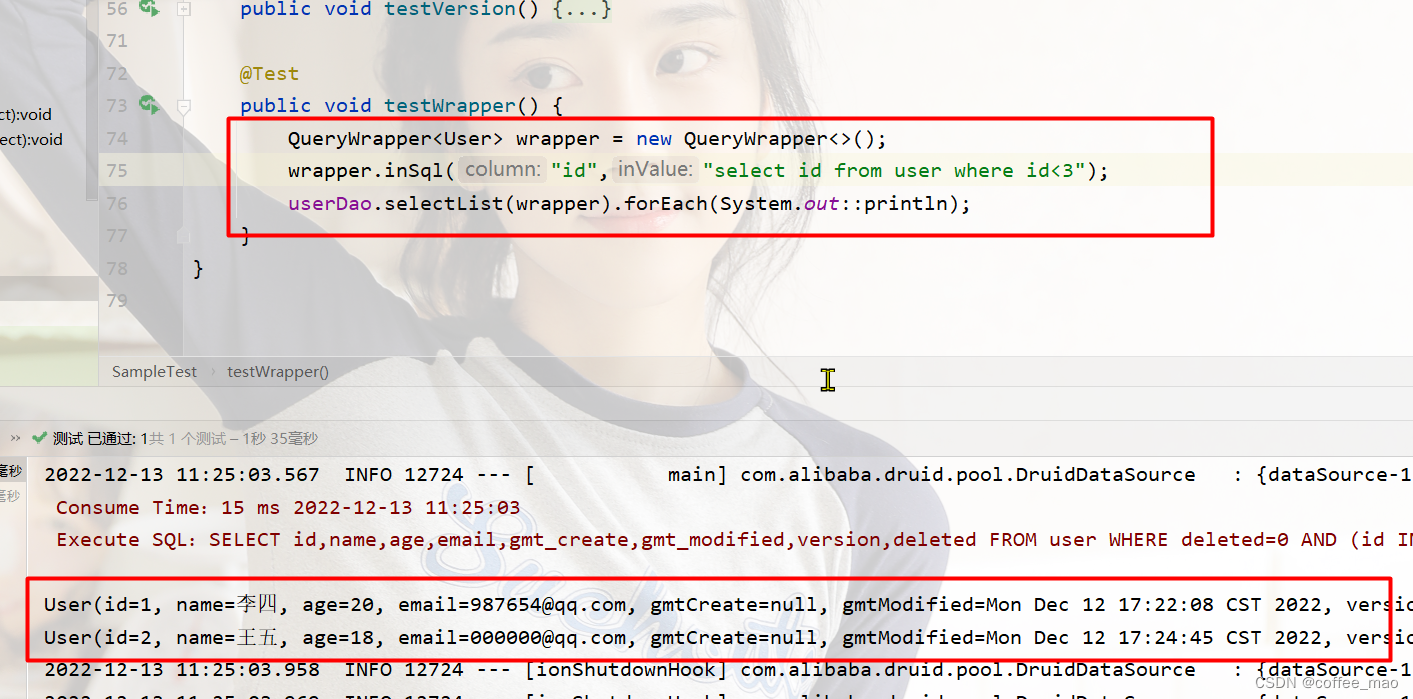
使用自定义的sql语句进行查询
    @Test
    public void testWrapper() {
        QueryWrapper<User> wrapper = new QueryWrapper<>();
        wrapper.inSql("id","select id from user where id<3");
        userDao.selectList(wrapper).forEach(System.out::println);
    }
代码生成器
导入依赖
		<!--mybatis-plus-->
        <dependency>
            <groupId>com.baomidou</groupId>
            <artifactId>mybatis-plus-boot-starter</artifactId>
            <version>3.0.5</version>
        </dependency>
        <!-- 代码生成器 -->
        <dependency>
            <groupId>com.baomidou</groupId>
            <artifactId>mybatis-plus-generator</artifactId>
            <version>3.0.5</version>
        </dependency>
        <!-- 模板引擎 -->
        <dependency>
            <groupId>org.apache.velocity</groupId>
            <artifactId>velocity-engine-core</artifactId>
            <version>2.3</version>
        </dependency>
        <!-- swagger-annotations -->
        <dependency>
            <groupId>io.swagger</groupId>
            <artifactId>swagger-annotations</artifactId>
            <version>1.6.2</version>
        </dependency>
        <!-- p6spy 依赖引入 -->
        <dependency>
            <groupId>p6spy</groupId>
            <artifactId>p6spy</artifactId>
            <version>3.9.1</version>
        </dependency>
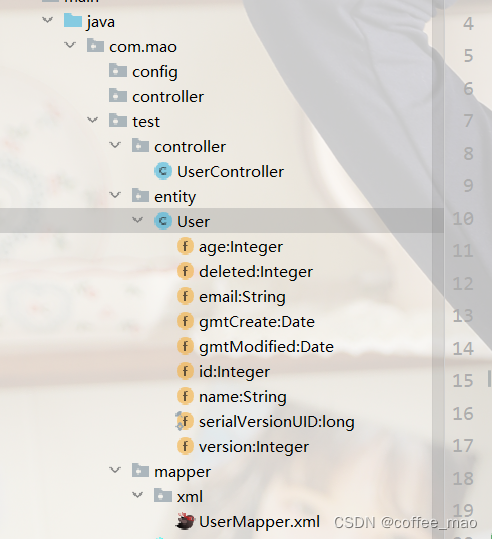
编写自动生成代码生成器
public class MybatisAtuoCode {
    public static void main(String[] args) {
        // 需要构建一个 代码自动生成器 对象
        AutoGenerator mpg = new AutoGenerator();
        // 配置策略
        // 1、全局配置
        GlobalConfig gc = new GlobalConfig();
        String projectPath = System.getProperty("user.dir");
        gc.setOutputDir(projectPath+"/src/main/java");
        gc.setAuthor("coffeemao");
        gc.setOpen(false);
        gc.setFileOverride(false); // 是否覆盖
        gc.setServiceName("%sService"); // 去Service的I前缀
        gc.setIdType(IdType.ID_WORKER);
        gc.setDateType(DateType.ONLY_DATE);
        gc.setSwagger2(true);
        mpg.setGlobalConfig(gc);
        //2、设置数据源
        DataSourceConfig dsc = new DataSourceConfig();
        dsc.setUrl("jdbc:mysql://localhost:3306/ems?useSSL=false&useUnicode=true&characterEncoding=utf-8&serverTimezone=GMT%2B8");
        dsc.setDriverName("com.mysql.cj.jdbc.Driver");
        dsc.setUsername("root");
        dsc.setPassword("123456");
        dsc.setDbType(DbType.MYSQL);
        mpg.setDataSource(dsc);
        //3、包的配置
        PackageConfig pc = new PackageConfig();
        pc.setModuleName("test");
        pc.setParent("com.mao");
        pc.setEntity("entity");
        pc.setMapper("mapper");
        pc.setService("service");
        pc.setController("controller");
        mpg.setPackageInfo(pc);
        //4、策略配置
        StrategyConfig strategy = new StrategyConfig();
        // 设置要映射的表名
        strategy.setInclude("user");
        strategy.setNaming(NamingStrategy.underline_to_camel);
        strategy.setColumnNaming(NamingStrategy.underline_to_camel);
        strategy.setEntityLombokModel(true); // 自动lombok;
        strategy.setLogicDeleteFieldName("deleted");
        // 自动填充配置
        TableFill gmtCreate = new TableFill("gmt_create", FieldFill.INSERT);
        TableFill gmtModified = new TableFill("gmt_modified", FieldFill.INSERT_UPDATE);
        ArrayList<TableFill> tableFills = new ArrayList<>();
        tableFills.add(gmtCreate);
        tableFills.add(gmtModified);
        strategy.setTableFillList(tableFills);
        // 乐观锁
        strategy.setVersionFieldName("version");
        strategy.setRestControllerStyle(true);
        strategy.setControllerMappingHyphenStyle(true);
        mpg.setStrategy(strategy);
        //执行
        mpg.execute();
    }
}
但是mybatis-plus的版本更新到3.5.2,此时发生了很多的变化
首先导入的依赖是最新版本的
<!--mybatis-plus-->
        <dependency>
            <groupId>com.baomidou</groupId>
            <artifactId>mybatis-plus-boot-starter</artifactId>
            <version>3.5.2</version>
        </dependency>
        <!-- 代码生成器 -->
        <dependency>
            <groupId>com.baomidou</groupId>
            <artifactId>mybatis-plus-generator</artifactId>
            <version>3.5.2</version>
        </dependency>
        <!--模板引擎-->
        <dependency>
            <groupId>org.freemarker</groupId>
            <artifactId>freemarker</artifactId>
            <version>2.3.31</version>
        </dependency>
        <!-- swagger-annotations -->
        <dependency>
            <groupId>io.swagger</groupId>
            <artifactId>swagger-annotations</artifactId>
            <version>1.6.2</version>
        </dependency>
编写的自动的代码生成器
public class MybatisAtuoCode {
    public static void main(String[] args) {
        FastAutoGenerator.create("jdbc:mysql://localhost:3306/ems?&characterEncoding=utf-8&userSSL=false", "root", "123456")
                .globalConfig(builder -> {//全局配置
                    builder.author("coffeemao") // 设置作者
                            .enableSwagger() // 开启 swagger 模式
                            .fileOverride() // 覆盖已生成文件
                            .disableOpenDir()
                            .outputDir(System.getProperty("user.dir")+"/src/main/java"); // 指定输出目录
                })
                .packageConfig(builder -> {//包配置
                    builder.parent("com.mao") // 设置父包名
                            .moduleName("test") // 设置父包模块名
                            .pathInfo(Collections.singletonMap(OutputFile.xml,System.getProperty("user.dir")+"/src/main/resources/mybatis/mapper"));// 设置mapperXml生成路径

                })
                .strategyConfig(builder -> {//策略配置
                    builder.addInclude("user"); // 设置需要生成的表名
                })
                .templateEngine(new FreemarkerTemplateEngine()) // 使用Freemarker 引擎模板,默认的是Velocity引擎模板
                .execute();

    }
}
