浏览器对于type="password"的输入框会自动填充密码,但有时出于安全或者其他原因,我们不希望浏览器记住并自动填充密码。通过网上查到的一些解决方案,可以总结出以下几种解决方案(主要用edge浏览器进行测试):
- 通过
autocomplete="off"/autocomplete="new-password"来关闭浏览器自动填充密码的功能, 但某些对于浏览器像edge,firfox等,这种方法并不起作用 - 通过
type="text"来解决,当focus时,通过js将type="text"改为type="password"。
<input type="text" onfocus="this.type='password'">
但同样对某些浏览器不起作用,如edge,在点击输入框时,仍会自动弹出填充密码的提示框。
- 某些浏览器可能只会识别第一个
type="password"的输入框,所以可以在前面添加一些隐藏的type="password"的输入框,来解决这个问题。
<form style="display:none">
  <input type="password">
</form>
<input type="password" style="display:none">
<input type="password">
但同样并不是总是有效,拿edge测试时即使前几个密码输入框没有隐藏,最后一个输入框也会自动填充密码,如图:

- 通过
readonly属性来解决,初始化时将readonly设置为true,通过setTimeout来延时设置readonly为false。
<input id="passwordInput" type="password" readonly>
setTimeout(() => {
    document.getElementById('passwordInput').removeAttribute('readonly')
}, 100)
但同样并非总是有效,拿edge测试时,虽然点击输入框时并没有弹出填充密码的提示框,但是在输入框中输入密码然后退格到输入框为空时,又会重新弹出填充密码的提示框。
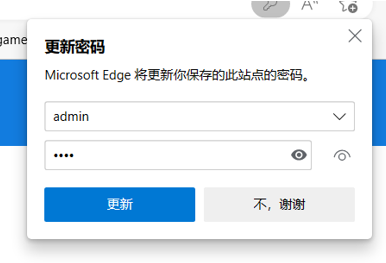
上述几种方法除了会弹出填充密码的提示框外,在页面跳转或刷新时(如edge浏览器),都会弹出保存密码的提示框,如图:
当然,应该还会有其他解决方案我暂时还没找到,如果有的话,欢迎留言。
自定义密码输入框组件解决方案
在尝试了上述几种解决方案后,发现效果都不是很好,所以我感觉只有让input的type属性始终为password,才能更有效的解决这个问题。可以考虑自定义一个密码输入框组件,通过某些方法去改变input的值的显示方式,来达到隐藏密码的效果。
目前想出了两种方法:一个是不改变input的值,仅仅隐藏input的内容,用另一个容器去显示密码或者显示*;另一个是将实际密码存在另一个变量中,将input的value值改成*来显示。
方案一
可以用两个input来实现,父容器是relative定位,两个input都是absolute,一个实际的输入框位于上层,设置为透明,另一个用于显示星号的输入框位于下层。
<div class="container">
  <input v-model="passwordDisplay">
  <input
    v-model="password"
    class="password"
    @input="passwordDisplay = password.replace(/./g, '*')">
</div>

<style scoped>
.container {
  position: relative;
}
.container input {
  position: absolute;
  left: 0;
  top: 0;
  font-size: 12px;
}
.password {
  opacity: 0;
}
</style>
效果如下图所示:

确实没有弹出密码填充的对话框,但样式上并不是很满意。因为实际的输入框被设置成了透明,且在密码显示框之上,所以光标无法显示出来,且无法进行选中一部分内容。
方案二
跟方案一差不多的方式,用input来接收用户输入的密码,但仅改变输入内容的透明度, 由于在opacity为0的情况下设置光标颜色无效,所以要将方案一中的opacity: 0改为:
.password {
  color: transparent;
  background-color: transparent;
  caret-color: #000; /* 光标颜色 */
}
但是这会有个问题,选中一部分内容时,会导致透明的内容选中后显现出来,如图所示:

这种情况下可以考虑监听选中事件,当选中一部分内容时,将后面的星号也选中,同时通过::selection伪类来设置选中的内容的背景色,让两个选中的内容颜色一致。要实现这种效果,input显然做不到修改部分内容的背景色,所以可以考虑用span代替input,向其innerHTML中插入带背景色的span:
<div class="container">
  <span
    ref="passwordInputDisplay"
    class="password password-input__behind"
  />
  <input
    v-model="password"
    class="password password-input__front"
    @focus="isActive = true"
    @blur="isActive = false"
    @input="passwordDisplay = password.replace(/./g, '*')">
</div>
<style scoped>
::selection {
  background-color: #409eff;
}
.container {
  position: relative;
}
.password {
  position: absolute;
  left: 0;
  top: 0;
  width: 100%;
  height: 100%;
  font-size: 12px;
  font-family: monospace; /* 必须用等宽字体 */
}
.password-input__behind {
  text-align: left;
  z-index: 1;
}
.password-input__front {
  color: transparent;
  background-color: transparent;
  caret-color: #000;
  z-index: 2;
}
export default {
  props: {
    value: {
      type: String,
      default: ''
    }
  },
  methods: {
    handleInput (e) {
      // 删除非法字符(只保留code>=32且code<=126的字符)
      const value = e.target.value
      const newValue = value.replace(/[^\x20-\x7E]/g, '')
      if (newValue !== value) {
        this.password = newValue
      }
      // 发布input事件,从而修改props中的value值
      this.$emit('input', this.password)
    }

  },
  created() {
    this.selectionEvent = () => {
      const display = this.$refs.passwordInputDisplay
      display.style.zIndex = 1
      display.innerHTML = this.passwordDisplay
      if (!this.isActive) { return }
      const selection = window.getSelection()
      // 如果选中的内容不为空, 则由passwordInputDisplay显示
      if (!selection.toString()) { return }
      const input = this.$refs.passwordInput
      const start = input.selectionStart
      const end = input.selectionEnd
      const highlightString = '<span style="background-color: #409eff; color: #fff;">' + this.passwordDisplay.slice(start, end) + '</span>'
      display.innerHTML = this.passwordDisplay.slice(0, start) + highlightString + this.passwordDisplay.slice(end)
      display.style.zIndex = 4
    }
    document.addEventListener('selectionchange', this.selectionEvent)
  },
  beforeDestory() {
    document.removeEventListener('selectionchange', this.selectionEvent)
  }
}
需要注意以下几点:
- 监听
select事件不能用input自带的onselect或@select,因为这只会在鼠标松开时触发,并不能实时相应选取区域的变化。所以要监听selectionchange事件。注意selectionchange事件在没选中内容时也会触发。 - 由于相比方案一显示了光标,光标的位置会受到实际字符宽度的影响,所以要使星号与其他字符宽度相等,必须使用如
monospace之类的等宽字体,且必须阻止中文字符的输入。 - 修改
innerHtml后需要改变密码显示框的z-index,否则仍然会被input中选中的内容覆盖。
效果如下图所示:

这里还有个问题,当输入内容超过了input的长度,显示上就会出现错误,可以考虑根据字体宽度计算出最大容纳的字符个数,阻止过多字符的输入。也可以在光标移动时同时移动后面的span,不过逻辑太过复杂没必要。
const width = this.$refs.passwordInput.clientWidth - 20 // 20为padding
const canvas = document.createElement('canvas')
const ctx = canvas.getContext('2d')
ctx.font = '16px monospace'
const fontWidth = ctx.measureText('A').width
this.maxLength = Math.floor(width / fontWidth)
这里用的是canvas进行计算字体宽度。
虽然最终实现了目标效果,不过逻辑上还是稍微复杂了点。
完整代码在: GitHub - lxmghct/my-vue-components
src/components/PasswordInput/PasswordInput1.vue
方案三
只使用一个input,另外设置一个变量去保存真实密码。这种方法比上述方法逻辑上要稍微简单一些,唯一需要注意的就是当输入框中显示为星号时,如何区分哪些是新输入的内容,因为会有鼠标选中一段内容再删除或输入、粘贴的操作,而新输入的内容中也可能包含星号,所以不能处理的过于简单。最后采用的是监听selectionchange事件来随时更新光标所在位置,从而区分新输入的内容。
<input
  ref="passwordInput"
  v-model="passwordDisplay"
  autocomplete="off"
  @focus="isActive = true"
  @blur="isActive = false"
  @input="handleInput"
>
export default {
  methods: {
    handleInput () {
      // 获取新输入的字符
      const tempEnd = this.passwordDisplaylength - (this.password.length - thisselection.end)
      const newStr = this.passwordDisplay.slic(this.selection.start, tempEnd)
      // 更新输入框的值
      const currentPosition = this.$refspasswordInput.selectionStart
      this.password = this.password.slice(0,Math.min(this.selection.start,currentPosition)) + newStr + this.passwordslice(this.selection.end)
      this.selection.start = currentPosition
      this.selection.end = currentPosition
      this.$emit('input', this.password)
    }
  },
  created () {
    this.selectionEvent = () => {
      if (!this.isActive) { return }
      const input = this.$refs.passwordInput
      this.selection = {
        start: input.selectionStart,
        end: input.selectionEnd
      }
    }
    this.copyEvent = (e) => {
      if (!this.isActive) { return }
      const clipboardData = e.clipboardData || window.clipboardData
      clipboardData.setData('text', this.password.slice(this.selection.start, this.selection.end))
      e.preventDefault()
    }
    document.addEventListener('selectionchange', this.selectionEvent)
    document.addEventListener('copy', this.copyEvent)
  },
  beforeDestroy () {
    document.removeEventListener('selectionchange', this.selectionEvent)
    document.removeEventListener('copy', this.copyEvent)
  }
}
有几点需要注意:
- 输入框中选定的内容的起始和结束位置无法通过
window.getSelection().anchorOffset等参数获取(window.getSelection()的几个offset都是0), 只能通过input的selectionStart和selectionEnd可以拿到当前选中区域的起始和结束位置。 - 由于输入框内实际显示的是星号,所以复制时若不处理则复制的也是星号,所以需要监听复制事件,将实际密码写入剪贴板。剪贴板通过
e.clipboardData || window.clipboardData获取。
相比于方案二,这种方法无需要求一定要等宽字体,也无需另外去处理选中内容的事件,唯一多出的地方就是对输入框实际值的处理,包括输入和复制,而这里的逻辑显然比方案二中修改样式容易的多。
效果上跟方案二基本差不多,而且没有长度限制,这里用this.passwordDisplay = '\u2022'.repeat(this.value.length)把星号改成了圆点,如下:

完整代码在: GitHub - lxmghct/my-vue-components
src/components/PasswordInput/PasswordInput2.vue
密码显示与隐藏
点击眼睛图标,切换密码的显示与隐藏状态。
export default {
  watch: {
    value () {
      this.updatePasswordDisplay()
    },
    showPassword () {
      this.updatePasswordDisplay()
    }
  },
  methods: {
    updatePasswordDisplay () {
      if (this.showPassword) {
        this.passwordDisplay = this.value
      } else {
        // this.passwordDisplay = '*'.repeat(this.value.length)
        this.passwordDisplay = '\u2022'.repeat(this.value.length) // 圆点
      }
    }
  }
}
眼睛图标可以用图标库或者导入图片,我这里用的是svg,眼睛图标的svg可以通过一些转换工具来实现,这里推荐一个网站: Free SVG Converter
<div class="password-input__eye-wrap">
  <div
      class="password-input__eye"
      @click="showPassword = !showPassword"
  >
      <svg version="1.0" xmlns="http://www.w3.org/2000/svg"
      width="58.000000pt" height="50.000000pt" viewBox="0 0 58.000000 50.000000"
      preserveAspectRatio="xMidYMid meet">
          <g transform="translate(0.000000,50.000000) scale(0.100000,-0.100000)"
          fill="#000000" stroke="none">
              <path d="M228 390 c-61 -19 -148 -96 -148 -130 0 -21 61 -87 103 -110 50 -29
              127 -32 173 -8 39 21 114 98 114 118 0 19 -74 97 -111 115 -36 19 -98 26 -131
              15z m121 -40 c37 -18 91 -72 91 -90 0 -18 -54 -72 -91 -90 -70 -36 -138 -22
              -206 43 -18 17 -33 38 -33 47 0 19 53 71 95 93 41 22 98 21 144 -3z"/>
              <path d="M235 338 c-31 -18 -44 -40 -45 -75 0 -45 9 -62 42 -79 84 -43 168 60
              106 130 -27 30 -74 41 -103 24z m79 -34 c20 -20 20 -68 0 -88 -35 -35 -104 -6
              -104 44 0 50 69 79 104 44z"/>
          </g>
      </svg>
  </div>
</div>
<style scoped>
.password-input__eye-wrap {
    display: flex;
    align-items: center;
    justify-content: center;
}
.password-input__eye {
    width: 20px;
    height: 20px;
    display: flex;
    align-items: center;
    justify-content: center;
    cursor: pointer;
}
</style>
效果如下:

完整代码在: GitHub - lxmghct/my-vue-components
src/components/PasswordInput/PasswordInput2.vue
![[JavaScript游戏开发] Q版地图上让英雄、地图都动起来](https://img-blog.csdnimg.cn/725ebb89254c46589848d4a6335abbd6.png)
