目录
一、了解对象装配
1、属性注入
1.1、属性注入的优缺点分析
2、setter注入
2.1、setter注入的优缺点分析
3、构造方法注入
3.1、构造方法注入的优缺点
二、@Resource注解
三、综合练习
上一个博客中,我们了解了使用注解快速的将对象存储到Spring中,当然存储有简单方法,读取对象也可以使用注解的简单方法来实现,下面我们来了解一下,简单的获取对象的方法。
一、了解对象装配
获取Bean对象也叫做对象装配,是把对象取出来放到某个类中,有时候也叫对象注入。
对象装配(对象注入)的实现方法有下面的三种方式
- 属性注入:会根据属性的类型,在容器种查找并获取对象,然后赋值给类的成员变量。
- 构造方法注入:通过构造方法将对象注入到对象中。
- Setter注入:通过setXXX 方法将对象注入到类中。
1、属性注入
属性注入只需要在需要注入对象的属性上加上@Autowired或者@Resource注解即可,这两个注解存在什么样的区别,我们在后面分析,这里我们以@Autowired注解来举例说明。
1️⃣容器中同类型的对象只有一个:直接将获取到的对象注入到当前属性上。
这里我们想让UserService类种获取到UserRepository类的对象,我们就需要在UserService类种设置一个类型是UserRepository的属性,给这个属性添加上@Autowired。表示的意思为从容器种获取这个属性类型的对象注入给这个属性。
首先给UserRepository类上添加类注解,将Bean存放在容器中。
package com.java.demo.dao;

import org.springframework.stereotype.Repository;

@Repository
public class UserRepository {
    public int add(){
        System.out.println("hello UserRepository");
        return 1;
    }
}
属性注入:将UserRepository在容器中的对象注入到UserService类中。
package com.java.demo.service;

import com.java.demo.dao.UserRepository;
import org.springframework.beans.factory.annotation.Autowired;
import org.springframework.stereotype.Service;

@Service
public class UserService {
    //1.属性注入(DI:依赖注入)
    @Autowired
    private UserRepository userRepository;
    public int add(){
        System.out.println("do UserService add method");
       return userRepository.add();
    }

}
上面两步完成之后,我们就可以在测试类中,通过获取上下文对象(容器对象)来获取到userService对象(也就是依赖查找的方式获取到userService对象),然后调用userService对象的add方法,就可以观察到执行了UserRepository类的add方法,此时说明属性注入获取对象成功,我们并没有手动的new 这个userRepository对象。这里设置这个类只是用来检测属性注入(依赖注入)获取对象是否成功。
package com.java.demo.test;

import com.java.demo.service.UserService;
import org.springframework.context.ApplicationContext;
import org.springframework.context.support.ClassPathXmlApplicationContext;

public class App {
    public static void main(String[] args) {
        ApplicationContext context = new ClassPathXmlApplicationContext("spring-config.xml");
        UserService userService = context.getBean("userService",UserService.class);
        userService.add();
    }
}

容器中同类型的对象只有一个的情况,属性注入的时候根据类型在Spring中查找,找到对象之后,直接复制给这个类型的属性,但是如果容器中同类型的对象存在多个的情况,就需要给属性指定注入那个对象。如果不指定这程序就会报错。
2️⃣容器中同类型的对象存在多个:如果获取到多个同类型对象,会根据属性的名字来进行匹配。
我们通过下面的例子来了解容器中存在多个同类型对象,在获取对象是没有指定给属性指定注入那个对象,程序出现的错误。
创建一个普通实体类User,然后再Users类中使用@Bean的方式向Spring中添加多个对象,然后再UserService类中使用属性注入的方式获取User类的对象注入到属性中。
package com.java.demo.model;

public class User {
    private int id;
    private String name;

    public int getId() {
        return id;
    }

    public void setId(int id) {
        this.id = id;
    }

    public String getName() {
        return name;
    }

    public void setName(String name) {
        this.name = name;
    }

    @Override
    public String toString() {
        return "User{" +
                "id=" + id +
                ", name='" + name + '\'' +
                '}';
    }
}


package com.java.demo.model;


import org.springframework.context.annotation.Bean;
import org.springframework.stereotype.Component;

@Component
public class Users {
    @Bean("user1")
    public User user1(){
        User user = new User();
        user.setId(1);
        user.setName("张三");
        return user;
    }

    @Bean("user2")
    public User user2(){
        User user = new User();
        user.setId(2);
        user.setName("李四");
        return user;
    }
}


package com.java.demo.service;

import com.java.demo.model.User;
import org.springframework.beans.factory.annotation.Autowired;
import org.springframework.stereotype.Service;

@Service
public class UserService2 {
    @Autowired
    private User user;
    public void sayHi(){
        System.out.println(user.toString());
    }
}


package com.java.demo.test;


import com.java.demo.service.UserService2;
import org.springframework.context.ApplicationContext;
import org.springframework.context.support.ClassPathXmlApplicationContext;

public class App {
    public static void main(String[] args) {
        ApplicationContext context = new ClassPathXmlApplicationContext("spring-config.xml");
        UserService2 userService2 = context.getBean("userService2",UserService2.class);
        userService2.sayHi();
    }
}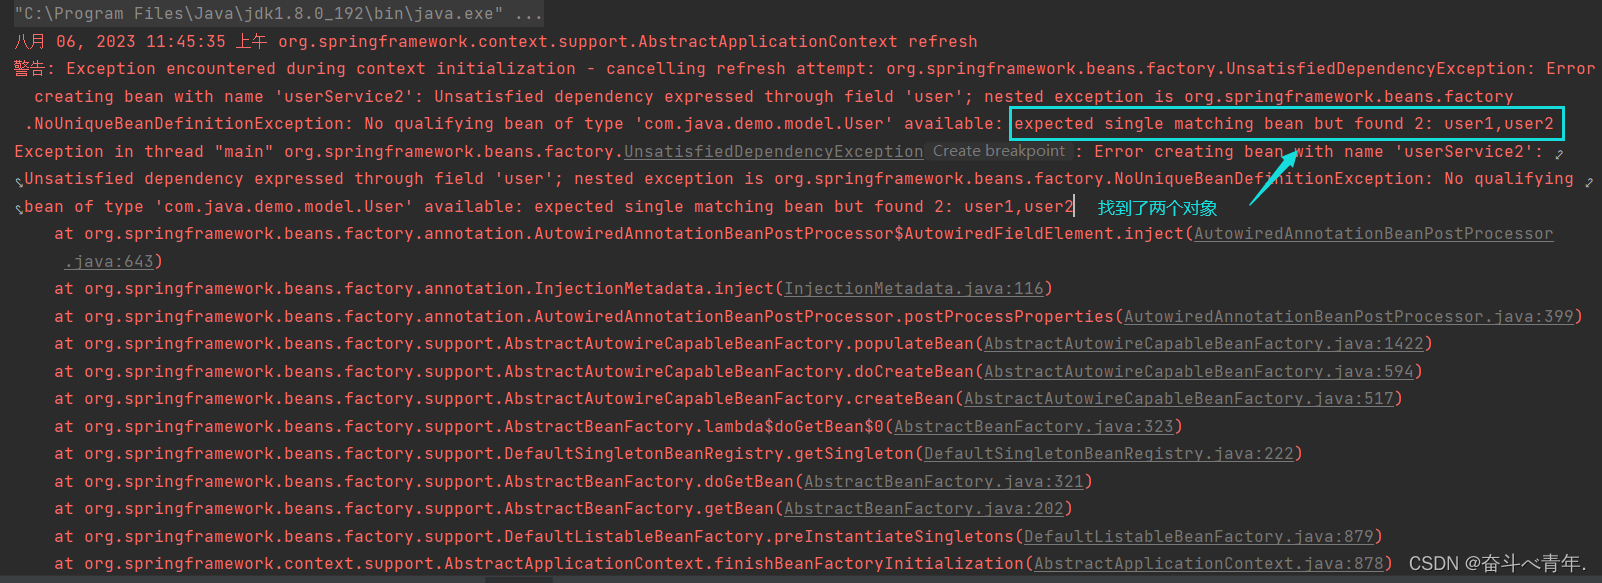
上述的代码中由于获取到多个同类型的对象,不能直接根据类型将对象直接注入到当前类的属性中,需要根据属性的名称,将获取到的对象注入到属性中,但是属性的名称和对象名不相同的情况下,属性注入就会失败。想要解决这个问题,就需要设置对象名与属性名匹配,下面是三种解决这个问题的方法。
✨解决方案
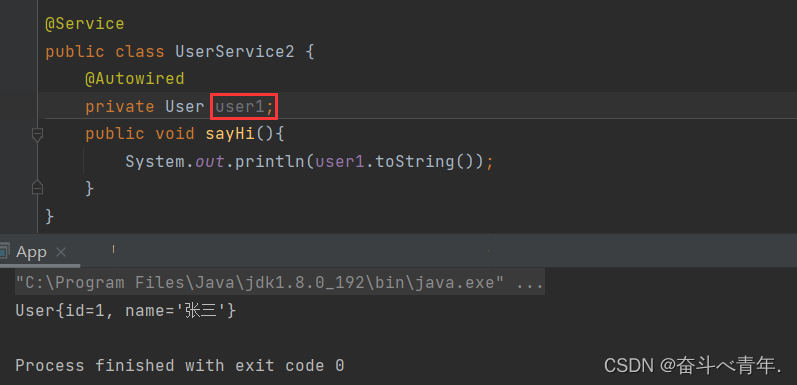
1️⃣将属性的名字和Bean的名字对应上即可。
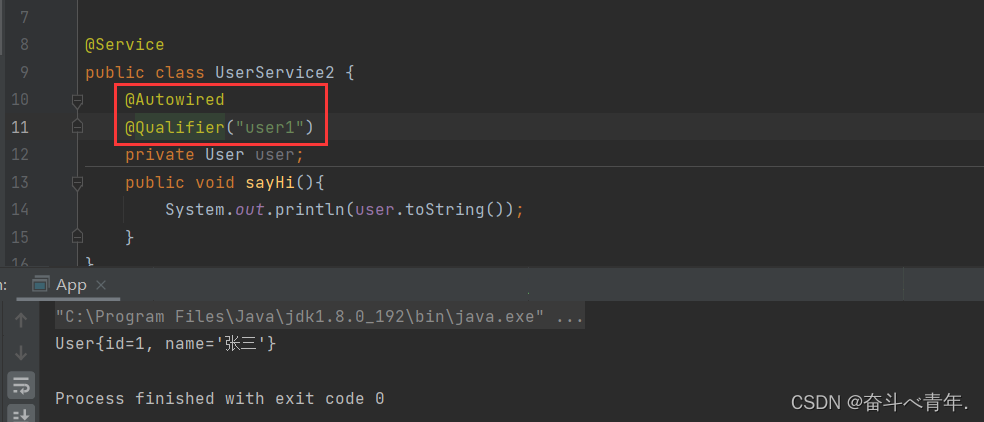
2️⃣ 也可以通过@Autowired注解和@Qualifier注解搭配使用,设置@Qualifier的参数为获取到的对象中的任意一个对象名即可,@Qualifier表示的意思就是根据参数筛选对象。
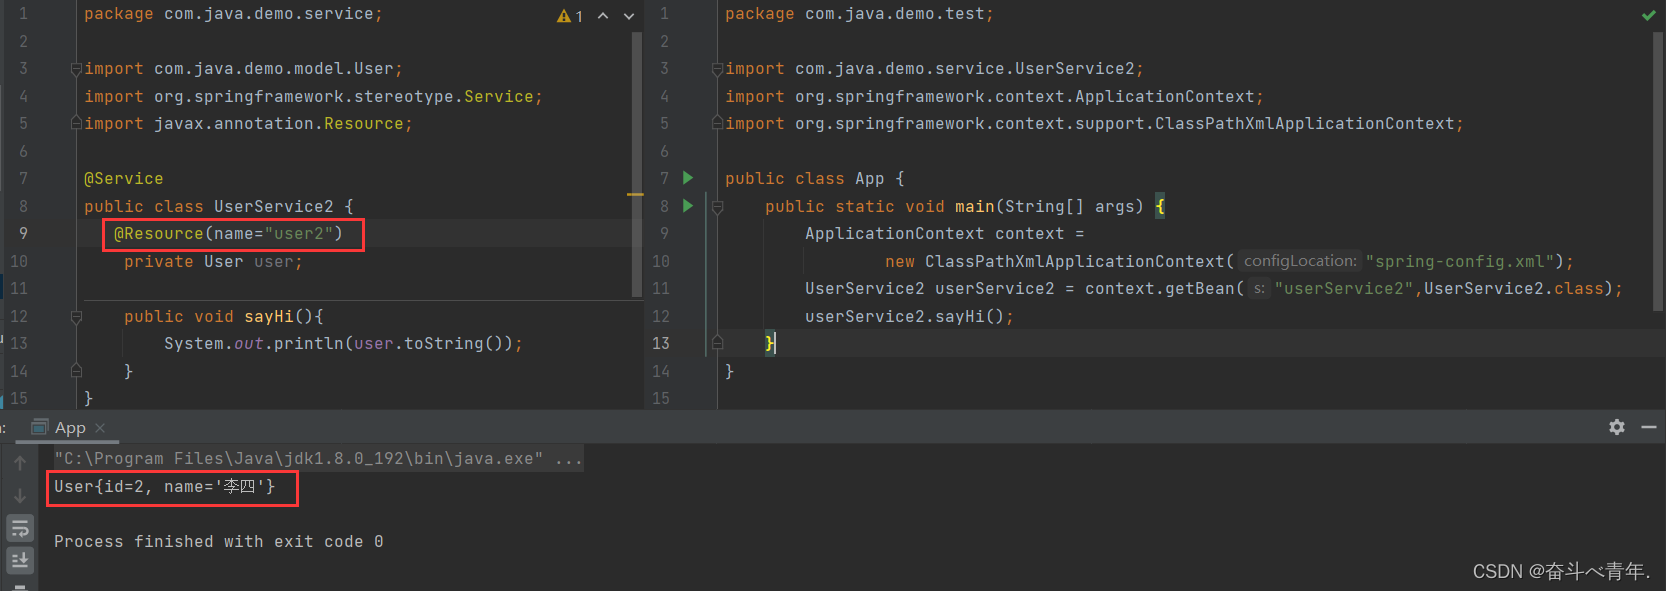
3️⃣属性上直接添加@Resource注解,这个注解的参数中存在name属性,我们可以将name的值设置获取到的对象中的某一个对象的名字。
1.1、属性注入的优缺点分析
1️⃣优点
属性注入的优点就是使用简单,直选哟添加一个@Autowired注解,就可以在不new对象的情况下,直接获取注入的对象了。
2️⃣缺点
🍂功能性问题:无法注入一个不可变的对象(被final修饰的对象),因为被final修饰的变量只能有两种初始化的方式,一种是直接复制,一种是通过构造方法赋值。就不能通过属性注入的方式获取到对象了。

🍂通用性问题:属性注入只能在IoC容器的前提下使用,脱离了IoC容器就不能使用了。
🍂设计原则问题:更容易违背单一设计原则,通俗来说就是属性注入的方式简单,滥用的概率就会很大。举个例子比如一个页面中不仅有用户的信息,也有用户请求的资源信息,那么后端写代码的时候在数据持久层的用户类中,本来就是针对用户注入相关的依赖,但是由于为了让程序的效率更高,有可能会在这个类中注入一些其他的信息相关的依赖。
2、setter注入
使用setter注入,在setXXX方法上添加一个@Autowired或者@Resource注解即可,当然setter注入也存在和属性注入一样的容器中相同类型的对象个数问题。这个问题的解决方法也和上述的属性注入时说的方法一样。
package com.java.demo.dao;

import org.springframework.stereotype.Repository;

@Repository
public class UserRepository {
    public int add(){
        System.out.println("hello UserRepository");
        return 1;
    }
}


package com.java.demo.service;

import com.java.demo.dao.UserRepository;
import org.springframework.beans.factory.annotation.Autowired;
import org.springframework.stereotype.Service;

@Service
public class UserService3 {
    private UserRepository userRepository;

    @Autowired
    public void setUserRepository(UserRepository userRepository) {
        this.userRepository = userRepository;
    }
    public void sayHi(){
        System.out.println("hello UserService3 .");
        userRepository.add();
    }
}


package com.java.demo.test;


import com.java.demo.service.UserService3;
import org.springframework.context.ApplicationContext;
import org.springframework.context.support.ClassPathXmlApplicationContext;

public class App {
    public static void main(String[] args) {
        ApplicationContext context = new ClassPathXmlApplicationContext("spring-config.xml");
        UserService3 userService3 = context.getBean("userService3",UserService3.class);
        userService3.sayHi();
    }
}

2.1、setter注入的优缺点分析
1️⃣优点
setter更符合单一设计原则,因为那个setter方法,只是针对一个属性进程赋值。
2️⃣缺点
🍂无法注入一个final修饰的变量,因为final修饰的变量初始化的时候只有两种方式要么直接初始化,要么通过构造方法初始化。
🍂注入的对象可被修改。因为setXXX是一个方法,所以他就可能别调用,这个时候就会导致注入的Bean对象被修改了。
3、构造方法注入
使用构造方法注入,标准的写法在构造方法上添加一个@Autowired注解或者在构造方法上不加注解也可以实现注入效果。当然构造注入也存在和属性注入一样的容器中相同类型的对象个数问题。这个问题的解决方法也和上述的属性注入时说的方法一样。这里构造方法不支持使用@Resource注解。
1️⃣标准的写法构造方法上添加@Autowired注解
package com.java.demo.dao;

import org.springframework.stereotype.Repository;

@Repository
public class UserRepository {
    public int add(){
        System.out.println("hello UserRepository");
        return 1;
    }
}


package com.java.demo.service;

import com.java.demo.dao.UserRepository;
import org.springframework.beans.factory.annotation.Autowired;
import org.springframework.stereotype.Service;

@Service
public class UserService4 {
    private UserRepository userRepository;

    @Autowired
    public UserService4(UserRepository userRepository) {
        this.userRepository = userRepository;
    }
    public void sayHi(){
        System.out.println("hello userService4 .");
        userRepository.add();
    }
}


package com.java.demo.test;


import com.java.demo.service.UserService2;
import org.springframework.context.ApplicationContext;
import org.springframework.context.support.ClassPathXmlApplicationContext;

public class App {
    public static void main(String[] args) {
        ApplicationContext context = new ClassPathXmlApplicationContext("spring-config.xml");
        UserService4 userService4 = context.getBean("userService4",UserService4.class);
        userService4.sayHi();
    }
}

2️⃣不太标准的写法,构造方法上不加注解,这种写法是当前类中只有一个构造方法的时候可以使用的,如果有多个构造方法的时候,构造方法上的@Autowired注解是不可以省略的。


3.1、构造方法注入的优缺点
1️⃣优点
🍂可以注入不可变对象(被final修改的变量)
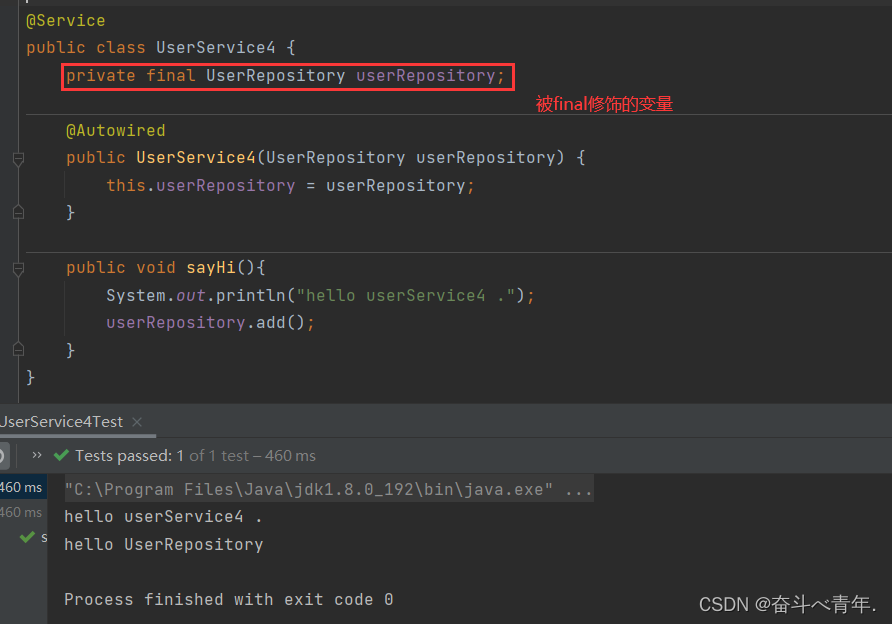
🍂注入的对象不会被修改,因为构造方法会随着JVM的启动而被加载,只会被加载一次。就像上面的例子userRepositoryd对象注入到UserService4这个类中,这个类实例化被存入容器的时候,构造方法只会执行一次。
🍂构造方法注入,可以保证注入对象完全初始化,因为构造方法是在对象创建之前执行的。
🍂构造方法注入的通用性最好的,因为一个类中使用了构造方法注入,当你要使用这个类的对象的时候你就不得不给构造方法中的参数(当前类的属性)注入一个对象。
2️⃣缺点
🍂构造方法注入的写法比属性注入复杂
🍂构造方法注入的写法无法解决循环依赖的问题
二、@Resource注解
@Resource注解和@Autowired注解的用法是相同的,都可以注入对象。
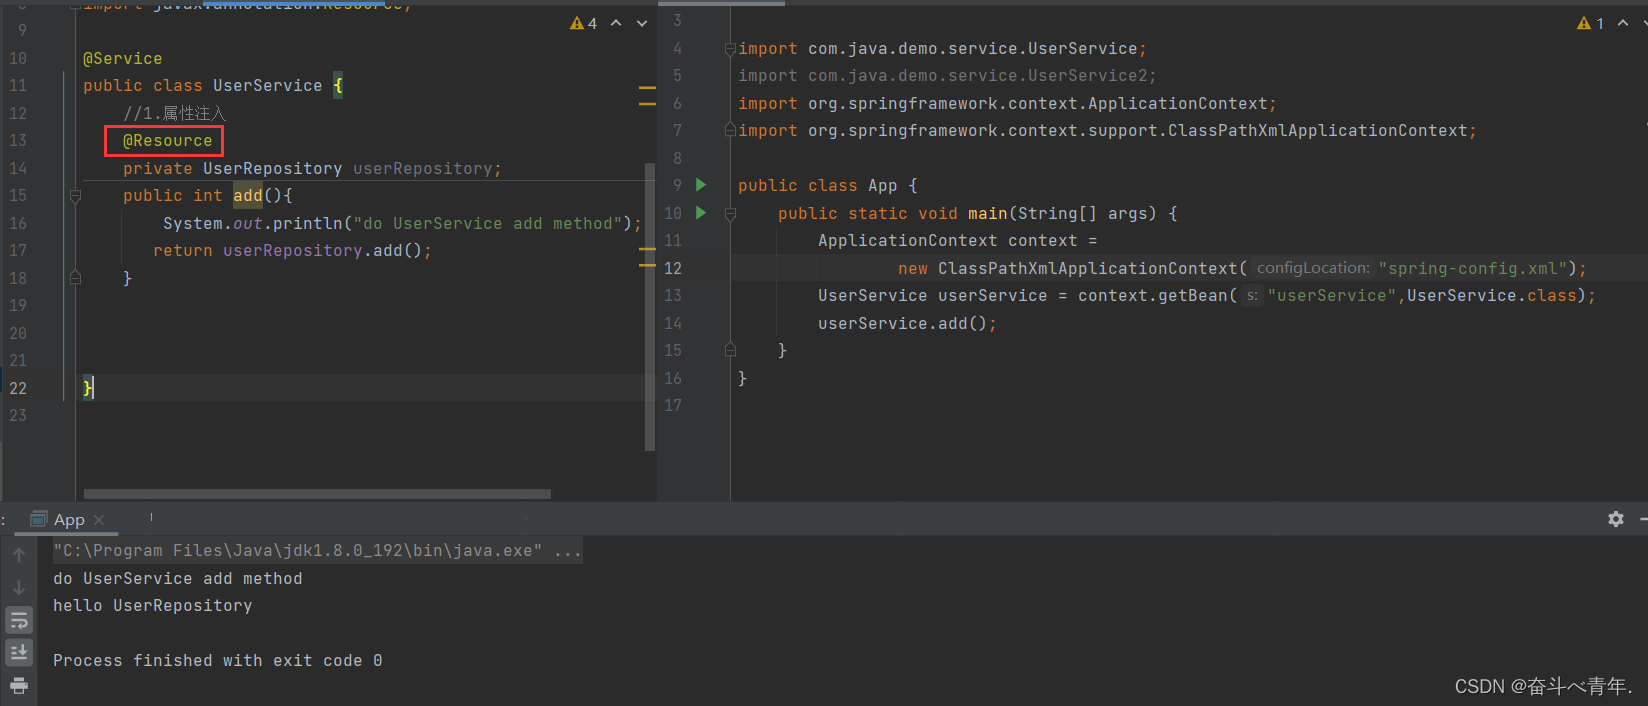
✨@Resource和@Autowired的区别
1️⃣出生不同:@Autowired来自于Spring,而@Resource来自于JDK的注解;
2️⃣支持参数不同:@Autowired的参数只有一个,而@Ressource支持更多的参数设置。

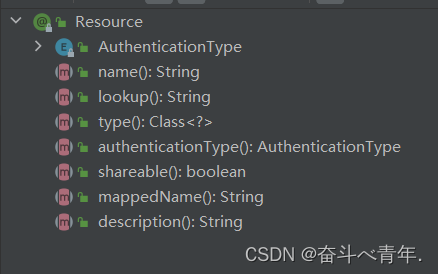
3️⃣使用上的区别:@Autowired可用于Setter注入、构造方法注入和属性注入,但是@Resource只能用于Setter注入和属性注入,不支持使用构造方法注入。
4️⃣idea兼容性支持不同:使用@Autowired在idea专业版下可能出现误报,@Resource不存在误报的问题。
三、综合练习
在 Spring 项⽬中,通过 main ⽅法获取到 Controller 类,调⽤ Controller ⾥⾯通过注⼊的⽅式调⽤ Service 类,Service 再通过注⼊的⽅式获取到 Repository 类,Repository 类⾥⾯有⼀个⽅法构建⼀ 个 User 对象,返回给 main ⽅法。Repository ⽆需连接数据库,使用伪代码即可。
这里需要注意的是,通过main方法获取Controller类,在main方法中不能使用依赖注入的方式获取对象,因为main方法为静态方法,静态方法的执行是在Spring框架之前的,所以我们需要使用依赖查找的方式获取容器对象,然后获取对象。
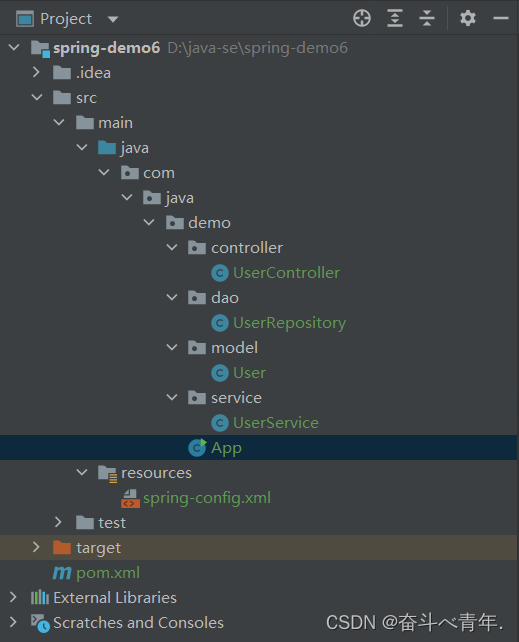
类的设置路径
package com.java.demo.model;

public class User {
    private int id;
    private String name;

    public int getId() {
        return id;
    }

    public void setId(int id) {
        this.id = id;
    }

    public String getName() {
        return name;
    }

    public void setName(String name) {
        this.name = name;
    }

    @Override
    public String toString() {
        return "User{" +
                "id=" + id +
                ", name='" + name + '\'' +
                '}';
    }

}
package com.java.demo.dao;

import com.java.demo.model.User;
import org.springframework.stereotype.Repository;

@Repository
public class UserRepository {
    //伪代码
    public User getUser(){
        User user = new User();
        user.setId(1);
        user.setName("王五");
        return user;
    }

}
package com.java.demo.service;

import com.java.demo.dao.UserRepository;
import com.java.demo.model.User;
import org.springframework.beans.factory.annotation.Autowired;
import org.springframework.stereotype.Service;

@Service
public class UserService {
    @Autowired
    private UserRepository userRepository;
    public User getUser(){
       return userRepository.getUser();
    }
}
package com.java.demo.controller;

import com.java.demo.model.User;
import com.java.demo.service.UserService;
import org.springframework.beans.factory.annotation.Autowired;
import org.springframework.stereotype.Controller;

@Controller
public class UserController {
    @Autowired
    private UserService userService;
    public User getUser(){
        return userService.getUser();
    }
}
package com.java.demo;

import com.java.demo.controller.UserController;
import org.springframework.context.ApplicationContext;
import org.springframework.context.support.ClassPathXmlApplicationContext;

public class App {
    public static void main(String[] args) {
        ApplicationContext context = new ClassPathXmlApplicationContext("spring-config.xml");
        UserController userController = context.getBean("userController",UserController.class);
        System.out.println(userController.getUser());
    }
}


![[23] Instruct 3D-to-3D: Text Instruction Guided 3D-to-3D conversion](https://img-blog.csdnimg.cn/bf17d2d1f8ef46b5a12eda50ca6b4c74.png)

