SAM从提示生成物体mask
Segment Anything Model(SAM)根据指示所需的对象来预测对象掩码。该模型首先将图像转换为图像嵌入,从而可以从提示中高效地生成高质量的掩码。
SamPredictor类为模型提供了一个简单的接口来提示模型。用户可以首先使用set_image方法设置图像,该方法会计算所需的图像嵌入。然后,可以通过predict方法提供提示,以从这些提示中高效地预测掩码。模型可以接受点和框提示以及先前迭代预测的掩码作为输入。
设置
导入所需的库和用于显示点、框和掩码的辅助函数。
import numpy as np
import torch
import matplotlib.pyplot as plt
import cv2
def show_mask(mask, ax, random_color=False):
    if random_color:
        color = np.concatenate([np.random.random(3), np.array([0.6])], axis=0)
    else:
        color = np.array([30/255, 144/255, 255/255, 0.6])
    h, w = mask.shape[-2:]
    mask_image = mask.reshape(h, w, 1) * color.reshape(1, 1, -1)
    ax.imshow(mask_image)

def show_points(coords, labels, ax, marker_size=375):
    pos_points = coords[labels==1]
    neg_points = coords[labels==0]
    ax.scatter(pos_points[:, 0], pos_points[:, 1], color='green', marker='*', s=marker_size, edgecolor='white', linewidth=1.25)
    ax.scatter(neg_points[:, 0], neg_points[:, 1], color='red', marker='*', s=marker_size, edgecolor='white', linewidth=1.25)

def show_box(box, ax):
    x0, y0 = box[0], box[1]
    w, h = box[2] - box[0], box[3] - box[1]
    ax.add_patch(plt.Rectangle((x0, y0), w, h, edgecolor='green', facecolor=(0,0,0,0), lw=2))
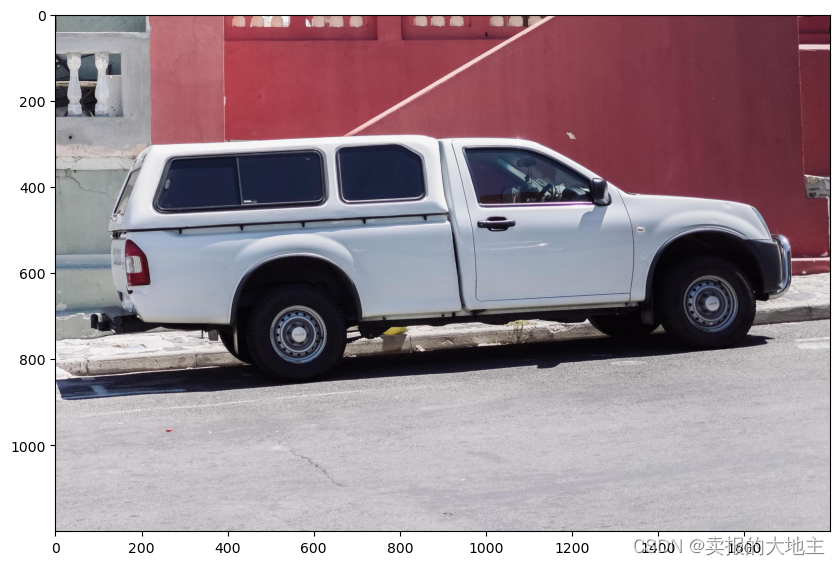
示例图像
image = cv2.imread('images/truck.jpg')
image = cv2.cvtColor(image, cv2.COLOR_BGR2RGB)
plt.figure(figsize=(10,10))
plt.imshow(image)
plt.axis('on')
plt.show()
使用SAM选择对象
首先,加载SAM模型和预测器。将下面的路径更改为指向SAM检查点。为了获得最佳结果,建议在CUDA上运行并使用默认模型。
import sys
sys.path.append("..")
from segment_anything import sam_model_registry, SamPredictor

sam_checkpoint = "sam_vit_h_4b8939.pth"
model_type = "vit_h"

device = "cuda"

sam = sam_model_registry[model_type](checkpoint=sam_checkpoint)
sam.to(device=device)

predictor = SamPredictor(sam)
通过调用SamPredictor.set_image来处理图像,以生成图像嵌入。SamPredictor会记住这个嵌入,并在后续的掩码预测中使用它。
predictor.set_image(image)
要选择卡车,选择其上的一个点。点以(x,y)格式输入模型,并附带标签1(前景点)或0(背景点)。可以输入多个点;在这里我们只使用一个。所选点将在图像上显示为星号。
input_point = np.array([[500, 375]])
input_label = np.array([1])
plt.figure(figsize=(10,10))
plt.imshow(image)
show_points(input_point, input_label, plt.gca())
plt.axis('on')
plt.show()
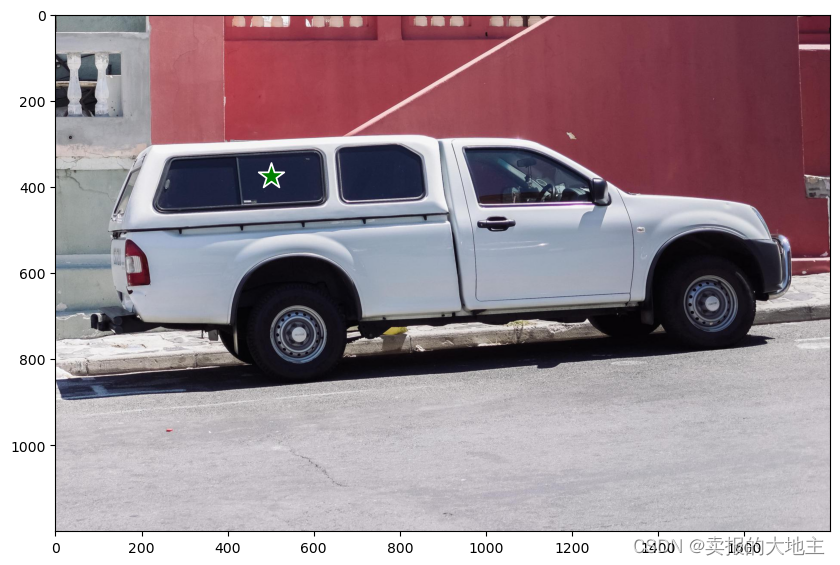
使用SamPredictor.predict进行预测。模型将返回掩码、这些掩码的质量预测以及可以传递给下一次预测迭代的低分辨率掩码logits。
masks, scores, logits = predictor.predict(
    point_coords=input_point,
    point_labels=input_label,
    multimask_output=True,
)
使用 multimask_output=True(默认设置),SAM会输出3个掩码,其中 scores 给出了模型对这些掩码质量的自我估计。这个设置旨在处理模糊的输入提示,有助于模型根据提示消除不同的一致对象。当设置为 False 时,它会返回一个单独的掩码。对于模糊的提示,比如一个单独的点,建议使用 multimask_output=True,即使只需要一个单独的掩码;最佳的单个掩码可以通过选择在 scores 中返回的最高分的掩码来选择。这通常会导致更好的掩码。
masks.shape # (number_of_masks) x H x W
(3, 1200, 1800)
for i, (mask, score) in enumerate(zip(masks, scores)):
    plt.figure(figsize=(10,10))
    plt.imshow(image)
    show_mask(mask, plt.gca())
    show_points(input_point, input_label, plt.gca())
    plt.title(f"Mask {i+1}, Score: {score:.3f}", fontsize=18)
    plt.axis('off')
    plt.show()
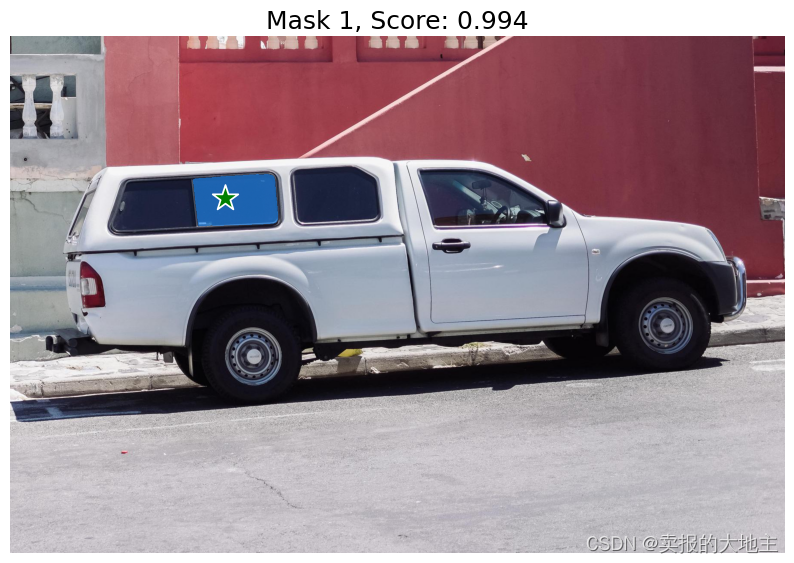
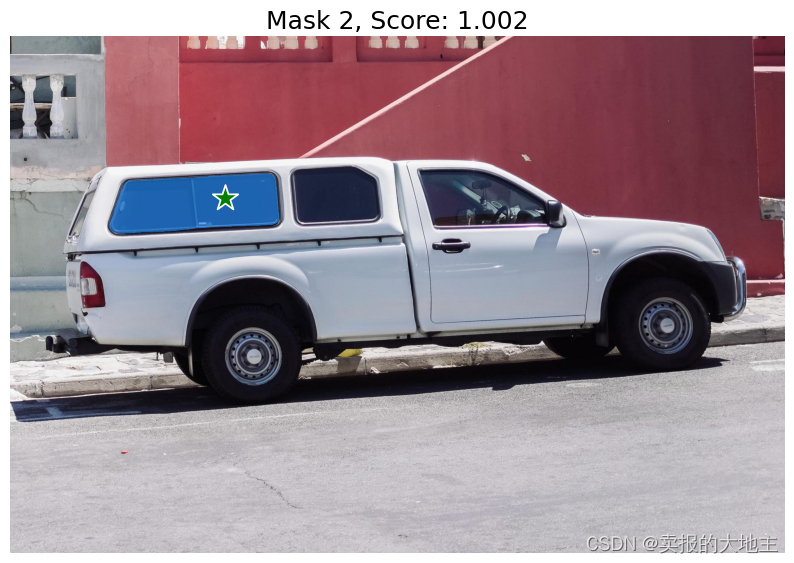
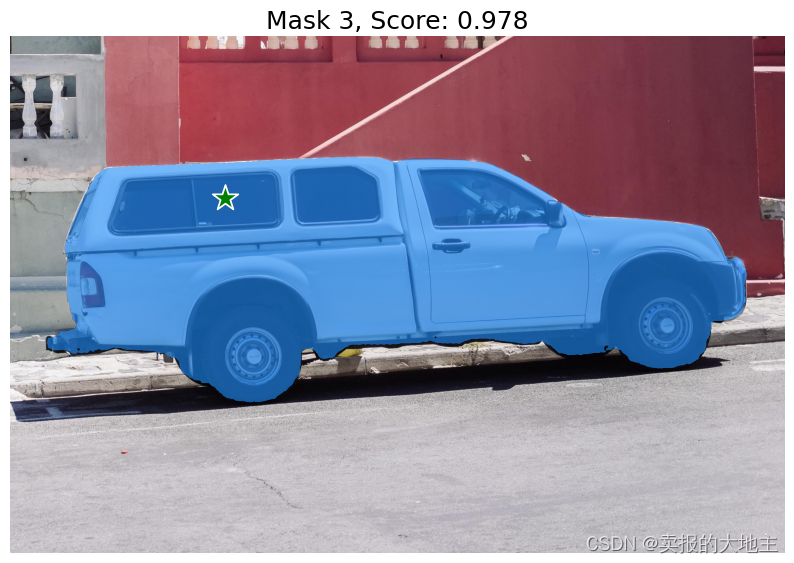
使用额外的点指定特定对象
单个输入点是模糊的,并且模型返回了与之一致的多个对象。要获取单个对象,可以提供多个点。如果可用,还可以将来自上一次迭代的掩码提供给模型以帮助预测。在使用多个提示指定单个对象时,可以通过设置 multimask_output=False 来请求单个掩码。
input_point = np.array([[500, 375], [1125, 625]])
input_label = np.array([1, 1])

mask_input = logits[np.argmax(scores), :, :]  # Choose the model's best mask
masks, _, _ = predictor.predict(
    point_coords=input_point,
    point_labels=input_label,
    mask_input=mask_input[None, :, :],
    multimask_output=False,
)
masks.shape
(1, 1200, 1800)
plt.figure(figsize=(10,10))
plt.imshow(image)
show_mask(masks, plt.gca())
show_points(input_point, input_label, plt.gca())
plt.axis('off')
plt.show()
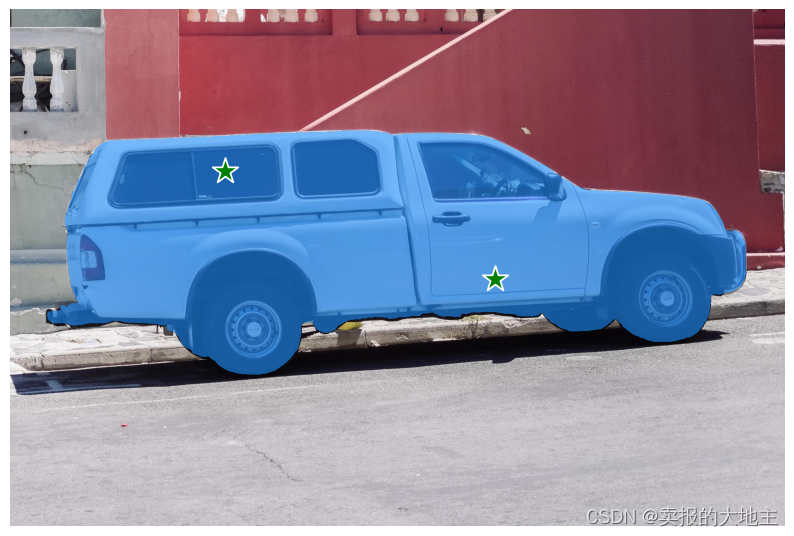
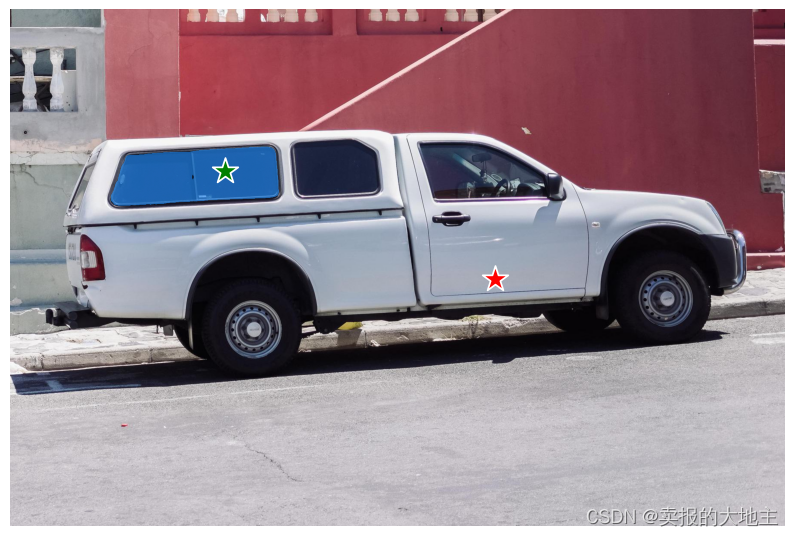
为了排除汽车并仅指定窗户,可以提供一个背景点(标签为0,这里以红色显示)。
input_point = np.array([[500, 375], [1125, 625]])
input_label = np.array([1, 0])

mask_input = logits[np.argmax(scores), :, :]  # Choose the model's best mask
masks, _, _ = predictor.predict(
    point_coords=input_point,
    point_labels=input_label,
    mask_input=mask_input[None, :, :],
    multimask_output=False,
)
plt.figure(figsize=(10, 10))
plt.imshow(image)
show_mask(masks, plt.gca())
show_points(input_point, input_label, plt.gca())
plt.axis('off')
plt.show()
使用框指定特定对象
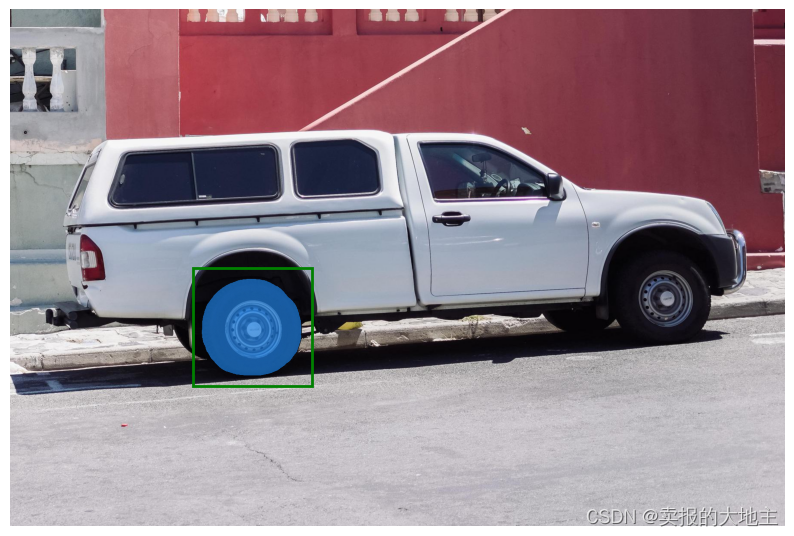
模型还可以接受框作为输入,以xyxy格式提供。
input_box = np.array([425, 600, 700, 875])
masks, _, _ = predictor.predict(
    point_coords=None,
    point_labels=None,
    box=input_box[None, :],
    multimask_output=False,
)
plt.figure(figsize=(10, 10))
plt.imshow(image)
show_mask(masks[0], plt.gca())
show_box(input_box, plt.gca())
plt.axis('off')
plt.show()
结合点和框
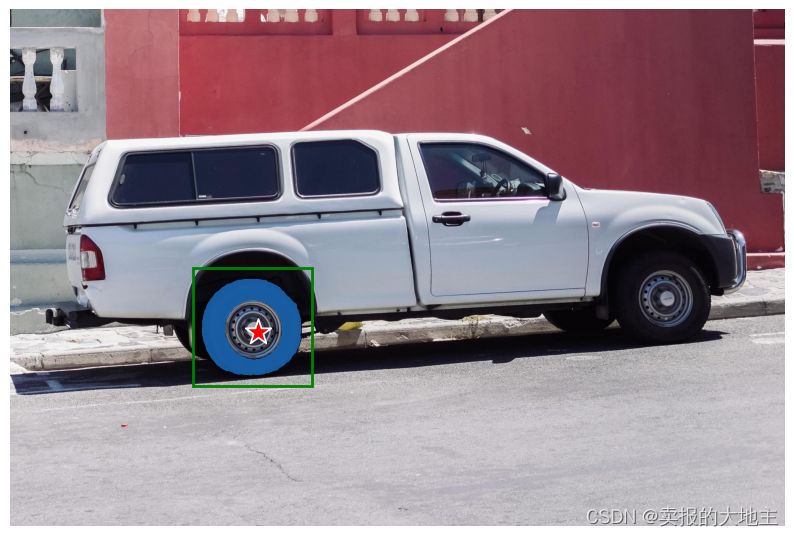
可以通过将两种类型的提示都包含在预测器中来组合点和框。在这里,可以使用这种方法仅选择卡车的轮胎,而不是整个车轮。
input_box = np.array([425, 600, 700, 875])
input_point = np.array([[575, 750]])
input_label = np.array([0])
masks, _, _ = predictor.predict(
    point_coords=input_point,
    point_labels=input_label,
    box=input_box,
    multimask_output=False,
)
plt.figure(figsize=(10, 10))
plt.imshow(image)
show_mask(masks[0], plt.gca())
show_box(input_box, plt.gca())
show_points(input_point, input_label, plt.gca())
plt.axis('off')
plt.show()
批量的提示输入
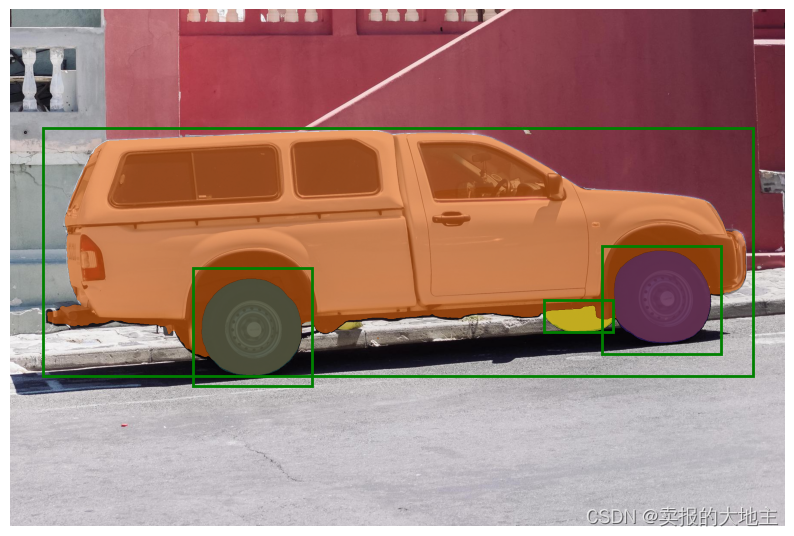
SamPredictor可以使用predict_torch方法为同一图像接受多个输入提示。此方法假定输入点已经是torch张量,并且已经被转换为输入帧。例如,假设我们从目标检测器中有几个框输出。
input_boxes = torch.tensor([
    [75, 275, 1725, 850],
    [425, 600, 700, 875],
    [1375, 550, 1650, 800],
    [1240, 675, 1400, 750],
], device=predictor.device)
将框转换为输入帧,然后预测掩码。SamPredictor将所需的转换存储在transform字段中,以便轻松访问,尽管它也可以直接实例化,用于例如数据加载器中的使用(参见segment_anything.utils.transforms)。
transformed_boxes = predictor.transform.apply_boxes_torch(input_boxes, image.shape[:2])
masks, _, _ = predictor.predict_torch(
    point_coords=None,
    point_labels=None,
    boxes=transformed_boxes,
    multimask_output=False,
)
masks.shape # (batch_size) x (num_predicted_masks_per_input) x H x W
torch.Size([4, 1, 1200, 1800])
plt.figure(figsize=(10, 10))
plt.imshow(image)
for mask in masks:
    show_mask(mask.cpu().numpy(), plt.gca(), random_color=True)
for box in input_boxes:
    show_box(box.cpu().numpy(), plt.gca())
plt.axis('off')
plt.show()
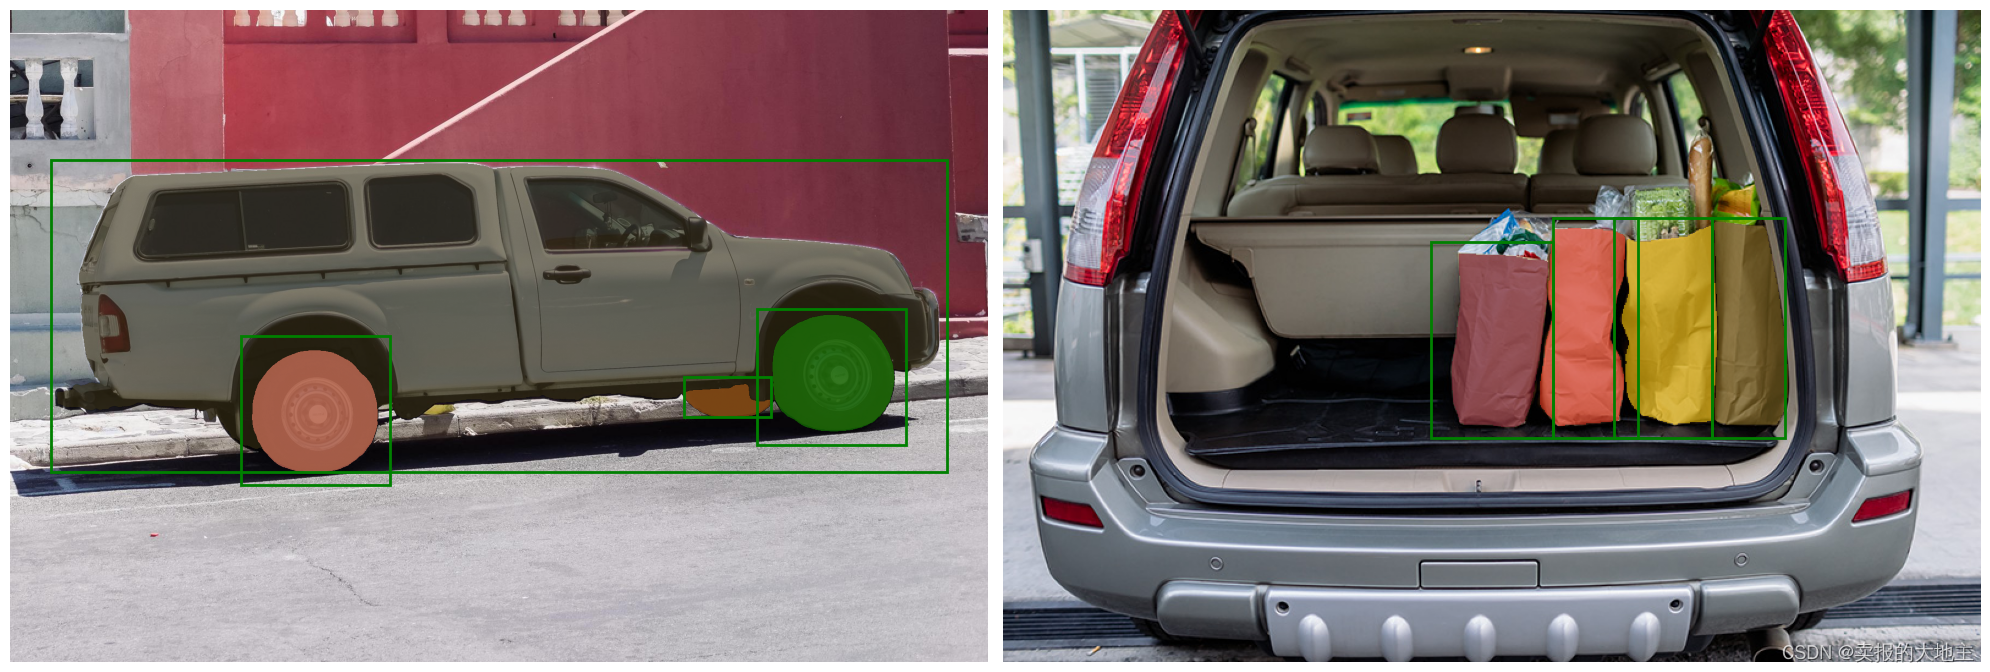
端到端批量推断
如果所有提示都提前准备好,就可以直接以端到端的方式运行SAM。这也允许对图像进行批处理。
image1 = image  # truck.jpg from above
image1_boxes = torch.tensor([
    [75, 275, 1725, 850],
    [425, 600, 700, 875],
    [1375, 550, 1650, 800],
    [1240, 675, 1400, 750],
], device=sam.device)

image2 = cv2.imread('images/groceries.jpg')
image2 = cv2.cvtColor(image2, cv2.COLOR_BGR2RGB)
image2_boxes = torch.tensor([
    [450, 170, 520, 350],
    [350, 190, 450, 350],
    [500, 170, 580, 350],
    [580, 170, 640, 350],
], device=sam.device)
这两个图像和提示都作为已经转换到正确帧的PyTorch张量进行输入。输入被打包成图像列表,其中每个元素是一个字典,包含以下键:
image:输入图像,以CHW格式的PyTorch张量形式。original_size:在将图像转换为输入SAM之前的图像尺寸,以(H,W)格式表示。point_coords:批量点提示的坐标。point_labels:批量点提示的标签。boxes:批量输入的框。mask_inputs:批量输入的掩码。
如果没有提示,可以排除相应的键。
from segment_anything.utils.transforms import ResizeLongestSide
resize_transform = ResizeLongestSide(sam.image_encoder.img_size)

def prepare_image(image, transform, device):
    image = transform.apply_image(image)
    image = torch.as_tensor(image, device=device.device)
    return image.permute(2, 0, 1).contiguous()
batched_input = [
     {
         'image': prepare_image(image1, resize_transform, sam),
         'boxes': resize_transform.apply_boxes_torch(image1_boxes, image1.shape[:2]),
         'original_size': image1.shape[:2]
     },
     {
         'image': prepare_image(image2, resize_transform, sam),
         'boxes': resize_transform.apply_boxes_torch(image2_boxes, image2.shape[:2]),
         'original_size': image2.shape[:2]
     }
]
运行模型。
batched_output = sam(batched_input, multimask_output=False)
输出是一个列表,其中包含每个输入图像的结果,列表元素是带有以下键的字典:
masks: 预测的二进制掩码的批处理torch张量,尺寸与原始图像相同。iou_predictions: 模型对每个掩码质量的预测。low_res_logits: 每个掩码的低分辨率logits,可以在后续迭代中作为掩码输入传回模型。
batched_output[0].keys()
dict_keys(['masks', 'iou_predictions', 'low_res_logits'])
fig, ax = plt.subplots(1, 2, figsize=(20, 20))

ax[0].imshow(image1)
for mask in batched_output[0]['masks']:
    show_mask(mask.cpu().numpy(), ax[0], random_color=True)
for box in image1_boxes:
    show_box(box.cpu().numpy(), ax[0])
ax[0].axis('off')

ax[1].imshow(image2)
for mask in batched_output[1]['masks']:
    show_mask(mask.cpu().numpy(), ax[1], random_color=True)
for box in image2_boxes:
    show_box(box.cpu().numpy(), ax[1])
ax[1].axis('off')

plt.tight_layout()
plt.show()
