学习目标
前两篇文章我们介绍了什么是Spring,以及Spring的一些核心概念,并且快速快发一个Spring项目,以及详细讲解IOC,今天详细介绍一些DI(依赖注入)
能够配置setter方式注入属性值
能够配置构造方式注入属性值
能够理解什么是自动装配
一、依赖注入(DI配置)
1 依赖注入方式【重点】
思考:向一个类中传递数据的方式有几种?(给类中的属性赋值)
-
setter方法
-
构造方法
思考:依赖注入描述了在容器中建立bean与bean之间依赖关系的过程,注入数据类型有哪些?
-
简单类型=八种基本数据类型+String
-
引用类型
1.1 依赖注入的两种方式
- setter注入
-
简单类型
-
引用类型(很常用)
-
- 构造器注入
-
简单类型
-
引用类型
-
2 setter方式注入
思考:setter方式注入使用什么子标签?
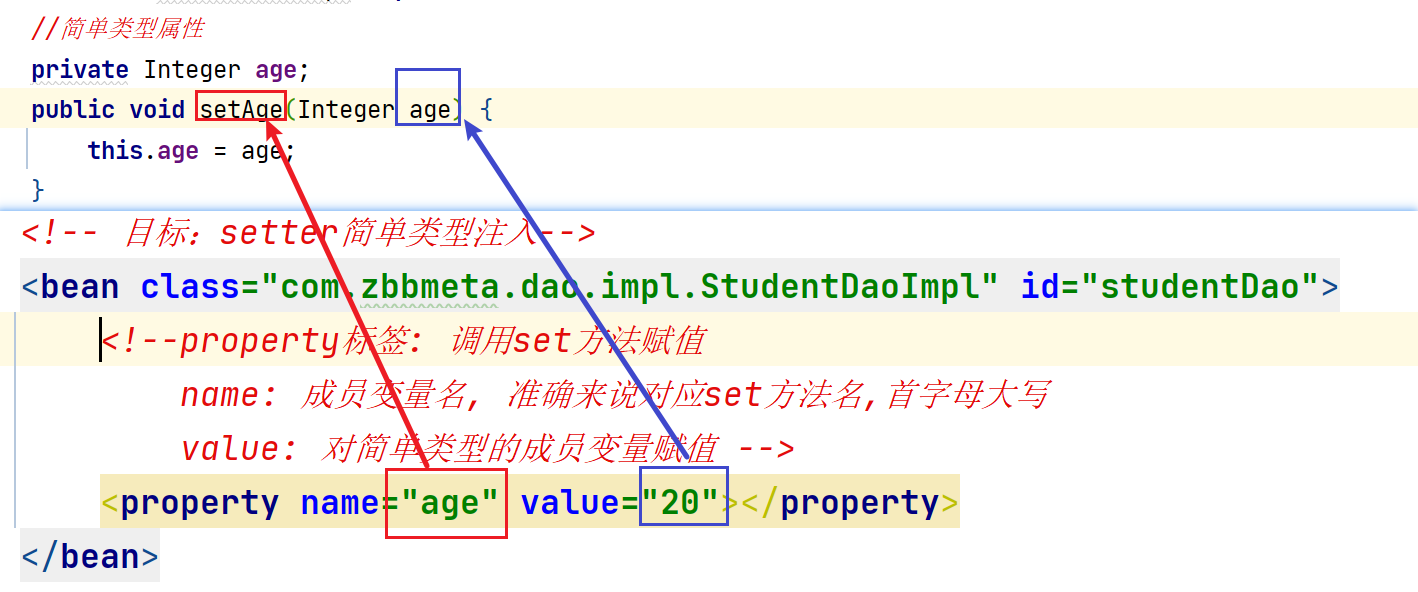
property标签: 调用set方法赋值
name: 成员变量名, 准确来说对应set方法名,首字母大写
value: 对简单类型的成员变量赋值
ref: 对引用类型的成员变量赋值
2.1简单类型setter注入
格式:
<!-- property标签: 调用set方法赋值
       name: 成员变量名, 准确来说对应set方法名,首字母大写
       value: 对简单类型的成员变量赋值 -->
<property name="age" value="20"></property>
2.2 引用类型setter注入
格式:
<!--property标签: 调用set方法赋值
      name: 成员变量名, 准确来说对应set方法名,首字母大写
      ref: 对引用类型的成员变量赋值, 引用的对象 -->
<property name="studentDao" ref="studentDao">
</property>
2.3 setter注入代码实现
【第0步】创建项目
【第1步】导入Spring坐标
【第2步】导入Student实体类
【第3步】定义Spring管理的类(接口)
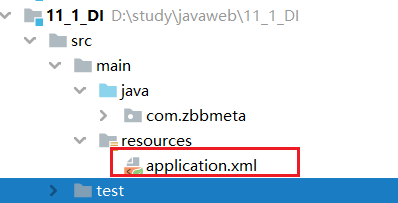
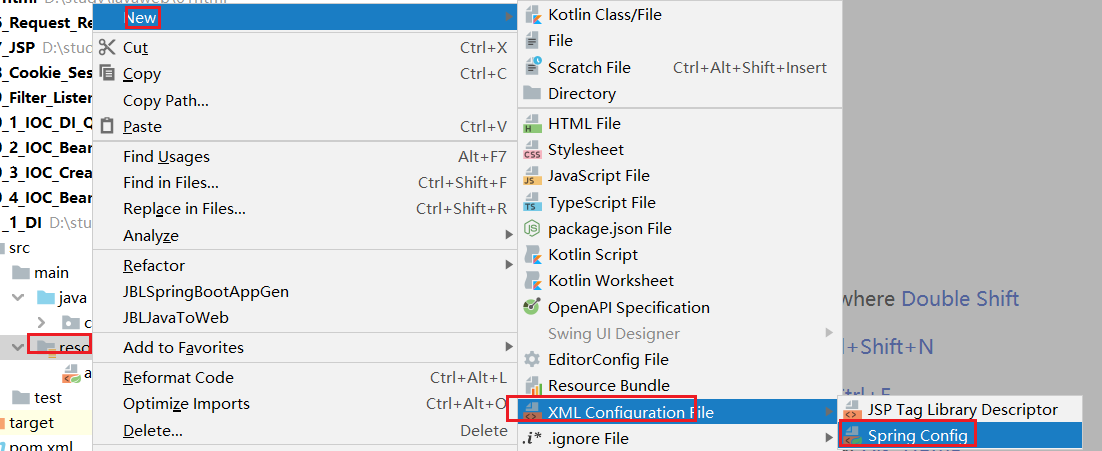
【第4步】创建Spring配置文件在resources目录下创建`application.xml`,配置setter的简单类型
【第5步】在test目录下创建`StudentServiceTest`,进行测试
【第6步】在`application.xml`,配置对应引用类型注入
【第7步】测试
【第0步】创建项目
【第1步】导入Spring坐标
  <dependencies>
      <!--导入spring的坐标spring-context,对应版本是5.2.10.RELEASE-->
      <dependency>
          <groupId>org.springframework</groupId>
          <artifactId>spring-context</artifactId>
          <version>5.3.15</version>
      </dependency>

      <!-- 导入junit的测试包 -->
      <dependency>
          <groupId>org.junit.jupiter</groupId>
          <artifactId>junit-jupiter</artifactId>
          <version>5.8.2</version>
          <scope>test</scope>
      </dependency>

      <dependency>
          <groupId>org.projectlombok</groupId>
          <artifactId>lombok</artifactId>
          <version>1.18.28</version>
      </dependency>
  </dependencies>
【第2步】导入Student实体类
@Data
@ToString
@AllArgsConstructor
public class Student {
    private String name;
    private String address;
    private Integer age;

    private Integer status;
}
【第3步】定义Spring管理的类(接口)
-
StudentDao接口和StudentDaoImpl实现类用于简单类型注入
package com.zbbmeta.dao;

public interface StudentDao {
    /**
     * 添加学生
     */
    void save();
}
public class StudentDaoImpl implements StudentDao {
    //简单类型属性
    private Integer age;
    public void setAge(Integer age) {
        this.age = age;
    }
    @Override
    public void save() {
        System.out.println("DAO: 年龄:"+this.age);
        System.out.println("DAO: 添加学生信息到数据库...");
    }
}
-
StudentService接口和StudentServiceImpl实现类用于引用类型注入
package com.zbbmeta.service;

public interface StudentService {
    /**
     * 添加学生
     */
    void save();
}
package com.zbbmeta.service.impl;

import com.zbbmeta.dao.StudentDao;
import com.zbbmeta.service.StudentService;


public class StudentServiceImpl implements StudentService {

    //创建成员对象
    private StudentDao studentDao ;

    //提供依赖对象对应的setter方法
    public void setStudentDao(StudentDao studentDao) {
        this.studentDao = studentDao;
    }

    @Override
    public void save() {
        System.out.println("Service: 添加学生信息到数据库...");
        studentDao.save();
    }
}
【第4步】创建Spring配置文件在resources目录下创建application.xml,配置setter的简单类型
-
定义application.xml文件中创建StudentDao类到IOC容器,并实现简单类型注入
<?xml version="1.0" encoding="UTF-8"?>
<beans xmlns="http://www.springframework.org/schema/beans"
       xmlns:xsi="http://www.w3.org/2001/XMLSchema-instance"
       xsi:schemaLocation="http://www.springframework.org/schema/beans http://www.springframework.org/schema/beans/spring-beans.xsd">

    <!-- 目标:setter简单类型注入-->
    <bean class="com.zbbmeta.dao.impl.StudentDaoImpl" id="studentDao">
<!--        property标签: 调用set方法赋值
            name: 成员变量名, 准确来说对应set方法名,首字母大写
            value: 对简单类型的成员变量赋值 -->
        <property name="age" value="20"></property>
    </bean>
</beans>
【第5步】在test目录下创建StudentServiceTest,进行测试
package com.zbbmeta;

import com.zbbmeta.dao.StudentDao;
import com.zbbmeta.service.StudentService;
import org.junit.jupiter.api.Test;
import org.springframework.context.support.ClassPathXmlApplicationContext;

public class StudentServiceTest {

    //目标:测试setter的简单类型的注入
    @Test
    public void test1(){

        //1.根据配置文件application.xml创建IOC容器
        ClassPathXmlApplicationContext ac = new ClassPathXmlApplicationContext("application.xml");

        //2.从IOC容器里面获取id="bookService"对象
        StudentDao studentDao = (StudentDao) ac.getBean("studentDao");

        //3.执行对象方法
        studentDao.save();

        //4.关闭容器
        ac.close();
    }
-
控制台结果:

【第6步】在application.xml,配置引用类型注入
    <!-- 目标:setter引用类型注入-->
    <bean class="com.zbbmeta.service.impl.StudentServiceImpl" id="studentService">
        <!--property标签: 调用set方法赋值
    name: 成员变量名, 准确来说对应set方法名,首字母大写
    ref: 对引用类型的成员变量赋值, 引用的对象 -->
        <property name="studentDao" ref="studentDao"></property>
    </bean>
【第7步】测试
    //目标:测试setter的引用类型的注入
    @Test
    public void test2(){
        //1.根据配置文件application.xml创建IOC容器
        ClassPathXmlApplicationContext ac = new ClassPathXmlApplicationContext("application.xml");
        //2.从IOC容器里面获取id="bookService"对象
        StudentService studentService = (StudentService) ac.getBean("studentService");
        //3.执行对象方法
        studentService.save();
        //4.关闭容器
        ac.close();
    }
-
控制台结果


3 构造器方式注入
思考:构造方式注入使用什么子标签?
3.1 构造器注入简单类型
格式:配置中使用constructor-arg标签value属性注入简单类型
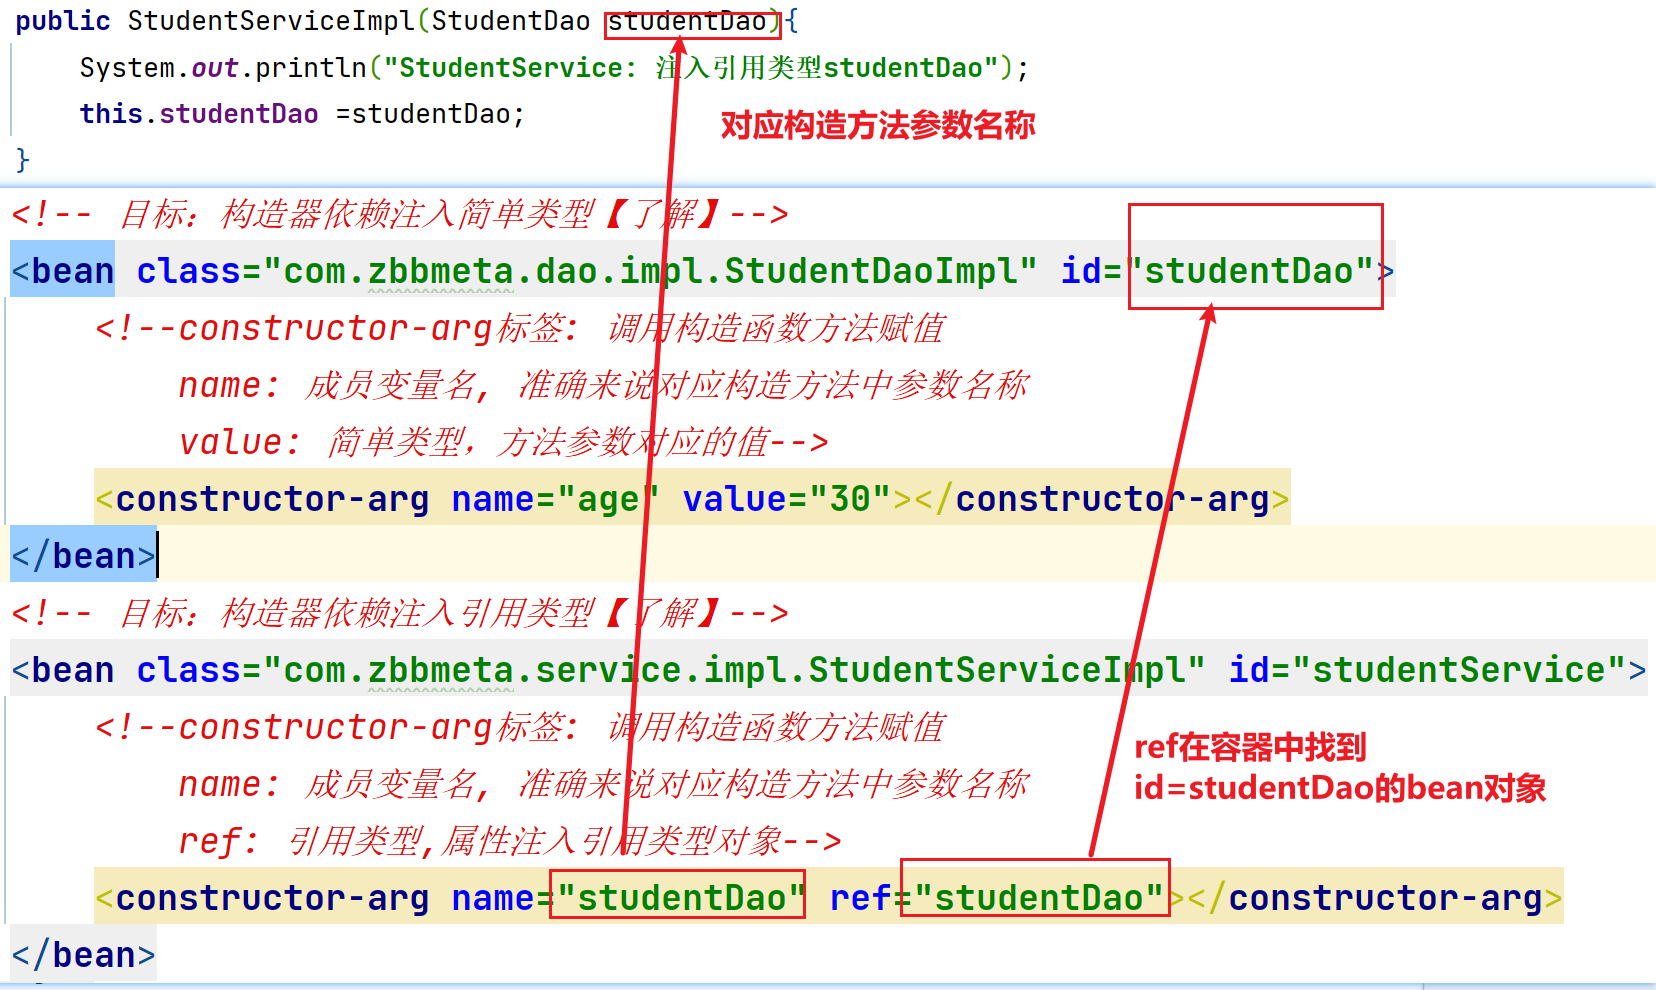
<!--constructor-arg标签: 调用构造函数方法赋值
    name: 成员变量名, 准确来说对应构造方法中参数名称
    value: 简单类型,方法参数对应的值-->
<constructor-arg name="age" value="30"></constructor-arg>
2.2 构造器注入引用类型
格式:配置中使用constructor-arg标签ref属性注入引用类型
<!--constructor-arg标签: 调用构造函数方法赋值
    name: 成员变量名, 准确来说对应构造方法中参数名称
    ref: 引用类型,属性注入引用类型对象-->
<constructor-arg name="studentDao" ref="studentDao"></constructor-arg>
3.3 构造器注入代码实现
【第0步】创建`11_2_DI_Construce`项目结构
【第1步】导入依赖坐标
【第2步】导入Student实体类
【第3步】定义Spring管理的类(接口)
【第4步】创建Spring配置文件在resources目录下创建`application.xml`,配置构造器注入简单类型
【第5步】在test目录下创建`StudentServiceTest`,进行测试
【第6步】在`application.xml`,配置构造器注入引用类型
【第7步】测试
【第0步】创建11_2_DI_Construce项目结构

【第1步】导入依赖坐标
和之前项目依赖一致
【第2步】导入Student实体类
和之前一致
【第3步】定义Spring管理的类(接口)
-
StudentDao接口和StudentDaoImpl实现类实现构造器注入简单类型
package com.zbbmeta.dao;

public interface StudentDao {
    /**
     * 添加学生
     */
    void save();
}
package com.zbbmeta.dao.impl;

import com.zbbmeta.dao.StudentDao;

public class StudentDaoImpl implements StudentDao {
    //简单类型属性
    private Integer age;

    public StudentDaoImpl(Integer age){
        System.out.println("DAO: 注入简单类型 age");
        this.age =age;
    }

    @Override
    public void save() {
        System.out.println("DAO: 年龄:"+this.age);
        System.out.println("DAO: 添加学生信息到数据库...");
    }
}
-
StudentService接口和StudentServiceImpl实现类实现构造器注入引用类型
package com.zbbmeta.service;

public interface StudentService {
    /**
     * 添加学生
     */
    void save();
}
package com.zbbmeta.service.impl;

import com.zbbmeta.dao.StudentDao;
import com.zbbmeta.service.StudentService;

public class StudentServiceImpl implements StudentService {

    //创建成员对象
    private StudentDao studentDao ;
    public StudentServiceImpl(StudentDao studentDao){
        System.out.println("StudentService: 注入引用类型studentDao");
        this.studentDao =studentDao;
    }
    @Override
    public void save() {
        System.out.println("Service: 添加学生信息到数据库...");
        studentDao.save();
    }
}
【第4步】创建Spring配置文件在resources目录下创建application.xml,配置构造器注入简单类型

-
定义application.xml配置文件并配置StudentDaoImpl实现构造器注入简单类型
<?xml version="1.0" encoding="UTF-8"?>
<beans xmlns="http://www.springframework.org/schema/beans"
       xmlns:xsi="http://www.w3.org/2001/XMLSchema-instance"
       xsi:schemaLocation="http://www.springframework.org/schema/beans http://www.springframework.org/schema/beans/spring-beans.xsd">
    <!-- 目标:构造器依赖注入简单类型【了解】-->
    <bean class="com.zbbmeta.dao.impl.StudentDaoImpl" id="studentDao">
        <!--constructor-arg标签: 调用构造函数方法赋值
            name: 成员变量名, 准确来说对应构造方法中参数名称
            value: 简单类型,方法参数对应的值-->
        <constructor-arg name="age" value="30"></constructor-arg>
    </bean>
</beans>
【第5步】在test目录下创建StudentServiceTest,进行测试
package com.zbbmeta;

import com.zbbmeta.dao.StudentDao;
import com.zbbmeta.service.StudentService;
import org.junit.jupiter.api.Test;
import org.springframework.context.support.ClassPathXmlApplicationContext;

public class StudentServiceTest {
    //目标:测试构造器的简单类型的注入
    @Test
    public void test1(){
        //1.根据配置文件application.xml创建IOC容器
        ClassPathXmlApplicationContext ac = new ClassPathXmlApplicationContext("application.xml");
        //2.从IOC容器里面获取id="studentDao"对象
        StudentDao studentDao = (StudentDao) ac.getBean("studentDao");
        //3.执行对象方法
        studentDao.save();
        //4.关闭容器
        ac.close();
    }
}
-
控制台结果:


**【第6步】在application.xml,配置构造器注入引用类型 **
<!-- 目标:构造器依赖注入引用类型【了解】-->
<bean class="com.zbbmeta.service.impl.StudentServiceImpl" id="studentService">
    <!--constructor-arg标签: 调用构造函数方法赋值
        name: 成员变量名, 准确来说对应构造方法中参数名称
        ref: 引用类型,属性注入引用类型对象-->
    <constructor-arg name="studentDao" ref="studentDao"></constructor-arg>
</bean>
【第7步】测试
    //目标:测试setter的引用类型的注入
    @Test
    public void test2(){
        //1.根据配置文件application.xml创建IOC容器
        ClassPathXmlApplicationContext ac = new ClassPathXmlApplicationContext("application.xml");
        //2.从IOC容器里面获取id="bookService"对象
        StudentService studentService = (StudentService) ac.getBean("studentService");
        //3.执行对象方法
        studentService.save();
        //4.关闭容器
        ac.close();
    }
-
控制台结果

4 依赖自动装配【理解】
4.1 自动装配概念
-
IoC容器根据bean所依赖的资源在容器中自动查找并注入到bean中的过程称为自动装配
- 自动装配方式
-
按类型
-
按名称
-
按构造方法
-
autowire: 自动装配, 在容器中找对应对象,自动给成员变量赋值
    byType: 通过类型注入
    byName: 通过名字注入
    constructor: 通过构造器注入
    no: 不自动注入
4.2 自动装配类型
4.2.1 依赖类型自动装配
配置中使用bean标签autowire属性设置自动装配的类型
byType使用按类型装配时(byType)必须保障容器中相同类型的bean唯一,推荐使用
格式:
<!--给成员变量赋值
    autowire: 自动装配, 在容器中找对应对象,自动给成员变量赋值
        byType: 通过类型注入
        byName: 通过名字注入
        constructor: 通过构造器注入
        no: 不自动注入
-->
<bean class="com.zbbmeta.service.impl.StudentServiceImpl" id="studentService" autowire="byType">
</bean>
4.2.2依赖bean容器名字自动装配
配置中使用bean标签autowire属性设置自动装配的类型
byName使用按名称装配时(byName)必须保障容器中具有指定名称的bean,不推荐使用
<!--
autowire="byType" 根据成员属性名自动注入
-->
<bean class="com.zbbmeta.service.impl.StudentServiceImpl" id="studentService2" autowire="byName">
</bean>
4.2.3 依赖bean容器根据构造器自动装配注入
配置中使用bean标签autowire属性设置自动装配的类型
constructor
<!--
autowire="constructor"
据成员的所属类型去IOC容器中查找一样类型的对象进行调用构造函数进行给成员赋值
-->
<bean class="com.zbbmeta.service.impl.StudentServiceImpl" id="studentService3" autowire="constructor">
</bean>
4.3 依赖自动装配代码实现
【第0步】创建11_2_DI_Autowire项目
【第1步】导入依赖坐标
【第2步】导入Student实体类
【第3步】定义Spring管理的类(接口)
【第4步】创建Spring配置文件在resources目录下创建`application.xml`
【第5步】在test目录下创建`StudentServiceTest`
【第0步】创建11_2_DI_Autowire项目

【第1步】导入Spring坐标
和之前项目依赖一致
【第1步】导入依赖坐标
和之前一致
【第3步】定义Spring管理的类(接口)
-
StudentDao接口和StudentDaoImpl实现类
package com.zbbmeta.dao;

public interface StudentDao {
    /**
     * 添加学生
     */
    void save();
}
package com.zbbmeta.dao.impl;

import com.zbbmeta.dao.StudentDao;

public class StudentDaoImpl implements StudentDao {

    @Override
    public void save() {
        System.out.println("DAO: 添加学生信息到数据库...");
    }
}
-
StudentService接口和StudentServiceImpl实现类
package com.zbbmeta.service;

public interface StudentService {
    /**
     * 添加学生
     */
    void save();
}
package com.zbbmeta.service.impl;

import com.zbbmeta.dao.StudentDao;
import com.zbbmeta.service.StudentService;

public class StudentServiceImpl implements StudentService {

    //创建成员对象
    private StudentDao studentDao ;

    //提供依赖对象对应的setter方法
    public void setStudentDao(StudentDao studentDao)     {
        this.studentDao = studentDao;
    }

    //构造函数
    StudentServiceImpl(){}
    public StudentServiceImpl(StudentDao studentDao)    {
        System.out.println("Service 构造器方法");
        this.studentDao=studentDao;
    }

    @Override
    public void save() {
        System.out.println("Service: 添加学生信息到数据库...");
        studentDao.save();
    }
}
【第4步】创建Spring配置文件在resources目录下创建application.xml

-
定义application.xml配置文件
<?xml version="1.0" encoding="UTF-8"?>
<beans xmlns="http://www.springframework.org/schema/beans"
       xmlns:xsi="http://www.w3.org/2001/XMLSchema-instance"
       xsi:schemaLocation="http://www.springframework.org/schema/beans http://www.springframework.org/schema/beans/spring-beans.xsd">
    <!--
    目标:自动装配(自动注入)
    -->
    <bean class="com.zbbmeta.dao.impl.StudentDaoImpl" id="studentDao">
    </bean>
    <!--
     autowire="byType" 根据类型自动注入【重点】
     成员属性:private StudentDao studentDao ;  根据成员的所属类型去IOC容器中查找一样类型的对象进行调用成员的setStudentDao(参数)注入数据
    -->
    <bean class="com.zbbmeta.service.impl.StudentServiceImpl" id="studentService" autowire="byType"></bean>


    <!--
autowire="byName" 根据成员属性名自动注入
成员属性:private StudentDao studentDao ;  根据成员的属性名字去IOC容器中查找一样名称的对象进行调用成员的setStudentDao(参数)注入数据

-->
    <bean class="com.zbbmeta.service.impl.StudentServiceImpl" id="studentService2" autowire="byName"></bean>

    <!--
   autowire="constructor"
   成员属性:private StudentDao studentDao
   构造函数:public StudentServiceImpl(StudentDao studentDao){
        this.studentDao = studentDao;
   }
   据成员的所属类型去IOC容器中查找一样类型的对象进行调用构造函数进行给成员赋值
  -->
    <bean class="com.zbbmeta.service.impl.StudentServiceImpl" id="studentService3" autowire="constructor"></bean>
</beans>
**【第5步】在test目录下创建StudentServiceTest进行测试
package com.zbbmeta;

import com.zbbmeta.dao.StudentDao;
import com.zbbmeta.service.StudentService;
import org.junit.jupiter.api.Test;
import org.springframework.context.support.ClassPathXmlApplicationContext;

public class StudentServiceTest {

    //目标:根据类型自动注入
    @Test
    public void test1(){

        //1.根据配置文件application.xml创建IOC容器
        ClassPathXmlApplicationContext ac = new ClassPathXmlApplicationContext("application.xml");
        //2.从IOC容器里面获取id="studentService"对象
        StudentService studentService = (StudentService) ac.getBean("studentService");
        //3.执行对象方法
        studentService.save();
        //4.关闭容器
        ac.close();
    }


    //目标:测试自动注入根据名称查找注入
    @Test
    public void test2(){
        //1.根据配置文件application.xml创建IOC容器
        ClassPathXmlApplicationContext ac = new ClassPathXmlApplicationContext("application.xml");
        //2.从IOC容器里面获取id="bookService"对象
        StudentService studentService = (StudentService) ac.getBean("studentService2");
        //3.执行对象方法
        studentService.save();
        //4.关闭容器
        ac.close();
    }


    //目标:测试构造器根据名称查找注入
    @Test
    public void test3(){
        //1.根据配置文件application.xml创建IOC容器
        ClassPathXmlApplicationContext ac = new ClassPathXmlApplicationContext("application.xml");
        //2.从IOC容器里面获取id="bookService"对象
        StudentService studentService = (StudentService) ac.getBean("studentService3");
        //3.执行对象方法
        studentService.save();
        //4.关闭容器
        ac.close();
    }
}
5 集合注入
5.1 注入数组类型数据
格式:
<!--调用setArray方法给成员array赋值-->
<property name="array">
    <array>
        <!--new String("数据") 引用类型赋值-->
        <bean class="java.lang.String" id="s">
            <constructor-arg value="100"></constructor-arg>
        </bean>
        <!--简单类型赋值-->
        <value>200</value>
        <value>300</value>
    </array>
</property>
5.2 注入List类型数据
格式:
<!--调用setList方法给成员list赋值-->
<property name="list">
    <list>
        <value>张三</value>
        <value>李四</value>
        <value>王五</value>
    </list>
</property>
5.3 注入Set类型数据
格式:
<!--调用setSet方法给成员set赋值-->
<property name="set">
    <set>
        <value>珠海</value>
        <value>江门</value>
        <value>惠州</value>
    </set>
</property>
5.4 注入Map类型数据
<!--调用setMap方法给成员map赋值-->
<property name="map">
    <map>
        <entry key="country" value="china"></entry>
        <entry key="province" value="广东"></entry>
        <entry key="city" value="广州"></entry>
    </map>
</property>
5.5 注入Properties类型数据
<!--调用setMap方法给成员map赋值-->
<property name="properties">
    <props>
        <prop key="country">china</prop>
        <prop key="province">广东</prop>
        <prop key="city">广州</prop>
    </props>
</property>
说明:property标签表示setter方式注入,构造方式注入constructor-arg标签内部也可以写<array>、<list>、<set>、<map>、<props>标签
5.6 集合注入完整代码
【第0步】在11_3_DI_Autowired的entity包下创建Person类
【第1步】创建Spring配置文件在resources目录下创建`application-person.xml`
【第2步】在test目录下创建`PersonTest`
【第0步】在11_3_DI_Autowired的entity包下创建Person类
package com.zbbmeta.entity;

import java.util.*;

public class Person {
    private String[] array;
    private List<String> list;
    private Set<String> set;
    private Map<String,Object> map;
    private Properties properties;


    public Person() {
    }

    public Person(String[] array, List<String> list, Set<String> set, Map<String, Object> map, Properties properties) {
        this.array = array;
        this.list = list;
        this.set = set;
        this.map = map;
        this.properties = properties;
    }

    /**
     * 获取
     * @return array
     */
    public String[] getArray() {
        return array;
    }

    /**
     * 设置
     * @param array
     */
    public void setArray(String[] array) {
        this.array = array;
    }

    /**
     * 获取
     * @return list
     */
    public List<String> getList() {
        return list;
    }

    /**
     * 设置
     * @param list
     */
    public void setList(List<String> list) {
        this.list = list;
    }

    /**
     * 获取
     * @return set
     */
    public Set<String> getSet() {
        return set;
    }

    /**
     * 设置
     * @param set
     */
    public void setSet(Set<String> set) {
        this.set = set;
    }

    /**
     * 获取
     * @return map
     */
    public Map<String, Object> getMap() {
        return map;
    }

    /**
     * 设置
     * @param map
     */
    public void setMap(Map<String, Object> map) {
        this.map = map;
    }

    /**
     * 获取
     * @return properties
     */
    public Properties getProperties() {
        return properties;
    }

    /**
     * 设置
     * @param properties
     */
    public void setProperties(Properties properties) {
        this.properties = properties;
    }

    @Override
    public String toString() {
        return "User{" +
                "array=" + Arrays.toString(array) +
                ", list=" + list +
                ", set=" + set +
                ", map=" + map +
                ", properties=" + properties +
                '}';
    }
}
【第1步】创建Spring配置文件在resources目录下创建application-person.xml
<?xml version="1.0" encoding="UTF-8"?>
<beans xmlns="http://www.springframework.org/schema/beans"
       xmlns:xsi="http://www.w3.org/2001/XMLSchema-instance"
       xsi:schemaLocation="http://www.springframework.org/schema/beans http://www.springframework.org/schema/beans/spring-beans.xsd">
    <!--
    目标:创建User对象并依赖注入赋值
    -->
    <bean class="com.zbbmeta.entity.Person" id="person">
        <!--调用setArray方法给成员array赋值-->
        <property name="array">
            <array>
                <!--new String("数据") 引用类型赋值-->
                <bean class="java.lang.String" id="s">
                    <constructor-arg value="100"></constructor-arg>
                </bean>
                <!--简单类型赋值-->
                <value>200</value>
                <value>300</value>
            </array>
        </property>
        <!--调用setList方法给成员list赋值-->
        <property name="list">
            <list>
                <value>张三</value>
                <value>李四</value>
                <value>王五</value>
            </list>
        </property>
        <!--调用setSet方法给成员set赋值-->
        <property name="set">
            <set>
                <value>珠海</value>
                <value>江门</value>
                <value>惠州</value>
            </set>
        </property>
        <!--调用setMap方法给成员map赋值-->
        <property name="map">
            <map>
                <entry key="country" value="china"></entry>
                <entry key="province" value="广东"></entry>
                <entry key="city" value="广州"></entry>
            </map>
        </property>
        <!--调用setMap方法给成员map赋值-->
        <property name="properties">
            <props>
                <prop key="country">china</prop>
                <prop key="province">广东</prop>
                <prop key="city">广州</prop>
            </props>
        </property>
    </bean>
</beans>
【第2步】在test目录下创建PersonTest
package com.zbbmeta;

import com.zbbmeta.entity.Person;
import org.junit.jupiter.api.Test;
import org.springframework.context.support.ClassPathXmlApplicationContext;

public class PersonTest {
    @Test
    public void test(){

        //1.创建IOC容器
        ClassPathXmlApplicationContext ac = new ClassPathXmlApplicationContext("application-person.xml");

        //2.获取对象
        Person person = ac.getBean(Person.class); //根据指定类型去IOC容器中查找对象

        //3.打印对象
        System.out.println(person);

        //4.关闭容器
        ac.close();
    }
}