文章目录
- 1.LinkedList简介
- 2.内部结构分析
- 3.LinkedList源码分析
- 3.1构造方法
- 3.2add方法
- 3.3根据位置取数据的方法
- 3.4根据对象得到索引的方法
- 3.5检查链表是否包含某对象的方法:
1.LinkedList简介
LinkedList是一个实现了List接口和Deque接口的双端链表。
LinkedList底层的链表结构使它支持高效的插入和删除操作,另外它实现了Deque接口,使得LinkedList类也具有队列的特性;
LinkedList不是线程安全的,如果想使LinkedList变成线程安全的,可以调用静态类Collections类中的synchronizedList方法:
List list=Collections.synchronizedList(new LinkedList(...));
2.内部结构分析
如下图所示:
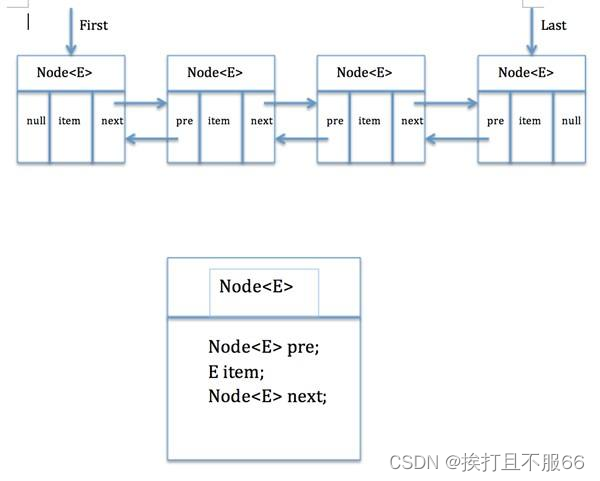
看完了图之后,我们再看LinkedList类中的一个内部私有类Node就很好理解了:
private static class Node<E> {
        E item;//节点值
        Node<E> next;//后继节点
        Node<E> prev;//前驱节点

        Node(Node<E> prev, E element, Node<E> next) {
            this.item = element;
            this.next = next;
            this.prev = prev;
        }
    }
这个类就代表双端链表的节点Node。这个类有三个属性,分别是前驱节点,本节点的值,后继结点。
3.LinkedList源码分析
3.1构造方法
空构造方法:
 public LinkedList() {
    }
用已有的集合创建链表的构造方法:
 public LinkedList(Collection<? extends E> c) {
        this();
        addAll(c);
    }
3.2add方法
add(E e) 方法:将元素添加到链表尾部
public boolean add(E e) {
        linkLast(e);//这里就只调用了这一个方法
        return true;
    }
 /**
     * 链接使e作为最后一个元素。
     */
    void linkLast(E e) {
        final Node<E> l = last;
        final Node<E> newNode = new Node<>(l, e, null);
        last = newNode;//新建节点
        if (l == null)
            first = newNode;
        else
            l.next = newNode;//指向后继元素也就是指向下一个元素
        size++;
        modCount++;
    }
add(int index,E e):在指定位置添加元素
public void add(int index, E element) {
        checkPositionIndex(index); //检查索引是否处于[0-size]之间

        if (index == size)//添加在链表尾部
            linkLast(element);
        else//添加在链表中间
            linkBefore(element, node(index));
    }
linkBefore方法需要给定两个参数,一个插入节点的值,一个指定的node,所以我们又调用了Node(index)去找到index对应的node
addAll(Collection c ):将集合插入到链表尾部
public boolean addAll(Collection<? extends E> c) {
        return addAll(size, c);
    }
addAll(int index, Collection c): 将集合从指定位置开始插入
public boolean addAll(int index, Collection<? extends E> c) {
        //1:检查index范围是否在size之内
        checkPositionIndex(index);

        //2:toArray()方法把集合的数据存到对象数组中
        Object[] a = c.toArray();
        int numNew = a.length;
        if (numNew == 0)
            return false;

        //3:得到插入位置的前驱节点和后继节点
        Node<E> pred, succ;
        //如果插入位置为尾部,前驱节点为last,后继节点为null
        if (index == size) {
            succ = null;
            pred = last;
        }
        //否则,调用node()方法得到后继节点,再得到前驱节点
        else {
            succ = node(index);
            pred = succ.prev;
        }

        // 4:遍历数据将数据插入
        for (Object o : a) {
            @SuppressWarnings("unchecked") E e = (E) o;
            //创建新节点
            Node<E> newNode = new Node<>(pred, e, null);
            //如果插入位置在链表头部
            if (pred == null)
                first = newNode;
            else
                pred.next = newNode;
            pred = newNode;
        }

        //如果插入位置在尾部,重置last节点
        if (succ == null) {
            last = pred;
        }
        //否则,将插入的链表与先前链表连接起来
        else {
            pred.next = succ;
            succ.prev = pred;
        }

        size += numNew;
        modCount++;
        return true;
    }
上面可以看出addAll方法通常包括下面四个步骤:
- 检查index范围是否在size之内
- toArray()方法把集合的数据存到对象数组中
- 得到插入位置的前驱和后继节点
- 遍历数据,将数据插入到指定位置
addFirst(E e): 将元素添加到链表头部
public void addFirst(E e) {
        linkFirst(e);
    }
private void linkFirst(E e) {
        final Node<E> f = first;
        final Node<E> newNode = new Node<>(null, e, f);//新建节点,以头节点为后继节点
        first = newNode;
        //如果链表为空,last节点也指向该节点
        if (f == null)
            last = newNode;
        //否则,将头节点的前驱指针指向新节点,也就是指向前一个元素
        else
            f.prev = newNode;
        size++;
        modCount++;
    }
addLast(E e): 将元素添加到链表尾部,与 add(E e) 方法一样
public void addLast(E e) {
        linkLast(e);
    }
3.3根据位置取数据的方法
get(int index): 根据指定索引返回数据
public E get(int index) {
        //检查index范围是否在size之内
        checkElementIndex(index);
        //调用Node(index)去找到index对应的node然后返回它的值
        return node(index).item;
    }
获取头节点(index=0)数据方法:
public E getFirst() {
        final Node<E> f = first;
        if (f == null)
            throw new NoSuchElementException();
        return f.item;
    }
public E element() {
        return getFirst();
    }
public E peek() {
        final Node<E> f = first;
        return (f == null) ? null : f.item;
    }

public E peekFirst() {
        final Node<E> f = first;
        return (f == null) ? null : f.item;
     }
区别:
getFirst(),element(),peek(),peekFirst()
这四个获取头结点方法的区别在于对链表为空时的处理,是抛出异常还是返回null,其中getFirst() 和element() 方法将会在链表为空时,抛出异常
element()方法的内部就是使用getFirst()实现的。它们会在链表为空时,抛出NoSuchElementException
获取尾节点(index=-1)数据方法:
public E getLast() {
        final Node<E> l = last;
        if (l == null)
            throw new NoSuchElementException();
        return l.item;
    }
 public E peekLast() {
        final Node<E> l = last;
        return (l == null) ? null : l.item;
    }
两者区别:
getLast() 方法在链表为空时,会抛出NoSuchElementException,而peekLast() 则不会,只是会返回 null。
3.4根据对象得到索引的方法
int indexOf(Object o): 从头遍历找
public int indexOf(Object o) {
        int index = 0;
        if (o == null) {
            //从头遍历
            for (Node<E> x = first; x != null; x = x.next) {
                if (x.item == null)
                    return index;
                index++;
            }
        } else {
            //从头遍历
            for (Node<E> x = first; x != null; x = x.next) {
                if (o.equals(x.item))
                    return index;
                index++;
            }
        }
        return -1;
    }
int lastIndexOf(Object o): 从尾遍历找
public int lastIndexOf(Object o) {
        int index = size;
        if (o == null) {
            //从尾遍历
            for (Node<E> x = last; x != null; x = x.prev) {
                index--;
                if (x.item == null)
                    return index;
            }
        } else {
            //从尾遍历
            for (Node<E> x = last; x != null; x = x.prev) {
                index--;
                if (o.equals(x.item))
                    return index;
            }
        }
        return -1;
    }
3.5检查链表是否包含某对象的方法:
contains(Object o): 检查对象o是否存在于链表中
public boolean contains(Object o) {
        return indexOf(o) != -1;
    }
### <font face="楷体" id="3.6">删除方法</font>

**remove()** ,**removeFirst(),pop():** 删除头节点

```java
public E pop() {
        return removeFirst();
    }
public E remove() {
        return removeFirst();
    }
public E removeFirst() {
        final Node<E> f = first;
        if (f == null)
            throw new NoSuchElementException();
        return unlinkFirst(f);
    }
**removeLast(),pollLast():** 删除尾节点

```java
public E removeLast() {
        final Node<E> l = last;
        if (l == null)
            throw new NoSuchElementException();
        return unlinkLast(l);
    }
public E pollLast() {
        final Node<E> l = last;
        return (l == null) ? null : unlinkLast(l);
    }
区别: removeLast()在链表为空时将抛出NoSuchElementException,而pollLast()方法返回null。
remove(Object o): 删除指定元素
public boolean remove(Object o) {
        //如果删除对象为null
        if (o == null) {
            //从头开始遍历
            for (Node<E> x = first; x != null; x = x.next) {
                //找到元素
                if (x.item == null) {
                   //从链表中移除找到的元素
                    unlink(x);
                    return true;
                }
            }
        } else {
            //从头开始遍历
            for (Node<E> x = first; x != null; x = x.next) {
                //找到元素
                if (o.equals(x.item)) {
                    //从链表中移除找到的元素
                    unlink(x);
                    return true;
                }
            }
        }
        return false;
    }
当删除指定对象时,只需调用remove(Object o)即可,不过该方法一次只会删除一个匹配的对象,如果删除了匹配对象,返回true,否则false。
unlink(Node x) 方法:
E unlink(Node<E> x) {
        // assert x != null;
        final E element = x.item;
        final Node<E> next = x.next;//得到后继节点
        final Node<E> prev = x.prev;//得到前驱节点

        //删除前驱指针
        if (prev == null) {
            first = next;//如果删除的节点是头节点,令头节点指向该节点的后继节点
        } else {
            prev.next = next;//将前驱节点的后继节点指向后继节点
            x.prev = null;
        }

        //删除后继指针
        if (next == null) {
            last = prev;//如果删除的节点是尾节点,令尾节点指向该节点的前驱节点
        } else {
            next.prev = prev;
            x.next = null;
        }

        x.item = null;
        size--;
        modCount++;
        return element;
    }
remove(int index):删除指定位置的元素
public E remove(int index) {
        //检查index范围
        checkElementIndex(index);
        //将节点删除
        return unlink(node(index));
    }
LinkedList类常用方法测试
package list;

import java.util.Iterator;
import java.util.LinkedList;

public class LinkedListDemo {
    public static void main(String[] srgs) {
        //创建存放int类型的linkedList
        LinkedList<Integer> linkedList = new LinkedList<>();
        /************************** linkedList的基本操作 ************************/
        linkedList.addFirst(0); // 添加元素到列表开头
        linkedList.add(1); // 在列表结尾添加元素
        linkedList.add(2, 2); // 在指定位置添加元素
        linkedList.addLast(3); // 添加元素到列表结尾

        System.out.println("LinkedList(直接输出的): " + linkedList);

        System.out.println("getFirst()获得第一个元素: " + linkedList.getFirst()); // 返回此列表的第一个元素
        System.out.println("getLast()获得第最后一个元素: " + linkedList.getLast()); // 返回此列表的最后一个元素
        System.out.println("removeFirst()删除第一个元素并返回: " + linkedList.removeFirst()); // 移除并返回此列表的第一个元素
        System.out.println("removeLast()删除最后一个元素并返回: " + linkedList.removeLast()); // 移除并返回此列表的最后一个元素
        System.out.println("After remove:" + linkedList);
        System.out.println("contains()方法判断列表是否包含1这个元素:" + linkedList.contains(1)); // 判断此列表包含指定元素,如果是,则返回true
        System.out.println("该linkedList的大小 : " + linkedList.size()); // 返回此列表的元素个数

        /************************** 位置访问操作 ************************/
        System.out.println("-----------------------------------------");
        linkedList.set(1, 3); // 将此列表中指定位置的元素替换为指定的元素
        System.out.println("After set(1, 3):" + linkedList);
        System.out.println("get(1)获得指定位置(这里为1)的元素: " + linkedList.get(1)); // 返回此列表中指定位置处的元素

        /************************** Search操作 ************************/
        System.out.println("-----------------------------------------");
        linkedList.add(3);
        System.out.println("indexOf(3): " + linkedList.indexOf(3)); // 返回此列表中首次出现的指定元素的索引
        System.out.println("lastIndexOf(3): " + linkedList.lastIndexOf(3));// 返回此列表中最后出现的指定元素的索引

        /************************** Queue操作 ************************/
        System.out.println("-----------------------------------------");
        System.out.println("peek(): " + linkedList.peek()); // 获取但不移除此列表的头
        System.out.println("element(): " + linkedList.element()); // 获取但不移除此列表的头
        linkedList.poll(); // 获取并移除此列表的头
        System.out.println("After poll():" + linkedList);
        linkedList.remove();
        System.out.println("After remove():" + linkedList); // 获取并移除此列表的头
        linkedList.offer(4);
        System.out.println("After offer(4):" + linkedList); // 将指定元素添加到此列表的末尾

        /************************** Deque操作 ************************/
        System.out.println("-----------------------------------------");
        linkedList.offerFirst(2); // 在此列表的开头插入指定的元素
        System.out.println("After offerFirst(2):" + linkedList);
        linkedList.offerLast(5); // 在此列表末尾插入指定的元素
        System.out.println("After offerLast(5):" + linkedList);
        System.out.println("peekFirst(): " + linkedList.peekFirst()); // 获取但不移除此列表的第一个元素
        System.out.println("peekLast(): " + linkedList.peekLast()); // 获取但不移除此列表的第一个元素
        linkedList.pollFirst(); // 获取并移除此列表的第一个元素
        System.out.println("After pollFirst():" + linkedList);
        linkedList.pollLast(); // 获取并移除此列表的最后一个元素
        System.out.println("After pollLast():" + linkedList);
        linkedList.push(2); // 将元素推入此列表所表示的堆栈(插入到列表的头)
        System.out.println("After push(2):" + linkedList);
        linkedList.pop(); // 从此列表所表示的堆栈处弹出一个元素(获取并移除列表第一个元素)
        System.out.println("After pop():" + linkedList);
        linkedList.add(3);
        linkedList.removeFirstOccurrence(3); // 从此列表中移除第一次出现的指定元素(从头部到尾部遍历列表)
        System.out.println("After removeFirstOccurrence(3):" + linkedList);
        linkedList.removeLastOccurrence(3); // 从此列表中移除最后一次出现的指定元素(从尾部到头部遍历列表)
        System.out.println("After removeFirstOccurrence(3):" + linkedList);

        /************************** 遍历操作 ************************/
        System.out.println("-----------------------------------------");
        linkedList.clear();
        for (int i = 0; i < 100000; i++) {
            linkedList.add(i);
        }
        // 迭代器遍历
        long start = System.currentTimeMillis();
        Iterator<Integer> iterator = linkedList.iterator();
        while (iterator.hasNext()) {
            iterator.next();
        }
        long end = System.currentTimeMillis();
        System.out.println("Iterator:" + (end - start) + " ms");

        // 顺序遍历(随机遍历)
        start = System.currentTimeMillis();
        for (int i = 0; i < linkedList.size(); i++) {
            linkedList.get(i);
        }
        end = System.currentTimeMillis();
        System.out.println("for:" + (end - start) + " ms");

        // 另一种for循环遍历
        start = System.currentTimeMillis();
        for (Integer i : linkedList)
            ;
        end = System.currentTimeMillis();
        System.out.println("for2:" + (end - start) + " ms");

        // 通过pollFirst()或pollLast()来遍历LinkedList
        LinkedList<Integer> temp1 = new LinkedList<>();
        temp1.addAll(linkedList);
        start = System.currentTimeMillis();
        while (temp1.size() != 0) {
            temp1.pollFirst();
        }
        end = System.currentTimeMillis();
        System.out.println("pollFirst()或pollLast():" + (end - start) + " ms");

        // 通过removeFirst()或removeLast()来遍历LinkedList
        LinkedList<Integer> temp2 = new LinkedList<>();
        temp2.addAll(linkedList);
        start = System.currentTimeMillis();
        while (temp2.size() != 0) {
            temp2.removeFirst();
        }
        end = System.currentTimeMillis();
        System.out.println("removeFirst()或removeLast():" + (end - start) + " ms");
    }
}


