文章目录
- 一、 Elasticsearch
- 二、正向索引与倒排索引
- 三、Elasticsearch与Mysql
- 3.1 文档document
- 3.2 索引库index
- 3.3 与Mysql对比
- 3.4 常见架构
- 四、部署与分词器
- 4.1 部署单点ES
- 4.2 使用IK分词器
- 4.3 字典词库的拓展
- 五、操作索引库
- 5.1 创建索引库
- 5.2 增删改索引库
- 六、文档操作
- 6.1 增
- 6.2 删
- 6.3 改
- 6.3.1 全量修改
- 6.3.2 增量修改,修改指定字段值
- 6.4 查
- 6.5 DSL查询文档
- 6.6 DSL查询格式
- 6.6.1 match_all
- 6.6.2 match
- 6.6.3 multi_match
- 6.6.4 term
- 6.6.5 range
- 6.6.6 geo_shape
- 6.6.7 function_score:
- 6.6.8 BooleanQuery
- 6.7 结果处理
- 6.7.1 排序
- 6.7.2 分页
- 6.7.3 高亮
- 七、RestClient操作索引库
- 7.1 准备
- 7.2 连接Elasticsearch
- 7.3 创建索引库
- 7.4 删除索引库与判断索引库是否存在
- 八、RestClient操作文档
- 8.1 准备
- 8.2 用ID添加数据
- 8.3 用ID查询数据
- 8.4 用ID修改数据
- 8.5 用ID删除文档
- 8.6 用ID批量新增
- 8.7 查询文档
- 8.7.1 简单开始
- 8.7.2 QueryBuilders
- 8.7.3 SearchRequest
- 8.8 尝试
- 九、 数据聚合
- 9.1 DSL实现
- 9.1.1 Bucket聚合
- 9.1.2 Metrics聚合
- 9.2 RestClient实现
- 9.2.1 Bucket
- 十、自动补全
- 10.1 自定义分词器
- 10.2 自动补全查询
- 10.3 RestClient补全查询
- 十一、数据同步
- 方案一、同步调用
- 方案二、异步通知
- 方案三、监听binlog
- MQ 实现mysql与elasticsearch数据同步
- 十二、ES集群
- 12.1 部署
- 12.2 集群监控
- 12.3 指定分片与备份
- 12.4 ES节点角色
- 12.5 ES集群脑裂与故障转移
- 12.6 ES查询流程
- 参考文献
一、 Elasticsearch
一个强大的开源搜索引擎,帮助我们从海量数据中快速找到需要的数据。
与Kibana、Logstash、Beats结合,也就是Elastic stack (ELK)。它们被广泛用在日志数据分析、实时监控等领域。
Elastic stack的核心就是Elasticsearch,负责存储、搜索、搜索数据。Logstash、Beats在于数据抓取。Kibana在于数据可视化。
二、正向索引与倒排索引
我们有如下表格
| id | title | price |
|---|---|---|
| 1 | 小米手机 | 123 |
| 2 | 华为手机 | 124 |
| 3 | 华为充电器 | 124 |
| 4 | 小米充电器 | 124 |
传统数据库采用正向索引:
- mysql中的索引,就是正向索引,在查询主键ID时就可以通过多叉树快速锁定。
- 当模糊搜索特别是这种 ‘%手机%’ 时,就无法走索引,只能一条一条的找,效率比较差
但是对于倒排索引则是:
- 文档(document):每条数据就是一个文档
- 词条(term):文档按照语义分成的词语
| 词条 | 文档 id |
|---|---|
| 小米 | 1,2 |
| 手机 | 1,2 |
| 华为 | 2,3 |
| 充电器 | 3,4 |
- 当我们要搜索“华为手机”时,会被划分为“华为”和“手机”。
- 我们会得到华为:2,3,手机:1,2
- 因此,比一条一条找快。
- 同时,在不同词条中出现得越多的ID,说明其关联度越高
三、Elasticsearch与Mysql
3.1 文档document
它是面向文档存储的。可以是数据库中的一条商品数据、一个订单信息。
文档数据会被序列化为Json格式后,储存在elasticsearch中。就概念而言,可以认为是Mysql中的一行数据。
下面就是4个文档。
{
	"id":1,
	"title":"小米手机",
	"price":123
}
{
	"id":2,
	"title":"华为手机",
	"price":124
}
{
	"id":3,
	"title":"华为充电器",
	"price":124
}
{
	"id":4,
	"title":"小米充电器",
	"price":124
}
3.2 索引库index
相同类型的文档集合。按照相同结构划分在一起。
比如按照:用户索引、商品索引、订单索引划分。就概念上来说,可以认为是Mysql中的用户表、商品表、订单表。
3.3 与Mysql对比
| Mysql | Elasticsearch | 说明 |
|---|---|---|
| Table | Index | 索引库就是文档的集合,类似于表 |
| Row | Document | 文档就是一条条数据,类似于行,不过是Json格式的,类似MongoDB |
| Column | Field | 字段,JSON文档中的字段,类似于数据库中的列 |
| Schema | Mapping | 映射是索引中文档的约束,例如文字型字段约束。类似数据库表结构。 |
| SQL | DSL | DSL是Elasticsearch 提供的Json风格的请求语句,用来操作Elasticsearch ,实现CRUD |
Mysql:更擅长事务类型操作,保证数据一致性和安全性。
Elasticsearch:擅长海量数据搜索、分析、计算。
3.4 常见架构
四、部署与分词器
4.1 部署单点ES
我们还需要部署Kibana容器,因此需要让ES与Kibana容器互联。我们先用docker创建一个局域网。
相关可参考docker network详解、教程
docker network create 网络名称
我们接下来下载镜像。
docker pull elasticsearch:7.6.2
docker pull kibana:7.6.2
启动
docker run -d --name es -e “ES_JAVA_OPTS=-Xms512m -Xmx512m” -e “discovery.type=single-node” -v es-data:/usr/share/elasticsearch/data -v es-plugins:/usr/share/elasticsearch/plugins --privileged --network es-net -p 9200:9200 -p 9300:9300 elasticsearch:7.6.2
我们打开端口后,从浏览器进入。9200端口,有如下结构则说明启动成功。

部署Kibana(低版本为 ELASTICSEARCH_URL)
docker run -d --name kibana -e ELASTICSEARCH_HOSTS=http://es:9200 --network=网络名称 -p 5601:5601 kibana:7.6.2
启动后等一下,可能比较慢。随后访问 5601
如果提示
No default index pattern. You must select or create one to continue.
就按照提示创建一个即可
接着进入该页面:

4.2 使用IK分词器
ES默认的分词器,对中文的分词比较差
我们进行测试,在页面左侧输入:
POST /_analyze
{
“analyzer”: “chinese”,
“text”: “测试中文分词器”
}
POST /_analyze
{
“analyzer”: “standard”,
“text”: “测试标准分词器”
}
会发现它逐字分词

我们接下来进入容器内部,安装IK分词器
docker exec -it es /bin/bash
./bin/elasticsearch-plugin install https://github.com/medcl/elasticsearch-analysis-ik/releases/download/v7.6.2/elasticsearch-analysis-ik-7.6.2.zip
exit
docker restart es
7.6.2 为安装的elasticsearch,替换为自己版本即可。
当然也可以从github上,从安装地址上下载好后,上传到准备的数据卷上(/var/lib/docker/volumes/es-plugins/_data)。然后重启即可。
IK分词器两种模式
- ik_smart:最少切分
- ik_max_word:最细切分
最少切分:

最细切分

4.3 字典词库的拓展
要拓展展词库,只需要修改Ik分词器目录中的config中的IKAnalyzer.cfg.xml文件

如图
<?xml version="1.0" encoding="UTF-8"?>
<!DOCTYPE properties SYSTEM "http://java.sun.com/dtd/properties.dtd">
<properties>
        <comment>IK Analyzer 扩展配置</comment>
        <!--用户可以在这里配置自己的扩展字典 -->
        <entry key="ext_dict"></entry>
         <!--用户可以在这里配置自己的扩展停止词字典-->
        <entry key="ext_stopwords"></entry>
        <!--用户可以在这里配置远程扩展字典 -->
        <!-- <entry key="remote_ext_dict">words_location</entry> -->
        <!--用户可以在这里配置远程扩展停止词字典-->
        <!-- <entry key="remote_ext_stopwords">words_location</entry> -->
</properties>
我们加入字典文件
<?xml version="1.0" encoding="UTF-8"?>
<!DOCTYPE properties SYSTEM "http://java.sun.com/dtd/properties.dtd">
<properties>
        <comment>IK Analyzer 扩展配置</comment>
        <!--用户可以在这里配置自己的扩展字典 -->
        <entry key="ext_dict"></entry>
         <!--用户可以在这里配置自己的扩展停止词字典-->
        <entry key="ext_stopwords">stopword.dic</entry>
        <!--用户可以在这里配置远程扩展字典 -->
        <!-- <entry key="remote_ext_dict">words_location</entry> -->
        <!--用户可以在这里配置远程扩展停止词字典-->
        <!-- <entry key="remote_ext_stopwords">words_location</entry> -->
</properties>
随后我们在当前目录,创建(如果没有)文件写入我们要加入/禁止的词语
我们这里禁止“的”、“地” 这两个无意义词。
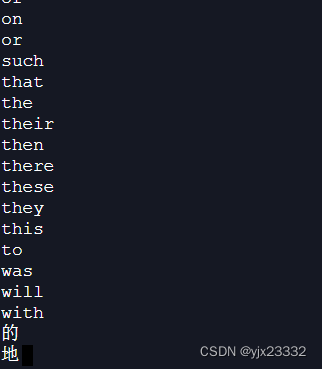
可以看到如下效果


五、操作索引库
5.1 创建索引库
包含属性:
- type:字段数据类型,常见的简单的类型:
- 字符串:text(可分词的文本)、keyword(精确值,例如:品牌、国家、IP地址)
- 数值:long,integer,short,byte,double,float
- 布尔:boolean
- 日期:date
- 对象:object
- 没有数组,但某个字段可以有多个值
- index:是否创建索引,默认为true。即,每个字段都会参与搜索。
- analyzer:使用那种分词器
- properties:该字段的子字段,如“name”
数据:
{
	"score": 62,
	"rank": 128,
	"name":{
			"firstName":"小明",
			"lastName": "王"
		}
	"history_rank":[126,125,129],
	"info": "位于XX省XX市XX区XX路X号"
}
索引:
# 创建索引库
# 创建索引库
PUT /yjx23332
{
  "mappings":{
	  "properties":{
		  "info":{
			  "type":"text",
			  "analyzer": "ik_smart"
		  },
		  "email":{
			  "type":"keyword",
			  "index":false
		  },
		  "name":{
		    "type":"object",
			  "properties":{
				  "firstName":{
					  "type":"keyword"
				  },
				  "secondName":{
					  "type":"keyword"
				  }
			  }
		  }
	  }
	}
}

5.2 增删改索引库
查询
GET /索引库名称
删除
DELETE /索引库名称
一般是不允许修改索引库,ES会根据索引库设置倒排索引。
但是允许添加字段
PUT /索引库名称/_mapping
{
	"properties":{
		"新字段名称":{
			"type":"integer"
		}
	}
}

六、文档操作
6.1 增
不加id,会随机生成一个
POST /索引库名称/_doc/文档id
{
	"字段1":"值1",
	"字段2":"值2",
	"字段3":{
		"子属性1":"值3",
		"子属性2":"值4"
	},
	...//
}
6.2 删
DELETE /索引库名称/_doc/文档id
6.3 改
6.3.1 全量修改
删除旧文档,添加新文档
如果ID不存在,就会直接新增。
PUT /索引库名称/_doc/文档id
{
	"字段1":"值1",
	"字段2":"值2",
	"字段3":{
		"子属性1":"值3",
		"子属性2":"值4"
	},
	...//
}
6.3.2 增量修改,修改指定字段值
POST /索引库名称/_update/文档id
{
	"doc":{
		"字段1":"新的值"
	}
}
6.4 查
GET /索引库名称/_doc/文档id
6.5 DSL查询文档
DSL官方文档
分类
- 查询所有:不加条件的查询,一般测试用,而且也不是查出所有,会分页。
- match_all
- 全文检索查询(full text):利用分词器对用户输入内容分词,然后去倒排索引库中匹配。
- match:单字段
- multi_match:多字段,尽量用match,通过copy_to,将多个条件放入一个字段。
- 精确查询:根据精确词条值查找数据,一般是查找keyword,数值、日期、boolean等类型字段。(不需要分词)
- ids
- range:根据值的范围查询
- term:根据词条精确值查询
- 地理查询(geo) :根据经纬信息查询
- geo_shape
- 复合(compound)查询:将上述查询条件组合,合并查询条件
- bool:一个或多个查询的组合
- function_score:算分函数查询,控制文档相关性算分,控制文档排名。
6.6 DSL查询格式
DSL官方文档
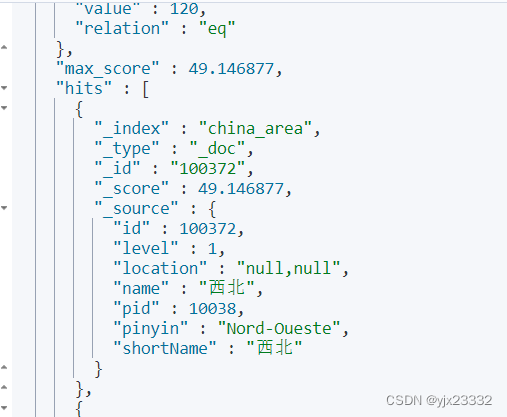
GET /china_area/_search
{
	"query":{
		"查询类型":{
			"查询条件":"条件值"
		}
	}
}
建议执行完8.6,将数据插入之后之后,再进行该部分。
6.6.1 match_all
GET /china_area/_search
{
  "query": {
    "match_all": {}
  }
}
6.6.2 match
GET /china_area/_search
{
  "query": {
    "match": {
      "level":3
    }
  }
}
6.6.3 multi_match
尽量使用match,用类似组合索引的方式,把多个要查询的字段,放到一个中。
GET /china_area/_search
{
  "query": {
    "multi_match": {
      "query":"北京",
      "fields":["mergerName","name"]
    }
  }
}
6.6.4 term
GET /china_area/_search
{
  "query": {
    "term": {
      "name":{
        "value":"昌平区"
      }
    }
  }
}
6.6.5 range
- gte >=
- lte <=
- gt >
- lt <
GET /china_area/_search
{
  "query": {
    "range": {
      "id":{
        "gte":7,
        "lte":16
      }
    }
  }
}
6.6.6 geo_shape
形状包括:point点,line线,polygon多边形,circle圆
coordinates:构成形状的坐标
relation包括:within查询形状被包裹在其中,disjoint查询形状不重叠,intersect查询形状有重叠
参考文章ElasticSearch地理类型字段-geo_point和geo_shape应用示例
GET /china_area/_search
{
  "query": {
    "geo_shape": {
      "location": {
        "shape": {
          "type": "",
          "coordinates": []
        }
      },
      "relation": "within"
    }
  }
}
6.6.7 function_score:
- TF(词条频率) = 词条出现的次数/文档中词条总数
可是,当都有该信息时,比如我们搜北京,几个词条都有且只包含一个,等于没有增加得分 - TF-IDF算法
IDF(逆文档频率)= Log(文档总数/包含词条的文档总数)
score= ∑ i n \sum^n_i ∑inTF*IDF - BM25算法,不会受词频影响变得越来越大
score(Q,d)= ∑ i n \sum^n_i ∑inlog(1+(N-n+0.5)/(n+0.5))* f i f_i fi/( f i + k 1 ∗ ( 1 − b + b ∗ ( d l ) / a v g d l ) f_i+k_1*(1-b+b*(dl)/avgdl) fi+k1∗(1−b+b∗(dl)/avgdl))
GET /china_area/_search
{
  "query": {
    "function_score": {
      "query": {//原始查询条件
        "match": {
          "name": "北"
        }
      },
      "functions": [
        {
          "filter": {//过滤条件,当符合条件,才会被重新划分
            "term":{
              "id":"100372"
            }
          },
          //算分函数,结果被称为function score,会与query score运算,得到新算分,常见的有:
          //weight:给定常量值,作为函数结果
          //field_value_factor:用文档中的某个字段值作为函数结果
          //random_score:随机生成一个值,作为函数结果
          //script_score:自定义计算公式,公式结果作为函数结果
          "weight": 10
        }
      ],
      //加权模式,定义function score 与 query score的运算方式:multiply相乘、replace function score 替换 query score。其他 sum、avg、max、min
      "boost_mode": "multiply"
    }
  }

}
6.6.8 BooleanQuery
- must:必须匹配,与
- should:选择性匹配子查询,或
- must_not:必须不匹配,不参与算分,非
- filter:必须匹配,不参与算分,会被放入缓存,将来使用时会进一步提升效率
GET /china_area/_search
{
  "query":{
    "bool":{
      "must":[
        {"term":{"first": "B"}}
      ],
      "filter": [
        {"range":{"id":{"gte":5}}}
      ]
    }
  }
}
6.7 结果处理
6.7.1 排序
如果我们设置了排序,ES就会放弃打分。
支持keyword(字典序)、数值、日期、地理坐标。
GET /china_area/_search
{
  "query": {
    "match_all": {}
  },
  "sort":[
    {
      "first":{
        "order": "desc"
      }
    },
    {
      "level": {
        "order": "asc"
      }
    }
  ]
}
GET /china_area/_search
{
  "query": {
    "match_all": {}
  },
  "sort":[
    {
      "first":{
        "order": "desc"
      }
    },
    {
      "_geo_distance": {
        "location": {
          "lat": 40,
          "lon": 70
        },
        "order": "asc",
        "unit": "km",
        "distance_type": "arc",
        "ignore_unmapped": false
      }
    }
  ]
}
6.7.2 分页
默认返回top10的数据,如果要查询更多数据就需要修改分页参数了。
from + size:
- 通过修改了from、size参数来控制要分页的结果
- 支持随机分页
- 深度分页问题,默认上线10000
GET /china_area/_search
{
  "query": {
    "match_all": {}
  },
  "sort":{
    "id":"asc"
  },
  "from":2,//开始位置,默认0
  "size":10//需要的大小
}
深度分页问题:
ES是分布式的,所以会面临深度分页问题。
- 假如有X个分片,则在分页时,每一个分片排序产生from+size的结果,将结果返回给协调节点。协调节点聚合(from+size )* X 个结果,然后排序,最后选出from到size的结果。
- 那么搜索页数过深,将导致结果集from+size越大,对内存CPU消耗也就越高。因此ES设定的上限是10000。
官方给出的深分页解决方案:
- search after:分页时需要排序,原理是从上一次的排序值开始,查询下一页数据。官方推荐使用
- 没有查询上限(单词查询的size不超过10000)
- 只能向后逐页查询,不支持随机翻页
- 没有随机翻页的需求搜索,例如手机向下滚动翻页
- scroll:原理将排序数据形成快照,保存在内存。官方已经不推荐使用。
- 没有查询上限(单词查询的size不超过10000)
- 会有额外内存消耗,并且搜索结果非实时的
- 海量数据的获取和秦阿姨。从ES7.1开始就不推荐,建议用after search方案。
6.7.3 高亮
在搜索结果中,把搜索结果关键字突出显示。
原理:
- 在搜索结果中的关键字用标签标记
- 在页面中给标签添加CSS样式
GET /china_area/_search
{
  "query": {
    "term": {
      "first":{
        "value":"B"
      }
    }
  },
  "highlight": {
    "fields":{
      "name": {
        "pre_tags":"<em>",//前置标签
        "post_tags":"</em>"//后置标签
        , "require_field_match": "false"//不需要匹配
      }
    }
  }
}
七、RestClient操作索引库
7.1 准备
官方提供不同语言的客户端,组装DSL语句,帮助我们通过http请求发送给ES。
官方地址
有关Java的是LowLevelClient和HighLevelClient,两个版本。HighLevelClient基于LowLevelClient进一步封装,使得用着更加方便。
笔者用的是这里的数据。国家地区 省市区 sql


导入数据库后,我们先建立对应的索引库。
这里"all"可以理解为一个组合索引名称,我们在最下面定义,让它可以同时用父类ID,名字,开头字母,级别进行搜索。
我们将pinyin索引设置为false,让它不会被参与搜索。
PUT /china_area
{
  "mappings": {
    "properties": {
      "id":{
        "type": "keyword"
      },
      "pid":{
        "type":"keyword",
        "copy_to": "all"
      },
      "short_name":{
        "type": "text",
        "analyzer": "ik_max_word"
      },
      "name":{
        "type":"text",
        "analyzer": "ik_max_word"
      },
      "merger_name":{
        "type":"text",
        "analyzer": "ik_max_word"
      },
      "level":{
        "type": "integer",
        "copy_to": "all"
      },
      "pinyin":{
        "type":"keyword",
        "index":false
      },
      "phone_code":{
        "type":"keyword"
      },
      "zip_code":{
        "type": "keyword"
      },
      "first":{
        "type": "keyword",
        "copy_to": "all"
      },
      "location":{
        "type": "geo_point"
      },
      "area_code":{
        "type": "keyword"
      },
      "all":{
        "type": "text",
        "analyzer": "ik_max_word"
      }
    }
  }


}
接下来我们用Spring-plus分析数据库,并生成代码
<?xml version="1.0" encoding="UTF-8"?>
<project xmlns="http://maven.apache.org/POM/4.0.0"
         xmlns:xsi="http://www.w3.org/2001/XMLSchema-instance"
         xsi:schemaLocation="http://maven.apache.org/POM/4.0.0 http://maven.apache.org/xsd/maven-4.0.0.xsd">
    <modelVersion>4.0.0</modelVersion>
    <parent>
        <groupId>org.springframework.boot</groupId>
        <artifactId>spring-boot-starter-parent</artifactId>
        <version>2.6.5</version>
    </parent>
    <groupId>org.example</groupId>
    <artifactId>test</artifactId>
    <version>1.0-SNAPSHOT</version>

    <properties>
        <maven.compiler.source>11</maven.compiler.source>
        <maven.compiler.target>11</maven.compiler.target>
    </properties>
    <dependencies>
        <dependency>
            <groupId>org.springframework.boot</groupId>
            <artifactId>spring-boot-starter-web</artifactId>
        </dependency>
        <dependency>
            <groupId>mysql</groupId>
            <artifactId>mysql-connector-java</artifactId>
        </dependency>
        <dependency>
            <groupId>org.projectlombok</groupId>
            <artifactId>lombok</artifactId>
        </dependency>
        <dependency>
            <groupId>com.baomidou</groupId>
            <artifactId>mybatis-plus-boot-starter</artifactId>
            <version>3.5.2</version>
        </dependency>
        <dependency>
            <groupId>com.baomidou</groupId>
            <artifactId>mybatis-plus-generator</artifactId>
            <version>3.5.3</version>
        </dependency>
        <dependency>
            <groupId>org.springframework.boot</groupId>
            <artifactId>spring-boot-starter-freemarker</artifactId>
        </dependency>
        <dependency>
            <groupId>io.swagger</groupId>
            <artifactId>swagger-annotations</artifactId>
            <version>1.6.6</version>
        </dependency>
    </dependencies>
</project>
package com.elastictest;

import com.baomidou.mybatisplus.generator.FastAutoGenerator;
import com.baomidou.mybatisplus.generator.config.OutputFile;
import com.baomidou.mybatisplus.generator.engine.FreemarkerTemplateEngine;

import java.util.Collections;

public class generator {
    public static void main(String[] args){
        FastAutoGenerator.create("jdbc:mysql://127.0.0.1:3306/数据库?useUnicode=true&characterEncoding=UTF-8&&useSSL=false", "账户", "密码")
                .globalConfig(builder -> {
                    builder.author("yjx23332") // 设置作者
                            .enableSwagger() // 开启 swagger 模式
                            .fileOverride() // 覆盖已生成文件
                            .outputDir("E:\\soft\\test\\src\\main\\java"); // 指定输出目录
                })
                .packageConfig(builder -> {
                    builder.parent("com.elastictest") // 设置父包名
                            .moduleName("") // 设置父包模块名
                            .pathInfo(Collections.singletonMap(OutputFile.xml, "E:\\soft\\test\\src\\main\\resources")); // 设置mapperXml生成路径
                })
                .strategyConfig(builder -> {
                    builder.addInclude("china_area") // 设置需要生成的表名
                            .addTablePrefix("t_", "c_"); // 设置过滤表前缀
                })
                .templateEngine(new FreemarkerTemplateEngine()) // 使用Freemarker引擎模板,默认的是Velocity引擎模板
                .execute();

    }
}

最后,我们再引入即可,要记得与服务版本一致。笔者用的是7.6.2,因此此处用该版本覆盖默认版本。
	<properties>
        <maven.compiler.source>11</maven.compiler.source>
        <maven.compiler.target>11</maven.compiler.target>
        <elasticsearch.version>7.6.2</elasticsearch.version>
    </properties>

 		<dependency>
            <groupId>org.elasticsearch.client</groupId>
            <artifactId>elasticsearch-rest-high-level-client</artifactId>
        </dependency>
7.2 连接Elasticsearch
接下来,我们引入junit
		<dependency>
            <groupId>junit</groupId>
            <artifactId>junit</artifactId>
            <scope>test</scope>
        </dependency>
并在test文件下创建
package com.elastictest;

import org.apache.http.HttpHost;
import org.elasticsearch.client.RestClient;
import org.elasticsearch.client.RestHighLevelClient;
import org.junit.jupiter.api.AfterEach;
import org.junit.jupiter.api.BeforeEach;
import org.junit.jupiter.api.Test;

import java.io.IOException;

public class ChinaAreaIndexTest{
    private RestHighLevelClient restHighLevelClient;
    @Test
    void testInit(){
        System.out.println(restHighLevelClient);
    }
    @BeforeEach
    void setUp(){
        this.restHighLevelClient = new RestHighLevelClient(RestClient.builder(HttpHost.create("地址:端口")));
    }
    @AfterEach
    void tearDown() throws IOException {
        this.restHighLevelClient.close();
    }
}
如下,连接成功。

7.3 创建索引库
我们先把之前的创建删除掉。
我们然后主项目中建一个constants类,用来放查询语句

package com.elastictest.constants;

public class ChinaArea {
    public static final String  MAPPING_TEMPLATE = "{" +
            "\"mappings\": {\n" +
            "    \"properties\": {\n" +
            "      \"id\":{\n" +
            "        \"type\": \"keyword\"\n" +
            "      },\n" +
            "      \"pid\":{\n" +
            "        \"type\":\"keyword\",\n" +
            "        \"copy_to\": \"all\"\n" +
            "      },\n" +
            "      \"short_name\":{\n" +
            "        \"type\": \"text\",\n" +
            "        \"analyzer\": \"ik_max_word\"\n" +
            "      },\n" +
            "      \"name\":{\n" +
            "        \"type\":\"text\",\n" +
            "        \"analyzer\": \"ik_max_word\"\n" +
            "      },\n" +
            "      \"merger_name\":{\n" +
            "        \"type\":\"text\",\n" +
            "        \"analyzer\": \"ik_max_word\"\n" +
            "      },\n" +
            "      \"level\":{\n" +
            "        \"type\": \"integer\",\n" +
            "        \"copy_to\": \"all\"\n" +
            "      },\n" +
            "      \"pinyin\":{\n" +
            "        \"type\":\"keyword\",\n" +
            "        \"index\":false\n" +
            "      },\n" +
            "      \"phone_code\":{\n" +
            "        \"type\":\"keyword\"\n" +
            "      },\n" +
            "      \"zip_code\":{\n" +
            "        \"type\": \"keyword\"\n" +
            "      },\n" +
            "      \"first\":{\n" +
            "        \"type\": \"keyword\",\n" +
            "        \"copy_to\": \"all\"\n" +
            "      },\n" +
            "      \"location\":{\n" +
            "        \"type\": \"geo_point\"\n" +
            "      },\n" +
            "      \"area_code\":{\n" +
            "        \"type\": \"keyword\"\n" +
            "      },\n" +
            "      \"all\":{\n" +
            "        \"type\": \"text\",\n" +
            "        \"analyzer\": \"ik_max_word\"\n" +
            "      }\n" +
            "    }\n" +
            "  }" +
            "}";
}
接下来,我们继续在Test文件中添加
	@Test
    void testCreateChinaArea()throws IOException{
        //1.创建request对象
        CreateIndexRequest createIndexRequest = new CreateIndexRequest("china_area");
        //2.请求参数
        createIndexRequest.source(MAPPING_TEMPLATE, XContentType.JSON);
        //3.发起请求
        restHighLevelClient.indices().create(createIndexRequest, RequestOptions.DEFAULT);
    }
执行后,通过Kibana查看是否成功。

7.4 删除索引库与判断索引库是否存在
同理
 	@Test
    void testExistsChinaArea()throws IOException {
        GetIndexRequest getIndexRequest = new GetIndexRequest("china_area");
        boolean exists = restHighLevelClient.indices().exists(getIndexRequest,RequestOptions.DEFAULT);
        System.out.println(exists);
    }

    @Test
    void testDeleteChinaArea()throws IOException{
        DeleteIndexRequest deleteIndexRequest = new DeleteIndexRequest("china_area");
        restHighLevelClient.indices().delete(deleteIndexRequest,RequestOptions.DEFAULT);
    }


八、RestClient操作文档
8.1 准备
我们引入test依赖
		<dependency>
            <groupId>org.springframework.boot</groupId>
            <artifactId>spring-boot-starter-test</artifactId>
        </dependency>
        <dependency>
            <groupId>junit</groupId>
            <artifactId>junit</artifactId>
            <scope>test</scope>
        </dependency>
        <dependency>
            <groupId>com.alibaba.fastjson2</groupId>
            <artifactId>fastjson2</artifactId>
            <version>2.0.7</version>
        </dependency>
在yml文件中配置
spring:
  datasource:
    driver-class-name: com.mysql.cj.jdbc.Driver
    password: 密码
    username: 账号
    url: jdbc:mysql://127.0.0.1:3306/world?useUnicode=true&characterEncoding=UTF-8&&useSSL=false
添加扫描
package com.elastictest;

import org.mybatis.spring.annotation.MapperScan;
import org.springframework.boot.SpringApplication;
import org.springframework.boot.autoconfigure.SpringBootApplication;

@SpringBootApplication
@MapperScan("com.elastictest.mapper")
public class MainApplication {
    public static void main(String[] args){
        SpringApplication.run(MainApplication.class,args);
    }
}
创建如下类,用于从mysql对象到elasticsearch对象(DTO)。
package com.elastictest.entity;

import com.baomidou.mybatisplus.annotation.IdType;
import com.baomidou.mybatisplus.annotation.TableId;
import com.baomidou.mybatisplus.annotation.TableName;
import io.swagger.annotations.ApiModel;
import io.swagger.annotations.ApiModelProperty;
import lombok.Data;

import java.io.Serializable;

@Data
@ApiModel(value = "ChinaArea对象", description = "")
public class ChinaAreaDoc implements Serializable {

    @ApiModelProperty("ID")
    private Integer id;

    @ApiModelProperty("父id")
    private Integer pid;

    @ApiModelProperty("简称")
    private String shortName;

    @ApiModelProperty("名称")
    private String name;

    @ApiModelProperty("全称")
    private String mergerName;

    @ApiModelProperty("层级 0 1 2 省市区县")
    private Byte level;

    @ApiModelProperty("拼音")
    private String pinyin;

    @ApiModelProperty("长途区号")
    private String phoneCode;

    @ApiModelProperty("邮编")
    private String zipCode;

    @ApiModelProperty("首字母")
    private String first;

    @ApiModelProperty("位置")
    private String location;

    public ChinaAreaDoc(){}

    public ChinaAreaDoc(ChinaArea chinaArea){
        this.id = chinaArea.getId();
        this.first = chinaArea.getFirst();
        this.location = chinaArea.getLat() +  "," + chinaArea.getLng();
        this.level = chinaArea.getLevel();
        this.mergerName = chinaArea.getMergerName();
        this.phoneCode = chinaArea.getPhoneCode();
        this.pid = chinaArea.getPid();
        this.pinyin = chinaArea.getPinyin();
        this.zipCode = chinaArea.getZipCode();
        this.name = chinaArea.getName();
        this.shortName = chinaArea.getShortName();
    }
}
8.2 用ID添加数据
我们再创建一个测试类
由于我们要用自动注入,所以之前用的方法用不了了,我们就这样写,避免空指针。
package com.elastictest;

import com.alibaba.fastjson2.JSON;
import com.elastictest.entity.ChinaArea;
import com.elastictest.entity.ChinaAreaDoc;
import com.elastictest.service.IChinaAreaService;
import org.apache.http.HttpHost;
import org.elasticsearch.action.index.IndexRequest;
import org.elasticsearch.client.RequestOptions;
import org.elasticsearch.client.RestClient;
import org.elasticsearch.client.RestHighLevelClient;
import org.elasticsearch.common.xcontent.XContentType;
import org.junit.Test;
import org.junit.runner.RunWith;
import org.springframework.beans.factory.annotation.Autowired;
import org.springframework.boot.test.context.SpringBootTest;
import org.springframework.test.context.junit4.SpringRunner;

import java.io.IOException;


@SpringBootTest
@RunWith(SpringRunner.class)
public class ChinaAreaTest {
    @Autowired
    private IChinaAreaService iChinaAreaService;
    private RestHighLevelClient restHighLevelClient;

    private void initial(){
        this.restHighLevelClient = new RestHighLevelClient(RestClient.builder(
                HttpHost.create("地址:端口")
        ));
    }


    @Test
    public void testAddDocumentById()throws IOException{
        initial();
        ChinaArea chinaArea = iChinaAreaService.getById(9);
        ChinaAreaDoc chinaAreaDoc = new ChinaAreaDoc(chinaArea);

        IndexRequest indexRequest = new IndexRequest("china_area").id(chinaAreaDoc.getId().toString());
        indexRequest.source(JSON.toJSONString(chinaAreaDoc), XContentType.JSON);
        restHighLevelClient.index(indexRequest, RequestOptions.DEFAULT);
        if(restHighLevelClient != null)
            restHighLevelClient.close();
    }
}

8.3 用ID查询数据
	@Test
    public void testGetDocumentById()throws IOException{
        initial();
        GetRequest getRequest = new GetRequest("china_area","9");
        GetResponse getResponse = restHighLevelClient.get(getRequest, RequestOptions.DEFAULT);
        String json = getResponse.getSourceAsString();
        System.out.println(json);
        if(restHighLevelClient != null)
            restHighLevelClient.close();
    }
8.4 用ID修改数据
- 全局更新,与写入一样的操作,自动删除旧文档,添加新文档。
- 局部更新
	@Test
    public void testUpdateDocumentById()throws IOException{
        initial();
        UpdateRequest updateRequest = new UpdateRequest("china_area","9");
        updateRequest.doc(
                "level", 1,
                "phoneCode","011"
        );
        restHighLevelClient.update(updateRequest, RequestOptions.DEFAULT);
        if(restHighLevelClient != null)
            restHighLevelClient.close();
    }

8.5 用ID删除文档
	@Test
    public void testDeleteDocumentById()throws IOException{
        initial();
        DeleteRequest deleteRequest = new DeleteRequest("china_area","9");
        restHighLevelClient.delete(deleteRequest, RequestOptions.DEFAULT);
        if(restHighLevelClient != null)
            restHighLevelClient.close();
    }

8.6 用ID批量新增
首先,我们使用Mybatis的分页插件,帮助我们,分页获取。
package com.elastictest.config;

import com.baomidou.mybatisplus.annotation.DbType;
import com.baomidou.mybatisplus.extension.plugins.MybatisPlusInterceptor;
import com.baomidou.mybatisplus.extension.plugins.inner.BlockAttackInnerInterceptor;
import com.baomidou.mybatisplus.extension.plugins.inner.PaginationInnerInterceptor;
import org.springframework.context.annotation.Bean;
import org.springframework.context.annotation.Configuration;

@Configuration
public class MybatisConfig{
    @Bean
    public MybatisPlusInterceptor mybatisPlusInterceptor() {
        MybatisPlusInterceptor interceptor = new MybatisPlusInterceptor();
        //物理分页
        interceptor.addInnerInterceptor(new PaginationInnerInterceptor(DbType.MYSQL));
        //防止恶意全表操作
        interceptor.addInnerInterceptor(new BlockAttackInnerInterceptor());
        return interceptor;
    }
}
@Test
    public void testBulk() throws IOException{
        initial();
        long total = iChinaAreaService.count();
        //每页100条
        long page = total / 100;
        for(int i = 1;i <= page + 1;i++){
            BulkRequest bulkRequest =new BulkRequest();
            Page<ChinaArea> result = iChinaAreaService.page(new Page<ChinaArea>(i,100,total,false));
            List<ChinaArea> chinaAreas = result.getRecords();
            for(ChinaArea  chinaArea: chinaAreas){
                ChinaAreaDoc chinaAreaDoc = new ChinaAreaDoc(chinaArea);
                bulkRequest.add(new IndexRequest("china_area").id(chinaAreaDoc.getId().toString()).source(JSON.toJSONString(chinaAreaDoc),XContentType.JSON));
            }
            restHighLevelClient.bulk(bulkRequest,RequestOptions.DEFAULT);
        }
        if(restHighLevelClient != null)
            restHighLevelClient.close();
    }
8.7 查询文档
8.7.1 简单开始
	@Test
    public void testMatchAll() throws IOException{
        initial();
        //1.准备Request
        SearchRequest searchRequest = new SearchRequest("china_area");
        //2.组织DSL参数,match_all
        searchRequest.source().query(QueryBuilders.matchAllQuery());
        //3. 发送请求,得到响应结果
        SearchResponse searchResponse = restHighLevelClient.search(searchRequest,RequestOptions.DEFAULT);
        if(restHighLevelClient != null)
            restHighLevelClient.close();
        //4. 解析结果
        SearchHits searchHits = searchResponse.getHits();
        long total = searchHits.getTotalHits().value;
        System.out.println("共有:" + total + "条数据");
        SearchHit[] hits= searchHits.getHits();
        for(SearchHit hit : hits){
            ChinaAreaDoc chinaAreaDoc = JSON.parseObject(hit.getSourceAsString(),ChinaAreaDoc.class);
            System.out.println(chinaAreaDoc.getId() + ":" + chinaAreaDoc.getName());
        }
    }

8.7.2 QueryBuilders
//match
QueryBuilders.matchQuery("name","北京")
QueryBuilders.matchQuery("name","[\"北京\",\"上海\"]")

//term
QueryBuilders.termQuery("first","B")

//range
QueryBuilders.rangeQuery("id").gte("100")

//function_score
 QueryBuilders.functionScoreQuery(
        QueryBuilders.matchQuery("name","北京"), new FunctionScoreQueryBuilder.FilterFunctionBuilder[]{
              new FunctionScoreQueryBuilder.FilterFunctionBuilder(QueryBuilders.rangeQuery("level").gte(1), ScoreFunctionBuilders.weightFactorFunction(5)),
         }
)


//bool
BoolQueryBuilder boolQueryBuilder = new BoolQueryBuilder();
boolQueryBuilder.must(QueryBuilders.termQuery("first","B"));
boolQueryBuilder.filter(QueryBuilders.rangeQuery("id").gte("100"));
searchRequest.source().query(boolQueryBuilder);
8.7.3 SearchRequest
//查询
searchRequest.source().query();
//分页
searchRequest.source().from(0).size(5)
//排序
searchRequest.source().sort("id", SortOrder.DESC)
searchRequest.source().sort(SortBuilders.geoDistanceSort("location",new GeoPoint("31.21,121.5"))
                            .order(SortOrder.ASC)
                            .unit(DistanceUnit.KILOMETERS))
//高亮
searchRequest.source().highlighter(new HighlightBuilder().field("name").requireFieldMatch(false))
//检查是否有高亮
SearchHit[] hits= searchHits.getHits();
for(SearchHit hit : hits){
   ChinaAreaDoc chinaAreaDoc = JSON.parseObject(hit.getSourceAsString(),ChinaAreaDoc.class);
   System.out.println(chinaAreaDoc.getId() + ":" + chinaAreaDoc.getName() + ":" + chinaAreaDoc.getLevel() + ":" + chinaAreaDoc.getZipCode());
   Map<String, HighlightField> highlightFields = hit.getHighlightFields();
   if(!CollectionUtils.isEmpty(highlightFields)){
       System.out.println(highlightFields.get("name").getFragments()[0].toString());
   }
}
8.8 尝试
创建一个返回数据
package com.elastictest.entity.vo;

import lombok.Data;

import java.util.List;

@Data
public class PageResVo<T> {
    private Long total;
    private List<T> data;
}
创建一个前端接收参数
package com.elastictest.entity.vo;

import lombok.Data;

@Data
public class PageReqVo {
    private String key;
    private Integer page;
    private Integer size;
    private String sortBy;
    private Boolean isAsc;
}
controll层
package com.elastictest.controller;

import com.elastictest.entity.ChinaAreaDoc;
import com.elastictest.entity.vo.PageReqVo;
import com.elastictest.entity.vo.PageResVo;
import com.elastictest.service.IChinaAreaService;
import org.springframework.beans.factory.annotation.Autowired;
import org.springframework.web.bind.annotation.*;

/**
 * <p>
 *  前端控制器
 * </p>
 *
 * @author yjx23332
 * @since 2022-08-17
 */
@RestController
@RequestMapping("/chinaArea")
public class ChinaAreaController {
    @Autowired
    private IChinaAreaService iChinaAreaService;

    @PostMapping("/list")
    public PageResVo<ChinaAreaDoc> search(@RequestBody PageReqVo params){
        return  iChinaAreaService.search(params);
    }
}
配值ES连接
package com.elastictest.config;

import org.apache.http.HttpHost;
import org.elasticsearch.client.RestClient;
import org.elasticsearch.client.RestHighLevelClient;
import org.springframework.context.annotation.Bean;

@Configuration
public class ElasticSearchConfig {
    @Bean
    public RestHighLevelClient restHighLevelClient(){
        return new RestHighLevelClient(RestClient.builder(HttpHost.create("IP:端口")));
    }
}
serviceImpl
package com.elastictest.service.impl;

import com.alibaba.fastjson2.JSON;
import com.elastictest.entity.ChinaArea;
import com.elastictest.entity.ChinaAreaDoc;
import com.elastictest.entity.vo.PageReqVo;
import com.elastictest.entity.vo.PageResVo;
import com.elastictest.mapper.ChinaAreaMapper;
import com.elastictest.service.IChinaAreaService;
import com.baomidou.mybatisplus.extension.service.impl.ServiceImpl;
import com.mysql.cj.util.StringUtils;
import lombok.extern.slf4j.Slf4j;
import org.elasticsearch.action.search.SearchRequest;
import org.elasticsearch.action.search.SearchResponse;
import org.elasticsearch.client.RequestOptions;
import org.elasticsearch.client.RestHighLevelClient;
import org.elasticsearch.index.query.QueryBuilder;
import org.elasticsearch.index.query.QueryBuilders;
import org.elasticsearch.search.SearchHit;
import org.elasticsearch.search.SearchHits;

import org.springframework.beans.factory.annotation.Autowired;
import org.springframework.stereotype.Service;

import java.io.IOException;
import java.util.ArrayList;
import java.util.List;


/**
 * <p>
 *  服务实现类
 * </p>
 *
 * @author yjx23332
 * @since 2022-08-17
 */
@Service
@Slf4j
public class ChinaAreaServiceImpl extends ServiceImpl<ChinaAreaMapper, ChinaArea> implements IChinaAreaService {
    @Autowired
    RestHighLevelClient restHighLevelClient;
    @Override
    public PageResVo<ChinaAreaDoc> search(PageReqVo params) {
        try {
            SearchRequest searchRequest = new SearchRequest("china_area");

            String key = params.getKey();
            if (StringUtils.isNullOrEmpty(key)) {
                searchRequest.source().query(QueryBuilders.matchAllQuery());
            } else {
                searchRequest.source().from((page - 1) * size).size(size)
                .sort(params.getSortBy(), params.getIsAsc()?SortOrder.ASC:SortOrder.DESC);

            }
            int page = params.getPage();
            int size = params.getSize();
            searchRequest.source().from((page - 1) * size).size(size);
            SearchResponse searchResponse = restHighLevelClient.search(searchRequest, RequestOptions.DEFAULT);
            return handleResponse(searchResponse);
        }catch (IOException e){
            log.error("{}",e.getMessage());
            throw new RuntimeException(e);
        }
    }
    private PageResVo<ChinaAreaDoc> handleResponse(SearchResponse searchResponse){
        SearchHits searchHits = searchResponse.getHits();
        long total = searchHits.getTotalHits().value;
        SearchHit[] hits= searchHits.getHits();
        PageResVo<ChinaAreaDoc> pageResVo = new PageResVo<>();
        pageResVo.setTotal(searchHits.getTotalHits().value);
        List<ChinaAreaDoc> chinaAreaDocs = new ArrayList<>();
        for(SearchHit hit : hits){
            chinaAreaDocs.add(JSON.parseObject(hit.getSourceAsString(),ChinaAreaDoc.class));
        }
        pageResVo.setData(chinaAreaDocs);
        return pageResVo;
    }
}
接下来启动后,用POSTMAN测一下

九、 数据聚合
官方文档地址
聚合(aggregation)可以实现对文档数据的统计、分析、运算。常见的有三类:
- 桶(Bucket)聚合:用来对文档做分组
- Term Aggregation:按照文档字段值分组
- Date Histogram:按照日期阶梯分组
- 度量(Metric)聚合:用以计算一些值,比如:最大值,最小值, 平均值等
- Avg:求平均值
- Max:求最大值
- Min:求最小值
- Stats:同时求max、min、avg、sum等
- 管道(pipeline)聚合:其他聚合的结果作为基础做聚合。
参与字段:
- keyword
- 数值
- 日期
- 布尔
9.1 DSL实现
9.1.1 Bucket聚合
GET /china_area/_search
{
  "size":0,//设置不包含文档,只包含聚合结果
  "aggs":{	//定义聚合:
    "levelAgg":{//聚合名称
      "terms": {//聚合类型
        "field": "level",//参与聚合的字段
        "order":{
          "_count": "desc"
        },
        "size": 20 //希望获取的聚合结果数量
      }
    }
  }

}

9.1.2 Metrics聚合
GET /china_area/_search
{
  "size":0,
  "aggs":{
    "pidAgg":{
      "terms": {
        "field": "pid",
        "order":{
          "levelAgg.avg":"asc"
        },
        "size": 20
      },
      "aggs":{
        "levelAgg":{
          "stats": {
            "field":"level"
          }
        }
      }
    }
  }
}

9.2 RestClient实现
9.2.1 Bucket
	@Test
    public void testAggregation()throws IOException{
        initial();
        SearchRequest searchRequest = new SearchRequest("china_area");
        searchRequest.source().size(0);
        searchRequest.source().aggregation(AggregationBuilders.terms("level_agg").field("level").size(20));
        SearchResponse searchResponse = restHighLevelClient.search(searchRequest,RequestOptions.DEFAULT);
        if(restHighLevelClient != null)
            restHighLevelClient.close();
        Aggregations aggregations = searchResponse.getAggregations();
        Terms levelTerms = aggregations.get("level_agg");
        List<? extends Terms.Bucket> buckets = levelTerms.getBuckets();
        for(Terms.Bucket bucket :buckets){
            System.out.println(bucket.getKeyAsNumber() + ":" +bucket.getDocCount());
        }
    }
十、自动补全
我们需要安装拼音分词器插件。
安装方式有两种,同分词器的用法,一个是自己下载后上传至(/var/lib/docker/volumes/es-plugins/_data)即可,二是直接用如下步骤安装。
记得版本号要与自己的一致。
拼音分词器github地址
容器直接安装步骤
docker exec -it es /bin/bash
./bin/elasticsearch-plugin install https://github.com/medcl/elasticsearch-analysis-pinyin/releases/download/v7.6.2/elasticsearch-analysis-pinyin-7.6.2.zip
exit
docker restart es
测试
GET /_analyze
{
  "text":["这家饭店的菜还不错"],
  "analyzer": "pinyin"

}

10.1 自定义分词器
elasticsearch中分词(analyzer)的组成包含三部分:
- character filters:在tokenizer之前对文本进行处理,入删除、替换字符
- tokenizer:将文本按照一定的柜子切割成词条(term)。例如keyword,ik_smart
- tokenizer filter:将tokenizer输出的词条作进一步处理。例如大小写转换,同义词处理、拼音处理等。
在创建索引库的时候,通过"settings"来配置自定义的分词器。
PUT /test
{
  "settings": {
    "analysis": {
      "analyzer": {//自定义分词器
        "my_analyzer":{//自定义分词器名称
          "tokenizer":"ik_max_word",
          "filter":"pinyin"
        }
      }
    }
  }
}
我们接下来也可以进一步定义过滤器
PUT /test
{
  "settings": {
    "analysis": {
      "analyzer": {
        "my_analyzer":{
          "tokenizer":"ik_max_word",
          "filter":"py"
        }
      },
      "filter":{
        "py":{
          "type":"pinyin",
          "keep_full_pinyin":false,
          "keep_joined_full_pinyin":true,
          "keep_original":true,
          "limit_first_letter_length":16,
          "remove_duplicated_term":true,
          "none_chinese_pinyin_tokenize":false
        }
      }
    }
  }
}
如下创建完成。
PUT /test
{
  "settings": {
    "analysis": {
      "analyzer": {
        "my_analyzer":{
          "tokenizer":"ik_max_word",
          "filter":"py"
        }
      },
      "filter":{
        "py":{
          "type":"pinyin",
          "keep_full_pinyin":false,
          "keep_joined_full_pinyin":true,
          "keep_original":true,
          "limit_first_letter_length":16,
          "remove_duplicated_term":true,
          "none_chinese_pinyin_tokenize":false
        }
      }
    }
  },
  "mappings": {
    "properties": {
      "name":{
        "type": "text",
        "analyzer": "my_analyzer"
      }
    }
  }
}
如下测试
GET /test/_analyze
{
  "text":["这家饭店的菜还不错"],
  "analyzer": "my_analyzer"

}

拼音分词器适合在创建倒排索引时使用,但不能在搜索时使用。我们用如下例子说明。
POST /test/_doc/1
{
  "id":1,
  "name":"狮子"
}

POST /test/_doc/2
{
  "id":2,
  "name":"虱子"
}

GET /test/_search
{
  "query":{
    "match":{
      "name":"掉入狮子笼子怎么办"
    }
  }
}
我们会发现所有的都搜出来了。因为狮子、虱子同拼音。
因此在创建之初,我们分别需要指定建立倒排索引的分词器和搜索的分词器
PUT /test
{
  "settings": {
    "analysis": {
      "analyzer": {
        "my_analyzer":{
          "tokenizer":"ik_max_word",
          "filter":"py"
        }
      },
      "filter":{
        "py":{
          "type":"pinyin",
          "keep_full_pinyin":false,
          "keep_joined_full_pinyin":true,
          "keep_original":true,
          "limit_first_letter_length":16,
          "remove_duplicated_term":true,
          "none_chinese_pinyin_tokenize":false
        }
      }
    }
  },
  "mappings": {
    "properties": {
      "name":{
        "type": "text",
        "analyzer": "my_analyzer",
        "search_analyzer": "ik_smart"
      }
    }
  }
}
随后,我们新做一遍,会发现没有问题了。
10.2 自动补全查询
completion suggester查询:匹配用户输入内容开头的词条并返回。为了提高不全查询的效率,对于文档中的字段的类型有一些约束。
- 参与补全查询的字段必须是completion类型
- 字段的内容一般是用来补全多个词条形成的数组。
PUT /test
{
  "settings": {
    "analysis": {
      "analyzer": {
        "my_analyzer":{
          "tokenizer":"ik_max_word",
          "filter":"py"
        }
      },
      "filter":{
        "py":{
          "type":"pinyin",
          "keep_full_pinyin":false,
          "keep_joined_full_pinyin":true,
          "keep_original":true,
          "limit_first_letter_length":16,
          "remove_duplicated_term":true,
          "none_chinese_pinyin_tokenize":false
        }
      }
    }
  },
  "mappings": {
    "properties": {
      "title":{
        "type": "completion"
      }
    }
  }
}

POST test/_doc
{
  "title":["sony","WH-1000XM3"]
}


POST test/_doc
{
  "title":["SK-II","PITERA"]
}


POST test/_doc
{
  "title":["Nintendo","switch"]
}

//自动补全查询
GET /test/_search
{
  "suggest": {
    "title_suggest": {
      "text": "s",//关键字
      "completion": {
        "field": "title",//补全查询的字段
        "skip_duplicates":true,//跳过重复的
        "size":10//获取前10条结果
      }
    }
  }
}

我们需要使用的时候,可以新建一个文件"suggestion",类型suggestion,放入我们想要不全的信息,单独进行查询。
10.3 RestClient补全查询
	@Test
    public void testSuggestion() throws IOException{
        initial();
        SearchRequest searchRequest = new SearchRequest("test");
        searchRequest.source().suggest(new SuggestBuilder().addSuggestion(
                "title_suggest", SuggestBuilders.completionSuggestion("title")
                        .prefix("s")
                        .skipDuplicates(true)
                        .size(10)
        ));
        SearchResponse searchResponse = restHighLevelClient.search(searchRequest,RequestOptions.DEFAULT);
        Suggest suggest = searchResponse.getSuggest();
        CompletionSuggestion completionSuggestion = suggest.getSuggestion("title_suggest");
        List<CompletionSuggestion.Entry.Option> options = completionSuggestion.getOptions();
        for(CompletionSuggestion.Entry.Option option: options){
            String text = option.getText().string();
            System.out.println(text);
        }
    }
十一、数据同步
数据库同步问题:数据库数据发生改变时,elasticsearch也必须跟着改变。但是在微服务时,管理数据的服务与搜索的服务可能不在一个服务上,数据同步应该如何实现。
方案一、同步调用
优点:
- 实现简单,粗暴
缺点:
- 业务耦合度高
方案二、异步通知
优点:
- 低耦合,实现难度一般
缺点:
- 依赖MQ的可靠性
方案三、监听binlog
优点:
- 完全解除服务间的耦合
缺点:
- 开启binlog增加数据库负担、实现复杂度高
MQ 实现mysql与elasticsearch数据同步
基于前面的代码我们增加发送消息的逻辑。
添加MQ依赖,配置对应的参数。
相关用法参看MessageQueue消息队列——基础(笔记)
		<dependency>
            <groupId>org.springframework.boot</groupId>
            <artifactId>spring-boot-starter-amqp</artifactId>
        </dependency>
spring:
	rabbitmq:
	    host:
	    port: 5672
	    virtual-host: /
	    username:
	    password:
package com.elastictest.constants;


/***
 * @author  yjx23332
 * @date 2022-8-19
 */
public class MqConstants {
    /**
     * 交换机配置
     * */
    public final  static String CHINA_AREA_EXCHANGE = "china.area.topic";
    /**
     * 监听新增和修改的队列
     */
    public final static String CHINA_AREA_INSERT_QUEUE = "china.area.insert.queue";
    /**
     * 监听删除的队列
     */
    public final static String CHINA_AREA_DELETE_QUEUE = "china.area.delete.queue";
    /**
     * 监听或修改的RountingKey
     */
    public final static String CHINA_AREA_INSERT_KEY = "china.area.insert";
    /**
     * 删除的RountingKey
     */
    public final static String CHINA_AREA_DELETE_KEY = "china.area.delete";
}
package com.elastictest.controller;

import com.elastictest.constants.MqConstants;
import com.elastictest.entity.ChinaArea;
import com.elastictest.entity.ChinaAreaDoc;
import com.elastictest.entity.vo.PageReqVo;
import com.elastictest.entity.vo.PageResVo;
import com.elastictest.service.IChinaAreaService;
import org.apache.ibatis.annotations.Delete;
import org.springframework.amqp.rabbit.core.RabbitTemplate;
import org.springframework.beans.factory.annotation.Autowired;
import org.springframework.web.bind.annotation.*;

/**
 * <p>
 *  前端控制器
 * </p>
 *
 * @author yjx23332
 * @since 2022-08-17
 */
@RestController
@RequestMapping("/chinaArea")
public class ChinaAreaController {
    @Autowired
    private IChinaAreaService iChinaAreaService;
    @Autowired
    private RabbitTemplate rabbitTemplate;

    @PutMapping
    public void saveOrUpdateArea(@RequestBody ChinaArea chinaArea){
        iChinaAreaService.saveOrUpdate(chinaArea);
        rabbitTemplate.convertAndSend(MqConstants.CHINA_AREA_EXCHANGE,MqConstants.CHINA_AREA_INSERT_KEY,chinaArea);
    }
    @DeleteMapping("/{id}")
    public void deleteById(@PathVariable("id") Long id){
        iChinaAreaService.removeById(id);
        rabbitTemplate.convertAndSend(MqConstants.CHINA_AREA_EXCHANGE,MqConstants.CHINA_AREA_DELETE_KEY,id);
    }
}
这里图方便,提供者和消费者放一起了,这里只是模拟过程。
package com.elastictest.listener;

import com.alibaba.fastjson2.JSON;
import com.elastictest.constants.MqConstants;
import com.elastictest.entity.ChinaArea;
import com.elastictest.entity.ChinaAreaDoc;
import org.elasticsearch.action.delete.DeleteRequest;
import org.elasticsearch.action.index.IndexRequest;
import org.elasticsearch.client.RequestOptions;
import org.elasticsearch.client.RestHighLevelClient;
import org.elasticsearch.common.xcontent.XContentType;
import org.springframework.amqp.core.ExchangeTypes;
import org.springframework.amqp.rabbit.annotation.Exchange;
import org.springframework.amqp.rabbit.annotation.Queue;
import org.springframework.amqp.rabbit.annotation.QueueBinding;
import org.springframework.amqp.rabbit.annotation.RabbitListener;
import org.springframework.beans.factory.annotation.Autowired;
import org.springframework.stereotype.Component;

import java.io.IOException;

@Component
public class RabbitMQListener {
    @Autowired
    RestHighLevelClient restHighLevelClient;

    @RabbitListener(
            bindings = @QueueBinding(
                value = @Queue(name = MqConstants.CHINA_AREA_INSERT_QUEUE),
                exchange = @Exchange(value = MqConstants.CHINA_AREA_EXCHANGE,type = ExchangeTypes.TOPIC),
                 key = {MqConstants.CHINA_AREA_INSERT_KEY}
            )
    )
    public void listenInsertQueue(ChinaArea chinaArea){
        try {
            ChinaAreaDoc chinaAreaDoc = new ChinaAreaDoc(chinaArea);
            IndexRequest indexRequest = new IndexRequest("china_area").id(chinaAreaDoc.getId().toString());
            indexRequest.source(JSON.toJSONString(chinaAreaDoc), XContentType.JSON);
            restHighLevelClient.index(indexRequest, RequestOptions.DEFAULT);
        }catch (IOException ex){
            throw new RuntimeException(ex);
        }
    }
    @RabbitListener(
            bindings = @QueueBinding(
                    value = @Queue(name = MqConstants.CHINA_AREA_DELETE_QUEUE),
                    exchange = @Exchange(value = MqConstants.CHINA_AREA_EXCHANGE,type = ExchangeTypes.TOPIC),
                    key = {MqConstants.CHINA_AREA_DELETE_KEY}
            )
    )
    public void listenDeleteQueue(Long id){
        try {
            DeleteRequest deleteRequest = new DeleteRequest("china_area").id(id.toString());
            restHighLevelClient.delete(deleteRequest, RequestOptions.DEFAULT);
        }catch (IOException ex){
            throw new RuntimeException(ex);
        }
    }
}
运行后,我们先查看MQ


随后我们用POSTMAN测试


十二、ES集群
单机的elasticsearch做存储会面临
- 海量数据存储问题
- 单点故障问题
对策:
- 通过将索引库从逻辑上拆分为N个分片(shard),存储到多节点
- 将分片数据放在不同节点备份(replica)
12.1 部署
通过docker-compose快速部署,集群名称一样,会被自动组装为一个集群
修改linux:
vi /etc/sysctl.conf
增添如下信息
vm.max_map_count=262144
再用如下命令载入
sysctl -p
version: '3.2'
services:
  es01:
    image: elasticsearch:7.6.2
    container_name: es01
    environment:
      - node.name=es01
      #集群名称
      - cluster.name=es-docker-cluster
      #另外两个节点的IP地址,docker容器互联直接用容器名
      - discovery.seed_hosts=es02,es03
      #参加选举
      - cluster.initial_master_nodes=es01,es02,es03
      - "ES_JAVA_OPTS=-Xms512m -Xmx512m"
    volumes:
      - data01:/usr/share/elasticsearch/data
    ports:
      - 9200:9200
    networks:
      - elastic
  es02:
    image: elasticsearch:7.6.2
    container_name: es02
    environment:
      - node.name=es02
      - cluster.name=es-docker-cluster
      - discovery.seed_hosts=es01,es03
      - cluster.initial_master_nodes=es01,es02,es03
      - "ES_JAVA_OPTS=-Xms512m -Xmx512m"
    volumes:
      - data02:/usr/share/elasticsearch/data
    ports:
      - 9201:9200
    networks:
      - elastic
  es03:
    image: elasticsearch:7.6.2
    container_name: es03
    environment:
      - node.name=es03
      - cluster.name=es-docker-cluster
      - discovery.seed_hosts=es01,es02
      - cluster.initial_master_nodes=es01,es02,es03
      - "ES_JAVA_OPTS=-Xms512m -Xmx512m"
    volumes:
      - data03:/usr/share/elasticsearch/data
    ports:
      - 9202:9200
    networks:
      - elastic
volumes:
  data01:
    driver: local
  data02:
    driver: local
  data03:
    driver: local
networks:
  elastic:
    driver: bridge
之后即可
docker-compose up -d

笔者服务器内存不够了,接下来的部分就没办法实操了。

记得开启端口。
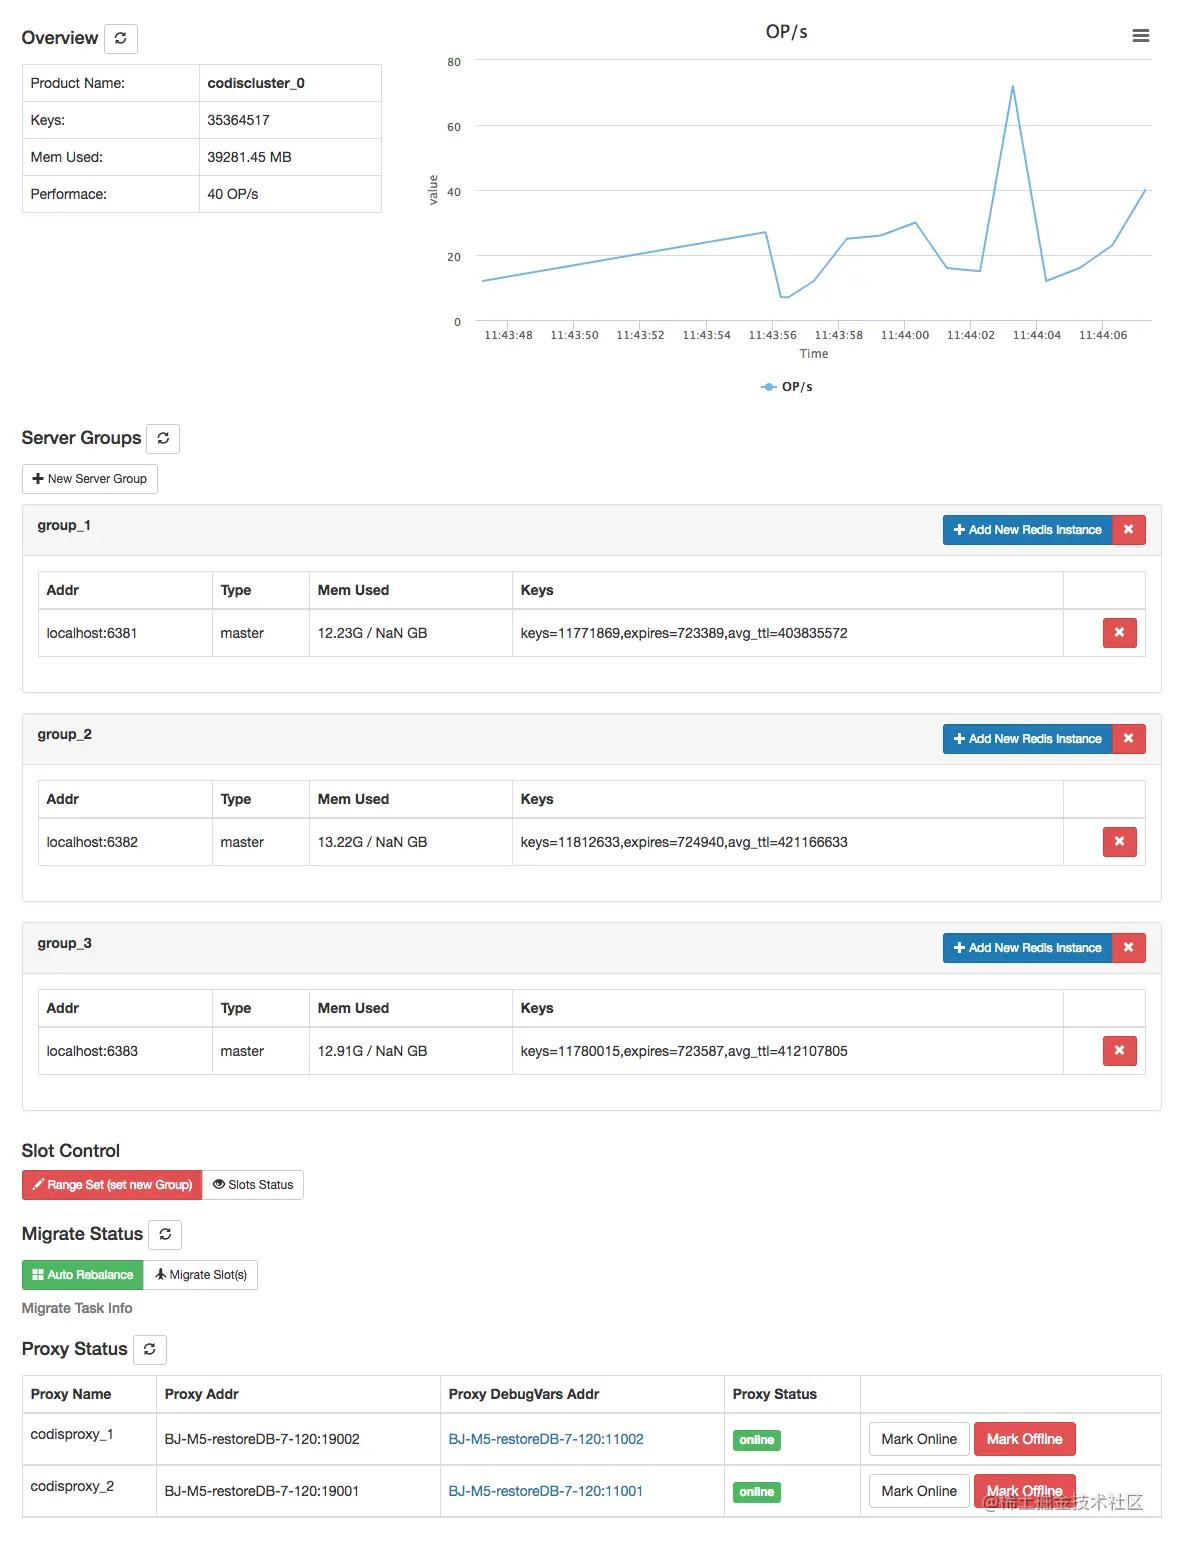
12.2 集群监控
对于集群,kibana也可以监控集群,但是需要较复杂的配置。
因此使用cerebro监控比较方便。
12.3 指定分片与备份
分片以及他的备份一般不会再同一个服务上,避免一起挂掉。
PUT /test
{
	"settings":{
		"number_of_shards":3,//发片数量
		"number_of_replicas":1//每一片副本数量
	},
	"mappings":{
		"propertries":{
			...
		}
	}
}
12.4 ES节点角色
主节点属于备选节点
| 节点类型 | 配置参数 | 默认值 | 节点职责 |
|---|---|---|---|
| master eligible | node.master | true | 备选主节点:可以管理和记录集群状态、决定分片在哪个节点、处理创建核删除索引库的请求 |
| data | node.data | true | 数据节点:存储数据、搜索、聚合、CRUD |
| ingest | node.ingest | true | 数据存储之前预处理 |
| coordinating | 上面3个参数都为false,则为协调节点节点 | 无 | 路由请求到其他节点,合并其他节点处理的结果,返回给用户 |
每个ES节点默认拥有以上4个配置,同时担任4个责任。
同时所有节点都必须有协调节点角色作为基础责任。节点要么是纯粹只做协调的节点或者是协调+其他角色的节点。
12.5 ES集群脑裂与故障转移
默认每个节点都是master eligible节点,一旦master节点宕机,其他候选节点会选一个成为主节点。
当主节点与其他节点网络故障时,可能发生脑裂问题。因为可能会有两个主节点出现。
为了避免脑裂,
- 主节点不要作为数据节点
- 数据节点不要具备选举功能
- 不少于3个节点具备成为主节点的资格
- 投票数超过(候选节点+1)/2才能成为主节点(因此数目最好是奇数)。
可以通过配置来管理选票数目,es7.0后默认配置。
discovery.zen.minimum_master_nodes
- 挂掉的节点如果是数据节点或者说有数据节点的职责,主节点会核对挂掉的数据有哪些,然后从各个健康节点的备份中找到,再次备份到健康的节点上,保证数目为设定的数目。
- 如果挂掉的主节点再上线,此时它不会成为主节点。
- 如果挂掉的数据节点再次上线,主节点则会从其他节点将需要的数据传给它,同时删除其它节点上本不应该有的多余备份。
脑裂是集群中较常考虑的问题,可以与redis主从模式的集群故障转移比较:主客观下线,加上选举主哨兵来做故障转移。
12.6 ES查询流程
类似于Redis的无中心化集群。为保证数据集均衡,会将数据保存到不同分片。通过一个计算式,来算出属于来一个分片。
shard = hash(_routing)%number_of_shards
- _routing:默认是文档ID。
- 算法与分片数量有关,因此索引库一旦创建,分片数量不能修改。
查询分为两个阶段:
- scatter phase:分散阶段,coordinating node会把请求分发到每一个分片
- gather phase:聚集阶段,coordinating node汇总data node的搜索结果,并处理为最终结果返回给用户
参考文献
[1]黑马程序员Java微服务
[2]docker network详解、教程
[3]Elasticsearch Guide
[4]RestClient部分官方文档
[5]DSL部分官方文档
[6]聚合部分官方文档


![成功解决ubuntu-22.04的sudo apt-get update一直卡在【0% [Waiting for headers]】](https://img-blog.csdnimg.cn/897f684f80c94a43a3617cd129eeaee0.png)


![NSS [MoeCTF 2022]baby_file](https://img-blog.csdnimg.cn/img_convert/430eb4a78dfdef8dd67c4c0e669f9609.png)