Ble蓝牙App(二)连接与发现服务
- 前言
- 正文
- 一、GATT回调
- 二、连接和断连
- 三、连接状态回调
- 四、发现服务
- 五、服务适配器
- 六、显示服务
- 七、源码
前言
在上一篇中我们进行扫描设备的处理,本文中进行连接和发现服务的数据处理,运行效果图如下所示:

正文
现在我们从MainActivity进入到ScanActivity,选中一个设备返回到MainActivity,下面要对选中的设备进行处理,首先我们来做连接。
一、GATT回调
在之前我们写了一个BleCore,这里面是对扫描的封装,那么对于连接来说我们同样可以封装到这里,我们可以在BleCore中写一个BleGattCallback 类,代码如下所示:
class BleGattCallback : BluetoothGattCallback() {

        /**
         * 连接状态改变
         */
        override fun onConnectionStateChange(gatt: BluetoothGatt, status: Int, newState: Int) {

        }

        /**
         * 发现服务
         */
        override fun onServicesDiscovered(gatt: BluetoothGatt, status: Int) {

        }
    }
因为本文要做的事情是连接和发现服务,所以我们就先重写这两个函数,注意一点的是,蓝牙的操作都是在子线程中进行的,如果我们需要知道当前是否连接,则需要写一个接口用于回调到Activity中,在ble包下新建一个BleCallback接口,代码如下所示:
interface BleCallback {

    /**
     * 设备的所有信息
     */
    fun deviceInfo(info: String)

    /**
     * 连接状态
     * @param state true or false
     */
    fun onConnectionStateChange(state: Boolean)

    /**
     * 发现服务
     */
    fun onServicesDiscovered(services: List<BluetoothGattService>)
}
接口中定义了三个函数,通过注释我们清晰的知道都是什么作用,这里着重介绍第一个函数,这个函数会显示设备各个时候的状态信息,从连接之后的所有动作,如果我们需要保存设备的操作日志的话,可以通过这个来进行处理保存。
然后回到BleCore,在companion object中声明变量和设置接口回调的函数:
    @SuppressLint("StaticFieldLeak")
    companion object {

        ...

        private var mGatt: BluetoothGatt? = null

        private var mBleCallback: BleCallback? = null

        private lateinit var mBleGattCallback: BleGattCallback
        /**
         * 是否连接
         */
        private var mIsConnected = false

        /**
         * 设备信息
         */
        private fun deviceInfo(info: String) = mBleCallback?.deviceInfo(info)
        /**
         * 连接状态
         */
        private fun connectState(state: Boolean) {
            mIsConnected = state
            mBleCallback?.onConnectionStateChange(state)
        }
    }
同时在 companion object外创建一个函数,代码如下所示:
    fun setBleCallback(bleCallback: BleCallback) {
        mBleCallback = bleCallback
    }
此函数和setPhyScanCallback()函数是同级的,下面我们增加连接和断连的函数。
二、连接和断连
在BleCore中增加如下代码:
	/**
     * 连接蓝牙设备
     */
    fun connect(device: BluetoothDevice) {
        deviceInfo("连接中...")
        mGatt = if (Build.VERSION.SDK_INT >= Build.VERSION_CODES.O) {
            device.connectGatt(context, false, mBleGattCallback, BluetoothDevice.TRANSPORT_LE, BluetoothDevice.PHY_LE_2M_MASK)
        } else {
            device.connectGatt(context, false, mBleGattCallback)
        }
    }

    /**
     * 断开连接
     */
    fun disconnect() {
        deviceInfo("断开连接...")
        mGatt?.disconnect()
    }
连接与断开连接,调用时会触发onConnectionStateChange()函数。
三、连接状态回调
下面修改这个函数的代码,如下所示:
        override fun onConnectionStateChange(gatt: BluetoothGatt, status: Int, newState: Int) {
            val address = gatt.device.address
            when (newState) {
                BluetoothProfile.STATE_CONNECTED -> {
                    deviceInfo("已连接:$address")
                    connectState(true)
                }
                BluetoothProfile.STATE_DISCONNECTED -> {
                    deviceInfo("已断开连接:$address")
                    connectState(false)
                }
                else -> {
                    Log.d(TAG, "onConnectionStateChange: $status")
                    connectState(false)
                    mGatt?.close()
                    mGatt = null
                }
            }
        }
在回调中,连接成功和断开连接都会有一个对应的状态码,通过状态回调到接口函数中,然后回到MainActivity中使用一下这个回调,首先我们修改一下activity_main.xml中的代码,如下所示:
<?xml version="1.0" encoding="utf-8"?>
<androidx.constraintlayout.widget.ConstraintLayout xmlns:android="http://schemas.android.com/apk/res/android"
    xmlns:app="http://schemas.android.com/apk/res-auto"
    xmlns:tools="http://schemas.android.com/tools"
    android:layout_width="match_parent"
    android:layout_height="match_parent"
    tools:context=".MainActivity">

    <com.google.android.material.appbar.MaterialToolbar
        android:id="@+id/toolbar"
        android:layout_width="match_parent"
        android:layout_height="?attr/actionBarSize"
        android:background="@color/orange"
        app:layout_constraintEnd_toEndOf="parent"
        app:layout_constraintStart_toStartOf="parent"
        app:layout_constraintTop_toTopOf="parent"
        app:navigationIcon="@drawable/ic_scan_ble"
        app:title="GoodBle"
        app:titleCentered="true"
        app:titleTextColor="@color/white">

        <TextView
            android:id="@+id/tv_disconnect"
            android:layout_width="wrap_content"
            android:layout_height="wrap_content"
            android:layout_gravity="end"
            android:layout_marginEnd="8dp"
            android:visibility="gone"
            android:padding="8dp"
            android:text="断开连接"
            android:textColor="@color/white" />
    </com.google.android.material.appbar.MaterialToolbar>

    <TextView
        android:id="@+id/tv_device_info"
        android:layout_width="0dp"
        android:layout_height="wrap_content"
        android:padding="16dp"
        android:text="设备信息"
        app:layout_constraintEnd_toEndOf="parent"
        app:layout_constraintStart_toStartOf="parent"
        app:layout_constraintTop_toBottomOf="@+id/toolbar" />

</androidx.constraintlayout.widget.ConstraintLayout>
在XML中只增加了两个TextView,分别用于断连和显示设备状态,然后我们修改MainActivity中的代码,如下所示:
class MainActivity : BaseActivity(), BleCallback {

    private val binding by viewBinding(ActivityMainBinding::inflate)

    private lateinit var bleCore: BleCore

    @SuppressLint("MissingPermission")
    private val scanIntent =
        registerForActivityResult(ActivityResultContracts.StartActivityForResult()) { result ->
            if (result.resultCode == Activity.RESULT_OK) {
                if (result.data == null) return@registerForActivityResult
                //获取选中的设备
                val device = if (Build.VERSION.SDK_INT >= Build.VERSION_CODES.TIRAMISU) {
                    result.data!!.getParcelableExtra("device", BluetoothDevice::class.java)
                } else {
                    result.data!!.getParcelableExtra("device") as BluetoothDevice?
                }
                //连接设备
                if (device != null) bleCore.connect(device)
            }
        }

    override fun onCreate(savedInstanceState: Bundle?) {
        super.onCreate(savedInstanceState)
        setContentView(R.layout.activity_main)

        bleCore = (application as BleApp).getBleCore()
        bleCore.setBleCallback(this@MainActivity)
        //进入扫描页面
        binding.toolbar.setNavigationOnClickListener { scanIntent.launch(Intent(this,ScanActivity::class.java)) }
        //断开连接
        binding.tvDisconnect.setOnClickListener {
            binding.tvDisconnect.visibility = View.GONE
            bleCore.disconnect()
        }
    }

    override fun deviceInfo(info: String) {
        runOnUiThread {
            binding.tvDeviceInfo.text = info
        }
    }

    override fun onConnectionStateChange(state: Boolean) {
        runOnUiThread {
            if (state) binding.tvDisconnect.visibility = View.VISIBLE
        }
    }

    override fun onServicesDiscovered(services: List<BluetoothGattService>) {

    }
}
这里我们首先是通过Activity Result API的StartActivityForResult()函数进行页面跳转,在返回的时候拿到device对象,这在前一篇已经写好了,拿到device对象之后调用BleCore的connect()函数进行连接设备,在onCreate()函数中进行BleCore的赋值,然后设置Ble的回调,实现BleCallback接口,重写里面的函数,当连接成功之后会通过回调deviceInfo()得到设备状态,因为是子线程所以在ui线程中渲染UI。而onConnectionStateChange()函数,回调连接成功或者失败,如果成功则为ture,就显示tvDisconnect控件,此时连接成功,点击这个tvDisconnect就会断开连接,点击监听就在onCreate()中写好了,下面我们运行一下看看效果。

从这个效果图来看,我们连接成功之后有状态,点击断开连接也会有状态改变,那么连接就写好了。
四、发现服务
连接写好了,下面可以写发现服务了,我们可以在连接成功的处理中进行发现服务,下面我们修改一下BleGattCallback中的onConnectionStateChange()函数中的代码,如下图所示:
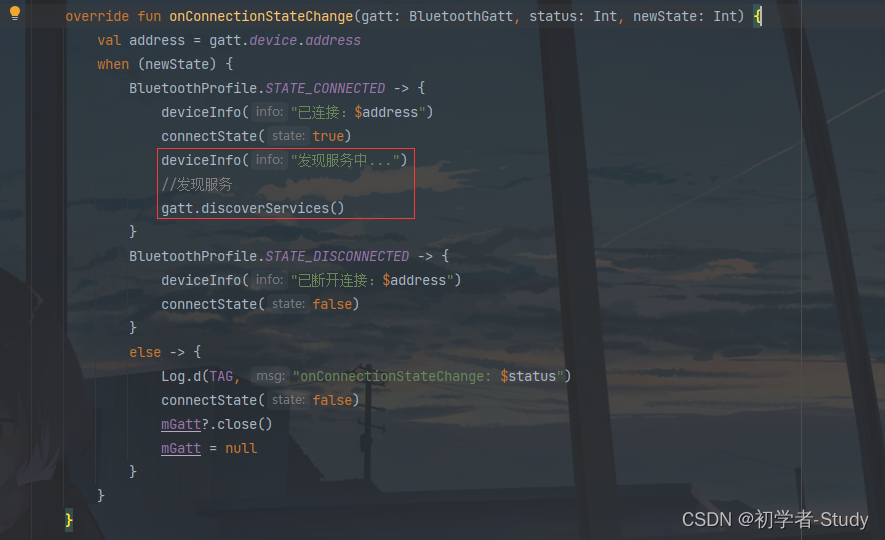
通过gatt.discoverServices()进行发现服务的动作,在此之前通过deviceInfo设置当前的动作状态,发现服务执行会触发onServicesDiscovered()回调,在这个回调中我们可以回调到页面,修改代码如下所示:
        override fun onServicesDiscovered(gatt: BluetoothGatt, status: Int) {
            if (status == BluetoothGatt.GATT_SUCCESS) {
                deviceInfo("发现了 ${gatt.services.size} 个服务")
                gatt.services?.let { mBleCallback?.onServicesDiscovered(it) }
            }
        }
在回调中设置发现服务的个数,然后回调,因为服务是多个的,那么下面我们就需要使用一个列表是装载服务,首先我们修改一下activity_main.xml,在里面增加一个RecyclerView,代码如下所示:
<?xml version="1.0" encoding="utf-8"?>
<androidx.constraintlayout.widget.ConstraintLayout...>

    ...

    <androidx.recyclerview.widget.RecyclerView
        android:id="@+id/rv_service"
        android:layout_width="match_parent"
        android:layout_height="wrap_content"
        android:background="@color/white"
        app:layout_constraintEnd_toEndOf="parent"
        app:layout_constraintStart_toStartOf="parent"
        app:layout_constraintTop_toBottomOf="@+id/tv_device_info" />

</androidx.constraintlayout.widget.ConstraintLayout>
五、服务适配器
要显示服务列表数据,首先需要一个适配器,而适配器又需要一个item去渲染数据,下面我们在layout下创建一个item_service.xml,代码如下所示:
<?xml version="1.0" encoding="utf-8"?>
<androidx.constraintlayout.widget.ConstraintLayout xmlns:android="http://schemas.android.com/apk/res/android"
    xmlns:app="http://schemas.android.com/apk/res-auto"
    android:id="@+id/item_service"
    android:layout_width="match_parent"
    android:layout_height="wrap_content"
    android:layout_marginBottom="2dp"
    android:background="@color/white"
    android:orientation="vertical">

    <TextView
        android:id="@+id/tv_service_name"
        android:layout_width="wrap_content"
        android:layout_height="wrap_content"
        android:layout_marginStart="16dp"
        android:layout_marginTop="8dp"
        android:text="服务"
        android:textColor="@color/black"
        android:textSize="16sp"
        android:textStyle="bold"
        app:layout_constraintStart_toStartOf="parent"
        app:layout_constraintTop_toTopOf="parent" />

    <TextView
        android:id="@+id/tv_uuid_title"
        android:layout_width="wrap_content"
        android:layout_height="wrap_content"
        android:text="UUID:"
        app:layout_constraintStart_toStartOf="@+id/tv_service_name"
        app:layout_constraintTop_toBottomOf="@+id/tv_service_name" />

    <TextView
        android:id="@+id/tv_service_uuid"
        android:layout_width="wrap_content"
        android:layout_height="wrap_content"
        android:text="UUID"
        android:textColor="@color/black"
        app:layout_constraintBottom_toBottomOf="@+id/tv_uuid_title"
        app:layout_constraintStart_toEndOf="@+id/tv_uuid_title"
        app:layout_constraintTop_toTopOf="@+id/tv_uuid_title" />

    <TextView
        android:id="@+id/tv_service_info"
        android:layout_width="wrap_content"
        android:layout_height="wrap_content"
        android:layout_marginBottom="8dp"
        android:text="PRIMARY SERVICE"
        app:layout_constraintBottom_toBottomOf="parent"
        app:layout_constraintStart_toStartOf="@+id/tv_service_name"
        app:layout_constraintTop_toBottomOf="@+id/tv_uuid_title" />

</androidx.constraintlayout.widget.ConstraintLayout>
下面我们在ble包下新建一个BleUtils类,代码如下所示:
object BleUtils {

    private val generic = "-0000-1000-8000-00805F9B34FB"

    /**
     * 获取蓝牙服务名称
     * @param uuid UUID
     */
    fun getServiceName(uuid: UUID) =
        when ("0x${uuid.toString().substring(4, 8).uppercase(Locale.getDefault())}") {
            "0x1800" -> "Generic Access service"
            "0x1801" -> "Generic Attribute service"
            "0x1802" -> "Immediate Alert service"
            "0x1803" -> "Link Loss service"
            "0x1804" -> "Tx Power service"
            "0x1805" -> "Current Time service"
            "0x1806" -> "Reference Time Update service"
            "0x1807" -> "Next DST Change service"
            "0x1808" -> "Glucose service"
            "0x1809" -> "Health Thermometer service"
            "0x180A" -> "Device Information service"
            "0x180D" -> "Heart Rate service"
            "0x180E" -> "Phone Alert Status service"
            "0x180F" -> "Battery service"
            "0x1810" -> "Blood Pressure service"
            "0x1811" -> "Alert Notification service"
            "0x1812" -> "Human Interface Device service"
            "0x1813" -> "Scan Parameters service"
            "0x1814" -> "Running Speed and Cadence service"
            "0x1815" -> "Automation IO service"
            "0x1816" -> "Cycling Speed and Cadence service"
            "0x1818" -> "Cycling Power service"
            "0x1819" -> "Location and Navigation service"
            "0x181A" -> "Environmental Sensing service"
            "0x181B" -> "Body Composition service"
            "0x181C" -> "User Data service"
            "0x181D" -> "Weight Scale service"
            "0x181E" -> "Bond Management service"
            "0x181F" -> "Continuous Glucose Monitoring service"
            "0x1820" -> "Internet Protocol Support service"
            "0x1821" -> "Indoor Positioning service"
            "0x1822" -> "Pulse Oximeter service"
            "0x1823" -> "HTTP Proxy service"
            "0x1824" -> "Transport Discovery service"
            "0x1825" -> "Object Transfer service"
            "0x1826" -> "Fitness Machine service"
            "0x1827" -> "Mesh Provisioning service"
            "0x1828" -> "Mesh Proxy service"
            "0x1829" -> "Reconnection Configuration service"
            "0x183A" -> "Insulin Delivery service"
            "0x183B" -> "Binary Sensor service"
            "0x183C" -> "Emergency Configuration service"
            "0x183D" -> "Authorization Control service"
            "0x183E" -> "Physical Activity Monitor service"
            "0x183F" -> "Elapsed Time service"
            "0x1840" -> "Generic Health Sensor service"
            "0x1843" -> "Audio Input Control service"
            "0x1844" -> "Volume Control service"
            "0x1845" -> "Volume Offset Control service"
            "0x1846" -> "Coordinated Set Identification service"
            "0x1847" -> "Device Time service"
            "0x1848" -> "Media Control service"
            "0x1849" -> "Generic Media Control service"
            "0x184A" -> "Constant Tone Extension service"
            "0x184B" -> "Telephone Bearer service"
            "0x184C" -> "Generic Telephone Bearer service"
            "0x184D" -> "Microphone Control service"
            "0x184E" -> "Audio Stream Control service"
            "0x184F" -> "Broadcast Audio Scan service"
            "0x1850" -> " Published Audio Capabilities service"
            "0x1851" -> "Basic Audio Announcement service"
            "0x1852" -> "Broadcast Audio Announcement service"
            "0x1853" -> "Common Audio service"
            "0x1854" -> "Hearing Access service"
            "0x1855" -> "Telephony and Media Audio service"
            "0x1856" -> "Public Broadcast Announcement service"
            "0x1857" -> "Electronic Shelf Label service"
            else -> "Unknown Service"
        }

    fun getServiceUUID(uuid: UUID) =
        "0x${uuid.toString().substring(4, 8).uppercase(Locale.getDefault())}"
}
这里需要说明一下蓝牙的UUID,蓝牙UUID(Universally Unique Identifier)是用于唯一标识蓝牙设备和服务的一种标识符。它是一个128位长的数字,在蓝牙通信中起到唯一标识的作用。蓝牙UUID按照标准分为两种类型:
-
16位UUID:这些UUID通常用于蓝牙标准定义的一些通用服务和特性。例如,设备名称服务的UUID是 00001800-0000-1000-8000-00805F9B34FB。
-
128位UUID:这些UUID通常用于自定义的服务和特性,以确保全球唯一性。可以自行生成一个128位的UUID作为自定义的服务或特性标识。例如,一个自定义的服务UUID可以是 0000XXXX-0000-1000-8000-00805F9B34FB,其中的 XXXX 部分可以是任意的16进制数字。
在蓝牙通信中,设备使用UUID来发布和查找服务以及识别特性。UUID是蓝牙设备之间进行通信时的重要标识,确保了设备和服务的唯一性。
那么getServiceName()中的键你就知道是什么意思了,0x1800就是16进制数字,而对应的值则是SIG定义的,可以参考这个文档:Assigned_Numbers.pdf。如果你的值找不到对应的,那说明它不是SIG规范的,你这个服务UUID就是自己公司自定义的。
下面我们写适配器,在adapter包下新建一个ServiceAdapter类,代码如下所示:
class ServiceAdapter(
    private val services: List<BluetoothGattService>
) : RecyclerView.Adapter<ServiceAdapter.ViewHolder>() {

    private var mOnItemClickListener: OnItemClickListener? = null

    fun setOnItemClickListener(mOnItemClickListener: OnItemClickListener?) {
        this.mOnItemClickListener = mOnItemClickListener
    }

    override fun onCreateViewHolder(parent: ViewGroup, viewType: Int): ViewHolder {
        val viewHolder = ViewHolder(ItemServiceBinding.inflate(LayoutInflater.from(parent.context), parent, false))
        viewHolder.binding.itemService.setOnClickListener { mOnItemClickListener?.onItemClick(it, viewHolder.adapterPosition) }
        return viewHolder
    }

    override fun onBindViewHolder(holder: ViewHolder, position: Int) {
        holder.binding.tvServiceName.text = BleUtils.getServiceName(services[position].uuid)
        holder.binding.tvServiceUuid.text = BleUtils.getServiceUUID(services[position].uuid)
    }

    override fun getItemCount() = services.size

    class ViewHolder(itemView: ItemServiceBinding) : RecyclerView.ViewHolder(itemView.root) {
        var binding: ItemServiceBinding

        init {
            binding = itemView
        }
    }
}
这里的代码就是比较简单的,就是基本的写法,下面回到MainActivity中进行显示数据。
六、显示服务
首先声明变量:
    private var mServiceAdapter: ServiceAdapter? = null

    private val mServiceList: MutableList<BluetoothGattService> = mutableListOf()
然后实现OnItemClickListener 接口
class MainActivity : BaseActivity(), BleCallback, OnItemClickListener {
重写onItemClick()函数。
    override fun onItemClick(view: View?, position: Int) {
        showMsg(mServiceList[position].uuid.toString())
    }
修改onServicesDiscovered()函数,代码如下所示:
    override fun onServicesDiscovered(services: List<BluetoothGattService>) {
        runOnUiThread {
            mServiceList.clear()
            mServiceList.addAll(services)
            mServiceAdapter ?: run {
                mServiceAdapter = ServiceAdapter(mServiceList)
                binding.rvService.apply {
                    (itemAnimator as SimpleItemAnimator).supportsChangeAnimations = false
                    layoutManager = LinearLayoutManager(this@MainActivity)
                    adapter = mServiceAdapter
                }
                mServiceAdapter!!.setOnItemClickListener(this@MainActivity)
                mServiceAdapter
            }
            mServiceAdapter!!.notifyDataSetChanged()
        }
    }
这里的写法其实和扫描设备哪里如出一辙,下面我们运行一下看看,什么效果。
七、源码
如果对你有所帮助的话,不妨 Star 或 Fork,山高水长,后会有期~
源码地址:GoodBle


![[CKA]考试之检查可用节点数量](https://img-blog.csdnimg.cn/9b0b748b5f6645efa58455eae291736c.png)