Scikit learn是机器学习社区中使用最广泛的机器学习库之一,其背后的原因是代码的易用性和机器学习开发人员构建机器学习模型所需的几乎所有功能的可用性。在本文中,我们将学习如何使用sklearn在手写数字数据集上训练MLP模型。
其优势是:
- 它提供分类、回归和聚类算法,如SVM算法、随机森林、梯度提升和k-means。
- 它还被设计为与Python的科学和数值库NumPy和SciPy一起操作。
导入库和数据集
让我们开始导入模型所需的库并加载数据集数字。
# importing the hand written digit dataset
from sklearn import datasets

# digit contain the dataset
digits = datasets.load_digits()

# dir function use to display the attributes of the dataset
dir(digits)
输出:
['DESCR', 'data', 'feature_names', 'frame', 'images', 'target', 'target_names']
打印一组图像
- digits.image是三维数组。第一个维度索引图像,我们可以看到总共有1797张。
- 以下两个维度涉及每个图像的像素的x和y坐标。
- 每个图像的大小为8×8 = 64像素。换句话说,该阵列可以在3D中表示为8×8像素图像的堆叠。
# outputting the picture value as a series of numbers
print(digits.images[0])
输出:
[[ 0.  0.  5. 13.  9.  1.  0.  0.]
 [ 0.  0. 13. 15. 10. 15.  5.  0.]
 [ 0.  3. 15.  2.  0. 11.  8.  0.]
 [ 0.  4. 12.  0.  0.  8.  8.  0.]
 [ 0.  5.  8.  0.  0.  9.  8.  0.]
 [ 0.  4. 11.  0.  1. 12.  7.  0.]
 [ 0.  2. 14.  5. 10. 12.  0.  0.]
 [ 0.  0.  6. 13. 10.  0.  0.  0.]]
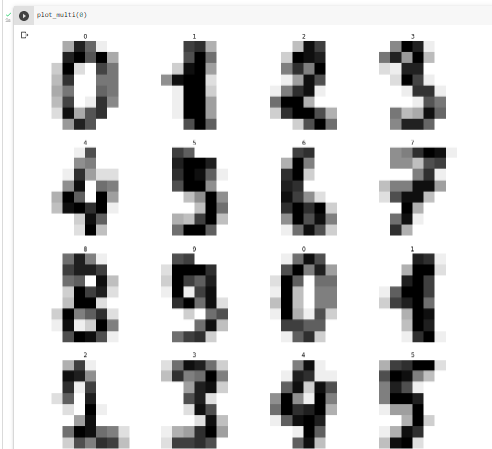
原始数字的分辨率要高得多,在为scikit-learn准备数据集时,分辨率被降低,以便训练机器学习系统更容易、更快地识别这些数字。因为在如此低的分辨率下,即使是人类也很难识别其中的一些数字。输入照片的低质量也会限制在这些设置中的表现。
# importing the matplotlib libraries pyplot function
import matplotlib.pyplot as plt
# defining the function plot_multi

def plot_multi(i):
    nplots = 16
    fig = plt.figure(figsize=(15, 15))
    for j in range(nplots):
        plt.subplot(4, 4, j+1)
        plt.imshow(digits.images[i+j], cmap='binary')
        plt.title(digits.target[i+j])
        plt.axis('off')
    # printing the each digits in the dataset.
    plt.show()

    plot_multi(0)
用数据集训练神经网络
神经网络是一组算法,它试图使用类似于人脑工作方式的技术来识别一批数据中的潜在关系。在这种情况下,神经网络是自然界中可能是有机或人工的神经元系统。
- 一个由64个节点组成的输入层,每个节点对应输入图片中的每个像素,它们只是将其输入值发送到下一层的神经元。
- 这是一个密集的神经网络,意味着每一层中的每个节点都链接到前面和后面的所有节点。
输入层需要一维数组,而图像数据集是二维的。因此,展平所有图像过程:
# converting the 2 dimensional array to one dimensional array
y = digits.target
x = digits.images.reshape((len(digits.images), -1))

# gives the  shape of the data
x.shape
输出:
(1797, 64)
通过将8个像素的行依次合成,将8×8图像的二维合并为一维。我们之前讨论过的第一个图像现在表示为具有8×8 = 64个插槽的一维阵列。
# printing the one-dimensional array's values
x[0]
输出:
array([ 0.,  0.,  5., 13.,  9.,  1.,  0.,  0.,  0.,  0., 13., 15., 10.,
       15.,  5.,  0.,  0.,  3., 15.,  2.,  0., 11.,  8.,  0.,  0.,  4.,
       12.,  0.,  0.,  8.,  8.,  0.,  0.,  5.,  8.,  0.,  0.,  9.,  8.,
        0.,  0.,  4., 11.,  0.,  1., 12.,  7.,  0.,  0.,  2., 14.,  5.,
       10., 12.,  0.,  0.,  0.,  0.,  6., 13., 10.,  0.,  0.,  0.])
划分训练和测试数据
当机器学习算法用于基于未用于训练模型的数据进行预测时,训练测试拆分过程用于测量其性能。
这是一种快速而简单的技术,允许您比较机器学习算法的性能,以应对预测建模挑战。
# Very first 1000 photographs and
# labels will be used in training.
x_train = x[:1000]
y_train = y[:1000]

# The leftover dataset will be utilised to
# test the network's performance later on.
x_test = x[1000:]
y_test = y[1000:]
多层感知分类器MLP
MLP代表多层感知器。它由密集连接的层组成,这些层将任何输入尺寸转换为所需尺寸。多层感知是具有多个层的神经网络。为了构建神经网络,我们连接神经元,使它们的输出成为其他神经元的输入。
# importing the MLP classifier from sklearn
from sklearn.neural_network import MLPClassifier

# calling the MLP classifier with specific parameters
mlp = MLPClassifier(hidden_layer_sizes=(15,),
                    activation='logistic',
                    alpha=1e-4, solver='sgd',
                    tol=1e-4, random_state=1,
                    learning_rate_init=.1,
                    verbose=True)
现在是时候在训练数据上训练我们的MLP模型了。
mlp.fit(x_train, y_train)
输出:
Iteration 185, loss = 0.01147629
Iteration 186, loss = 0.01142365
Iteration 187, loss = 0.01136608
Iteration 188, loss = 0.01128053
Iteration 189, loss = 0.01128869
Training loss did not improve more than tol=0.000100 for 10 consecutive epochs.
Stopping.
MLPClassifier(activation='logistic', hidden_layer_sizes=(15,),
              learning_rate_init=0.1, random_state=1, solver='sgd',
              verbose=True)
上所示为MLPClassifier及其相应配置的最后五个时期的损失。
fig, axes = plt.subplots(1, 1)
axes.plot(mlp.loss_curve_, 'o-')
axes.set_xlabel("number of iteration")
axes.set_ylabel("loss")
plt.show()

模型评估
现在,让我们使用识别数据集检查模型的性能,或者它只是记住了它。我们将通过使用剩余的测试数据来做到这一点,这样我们就可以检查模型是否已经学习了数字中的实际模式 。
predictions = mlp.predict(x_test)
predictions[:50]
输出:
array([1, 4, 0, 5, 3, 6, 9, 6, 1, 7, 5, 4, 4, 7, 2, 8, 2, 2, 5, 7, 9, 5,
       4, 4, 9, 0, 8, 9, 8, 0, 1, 2, 3, 4, 5, 6, 7, 8, 3, 0, 1, 2, 3, 4,
       5, 6, 7, 8, 5, 0])
但是真实的标签如下所示。
y_test[:50]
输出:
array([1, 4, 0, 5, 3, 6, 9, 6, 1, 7, 5, 4, 4, 7, 2, 8, 2, 2, 5, 7, 9, 5,
       4, 4, 9, 0, 8, 9, 8, 0, 1, 2, 3, 4, 5, 6, 7, 8, 9, 0, 1, 2, 3, 4,
       5, 6, 7, 8, 9, 0])
因此,通过使用预测标签和真实标签,我们可以找到模型的准确性。
# importing the accuracy_score from the sklearn
from sklearn.metrics import accuracy_score

# calculating the accuracy with y_test and predictions
accuracy_score(y_test, predictions)
输出:
0.9146800501882058


