-
弹性盒子布局(Flexbox Layout):通过
display: flex;设置容器为弹性盒子,可以实现更复杂的自适应和响应式布局。 -
网格布局(Grid Layout):通过
display: grid;设置容器为网格布局,可以将元素划分为一个个网格,并定义网格在容器中的位置和大小。
display属性主要用来决定元素的呈现方式
display:block;/*以块级元素的方式显示*/
display:inline-block;/*在一行中以块级元素的方式显示*/
display:inline;/*在一行中显示*/
display:flex;/*弹性盒子布局*/
display:grid;/*网格布局*/
- flex布局
flex-grow: 1.5;/*弹性布局时,元素的扩充比例*/
flex-shrink: 0.8;/*弹性布局时元素的收缩比例*/
flex-direction: row;
<!DOCTYPE html>
<html lang="en">
    <head>
        <meta charset="UTF-8">
        <title>flex弹性布局</title>
        <style>
            html,body{
                height: 100%;
                width: 100%;
                margin: 0;
                display: flex;
                flex-direction: column;
                font-size: 50px;
                font-family: 楷体, serif;
            }
            header{
                height: 60px;
                background-color: #0a142b;
                color: #dddddd;

            }
            main{
                flex-grow: 1.5;
                flex-shrink: 0.8;
                display: flex;
                flex-direction: row;
            }
            aside{
                width: 200px;
                background-color: #acacb3;
            }
            section{
                flex-grow: 1.5;
                flex-shrink: 0.8;
                display: flex;
                flex-direction: column;
            }
            nav,footer{
                height: 60px;
                background-color: #33b4da;
            }
            article{
                flex-grow: 1.5;
                flex-shrink: 0.8;
                background-color: bisque;
            }
        </style>
    </head>
    <body>
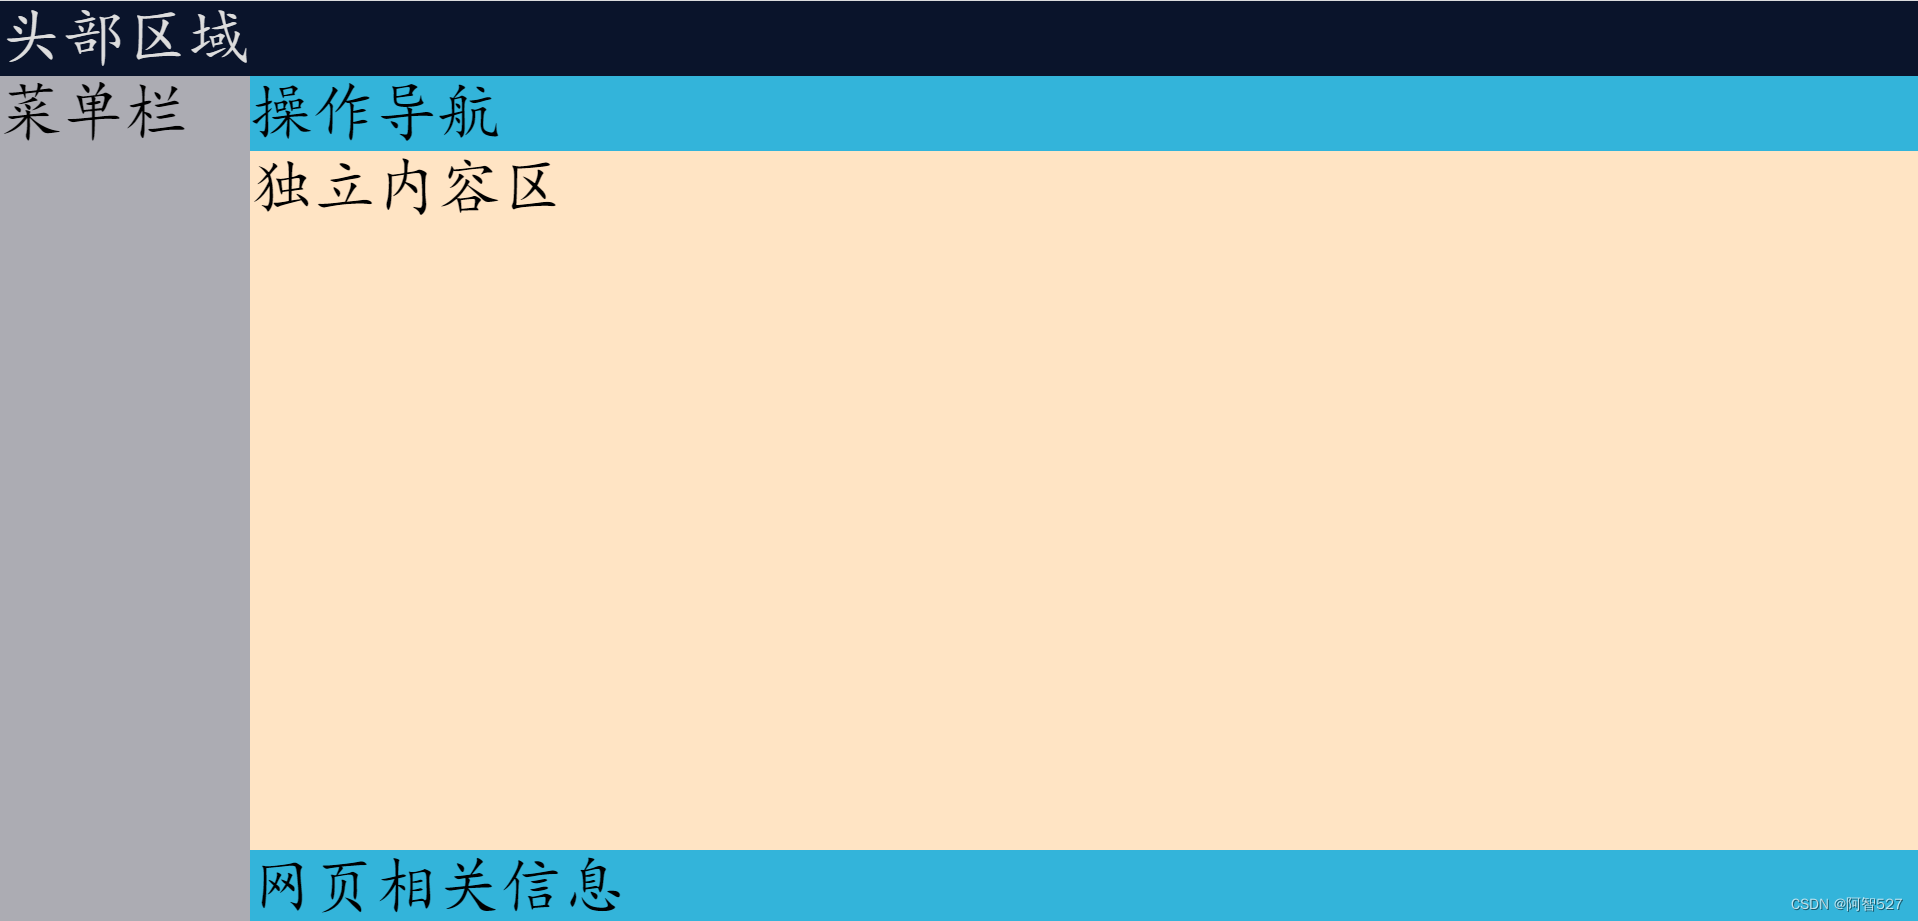
        <header>头部区域</header>
        <main>
            <aside>菜单栏</aside>
            <section>
                <nav>操作导航</nav>
                <article>独立内容区</article>
                <footer>网页相关信息</footer>
            </section>
        </main>
    </body>
</html>
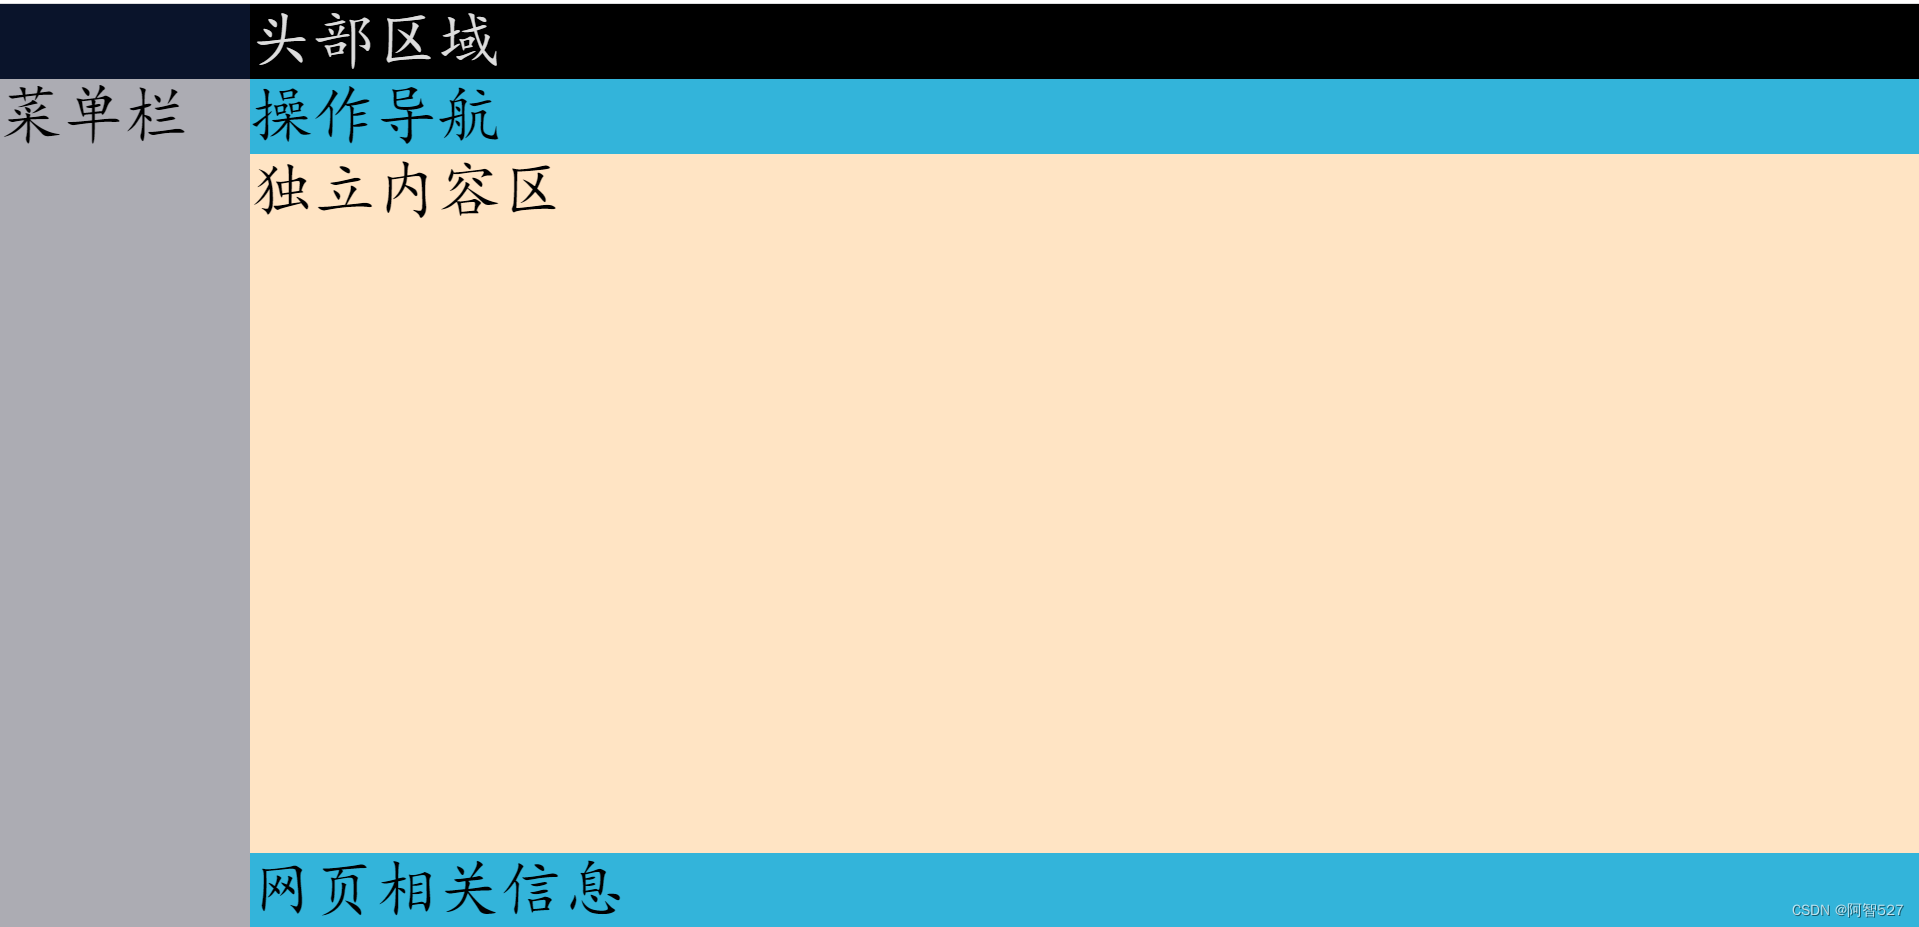
结果:
<!DOCTYPE html>
<html lang="en">
    <head>
        <meta charset="UTF-8">
        <title>flex弹性布局</title>
        <style>
            html,body{
                height: 100%;
                width: 100%;
                margin: 0;
                display: flex;
                flex-direction: row;
                font-size: 50px;
                font-family: 楷体, serif;
            }
            aside{
                width: 200px;
                background-color: #acacb3;
                color: black;
            }
            aside > .title{
                height: 60px;
                background-color: #0a142b;
            }
            main{
                flex-grow: 1.5;
                flex-shrink: 0.8;
                display: flex;
                flex-direction: column;
            }
            header{
                height: 60px;
                background-color: black;
                color: #dddddd;
            }
            section{
                flex-grow: 1.5;
                flex-shrink: 0.8;
                display: flex;
                flex-direction: column;
            }
            nav,footer{
                height: 60px;
                background-color: #33b4da;
            }
            article{
                flex-grow: 1.5;
                flex-shrink: 0.8;
                background-color: bisque;
            }

        </style>
    </head>
    <body>
        <aside>
            <div class="title"></div>
            菜单栏
        </aside>
        <main>
            <header>头部区域</header>
            <section>
                <nav>操作导航</nav>
                <article>独立内容区</article>
                <footer>网页相关信息</footer>
            </section>
        </main>
    </body>
</html>
结果:
- grid布局
display: grid;
grid-template-columns: 100%;
grid-template-rows: 60px calc(100% - 200px);
<!DOCTYPE html>
<html lang="en">
    <head>
        <meta charset="UTF-8">
        <title>grid网格布局</title>
        <style>
            html,body{
                height: 100%;
                width: 100%;
                margin: 0;
                font-size: 50px;
                font-family: 楷体, serif;
            }
            body{
                display: grid;
                grid-template-columns: 100%;
                grid-template-rows: 60px calc(100% - 60px);
            }
            header{
                background-color: #0a142b;
                color: #dddddd;
            }
            main{
                display: grid;
                grid-template-columns: 200px calc(100% - 200px);
                grid-template-rows: 100%;
            }
            aside{
                background-color: #acacb3;
            }
            nav,footer{
                height: 60px;
                background-color: #33b4da;
            }
            article{
                height:calc(100% - 120px);
            }
        </style>
    </head>
    <body>
        <header>头部区域</header>
        <main>
            <aside>菜单栏</aside>
            <section>
                <nav>操作导航</nav>
                <article>独立内容区</article>
                <footer>网页相关信息</footer>
            </section>
        </main>
    </body>
</html>
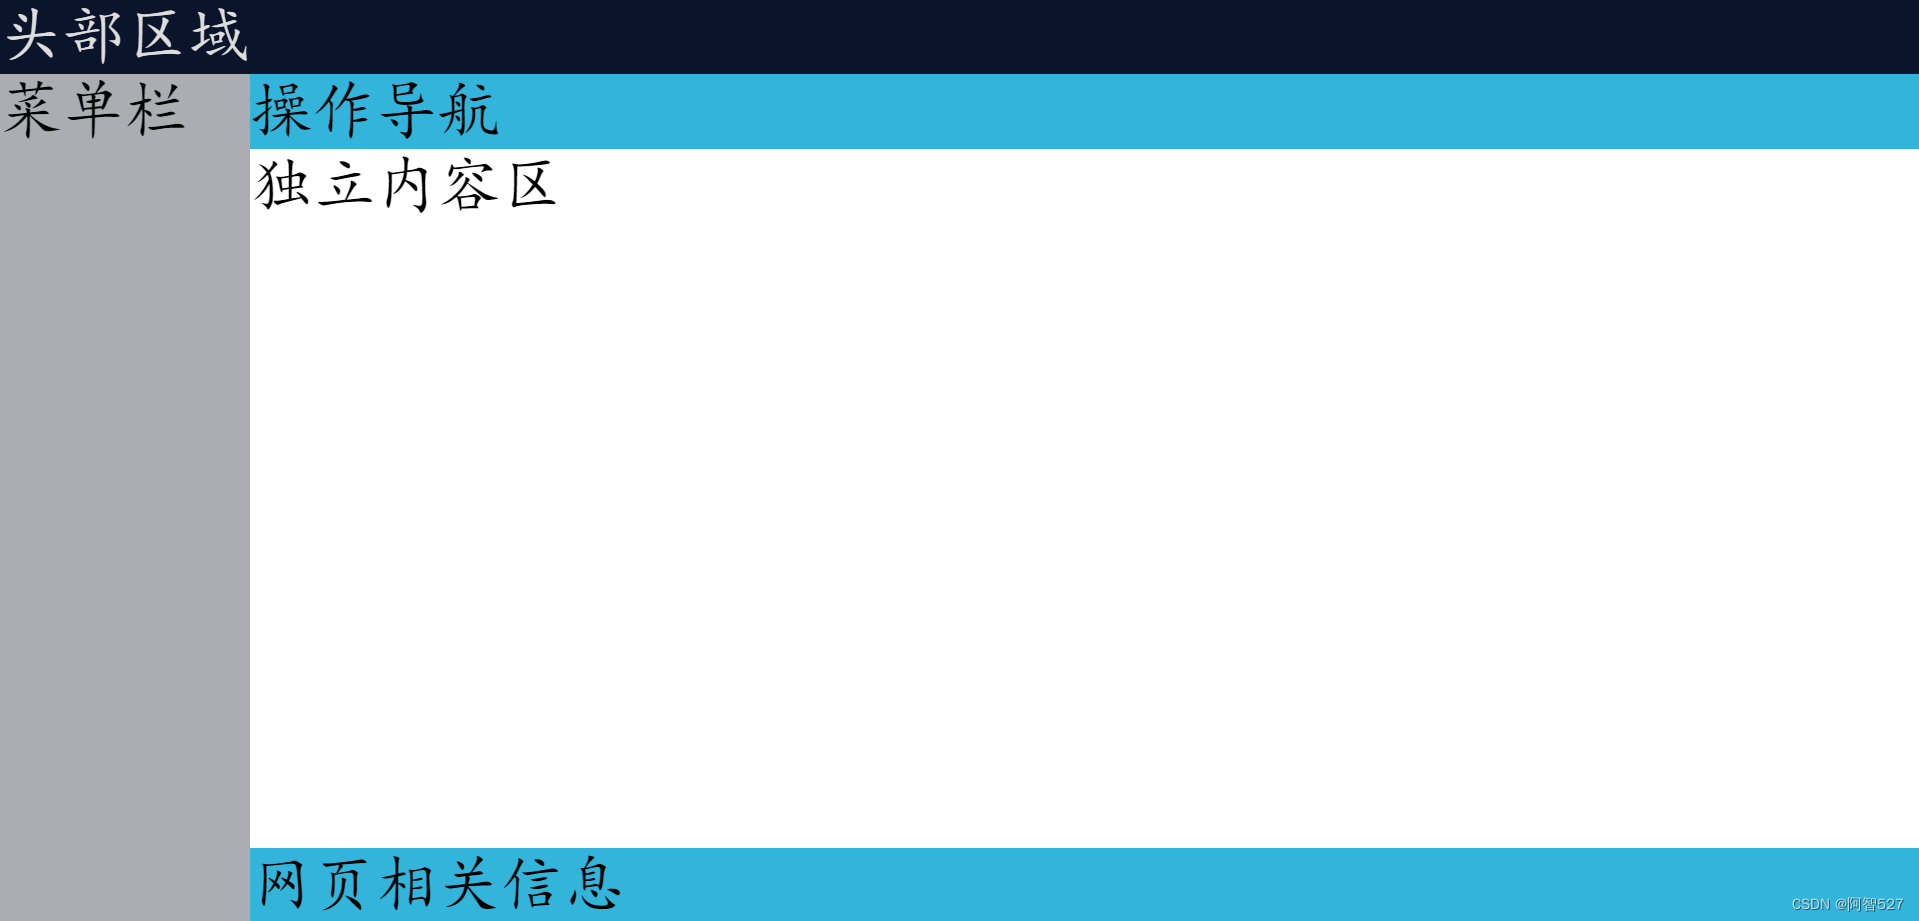
结果:
JavaScript
<script type="text/javascript" src="demo.js"></script>
JavaScript执行过程
用户从浏览器发出页面请求,服务器接收请求并进行处理,处理完成后会将页面返回至浏览器,浏览器开始解释执行该页面,如果页面中包含有 JavaScript 脚本,那么浏览器会再次向服务器发出 JavaScript 脚本获取请求,服务器接收请求并进行处理,处理完成后会将 JavaScript 脚本返回至浏览器,浏览器开始解释执行JavaScript 脚本。
- 数据类型
| 数据类型 |
|---|
| undefined |
| null |
| number |
| boolean |
| string |
| object |
- var和let的区别
var是全局变量
let是局部变量
- 字符串
let name ="ZhangSan";
let name='LiSi';
| 方法 | 说明 |
|---|---|
| charAt(index) | 返回指定位置的字符串 |
| indexOf(str) | 查找字符串首次出现的位置 |
| substring(start,end) | 返回在【】区间中的字符串 |
| split(str) | 分割 |
| replace(oldStr,newStr) | 替换 |
- 数组
push()添加元素
.concat()拼接数组
join(“”)按照指定字符串拼接,结果是字符串
splice(start,deleteCount,items)从start开始删除指定数量的元素,并插入items
遍历:
numbers.forEach(num=>console.log(num))
let num = [1,2,3];
console.log(num)
//在JavaScript中,数组是可以自动扩容的
//添加元素
let num2 = num.push(4,5,6);
console.log(num2)
let num3 = [7,8,9];

//拼接num3在num后面,生成一个新数组
let num4 = num.concat(num3);
console.log(num4)
//将数中的元素按照给定字符串拼接起来,结果是一个字符串
var s = num4.join("&@");
console.log(s)

let arr = [1,2,3,4,5,6]
//从3开始删除数组中的元素,删除2个元素
arr.splice(3,2);
console.log(arr)
// //从2这个位置开始删除元素,删除1个元素,然后再将10,20,30,40从2这个位置开始插入
arr.splice(2,1,10,20,30,40)
console.log(arr)

//拼接
let arr2 =[100,200]
let numbers = arr.concat(arr2);
console.log(numbers)

for (let i = 0; i < numbers.length; i++) {
    console.log(numbers[i])
}

console.log("================")

// for (const index in numbers) {
//     console.log(numbers[index])
// }

console.log("================")
numbers.forEach(num=>console.log(num))
console.log("================")
numbers.map(num=>num*10)
    .filter(num=>num%3===0)
    .forEach(num=>console.log(num))
console.log("--------")
let number = numbers.find(num=>num%5===0);
console.log(number)
console.log("-----------")
//找到数组中第一个匹配条件的元素,如果没有,那么结果就是undefined
let num1 = numbers.find(num => num % 5 === 0);
console.log(num1)
- 对象Object
对象创建的方式:
let user = {
    'name':'ZhangSan',
    'age':'18',
    'sex':'男'
}

let student = new Object();
    student.name="ZhangSan";
    student.age =18;
    student.sex="男";
对象属性的遍历
//基于工具类实现对象的遍历
Object.keys(student).forEach(prop=>console.log(prop+"="+student[prop]))
//for-in循环,循环的就是对象的属性名
for (let prop in student) {
    console.log(prop+"="+student[prop])
}
对象的访问方式
//访问对象的方式有两种:
//第一种:通过 对象名.属性名
console.log(student.name)
//第二种: 通过 对象名[属性名]
console.log(student["nick-name"])
将一个对象赋值给另一个对象
let stu1 = {
    'name':'WangWu',
    'sex':'男'
};
let stu2={

};

Object.keys(stu1).forEach(prop=>stu2[prop]=stu1[prop])
console.log(stu2)
console.log(stu1===stu2)
console.log("------")
let s1 = JSON.stringify(stu1)//将stu1转化为json格式的字符串
console.log(s1)
//再将json格式的字符串解析成一个对象,这个解析出来的对象就与原来的对象地址不一样了
let s2 = JSON.parse(s1);
console.log(s2)
console.log(s1===s2)
- 窗体函数
| 函数名 | 说明 |
|---|---|
| alert(“提示信息”) | 提示对话框 |
| confirm(“提示信息”) | 确认对话框 |
| prompt(“提示信息”) | 输入对话框 |
- 数学相关函数
| 方法 | 说明 |
|---|---|
| ceil() | 向上取整 |
| floor() | 向下取整 |
| round() | 返回与给定数值最近的一个整数 |
| random() | 随机数(浮点数) |
let number = parseInt("123")
console.log(typeof number)

//将字符串解析成数字,必须是以数字开头
//如果中间存在其他非数字字符,解析停止
let num = parseInt("1234aa32");
console.log(num)//1234

//在js中,两个整数相除,结果可能是浮点数
let n1 = 5; n2=3;
console.log(n1/n2)

//判断结果是否不是数字
let b =isNaN(123)
console.log(b)//false

console.log(Math.ceil(0.2));//1
console.log(Math.floor(0.99999));//0
console.log(Math.abs(-1))//1
//返回与给定数值最近的一个整数
console.log(Math.round(-2.6))//-3
console.log(Math.random());
- 自定义函数
function sum(a,b){
    return a+b;
}

function show(msg){
    console.log(msg)
}
console.log(sum(1,2))
show("hello world")
function sum(a,b){
    return a+b;
}

function show(msg){
    console.log(msg)
}
console.log(sum(1,2))
show("hello world")

//匿名函数,将函数赋值给一个变量,这个变量本质是一个函数
let print = function (msg){
    console.log(msg)
}
print("javascript");

/*    function calculate(num1,num2){
      const result = num1+num2;
      return function (num3,num4){
        return result*(num3+num4);
      }
    }
    let s = calculate(1,2)(3,4);
    console.log(s)*/
let result = (function calculate(num1, num2){
    const result = num1+num2;
    return function (num3,num4){
        return result*(num3+num4);
    }
})(1,2)(3,4);
console.log(result)
- 元素事件
| 名称 | 说明 |
|---|---|
| click | 鼠标左键单击 |
| blur | 元素失去焦点 |
| focus | 元素获得焦点 |
| keydown | 键盘按下 |
| keyup | 键盘按下后释放 |
| mouseover | 鼠标移动到元素上 |
| mouseout | 鼠标移动到元素外 |
| change | 元素内容发生改变 |
| input | 元素内容发生改变 |
开启元素事件只需要在事件名前面加上“on”即可,关闭元素事件只需要在事件名前面加上“off”即可。
<!DOCTYPE html>
    <html lang="en">
        <head>
        <meta charset="UTF-8">
            <title>点击事件</title>
</head>
<body>
            <input type="button" value="登录" id="loginBtn">
                </body>
<script type="text/javascript">
    let btn = document.getElementById("loginBtn");
btn.onclick = function (event){
    console.log(event)
    alert("你点击了登录按钮")
}
</script>
</html>
<input type="text" onfocus="console.log('获得焦点')" onblur="console.log('失去焦点')">
<!DOCTYPE html>
<html lang="en">
    <head>
        <meta charset="UTF-8">
        <title>按键事件</title>
    </head>
    <body>
        <input type="text " id="a">
    </body>
    <script type="text/javascript">
        let el = document.getElementById("a");
        el.onkeydown = function (){

        }
        el.onkeyup = function (event){
            let key = event.key;
            if (key==='Enter'){
                console.log('登录')
            }
        }
    </script>
</html>
- 密码强度检测
<!DOCTYPE html>
<html lang="en">
    <head>
        <meta charset="UTF-8">
        <title>密码强度</title>
        <style>
            ul {
                margin: 0;
                padding: 0;
            }
            #a,
            #b,
            #c {
                display: inline-block;
                background-color: gray;
                height: 5px;
                width: 56px;
            }

        </style>
    </head>
    <body>
        <input type="text" id="pw">
        <ul>
            <li id="a"></li>
            <li id="b"></li>
            <li id="c"></li>
        </ul>
    </body>
    <script type="text/javascript">
        document.getElementById("pw").onkeyup=function (){
            let password = this.value;
            let strong = 0;
            for (let i = 0; i <password.length; i++) {
                let s =password.charAt(i);
                //test函数检测给定的字符串是否满足正则表达式
                if (/[0-9]/.test(s)){
                    strong |= 2;
                }else if (/[a-z]/.test(s)){
                    strong |= 4;
                }else if (/[A-Z]/.test(s)){
                    strong |= 8;
                }else if (/[~!@#$%^&*?\\.]/.test(s)){
                    strong |= 16;
                }
            }

            let a =document.getElementById("a");
            let b =document.getElementById("b");
            let c =document.getElementById("c");
            if(strong >0 && strong <= 10){
                a.style.backgroundColor = 'green';
                b.style.backgroundColor = 'gray';
                c.style.backgroundColor = 'gray';
            } else if(strong > 10 && strong <= 20){
                a.style.backgroundColor = 'green';
                b.style.backgroundColor = 'green';
                c.style.backgroundColor = 'gray';
            } else if(strong > 20){
                a.style.backgroundColor = 'green';
                b.style.backgroundColor = 'green';
                c.style.backgroundColor = 'green';
            } else {
                a.style.backgroundColor = 'gray';
                b.style.backgroundColor = 'gray';
                c.style.backgroundColor = 'gray';
            }

        }
    </script>
</html>
- 鼠标事件-轮播图
<!DOCTYPE html>
<html lang="en">
    <head>
        <meta charset="UTF-8">
        <title>轮播图-鼠标事件</title>
        <style>
            .img-box {
                width: 590px;
                height: 470px;
                margin: 0 auto;
                border-style: solid;

            }
            img{
                display: none;
            }
            .active{
                display: block;
            }

        </style>
    </head>
    <body>
        <div class="img-box">
            <img src="../img/a.jpg">
            <img src="../img/b.jpg">
            <img src="../img/c.jpg">
            <img src="../img/d.jpg">
            <img src="../img/e.jpg">
            <img src="../img/f.jpg">
        </div>
    </body>
    <script type="text/javascript">
        //js提供了周期函数,周期从本质来说就是一个时间间隔,因此,这个
        //函数叫setInterval,也就是设置时间间隔。这个函数接收两个参数
        //第一个参数是一个函数的调用或者函数的名称,第二个参数是间隔时间

        //通过标签名获取元素,得到的结果是一个数组
        let imgArr = document.getElementsByTagName("img");
        for (let i = 0; i < imgArr.length; i++) {
            imgArr[i].onmouseover = function (){
                clearInterval(t);
            }
            imgArr[i].onmouseout = function (){
                t = setInterval(changeImage, 1000)
            }
        }

        let index = 0; //默认显示的图片是第一张

        const changeImage = () => {
            imgArr[index].className = '';//将原来的图片的显示移除
            index++; //下标自加1
            if(index === imgArr.length)
                index = 0;
            imgArr[index].className = 'active'; //下一张图片显示
        }

        // function changeImage(){
        //     imgArr[index].className = '';//将原来的图片的显示移除
        //     index++; //下标自加1
        //     if(index === imgArr.length)
        //         index = 0;
        //     imgArr[index].className = 'active'; //下一张图片显示
        // }

        //第一个参数是一个函数名,这个函数名不能有字符串。如果要使用
        //字符串,那么就必须是函数的调用
        let t = setInterval(changeImage, 1000)
        //周期函数可以通过clearInterval函数来清理掉
        // function removeInterval(){
        //
        // }
    </script>
</html>
- change&input
change事件主要表示的是元素的内容发生了变化,可用于下拉列表、文件域、复选框、单选按钮
input事件主要表示的是元素的内容或者值发生了变化,可用于下拉列表、文件域、复选框、单选按钮以及所有的能够输入的元素(这个事件是HTML5提供的)
input事件: 在输入框输入的时候会实时响应并触发;
change事件:在输入框失去焦点,并且输入框的值发生变化的时候才会触发,和 blur事件略有不同,blur事件是每次失去焦点时触发,不管输入框数据有没有变化;

