文章目录
- SSM(Vue3+ElementPlus+Axios+SSM前后端分离)--基础环境搭建【三】
- 项目介绍
- 项目功能/界面
- ● SSM 整合项目界面
- 配置Spring 和MyBatis , 并完成整合
SSM(Vue3+ElementPlus+Axios+SSM前后端分离)–基础环境搭建【三】
项目介绍
项目功能/界面
● SSM 整合项目界面

配置Spring 和MyBatis , 并完成整合
1、创建spring 的配置文件applicationContext.xml : 主要配置和业务逻辑有关的,比如数据源,事务控制等
2、创建furns_ssm\src\main\resources\applicationContext.xml , 并加入必要的命名空间, 提示:同样适用前面的方式创建: 右键->New->XML configuration ->Spring Config
<?xml version="1.0" encoding="UTF-8"?>
<beans xmlns="http://www.springframework.org/schema/beans"
xmlns:xsi="http://www.w3.org/2001/XMLSchema-instance"
xmlns:context="http://www.springframework.org/schema/context"
xmlns:aop="http://www.springframework.org/schema/aop" xmlns:tx="http://www.springframework.org/schema/tx"
xsi:schemaLocation="http://www.springframework.org/schema/beans http://www.springframework.org/schema/beans/spring-beans.xsd http://www.springframework.org/schema/context https://www.springframework.org/schema/context/spring-context.xsd http://www.springframework.org/schema/aop https://www.springframework.org/schema/aop/spring-aop.xsd http://www.springframework.org/schema/tx http://www.springframework.org/schema/tx/spring-tx.xsd">
<!-- spring的配置文件 : 主要配置和业务逻辑有关的,比如数据源,事务控制等 -->
<!--配置扫描com.nlc 包,但是不扫描控制器, 控制器由springmvc 管理
1. 扫描com.nlc.furn包 [包括子包]
2. context:exclude-filter 配置说明 不扫描控制器
-->
<context:component-scan base-package="com.nlc.furn">
<context:exclude-filter type="annotation"
expression="org.springframework.stereotype.Controller"/>
</context:component-scan>
<!--引入外部的jdbc.properties文件-->
<context:property-placeholder location="classpath:jdbc.properties"/>
<!--配置数据源对象-DataSoruce Druid数据源-->
<bean class="com.alibaba.druid.pool.DruidDataSource" id="pooledDataSource">
<!--给数据源对象配置属性值-->
<property name="username" value="${jdbc.user}"/>
<property name="password" value="${jdbc.pwd}"/>
<property name="driverClassName" value="${jdbc.driver}"/>
<property name="url" value="${jdbc.url}"/>
</bean>
<!--配置mybatis和spring整合
1、在项目中引入 mybatis整合到spring的适配库/包
2. 这里爆红,是因为你还没有相应的文件, 当有文件时,就不会爆红
-->
<bean class="org.mybatis.spring.SqlSessionFactoryBean" id="sqlSessionFactory">
<!--指定mybatis全局配置文件-->
<property name="configLocation" value="classpath:mybatis-config.xml"/>
<!--指定数据源-->
<property name="dataSource" ref="pooledDataSource"/>
<!--指定mybatis的mapper文件[Mapper.XML]位置
1、我们在开发中, 通常将mapper.xml放在类路径 resources/mapper
2. 所以这里指定的value 是 classpath:mapper/*.xml
-->
<property name="mapperLocations" value="classpath:mapper/*.xml"/>
</bean>
<!-- 配置扫描器,将mybatis接口的实现加入到ioc容器中
1、我们的mapper接口放在com.nlc.furn.dao
2. mybatis就是处于DAO层, 操作DB
-->
<bean class="org.mybatis.spring.mapper.MapperScannerConfigurer">
<!--
1. 扫描所有的dao接口的实现,加入到ioc容器中
2. 这里dao接口,就是mapper接口
-->
<property name="basePackage" value="com.nlc.furn.dao"/>
</bean>
<!--配置事务管理器-对象
1. DataSourceTransactionManager 这个对象是进行事务管理
2. 一定要配置数据源属性,这样指定该事务管理器 是对哪个数据源进行事务控制
-->
<bean class="org.springframework.jdbc.datasource.DataSourceTransactionManager" id="transactionManager">
<property name="dataSource" ref="pooledDataSource"/>
</bean>
<!--<!–配置启动基于注解的声明式事务管理功能-->
<!--这是以前的玩法, 使用XML配置+切入表达式来玩-->
<!--–>-->
<!--<tx:annotation-driven transaction-manager="transactionManager"/>-->
<!--
解读
1. 开启基于注解的事务,并指定切入点
2. execution(* com.nlcfurns.service..*(..)):
表示对com.nlc.furns.service包所有类的所有方法控制事务
3. tx:advice : 配置事务增强, 也就是指定事务如何切入
4. 不需要背,但是能看到,能修改,能维护
-->
<aop:config>
<!-- 切入点表达式 -->
<aop:pointcut id="txPoint" expression="execution(* com.nlc.furn.service..*(..))"/>
<!-- 配置事务增强/规则: 使用txAdvice 指定规则对 txPoint进行切入-->
<aop:advisor advice-ref="txAdvice" pointcut-ref="txPoint"/>
</aop:config>
<!-- 配置事务增强【指定事务规则】,也就是指定事务如何切入-->
<tx:advice id="txAdvice">
<tx:attributes>
<!-- *代表所有方法都是事务方法-->
<tx:method name="*"/>
<!-- 以get开始的所有方法 ,我们认为是只读,进行调优-->
<tx:method name="get*" read-only="true"/>
</tx:attributes>
</tx:advice>
</beans>
3.创建furns_ssm\src\main\resources\jdbc.properties , 配置连接mysql 的信息
jdbc.userName=root
jdbc.password=123456
jdbc.driverClass=com.mysql.jdbc.Driver
jdbc.url=jdbc:mysql://localhost:3306/furns_ssm?userSSL=true&userUnicode=true&characterEncoding=UTF-8
#密码和端口是自己的
4.在类路径resources 下创建furns_ssm\src\main\resources\mybatis-config.xml
<?xml version="1.0" encoding="UTF-8" ?>
<!DOCTYPE configuration
PUBLIC "-//mybatis.org//DTD Config 3.0//EN"
"http://mybatis.org/dtd/mybatis-3-config.dtd">
<configuration>
</configuration>
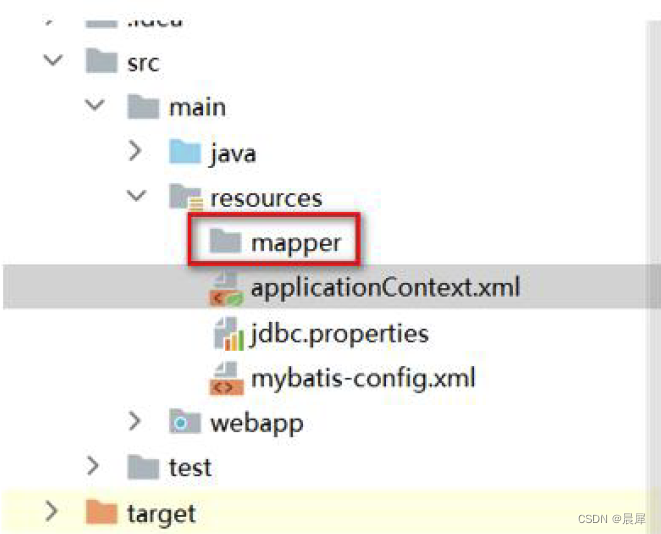
5.在类路径下创建mapper 目录,存放mapper 的xml 文件
6.完成测试: 创建furns-ssm\src\test\java\com\nlc\furns\test\T1.java
public class T1 {

    @Test
    public void t1() {
        //看看spring配置的Bean是否可以获取到

        //1. 获取到容器
        ApplicationContext ioc =
                new ClassPathXmlApplicationContext("applicationContext.xml");

        //获取Bean
        System.out.println(ioc.getBean("pooledDataSource"));
        System.out.println(ioc.getBean("sqlSessionFactory"));
    }
}
看看是否能够得到Spring 容器的数据源对象和会话工厂对象.

