为了能够在改变视图的同时,不向后端发出网络请求。浏览器提供了 hash 模式与 history 模式。
而 vue 中的路由器就是利用了这两种模式,来实现前端路由的。
路由器的 hash 模式:
一、在 router 目录下的 index.js 文件中,通过 mode 属性配置 hash 模式。
import Vue from 'vue'
import VueRouter from 'vue-router'
Vue.use(VueRouter)

import Home from '../views/Home.vue'
import About from '../views/About.vue'

const routes = [
  {
    path: '/',
    name: 'home',
    component: Home,
  },
  {
    path: '/about',
    name: 'about',
    component: About,
  }
]

const router = new VueRouter({
  // 配置路由为 hash 模式
  mode: 'hash',
  routes
})

export default router注:vue-router 默认使用的就是 hash 模式,所以以上的 mode: 'hash' 可以省略。
二、hash 模式的 URL 路径

注:在 hash 模式中,URL 地址里有一个 # 号,# 号和后面的内容被称为 hash 值。
三、hash 模式向服务器发送请求:
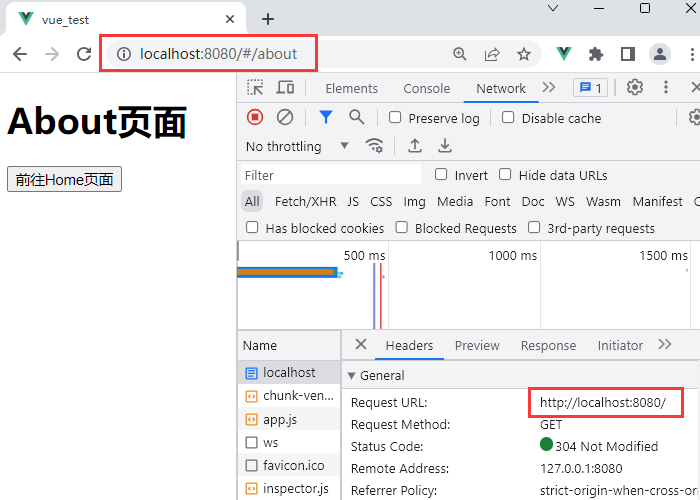
注:hash 值不会随着 URL 发送给服务器,只会被路由器解析。
路由器的 history 模式:
一、在 router 目录下的 index.js 文件中,通过 mode 属性配置 history 模式。
import Vue from 'vue'
import VueRouter from 'vue-router'
Vue.use(VueRouter)

import Home from '../views/Home.vue'
import About from '../views/About.vue'

const routes = [
  {
    path: '/',
    name: 'home',
    component: Home,
  },
  {
    path: '/about',
    name: 'about',
    component: About,
  }
]

const router = new VueRouter({
  // 配置路由为 history 模式
  mode: 'history',
  routes
})

export default router
二、history 模式的 URL 路径

注:在 history 模式下,URL 地址更加干净、美观。
三、history 模式向服务器发送请求:
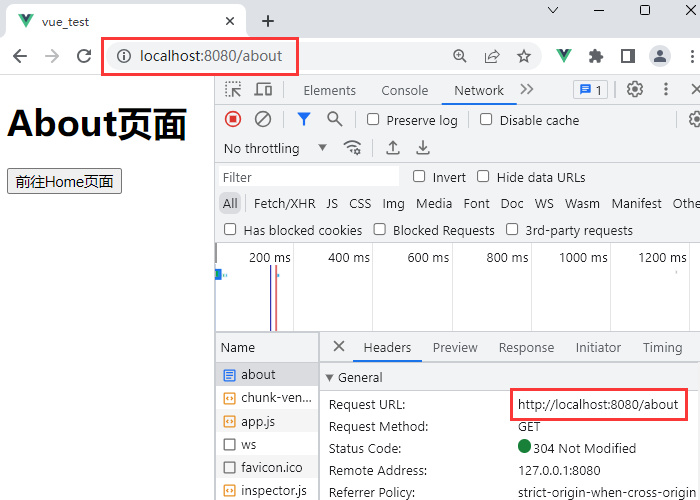
注:在 history 模式下,URL 地址会被完整的发送到服务器中。如果把项目打包部署到服务器上,刷新页面就会向服务器重新请求该路径的资源,但是服务器中并没有这个文件,就会报 404 的错误。
原创作者:吴小糖
创作时间:2023.8.3


