
一、前言
1. 纯函数
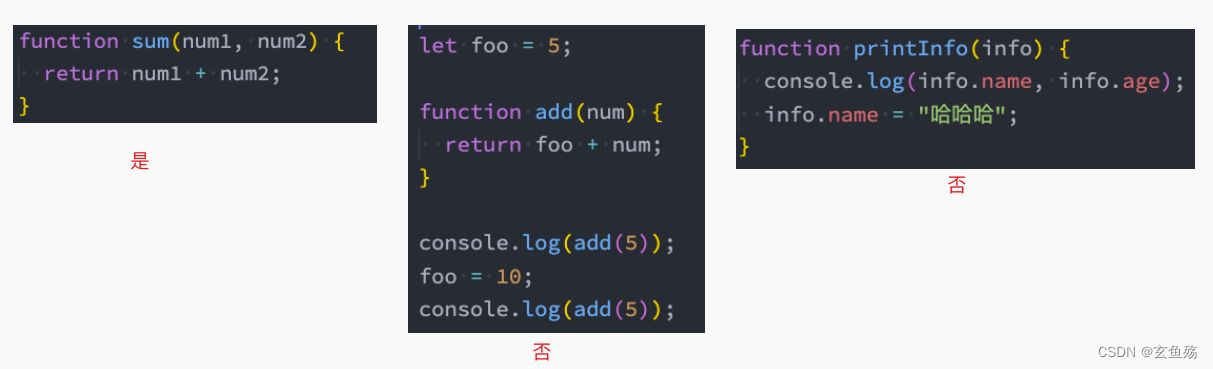
函数式编程中有一个非常重要的概念叫纯函数,JavaScript符合函数式编程的范式,所以也有纯函数的概念
-
确定的输入,一定会产生确定的输出
-
函数在执行过程中,不能产生副作用
2. 副作用
表示在执行一个函数时,除了返回函数值之外,还对调用函数产生了附加的影响,
比如修改了全局变量,修改参数或者改变外部的存储
-
纯函数在执行的过程中就是不能产生这样的副作用
-
副作用往往是产生bug的 “温床”
3. 纯函数的案例
对数组操作的两个函数:
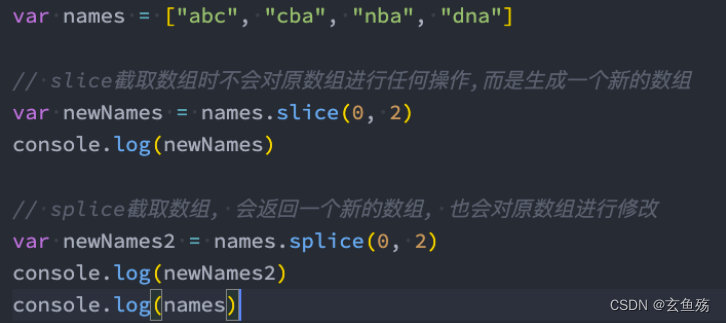
slice就是一个纯函数,不会修改数组本身,而splice函数不是一个纯函数
-
slice:slice截取数组时不会对原数组进行任何操作,而是生成一个新的数组
-
splice:splice截取数组, 会返回一个新的数组, 也会对原数组进行修改
4. 判断是否纯函数
5. 纯函数的作用和优势
纯函数在函数式编程中非常重要 :
-
可以安心的编写和安心的使用
-
在写的时候保证了函数的纯度,只是单纯实现业务逻辑即可,不需要关心传入的内容是如何获得的或者依赖其他的外部变量是否已经发生了修改
-
在用的时候,确定的输入内容不会被任意篡改,并且确定的输入,一定会有确定的输出
6. 在React中
React中就要求无论是函数还是class声明一个组件,这个组件都必须像纯函数一样,保护它们的props不被修改

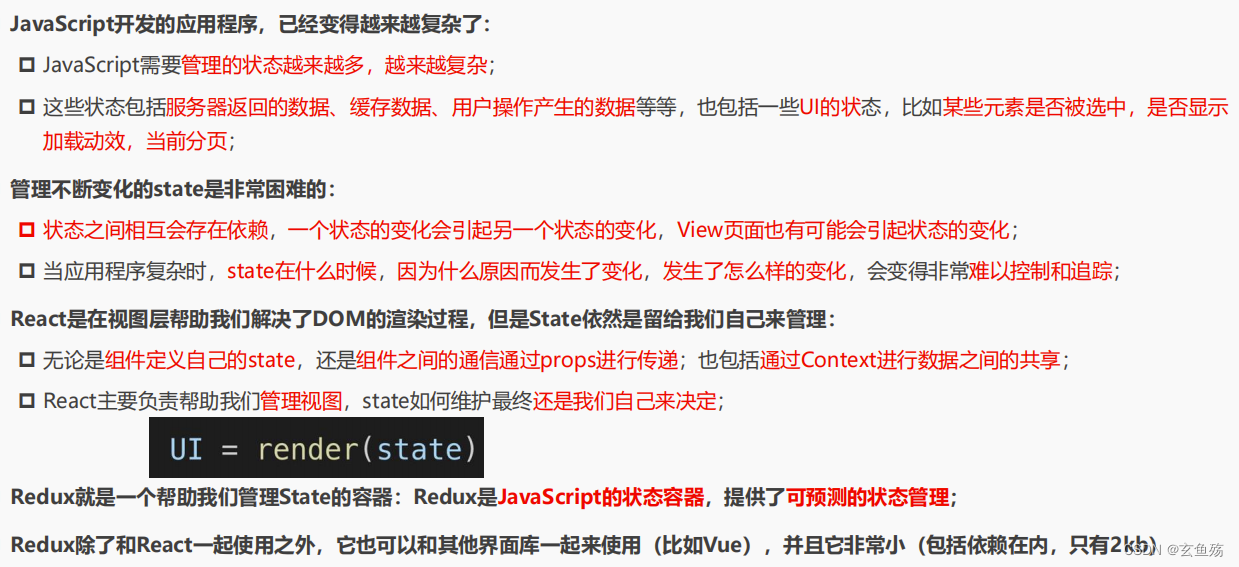
7. 为啥使用Redux
二、Redux的核心理念
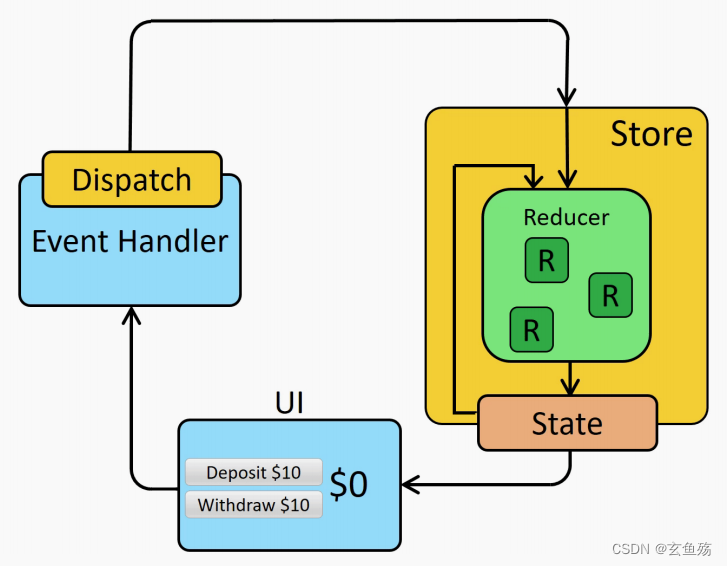
1. 核心理念 - store
store : 用于存储共享数据的仓库
2. 核心理念 - action
action : store中所有数据的变化,必须通过派发(dispatch)action来更新
action是一个普通的JavaScript对象,用来描述这次更新的type和content
3. 核心理念 - reducer
reducer : reducer是一个纯函数,将state和action联系在一起
reducer做的事情就是将传入的state和action结合起来生成一个新的state
4. Redux的三大原则
单一数据源
-
整个应用程序的state被存储在一颗object tree中,并且这个object tree只存储在一个 store 中
-
Redux并没有强制让我们不能创建多个Store,但是那样做并不利于数据的维护
-
单一的数据源可以让整个应用程序的state变得方便维护、追踪、修改
State是只读的
-
唯一修改State的方法一定是触发action,不要试图在其他地方通过任何的方式来修改State
-
这样就确保了View或网络请求都不能直接修改state,它们只能通过action来描述自己想要如何修改state
-
这样可以保证所有的修改都被集中化处理,并且按照严格的顺序来执行,所以不需要担心race condition(竟态)的问题
使用纯函数来执行修改
-
通过reducer将 旧state和 actions联系在一起,并且返回一个新的State
-
随着应用程序的复杂度增加,我们可以将reducer拆分成多个小的reducers,分别操作不同state tree的一部分
-
但是所有的reducer都应该是纯函数,不能产生任何的副作用
三、Redux的基本使用
1. 测试项目搭建
01. 创建一个新的项目文件夹: learn-redux
02. 进入文件夹后进行项目初始化
npm init -y
03. 安装redux
npm install redux
04. 创建src目录,以及其中的index.js文件
05. 修改package.json可以执行index.js
也可不修改,直接控制台输入 node src/index.js
"scripts": {
  // node v13.2.0之后,添加属性:"type": "module",就可以在node中对ES6模块化的支持
  "type": "module",
  "start": "node src/index.js"
},
06. 在src中创建目录store,并创建index.js
// 需要配置下type,否则的话直接使用commonjs也是可以的
import { createStore } from 'redux';

// 1. 定义初始化数据
const initialState = {
  name: 'coder',
  age: 18,
  counter: 100
};

// 2. 定义reducer纯函数
// 2.1 reducer函数的第一个参数是state,第二个参数是action
// 2.2 reducer函数必须返回一个新的state,这个state会覆盖原来的state
// 2.3 reducer函数中,不能修改原来的state,必须返回一个新的state

// 第一次调用reducer函数的时候,state是undefined,所以给state设置默认值,只会在第一次调用的时候生效
const reducer = (state = initialState, action) => {

  // 2.4 在这里,根据action的type,来决定如何修改state,返回一个新的state
  switch (action.type) {
    case 'xxx' : return {...state,...}
  }
  // 2.5 没有数据更新的时候,返回一个新的state
  return state;
};

// 3. 创建store
export const store = createStore(reducer);
2. 使用store中的数据
// 1. 导入store
import { store } from './store/index.js';

// 2. 拿到store中存储的数据
console.log(store.getState()); // { name: 'coder', age: 18, counter: 100 }
3. 修改store中的数据
执行代码
// 导入store
import { store } from './store/index.js';

// 创建一个action对象
const nameAction = { type: 'change_name', name: 'star' };
// 进行派发, 派发的时候,会调用reducer函数,传入state和action
store.dispatch(nameAction)

// 创建一个action对象
const counterAction = { type: 'increment_counter', number: 10 };
// 进行派发
store.dispatch(counterAction);

console.log(store.getState()); // { name: 'star', age: 18, counter: 110 }
在reducer函数中新增判断
const reducer = (state = initialState, action) => {
  // action => { type: 'change_name', name: 'star' }
  switch (action.type) {
    case 'change_name':
      return {
        // 先对原来staet进行解构
        ...state,
        // 再对name进行覆盖
        name: action.name
      };
    case 'increment_counter':
      return { ...state, counter: state.counter + action.number };
    default:
      // 如果没有匹配到action.type,就返回原来的state
      return state;
  }
};
4. 订阅store中的数据
// 导入store
import { store } from './store/index.js';

// 监听state的变化, 只要state发生了变化,就会调用回调函数
// 返回值是一个函数,调用这个函数,就可以取消监听
const unSubscribe = store.subscribe(() => {
  console.log('state发生了变化');
  console.log(store.getState());
});

// 派发action => 可以监听到
store.dispatch({ type: 'change_name', name: 'star' });

// 取消监听
unSubscribe();

// 派发action => 不会监听到,但是state会发生变化,因为store.dispatch会调用reducer函数
store.dispatch({ type: 'increment_counter', number: 10 });
5. 优化
动态生成action
// 导入store
import { store } from './store/index.js';

store.subscribe(() => {
  console.log('state发生了变化', store.getState());
});

// 动态生成action : actionCreator => 创建action的函数, 返回一个action对象
const changeNameAction = (name) => ({ type: 'change_name', name });

// store.dispatch({ type: 'change_name', name: 'star' });
// store.dispatch({ type: 'change_name', name: 'coderstar' });
store.dispatch(changeNameAction('star'));
store.dispatch(changeNameAction('coderstar'));
目录结构优化
如果将所有的逻辑代码写到一起,那么当redux变得复杂时代码就难以维护
对代码进行拆分,将store、reducer、action、constants拆分成一个个文件
创建store/index.js文件
import { createStore } from 'redux';

import reducer from './reducer.js';

// 创建store
export const store = createStore(reducer);
创建store/reducer.js文件
import { CHANGE_NAME, INCREMENT_COUNTER } from './constants.js';

// 1. 定义初始化数据
const initialState = {
  name: 'coder',
  age: 18,
  counter: 100
};

// 2. 定义reducer
export const reducer = (state = initialState, action) => {
  switch (action.type) {
    case CHANGE_NAME:
      return {
        // 先对原来staet进行解构
        ...state,
        // 再对name进行覆盖
        name: action.name
      };
    case INCREMENT_COUNTER:
      return { ...state, counter: state.counter + action.number };
    default:
      // 如果没有匹配到action.type,就返回原来的state
      return state;
  }
};
创建store/actionCreators.js文件 => 用于生成action
// Description: Action Creators

import { CHANGE_NAME, INCREMENT_COUNTER } from './constants.js';

// 修改name名字的action
export const changeNameAction = (name) => ({ type: CHANGE_NAME, name });

// 修改counter的action
export const incrementCounterAction = (number) => ({ type: INCREMENT_COUNTER, number });
创建store/constants.js文件 => 用于定义type常量
// Desc: constants for actions

export const CHANGE_NAME = 'change_name';
export const INCREMENT_COUNTER = 'increment_counter';
6. Redux使用流程图

四、React结合Redux
1. 安装
npm install redux
2. 基本使用

store文件夹
index.js
import { createStore } from 'redux';
import { reducer } from './reducer';

export const store = createStore(reducer);
constants.js
export const CHANGE_COUNTER = 'change_counter';

export const CHANGE_BANNER = 'change_banner';
reducer.js
import { CHANGE_BANNER, CHANGE_COUNTER } from './constants';

const initialState = {
  counter: 20,
  bannerList: []
};

export const reducer = (state = initialState, action) => {
  switch (action.type) {
    case CHANGE_COUNTER:
      return { ...state, counter: state.counter + action.counter };
    case CHANGE_BANNER:
      return { ...state, bannerList: [...state.bannerList, ...action.bannerList] };
    default:
      return state;
  }
};
actionCreatores.js
import { CHANGE_COUNTER, CHANGE_BANNER } from './constants';

// 修改counter的action
export const changeCounterAction = (counter) => ({ type: CHANGE_COUNTER, counter });

// 修改bannerList的action
export const changeBannerAction = (bannerList) => ({ type: CHANGE_BANNER, bannerList });
page文件夹
Home.jsx
import React, { PureComponent } from 'react';
import { store } from '../store';
import { changeCounterAction } from '../store/actionCreatores.js';

export class Home extends PureComponent {
  constructor(porps) {
    super(porps);

    this.state = {
      // 从store中获取counter的值,赋予初始化值
      counter: store.getState().counter
    };
  }
  componentDidMount() {
    // 监听store的变化
    store.subscribe(() => {
      this.setState({
        counter: store.getState().counter
      });
    });
  }
  changeCounter(num) {
    // 改变store中的值,通过dispatch派发action
    store.dispatch(changeCounterAction(num));
  }
  render() {
    const { counter } = this.state;
    return (
      <>
        <h2>Home counter : {counter}</h2>
        <button onClick={(e) => this.changeCounter(5)}>+5</button>
        {'                                                       '}
        <button onClick={(e) => this.changeCounter(10)}>+10</button>
      </>
    );
  }
}

export default Home;
Profily.jsx
import React, { PureComponent } from 'react';
import { store } from '../store';
import { changeCounterAction } from '../store/actionCreatores.js';

export class Profily extends PureComponent {
  constructor(porps) {
    super(porps);

    this.state = {
      // 从store中获取counter的值,赋予初始化值
      counter: store.getState().counter
    };
  }
  componentDidMount() {
    // 监听store的变化
    store.subscribe(() => {
      this.setState({
        counter: store.getState().counter
      });
    });
  }
  changeCounter(num) {
    // 改变store中的值,通过dispatch派发action
    store.dispatch(changeCounterAction(num));
  }
  render() {
    const { counter } = this.state;
    return (
      <>
        <h2>Profily counter : {counter}</h2>
        <button onClick={(e) => this.changeCounter(-5)}>-5</button>
        {'                                                       '}
        <button onClick={(e) => this.changeCounter(-10)}>-10</button>
      </>
    );
  }
}

export default Profily;
App.jsx
import React, { PureComponent } from 'react';
import Home from './page/Home';
import Profily from './page/Profily';

import { store } from './store';

export class App extends PureComponent {
  constructor(porps) {
    super(porps);

    this.state = {
      // 从store中获取counter的值,赋予初始化值
      counter: store.getState().counter
    };
  }
  componentDidMount() {
    // 监听store的变化
    store.subscribe(() => {
      this.setState({
        counter: store.getState().counter
      });
    });
  }
  render() {
    const { counter } = this.state;
    return (
      <div style={{ textAlign: 'center', marginTop: '100px' }}>
        <h2>App counter : {counter}</h2>
        <hr />
        <hr />
        <hr />
        <Home />
        <hr />
        <hr />
        <hr />
        <Profily />
      </div>
    );
  }
}

export default App;
3. react-redux的使用
-
redux和react没有直接的关系,完全可以在React, Angular, Ember, jQuery, or vanilla
JavaScript中使用Redux -
redux依然是和React库结合的更好
-
redux官方帮助我们提供了 react-redux 的库,可以直接在项目中使用,并且实现的逻辑会更加的严谨和高效
将组件和store连接
安装 => npm install react-redux
1. 修改index.js
import React from 'react';
import ReactDOM from 'react-dom/client';
import App from './App.jsx';
// 引入Provider组件, 用于给整个项目提供一个公共的store
import { Provider } from 'react-redux';
import { store } from './store';

const root = ReactDOM.createRoot(document.querySelector('#root'));

root.render(
  <React.StrictMode>
    {/* 给整个项目提供一个公共的store */}
    <Provider store={store}>
      <App />
    </Provider>
  </React.StrictMode>
);
2. 组件中使用
需要进行映射,state、dispatch都需要映射
import React, { PureComponent } from 'react';
// 1. 引入connect,用于连接组件和redux,返回一个高阶组件
import { connect } from 'react-redux';
import { changeCounterAction } from '../store/actionCreatores';

export class About extends PureComponent {
  changeCounter(num) {
    // 4. 从props中取出changeCounter,不再从state中取,因为state中的值已经被映射到props中了
    const { changeCounter } = this.props;
    // 执行了下面定义的方法,相当于调用了dispatch(changeCounterAction(num))
    changeCounter(num);
  }
  render() {
    // 3. 从props中取出counter,不再从state中取,因为state中的值已经被映射到props中了
    const { counter } = this.props;
    return (
      <>
        <h2>About : {counter}</h2>
        <button onClick={(e) => this.changeCounter(8)}>+8</button>
        {'                                                       '}
        <button onClick={(e) => this.changeCounter(-8)}>-8</button>
      </>
    );
  }
}

/**
 * connect => connect()()返回一个高阶组件,第一个()传入两个参数,第二个()传入一个组件,返回一个新的 高阶组件🌟
 * 第一个()传入两个参数,第一个参数是一个函数,第二个参数是一个对象
 *    第一个参数函数,函数的参数是state,返回一个对象,对象的属性是state,值是state
 *    第二个参数对象,对象的属性是一个函数,函数的参数是dispatch,返回一个对象,对象的属性是函数,函数的参数是参数,返回一个action
 * 第二个()传入一个组件,返回一个新的组件
 */
// 2. 注入store中的state和dispatch到组件的props中

// 用来映射state中的值到组件的props中,可以设置取其中需要的数据
const mapStateToProps = (state) => ({ counter: state.counter });
// 用来映射dispatch到组件的props中,可以设置取其中需要的方法
const mapDispatchToProps = (dispatch) => ({
  changeCounter: (num) => dispatch(changeCounterAction(num))
});

export default connect(mapStateToProps, mapDispatchToProps)(About);
3. 组件中异步操作

About组件 => 请求banners数据
Category组件 => 展示banners数据
效果

About组件
import React, { PureComponent } from 'react';
import { connect } from 'react-redux';
import { changeCounterAction, changeBannerAction } from '../store/actionCreatores';
import axios from 'axios';

export class About extends PureComponent {
  changeCounter(num) {
    const { changeCounter } = this.props;
    changeCounter(num);
  }
  async getData() {
    const res = await axios.get('http://xxxxxx');
    const bannerList = res?.data?.data?.banner?.list || [];
    const { changeBanner } = this.props;
    // 请求数据后,改变store中的值
    changeBanner(bannerList);
  }
  render() {
    const { counter } = this.props;
    return (
      <>
        <h2>About : {counter}</h2>
        <button onClick={(e) => this.changeCounter(8)}>+8</button>
        {'                                                       '}
        <button onClick={(e) => this.changeCounter(-8)}>-8</button>
        {'                                                       '}
        <button onClick={(e) => this.getData()}>请求数据</button>
      </>
    );
  }
}

const mapStateToProps = (state) => ({ counter: state.counter });
const mapDispatchToProps = (dispatch) => ({
  changeCounter: (num) => dispatch(changeCounterAction(num)),
  changeBanner: (bannerList) => dispatch(changeBannerAction(bannerList))
});

export default connect(mapStateToProps, mapDispatchToProps)(About);
Category组件
import React, { PureComponent } from 'react';
import { connect } from 'react-redux';

export class Category extends PureComponent {
  render() {
    const { bannerList } = this.props;
    return (
      <>
        <h2>Category</h2>
        <ul>
          {bannerList.map((item, index) => {
            return <li key={index}>{item.title}</li>;
          })}
        </ul>
      </>
    );
  }
}

const mapStateToProps = (state) => ({ bannerList: state.bannerList });

export default connect(mapStateToProps, null)(Category);
4. redux中异步操作
上面的代码有一个缺陷
- 必须将网络请求的异步代码放到组件的生命周期中来完成
- 事实上,网络请求到的数据也属于状态管理的一部分,更好的一种方式应该是将其也交给redux来管理
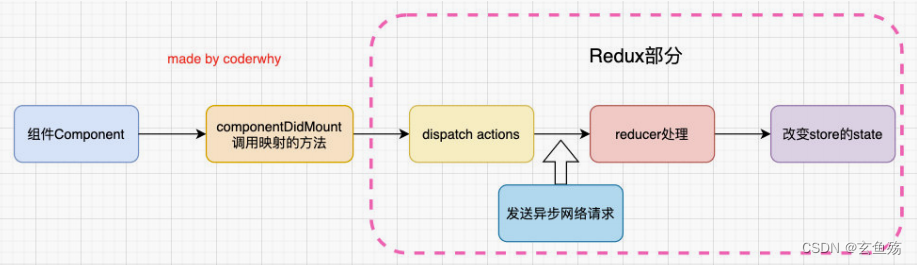
redux中如何可以进行异步的操作 :
- 答案就是使用中间件(Middleware)
- 学习过Express或Koa框架的童鞋对中间件的概念一定不陌生
- 在这类框架中,Middleware可以帮助我们在请求和响应之间嵌入一些操作的代码,比如cookie解析、日志记录、文件压缩等操作
中间件
redux也引入了中间件(Middleware)的概念:
- 这个中间件的目的是在dispatch的action和最终达到的reducer之间,扩展一些自己的代码
- 比如日志记录、调用异步接口、添加代码调试功能等等
- 发送异步的网络请求,可以使用中间件是 redux-thunk
redux-thunk是如何做到让我们可以发送异步的请求呢
- 我们知道,默认情况下的dispatch(action),action需要是一个JavaScript的对象
- redux-thunk可以让dispatch(action函数),action可以是一个函数
- 该函数会被调用,并且会传给这个函数一个dispatch函数和getState函数
- dispatch函数用于我们之后再次派发action
- getState函数考虑到我们之后的一些操作需要依赖原来的状态,用于让我们可以获取之前的一些状态
redux-thunk的使用
安装 => npm install redux-thunk
store/index.js
// applyMiddleware => 应用中间件
import { createStore, applyMiddleware } from 'redux';

import thunk from 'redux-thunk';
import { reducer } from './reducer';

// 正常情况下,store.dispatch只能接收对象 store.dispatch(对象object)

// 想要派发函数store.dispatch(函数function),需要对store进行增强,增强的方式是使用中间件
// 但是如果使用了redux-thunk中间件,那么store.dispatch就可以接收函数 store.dispatch(函数function)

// 1. 引入中间件 applyMiddleware(thunk, logger, ...) => 可以传入多个中间件
const enhancer = applyMiddleware(thunk);
// 2. 使用中间件
export const store = createStore(reducer, enhancer);
actionCreatores.js
import axios from 'axios';
import { CHANGE_COUNTER, CHANGE_BANNER } from './constants';

// 修改counter的action
export const changeCounterAction = (counter) => ({ type: CHANGE_COUNTER, counter });

// 修改bannerList的action
export const changeBannerAction = (bannerList) => ({ type: CHANGE_BANNER, bannerList });

// 异步获取bannerList的action
export const getBannerListAction = () => {
  // 如果是普通的action,那么返回的是一个对象, {type: 'xxx', payload: 'xxx'}
  // 问题:对象中不能直接拿到从服务器获取的数据
  // return {}

  // 如果是函数,那么redux是不支持的,需要使用中间件redux-thunk
  // 一旦派发来到这个函数,那么redux-thunk就会自动执行这个函数
  // 这个函数的参数有来两个,第一个是dispatch => store.dispatch dispatch(xxx) , 第二个是getState => 获取store中的数据 getState().counter
  return async (dispatch, getState) => {
    const res = await axios.get('http://123.207.32.32:8000/home/multidata');
    const bannerList = res?.data?.data?.banner?.list || [];
    // 派发action对象
    dispatch(changeBannerAction(bannerList));
  };
};
About.jsx
import React, { PureComponent } from 'react';
import { connect } from 'react-redux';
import { changeCounterAction, getBannerListAction } from '../store/actionCreatores';

export class About extends PureComponent {
  changeCounter(num) {
    const { changeCounter } = this.props;
    changeCounter(num);
  }
  getData() {
    const { getBannerList } = this.props;
    // 在这里调用store中的action发送异步请求,获取数据
    getBannerList();
  }
  render() {
    const { counter } = this.props;
    return (
      <>
        <h2>About : {counter}</h2>
        <button onClick={(e) => this.changeCounter(8)}>+8</button>
        {'                                                       '}
        <button onClick={(e) => this.changeCounter(-8)}>-8</button>
        {'                                                       '}
        <button onClick={(e) => this.getData()}>请求数据</button>
      </>
    );
  }
}

const mapStateToProps = (state) => ({ counter: state.counter });
const mapDispatchToProps = (dispatch) => ({
  changeCounter: (num) => dispatch(changeCounterAction(num)),
  getBannerList: () => dispatch(getBannerListAction())
});

export default connect(mapStateToProps, mapDispatchToProps)(About);
5. react调试工具 - redux-devtools
redux可以方便的让我们对状态进行跟踪和调试
- redux官网为我们提供了redux-devtools的工具
- 利用这个工具,我们可以知道每次状态是如何被修改的,修改前后的状态变化等等
步骤一
在对应的浏览器中安装相关的插件
比如Chrome浏览器扩展商店中搜索Redux DevTools即可


步骤二
在redux中继承devtools的中间件
import { createStore, applyMiddleware, compose } from 'redux';

import thunk from 'redux-thunk';
import { reducer } from './reducer';

// redux-devtools-extension,用于在浏览器中查看redux的状态 => 为了安全,只在开发环境中使用
// 生产环境
let composeEnhancers = compose;
if (process.env.NODE_ENV === 'development') {
  // 开发环境
  composeEnhancers = window.__REDUX_DEVTOOLS_EXTENSION_COMPOSE__({ trace: true }) || compose;
}
const enhancer = applyMiddleware(thunk);

export const store = createStore(reducer, composeEnhancers(enhancer));

6. Reducer文件拆分
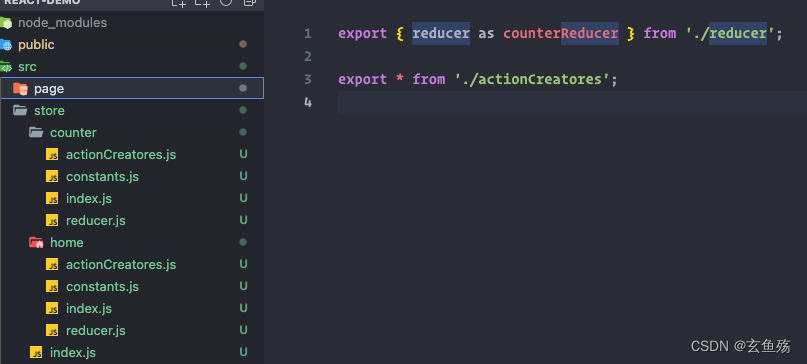
拆分
actionCreatores.js
import { CHANGE_COUNTER } from './constants';

// 修改counter的action
export const changeCounterAction = (counter) => ({ type: CHANGE_COUNTER, counter });
constants.js
export const CHANGE_COUNTER = 'change_counter';
index.js
// 文件做统一的导出

export { reducer as counterReducer } from './reducer';

export * from './actionCreatores';
reducer.js
import { CHANGE_COUNTER } from './constants';

const initialState = {
  counter: 20
};

export const reducer = (state = initialState, action) => {
  switch (action.type) {
    case CHANGE_COUNTER:
      return { ...state, counter: state.counter + action.counter };
    default:
      return state;
  }
};
store => 下的index.js文件,用来合并各个模块的reducer
combineReducers函数可以方便的让我们对多个reducer进行合并
import { createStore, applyMiddleware, compose, combineReducers } from 'redux';

import thunk from 'redux-thunk';

import { counterReducer } from './counter';
import { homeReducer } from './home';

// 合并reducer
const reducer = combineReducers({
  // 相当于模块名称
  counter: counterReducer,
  home: homeReducer
});

// redux-devtools-extension,用于在浏览器中查看redux的状态 => 为了安全,只在开发环境中使用
// 生产环境
let composeEnhancers = compose;
if (process.env.NODE_ENV === 'development') {
  // 开发环境
  composeEnhancers = window.__REDUX_DEVTOOLS_EXTENSION_COMPOSE__({ trace: true }) || compose;
}
const enhancer = applyMiddleware(thunk);

export const store = createStore(reducer, composeEnhancers(enhancer));
使用
直接取数据或者映射数据时,需要加上模块名
派发action还是和以前一样,不需要更改

五、ReduxToolkit
1. 概念
Redux Toolkit 是官方推荐的编写 Redux 逻辑的方法
- 在前面我们学习Redux的时候应该已经发现,redux的编写逻辑过于的繁琐和麻烦
- 并且代码通常分拆在多个文件中(虽然也可以放到一个文件管理,但是代码量过多,不利于管理)
- Redux Toolkit包旨在成为编写Redux逻辑的标准方式,从而解决上面提到的问题
- 在很多地方为了称呼方便,也将之称为“RTK”
安装 => npm install @reduxjs/toolkit react-redux
Redux Toolkit的核心API
- configureStore:包装createStore以提供简化的配置选项和良好的默认值
- 它可以自动组合你的 slice reducer,添加你提供的任何 Redux 中间件,redux-thunk默认包含,并启用 Redux DevTools Extension
- createSlice:接受reducer函数的对象、切片名称和初始状态值,并自动生成切片reducer,并带有相应的actions
- createAsyncThunk: 接受一个动作类型字符串和一个返回承诺的函数,并生成一个pending/fulfilled/rejected基于该承诺分派动作类型的 thunk
2. 基本使用
store中的代码
counter.js => store/peature/counter.js
// 1. 导入创建切片的函数
import { createSlice } from '@reduxjs/toolkit';

const counterSlice = createSlice({
  // 2. 切片名称
  name: 'counter',
  // 3. 初始状态
  initialState: {
    counter: 88
  },
  // 4. reducers => 相当于之前的reducer
  reducers: {
    // 5. 相当于之前的case,action.type就是这里的方法名称
    changeCounterAction(state, action) {
      state.counter += action.payload;
    }
  }
});

// 6. 导出actions
export const { changeCounterAction } = counterSlice.actions;

// 7. 导出reducer
export default counterSlice.reducer;
index.js => store/index.js
import { configureStore } from '@reduxjs/toolkit';
import counterReducer from './features/counter';
import categoryReducer from './features/category';

import thunk from 'redux-thunk';

const store = configureStore({
  // 1. reducer : 将切片的reducer添加到store中
  reducer: {
    counter: counterReducer,
    category: categoryReducer
  },
  // 2. devTools : 开启redux-devtools,默认开启,开发环境开启,生产环境关闭
  devTools: process.env.NODE_ENV === 'development',
  // 3. middleware : 中间件,默认只有thunk,如果需要添加其他中间件,可以在这里添加
  middleware: (getDefaultMiddleware) => {
    return getDefaultMiddleware().concat(thunk);
  },

  // 不常用的配置项
  // 4. enhancers : 增强器,如果需要添加其他增强器,可以在这里添加
  enhancers: [],
  // 5. preloadedState : 初始状态,如果需要添加初始状态,可以在这里添加
  preloadedState: {},
  // 6. reducerPathInfo : reducer路径信息,如果需要添加reducer路径信息,可以在这里添加
  reducerPathInfo: {},
  // 7. middlewareFactories : 中间件工厂,如果需要添加中间件工厂,可以在这里添加
  middlewareFactories: {},
  // 8. devToolsEnhancerOptions : devTools增强器选项,如果需要添加devTools增强器选项,可以在这里添加
  devToolsEnhancerOptions: {},
  // 9. immutableCheck : 是否开启不可变检查,默认开启
  immutableCheck: true,
  // 10. serializableCheck : 是否开启序列化检查,默认开启
  serializableCheck: true,
  // 11. middlewareOptions : 中间件选项,如果需要添加中间件选项,可以在这里添加
  middlewareOptions: {},
  // 12. thunk : thunk中间件选项,如果需要添加thunk中间件选项,可以在这里添加
  thunk: {},
});

export default store;
主体index.js中的代码
import React from 'react';
import ReactDOM from 'react-dom/client';
import App from './App.jsx';
import { Provider } from 'react-redux';
import store from './store';

const root = ReactDOM.createRoot(document.querySelector('#root'));

root.render(
  <React.StrictMode>
    {/* 给整个项目提供一个公共的store */}
    <Provider store={store}>
      <App />
    </Provider>
  </React.StrictMode>
);
page中的代码
About.jsx => page/About.jsx
import React, { PureComponent } from 'react';
import { connect } from 'react-redux';
import { changeCounterAction } from '../store/features/counter';

export class About extends PureComponent {
  changeCounter(num) {
    // 通过props获取action
    const { changeCounterAction } = this.props;
    // 调用action
    changeCounterAction(num);
  }
  render() {
    const { counter } = this.props;
    return (
      <>
        <h2>About : {counter}</h2>
        <button onClick={(e) => this.changeCounter(8)}>+8</button>
        {'                                                       '}
        <button onClick={(e) => this.changeCounter(-8)}>-8</button>
      </>
    );
  }
}

// 映射Redux全局的state到组件的props上 => counter
const mapStateToProps = (state) => ({ counter: state.counter.counter });
// 映射dispatch到props上
const mapDispatchToProps = (dispatch) => ({
  changeCounterAction: (num) => dispatch(changeCounterAction(num)),
});

export default connect(mapStateToProps, mapDispatchToProps)(About);
3. 异步操作
之前通过redux-thunk中间件让dispatch中可以进行异步操作。
Redux Toolkit默认已经继承了Thunk相关的功能:createAsyncThunk
teAsyncThunk创建出来的action被dispatch时,会存在三种状态:
- pending:action被发出,但是还没有最终的结果
- fulfilled:获取到最终的结果(有返回值的结果)
- rejected:执行过程中有错误或者抛出了异常
- 可以在createSlice的entraReducer中监听这些结果
category.js => store/peature/category.js
import axios from 'axios';
import { createSlice } from '@reduxjs/toolkit';
// 1. 导入createAsyncThunk,用于创建异步action
import { createAsyncThunk } from '@reduxjs/toolkit';

// 2. 创建异步action
export const getBannerListAction = createAsyncThunk(
  'home/getBannerListAction',
  async (extraInfo, store) => {
    // extraInfo  =>   是调用异步action时传入的参数 => {name: 'coder'}
    // store      =>   store对象,可以获取到store中的数据和dispatch方法,但是不推荐使用

    const res = await axios.get('http://123.207.32.32:8000/home/multidata');

    // 不能直接返回res,不支持序列化会报错,需要返回res.data
    return res.data;
  }
);

const categorySlick = createSlice({
  name: 'category',
  initialState: {
    bannerList: []
  },
  reducers: {
    changeBannerListAction(state, { payload }) {
      state.bannerList = payload;
    }
  },
  // 3. 添加异步action的处理逻辑
  extraReducers: {
    // 不需要监听的话,可以不写
    [getBannerListAction.pending]: (state, { payload }) => {
      console.log('pending');
    },
    // 4. 在这里拿到异步action的结果,然后修改state
    [getBannerListAction.fulfilled]: (state, { payload }) => {
      state.bannerList = payload.data.banner.list;
    },
    // 不需要监听的话,可以不写
    [getBannerListAction.rejected]: (state, { payload }) => {
      console.log('rejected');
    }
  }
});

// 6. 导出actions
export const { changeBannerListAction } = categorySlick.actions;

// 7. 导出reducer
export default categorySlick.reducer;
Category.jsx => page/Category.jsx
import React, { PureComponent } from 'react';
import { connect } from 'react-redux';

import { getBannerListAction } from '../store/features/category';
export class Category extends PureComponent {
  componentDidMount() {
    // 2. 在redux中进行数据请求
    this.props.getBannerListAction();
  }
  render() {
    // 4. 获取redux中的数据
    const { bannerList } = this.props;
    return (
      <>
        <h2>Category</h2>
        <ul>
          {bannerList.map((item, index) => {
            return <li key={index}>{item.title}</li>;
          })}
        </ul>
      </>
    );
  }
}

// 3. 映射redux中的数据
const mapStateToProps = (state) => ({ bannerList: state.category.bannerList });

// 1. 映射redux中的方法
const mapDispatchToProps = (dispatch) => ({
  // 这里可以传递参数过去
  getBannerListAction: () => dispatch(getBannerListAction({ name: 'coder' }))
});
export default connect(mapStateToProps, mapDispatchToProps)(Category);
4. 异步操作的另一种写法
extraReducer还可以传入一个函数,函数接受一个builder参数
/**
 *  extraReducer还可以传入一个函数,函数接受一个builder参数
 *    builder对象中包含了pending、fulfilled、rejected三个属性,分别对应异步action的三种状态
 *    builder对象中的属性值都是函数,函数的第一个参数是state,第二个参数是action
 *    builder对象中的属性值函数的返回值会直接赋值给state
 */
extraReducers: (builder) => {
  builder
    .addCase(getBannerListAction.pending, (state, { payload }) => {
      console.log('pending');
    })
    .addCase(getBannerListAction.fulfilled, (state, { payload }) => {
      state.bannerList = payload.data.banner.list;
    })
    .addCase(getBannerListAction.rejected, (state, { payload }) => {
      console.log('rejected');
    });
}
5. Redux Toolkit的数据不可变性

六、其他补充
1. 自定义实现connect
组件中引入该文件即可,用法一致
实现代码
connect.js => hoc/Category.js
/**
 * 自定义实现 connect 函数
 * @param {*} mapStateToProps => 函数
 * @param {*} mapDispatchToProps => 函数
 * @returns => 返回值也是函数,是个高级组件,接收一个组件作为参数
 */

// 1. 导入stroe
import store from '../store';

export default function connect(mapStateToProps, mapDispatchToProps) {
  // 返回一个高级组件
  return function (WrappedComponent) {
    class NewComponent extends WrappedComponent {
      constructor(props) {
        super(props);
        // 2. 给state赋初始值
        this.state = mapStateToProps(store.getState());
      }
      componentDidMount() {
        // 3. 订阅store的变化, 一旦store发生变化,就会执行回调函数
        this.unSubscribe = store.subscribe(() => {
          // 4. 更新state
          this.setState(mapStateToProps(store.getState()));

          // 直接调用父类的forceUpdate方法,强制更新, 但是不推荐使用
          // this.forceUpdate();
        });
      }
      componentWillUnmount() {
        // 5. 取消订阅
        this.unSubscribe();
      }

      render() {
        // 6. 拿到stateObj
        const stateObj = mapStateToProps(store.getState());
        // 7. 拿到dispatchObj
        const dispatchObj = mapDispatchToProps(store.dispatch);
        // 8. 合并stateObj和dispatchObj,传递给WrappedComponent

        return <WrappedComponent {...this.props} {...stateObj} {...dispatchObj} />;
      }
    }
    return NewComponent;
  };
}
优化代码
上面的connect函数有一个很大的缺陷:依赖导入的store
正确的做法是我们提供一个Provider,Provider来自于我们创建的Context,让用户将store传入到value中即可
主体index.js中的代码
import React from 'react';
import ReactDOM from 'react-dom/client';
import App from './App.jsx';
import { Provider } from 'react-redux';
import store from './store';
// 导入StoreContext
import { StoreContext } from './hoc';

const root = ReactDOM.createRoot(document.querySelector('#root'));

root.render(
  <React.StrictMode>
    <Provider store={store}>
      {/* 3. 使用StoreContext.Provider包裹App组件 => 把store传进去 */}
      <StoreContext.Provider value={store}>
        <App />
      </StoreContext.Provider>
    </Provider>
  </React.StrictMode>
);
connect.js => hoc/connect.js
/**
 * 自定义实现 connect 函数
 * @param {*} mapStateToProps => 函数
 * @param {*} mapDispatchToProps => 函数
 * @returns => 返回值也是函数,是个高级组件,接收一个组件作为参数
 */

// 不直接引入store, 而是从storeContext中获取
// import store from '../store';

// 1. 引入storeContext
import { StoreContext } from './index.js';

// 3. 这里的context就是store   =>   因为在index.js中,使用storeContext.Provider包裹了App组件,把store传进去了

export function connect(mapStateToProps, mapDispatchToProps) {
  // 返回一个高级组件
  return function (WrappedComponent) {
    class NewComponent extends WrappedComponent {
      // 这里有两个参数,props和context,context就是store
      constructor(props, context) {
        super(props);
        this.state = mapStateToProps(context.getState());
      }
      componentDidMount() {
        this.unSubscribe = this.context.subscribe(() => {
          this.setState(mapStateToProps(this.context.getState()));
        });
      }
      componentWillUnmount() {
        this.unSubscribe();
      }

      render() {
        const stateObj = mapStateToProps(this.context.getState());
        const dispatchObj = mapDispatchToProps(this.context.dispatch);

        return <WrappedComponent {...this.props} {...stateObj} {...dispatchObj} />;
      }
    }

    // 2. 使用storeContext.Consumer包裹NewComponent组件, 传入store
    NewComponent.contextType = StoreContext;
    return NewComponent;
  };
}
storeContext.js => hoc/storeContext.js
// 1. 引入createContext, 用于创建上下文
import { createContext } from 'react';

// 2. 创建上下文
export const StoreContext = createContext();
index.js => hoc/index.js
// 统一的导出

export { connect } from './connect';

export { StoreContext } from './storeContext';
2. 打印日志需求
在dispatch之前 : 打印一下本次的action对象
在dispatch完成之后 : 打印一下最新的store state
01 - 手动修改

缺陷非常明显:
- 首先,每一次的dispatch操作,都需要在前面加上这样的逻辑代码
- 其次,存在大量重复的代码,会非常麻烦和臃肿
02 - 修改dispatch
利用一个hack一点的技术:Monkey Patching,利用它可以修改原有的程序逻辑
- 直接修改了dispatch的调用过程
- 在调用dispatch的过程中,真正调用的函数其实是dispatchAndLog
// 导出之前,做一层拦截,派发action之前,做一些事情,比如  =>  打印日志
function interceptStoreLog(store) {
  // 1. 拿到原始的dispatch方法
  const next = store.dispatch;
  // 2. 重写dispatch方法 => 在组件中派发action的时候,其实就是调用的这个方法
  store.dispatch = function dispatchAndLog(action) {
    console.log('当前派发的action', action);
    // 3. 调用原始的dispatch方法,派发action
    next(action);
    console.log('派发之后的结果', store.getState());
  };
}
interceptStoreLog(store);

export default store;
3. 自定义实现thunk中间件
// 自定义实现thunk中间件
function thunkMiddleware(store) {
  // 1. 拿到原始的dispatch方法
  const next = store.dispatch;
  // 2. 重写dispatch方法 => 在组件中派发action的时候,其实就是调用的这个方法
  store.dispatch = function dispatchAndThunk(action) {
    // 3. 判断action是不是函数
    if (typeof action === 'function') {
      // 4. 如果是函数,就调用这个函数,并且传入dispatch和getState方法 => 使用新的dispatch方法,因为可能又派发了函数
      action(store.dispatch, store.getState);
    } else {
      // 5. 如果是对象,就调用原始的dispatch方法
      next(action);
    }
  };
}
thunkMiddleware(store);
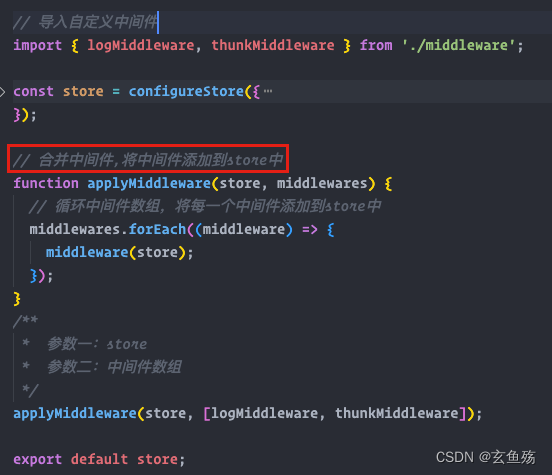
4. 合并自定义的中间件
目录修改
log.js => middleware/log.js
// 导出之前,做一层拦截,派发action之前,做一些事情,比如  =>  打印日志
export default function logMiddleware(store) {
  // 1. 拿到原始的dispatch方法
  const next = store.dispatch;
  // 2. 重写dispatch方法 => 在组件中派发action的时候,其实就是调用的这个方法
  store.dispatch = function dispatchAndLog(action) {
    console.log('当前派发的action', action);
    // 3. 调用原始的dispatch方法,派发action
    next(action);
    console.log('派发之后的结果', store.getState());
  };
}
thunk.js => middleware/thunk.js
// 自定义实现thunk中间件
export default function thunkMiddleware(store) {
  // 1. 拿到原始的dispatch方法
  const next = store.dispatch;
  // 2. 重写dispatch方法 => 在组件中派发action的时候,其实就是调用的这个方法
  store.dispatch = function dispatchAndThunk(action) {
    // 3. 判断action是不是函数
    if (typeof action === 'function') {
      // 4. 如果是函数,就调用这个函数,并且传入dispatch和getState方法 => 使用新的dispatch方法,因为可能又派发了函数
      action(store.dispatch, store.getState);
    } else {
      // 5. 如果是对象,就调用原始的dispatch方法
      next(action);
    }
  };
}
index.js => middleware/thunk.js
export { default as logMiddleware } from './log';
export { default as thunkMiddleware } from './thunk';
合并
封装一个函数来实现所有的中间件合并
七、React中的state如何管理
目前主要有三种状态管理方式:
- 方式一:组件中自己的state管理
- 方式二:Context数据的共享状态
- 方式三:Redux管理应用状态
推荐使用 :
- UI相关的组件内部可以维护的状态,在组件内部自己来维护
- 大部分需要共享的状态,都交给redux来管理和维护
- 从服务器请求的数据(包括请求的操作),交给redux来维护
- 根据不同的情况会进行适当的调整


![[腾讯云 Cloud studio 实战训练营] 制作Scrapy Demo爬取起点网月票榜小说数据](https://img-blog.csdnimg.cn/86f146b43a364172bd4d53ea70a8bd0d.png)


![【MFC]实现16进制文件浏览器-详细步骤+代码](https://img-blog.csdnimg.cn/926522a7acda4e7b8ab5552150bf8ae2.png)
