目录
一、Byzer-Python介绍
二、Byzer-python工具语法糖
三、环境依赖
1. Python 环境搭建
2. Ray 环境搭建
3. Byzer-python 与 Ray
四、参数详解
五、数据处理
1. Byzer-python 处理数据
2. Byzer-python 代码说明
3. Byzer-python 读写 Excel 文件
4. Byzer-python 分布式计算
5. Byzer-python 图表绘制
六、SQL表转化为分布式Pandas
七、模型训练
1. 单机训练
2. 分布式训练
八、模型部署
1. 数据准备
2. 训练模型
3. 将模型注册成 UDF 函数
4. 使用模型做预测
九、PyJava API简介
1. 初始化 RayContext
2. 获取数据
3. 构建新的结果数据输出
十、dataMode 详解
请注意:文章内容借鉴于Byzer官网,仅供参考。更多信息请访问Byzer官网(需保证外网访问速度)
一、Byzer-Python介绍
Byzer通过 Byzer-python 扩展(内置)来支持Python 代码。通过 Byzer-python,用户不仅仅可以进行使用 Python 进行 ETL 处理,比如可以将一个 Byzer 表转化成一个分布式DataFrame on Dask 来操作,支持各种机器学习框架,比如 Tensorflow,Sklearn,PyTorch。用户的Python脚本在 Byzer中是黑盒,用户可以通过固定API获得表数据,通过固定API来将Python输出转化为表,方便后续SQL处理。
下面看一个Hello Wrold的例子:
-- Byzer-python Hello World
select "world" as hello as table1;

!python conf "schema=st(field(hello,string))";
!python conf "pythonExec=/home/winubuntu/miniconda3/envs/byzerllm-desktop/bin/python";
!python conf "dataMode=model";
!python conf "runIn=driver";

run command as Ray.`` where
inputTable="table1"
and outputTable="new_table"
and code='''
import ray
from pyjava.api.mlsql import RayContext,PythonContext

ray_context = RayContext.connect(globals(),None)

rows_from_table1 = [item for item in ray_context.collect()]

for row in rows_from_table1:
   row["hello"] = "Byzer-Python"

context.build_result(rows_from_table1)
''';

select * from new_table as output;
简单描述下上面的代码。
第一步我们通过SQL获取到 table1
第二步我们设置一些配置参数
第三步我们通过 Ray 扩展来书写 Python 代码对 table1 里的每条记录做处理。
第四步我们把 Python处理的结果得到的表 new_table 进行输出。
当然,上面的hello world 代码无法处理大规模数据。我们在后续教程中会进行更详细的介绍。
二、Byzer-python工具语法糖
为了方便用户编写 Byzer-python 代码,我们在 Byzer-Notebook, Byzer Desktop 等产品中提供了如下的方式来写 Python代码:
#%python
#%input=command
#%output=test
#%schema=st(field(response,string))
#%runIn=driver
#%dataMode=model
#%cache=false
#%env=source /home/winubuntu/miniconda3/bin/activate byzerllm-desktop
#%pythonExec=/home/winubuntu/miniconda3/envs/byzerllm-desktop/bin/python

 import ray
from pyjava.api.mlsql import RayContext,PythonContext
from pyjava.storage import streaming_tar
from pyjava import rayfix
import os
import json
import logging
import sys

from byzerllm.moss.models.modeling_moss import MossForCausalLM
from byzerllm.moss.moss_inference import Inference

ray_context = RayContext.connect(globals(),"127.0.0.1:10001")

@ray.remote(num_gpus=1)
class Test():
    def __init__(self):
        pass

    def test(self):
        os.environ["CUDA_VISIBLE_DEVICES"] = "0"

        # Create an Inference instance with the specified model directory.
        print("init model")
        model = MossForCausalLM.from_pretrained("/home/winubuntu/projects/moss-model/moss-moon-003-sft-plugin-int4").half().cuda()
        print("infer")
        infer = Inference(model, device_map="auto")
        # Define a test case string.
        test_case = "<|Human|>: 你好 MOSS<eoh>\n<|MOSS|>:"

        # Generate a response using the Inference instance.
        res = infer(test_case)
        print(res)
        # Print the generated response.
        return res

res = ray.get(Test.remote().test.remote())
ray_context.build_result([{"response":res[0]}])
在上面代码中, 这些工具会提供语法糖,自动将 #% 注释 改写成 !python conf 设置,并且生成 run command as Ray 语法。此外,Byzer-Notebook 不需要自己手写这些注释,当你将Cell设置为 Python 代码时,会提供一个表格框方便你填写注释。注意:Byzer Notebook 暂时不能识别 pythonExec 参数,你需要使用 env 来设置。为了确保正确,你可以两个注释都填写上,就像上面的示例展示的那样。
三、环境依赖
在使用 Byzer-python 前,需要 Driver 的节点上配置好 Python 环境 ( Executor 节点可选) 。如果您使用 yarn 做集群管理,推荐使用 Conda 管理 Python 环境(参考Conda 环境安装)。而如果您使用 K8s,则可直接使用镜像管理。接下来,我们以 Conda 为例,介绍创建 Byzer-python 环境的流程。
1. Python 环境搭建
创建一个名字为 byzerllm-desktop 的 Python 3.10 环境
conda create -n byzerllm-desktop python=3.10
激活 byzerllm-desktop 环境
source activate byzerllm-desktop
安装基础以下基础依赖包
pandas==1.5.3
pyarrow==11.0.0
aiohttp==3.8.4
ray[default]==2.3.0
pyjava==0.5.0
2. Ray 环境搭建
Ray 是 Byzer 的运行时环境之一。尽管如此,他是可选的。当你有如下需求时:分布式Python处理,或者分布式 Pandas 的能力或者需要 GPU 等资源的管理能力,需要大模型等支持则用户需要部署 Ray 方便 Byzer 使用。Ray 依赖 Python 环境,需要和前面的环境保持一致。这里直接在 byzerllm-desktop 启动 Ray.
(1) 单机启动
ray start --head
看到以下日志说明启动成功:
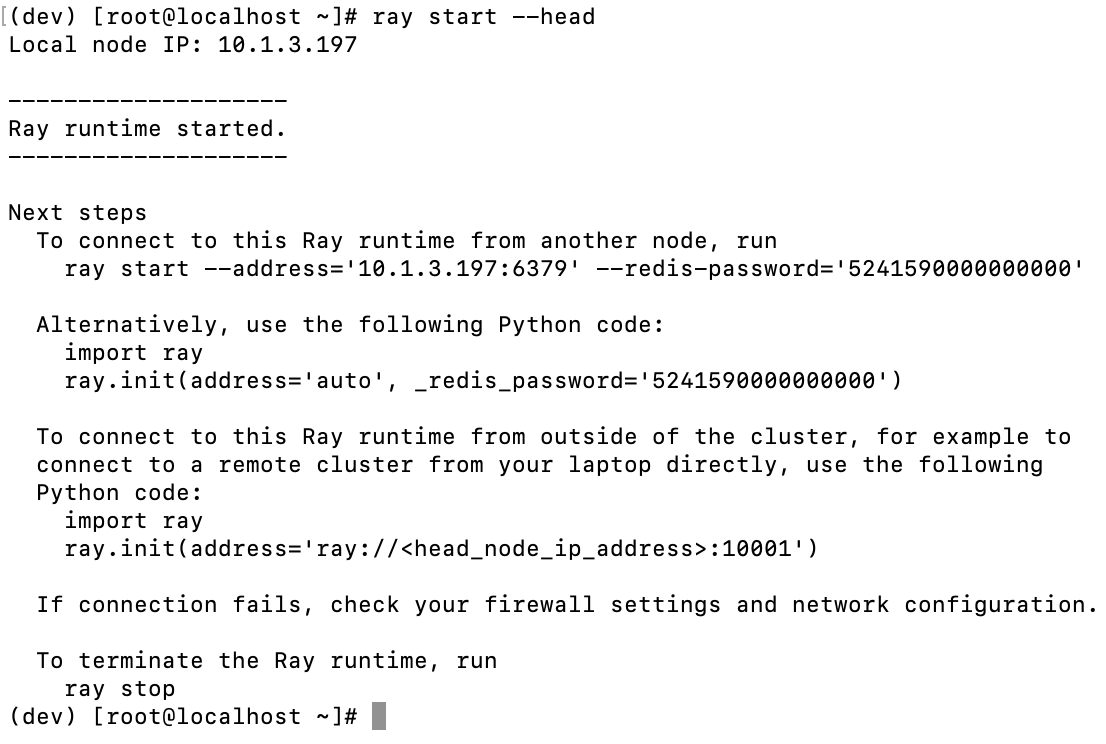
运行上文日志中给出的 Python 代码,测试能否正常连接到 Ray 节点:
import ray
ray.init(address="ray://<head_node_ip_address>:10001") 
如果出现下方报错可能是 Conda 虚拟环境版本问题,建议重新安装

(2) 集群启动
在 Head 节点上运行
ray start --head
Worker 节点上运行
ray start --address='<head_node_ip_address>:6379' --redis-password='<password>'

下面是一个使用了Python高阶 API进行对SQL表进行分布式处理的一个示例。复制到 Byzer-Notebook中即可执行。
-- 分布式获取 python hello world

set jsonStr='''
{"Busn_A":114,"Busn_B":57},
{"Busn_A":55,"Busn_B":134},
{"Busn_A":27,"Busn_B":137},
{"Busn_A":101,"Busn_B":129},
{"Busn_A":125,"Busn_B":145},
{"Busn_A":27,"Busn_B":60},
{"Busn_A":105,"Busn_B":49}
''';

load jsonStr.`jsonStr` as data;

!python conf "pythonExec=/home/winubuntu/miniconda3/envs/byzerllm-desktop/bin/python";
!python conf "schema=st(field(ProductName,string),field(SubProduct,string))";
!python conf "dataMode=data";
!python conf "runIn=driver";

run command as Ray.`` where
inputTable="data"
and outputTable="python_output_table"
and code='''
from pyjava.api.mlsql import PythonContext,RayContext

# type hint
context:PythonContext = context

ray_context = RayContext.connect(globals(),"127.0.0.1:10001")

def echo(row):
    row1 = {}
    row1["ProductName"]=str(row['Busn_A'])+'_jackm'
    row1["SubProduct"] = str(row['Busn_B'])+'_product'
    return row1

ray_context.foreach(echo)
''';
3. Byzer-python 与 Ray
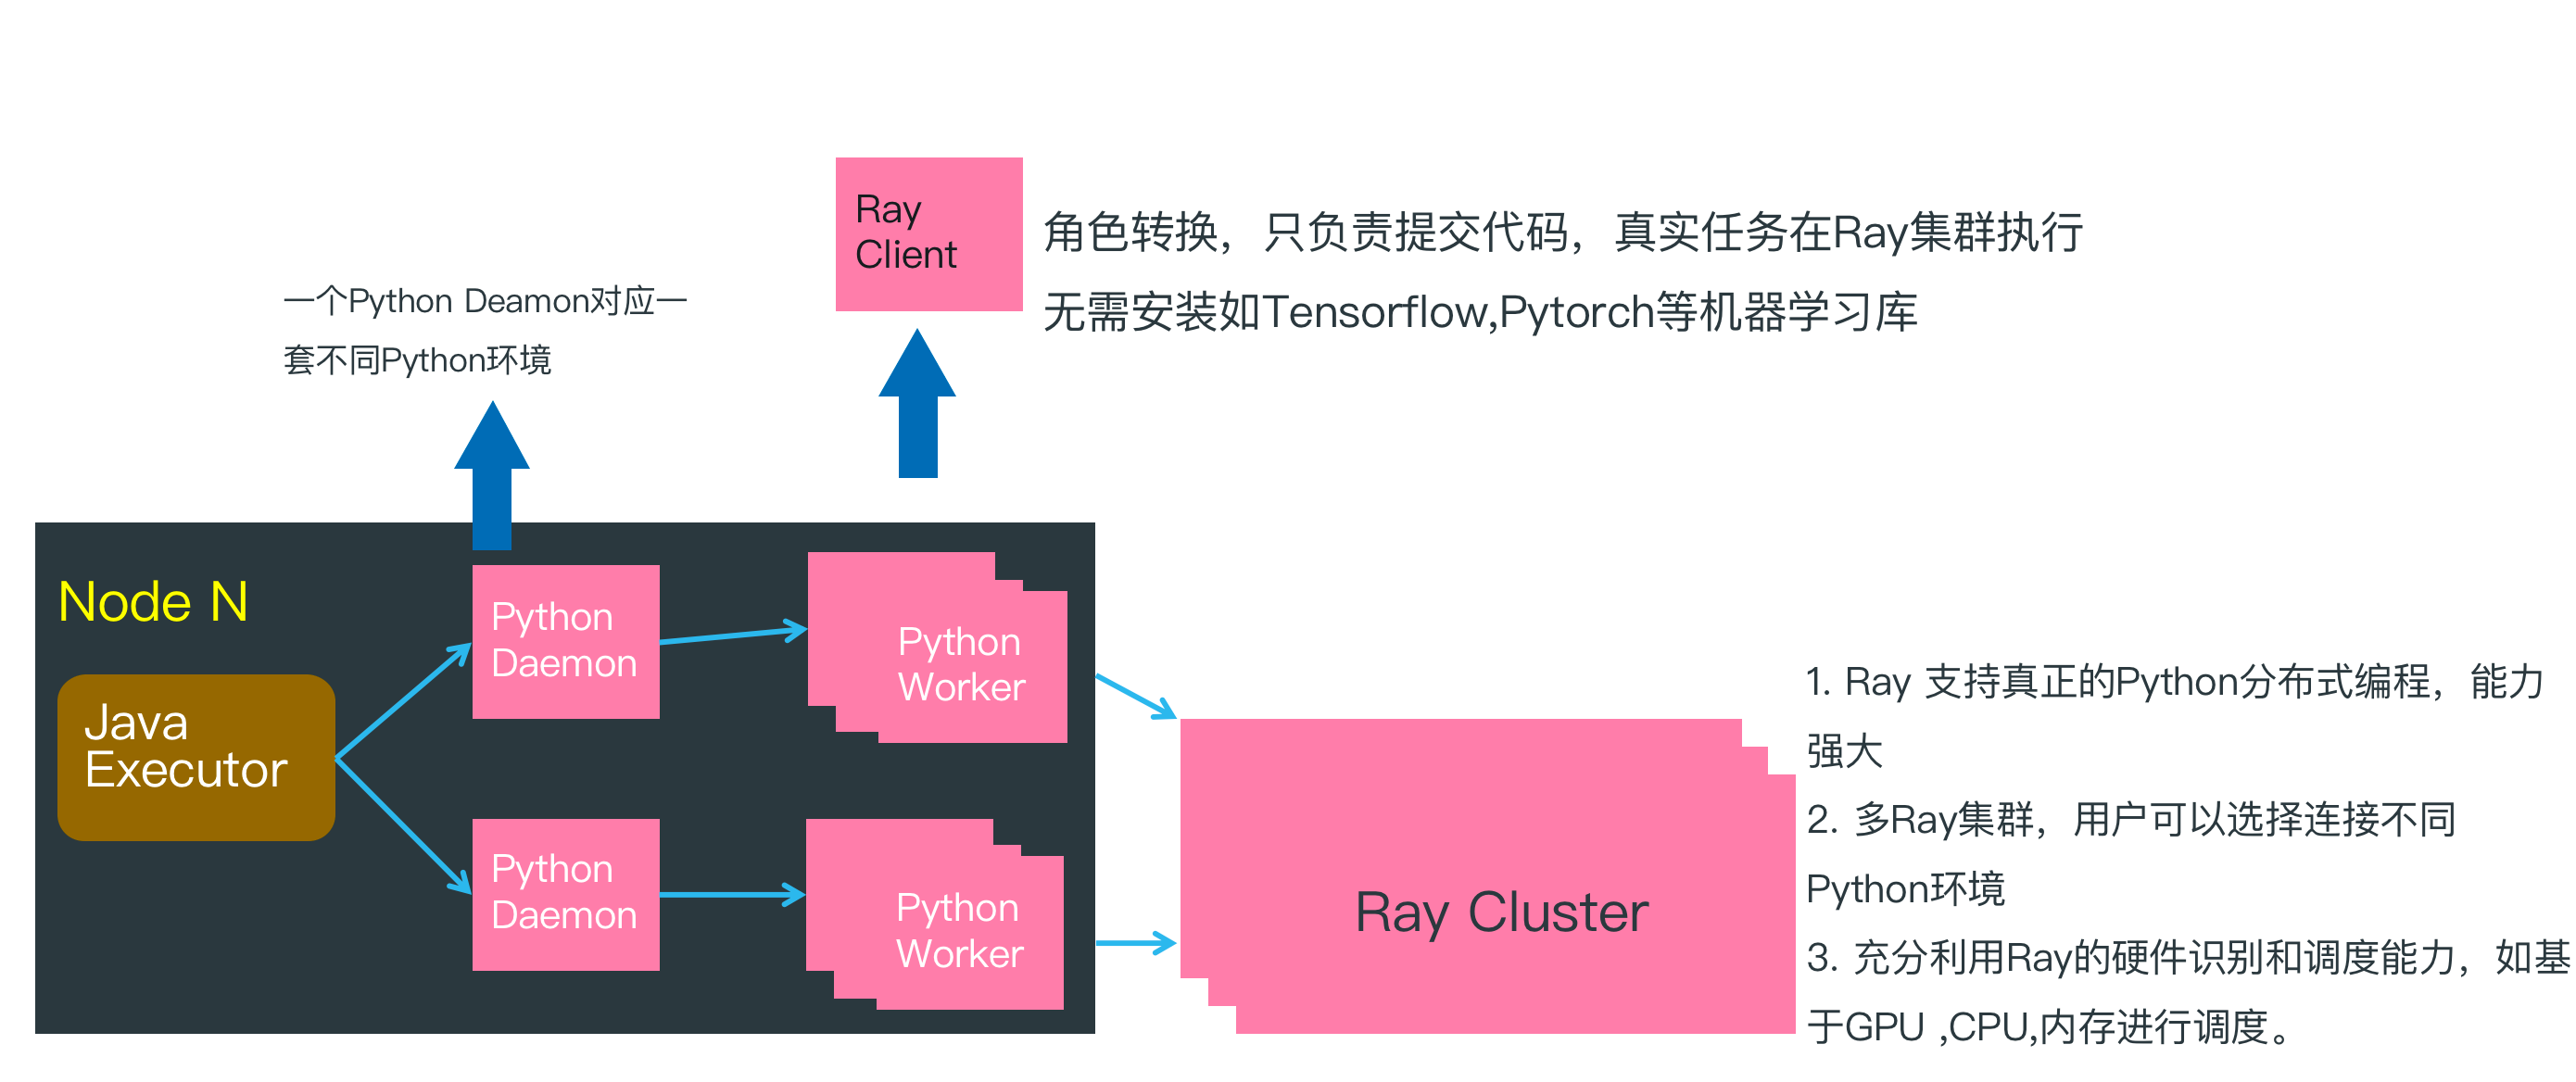
在上一篇 Hello World 例子中, 脚本在 Java Executor节点执行,然后再把 Byzer-python 代码传递给 Python Worker 执行。此时因为没有连接 Ray 集群,所以所有的逻辑处理工作都在 Python Worker 中完成,并且是单机执行。
在上文分布式的 Hello World 示例中, 通过连接 Ray Cluster, Python Worker 转化为 Ray Client,只负责把 Byzer-python 代码转化为任务提交给 Ray Cluster,所以在分布式计算场景下 Python Worker 可以很轻量,除了基本的 Ray,Pyjava 等库以外,不需要安装额外的 Python 依赖库。
四、参数详解
在前面的示例中,你会看到类似这样的配置:
!python conf "pythonExec=/home/winubuntu/miniconda3/envs/byzerllm-desktop/bin/python";
!python conf "schema=st(field(ProductName,string),field(SubProduct,string))";
!python conf "dataMode=data";
!python conf "runIn=driver";
这些配置决定了后续 Python 代码的执行模式。 比如 pythonExec 其实是指定 Python 代码在什么环境下执行。 schema 则决定了 Python的输出表的格式是什么。
(1)Byzer-python 常见参数:

(2)仅仅和模型部署相关的参数
|rayAddress| 设置一个 Ray 地址。 该参数对于部署模型有效| |num_gpus| 单个模型需要的GPU资源。该参数对于部署模型有效 | |maxConcurrency| 部署的模型需要支持的并发。该参数对于部署模型有效 | |standalone| 是不是只有一个模型节点。是的话设置为true,否则为false. 该参数对于部署模型有效 |
(3)Schema 表达
当我们使用 Python 代码创建新表输出的时候,需要手动指定 Schema. 有两种情况:
如果返回的是数据,可以通过设置 schema=st(field({name},{type})...) 定义各字段的字段名和字段类型;
如果返回到是文件,可设置 schema=file;
设置格式如下:
!python conf "schema=st(field(_id,string),field(x,double),field(y,double))";schema 字段类型对应关系:

此外,也支持 json/MySQL Create table 格式的设置方式.
json 格式符合 Spark 格式,你可以通过
!desc TableName json;
获取json格式示例。比如:
{"type":"struct",
 "fields":[
        {"name":"source","type":"string","nullable":true,"metadata":{}},
        {"name":"page_content","type":"string","nullable":true,"metadata":{}}
    ]
}
五、数据处理
在上一篇环境设置的里,我们提供了一个分布式做ETL处理的例子。等价于实现了一个 Python UDF(User-Defined-Function 用户自定义函数)。 在这一篇中,我们会详细介绍使用 Byzer-pyhton。
演示数据准备
set jsonStr='''
{"features":[5.1,3.5,1.4,0.2],"label":0.0},
{"features":[5.1,3.5,1.4,0.2],"label":1.0},
{"features":[5.1,3.5,1.4,0.2],"label":0.0},
{"features":[4.4,2.9,1.4,0.2],"label":0.0},
{"features":[5.1,3.5,1.4,0.2],"label":1.0},
{"features":[5.1,3.5,1.4,0.2],"label":0.0},
{"features":[5.1,3.5,1.4,0.2],"label":0.0},
{"features":[4.7,3.2,1.3,0.2],"label":1.0},
{"features":[5.1,3.5,1.4,0.2],"label":0.0},
{"features":[5.1,3.5,1.4,0.2],"label":0.0}
''';
load jsonStr.`jsonStr` as data;
保存至数据湖:
save overwrite data as delta.`example.mock_data`;
加载数据湖里的 mock_data,并做简单的处理,得到 sample_data。
load delta.`example.mock_data` as example_data;
select features[0] as a ,features[1] as b from example_data
as sample_data;
1. Byzer-python 处理数据
如果数据规模不大,可以在 Byzer-Notebook 中使用如下 Python 脚本对表 sample_data 进行处理:
#%python
#%input=sample_data
#%output=python_output_table
#%schema=st(field(_id,string),field(x,double),field(y,double))
#%runIn=driver
#%dataMode=model
#%cache=true
#%pythonExec=/home/winubuntu/miniconda3/envs/byzerllm-desktop/bin/python
#%env=source /home/winubuntu/miniconda3/bin/activate byzerllm-desktop

import ray
from pyjava.api.mlsql import RayContext

ray_context = RayContext.connect(globals(), None)
rows = RayContext.collect_from(ray_context.data_servers())
id_count = 1

def handle_record(row):
    global id_count
    item = {"_id": str(id_count)}
    id_count += 1
    item["x"] = row["a"]
    item["y"] = row["b"]
    return item

result = [handle_record(row) for row in rows]
context.build_result(result)
''';
上面的代码如果去Byzer-Notebook 提供的语法糖的话,会长成这个样子:
!python env "PYTHON_ENV=source /home/winubuntu/miniconda3/bin/activate byzerllm-desktop";
!python conf "runIn=driver"
!python conf "dataMode=model";
!python conf "schema=st(field(_id,string),field(x,double),field(y,double)

run command as Ray.`` where
inputTable="sample_data"
and outputTable="python_output_table"
and code='''
import ray
from pyjava.api.mlsql import RayContext

ray_context = RayContext.connect(globals(), None)
rows = RayContext.collect_from(ray_context.data_servers())
id_count = 1

def handle_record(row):
    global id_count
    item = {"_id": str(id_count)}
    id_count += 1
    item["x"] = row["a"]
    item["y"] = row["b"]
    return item

result = [handle_record(row) for row in rows]
context.build_result(result)
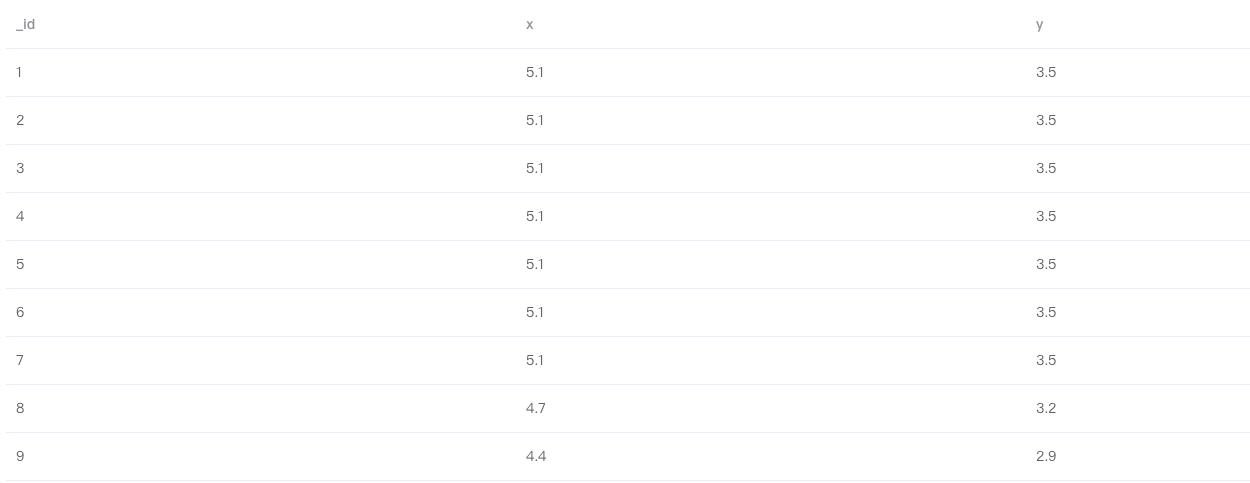
''';
2. Byzer-python 代码说明
注意到 Python 脚本以字符串参数形式出现在代码中,这是 Byzer-Python 代码的一个模版。其中参数 inputTable 指定需要处理的表,没有需要处理的表时,可设置为 command ;参数 outputTable 指定输出表的表名;参数 code 为需要执行的 Python 脚本。
run command as Ray.`` where
inputTable="sample_data"
and outputTable="python_output_table"
and code='''
import ray
......
''';
传入的 Python 脚本:
## 引入必要的包
import ray
from pyjava.api.mlsql import RayContext

## 获取 ray_context,如果需要使用 Ray 集群,那么第二个参数填写集群 Master 节点的地址
## 否则设置为None就好。
ray_context = RayContext.connect(globals(), None)

# 通过ray_context.data_servers() 获取所有数据源,如果开启了Ray,那么就可以
# 分布式获取这些数据进行处理。
rows = RayContext.collect_from(ray_context.data_servers())
id_count = 1

## 从 java 端接受的数据格式也是list(dict),也就是说,每一行的数据都以字典的数据结构存储。
## 比如 sample_data 的数据,在 Python 端拿到的结构就是
## [{'a':'5.1','b':'3.5'}, {'a':'5.1','b':'3.5'}, {'a':'5.1','b':'3.5'} ...]
## 基于这个数据结构,我们对输入数据进行数据处理
def handle_record(row):
    global id_count
    item = {"_id": str(id_count)}
    id_count += 1
    item["x"] = row["a"]
    item["y"] = row["b"]
    return item

result = [handle_record(row) for row in rows]

## 此处 result 是一个迭代器,context.build_result 也支持传入生成器/数组
context.build_result(result)
3. Byzer-python 读写 Excel 文件
Python 有很多处理 Excel 文件的库,功能成熟完善,您可以在 Byzer-python 环境中安装相应的库来处理您的 Excel 文件。这里以 pandas 为例来读取和保存 Excel 文件(需要安装 xlrd/xlwt 包,pip install xlrd==1.2.0 xlwt):
-- 将上文 sample_data 保存成 Excel 文件

!python env "PYTHON_ENV=source activate dev";
!python conf "schema=st(field(file,binary))";
!python conf "dataMode=model";
!python conf "runIn=driver";
run command as Ray.`` where
inputTable="sample_data"
and outputTable="excel_data"
and code='''
import io
import ray
import pandas as pd
from pyjava.api.mlsql import RayContext, PythonContext

ray_context = RayContext.connect(globals(), None)

data = ray_context.to_pandas()

output = io.BytesIO()
writer = pd.ExcelWriter(output, engine='xlwt')
data.to_excel(writer, index=False)
writer.save()
xlsx_data = output.getvalue()

context.build_result([{"file":xlsx_data}])
''';
!saveFile _ -i excel_data -o /tmp/sample_data.xlsx;
-- 读取 sample_data.xlsx 文件
load binaryFile.`/tmp/sample_data.xlsx` as excel_table;
!python env "PYTHON_ENV=source activate dev";
!python conf "schema=st(field(a,double),field(b,double))";
!python conf "dataMode=model";
!python conf "runIn=driver";
run command as Ray.`` where
inputTable="excel_table"
and outputTable="excel_data"
and code='''
import io
import ray
from pyjava.api.mlsql import RayContext
import pandas as pd
ray_context = RayContext.connect(globals(),None)
file_content = ray_context.to_pandas().loc[0, "content"]
df = pd.read_excel(io.BytesIO(file_content))
data = [row for row in df.to_dict('records')]
context.log_client.log_to_driver(data)
context.build_result(data)
''';4. Byzer-python 分布式计算
分布式处理依赖 Ray 环境,您可以参考Ray 环境搭建 搭建 Ray 集群。这里我们简单介绍下如何使用 Pyjava 高阶 API 使用 Ray 完成分布式计算:
!python env "PYTHON_ENV=source activate dev";
!python conf "schema=st(field(_id,string),field(x,double),field(y,double))";
!python conf "dataMode=model";
!python conf "runIn=driver";

run command as Ray.`` where
inputTable="sample_data"
and outputTable="python_output_table"
and code='''
import ray
from pyjava import rayfix
from pyjava.api.mlsql import RayContext
import socket

## 获取 ray_context,这里需要使用 Ray,第二个参数填写 Ray head-node 的地址和端口
ray_context = RayContext.connect(globals(), '127.0.0.1:10001')

## Ray 集群分布式处理
@ray.remote
@rayfix.last
def handle_record(servers):

    datas = RayContext.collect_from(servers)

    result = []
    for row in datas:
        item = {"_id": socket.gethostname()}
        item["x"] = row["a"]
        item["y"] = row["b"]
        result.append(item)
    return result

data_servers = ray_context.data_servers()
res =  ray.get(handle_record.remote(data_servers))
## 构造结果数据返回
context.build_result(res)
''';
5. Byzer-python 图表绘制
您可以在 Byzer 桌面版 和 Bzyer Notebook 中使用 Python 绘图包(matplotlib、plotly、pyecharts 等,需要提前安装)绘制精美的图表,并用 Byzer-python 提供的 API 输出图片:
-- 绘图数据
set jsonStr='''
{"Busn_A":114,"Busn_B":57},
{"Busn_A":55,"Busn_B":134},
{"Busn_A":27,"Busn_B":137},
{"Busn_A":101,"Busn_B":129},
{"Busn_A":125,"Busn_B":145},
{"Busn_A":27,"Busn_B":60},
{"Busn_A":105,"Busn_B":49}
''';
load jsonStr.`jsonStr` as data;
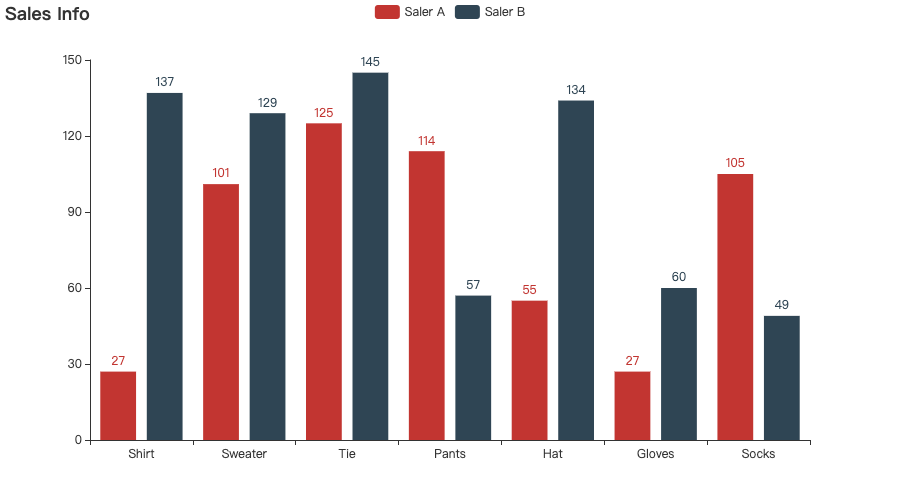
使用 pyecharts 绘制图表:
!python env "PYTHON_ENV=source activate dev";
!python conf "schema=st(field(content,string),field(mime,string))";
!python conf "dataMode=model";
!python conf "runIn=driver";

run command as Ray.`` where
inputTable="data"
and outputTable="plt"
and code='''
from pyjava.api.mlsql import RayContext,PythonContext
from pyecharts import options as opts
import os
from pyecharts.charts import Bar

ray_context = RayContext.connect(globals(),None)

data = ray_context.to_pandas()
data_a = data['Busn_A']
data_b = data['Busn_B']

# 基本柱状图
bar = Bar()
bar.add_xaxis(["Shirt", "Sweater", "Tie", "Pants", "Hat", "Gloves", "Socks"])


bar.add_yaxis("Saler A", list(data_a))
bar.add_yaxis("Saler B", list(data_b))
bar.set_global_opts(title_opts=opts.TitleOpts(title="Sales Info"))
bar.render('bar_demo.html')  # 生成html文件
html = ""
with open("bar_demo.html") as file:
   html = "\n".join(file.readlines())
os.remove("bar_demo.html")
context.build_result([{"content":html,"mime":"html"}])
''';
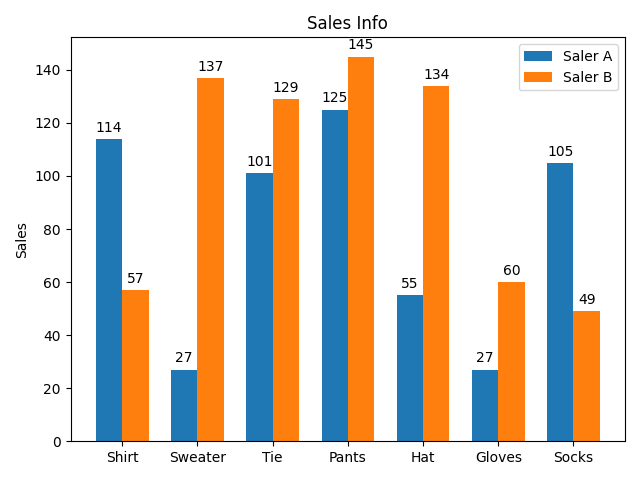
使用 matplotlib 绘制图表:
!python env "PYTHON_ENV=source activate dev";
!python conf "schema=st(field(content,string),field(mime,string))";
!python conf "dataMode=model";
!python conf "runIn=driver";

run command as Ray.`` where
inputTable="data"
and outputTable="plt"
and code='''
from pyjava.api.mlsql import RayContext,PythonContext
import matplotlib.pyplot as plt
import numpy as np
from pyjava.api import Utils
ray_context = RayContext.connect(globals(),None)

data = ray_context.to_pandas()


labels = ["Shirt", "Sweater", "Tie", "Pants", "Hat", "Gloves", "Socks"]
men_means = data['Busn_A']
women_means = data['Busn_B']

x = np.arange(len(labels))  # the label locations
width = 0.35  # the width of the bars

fig, ax = plt.subplots()
rects1 = ax.bar(x - width/2, men_means, width, label='Saler A')
rects2 = ax.bar(x + width/2, women_means, width, label='Saler B')

# Add some text for labels, title and custom x-axis tick labels, etc.
ax.set_ylabel('Sales')
ax.set_title('Sales Info')
ax.set_xticks(x)
ax.set_xticklabels(labels)
ax.legend()


def autolabel(rects):
    """Attach a text label above each bar in *rects*, displaying its height."""
    for rect in rects:
        height = rect.get_height()
        ax.annotate('{}'.format(height),
                    xy=(rect.get_x() + rect.get_width() / 2, height),
                    xytext=(0, 3),  # 3 points vertical offset
                    textcoords="offset points",
                    ha='center', va='bottom')


autolabel(rects1)
autolabel(rects2)

fig.tight_layout()

Utils.show_plt(plt, context)
''';
六、SQL表转化为分布式Pandas
运行本示例之前,需要安装dask:
pip install dask==2022.10.1
我们先通过 Byzer 语句加载一个数据集:
load csv.`/tmp/upload/iris-test.csv` where header="true" and inferSchema="true"
as iris;
接着我们在 Byzer-python中将该表转化为 分布式 Pandas API
#%python
#%input=iris
#%output=iris_scale1
#%schema=st(field(species,string),field(mean,double))
#%runIn=driver
#%dataMode=model
#%cache=true
#%pythonExec=/home/winubuntu/miniconda3/envs/byzerllm-desktop/bin/python
#%env=source /home/winubuntu/miniconda3/bin/activate byzerllm-desktop

from pyjava.api.mlsql import RayContext,PythonContext
import pandas as pd

context:PythonContext = context

ray_context = RayContext.connect(globals(),"127.0.0.1:10001")
# 把SQL表格数据转换为分布式 DataFrame
df = ray_context.to_dataset().to_dask()

print(df.head(10))

df2 = df.groupby("species").sepal_length.mean().compute()
df3 =  pd.DataFrame({"species":df2.index,"mean":df2.to_list()})

# 输出表格数据,供后续 SQL 使用
ray_context.build_result_from_dataframe(df3)
最后输出的结果可以继续在SQL中处理:
select * from iris_scale1 as output;七、模型训练
1. 单机训练
这里用到 tensorflow,运行前需要在 Driver 端安装
!python env "PYTHON_ENV=source activate dev";
!python conf "schema=st(field(epoch,string),field(k,string), field(b,string))";
!python conf "dataMode=model";
!python conf "runIn=driver";

run command as Ray.`` where
inputTable="command"
and outputTable="result"
and code='''
import ray
from pyjava import rayfix
from pyjava.api.mlsql import RayContext,PythonContext
# import tensorflow as tf

ray_context = RayContext.connect(globals(), None)

# 上面导包找不到placeholder模块时,换下面导入方式
import tensorflow.compat.v1 as tf
tf.disable_v2_behavior()

import numpy as np  # Python的一种开源的数值计算扩展
import matplotlib.pyplot as plt  # Python的一种绘图库

np.random.seed(5)  # 设置产生伪随机数的类型
sx = np.linspace(-1, 1, 100)  # 在-1到1之间产生100个等差数列作为图像的横坐标
# 根据y=2*x+1+噪声产生纵坐标
# randn(100)表示从100个样本的标准正态分布中返回一个样本值,0.4为数据抖动幅度
sy = 2 * sx + 1.0 + np.random.randn(100) * 0.4

def model(x, k, b):
    return tf.multiply(k, x) + b

def train():
    # 定义模型中的参数变量,并为其赋初值
    k = tf.Variable(1.0, dtype=tf.float32, name='k')
    b = tf.Variable(0, dtype=tf.float32, name='b')


    # 定义训练数据的占位符,x为特征值,y为标签
    x = tf.placeholder(dtype=tf.float32, name='x')
    y = tf.placeholder(dtype=tf.float32, name='y')
    # 通过模型得出特征值x对应的预测值yp
    yp = model(x, k, b)


    # 训练模型,设置训练参数(迭代次数、学习率)
    train_epoch = 10
    rate = 0.05


    # 定义均方差为损失函数
    loss = tf.reduce_mean(tf.square(y - yp))


    # 定义梯度下降优化器,并传入参数学习率和损失函数
    optimizer = tf.train.GradientDescentOptimizer(rate).minimize(loss)
    ss = tf.Session()
    init = tf.global_variables_initializer()
    ss.run(init)

    res = []

    # 进行多轮迭代训练,每轮将样本值逐个输入模型,进行梯度下降优化操作得出参数,绘制模型曲线
    for _ in range(train_epoch):
        for x1, y1 in zip(sx, sy):
            ss.run([optimizer, loss], feed_dict={x: x1, y: y1})
        tmp_k = k.eval(session=ss)
        tmp_b = b.eval(session=ss)
        res.append((str(_), str(tmp_k), str(tmp_b)))
    return res


res = train()
res = [{'epoch':item[0], 'k':item[1], 'b':item[2]} for item in res]
context.build_result(res)
''';
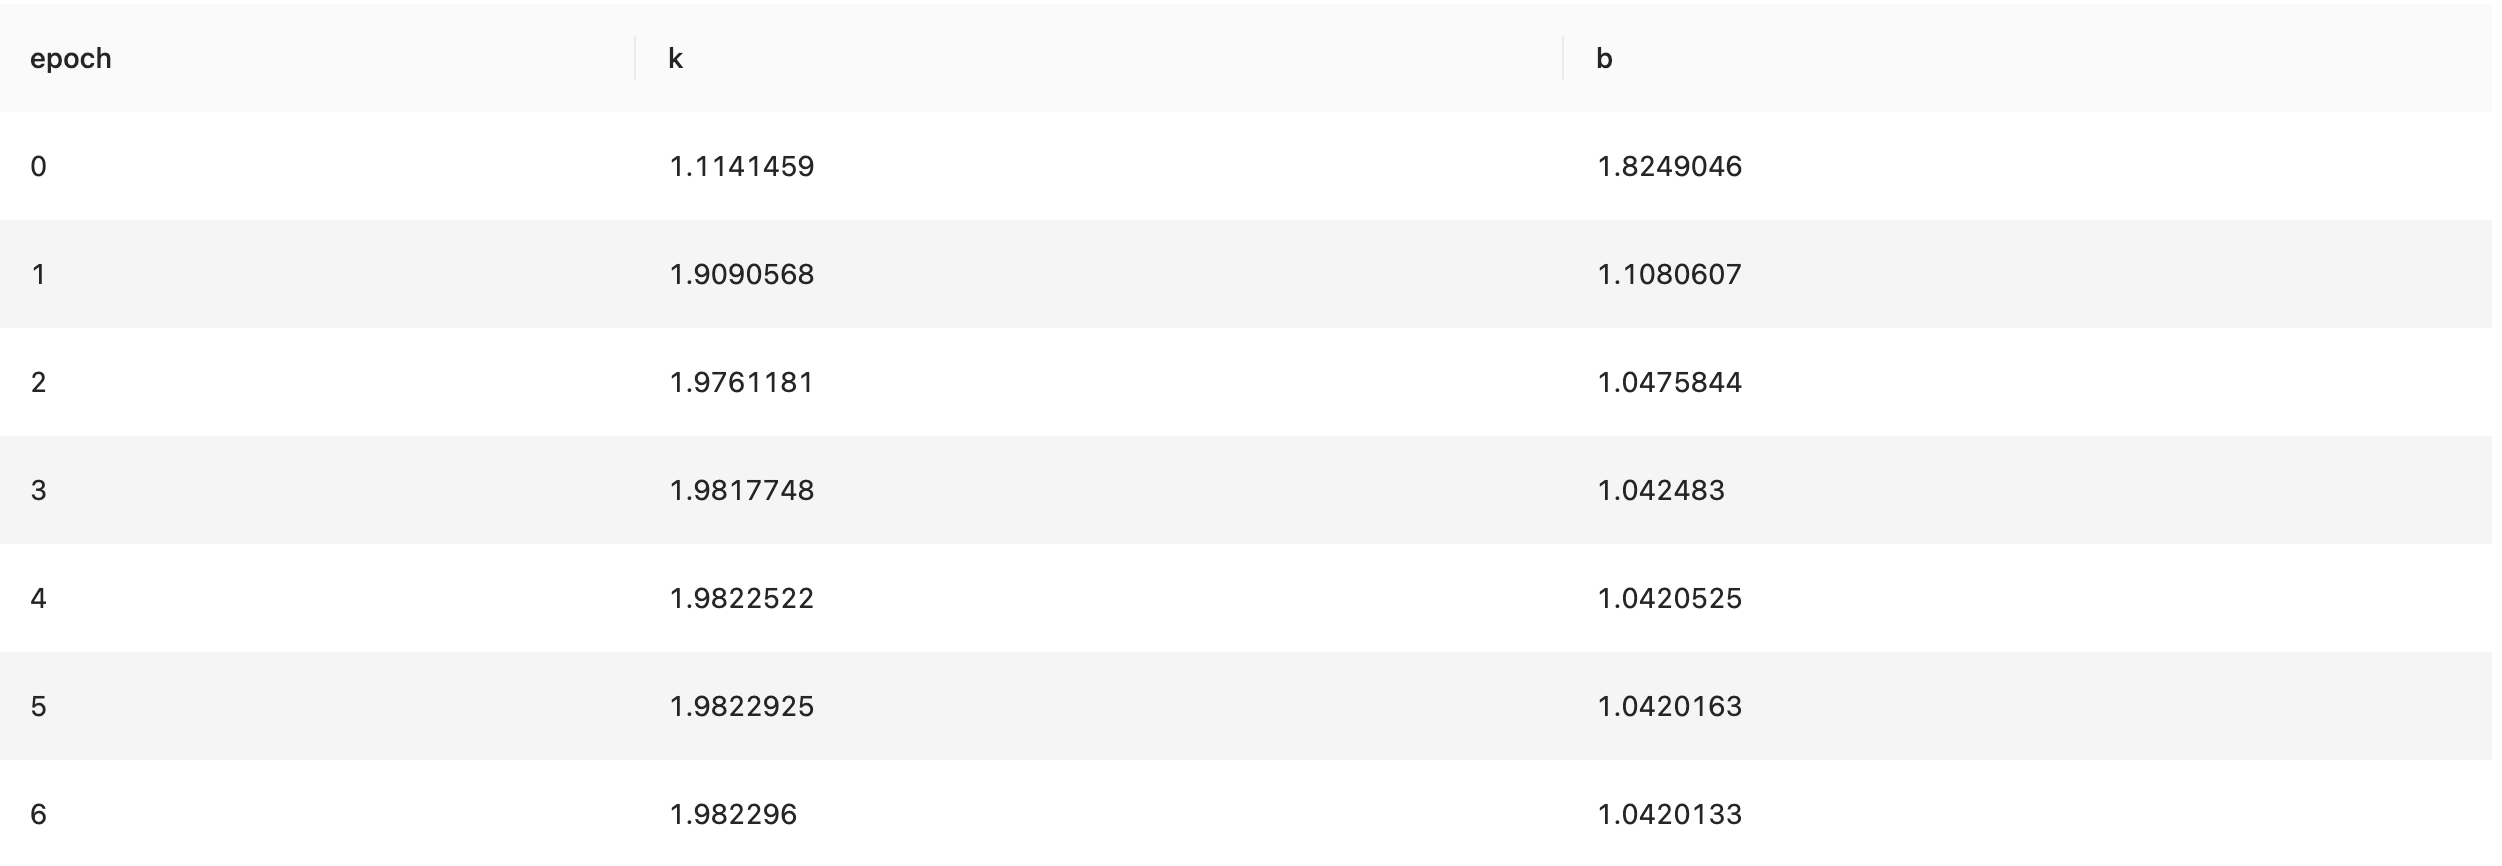
结果展示了每一个 epoch 的斜率(k)和截距(b)的拟合数据
2. 分布式训练
运行前需要在 Ray 环境中安装 tensorflow
!python env "PYTHON_ENV=source activate dev";
!python conf "schema=st(field(epoch,string),field(k,string), field(b,string))";
!python conf "dataMode=model";
!python conf "runIn=driver";

run command as Ray.`` where
inputTable="command"
and outputTable="result"
and code='''
import ray
from pyjava import rayfix
from pyjava.api.mlsql import RayContext,PythonContext
# import tensorflow as tf
ray_context = RayContext.connect(globals(), url="127.0.0.1:10001")

@ray.remote
@rayfix.last
def train(servers):
    # 上面导包找不到placeholder模块时,换下面导入方式
    import numpy as np  # Python的一种开源的数值计算扩展
    import matplotlib.pyplot as plt  # Python的一种绘图库
    import tensorflow.compat.v1 as tf
    tf.disable_v2_behavior()
    np.random.seed(5)  # 设置产生伪随机数的类型
    sx = np.linspace(-1, 1, 100)  # 在-1到1之间产生100个等差数列作为图像的横坐标
    # 根据y=2*x+1+噪声产生纵坐标
    # randn(100)表示从100个样本的标准正态分布中返回一个样本值,0.4为数据抖动幅度
    sy = 2 * sx + 1.0 + np.random.randn(100) * 0.4
    # 定义模型中的参数变量,并为其赋初值
    k = tf.Variable(1.0, dtype=tf.float32, name='k')
    b = tf.Variable(0, dtype=tf.float32, name='b')
    # 定义训练数据的占位符,x为特征值,y为标签
    x = tf.placeholder(dtype=tf.float32, name='x')
    y = tf.placeholder(dtype=tf.float32, name='y')
    # 通过模型得出特征值x对应的预测值yp
    yp = tf.multiply(k, x) + b
    # 训练模型,设置训练参数(迭代次数、学习率)
    train_epoch = 10
    rate = 0.05
    # 定义均方差为损失函数
    loss = tf.reduce_mean(tf.square(y - yp))
    # 定义梯度下降优化器,并传入参数学习率和损失函数
    optimizer = tf.train.GradientDescentOptimizer(rate).minimize(loss)
    ss = tf.Session()
    init = tf.global_variables_initializer()
    ss.run(init)
    res = []
    # 进行多轮迭代训练,每轮将样本值逐个输入模型,进行梯度下降优化操作得出参数,绘制模型曲线
    for _ in range(train_epoch):
        for x1, y1 in zip(sx, sy):
            ss.run([optimizer, loss], feed_dict={x: x1, y: y1})
        tmp_k = k.eval(session=ss)
        tmp_b = b.eval(session=ss)
        res.append((str(_), str(tmp_k), str(tmp_b)))
    return res


data_servers = ray_context.data_servers()
res =  ray.get(train.remote(data_servers))
res = [{'epoch':item[0], 'k':item[1], 'b':item[2]} for item in res]
context.build_result(res)
''';
八、模型部署
在 Byzer 中,我们可以使用和内置算法一样的方式将一个基于 Byzer-python 训练出的 AI 模型注册成一个 UDF 函数,这样可以将模型应用于批、流,以及 Web 服务中。接下来我们将展示 Byzer-python 基于 Ray 从模型训练再到模型部署的全流程 demo。
1. 数据准备
首先,安装 tensorflow 和 keras:
pip install keras tensorflow "tenacity~=6.2.0"准备 mnist 数据集(需要):
!python env "PYTHON_ENV=source activate ray1.8.0";
!python conf "schema=st(field(image,array(long)),field(label,long),field(tag,string))";
!python conf "runIn=driver";
!python conf "dataMode=model";

run command as Ray.`` where
inputTable="command"
and outputTable="mnist_data"
and code='''
from pyjava.api.mlsql import RayContext, PythonContext
from keras.datasets import mnist

ray_context = RayContext.connect(globals(), None)

(x_train, y_train),(x_test, y_test) = mnist.load_data()

train_images = x_train.reshape((x_train.shape[0], 28 * 28))
test_images = x_test.reshape((x_test.shape[0], 28 * 28))

train_data = [{"image": image.tolist(), "label": int(label), "tag": "train"} for (image, label) in zip(train_images, y_train)]
test_data = [{"image": image.tolist(), "label": int(label), "tag": "test"} for (image, label) in zip(test_images, y_test)]
context.build_result(train_data + test_data)
''';

save overwrite mnist_data as delta.`ai_datasets.mnist`;
上面的 Byzer-python 脚本,获取keras自带的 mnist 数据集,再将数据集保存到数据湖中。
2. 训练模型
接着就开始拿测试数据 minist 进行训练,下面是模型训练代码:
-- 获取训练数据集
load delta.`ai_datasets.mnist` as mnist_data;
select image, label from mnist_data where tag="train" as mnist_train_data;

!python env "PYTHON_ENV=source activate ray1.8.0";
!python conf "schema=file";
!python conf "dataMode=model";
!python conf "runIn=driver";

run command as Ray.`` where
inputTable="mnist_train_data"
and outputTable="mnist_model"
and code='''
import ray
import os
import tensorflow as tf
from pyjava.api.mlsql import RayContext
from pyjava.storage import streaming_tar
import numpy as np


ray_context = RayContext.connect(globals(),"127.0.0.1:10001")
data_servers = ray_context.data_servers()

train_dataset = [item for item in RayContext.collect_from(data_servers)]

x_train = np.array([np.array(item["image"]) for item in train_dataset])
y_train = np.array([item["label"] for item in train_dataset])

x_train = x_train.reshape((len(x_train),28, 28))

model = tf.keras.models.Sequential([
  tf.keras.layers.Flatten(input_shape=(28, 28)),
  tf.keras.layers.Dense(128, activation='relu'),
  tf.keras.layers.Dropout(0.2),
  tf.keras.layers.Dense(10, activation='softmax')
])

model.compile(optimizer='adam',
              loss='sparse_categorical_crossentropy',
              metrics=['accuracy'])

model.fit(x_train, y_train, epochs=5)

model_path = os.path.join("tmp","minist_model")
model.save(model_path)
model_binary = [item for item in streaming_tar.build_rows_from_file(model_path)]

ray_context.build_result(model_binary)
''';
最后把模型保存至数据湖里:
save overwrite mnist_model as delta.`ai_model.mnist_model`;3. 将模型注册成 UDF 函数
训练好模型之后,我们就可以用 Byzer-lang 的 Register 语法将模型注册成基于 Ray 的服务了,下面是模型注册的代码:
!python env "PYTHON_ENV=source activate ray1.8.0";
!python conf "schema=st(field(content,string))";
!python conf "mode=model";
!python conf "runIn=driver";
!python conf "rayAddress=127.0.0.1:10001";


-- 加载前面训练好的tf模型
load delta.`ai_model.mnist_model` as mnist_model;

-- 把模型注册成udf函数
register Ray.`mnist_model` as model_predict where
maxConcurrency="8"
and debugMode="true"
and registerCode='''

import ray
import numpy as np
from pyjava.api.mlsql import RayContext
from pyjava.udf import UDFMaster,UDFWorker,UDFBuilder,UDFBuildInFunc

ray_context = RayContext.connect(globals(), context.conf["rayAddress"])

# 预测函数
def predict_func(model,v):
    test_images = np.array([v])
    predictions = model.predict(test_images.reshape((1,28*28)))
    return {"value":[[float(np.argmax(item)) for item in predictions]]}

# 将预测函数提交到 ray_context
UDFBuilder.build(ray_context,UDFBuildInFunc.init_tf,predict_func)

''' and
predictCode='''

import ray
from pyjava.api.mlsql import RayContext
from pyjava.udf import UDFMaster,UDFWorker,UDFBuilder,UDFBuildInFunc

ray_context = RayContext.connect(globals(), context.conf["rayAddress"])

#
UDFBuilder.apply(ray_context)

''';
这里 UDFBuilder 与 UDFBuildInFunc 都是 Pyjava 提供的高阶 API,用来将 Python 脚本注册成 UDF 函数。
4. 使用模型做预测
Byzer 提供了类 SQL 语句做批量(Batch)查询,加载您的数据集,即可对数据进行预测。
load delta.`ai_datasets.mnist` as mnist_data;
select cast(image as array<double>) as image, label as label from mnist_data where tag = "test" limit 100 as mnist_test_data;
select model_predict(array(image))[0][0] as predicted, label as label  from  mnist_test_data as output;
后续可以直接调用 Byzer-engine 的 Rest API, 使用注册好的 UDF 函数对您的数据集作预测。
九、PyJava API简介
前面的示例中,可以看到类似 RayContext、 PythonContext 这些对象。这些对象帮助用户进行输入和输出的控制。
Byzer-python 代码编写三步走:
1. 初始化 RayContext
ray_context = RayContext.connect(globals(), "192.168.1.7:10001")其中第二个参数是可选的,用来设置 Ray 集群 Master 节点地址和端口。如果不需要连接 Ray 集群,则设置为 None 即可。
2. 获取数据
获取所有数据:
# 获取 DataFrame
data = ray_context.to_pandas()

# 获取一个返回值为 dict 类型的生成器
items = ray_context.collect()注意,ray_context.collect() 得到的生成器只能迭代一次。
通过分片来获取数据:
data_refs = ray_context.data_servers()

data = [RayContext.collect_from([data_ref]) for data_ref in data_refs]注意,data_refs 是字符串数组,每个元素是一个 ip:port 的形态. 可以使用 RayContext.collect_from 单独获取每个数据分片。
如果数据规模大,可以转化为 Dask 数据集来进行操作:
data = ray_context.to_dataset().to_dask()3. 构建新的结果数据输出
context.build_result(data) 这里 PythonContext.build_result 的入参 data 是可迭代对象,支持数组、生成器等
现在引入下面两个 API 用来做数据分布式处理:
(1)RayContext.foreach
如果已经连接了 Ray,那么可以直接使用高阶 API RayContext.foreach
set jsonStr='''

{"Busn_A":114,"Busn_B":57},

{"Busn_A":55,"Busn_B":134},

{"Busn_A":27,"Busn_B":137},

{"Busn_A":101,"Busn_B":129},

{"Busn_A":125,"Busn_B":145},

{"Busn_A":27,"Busn_B":60},

{"Busn_A":105,"Busn_B":49}

''';

load jsonStr.`jsonStr` as data;

!python env "PYTHON_ENV=source activate dev";
!python conf "schema=st(field(ProductName,string),field(SubProduct,string))";
!python conf "dataMode=data";
!python conf "runIn=driver";

run command as Ray.`` where
inputTable="data"
and outputTable="data2"
and code='''
import ray
from pyjava.api.mlsql import RayContext,PythonContext

context:PythonContext = context
ray_context = RayContext.connect(globals(),"127.0.0.1:10001")

def echo(row):
    row1 = {}
    row1["ProductName"]=str(row['a'])+'_jackm'
    row1["SubProduct"] = str(row['b'])+'_product'
    return row1
buffer = ray_context.foreach(echo)
''';
RayContext.foreach 接收一个回调函数,函数的入参是单条记录。无需显示的申明如何获取数据,只要实现回调函数即可。
(2)RayContext.map_iter
我们也可以获得一批数据,可以使用 RayContext.map_iter。
系统会自动调度多个任务到 Ray 上并行运行。 map_iter 会根据表的分片大小启动相应个数的 task,如果你希望通过 map_iter 拿到所有的数据,而非部分数据,可以先对表做重新分区:
!python env "PYTHON_ENV=source activate dev";
!python conf "schema=st(field(ProductName,string),field(SubProduct,string))";
!python conf "dataMode=data";
!python conf "runIn=driver";

run command as Ray.`` where
inputTable="data"
and outputTable="data2"
and code='''
import ray
from pyjava.api.mlsql import RayContext
import numpy as np;
import time
ray_context = RayContext.connect(globals(),"127.0.0.1:10001")

def echo(rows):
    count = 0
    for row in rows:
      row1 = {}
      row1["ProductName"]="jackm"
      row1["SubProduct"] = str(row["Busn_A"])+'_'+str(row["Busn_B"])
      count = count + 1
      if count%1000 == 0:
          print("=====> " + str(time.time()) + " ====>" + str(count))
      yield row1

ray_context.map_iter(echo)
''';
(3)将表转化为分布式 DataFrame
如果用户喜欢使用 Pandas API,而数据集又特别大,也可以将数据转换为分布式 DataFrame on Dask 来做进一步处理:
!python env "PYTHON_ENV=source activate dev";
!python conf "schema=st(field(count,long))";
!python conf "dataMode=model";
!python conf "runIn=driver";

run command as Ray.`` where
inputTable="data"
and outputTable="data2"
and code='''
from pyjava.api.mlsql import PythonContext,RayContext
context:PythonContext = context

ray_context = RayContext.connect(globals(),"127.0.0.1:10001")
df = ray_context.to_dataset().to_dask()
c = df.shape[0].compute()
context.build_result([{"count":c}])
''';- 使用该 API 需要连接到 Ray,需要配置节点地址。
- 对应的 Python 环境需要预先安装好 dask ,
pip install "dask[complete]"
(4)将目录转化为表
这个功能在做算法训练的时候特别有用。比如模型训练完毕后,一般是保存在训练所在的节点上的。我们需要将其转化为表,并且保存到数据湖里去。具体操作如下:
首先,通过 Byzer-python 读取目录,转化为表:
!python env "PYTHON_ENV=source activate dev";
!python conf "schema=file";
!python conf "dataMode=model";
!python conf "runIn=driver";


run command as Ray.`` where
inputTable="train_data"
and outputTable="model_output"
and code='''
import os
from pyjava.storage import streaming_tar
from pyjava.api.mlsql import PythonContext,RayContext

context:PythonContext = context
ray_context = RayContext.connect(globals(), None)

# train your model here
......

model_path = os.path.join("/","tmp","ai_model/model")
your_model.save(model_path)

model_binary = [item for item in streaming_tar.build_rows_from_file(model_path)]

context.build_result(model_binary)
''';
将 Byzer-python 产生的表保存到数据湖里
save overwrite model_output as delta.`ai_model.model_output`;十、dataMode 详解


