文章目录
- 💗通过注解配置bean
- 🍝基本介绍
- 🍝快速入门
- 🍝注意事项和细节
- 💗自己实现Spring注解配置Bean机制
- 🍝需求说明
- 🍝思路分析
- 🍝注意事项和细节
- 💗自动装配 @Autowired
- 🍝`案例1:` @Autowired引出
- 🍝`案例2:` @Autowired解读
- 🍚`案例3:` @Resource解读
- 🍝小结
- 💗泛型依赖注入
上文中, 我们学习到了 Spring系列一:spring的安装与使用
接下来我们学习, 通过注解配置bean

💗通过注解配置bean
🍝基本介绍
基于注解的方式配置bean, 主要是项目开发中的组件, 比如Controller, Service和Dao.
- 组件注解的形式有
1.@Component 表示当前注解标识的是一个组件
2.@Controller 表示当前注解标识的是一个控制器, 通常用于Servlet
3.@Service 表示当前注解表示的是一个处理业务逻辑的类, 通常用于Service类
4.@Repository表示当前注解标识的是一个持久化的类, 通常用于Dao类
🍝快速入门
-
应用实例
使用注解的方式来配置 Controller / Service / Repository / Component -
代码实现
1引入spring-aop-5.3.8.jar, 在 spring/lib 目录下拷贝即可
2.在spring/component包下 创建 UserAction .java, UserService.java, UserDao.java, MyComponent.java
//使用 @Repository 标识该类是一个Repository, 即是一个持久化层的类/对象
@Repository
public class UserDao {}
//@Service 标识该类是一个Service类/对象
@Service
public class UserService {}
//@Controller 标识该类是一个控制器Controller, 通常该类是一个Servlet
@Controller
public class UserAction {}
//@Component 标识该类是一个组件, 是一个通用的注解
@Component
public class MyComponent {}
配置文件

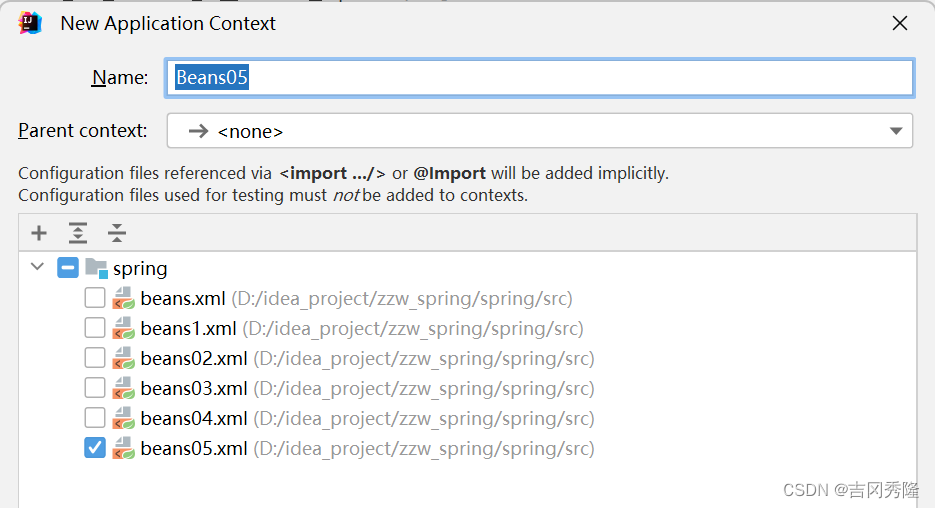
beans05.xml
<!--配置容器要扫描的包
解读:
1.component-scan 要对指定包下的类进行扫描, 并创建对象到我们的容器中
2.base-package 指定要扫描的包
3.含义是当spring容器创建/初始化时, 就会扫描com.zzw.spring.component包
 下的所有的 有注解 @Controller / @Service / @Repository / @Component 的类
 将其实例化, 生成对象, 放入到ioc容器
-->
<context:component-scan base-package="com.zzw.spring.component"/>
通过注解来配置bean
public class SpringBeanTest {
//通过注解来配置bean
@Test
public void setBeanByAnnotation() {
ApplicationContext ioc =
new ClassPathXmlApplicationContext("beans05.xml");
UserAction userAction = ioc.getBean(UserAction.class);
UserService userService = ioc.getBean(UserService.class);
UserDao userDao = ioc.getBean(UserDao.class);
MyComponent myComponent = ioc.getBean(MyComponent.class);
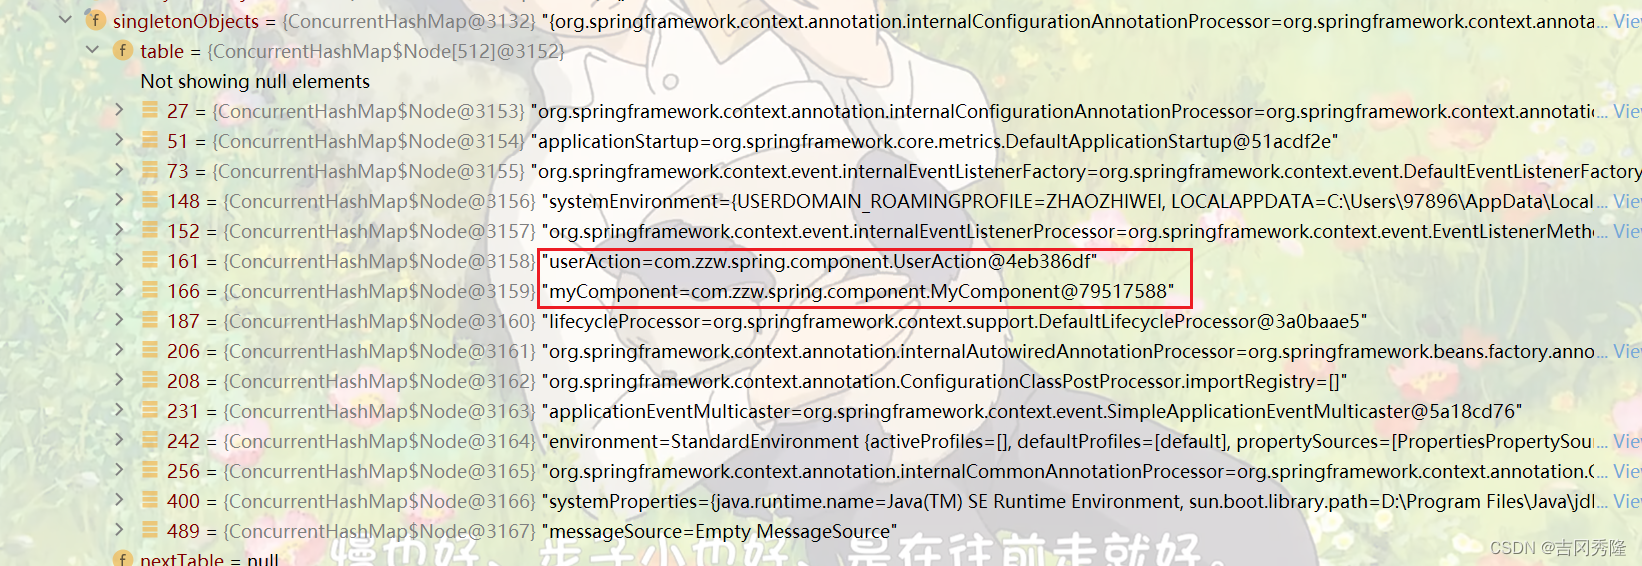
System.out.println("userDao=" + userDao);
System.out.println("userService=" + userService);
System.out.println("userAction=" + userAction);
System.out.println("myComponent=" + myComponent);
System.out.println("ok");
}
}
🍝注意事项和细节
1.需要导入spring-aop-5.3.8.jar, 别忘了
2.必须在Spring配置文件中指定 “自动扫描的包”, IOC容器才能够检测到当前项目中哪些类被标识了注解, 注意必须导入context名称空间
<!–配置自动扫描的包–>
<context:component-scan base-package="com.zzw.spring.component"/>
可以使用通配符 * 来指定, 比如 com.zzw.spring.* 表示
问题: com.zzw.spring.component 会不会去扫描它的子包? 会
3.Spring的IOC容器不能检测一个使用了@Controller注解的类到底是不是一个真正的控制器. 注解的名称是用于程序员自己识别当前标识的是什么组件. 其它的@Service, @Repository也是一样的道理. [也就是说spring的IOC容器只要检查到注解就会生成对象, 但是这个注解的含义spring不会识别, 注解是给程序员编程方便看的.]
4.<context:component-scan base-package=“com.zzw.spring.component” resource-pattern=“User*.class”/>
注意1: resource-pattern=“User*.class”: 表示只扫描 com.zzw.spring.component包 和 它的子包下的User打头的类.[使用的少, 不想扫描, 不写注解就可以]
注意2: 真正运行的是out目录, 所以扫描的是.class文件

5.排除一些类, 以annotation注解为例
<context: exclude-filter type=“annotation” expression=“org.springframework.stereotype.Service”/>
<!--
    需求: 如果我们希望排除某个包/子包下的某种类型的注解, 可以通过exclude-filter来指定
    1.context:exclude-filter 指定要排除哪些类
    2.type 指定排除方式 annotation表示按照注解来排除
    3.expression="org.springframework.stereotype.Service" 指定要排除的注解的全路径
-->
<context:component-scan base-package="com.zzw.spring.component">
    <context:exclude-filter type="annotation" expression="org.springframework.stereotype.Service"/>
    <context:exclude-filter type="annotation" expression="org.springframework.stereotype.Repository"/>
</context:component-scan>
– 通过Debug IOC容器结构, 可以一目了然.
解读
1)<context:exclude-filter> 放在 <context:component-scan>内, 表示扫描需要过滤掉当前包及其子包的某些类
2)type=“annotation”* 按照注解类型进行过滤
3)expression: 就是注解的全类名, 比如org.springframework.stereotype.Service就是@Service注解的全类名, 其他比如@Controller @Repository等, 依此类推
4)上面表示过滤掉com.zzw.spring.component包及其子包下, 加入了@Service 注解的类
5)测试, 修改beans05.xml, 增加exclude-filter, 发现UserService, 不会注入到容器.
6.指定自动扫描哪些注解类
<!--
    需求: 如果我们希望按照自己的规则, 来扫描包/子包下的某些注解, 可以通过include-filter来指定
    1.use-default-filters="false" 表示不使用默认的 扫描机制/过滤机制
    2.context:include-filter 表示要去扫描哪些类
    3.type="annotation" 按照注解的方式去 扫描/过滤
    4.expression="org.springframework.stereotype.Service" 指定要扫描的注解的全路径
-->
<context:component-scan base-package="com.zzw.spring.component" use-default-filters="false">
    <context:include-filter type="annotation" expression="org.springframework.stereotype.Service"/>
    <context:include-filter type="annotation" expression="org.springframework.stereotype.Controller"/>
</context:component-scan>
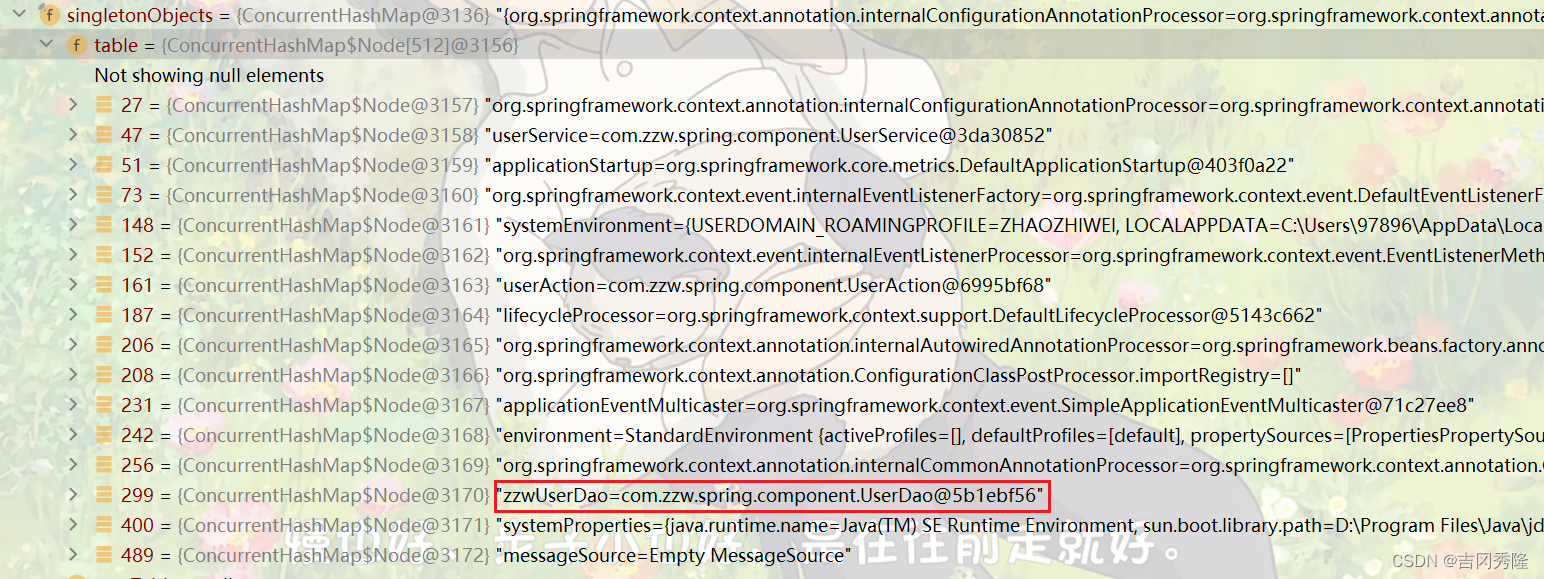
7.默认情况: 标记注解后, 类名首字母小写作为id的值, 也可以使用注解的value属性指定id值, 并且value可以省略.
//在默认情况下, 注解标识的类创建对象后, 在容器中, id 为类名的首字母小写
UserDao userDao1 = ioc.getBean("userDao", UserDao.class);
System.out.println("userDao1=" + userDao1);
 /**
 * 解读
 * 1.标记注解后, 类名首字母小写作为id的值(默认)
 * 2.value="zzwUserDao" 使用指定的 zzwUserDao作为UserDao对象的id
 */
@Repository(value = "zzwUserDao")
public class UserDao {}
8.关于@Controller, @Service, @Component区别:
https://zhuanlan.zhihu.com/p/454638478
💗自己实现Spring注解配置Bean机制
🍝需求说明
1.自己写一个简单的Spring容器, 通过读取类的注解(@Component, @Controller, @Service, @Repository), 将对象注入到IOC容器
2.也就是说, 不使用Spring原生框架, 我们自己使用 IO + Annotation + 反射 + 集合 技术实现, 打通Spring注解方式开发的技术痛点.
IO知识,传送门 - 注解知识,传送门 - 反射知识,传送门 - 集合知识,传送门
🍝思路分析
1)思路分析+程序结构
2)我们使用注解方式完成, 这里我们不使用xml来配置
3)程序框架图
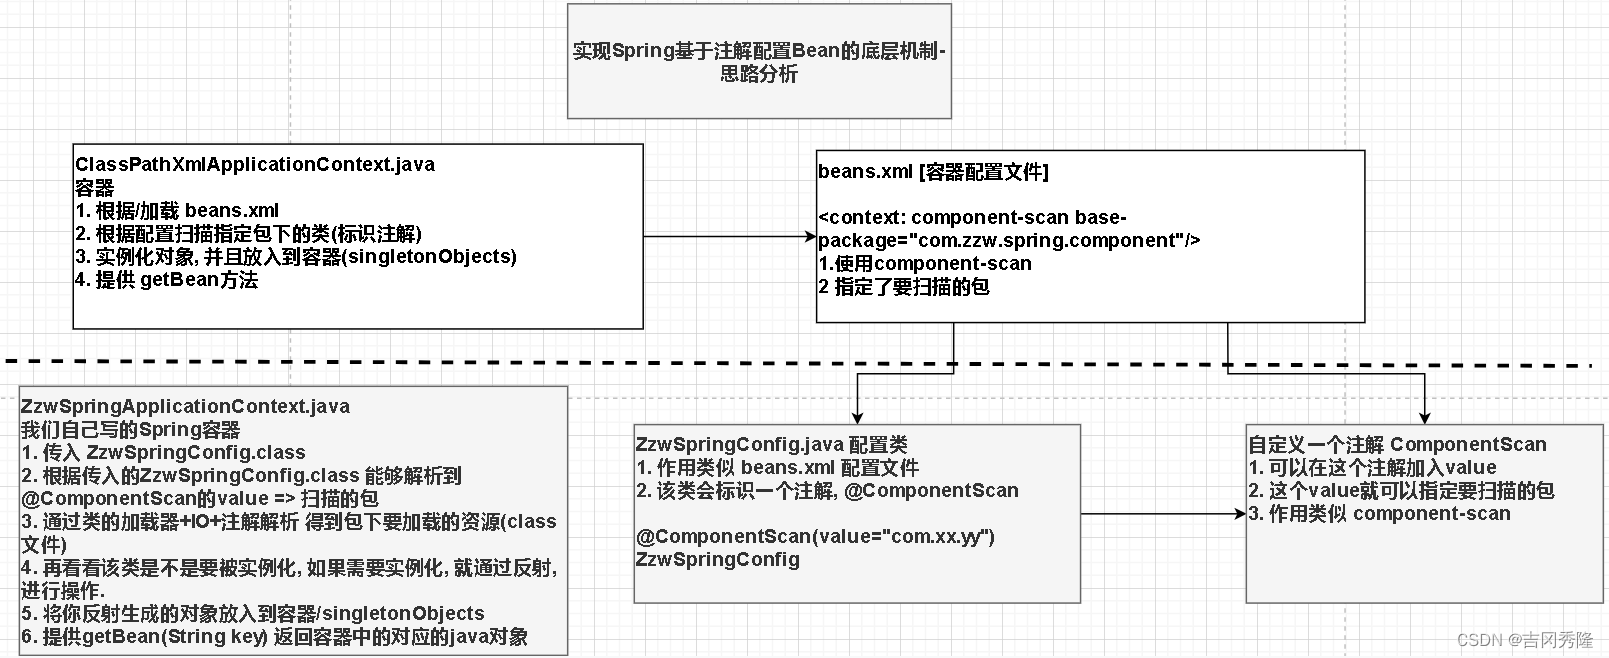
1.搭建基本结构并获取扫描的包
自定义注解 ComponentScan
/**
 * 1. @Target(ElementType.TYPE)指定我们的ComponentScan注解可以修饰 Type程序元素
 * 2. @Retention(RetentionPolicy.RUNTIME)指定ComponentScan注解 保留范围
 * 3. String value() default "": 表示ComponentScan注解可以传入 value
 */
@Target(ElementType.TYPE)
@Retention(RetentionPolicy.RUNTIME)
public @interface ComponentScan {
    String value() default "";
}
容器配置文件 ZzwSpringConfig
//这是一个配置类, 它的作用类似于我们原生spring的 beans.xml 容器配置文件
@ComponentScan(value = "com.zzw.spring.component")
public class ZzwSpringConfig {

}
模拟Spring-ioc容器 ZzwSpringApplicationContext
//ZzwSpringApplicationContext 类的作用类似Spring原生ioc容器
@SuppressWarnings({"all"})
public class ZzwSpringApplicationContext {

    private Class configClass;

    //ioc存放的就是通过反射创建的对象(基于注解方式)
    private final ConcurrentHashMap<String, Object> ioc =
            new ConcurrentHashMap<>();

    //构造器
    public ZzwSpringApplicationContext(Class configClass) {
        this.configClass = configClass;
        //System.out.println("this.configClass=" + this.configClass);
        //获取要扫描的包
        //1.先得到ZzwSpringConfig配置类的 @ComponentScan(value = "com.zzw.spring.component")
        ComponentScan componentScan =
                (ComponentScan) this.configClass.getDeclaredAnnotation(ComponentScan.class);
        //2.获取componentScan的value => 即要扫描的包
        String path = componentScan.value();
        System.out.println("要扫描的包=" + path);
    }
}
测试
public class ZzwSpringApplicationContextTest {
    public static void main(String[] args) {
        ZzwSpringApplicationContext ioc =
                new ZzwSpringApplicationContext(ZzwSpringConfig.class);
    }
}
2.获取扫描包下所有的.class文件 [扫描的out目录下的component目录, 里面都是.class后缀的文件]

public class ZzwSpringApplicationContext {

    private Class configClass;

    //ioc存放的就是通过反射创建的对象(基于注解方式)
    private final ConcurrentHashMap<String, Object> ioc =
            new ConcurrentHashMap<>();

    //构造器
    public ZzwSpringApplicationContext(Class configClass) {
        this.configClass = configClass;
        //System.out.println("this.configClass=" + this.configClass);
        //获取要扫描的包
        //1.先得到ZzwSpringConfig配置类的 @ComponentScan(value = "com.zzw.spring.component")
        ComponentScan componentScan =
                (ComponentScan) this.configClass.getDeclaredAnnotation(ComponentScan.class);
        //2.通过componentScan的value => 即要扫描的包
        String path = componentScan.value();
        System.out.println("要扫描的包=" + path);//com.zzw.spring.component

        //得到要扫描的包下的所有资源(.class 类)
        //1.得到类的加载器
        ClassLoader classLoader = ZzwApplicationContext.class.getClassLoader();
        //2.通过类的加载器获取到要扫描包的资源url =>类似一个路径
        path = path.replace(".", "/");//一定要把 .替换成 /
        URL resource = classLoader.getResource(path);//file:/D:/idea_project/zzw_spring/spring/out/production/spring/com/zzw/spring/component
        System.out.println("resource=" + resource);
        //3.将要加载的资源(.class) 路径下的文件进行遍历
        File file = new File(resource.getFile());//在io中, 目录也是文件
        if (file.isDirectory()) {//检查是否是目录
            File[] files = file.listFiles();
            for (File f : files) {
                System.out.println("=============================");
                System.out.println(f.getAbsolutePath());
            }
        }
    }
}
测试
public class ZzwSpringApplicationContextTest {
    public static void main(String[] args) {
        ZzwSpringApplicationContext ioc =
                new ZzwSpringApplicationContext(ZzwSpringConfig.class);
    }
}
3.获取全类名 反射对象 放入容器
public class ZzwSpringApplicationContext {

    private Class configClass;

    //ioc存放的就是通过反射创建的对象(基于注解方式)
    private final ConcurrentHashMap<String, Object> ioc =
            new ConcurrentHashMap<>();

    //构造器
    public ZzwSpringApplicationContext(Class configClass) {
        this.configClass = configClass;
        System.out.println("this.configClass=" + this.configClass);
        //获取要扫描的包
        //1.先得到ZzwSpringConfig配置类的 @ComponentScan(value = "com.zzw.spring.component")
        ComponentScan componentScan =
                (ComponentScan) this.configClass.getDeclaredAnnotation(ComponentScan.class);
        //2.通过componentScan的value => 即要扫描的包
        String path = componentScan.value();
        System.out.println("要扫描的包=" + path);//com.zzw.spring.component

        //得到要扫描的包下的所有资源(.class 类)
        //1.得到类的加载器
        ClassLoader classLoader = ZzwApplicationContext.class.getClassLoader();
        //2.通过类的加载器获取到要扫描包的资源url =>类似一个路径
        path = path.replace(".", "/");//一定要把 .替换成 / com/zzw/spring/component
        URL resource = classLoader.getResource(path);//file:/D:/idea_project/zzw_spring/spring/out/production/spring/com/zzw/spring/component
        System.out.println("resource=" + resource);
        //3.将要加载的资源(.class) 路径下的文件进行遍历
        File file = new File(resource.getFile());//在io中, 目录也是文件
        if (file.isDirectory()) {
            File[] files = file.listFiles();
            for (File f : files) {
                System.out.println("=============================");
                System.out.println(f.getAbsolutePath());
                //fileAbsolutePath: D:\idea_project\zzw_spring\spring\out\production\spring\com\zzw\spring\component\UserDao.class
                //获取到 com.zzw.spring.component.UserDao
                String fileAbsolutePath = f.getAbsolutePath();

                //这里我们只处理.class文件
                if (fileAbsolutePath.endsWith(".class")) {

                    //1.获取类名
                    String className =
                            fileAbsolutePath.substring(fileAbsolutePath.lastIndexOf("\\") + 1, fileAbsolutePath.lastIndexOf(".class"));
                    System.out.println("className="+className);
                    //2.获取类的完整的路径(全类名)
                    // path.replace("/", ".") => com.zzw.spring.component
                    String classFullName = path.replace("/", ".") + "." + className;//比如 com.zzw.spring.component.UserDao
                    //System.out.println("classFullName=" + classFullName);

                    //3.判断该类是不是需要注入到容器, 就看该类是不是有注解 @Component @Controller...
                    try {
                        //这时, 我们就得到了该类的Class对象
                        //Class clazz = Class.forName(classFullName)
                        //说明
                        //1. Class clazz = Class.forName(classFullName) 可以反射加载类
                        //2. classLoader.loadClass(classFullName); 可以反射类的Class
                        //3. 区别是: 上面方式会调用该类的静态方法, 下面方式不会
                        //4. aClass.isAnnotationPresent(Component.class) 判断该类是否有 Component注解
                        Class<?> aClass = classLoader.loadClass(classFullName);

                        if (aClass.isAnnotationPresent(Component.class) ||
                                aClass.isAnnotationPresent(Repository.class) ||
                                aClass.isAnnotationPresent(Service.class) ||
                                aClass.isAnnotationPresent(Controller.class)) {

                            //这时就可以反射对象, 并放入到容器中
                            Class<?> clazz = Class.forName(classFullName);
                            Object instance = clazz.newInstance();
                            //放入到容器中, 将类名的首字母小写作为id
                            //StringUtils 工具类 import org.springframework.util.StringUtils;

                            ioc.put(StringUtils.uncapitalize(className), instance);
                        }
                    } catch (Exception e) {
                        throw new RuntimeException(e);
                    }
                }
            }
        }
    }

    //编写方法返回容器对象
    public Object getBean(String name) {
        return ioc.get(name);
    }
}
测试
public class ZzwSpringApplicationContextTest {
    public static void main(String[] args) {
        ZzwSpringApplicationContext ioc =
                new ZzwSpringApplicationContext(ZzwSpringConfig.class);
        UserAction userAction = (UserAction) ioc.getBean("userAction");
        UserDao userDao = (UserDao) ioc.getBean("userDao");
        UserService userService = (UserService) ioc.getBean("userService");
        MyComponent myComponent = (MyComponent) ioc.getBean("myComponent");
        System.out.println("userAction=" + userAction);
        System.out.println("userDao=" + userDao);
        System.out.println("userService=" + userService);
        System.out.println("myComponent=" + myComponent);
        System.out.println("ok");
    }
}
🍝注意事项和细节
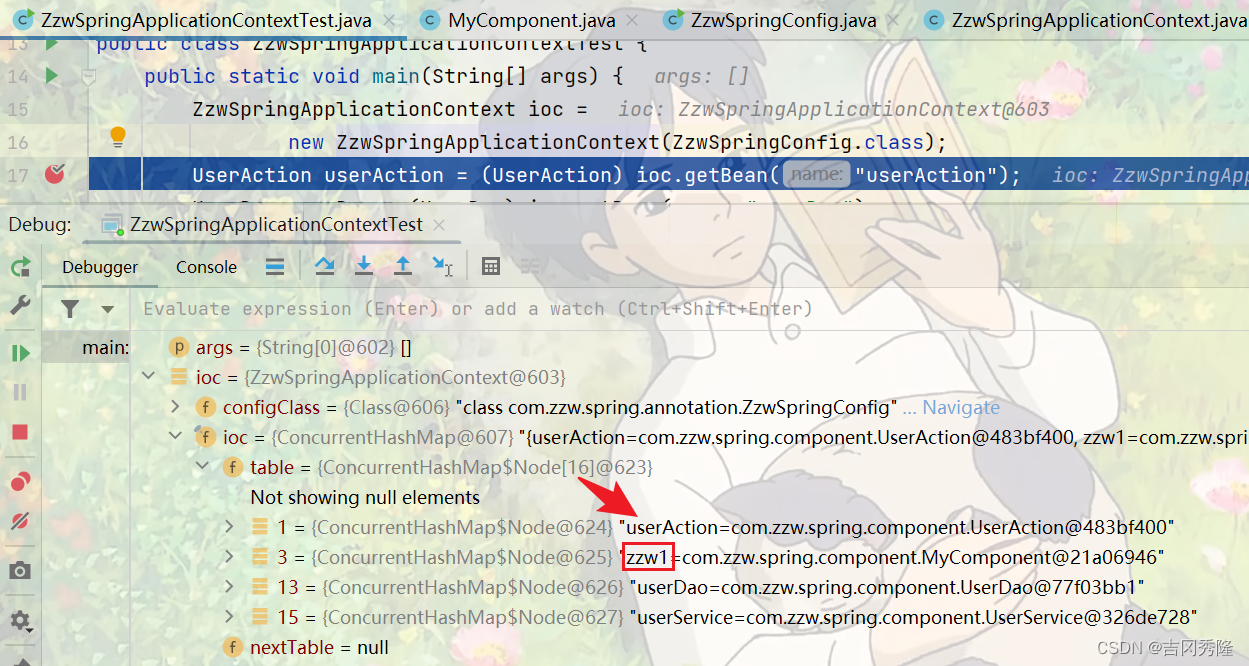
案例:还可以通过 @Component(value = “xx”) @Controller(value = “yy”) @Service(value = “zz”) 中指定的 value, 给bean分配id
@Component(value = "zzw1")
public class MyComponent {

}
if (aClass.isAnnotationPresent(Component.class) ||
        aClass.isAnnotationPresent(Repository.class) ||
        aClass.isAnnotationPresent(Service.class) ||
        aClass.isAnnotationPresent(Controller.class)) {

    //这里我们演示一个Component注解指定value, 分配id
    //这里就是演示了一下机制
    if (aClass.isAnnotationPresent(Component.class)) {
        //获取到该注解
        Component component = aClass.getDeclaredAnnotation(Component.class);
        //获取component的value =>即要分配的id
        String id = component.value();
        if (!"".equals(id)) {
            className = id;
        }
    }

    //这时就可以反射对象, 并放入到容器中
    Class<?> clazz = Class.forName(classFullName);
    Object instance = clazz.newInstance();
    //放入到容器中, 将类名的首字母小写作为id
    //StringUtils 工具类
    ioc.put(StringUtils.uncapitalize(className), instance);
}
测试结果
💗自动装配 @Autowired
基本说明
1.基于注解配置bean, 也可实现自动装配. 使用的注解是: @Autowired 或者 @Resource
- @Autowired的规则说明
-
在ioc容器中查找待装配的组件的类型, 如果有唯一的bean则匹配.
-
如果装配的类型对应的bean在ioc容器中有多个, 则使用待装配的属性的属性名作为id值再进行查找, 找到就装配, 找不到就抛异常.
-
- @Resource的规则说明
-
@Resource有两个属性是有两个属性是比较重要的, 分别是name和type. Spring将@Resource注解的name属性解析为bean的名字, 将type属性解析为bean的类型.
-
如果使用name属性, 则使用byName的自动注入策略; 而使用type属性时, 则使用byType自动注入策略.
-
如果@Resource 没有指定 name 和 type, 则优先使用byName注入策略 (即使用待装配的属性的属性名作为id值进行查找), 如果匹配不上, 再使用byType策略(即查找待装配的组件的类型). 如果都不成功, 就会报错.
-
- 不管是@Autowired 还是 @Resource 都保证属性名是规范写法就可以 注入.
🍝案例1: @Autowired引出
@Service
public class UserService {
    public void hi() {
        System.out.println("UserService hi()...");
    }
}
@Controller
public class UserAction {

    private UserService userService;

    public void sayOK() {
        System.out.println("UserAction sayOK()....");
        userService.hi();
    }
}
<?xml version="1.0" encoding="UTF-8"?>
<beans xmlns="http://www.springframework.org/schema/beans"
       xmlns:xsi="http://www.w3.org/2001/XMLSchema-instance"
       xmlns:context="http://www.springframework.org/schema/context"
       xsi:schemaLocation="http://www.springframework.org/schema/beans http://www.springframework.org/schema/beans/spring-beans.xsd http://www.springframework.org/schema/context https://www.springframework.org/schema/context/spring-context.xsd">

    <context:component-scan base-package="com.zzw.spring.component"/>
</beans>
public class SpringBeanTest {
    @Test
    public void setPropertyByAutowired() {
        ApplicationContext ioc =
                new ClassPathXmlApplicationContext("beans06.xml");
        UserAction userAction = ioc.getBean("userAction", UserAction.class);
        System.out.println("userAction=" + userAction);//这里会输出
        userAction.sayOK();//这里会报空指针异常
    }
}
加入@Autowired, 就不会报错了.
@Controller
public class UserAction {
    @Autowired
    private UserService userService;

    public void sayOK() {
        System.out.println("UserAction sayOK()....");
        userService.hi();
    }
}
🍝案例2: @Autowired解读
下面的代码中, UserAction中的userService200 和 SpringBeanTest中的userService是同一个对象. 因为ioc容器中只有一个UserService类型的对象, 此时按照类型来匹配.
@Service
public class UserService {
    public void hi() {
        System.out.println("UserService hi()...");
    }
}
@Controller
public class UserAction {
    //原先的xml配置, 我们会配置ref. 但是注解配置的情况下, 我们会用@Autowired
    //说明
    //1.在ioc容器中查找待装配的组件的类型, 如果有唯一的bean匹配(按照类型), 则使用该bean匹配
    //2.如果待装配的类型对应的bean在ioc容器中有多个, 则使用待装配的属性的属性名作为id值再进行查找
    //  找到就装配, 找不到就抛异常
    @Autowired
    private UserService userService200;

    public void sayOK() {
        System.out.println("UserAction sayOK()....");
        System.out.println("UserAction 装配的 userService属性=" + userService200);
        userService200.hi();
    }
}
<?xml version="1.0" encoding="UTF-8"?>
<beans xmlns="http://www.springframework.org/schema/beans"
       xmlns:xsi="http://www.w3.org/2001/XMLSchema-instance"
       xmlns:context="http://www.springframework.org/schema/context"
       xsi:schemaLocation="http://www.springframework.org/schema/beans http://www.springframework.org/schema/beans/spring-beans.xsd http://www.springframework.org/schema/context https://www.springframework.org/schema/context/spring-context.xsd">

	<!--通过注解获取的对象id是类名首字母小写-->
    <context:component-scan base-package="com.zzw.spring.component"/>
</beans>
public class SpringBeanTest {
    @Test
    public void setPropertyByAutowired() {
        ApplicationContext ioc = new ClassPathXmlApplicationContext("beans06.xml");
        UserService userService = ioc.getBean("userService", UserService.class);
        System.out.println("ioc容器中的userService=" + userService);
        userAction.sayOK();
    }
}
如果在beans06.xml中加入了同一类型(UserService)的对象, 如下. 那么UserAction中的userService200 和 SpringBeanTest中的userService将不再是同一个对象. 因为ioc容器中UserService类型的对象有多个, 此时将按照待匹配属性的属性名作为id值来匹配, 匹配到的是id为userService200的对象.
<?xml version="1.0" encoding="UTF-8"?>
<beans xmlns="http://www.springframework.org/schema/beans"
       xmlns:xsi="http://www.w3.org/2001/XMLSchema-instance"
       xmlns:context="http://www.springframework.org/schema/context"
       xsi:schemaLocation="http://www.springframework.org/schema/beans http://www.springframework.org/schema/beans/spring-beans.xsd http://www.springframework.org/schema/context https://www.springframework.org/schema/context/spring-context.xsd">

    <!--通过注解获取的对象id是类名首字母小写-->
    <context:component-scan base-package="com.zzw.spring.component"/><!--id=userService-->

    <!--配置两个UserService对象-->
    <bean class="com.zzw.spring.component.UserService" id="userService200"/>
    <bean class="com.zzw.spring.component.UserService" id="userService300"/>
</beans>
如果UserAction改为如下情况, 那么将会报错. 因为此时是按照待匹配属性的属性名作为id值来匹配的, 但beans06.xml中并没有id=userService400的bean对象, 所以报错.
@Controller
public class UserAction {
    //原先的xml配置, 我们会配置ref. 但是注解配置的情况下, 我们会用@Autowired
    //说明
    //1.在ioc容器中查找待装配的组件的类型, 如果有唯一的bean匹配(按照类型), 则使用该bean匹配
    //2.如果待装配的类型对应的bean在ioc容器中有多个, 则使用待装配的属性的属性名作为id值再进行查找
    //  找到就装配, 找不到就抛异常
    @Autowired
    private UserService userService400;

    public void sayOK() {
        System.out.println("UserAction sayOK()....");
        System.out.println("UserAction 装配的 userService属性=" + userService400);
        userService400.hi();
    }
}
指定id进行组装. 可以使用@Autowired和@Qualifier(value=“userService200”). 这时, 是装配的 id=userService200, 类似于@Resource(name="userService200"), 两个注解要配合使用.
此时, UserAction中的userService 和 SpringBeanTest中的userService200是同一个对象.
@Controller
public class UserAction {
    //指定id进行组装. 可以使用@Autowired和@Qualifier(value="userService200").
    //这时, 是装配的 id=userService200, 类似于@Resource(name="userService200").
    //前提是需要两个注解都写上.
    @Autowired
    @Qualifier(value = "userService200")
    private UserService userService;

    public void sayOK() {
        System.out.println("UserAction sayOK()....");
        System.out.println("UserAction 装配的 userService属性=" + userService);
        userService.hi();
    }
}
🍚案例3: @Resource解读
@Resource源码解读: 通过解析注解来支撑, 底层是注解来支撑的.
String name() default "";
Class<?> type() default java.lang.Object.class;
@Resource(name = "userService") 代表把beans06.xml对应的容器里的id=userService的对象注入到属性上去, 所以UserAction中的userService400 和 SpringBeanTest中的userService是同一个对象
@Controller
public class UserAction {

    //1.@Resource 有两个属性是比较重要的, 分别是name和type, Spring将@Resource注解的name属性解析为bean的名字,
    //  将type属性解析为bean的类型. 所以如果使用name属性, 则使用byName的自动注入策略, 而使用type属性时则使用
    //  byType自动注入策略
    //  比如 @Resource(name="userService") 表示装配id=userService的对象
    //  比如 @Resource(type="UserService.class") 表示按照UserService.class类型进行装配. 这时要求容器中,只能有一个这样类型的对象
    //2.如果@Resource 没有指定 name 和 type, 则先使用byName注入策略 (即使用待装配的属性的属性名作为id值进行查找),
    //  如果匹配不上, 再使用byType策略. 如果都不成功, 就会报错.
    @Resource(name = "userService")
    private UserService userService400;

    public void sayOK() {
        System.out.println("UserAction sayOK()....");
        System.out.println("UserAction 装配的 userService属性=" + userService400);
        userService400.hi();
    }
}
<?xml version="1.0" encoding="UTF-8"?>
<beans xmlns="http://www.springframework.org/schema/beans"
       xmlns:xsi="http://www.w3.org/2001/XMLSchema-instance"
       xmlns:context="http://www.springframework.org/schema/context"
       xsi:schemaLocation="http://www.springframework.org/schema/beans http://www.springframework.org/schema/beans/spring-beans.xsd http://www.springframework.org/schema/context https://www.springframework.org/schema/context/spring-context.xsd">

    <!--通过注解获取的对象id是类名首字母小写, 这里是userService-->
    <context:component-scan base-package="com.zzw.spring.component"/><!--id=userService-->

    <!--配置两个UserService对象-->
    <bean class="com.zzw.spring.component.UserService" id="userService200"/>
    <bean class="com.zzw.spring.component.UserService" id="userService300"/>
</beans>
public class SpringBeanTest {

    @Test
    public void setPropertyByAutowired() {
        ApplicationContext ioc =
                new ClassPathXmlApplicationContext("beans06.xml");

        UserService userService = ioc.getBean("userService", UserService.class);
        System.out.println("ioc容器中的userService=" + userService);

        UserAction userAction = ioc.getBean("userAction", UserAction.class);
        userAction.sayOK();
    }
}
如果将代码改为@Resource(name = "userService200") 代表把beans06.xml对应的容器里的id=userService200的对象注入到属性上去, 那么UserAction中的userService400 和 SpringBeanTest中的userService200将是同一个对象,
@Controller
public class UserAction {

    //1.@Resource 有两个属性是比较重要的, 分别是name和type, Spring将@Resource注解的name属性解析为bean的名字,
    //  将type属性解析为bean的类型. 所以如果使用name属性, 则使用byName的自动注入策略, 而使用type属性时则使用
    //  byType自动注入策略
    //  比如 @Resource(name="userService") 表示装配id=userService的对象
    @Resource(name = "userService200")
    private UserService userService400;

    public void sayOK() {
        System.out.println("UserAction sayOK()....");
        System.out.println("UserAction 装配的 userService属性=" + userService400);
        userService400.hi();
    }
}
<?xml version="1.0" encoding="UTF-8"?>
<beans xmlns="http://www.springframework.org/schema/beans"
       xmlns:xsi="http://www.w3.org/2001/XMLSchema-instance"
       xmlns:context="http://www.springframework.org/schema/context"
       xsi:schemaLocation="http://www.springframework.org/schema/beans http://www.springframework.org/schema/beans/spring-beans.xsd http://www.springframework.org/schema/context https://www.springframework.org/schema/context/spring-context.xsd">

    <!--通过注解获取的对象id是类名首字母小写, 这里是userService-->
    <context:component-scan base-package="com.zzw.spring.component"/><!--id=userService-->

    <!--配置两个UserService对象-->
    <bean class="com.zzw.spring.component.UserService" id="userService200"/>
    <bean class="com.zzw.spring.component.UserService" id="userService300"/>
</beans>
public class SpringBeanTest {

    @Test
    public void setPropertyByAutowired() {
        ApplicationContext ioc =
                new ClassPathXmlApplicationContext("beans06.xml");

        UserService userService = ioc.getBean("userService", UserService.class);
        System.out.println("ioc容器中的userService=" + userService);

        UserService userService200 = ioc.getBean("userService200", UserService.class);
        System.out.println("ioc容器中的userService200=" + userService200);

        UserAction userAction = ioc.getBean("userAction", UserAction.class);
        userAction.sayOK();
    }
}
如果将代码改为@Resource(name = "userService600") 会直接报错. 因为beans06.xml对应的容器中没有id为userService600的对象, 所以报错.
@Controller
public class UserAction {

    //1.@Resource 有两个属性是比较重要的, 分别是name和type, Spring将@Resource注解的name属性解析为bean的名字,
    //  将type属性解析为bean的类型. 所以如果使用name属性, 则使用byName的自动注入策略, 而使用type属性时则使用
    //  byType自动注入策略
    //  比如 @Resource(name="userService") 表示装配id=userService的对象
    @Resource(name = "userService600")
    private UserService userService400;

    public void sayOK() {
        System.out.println("UserAction sayOK()....");
        System.out.println("UserAction 装配的 userService属性=" + userService400);
        userService400.hi();
    }
}
<?xml version="1.0" encoding="UTF-8"?>
<beans xmlns="http://www.springframework.org/schema/beans"
       xmlns:xsi="http://www.w3.org/2001/XMLSchema-instance"
       xmlns:context="http://www.springframework.org/schema/context"
       xsi:schemaLocation="http://www.springframework.org/schema/beans http://www.springframework.org/schema/beans/spring-beans.xsd http://www.springframework.org/schema/context https://www.springframework.org/schema/context/spring-context.xsd">

    <!--通过注解获取的对象id是类名首字母小写, 这里是userService-->
    <context:component-scan base-package="com.zzw.spring.component"/><!--id=userService-->

    <!--配置两个UserService对象-->
    <bean class="com.zzw.spring.component.UserService" id="userService200"/>
    <bean class="com.zzw.spring.component.UserService" id="userService300"/>
</beans>
如果按照类型来装配, @Resource(type = UserService.class), 那么必须保证容器中该类型的对象只有一个.
像下面的情况就会报错.
public class UserAction {

    @Resource(type = UserService.class)
    private UserService userService400;

    public void sayOK() {
        System.out.println("UserAction sayOK()....");
        System.out.println("UserAction 装配的 userService属性=" + userService400);
        userService400.hi();
    }
}
<?xml version="1.0" encoding="UTF-8"?>
<beans xmlns="http://www.springframework.org/schema/beans"
       xmlns:xsi="http://www.w3.org/2001/XMLSchema-instance"
       xmlns:context="http://www.springframework.org/schema/context"
       xsi:schemaLocation="http://www.springframework.org/schema/beans http://www.springframework.org/schema/beans/spring-beans.xsd http://www.springframework.org/schema/context https://www.springframework.org/schema/context/spring-context.xsd">

    <!--通过注解获取的对象id是类名首字母小写-->
    <context:component-scan base-package="com.zzw.spring.component"/><!--id=userService-->

    <!--配置两个UserService对象-->
    <bean class="com.zzw.spring.component.UserService" id="userService200"/>
    <bean class="com.zzw.spring.component.UserService" id="userService300"/>
</beans>
如果@Resource 没有指定 name 和 type, 则先使用byName注入策略 (即使用待装配的属性的属性名作为id值进行查找),如果匹配不上, 再使用byType策略. 如果都不成功, 就会报错. 像下面的代码就会报错.
public class UserAction {

    //2.如果@Resource 没有指定 name 和 type, 则先使用byName注入策略 (即使用待装配的属性的属性名作为id值进行查找),
    //  如果匹配不上, 再使用byType策略. 如果都不成功, 就会报错.
    @Resource
    private UserService userService400;

    public void sayOK() {
        System.out.println("UserAction sayOK()....");
        System.out.println("UserAction 装配的 userService属性=" + userService400);
        userService400.hi();
    }
}
<?xml version="1.0" encoding="UTF-8"?>
<beans xmlns="http://www.springframework.org/schema/beans"
       xmlns:xsi="http://www.w3.org/2001/XMLSchema-instance"
       xmlns:context="http://www.springframework.org/schema/context"
       xsi:schemaLocation="http://www.springframework.org/schema/beans http://www.springframework.org/schema/beans/spring-beans.xsd http://www.springframework.org/schema/context https://www.springframework.org/schema/context/spring-context.xsd">

    <!--通过注解获取的对象id是类名首字母小写-->
    <context:component-scan base-package="com.zzw.spring.component"/><!--id=userService-->

    <!--配置两个UserService对象-->
    <bean class="com.zzw.spring.component.UserService" id="userService200"/>
    <bean class="com.zzw.spring.component.UserService" id="userService300"/>
</beans>
下面代码会成功
public class UserAction {

    //2.如果@Resource 没有指定 name 和 type, 则先使用byName注入策略 (即使用待装配的属性的属性名作为id值进行查找),
    //  如果匹配不上, 再使用byType策略. 如果都不成功, 就会报错.
    @Resource
    private UserService userService;

    public void sayOK() {
        System.out.println("UserAction sayOK()....");
        System.out.println("UserAction 装配的 userService属性=" + userService);
        userService.hi();
    }
}
下面代码依然会成功
public class UserAction {

    //2.如果@Resource 没有指定 name 和 type, 则先使用byName注入策略 (即使用待装配的属性的属性名作为id值进行查找),
    //  如果匹配不上, 再使用byType策略. 如果都不成功, 就会报错.
    @Resource
    private UserService userService200;

    public void sayOK() {
        System.out.println("UserAction sayOK()....");
        System.out.println("UserAction 装配的 userService属性=" + userService200);
        userService200.hi();
    }
}
下面代码会失败. 因为beans.xml中没有id=userServise600的bean对象, byName注入策略不成功, 并且byType注入策略也不成功, 所以会失败.
public class UserAction {

    //2.如果@Resource 没有指定 name 和 type, 则先使用byName注入策略 (即使用待装配的属性的属性名作为id值进行查找),
    //  如果匹配不上, 再使用byType策略. 如果都不成功, 就会报错.
    @Resource
    private UserService userService600;

    public void sayOK() {
        System.out.println("UserAction sayOK()....");
        System.out.println("UserAction 装配的 userService属性=" + userService600);
        userService600.hi();
    }
}
但是下面的代码会成功. 虽然beans.xml中没有id=userServise600的bean对象, 即byName注入策略不成功, 但是由于beans06.xml对应的容器中只有一个UserService类型的对象, 所以byType策略成功, 所以下面代码不会报错.
public class UserAction {

    //2.如果@Resource 没有指定 name 和 type, 则先使用byName注入策略 (即使用待装配的属性的属性名作为id值进行查找),
    //  如果匹配不上, 再使用byType策略. 如果都不成功, 就会报错.
    @Resource
    private UserService userService600;

    public void sayOK() {
        System.out.println("UserAction sayOK()....");
        System.out.println("UserAction 装配的 userService属性=" + userService600);
        userService600.hi();
    }
}
<?xml version="1.0" encoding="UTF-8"?>
<beans xmlns="http://www.springframework.org/schema/beans"
       xmlns:xsi="http://www.w3.org/2001/XMLSchema-instance"
       xmlns:context="http://www.springframework.org/schema/context"
       xsi:schemaLocation="http://www.springframework.org/schema/beans http://www.springframework.org/schema/beans/spring-beans.xsd http://www.springframework.org/schema/context https://www.springframework.org/schema/context/spring-context.xsd">

    <!--通过注解获取的对象id是类名首字母小写-->
    <context:component-scan base-package="com.zzw.spring.component"/><!--id=userService-->

    <!--配置两个UserService对象-->
    <!--<bean class="com.zzw.spring.component.UserService" id="userService200"/>-->
    <!--<bean class="com.zzw.spring.component.UserService" id="userService300"/>-->
</beans>
🍝小结
1.如果装配的类型对应的bean在IOC容器中有多个, 则使用待装配的属性的属性名作为id值再进行查找, 找到就装配, 找不到就抛异常.
💗泛型依赖注入
基本说明
1.为了更好地管理有继承和相互依赖的bean的自动装配, spring还提供基于泛型依赖的注入机制.
2.在继承关系复杂情况下, 泛型依赖注入就会有很大的优越性.
各个类关系图

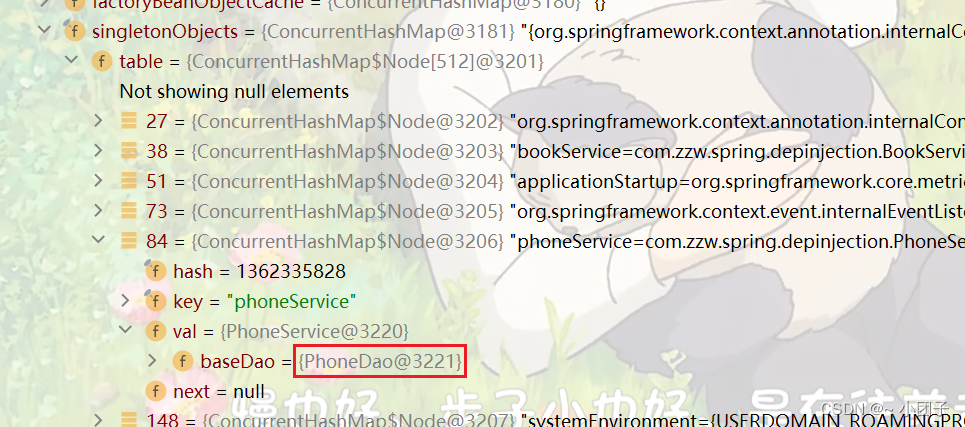
传统方法是将 PhoneDao / BookDao 自动装配到 BookService / PhoneService中, 当这种继承关系多时, 就比较麻烦. 可以使用spring提供的泛型依赖注入.
public class Book {}
public class Phone {}
//自定义泛型类
public abstract class BaseDao<T> {
    public abstract void save();
}
@Repository
public class BookDao extends BaseDao<Book> {
    @Override
    public void save() {
        System.out.println("BookDao的 save方法....");
    }
}
@Repository
public class PhoneDao extends BaseDao<Phone> {
    @Override
    public void save() {
        System.out.println("PhoneDao的 save方法...");
    }
}
//自定义泛型类
public class BaseService<T> {
    @Autowired
    private BaseDao<T> baseDao;

    public void save() {
        baseDao.save();
    }
}
@Service
public class BookService extends BaseService<Book> {
    //并没有写属性
}
@Service
public class PhoneService extends BaseService<Phone> {
    //没有写属性
}
beans07.xml
<?xml version="1.0" encoding="UTF-8"?>
<beans xmlns="http://www.springframework.org/schema/beans"
       xmlns:xsi="http://www.w3.org/2001/XMLSchema-instance"
       xmlns:context="http://www.springframework.org/schema/context"
       xsi:schemaLocation="http://www.springframework.org/schema/beans http://www.springframework.org/schema/beans/spring-beans.xsd http://www.springframework.org/schema/context https://www.springframework.org/schema/context/spring-context.xsd">

    <context:component-scan base-package="com.zzw.spring.depinjection"/>
</beans>
public class SpringBeanTest {

    @Test
    public void setProByDependencyInjection() {
        ApplicationContext ioc =
                new ClassPathXmlApplicationContext("beans07.xml");

        PhoneService phoneService = ioc.getBean("phoneService", PhoneService.class);
        phoneService.save();//PhoneDao的 save方法...
        System.out.println("OK");
    }
}