目录
1 I2C驱动整体框架图
2 I2C控制器
2.1 I2C控制器设备--I2C控制器在内核中也被看做一个设备
2.2 i2c控制器驱动程序
2.3 platform_driver结构体中的probe函数做了什么
2.3.1 疑问: i2cdev_notifier_call函数哪里来的
2.3.2 疑问:为什么有两个probe
2.3.3 疑问:of_i2c_register_devices(adap);和bus_for_each_drv(&i2c_bus_type, NULL, adap, __process_new_adapter)函数的功能是不是重叠了
2.3.4 疑问:platform_bus_type和I2c_bus_type的问题
2.3.5 疑问:为什么i2c_imx_probe函数里面最终还是调用了match和probe函数
3 i2c-core
4 i2c设备
4.1 i2c-client
4.2 i2c-driver
4.2.1 疑问:i2c_register_driver函数中调用driver_register(&driver->driver);函数增加驱动就行了,为什么还调用了i2c_for_each_dev(driver, __process_new_driver);
4.3 probe函数做了什么
4.3.1 疑问:at24_probe里面怎么又有match和probe
5 i2c-tools
5.1 为什么说i2c-tools是一套好用的工具
5.2 为什么说是i2c-tools也是一套示例代码
6 i2c_dev.c通用驱动
7 GPIO模拟I2C
参考文献:
1 I2C驱动整体框架图
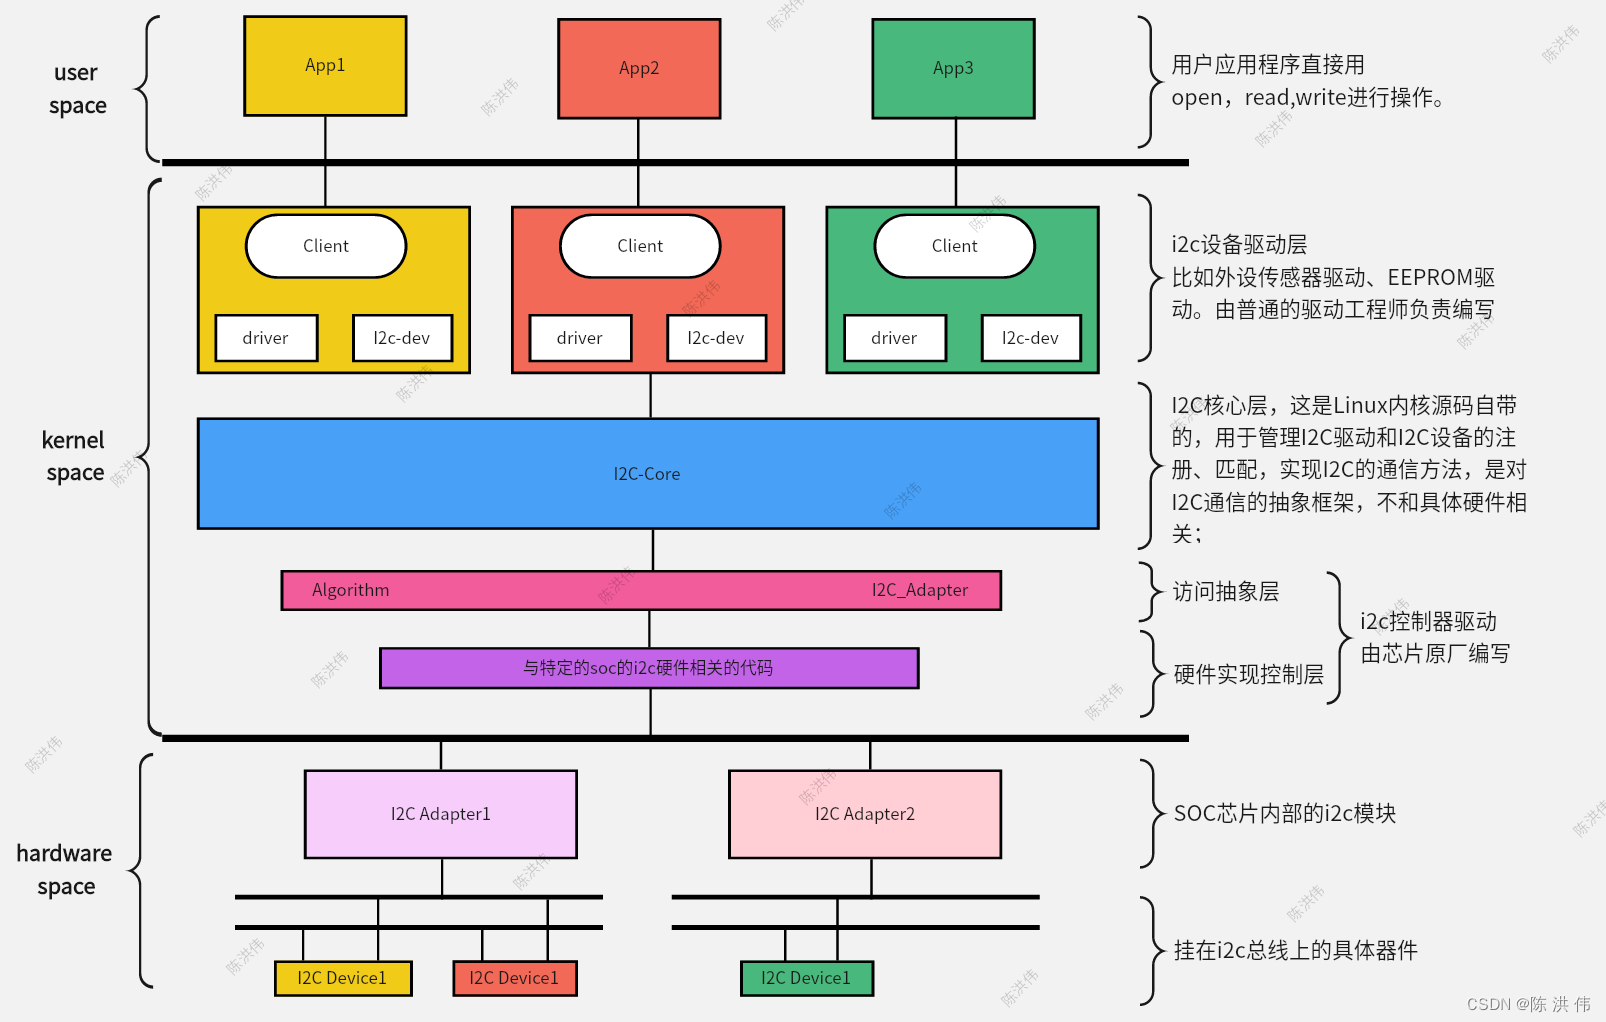
上图是I2C系统的整体框架,介绍如下。
- 最上层是应用层,在应用层用户可以直接用open read write对设备进行操作,
- 往下是设备驱动层,这个就是外围的比如一些用I2C总线连接到SOC的传感器或者EEPROM的驱动程序,这个一般由普通驱动工程师负责,
- 再往下的I2C-Core是核心层,这个是Linux内核源码里面本来就有的,这里面主要是一些驱动和设备的注册函数以及i2c_transfer函数,
- 再往下就是I2C控制器驱动,这个一般是由芯片原厂的程序员负责编写,
- 再往下就是具体的硬件了。
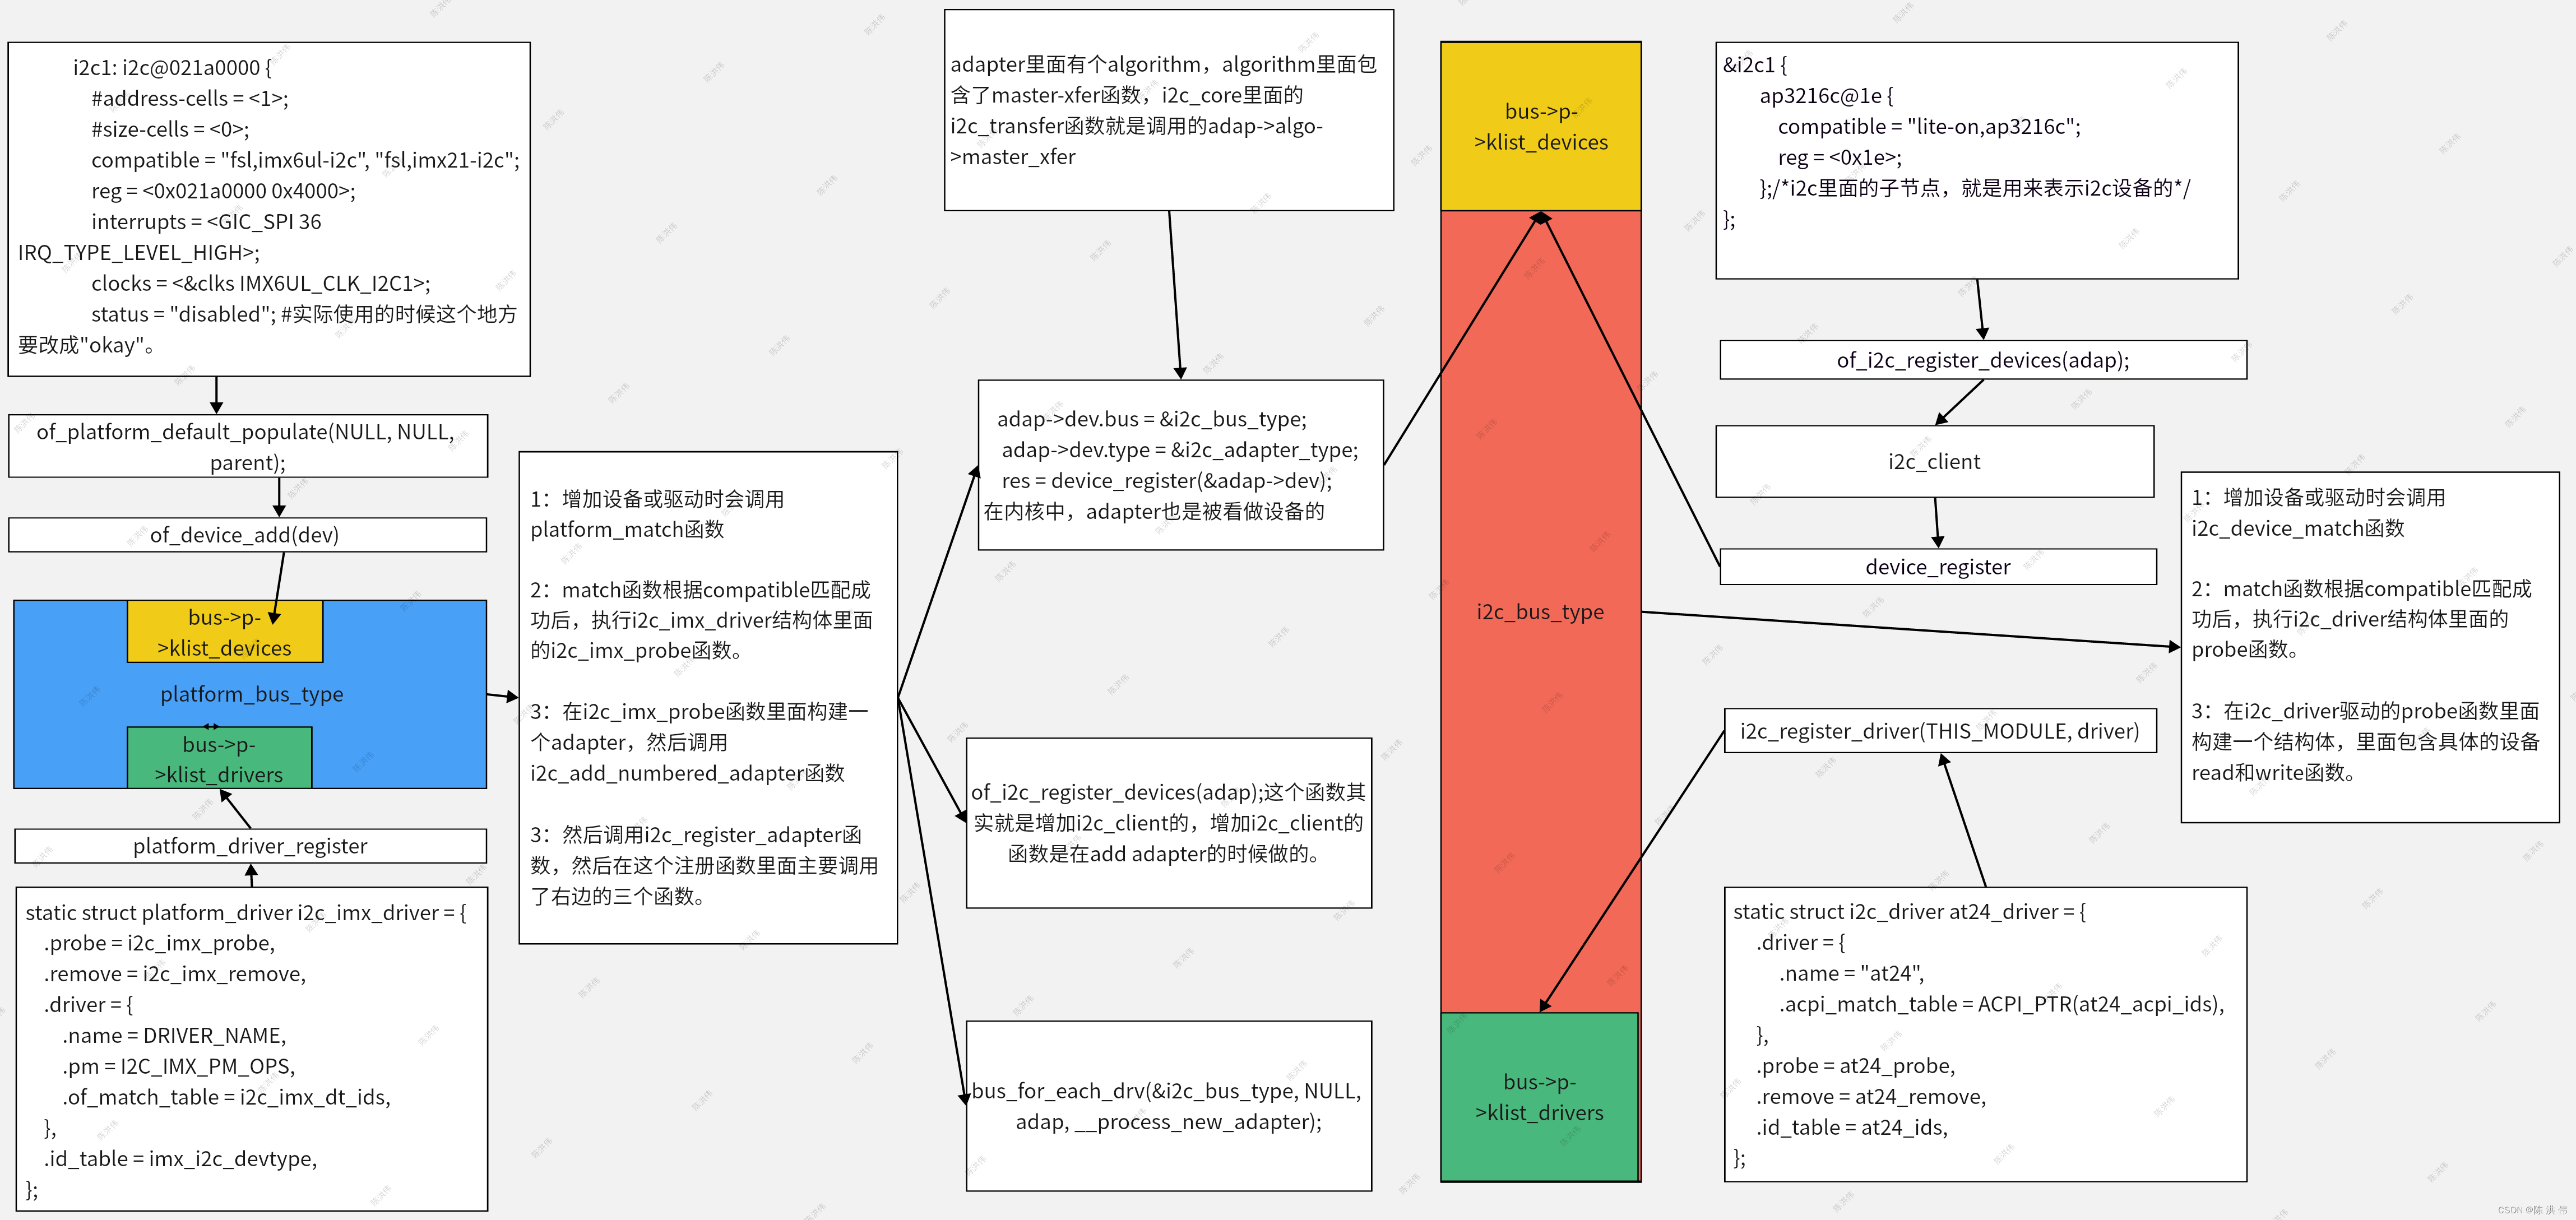
上图是I2C驱动的软件框架,介绍如下。
- 首先最右边的是I2C设备驱动,它分为i2c-client和i2c-driver,i2c设备驱动是挂载在i2c_bus_type的,其中i2c-client来自设备树文件,通过of_i2c_register_devices(adap);函数转成i2c-client,然后添加到总线的设备链表中,然后i2c_driver结构体通过注册函数添加到总线的驱动链表中,当新增驱动或者设备时,会调用总线的mach函数进行匹配,然后调用驱动里面的probe函数,在probe函数里面添加一个结构体,然后这个结构体里面就包含设备的读写函数。
- 最左边的是I2C控制器驱动,其中设备树的i2c节点被转换成platform_device,然后添加到platform_bus_type的设备链表中,然后还有一个platform_driver驱动结构体,这个结构体注册到platform_bus_type的驱动链表中,然后当添加设备和驱动的时候,会调用platform_match函数,当匹配之后会调用platform_driver驱动里面的i2x_imx_probe函数。
- 中间是i2x_imx_probe函数里面做的工作,这个函数里面先是调用了device_register把adapter添加到i2c_bus_type的device结构体中,注意是i2c_bus_type,不是platform_bus_type,adapter里面包含一个algorithm成员,这个algorithm里面有master_xfer函数,i2c-core里面的i2c_transfer函数就是调用的algorithm里面的master_xfer函数,然后i2x_imx_probe函数里面还调用了of_i2c_register_device用于添加i2c-client。
以上是i2c驱动的整体介绍,下面分别介绍i2c控制器,i2c-core和i2c设备驱动的相关内容。
2 I2C控制器
2.1 I2C控制器设备--I2C控制器在内核中也被看做一个设备
首先看一下i2c控制器设备,在./Linux-4.9.88/arch/arm/boot/dts/imx6ull.dtsi设备树文件中可以看到i2c节点,
i2c1: i2c@021a0000 {
#address-cells = <1>;
#size-cells = <0>;
compatible = "fsl,imx6ul-i2c", "fsl,imx21-i2c";
reg = <0x021a0000 0x4000>;
interrupts = <GIC_SPI 36 IRQ_TYPE_LEVEL_HIGH>;
clocks = <&clks IMX6UL_CLK_I2C1>;
status = "disabled"; #实际使用的时候这个地方要改成"okay"。
};
of_platform_default_populate(NULL, NULL, parent);函数里面把I2C节点转换成platform_device,并添加设备,具体的函数调用关系如下:
of_platform_default_populate(NULL, NULL, parent);
of_platform_populate(root, of_default_bus_match_table, lookup,parent);
of_find_node_by_path("/")//查找设备树的根节点
of_platform_bus_create//这个函数会被循环调用
of_platform_device_create_pdata
of_device_alloc(np, bus_id, parent);
of_device_add(dev)
device_add(&ofdev->dev);
bus_add_device(dev);
klist_add_tail(&dev->p->knode_bus, &bus->p->klist_devices);添加到链表
blocking_notifier_call_chain(&dev->bus->p->bus_notifier,调用bus_notifier
i2cdev_notifier_call
i2cdev_attach_adapter
if (dev->type != &i2c_adapter_type)//直接返回device_create不调用
return 0;
device_create//增加i2c-%d节点bus_probe_device(dev);
device_initial_probe(dev);
__device_attach(dev, true);
bus_for_each_drv(dev->bus, NULL, &data, __device_attach_driver);
__device_attach_driver
driver_match_device(drv, dev);
drv->bus->match ? drv->bus->match(dev, drv) : 1;
driver_probe_device(drv, dev);
really_probe(dev, drv);
dev->bus->probe(dev);或drv->probe(dev)
最后调用platform_driver结构体里面的i2c_imx_probe函数,i2c_imx_probe函数后面会再分析,platform_device设备先看到这里。
static struct platform_driver i2c_imx_driver = {
	.probe = i2c_imx_probe,
	.remove = i2c_imx_remove,
	.driver = {
		.name = DRIVER_NAME,
		.pm = I2C_IMX_PM_OPS,
		.of_match_table = i2c_imx_dt_ids,
	},
	.id_table = imx_i2c_devtype,
};
2.2 i2c控制器驱动程序
通过前面 i2c1 节点的 compatible 属性值 可以在 Linux 源码里面找到对应的驱动文件。这里 i2c1节点的compatible 属性值有两个:“fsl,imx6ul-i2c”和“fsl,imx21-i2c”,在 Linux 源码中搜索这两个字符串即可找到对应的驱动文件。I.MX6U 的 I2C 适配器驱动驱动文件为 drivers/i2c/busses/i2c-imx.c,上面i2c控制器设备最终被转成了platform_device,那么i2c控制器驱动采用的也是platform_driver,挂载在platform_bus_type.
看一个驱动先从入口函数开始看,我们找到drivers/i2c/busses/i2c-imx.c文件中的i2c_adap_imx_init函数,首先调用platform_driver_register(&i2c_imx_driver)注册i2c_imx_driver结构体,具体的函数调用关系如下,然后当match函数发现驱动和设备匹配,就会调用驱动里面的额probe函数,也就是i2c_imx_probe函数。
platform_driver_register(&i2c_imx_driver);
__platform_driver_register(drv, THIS_MODULE)
drv->driver.owner = owner;
drv->driver.bus = &platform_bus_type;
drv->driver.probe = platform_drv_probe;
drv->driver.remove = platform_drv_remove;
drv->driver.shutdown = platform_drv_shutdown;
driver_register(&drv->driver);
bus_add_driver(drv);
klist_add_tail(&priv->knode_bus, &bus->p->klist_drivers);把驱动放到klist_driver
driver_attach(drv);
bus_for_each_dev(drv->bus, NULL, drv, __driver_attach);
__driver_attach
driver_match_device(drv, dev);
drv->bus->match ? drv->bus->match(dev, drv) : 1;
driver_probe_device(drv, dev);
ret = really_probe(dev, drv);
dev->bus->probe(dev);或drv->probe(dev)
2.3 platform_driver结构体中的probe函数做了什么
当新增设备或者驱动的时候,都会调用总线的match函数,然后match函数根据compatible属性值或者name去匹配设备和驱动,
 * Platform device IDs are assumed to be encoded like this:
 * "<name><instance>", where <name> is a short description of the type of
 * device, like "pci" or "floppy", and <instance> is the enumerated
 * instance of the device, like '0' or '42'.  Driver IDs are simply
 * "<name>".  So, extract the <name> from the platform_device structure,
 * and compare it against the name of the driver. Return whether they match
 * or not.
 */
static int platform_match(struct device *dev, struct device_driver *drv)
{
	struct platform_device *pdev = to_platform_device(dev);
	struct platform_driver *pdrv = to_platform_driver(drv);

	/* When driver_override is set, only bind to the matching driver */
	if (pdev->driver_override)
		return !strcmp(pdev->driver_override, drv->name);

	/* Attempt an OF style match first */
	if (of_driver_match_device(dev, drv))
		return 1;

	/* Then try ACPI style match */
	if (acpi_driver_match_device(dev, drv))
		return 1;

	/* Then try to match against the id table */
	if (pdrv->id_table)
		return platform_match_id(pdrv->id_table, pdev) != NULL;

	/* fall-back to driver name match */
	return (strcmp(pdev->name, drv->name) == 0);
}
匹配上之后,就会调用驱动结构体里面的probe函数,接下来看一下struct platform_driver i2c_imx_driver结构体中的i2c_imx_probe函数做了什么。
static struct platform_driver i2c_imx_driver = {
	.probe = i2c_imx_probe,
	.remove = i2c_imx_remove,
	.driver = {
		.name = DRIVER_NAME,
		.pm = I2C_IMX_PM_OPS,
		.of_match_table = i2c_imx_dt_ids,
	},
	.id_table = imx_i2c_devtype,
};
具体的函数调用关系如下:
i2c_imx_probe
i2c_add_numbered_adapter
__i2c_add_numbered_adapter
i2c_register_adapter
device_register(&adap->dev);
device_add(dev);
bus_add_device(dev);
klist_add_tail(&dev->p->knode_bus, &bus->p->klist_devices);添加到链表
blocking_notifier_call_chain(&dev->bus->p->bus_notifier,调用bus_notifier
i2cdev_notifier_call
i2cdev_attach_adapter
device_create//增加i2c-%d节点
bus_probe_device(dev);
device_initial_probe(dev);
__device_attach(dev, true);
bus_for_each_drv(dev->bus, NULL, &data, __device_attach_driver);
__device_attach_driver
driver_match_device(drv, dev);
drv->bus->match ? drv->bus->match(dev, drv) : 1;//匹配不成功,直接返回,
driver_probe_device(drv, dev);上面匹配不成功,这里直接不调用
really_probe(dev, drv);
dev->bus->probe(dev);或drv->probe(dev),of_i2c_register_devices(adap);
of_i2c_register_device(adap, node);
i2c_new_device(adap, &info);用来增加client的
client->dev.parent = &client->adapter->dev;
client->dev.bus = &i2c_bus_type;//注意这里是i2c-bus,不是platform_bus
client->dev.type = &i2c_client_type;
client->dev.of_node = info->of_node;
client->dev.fwnode = info->fwnode;
status = device_register(&client->dev);注册新的 i2c_client 设备
device_add(dev);
bus_add_device(dev);
klist_add_tail(&dev->p->knode_bus, &bus->p->klist_devices);
bus_probe_device
device_initial_probe(dev);
__device_attach(dev, true);
bus_for_each_drv
__device_attach_driver
driver_match_device
drv->bus->match ? drv->bus->match(dev, drv) : 1;
driver_probe_device(drv, dev);
really_probe(dev, drv);
dev->bus->probe(dev);或drv->probe(dev)
bus_for_each_drv(&i2c_bus_type, NULL, adap, __process_new_adapter)
__process_new_adapter(struct device_driver *d, void *data)
i2c_do_add_adapter(struct i2c_driver *driver, struct i2c_adapter *adap)
i2c_detect(adap, driver);通过i2c_detect检测是否有适合的设备连接在总线上
if (!driver->detect || !address_list) return 0;如果没定义detect或address_list就直接返回了
i2c_detect_address(temp_client, driver);
err = driver->detect(temp_client, &info);根据对应client发送一个测试数据如果没有问题则证明这个client是这个驱动所需要的设备,最后将设备添加到链表,最后调用bus_probe_device,尝试绑定驱动。
client = i2c_new_device(adapter, &info);用来增加client的
device_register(&client->dev);
device_add(dev);
bus_add_device(dev);
klist_add_tail
bus_probe_device(dev);
bus_probe_device(dev);
device_initial_probe(dev);
__device_attach(dev, true);
bus_for_each_drv
__device_attach_driver
driver_match_device(drv, dev);
drv->bus->match ? drv->bus->match(dev, drv) : 1;
driver_probe_device(drv, dev);
really_probe(dev, drv);
dev->bus->probe(dev);或drv->probe(dev)
自己在看内核代码,得到了上面的函数调用流程,但同时有以下几个问题或疑问;
2.3.1 疑问: i2cdev_notifier_call函数哪里来的
上面流程中为什么 blocking_notifier_call_chain(&dev->bus->p->bus_notifier,调用bus_notifier会调用i2cdev_notifier_call,原因在这里。
static int i2cdev_notifier_call(struct notifier_block *nb, unsigned long action,
  		 void *data)
{
  	struct device *dev = data;

  	switch (action) {
  	case BUS_NOTIFY_ADD_DEVICE:
  		return i2cdev_attach_adapter(dev, NULL);
  	case BUS_NOTIFY_DEL_DEVICE:
  		return i2cdev_detach_adapter(dev, NULL);
  	}

  	return 0;
}

static struct notifier_block i2cdev_notifier = {
  	.notifier_call = i2cdev_notifier_call,
};

static int __init i2c_dev_init(void)
{
	...
	res = bus_register_notifier(&i2c_bus_type, &i2cdev_notifier);
	...
}
2.3.2 疑问:为什么有两个probe
platform_driver 这个结构体里面有个probe函数了,
static struct platform_driver i2c_imx_driver = {
	.probe = i2c_imx_probe,
	.remove = i2c_imx_remove,
	.driver = {
		.name = DRIVER_NAME,
		.pm = I2C_IMX_PM_OPS,
		.of_match_table = i2c_imx_dt_ids,
	},
	.id_table = imx_i2c_devtype,
};
可是在注册这个驱动的时候,怎么里面还有个platform_drv_probe函数,
 */
int __platform_driver_register(struct platform_driver *drv,
				struct module *owner)
{
	drv->driver.owner = owner;
	drv->driver.bus = &platform_bus_type;
	drv->driver.probe = platform_drv_probe;
	drv->driver.remove = platform_drv_remove;
	drv->driver.shutdown = platform_drv_shutdown;

	return driver_register(&drv->driver);
}
看了下代码发现,这是因为外层的platform_drv_probe里面其实最终就是调用了platform_driver里面的probe。
static int platform_drv_probe(struct device *_dev)
{
	struct platform_driver *drv = to_platform_driver(_dev->driver);
	struct platform_device *dev = to_platform_device(_dev);
	int ret;

	ret = of_clk_set_defaults(_dev->of_node, false);
	if (ret < 0)
		return ret;

	ret = dev_pm_domain_attach(_dev, true);
	if (ret != -EPROBE_DEFER) {
		if (drv->probe) {
			ret = drv->probe(dev);  //在这个地方调用了platform_driver的probe函数
			if (ret)
				dev_pm_domain_detach(_dev, true);
		} else {
			/* don't fail if just dev_pm_domain_attach failed */
			ret = 0;
		}
	}

	if (drv->prevent_deferred_probe && ret == -EPROBE_DEFER) {
		dev_warn(_dev, "probe deferral not supported\n");
		ret = -ENXIO;
	}

	return ret;
}
2.3.3 疑问:of_i2c_register_devices(adap);和bus_for_each_drv(&i2c_bus_type, NULL, adap, __process_new_adapter)函数的功能是不是重叠了
在看上面的函数调用流程的时候,发现of_i2c_register_devices(adap);和 bus_for_each_drv(&i2c_bus_type, NULL, adap, __process_new_adapter)函数里面都调用了i2c_new_device来添加i2c-client的,那功能岂不是重复了吗,仔细看了下代码发现应该是这样的,of_i2c_register_devices(adap);是从设备树节点中获取设备信息,然后注册i2c-client,而bus_for_each_drv(&i2c_bus_type, NULL, adap, __process_new_adapter)最终其实是调用的i2c_detect,然后根据驱动里面定义的detect函数和address_list去检测总线上的i2c-client,然后这相当于是添加client的不同的方法,具体解释可以看内核的这个文档:Linux内核中实例化i2c设备的几种方法----./Linux-4.9.88/Documentation/i2c/instantiating-devices文件翻译_陈 洪 伟的博客-CSDN博客
2.3.4 疑问:platform_bus_type和I2c_bus_type的问题
注意在函数i2c_adap_imx_init
static int __init i2c_adap_imx_init(void)
{
	return platform_driver_register(&i2c_imx_driver);
}
然后进一步调用__platform_driver_register,这时候的总线是platform_bus_type
int __platform_driver_register(struct platform_driver *drv,
				struct module *owner)
{
	drv->driver.owner = owner;
	drv->driver.bus = &platform_bus_type;
	drv->driver.probe = platform_drv_probe;
	drv->driver.remove = platform_drv_remove;
	drv->driver.shutdown = platform_drv_shutdown;

	return driver_register(&drv->driver);
}
但是在驱动中的probe中注册adapter(控制器)时调用i2c_add_numbered_adapter接口,这时候的总线是i2c_bus_type。
static int i2c_register_adapter(struct i2c_adapter *adap)
{
	...

	dev_set_name(&adap->dev, "i2c-%d", adap->nr);
	//BUS指向I2C
	adap->dev.bus = &i2c_bus_type;
	adap->dev.type = &i2c_adapter_type;
	res = device_register(&adap->dev);
	...
又仔细看了下代码理解了一下,其实是这样的,设备树节点中的I2C节点确实是转成platform_device然后挂载到platform_bus总线上的,然后当platform_bus_type的match函数发现设备和驱动匹配后,调用driver结构体中的probe函数,然后再probe函数中构建adapter并且添加,然后adapter是添加到i2c_bus_type的。
2.3.5 疑问:为什么i2c_imx_probe函数里面最终还是调用了match和probe函数
这个 i2c_imx_probe函数是当plarform_bus_type的match函数发现控制器驱动和控制器设备匹配之后调用i2c_imx_probe函数,然后在这里面增加adapter,可是在i2c_imx_probe函数内部一层层的最终怎么又有了drv->bus->match ? drv->bus->match(dev, drv) : 1;和 dev->bus->probe(dev);或drv->probe(dev)函数, probe里面怎么又调用了probe,那内部的probe是用来做什么的。
i2c_imx_probe
i2c_add_numbered_adapter
__i2c_add_numbered_adapter
i2c_register_adapter
device_register(&adap->dev);
device_add(dev);
bus_add_device(dev);
klist_add_tail(&dev->p->knode_bus, &bus->p->klist_devices);添加到链表
blocking_notifier_call_chain(&dev->bus->p->bus_notifier,调用bus_notifier
i2cdev_notifier_call
i2cdev_attach_adapter
device_create//增加i2c-%d节点
bus_probe_device(dev);
device_initial_probe(dev);
__device_attach(dev, true);
bus_for_each_drv(dev->bus, NULL, &data, __device_attach_driver);
__device_attach_driver
driver_match_device(drv, dev);
drv->bus->match ? drv->bus->match(dev, drv) : 1;
driver_probe_device(drv, dev);
really_probe(dev, drv);
dev->bus->probe(dev);或drv->probe(dev)
为什么里面又有probe,看不明白很难受,我又去看内核代码把i2c_imx_probe函数的调用流程捋了,我发现,应该是这样的,不过不确定我理解的是不是对的。前面的那些增加什么adapter都是没问题的,在注册adapter的时候,bus是i2c_bus_tyupe,
static int i2c_register_adapter(struct i2c_adapter *adap)
{
    ...

    adap->dev.bus = &i2c_bus_type;
	adap->dev.type = &i2c_adapter_type;
	res = device_register(&adap->dev);

     ...

}
那么,到了 drv->bus->match,这里的时候,这个bus是i2c_bus_type,那么调用的也就是
struct bus_type i2c_bus_type = {
	.name		= "i2c",
	.match		= i2c_device_match,
	.probe		= i2c_device_probe,
	.remove		= i2c_device_remove,
	.shutdown	= i2c_device_shutdown,
};
那么也就是
static int i2c_device_match(struct device *dev, struct device_driver *drv)
{
	struct i2c_client	*client = i2c_verify_client(dev);
	struct i2c_driver	*driver;

	if (!client)
		return 0;

	/* Attempt an OF style match */
	if (of_driver_match_device(dev, drv))
		return 1;

	/* Then ACPI style match */
	if (acpi_driver_match_device(dev, drv))
		return 1;

	driver = to_i2c_driver(drv);
	/* match on an id table if there is one */
	if (driver->id_table)
		return i2c_match_id(driver->id_table, client) != NULL;

	return 0;
}
那么由于这里添加的是adapter设备,那么if (!client)根本就不成立,所以,这里match是0,那么
static int __device_attach_driver(struct device_driver *drv, void *_data)
{
	struct device_attach_data *data = _data;
	struct device *dev = data->dev;
	bool async_allowed;
	int ret;

	/*
	 * Check if device has already been claimed. This may
	 * happen with driver loading, device discovery/registration,
	 * and deferred probe processing happens all at once with
	 * multiple threads.
	 */
	if (dev->driver)
		return -EBUSY;

	ret = driver_match_device(drv, dev);
	if (ret == 0) {
		/* no match */
		return 0;
	} else if (ret == -EPROBE_DEFER) {
		dev_dbg(dev, "Device match requests probe deferral\n");
		driver_deferred_probe_add(dev);
	} else if (ret < 0) {
		dev_dbg(dev, "Bus failed to match device: %d", ret);
		return ret;
	} /* ret > 0 means positive match */

	async_allowed = driver_allows_async_probing(drv);

	if (async_allowed)
		data->have_async = true;

	if (data->check_async && async_allowed != data->want_async)
		return 0;

	return driver_probe_device(drv, dev);
}
由于driver_match_device(drv, dev);函数直接返回的0,那么__device_attach_driver函数也就直接返回了,也就不会调用driver_probe_device(drv, dev);函数了。
3 i2c-core
I2C 设备和驱动的匹配过程是由 I2C 核心来完成的,drivers/i2c/i2c-core.c 就是 I2C 的核心
部分,I2C 核心提供了一些与具体硬件无关的 API 函数,比如前面讲过的:
1、i2c_adapter 注册/注销函数
int i2c_add_adapter(struct i2c_adapter *adapter)
int i2c_add_numbered_adapter(struct i2c_adapter *adap)
void i2c_del_adapter(struct i2c_adapter * adap)
2、i2c_driver 注册/注销函数
int i2c_register_driver(struct module *owner, struct i2c_driver *driver)
int i2c_add_driver (struct i2c_driver *driver)
void i2c_del_driver(struct i2c_driver *driver)
设备和驱动的匹配过程也是由 I2C 总线完成的,I2C 总线的数据结构为 i2c_bus_type,定义
在 drivers/i2c/i2c-core.c 文件。
另外i2c-core里面还有i2c_transfer函数,然后设备驱动里面直接用i2c_transfer 函数发送数据,而这个i2c_transfer 函数最终调用的是adapter里面的algorithm里面的master_xfer 函数,从这里也能看出来,i2c-core起到了一个承上启下的作用,连接设备驱动和控制器驱动。
4 i2c设备
4.1 i2c-client
i2c-client来自设备树文件,一般放在i2c节点里面的子节点,比如下面的ap3216设备。
&i2c1 {
ap3216c@1e {
compatible = "lite-on,ap3216c";
reg = <0x1e>;
};/*i2c里面的子节点,就是用来表示i2c设备的*/
};&i2c1 {
clock-frequency = <100000>;
pinctrl-names = "default";
pinctrl-0 = <&pinctrl_i2c1>;
status = "okay";
};/*这个是用来表示i2c控制器的,不是i2c设备的*/
i2c总线节点下的子节点不会被转成platform_device,他们是由I2C总线驱动程序来处理, 把I2C下的设备节点转成client其实是i2c控制器驱动程序里面的probe函数来做的,前面已经分析过probe函数内部的流程,其中中间部分的of_i2c_register_devices函数就是用来增加i2c-client的。
i2c_imx_probe
i2c_add_numbered_adapter
__i2c_add_numbered_adapter
i2c_register_adapter
device_register(&adap->dev);
device_add(dev);
bus_add_device(dev);
klist_add_tail(&dev->p->knode_bus, &bus->p->klist_devices);添加到链表
blocking_notifier_call_chain(&dev->bus->p->bus_notifier,调用bus_notifier
i2cdev_notifier_call
i2cdev_attach_adapter
device_create//增加i2c-%d节点
bus_probe_device(dev);
device_initial_probe(dev);
__device_attach(dev, true);
bus_for_each_drv(dev->bus, NULL, &data, __device_attach_driver);
__device_attach_driver
driver_match_device(drv, dev);
drv->bus->match ? drv->bus->match(dev, drv) : 1;
driver_probe_device(drv, dev);
really_probe(dev, drv);
dev->bus->probe(dev);或drv->probe(dev)
of_i2c_register_devices(adap);
of_i2c_register_device(adap, node);
i2c_new_device(adap, &info);用来增加client的
client->dev.parent = &client->adapter->dev;
client->dev.bus = &i2c_bus_type;//注意这里是i2c-bus,不是platform_bus
client->dev.type = &i2c_client_type;
client->dev.of_node = info->of_node;
client->dev.fwnode = info->fwnode;
status = device_register(&client->dev);注册新的 i2c_client 设备
device_add(dev);
bus_add_device(dev);
klist_add_tail(&dev->p->knode_bus, &bus->p->klist_devices);
bus_probe_device
device_initial_probe(dev);
__device_attach(dev, true);
bus_for_each_drv
__device_attach_driver
driver_match_device
drv->bus->match ? drv->bus->match(dev, drv) : 1;
driver_probe_device(drv, dev);
really_probe(dev, drv);
dev->bus->probe(dev);或drv->probe(dev)
bus_for_each_drv(&i2c_bus_type, NULL, adap, __process_new_adapter)
__process_new_adapter(struct device_driver *d, void *data)
i2c_do_add_adapter(struct i2c_driver *driver, struct i2c_adapter *adap)
i2c_detect(adap, driver);通过i2c_detect检测是否有适合的设备连接在总线上
if (!driver->detect || !address_list) return 0;如果没定义detect或address_list就直接返回了
i2c_detect_address(temp_client, driver);
err = driver->detect(temp_client, &info);根据对应client发送一个测试数据如果没有问题则证明这个client是这个驱动所需要的设备,最后将设备添加到链表,最后调用bus_probe_device,尝试绑定驱动。
client = i2c_new_device(adapter, &info);用来增加client的
device_register(&client->dev);
device_add(dev);
bus_add_device(dev);
klist_add_tail
bus_probe_device(dev);
bus_probe_device(dev);
device_initial_probe(dev);
__device_attach(dev, true);
bus_for_each_drv
__device_attach_driver
driver_match_device(drv, dev);
drv->bus->match ? drv->bus->match(dev, drv) : 1;
driver_probe_device(drv, dev);
really_probe(dev, drv);
dev->bus->probe(dev);或drv->probe(dev)
4.2 i2c-driver
i2c_driver采用的是这个总线结构体
struct bus_type i2c_bus_type = {
	.name		= "i2c",
	.match		= i2c_device_match,
	.probe		= i2c_device_probe,
	.remove		= i2c_device_remove,
	.shutdown	= i2c_device_shutdown,
};
先从入口函数module_init(at24_init);开始看,这里面调用了i2c_add_driver(&at24_driver);,然后里面调用了i2c_register_driver(THIS_MODULE, driver),然后里面调用了driver_register(&driver->driver);然后再往里调用了bus_add_driver(drv);,然后继续往里调用了driver_attach(drv);然后继续bus_for_each_dev(drv->bus, NULL, drv, __driver_attach);这个函数就是就是针对每个device都调用__driver_attach函数,那进去__driver_attach函数发现里面有两个重要的函数
- driver_match_device(drv, dev);
- driver_probe_device(drv, dev);
driver_match_device(drv, dev);里面进一步调用了drv->bus->match(dev, drv),这便是i2c_bus_type里面的match函数了。
driver_probe_device(drv, dev);里面进一步调用了really_probe(dev, drv);,然后再往里进一步调用了dev->bus->probe(dev);,这便是i2c_bus_type里面的probe函数了。
i2c_add_driver(&at24_driver)
i2c_register_driver(THIS_MODULE, driver)
driver_register(&driver->driver)
bus_add_driver(drv)
klist_add_tail(&priv->knode_bus, &bus->p->klist_drivers)把驱动放到klist_driver
driver_attach(drv)
bus_for_each_dev(drv->bus, NULL, drv, __driver_attach);
__driver_attach(struct device *dev, void *data)
driver_match_device(drv, dev);
drv->bus->match ? drv->bus->match(dev, drv) : 1;
driver_probe_device(drv, dev);
really_probe(dev, drv);
dev->bus->probe(dev);或drv->probe(dev)
/* Walk the adapters that are already present */
i2c_for_each_dev(driver, __process_new_driver);//
__process_new_driver //下面的代码不会被调用,从这里就直接返回了。
i2c_do_add_adapter(struct i2c_driver *driver,struct i2c_adapter *adap)
i2c_detect(adap, driver);
if (!driver->detect || !address_list) return 0;如果没定义detect或address_list就直接返回了
i2c_detect_address(temp_client, driver);
err = driver->detect(temp_client, &info);
client = i2c_new_device(adapter, &info);
device_register(&client->dev);
device_add(dev);
bus_add_device(dev);
klist_add_tail
bus_probe_device(dev);
bus_probe_device(dev);
device_initial_probe(dev);
__device_attach(dev, true);
bus_for_each_drv
__device_attach_driver
driver_match_device(drv, dev);
drv->bus->match ? drv->bus->match(dev, drv) : 1;
driver_probe_device(drv, dev);
really_probe(dev, drv);
dev->bus->probe(dev);或drv->probe(dev)
4.2.1 疑问:i2c_register_driver函数中调用driver_register(&driver->driver);函数增加驱动就行了,为什么还调用了i2c_for_each_dev(driver, __process_new_driver);
我在看 i2c_add_driver(&at24_driver)函数的时候,发现里面调用driver_register函数其实就已经完成了驱动注册工作,下面还调用了一个i2c_for_each_dev(driver, __process_new_driver);做什么用,而且这个函数内部竟然是i2c_do_add_adapter的,又看了下代码,其实__process_new_driver函数没被调用,
int i2c_register_driver(struct module *owner, struct i2c_driver *driver)
{
	int res;

	/* Can't register until after driver model init */
	if (WARN_ON(!is_registered))
		return -EAGAIN;

	/* add the driver to the list of i2c drivers in the driver core */
	driver->driver.owner = owner;
	driver->driver.bus = &i2c_bus_type;
	INIT_LIST_HEAD(&driver->clients);

	/* When registration returns, the driver core
	 * will have called probe() for all matching-but-unbound devices.
	 */
	res = driver_register(&driver->driver);
	if (res)
		return res;

	pr_debug("driver [%s] registered\n", driver->driver.name);

	/* Walk the adapters that are already present */
	i2c_for_each_dev(driver, __process_new_driver);

	return 0;
}
原因在这里,
static int __process_new_driver(struct device *dev, void *data)
{
	if (dev->type != &i2c_adapter_type)
		return 0;
	return i2c_do_add_adapter(data, to_i2c_adapter(dev));
}
这里有个判断if (dev->type != &i2c_adapter_type),所以后面的函数根本没被调用,疑问解决。
4.3 probe函数做了什么
当新增设备或驱动后,会调用i2c_bus_type中的match函数,match匹配之后就会调用驱动程序里面的probe函数,来看一下驱动程序里面的probe函数做了什么。
at24_probe
....
at24->nvmem_config.name = dev_name(&client->dev);
at24->nvmem_config.dev = &client->dev;
at24->nvmem_config.read_only = !writable;
at24->nvmem_config.root_only = true;
at24->nvmem_config.owner = THIS_MODULE;
at24->nvmem_config.compat = true;
at24->nvmem_config.base_dev = &client->dev;
at24->nvmem_config.reg_read = at24_read;//读函数
at24->nvmem_config.reg_write = at24_write;//写函数
at24->nvmem_config.priv = at24;
at24->nvmem_config.stride = 1;
at24->nvmem_config.word_size = 1;
at24->nvmem_config.size = chip.byte_len;
at24->nvmem = nvmem_register(&at24->nvmem_config);
....
nvmem->id = rval;
nvmem->owner = config->owner;
nvmem->stride = config->stride;
nvmem->word_size = config->word_size;
nvmem->size = config->size;
nvmem->dev.type = &nvmem_provider_type;
nvmem->dev.bus = &nvmem_bus_type;//注意这个地方。
nvmem->dev.parent = config->dev;
nvmem->priv = config->priv;
nvmem->reg_read = config->reg_read;
nvmem->reg_write = config->reg_write;
np = config->dev->of_node;
nvmem->dev.of_node = np;
rval = device_add(&nvmem->dev);//这个device_add函数在前面看多很多遍了,无非就是那一套。
bus_add_device(dev);
bus_probe_device(dev);
device_initial_probe(dev);
__device_attach(dev, true);
bus_for_each_drv(dev->bus, NULL, &data,__device_attach_driver);
__device_attach_driver
driver_match_device(drv, dev);
return drv->bus->match ? drv->bus->match(dev, drv) : 1;
driver_probe_device(drv, dev);
driver_probe_device(drv, dev);
really_probe(dev, drv);
dev->bus->probe(dev);或drv->probe(dev)
4.3.1 疑问:at24_probe里面怎么又有match和probe
我的理解at24_probe 函数里面应该是类似实现一个file_operation结构体,然后里面有具体的读写函数这不就行了吗,可是从上面的流程看怎么at24_probe 函数里面又调用了match和probe函数,好吧继续看内核代码解决我的困惑。。。。。。。。
首先看一下
static struct bus_type nvmem_bus_type = {
	.name		= "nvmem",
};
然后发现这里面没定义match函数,那么match函数就是空的,那么return drv->bus->match ? drv->bus->match(dev, drv) : 1;直接返回1,然后会调用driver_probe_device(drv, dev);函数,
static int really_probe(struct device *dev, struct device_driver *drv)
{
	...

	if (dev->bus->probe) {
		ret = dev->bus->probe(dev);
		if (ret)
			goto probe_failed;
	} else if (drv->probe) {
		ret = drv->probe(dev);
		if (ret)
			goto probe_failed;
	}

    ...
}
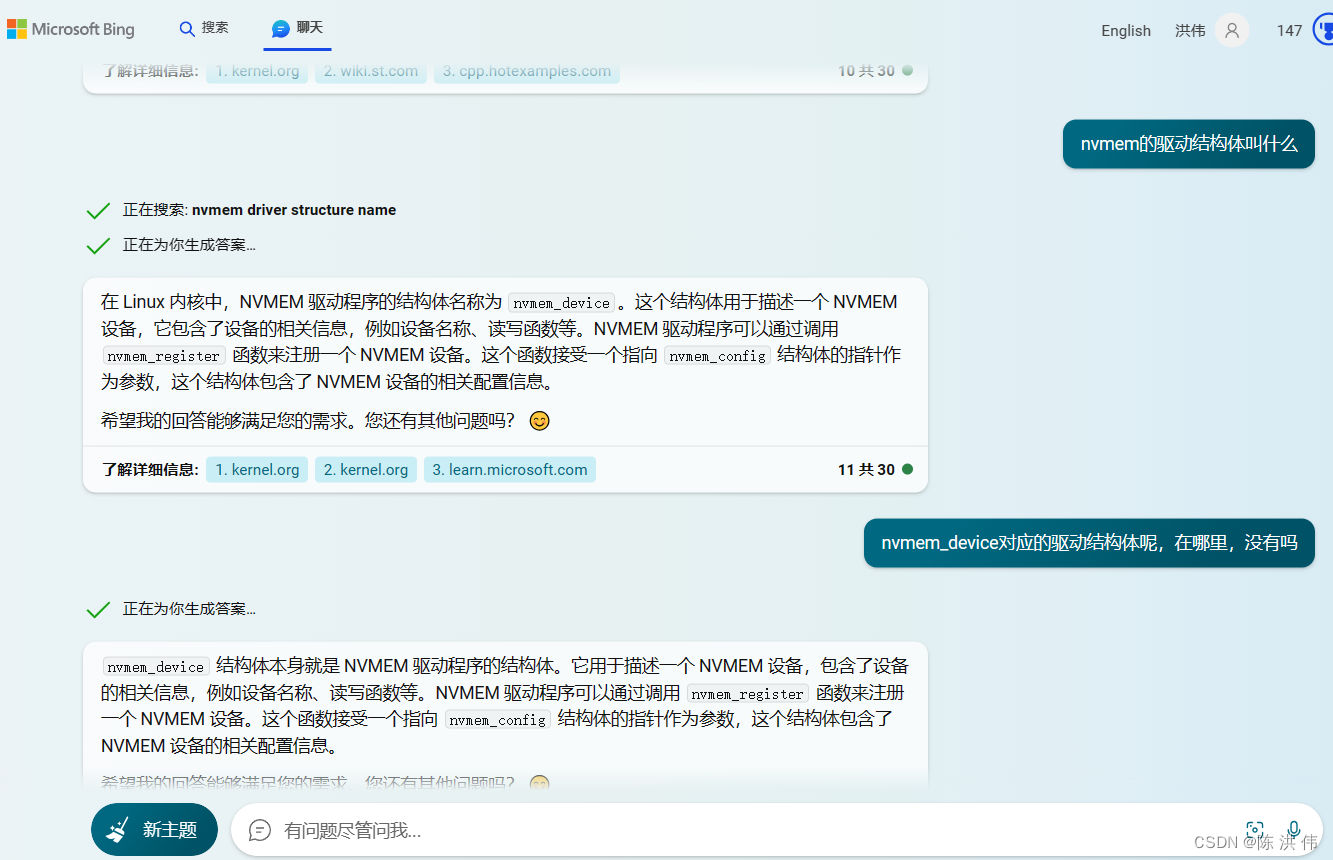
这里调用dev->bus->probe空的,那么就去调用driver结构体的probe函数,那我在内核代码中找nvmem driver结构体,没找到,那么求助Bing AI
那么
struct nvmem_device {
	const char		*name;
	struct module		*owner;
	struct device		dev;
	int			stride;
	int			word_size;
	int			ncells;
	int			id;
	int			users;
	size_t			size;
	bool			read_only;
	int			flags;
	struct bin_attribute	eeprom;
	struct device		*base_dev;
	nvmem_reg_read_t	reg_read;
	nvmem_reg_write_t	reg_write;
	void *priv;
};
这里面就没有probe函数,所以else if (drv->probe)也不成立。
到这里,I2C驱动框架其实就算是看完了,下面再简单介绍一下I2C驱动相关的其他东西。
5 i2c-tools
i2c-tools 是一套好用的工具,也是一套示例代码。
5.1 为什么说i2c-tools是一套好用的工具
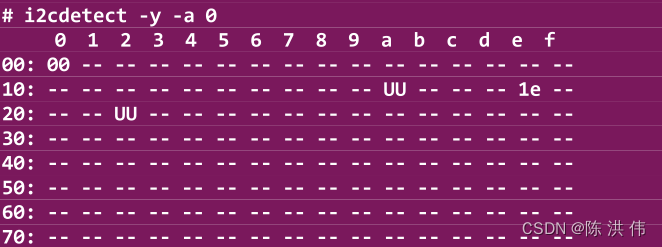
为什么说i2c-tools是一套好用的工具,因为他里面实现了 i2cdetect检测函数, i2cget读函数, i2cset写函数,i2ctransfer传输函数,我们可以字节用这些命令去操作或调试I2C设备,比如
5.2 为什么说是i2c-tools也是一套示例代码
为什么说i2c-tools也是一套示例代码,比如如果用I2C总线进行传输,在./tools/i2ctransfer.c里面,我们可以看到他的代码实现,
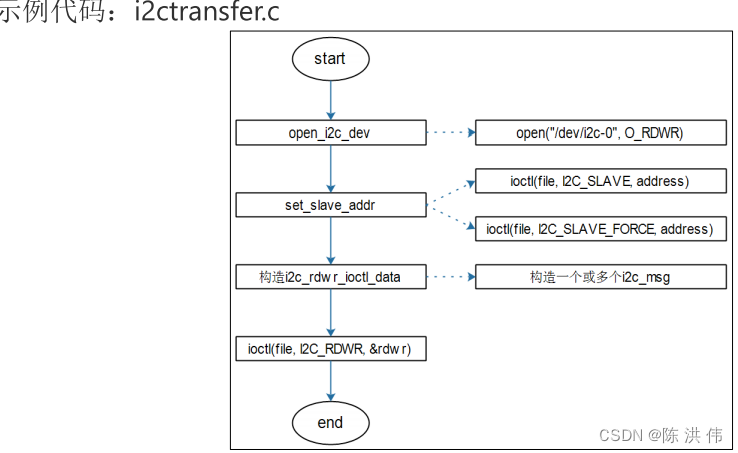
那我们就可以模仿他的流程操作我们自己的I2C设备,上面的比如 set_slave_addr函数具体实现就是在./tools/i2cbusses.c里面,我们写代码需要包含./tools/i2cbusses.c文件。
如果用SMBus总线进行传输,i2cget.c、i2cset.c里面的示例代码是这样的

然后如果我们想用SMBus总线操作我们的i2c设备,我们就可以模仿他的代码,上面的比如i2c_smbus_access函数具体实现是在./lib/smbus.c文件里面,那我们写代码的时候需要包含./lib/smbus.c文件.
比如编写一个读写eeprom的测试程序
#include <sys/ioctl.h>
#include <errno.h>
#include <string.h>
#include <stdio.h>
#include <stdlib.h>
#include <unistd.h>
#include <linux/i2c.h>
#include <linux/i2c-dev.h>
#include <i2c/smbus.h>
#include "i2cbusses.h"
#include <time.h>


/* ./at24c02 <i2c_bus_number> w "100ask.taobao.com"
 * ./at24c02 <i2c_bus_number> r
 */

int main(int argc, char **argv)
{
	unsigned char dev_addr = 0x50;
	unsigned char mem_addr = 0;
	unsigned char buf[32];

	int file;
	char filename[20];
	unsigned char *str;

	int ret;

	struct timespec req;

	if (argc != 3 && argc != 4)
	{
		printf("Usage:\n");
		printf("write eeprom: %s <i2c_bus_number> w string\n", argv[0]);
		printf("read  eeprom: %s <i2c_bus_number> r\n", argv[0]);
		return -1;
	}

	file = open_i2c_dev(argv[1][0]-'0', filename, sizeof(filename), 0);
	if (file < 0)
	{
		printf("can't open %s\n", filename);
		return -1;
	}

	if (set_slave_addr(file, dev_addr, 1))
	{
		printf("can't set_slave_addr\n");
		return -1;
	}

	if (argv[2][0] == 'w')
	{
		// write str: argv[3]
		str = argv[3];

		req.tv_sec  = 0;
		req.tv_nsec = 20000000; /* 20ms */

		while (*str)
		{
			// mem_addr, *str
			// mem_addr++, str++
			ret = i2c_smbus_write_byte_data(file, mem_addr, *str);
			if (ret)
			{
				printf("i2c_smbus_write_byte_data err\n");
				return -1;
			}
			// wait tWR(10ms)
			nanosleep(&req, NULL);

			mem_addr++;
			str++;
		}
		ret = i2c_smbus_write_byte_data(file, mem_addr, 0); // string end char
		if (ret)
		{
			printf("i2c_smbus_write_byte_data err\n");
			return -1;
		}
	}
	else
	{
		// read
		ret = i2c_smbus_read_i2c_block_data(file, mem_addr, sizeof(buf), buf);
		if (ret < 0)
		{
			printf("i2c_smbus_read_i2c_block_data err\n");
			return -1;
		}

		buf[31] = '\0';
		printf("get data: %s\n", buf);
	}

	return 0;

}
6 i2c_dev.c通用驱动
i2c_dev.c其实就是通用驱动或者说万能驱动,它里面实现了一个
static const struct file_operations i2cdev_fops = {
	.owner		= THIS_MODULE,
	.llseek		= no_llseek,
	.read		= i2cdev_read,
	.write		= i2cdev_write,
	.unlocked_ioctl	= i2cdev_ioctl,
	.open		= i2cdev_open,
	.release	= i2cdev_release,
};
如果我们使用i2c_dev.c这个万能驱动,那么我们不需要增加i2c_client以及i2c_driver,然后我们在应用层可以直接操作i2c控制器,然后去和挂载在I2C总线的从设备进行通信,就相当于把操作具体硬件的时序放到应用去实现了,要求应用开发人员既要了解具体的硬件操作时序,也要了解I2C总线协议。也就是红线画的走向

7 GPIO模拟I2C
简单看一下./Linux-4.9.88_just_for_read/drivers/i2c/busses/i2c-gpio.c文件,还是从入口函数开始看
static struct platform_driver i2c_gpio_driver = {
	.driver		= {
		.name	= "i2c-gpio",
		.of_match_table	= of_match_ptr(i2c_gpio_dt_ids),
	},
	.probe		= i2c_gpio_probe,
	.remove		= i2c_gpio_remove,
};
static int __init i2c_gpio_init(void)
{
int ret;
ret = platform_driver_register(&i2c_gpio_driver);
if (ret)
printk(KERN_ERR "i2c-gpio: probe failed: %d\n", ret);
return ret;
}函数调用关系无非又是那一套
i2c_gpio_init
platform_driver_register
__platform_driver_register
drv->driver.owner = owner;
drv->driver.bus = &platform_bus_type;
drv->driver.probe = platform_drv_probe;
drv->driver.remove = platform_drv_remove;
drv->driver.shutdown = platform_drv_shutdown;
driver_register(&drv->driver);
bus_add_driver
driver_attach(drv);
__driver_attach
driver_match_device(drv, dev);
drv->bus->match ? drv->bus->match(dev, drv) : 1;
driver_probe_device(drv, dev);
really_probe(dev, drv);
dev->bus->probe或drv->probe(dev)
match之后就调用驱动结构体里面的i2c_gpio_probe函数,然后首先调用of_i2c_gpio_get_props函数从设备树里面获取gpio的信息和一些属性,就是频率,开漏的设置,然后获取sda引脚,scl引脚, 然后根据从设备树中获取的值设置adapter,然后利用i2c_bit_add_numbered_bus注册adapter,然后i2c_bit_add_numbered_bus里面是调用了__i2c_bit_add_bus,在这里面设置了algo算法,然后add_adapter。
i2c_gpio_probe
of_i2c_gpio_get_pins
devm_gpio_request(&pdev->dev, sda_pin, "sda");
devm_gpio_request(&pdev->dev, scl_pin, "scl");
i2c_bit_add_numbered_bus(adap);
__i2c_bit_add_bus(adap, i2c_add_numbered_adapter);
adap->algo = &i2c_bit_algo;
adap->retries = 3;
if (bit_adap->getscl == NULL)
adap->quirks = &i2c_bit_quirk_no_clk_stretch;
ret = add_adapter(adap);//add_adapter就是i2c_add_numbered_adapter
再往后的调用不看了,前面类似的分析了很多遍了
以上是Linux内核的驱动框架介绍,如有错误和问题恳请指出。
参考文献:
正点原子驱动开发手册
韦东山老师驱动开发大全学习视频
Linux4.9.88内核源码
7. 平台设备驱动 — [野火]嵌入式Linux驱动开发实战指南——基于i.MX6ULL系列 文档
I2C驱动实现的两种思路(i2c-dev.c和i2c-core.c)_正在起飞的蜗牛的博客-CSDN博客
https://www.cnblogs.com/happybirthdaytoyou/p/13594060.html
【I2C】通用驱动i2c-dev分析_i2c_dev_init_ZHONGCAI0901的博客-CSDN博客
linux内核I2C子系统详解——看这一篇就够了_正在起飞的蜗牛的博客-CSDN博客
https://www.cnblogs.com/burnk/p/17454052.html
十分钟带你搞懂 Linux I2C 软件架构_哔哩哔哩_bilibili
I2C——i2c_driver的注册及probe探测函数调用过程_i2c probe_lxllinux的博客-CSDN博客
内核对设备树的处理__device_node转换为platform_device_initcall_from_entry_陈 洪 伟的博客-CSDN博客 https://www.cnblogs.com/schips/p/linux_driver_device_node_to_platform_device.html
Linux设备模型之device_add_庐州拎壶冲的博客-CSDN博客
https://www.cnblogs.com/yangjiguang/p/6220600.html
i2c设备添加、驱动的加载和设备匹配_安卓 i2c 心率设备添加_bruk_spp的博客-CSDN博客
【I2C】Linux I2C子系统分析_ZHONGCAI0901的博客-CSDN博客

![[PAT乙级] 1029 旧键盘 C++实现](https://img-blog.csdnimg.cn/8a223f6ebe4e469b986313f2e5b8e3e8.png)
