1、Mybatis Plus介绍
Mybatis,用过的都知道,这里不介绍,mybatis plus只是在mybatis原来的基础上做了些改进,增强了些功能,增强的功能主要为增加更多常用接口方法调用,减少xml内sql语句编写,也可以自定义接口,简单的查询、新增和删除只需调用内置接口方法即可,有点类似于springdata jpa的方式。
2、插件引入和启动配置
2.1、pom.xml
<dependencies>
<!-- mybatis-plus插的springboot支持 -->
   <dependency>
        <groupId>com.baomidou</groupId>
        <artifactId>mybatis-plus-boot-starter</artifactId>
        <version>3.5.2</version>
    </dependency>
    <!-- MySql -->
    <dependency>
        <groupId>mysql</groupId>
        <artifactId>mysql-connector-java</artifactId>
        <version>8.0.30</version>
    </dependency>
    <!-- 连接池 -->
    <dependency>
        <groupId>com.alibaba</groupId>
        <artifactId>druid</artifactId>
        <version>1.2.15</version>
    </dependency>
</dependencies>
2.2、application.yml配置
server:
  port: 8080
spring:
  application:
    name: mybatisPlus
  datasource:
    driver-class-name: com.mysql.cj.jdbc.Driver
    url: jdbc:mysql://127.0.0.1:3306/mybatistest?useUnicode=true&characterEncoding=utf8&autoReconnect=true&allowMultiQueries=true&useSSL=false
    username: liuliu
    password: 123456
mybatis:
  database:
    type: mysql
mybatis-plus:
  mapper-locations: classpath*:mapper/*.xml
mapper-locations: 这里配置xxxMapper.xml文件路径的地方,静态目录【resources】下,如果项目简单,不需要用到xml内的查询,这里可以省略掉。
2.3、启动入口配置
package com.liuliu.demo;

import org.mybatis.spring.annotation.MapperScan;
import org.springframework.boot.SpringApplication;
import org.springframework.boot.autoconfigure.SpringBootApplication;

@SpringBootApplication
//启动前需扫描dao接口文件所对应的包路径,加入到bean处理,
//这里很重要,否则自定义的查询接口无效
@MapperScan("com.liuliu.demo.mapper")
public class DemoApplication {

    public static void main(String[] args) {
        SpringApplication.run(DemoApplication.class, args);
    }

}
3、查询
3.1、创建数据表对象
数据表结构:
CREATE TABLE `tb_user` (
  `id` int(11) NOT NULL AUTO_INCREMENT,
  `user_name` varchar(32) NOT NULL COMMENT '用户名称',
  `password` varchar(32) DEFAULT NULL COMMENT '密码',
  `name` varchar(64) DEFAULT NULL COMMENT 'name',
  `age` int(11) DEFAULT NULL,
  `email` varchar(32) DEFAULT NULL,
  `demp_id` int(11) DEFAULT NULL,
  `md5` char(32) DEFAULT NULL,
  PRIMARY KEY (`id`)
) ENGINE=InnoDB DEFAULT CHARSET=utf8;
CREATE TABLE `demp` (
  `id` int(11) NOT NULL AUTO_INCREMENT,
  `classname` varchar(32) NOT NULL,
  PRIMARY KEY (`id`),
  UNIQUE KEY `actable_uni_classname` (`classname`)
) ENGINE=InnoDB DEFAULT CHARSET=utf8;
创建实体类:
@Data
@TableName("tb_user")
public class User {
    @TableId(type = IdType.AUTO)
    private Integer id;

    private String userName;

    @TableField(select = false)
    private String password;

    private String name;

    private Integer age;

    @TableField(value = "email")
    private String mail;

    @TableField(exist = false)
    private String address;

    @TableField(value = "demp_id")
    private Integer dempId;

    private String md5;

    @TableField(exist = false)
    private Demp demp;
}
@Data
public class Demp {

    @TableId(type = IdType.AUTO)
    private Integer id;

    private String classname;
}
创建mapperDao接口
@Mapper
@Repository
public interface UserMapper extends BaseMapper<User> {
}
@Mapper
@Repository
public interface DempMapper extends BaseMapper<Demp> {
}
创建service接口
package com.liuliu.demo.service;

public interface UserService extends IService<User> {
}
这里只需演示一个表的查询,其它的service就不演示创建了。
3.2、查询数据
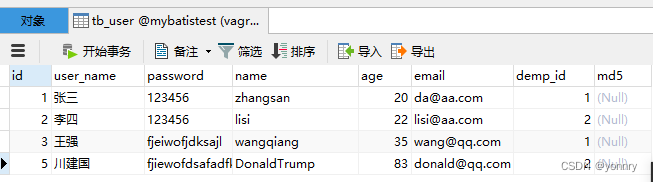
先手动创建好数据:
创建一个实现查询接口service类
package com.liuliu.demo.service.impl;

@Service
public class UserServiceImpl extends ServiceImpl<UserMapper, User> implements UserService {
    @Autowired
    private UserMapper userMapper;

    public void findUserModule(){
        //查多条,当没查到时返回[]
       System.out.println(list(query().ge("id", 2).getWrapper()));

       //只查一条,当没查到时返回null
       System.out.println(getOne(query().ge("age", 22).orderByDesc("id").getWrapper().last("limit 1")));
    }
创建一个controller类
@RestController
public class UserController {

    @Autowired
    private UserServiceImpl userserviceimpl;

    @GetMapping("findtest")
    public long findtestmodule(){

        userserviceimpl.findUserModule();
        //作为测试效果,这里不做数据返回了,而是在内部控制台打印
        return System.currentTimeMillis();
    }
}
控制台输出的结果:
[User(id=2, userName=李四, password=null, name=lisi, age=22, mail=lisi@aa.com, address=null, dempId=2, md5=null, demp=null), User(id=3, userName=王强, password=null, name=wangqiang, age=35, mail=wang@qq.com, address=null, dempId=1, md5=null, demp=null), User(id=5, userName=川建国, password=null, name=DonaldTrump, age=83, mail=donald@qq.com, address=null, dempId=2, md5=null, demp=null)]
User(id=5, userName=川建国, password=null, name=DonaldTrump, age=83, mail=donald@qq.com, address=null, dempId=2, md5=null, demp=null)
是不是很解单?新增和删除数据方法自己去试试:
this.save(user);
userMapper.deleteById(id);
3.3、关联查询
通过Mybatis plus自带方法来查关联表,暂时好像还不支持,但可以使用xml文件内的sql语法来创建
3.3.1、自定义接口方法
package com.liuliu.demo.mapper;

import com.baomidou.mybatisplus.core.mapper.BaseMapper;
import com.liuliu.demo.pojo.User;
import org.apache.ibatis.annotations.Mapper;
import org.springframework.stereotype.Repository;

import java.util.List;

@Mapper
@Repository
public interface UserMapper extends BaseMapper<User> {

    User getUserById(Integer id);

    List<User> getUserAll();
}
3.3.2、创建userMapper.xml
路径:resources/mapper/userMapper.xml
<?xml version="1.0" encoding="UTF-8"?>
<!DOCTYPE mapper PUBLIC "-//mybatis.org//DTD Mapper 3.0//EN" "http://mybatis.org/dtd/mybatis-3-mapper.dtd">
<mapper namespace="com.liuliu.demo.mapper.UserMapper">
    <resultMap id="userMap" type="com.liuliu.demo.pojo.User">
        <!--proerty:对象属性, column: 数据表字段-->
        <id property="id" column="id" />
        <result property="userName" column="user_name" />
        <result property="name" column="name" />
        <result property="age" column="age" />
        <result property="password" column="password" />
        <result property="mail" column="email" />
        <result property="dempId" column="demp_id" />
        <!--association:关联对象-->
        <association property="demp" javaType="com.liuliu.demo.pojo.Demp">
            <result property="id" column="id" />
            <result property="classname" column="classname" />
        </association>
    </resultMap>
    <select id="getUserById" resultMap="userMap" parameterType="Integer">
        select * from tb_user join demp on tb_user.demp_id=demp.id where tb_user.id=#{id}
    </select>
    <select id="getUserAll" resultMap="userMap">
        select * from tb_user join demp on tb_user.demp_id=demp.id
    </select>
</mapper>
3.3.3、实现关联查询
UserServiceImpl.java内添加查询方法
public User findByid(Integer id){
     return userMapper.getUserById(id);
}

@Override
public List<User> findUserAll() {
     return userMapper.getUserAll();
}
控制器内添加查询对接
@GetMapping("/findById")
    public User findById(@RequestParam(name = "id") Integer id){
        return userserviceimpl.findByid(id);
    }

    @GetMapping("/findUserAll")
    public List<User> findUserAll(){
        return userserviceimpl.findUserAll();
    }
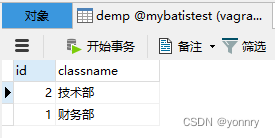
demp表数据:
访问结果
http://127.0.0.1:8080/findById?id=5

{
	"id": 5,
	"userName": "川建国",
	"password": "fjiewofdsafadfkewok",
	"name": "DonaldTrump",
	"age": 83,
	"mail": "donald@qq.com",
	"address": null,
	"dempId": 2,
	"md5": null,
	"demp": {
		"id": 5,
		"classname": "技术部"
	}
}
http://127.0.0.1:8080/findUserAll

[
	{
		"id": 1,
		"userName": "张三",
		"password": "123456",
		"name": "zhangsan",
		"age": 20,
		"mail": "da@aa.com",
		"address": null,
		"dempId": 1,
		"md5": null,
		"demp": {
			"id": 1,
			"classname": "财务部"
		}
	},
	{
		"id": 2,
		"userName": "李四",
		"password": "123456",
		"name": "lisi",
		"age": 22,
		"mail": "lisi@aa.com",
		"address": null,
		"dempId": 2,
		"md5": null,
		"demp": {
			"id": 2,
			"classname": "技术部"
		}
	},
	{
		"id": 3,
		"userName": "王强",
		"password": "fjeiwofjdksajl",
		"name": "wangqiang",
		"age": 35,
		"mail": "wang@qq.com",
		"address": null,
		"dempId": 1,
		"md5": null,
		"demp": {
			"id": 3,
			"classname": "财务部"
		}
	},
	{
		"id": 5,
		"userName": "川建国",
		"password": "fjiewofdsafadfkewok",
		"name": "DonaldTrump",
		"age": 83,
		"mail": "donald@qq.com",
		"address": null,
		"dempId": 2,
		"md5": null,
		"demp": {
			"id": 5,
			"classname": "技术部"
		}
	}
]
4、SpringBoot启动时自动更新数据表
自动更新表结构,在团队开发中非常重要,否则在开发管理上很麻烦,并且增加正式环境中的运维难度,每次新增一个表或更改一个表结构,都需要单独在数据库中去操作,这不符合实际开发应用。
Mybatis plus自动更新数据表结构在设置上相比springdata jpa要复杂一些,需要先在pom中引入一个包,然后在yml配置文件中配置相关启动开关,还需在入口处配置实体扫描。
4.1、pom.xml引入相关包
<dependency>
     <groupId>com.gitee.sunchenbin.mybatis.actable</groupId>
     <artifactId>mybatis-enhance-actable</artifactId>
     <version>1.1.1.RELEASE</version>
</dependency>
4.2、application.yml增加内容
mybatis:
  table:
    auto: update  #update: 数据表实体类只要有变动,就会对数据表实施更改操作,包括删除表、新增表、更新表字段等。
  model:
    pack: com.liuliu.demo.pojo  #扫描数据实体位置
  database:
    type: mysql  #数据库类型
mybatis-plus:
#前部分为自动更新需用到的查询xml
  mapper-locations: com/gitee/sunchenbin/mybatis/actable/mapping/*/*.xml,classpath*:mapper/*.xml
4.3、入口启动文件配置
package com.liuliu.demo;

import org.mybatis.spring.annotation.MapperScan;
import org.springframework.boot.SpringApplication;
import org.springframework.boot.autoconfigure.SpringBootApplication;
import org.springframework.context.annotation.ComponentScan;

@SpringBootApplication
@MapperScan({"com.gitee.sunchenbin.mybatis.actable.dao.*", "com.liuliu.demo.mapper"})
@ComponentScan({"com.gitee.sunchenbin.mybatis.actable.manager.*", "com.liuliu.demo.*"})
public class DemoApplication {

    public static void main(String[] args) {
        SpringApplication.run(DemoApplication.class, args);
    }
}
注意@ComponentScan,前段是mybatis自带的,没有是会报错的,会报找不到对应的bean,后段是当前项目根目录包,如果不写,会访问不到任何控制器,因为这里的扫描会导致后面的been添加无效。
4.4、数据实体配置
实体类需要添加对应的@注解,否则前面做了那么多,也没有用。
主要有:
@Table
@IsKey
@IsAutoIncrement
@Column
@Unique
@Index
User.java
package com.liuliu.demo.pojo;

import com.baomidou.mybatisplus.annotation.IdType;
import com.baomidou.mybatisplus.annotation.TableField;
import com.baomidou.mybatisplus.annotation.TableId;
import com.baomidou.mybatisplus.annotation.TableName;
import com.gitee.sunchenbin.mybatis.actable.annotation.*;
import lombok.Data;

@Data
@TableName("tb_user")
@Table(name = "tb_user")
public class User {
    @TableId(type = IdType.AUTO)
    @IsKey
    @IsAutoIncrement
    @Column
    private Integer id;

	//这里有个bug说明下,这个length默认是255,设置length时如果不设置type,是无效的,最后查看数据表结果还是255
    @Column(name = "user_name", length = 32, comment = "用户名称", type = "varchar", isNull = false)
    private String userName;

    @TableField(select = false)
    @Column(name = "password", length = 32, comment = "密码", type = "varchar")
    private String password;

    @Column(name = "name", length = 64, comment = "name", type = "varchar")
    private String name;

    @Column
    private Integer age;

    @TableField(value = "email")
    @Column(name = "email", length = 32, type = "varchar")
    private String mail;

    @TableField(exist = false)
    private String address;

    @TableField(value = "demp_id")
    @Column(name = "demp_id")
    private Integer dempId;

    @Column(type = "char", length = 32)
    private String md5;

    @TableField(exist = false)
    private Demp demp;
}
Demp.java
package com.liuliu.demo.pojo;

import com.baomidou.mybatisplus.annotation.IdType;
import com.baomidou.mybatisplus.annotation.TableId;
import com.gitee.sunchenbin.mybatis.actable.annotation.*;
import lombok.Data;

@Data
@Table(name = "demp")
public class Demp {

    @TableId(type = IdType.AUTO)
    @Column
    @IsAutoIncrement
    @IsKey
    private Integer id;

    @Column(type = "varchar", length = 32, isNull = false)
    @Unique
    private String classname;
}
4.5、重启springboot应用查看效果
重启前先清空数据表
 :: Spring Boot ::       (v2.3.12.RELEASE)

2023-07-31 16:49:42.628  INFO 17156 --- [           main] com.liuliu.demo.DemoApplication          : Starting DemoApplication on yonnry with PID 17156 (C:\src\test\mybatisPlusDemo\target\classes started by yongp in C:\src\test\mybatisPlusDemo)
2023-07-31 16:49:42.629  INFO 17156 --- [           main] com.liuliu.demo.DemoApplication          : No active profile set, falling back to default profiles: default
2023-07-31 16:49:42.669  WARN 17156 --- [kground-preinit] o.s.h.c.j.Jackson2ObjectMapperBuilder    : For Jackson Kotlin classes support please add "com.fasterxml.jackson.module:jackson-module-kotlin" to the classpath
2023-07-31 16:49:43.198  INFO 17156 --- [           main] o.s.b.w.embedded.tomcat.TomcatWebServer  : Tomcat initialized with port(s): 8080 (http)
2023-07-31 16:49:43.203  INFO 17156 --- [           main] o.apache.catalina.core.StandardService   : Starting service [Tomcat]
2023-07-31 16:49:43.203  INFO 17156 --- [           main] org.apache.catalina.core.StandardEngine  : Starting Servlet engine: [Apache Tomcat/9.0.46]
2023-07-31 16:49:43.241  INFO 17156 --- [           main] o.a.c.c.C.[Tomcat].[localhost].[/]       : Initializing Spring embedded WebApplicationContext
2023-07-31 16:49:43.241  INFO 17156 --- [           main] w.s.c.ServletWebServerApplicationContext : Root WebApplicationContext: initialization completed in 575 ms
2023-07-31 16:49:43.422  WARN 17156 --- [           main] c.b.m.core.injector.AbstractMethod       : [com.liuliu.demo.mapper.DempMapper.selectById] Has been loaded by XML or SqlProvider or Mybatis's Annotation, so ignoring this injection for [class com.baomidou.mybatisplus.core.injector.methods.SelectById]
 _ _   |_  _ _|_. ___ _ |    _
| | |\/|_)(_| | |_\  |_)||_|_\
     /               |
                        3.5.2
2023-07-31 16:49:43.742  INFO 17156 --- [           main] c.g.s.m.a.m.handler.StartUpHandlerImpl   : databaseType=mysql,开始执行mysql的处理方法
2023-07-31 16:49:43.749  INFO 17156 --- [           main] com.zaxxer.hikari.HikariDataSource       : HikariPool-1 - Starting...
2023-07-31 16:49:43.818  INFO 17156 --- [           main] com.zaxxer.hikari.HikariDataSource       : HikariPool-1 - Start completed.
file类型的扫描:com.liuliu.demo.pojo
2023-07-31 16:49:43.907  INFO 17156 --- [           main] s.m.a.m.s.SysMysqlCreateTableManagerImpl : 开始创建表:tb_user
2023-07-31 16:49:43.958  INFO 17156 --- [           main] s.m.a.m.s.SysMysqlCreateTableManagerImpl : 完成创建表:tb_user
2023-07-31 16:49:43.958  INFO 17156 --- [           main] s.m.a.m.s.SysMysqlCreateTableManagerImpl : 开始创建表:demp
2023-07-31 16:49:43.973  INFO 17156 --- [           main] s.m.a.m.s.SysMysqlCreateTableManagerImpl : 完成创建表:demp
2023-07-31 16:49:43.973  INFO 17156 --- [           main] s.m.a.m.s.SysMysqlCreateTableManagerImpl : 开始创建表demp中的唯一约束actable_uni_classname
2023-07-31 16:49:43.982  INFO 17156 --- [           main] s.m.a.m.s.SysMysqlCreateTableManagerImpl : 完成创建表demp中的唯一约束actable_uni_classname
2023-07-31 16:49:44.064  INFO 17156 --- [           main] o.s.s.concurrent.ThreadPoolTaskExecutor  : Initializing ExecutorService 'applicationTaskExecutor'
2023-07-31 16:49:44.100  INFO 17156 --- [           main] o.s.b.a.w.s.WelcomePageHandlerMapping    : Adding welcome page: class path resource [static/index.html]
2023-07-31 16:49:44.154  INFO 17156 --- [           main] o.s.b.w.embedded.tomcat.TomcatWebServer  : Tomcat started on port(s): 8080 (http) with context path ''
2023-07-31 16:49:44.159  INFO 17156 --- [           main] com.liuliu.demo.DemoApplication          : Started DemoApplication in 1.738 seconds (JVM running for 2.192)
注意看,已成功启动,console中有提示“完成创建数据表***”,修改表就不演示了,原理是一样的。
5、结束
源码下载:https://download.csdn.net/download/u012029030/88136220
感谢观看,以上是我对springboot总结的经验,如有什么疑问或不同意见,欢迎留言。