1.引入相关依赖
<dependency>
<groupId>org.apache.shardingsphere</groupId>
<artifactId>sharding-jdbc-spring-boot-starter</artifactId>
<version>4.1.1</version>
</dependency>
2.添加配置
不懂的地方自己看注释
主要就是配置了
2.1数据源
记得把原本的数据源配置去除
2.2分表策略
根据account_no分表 这里只简单分了两张traffic 流量表,表名分别是
traffic_0,traffic_1 然后account_no 为偶数的在一张 account_no为奇数的在另一张
2.3id生成策略
这里使用了雪花id生成器 记得配置workId 不然有极小概率ID重复
  # 数据源 ds0 第一个数据库
  shardingsphere:
    datasource:
      #数据源名称
      names: ds0
      ds0:
        connectionTimeoutMilliseconds: 30000
        driver-class-name: com.mysql.cj.jdbc.Driver
        idleTimeoutMilliseconds: 60000
        jdbc-url: jdbc:mysql://101.227.52.230:3306/dcloud_account?useUnicode=true&characterEncoding=utf-8&useSSL=false&serverTimezone=Asia/Shanghai&allowPublicKeyRetrieval=true
        maintenanceIntervalMilliseconds: 30000
        maxLifetimeMilliseconds: 1800000
        maxPoolSize: 50
        minPoolSize: 50
        password: xxx
        type: com.zaxxer.hikari.HikariDataSource
        username: root

    props:
      # 打印执行的数据库以及语句
      sql:
        show: true

    sharding:
      tables:
        traffic:
          # 指定traffic表的数据分布情况,配置数据节点,行表达式标识符使用 ${...} 或 $->{...},但前者与 Spring 本身的文件占位符冲突,所以在 Spring 环境中建议使用 $->{...}
          actual-data-nodes: ds0.traffic_$->{0..1}
          #水平分表策略+行表达式分片
          table-strategy:
            inline:
              algorithm-expression: traffic_$->{ account_no % 2 }
              sharding-column: account_no
          #id生成策略
          key-generator:
            column: id
            props:
              worker:
                id:  ${workId}
            #id生成策略
            type: SNOWFLAKE
3.具体相关代码
雪花id生成类
package net.xdclass.util;

import org.apache.shardingsphere.core.strategy.keygen.SnowflakeShardingKeyGenerator;

/**
 * 小滴课堂,愿景:让技术不再难学
 *
 * @Description
 * @Author 二当家小D
 * @Remark 有问题直接联系我,源码-笔记-技术交流群
 * @Version 1.0
 **/

public class IDUtil {

    private static SnowflakeShardingKeyGenerator shardingKeyGenerator = new SnowflakeShardingKeyGenerator();

    /**
     * 雪花算法生成器
     * @return
     */
    public static   Comparable<?> geneSnowFlakeID(){

        return shardingKeyGenerator.generateKey();
    }

}
workId配置类
package net.xdclass.config;

import lombok.extern.slf4j.Slf4j;
import org.springframework.context.annotation.Configuration;

import java.net.InetAddress;
import java.net.UnknownHostException;

@Configuration
@Slf4j
public class SnowFlakeWorkIdConfig {

    /**
     * 动态指定sharding jdbc 的雪花算法中的属性work.id属性
     * 通过调用System.setProperty()的方式实现,可用容器的 id 或者机器标识位
     * workId最大值 1L << 100,就是1024,即 0<= workId < 1024
     * {@link SnowflakeShardingKeyGenerator#getWorkerId()}
     *
     */
    static {
        try {
            InetAddress inetAddress = InetAddress.getLocalHost();
            String ip = inetAddress.getHostAddress();
            String workId = Math.abs(ip.hashCode()) % 1024 + "";

            System.setProperty("workId",workId);
            log.info("workId:{}",workId);
        } catch (UnknownHostException e) {
            throw new RuntimeException(e);
        }
    }
}
测试类
package net.xdclass.biz;

import lombok.extern.slf4j.Slf4j;
import net.xdclass.AccountApplication;
import net.xdclass.mapper.TrafficMapper;
import net.xdclass.model.TrafficDO;
import net.xdclass.util.IDUtil;
import org.junit.Test;
import org.junit.runner.RunWith;
import org.springframework.beans.factory.annotation.Autowired;
import org.springframework.boot.test.context.SpringBootTest;
import org.springframework.test.context.junit4.SpringRunner;

import java.util.Random;

/**
 * 小滴课堂,愿景:让技术不再难学
 *
 * @Description
 * @Author 二当家小D
 * @Remark 有问题直接联系我,源码-笔记-技术交流群
 * @Version 1.0
 **/

@RunWith(SpringRunner.class)
@SpringBootTest(classes = AccountApplication.class)
@Slf4j
public class AccountTest {


    @Autowired
    private TrafficMapper trafficMapper;


    @Test
    public void testSaveTraffic() {

        Random random = new Random();
        for (int i = 0; i < 10; i++) {
            TrafficDO trafficDO = new TrafficDO();
//            trafficDO.setAccountNo(Long.valueOf(random.nextInt(100)));
            trafficDO.setAccountNo(Long.valueOf(IDUtil.geneSnowFlakeID().toString()));
            trafficMapper.insert(trafficDO);
        }

    }


}
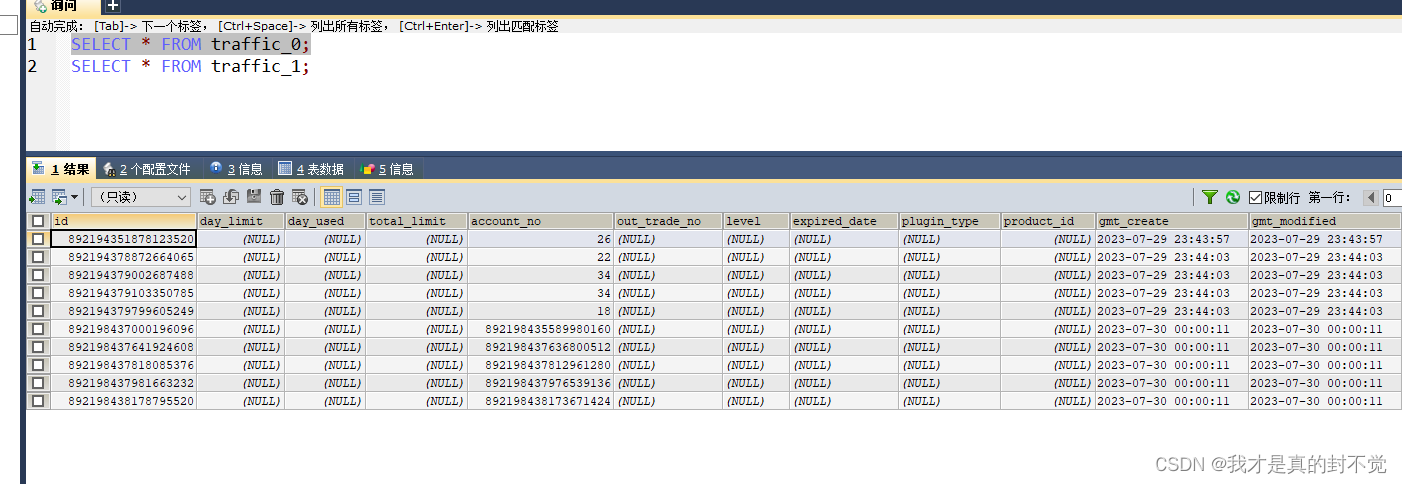
数据库效果如下 可以看到分表并插入成功 记得要提前创建traffic_0 到 traffic_N 几张表
