vuex
基本用法
vuex是作为插件使用,Vue.use(vuex)
最后注册给new Vue的是一个new Vuex.Store实例
// store.js
import Vue from 'vue'
import Vuex from 'vuex'
Vue.use(Vuex) // Vue.use注册插件
// new Vuex.Store实例
export default new Vuex.Store({
state: {
},
getters: {
},
mutations: {
},
actions: {
},
modules: {
}
})
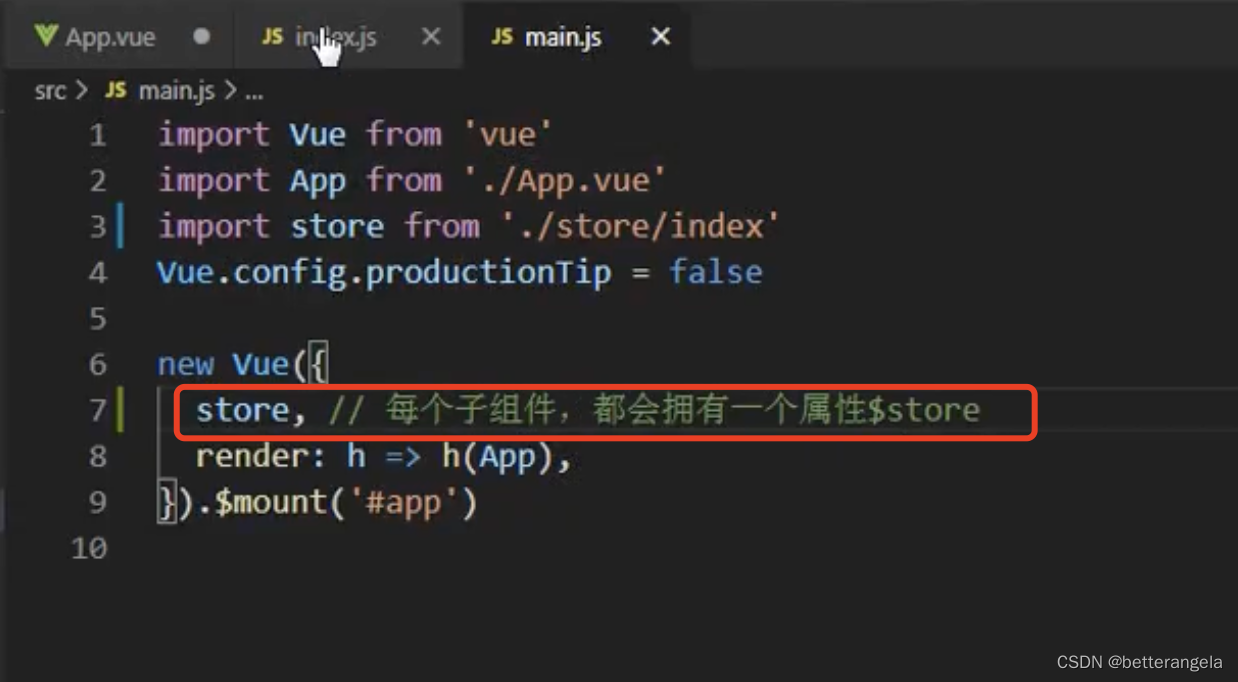
// main.js
import store from './store'
new Vue({
router,
store,
render: h => h(App)
}).$mount('#app')
根实例 组件
比如这里,App是vue实例的子组件即渲染组件
import App from './App.vue'
import store from './store'

new Vue({
  router,
  store, // 每个子组件都有$store
  render: h => h(App)
}).$mount('#app')
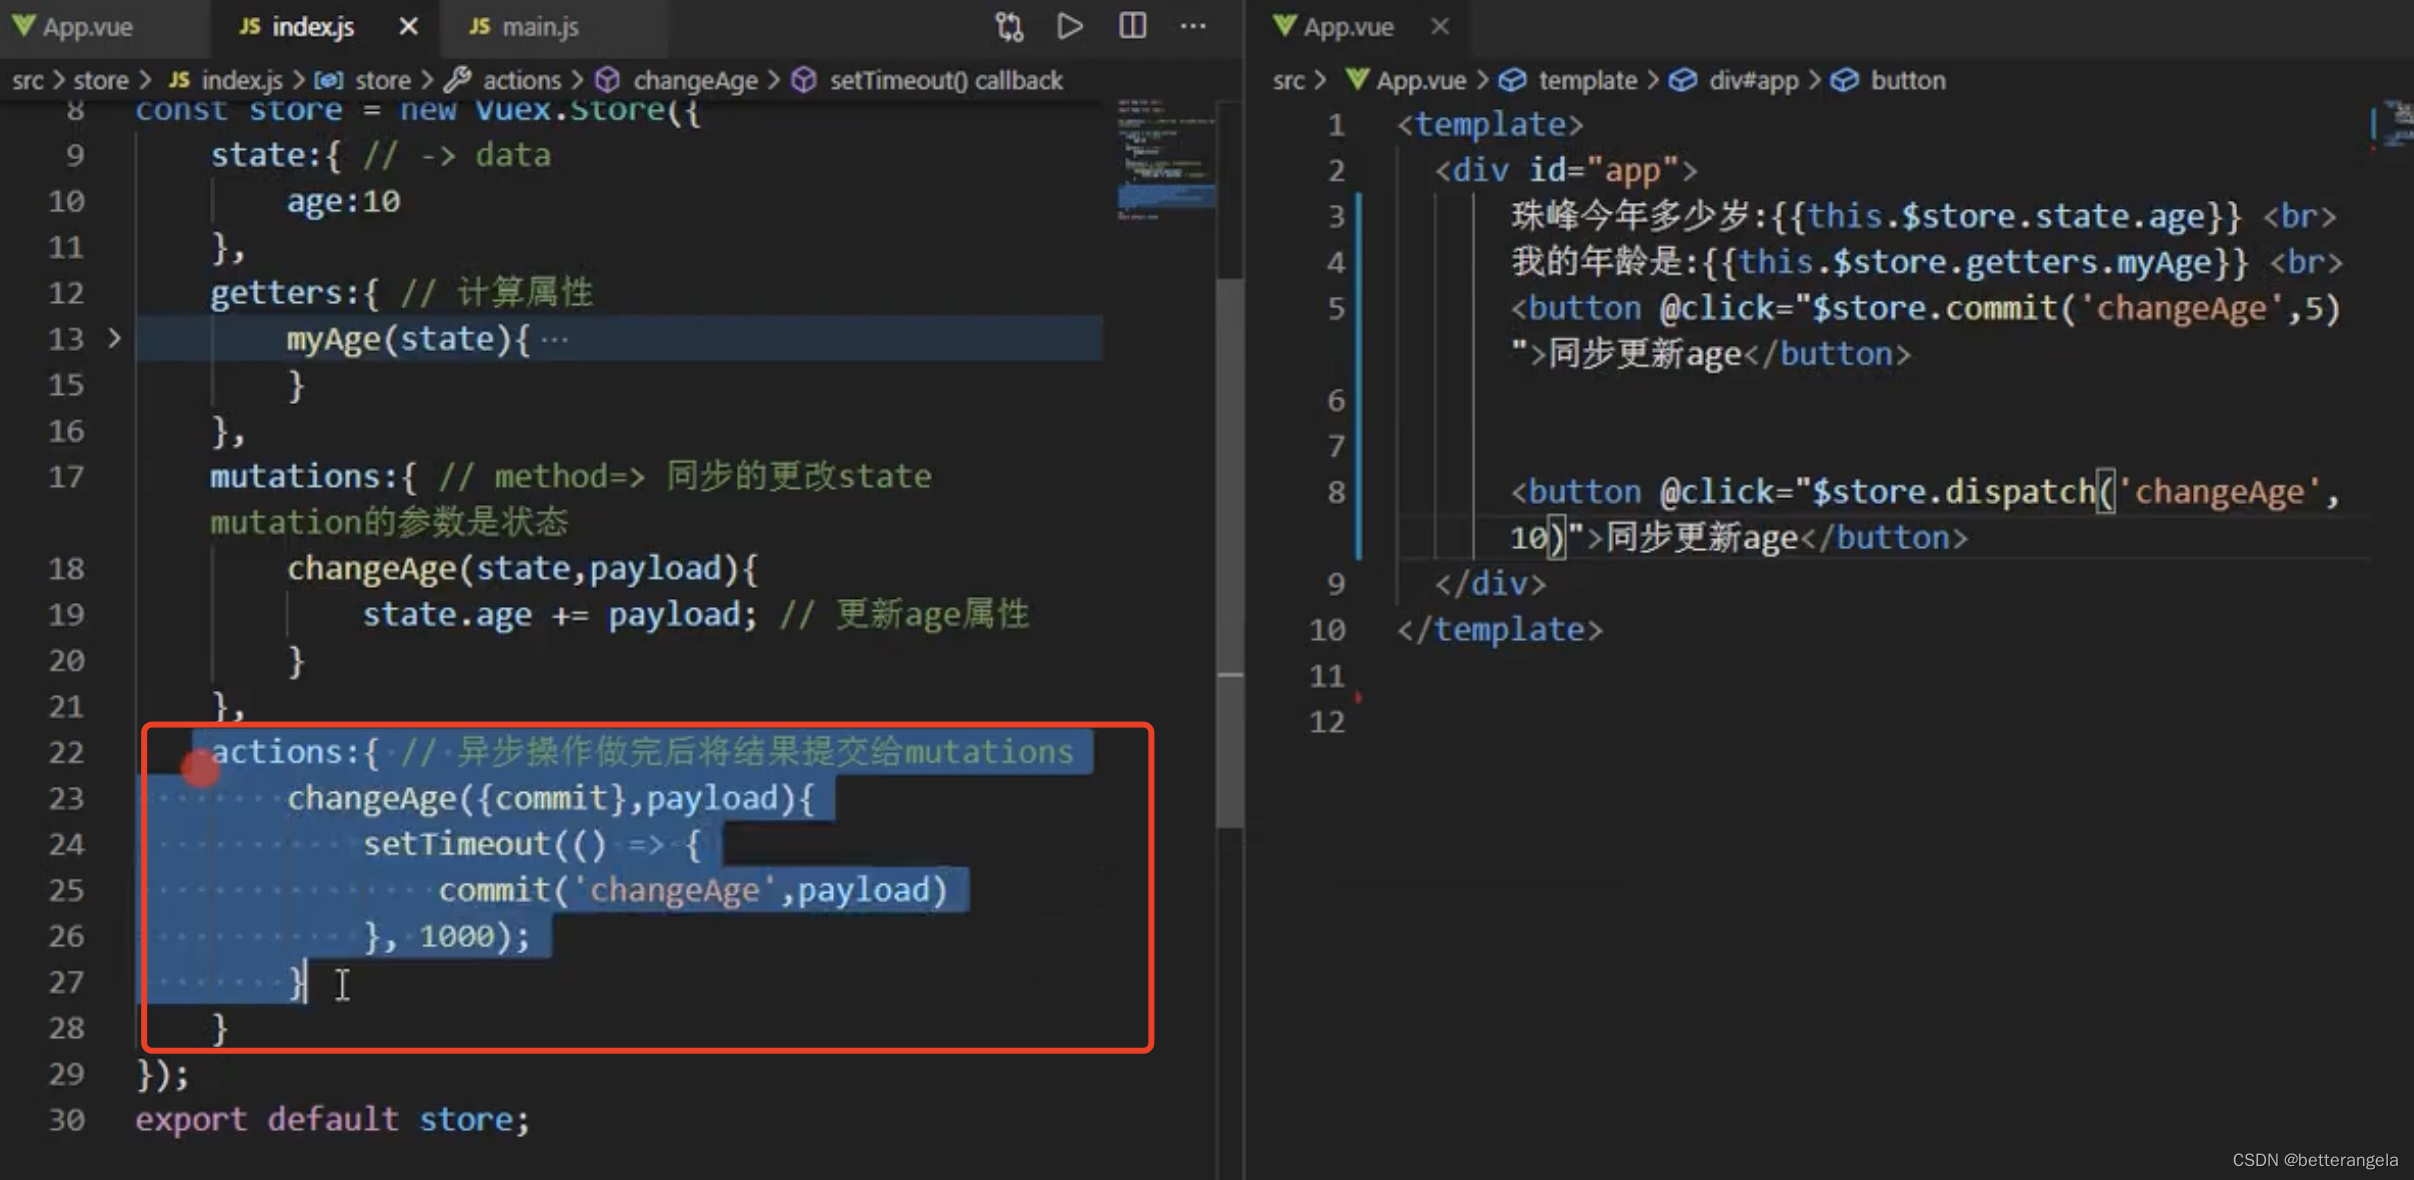
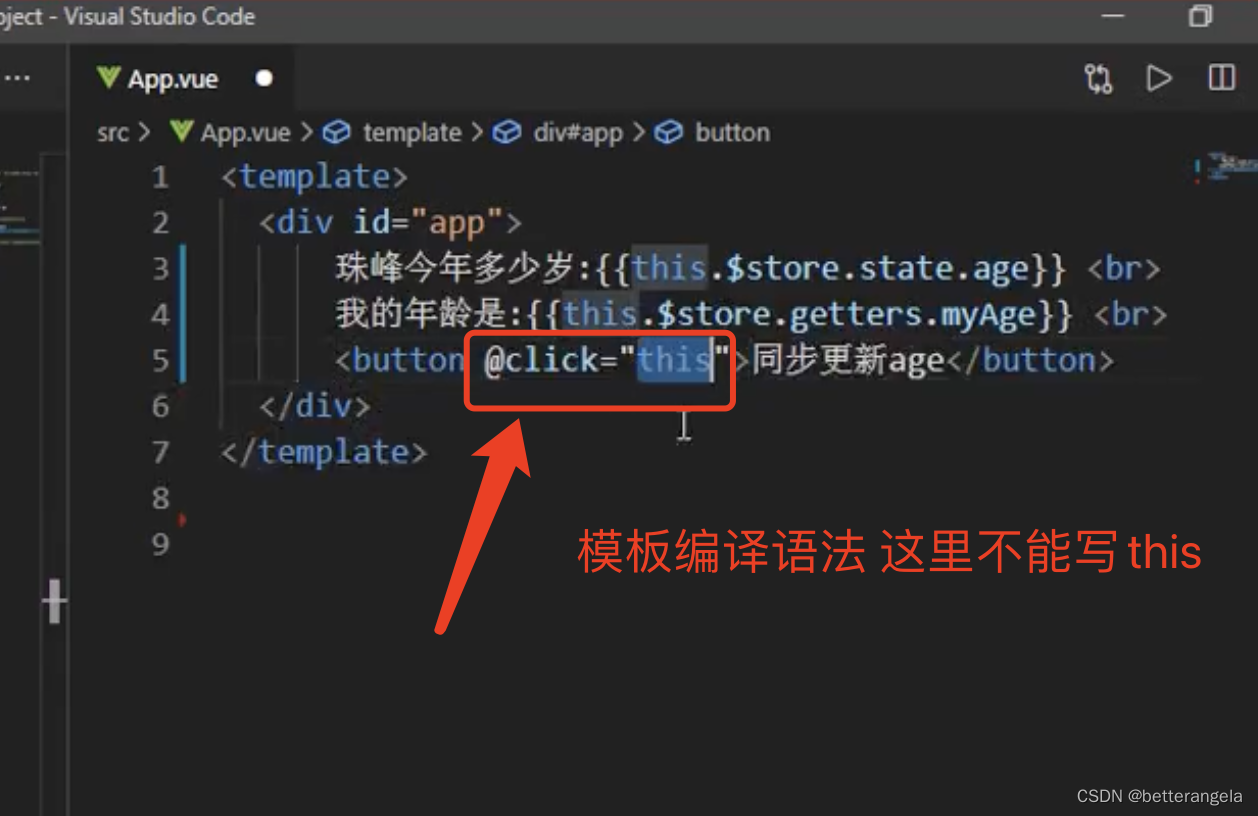
getters:注册参数state
mutation: (state, payload)
actions: ({ commit, dispatch }, payload)
?模板编译语法
手写vuex: install
install:接收注入的参数Vue,那么这个插件就是不需要依赖于Vue的。
store是通过根组件传入进去的
通过Vue.mixin
main->app->xxx
main.js中创建实例,app.vue
也说明组件的渲染是从父到子
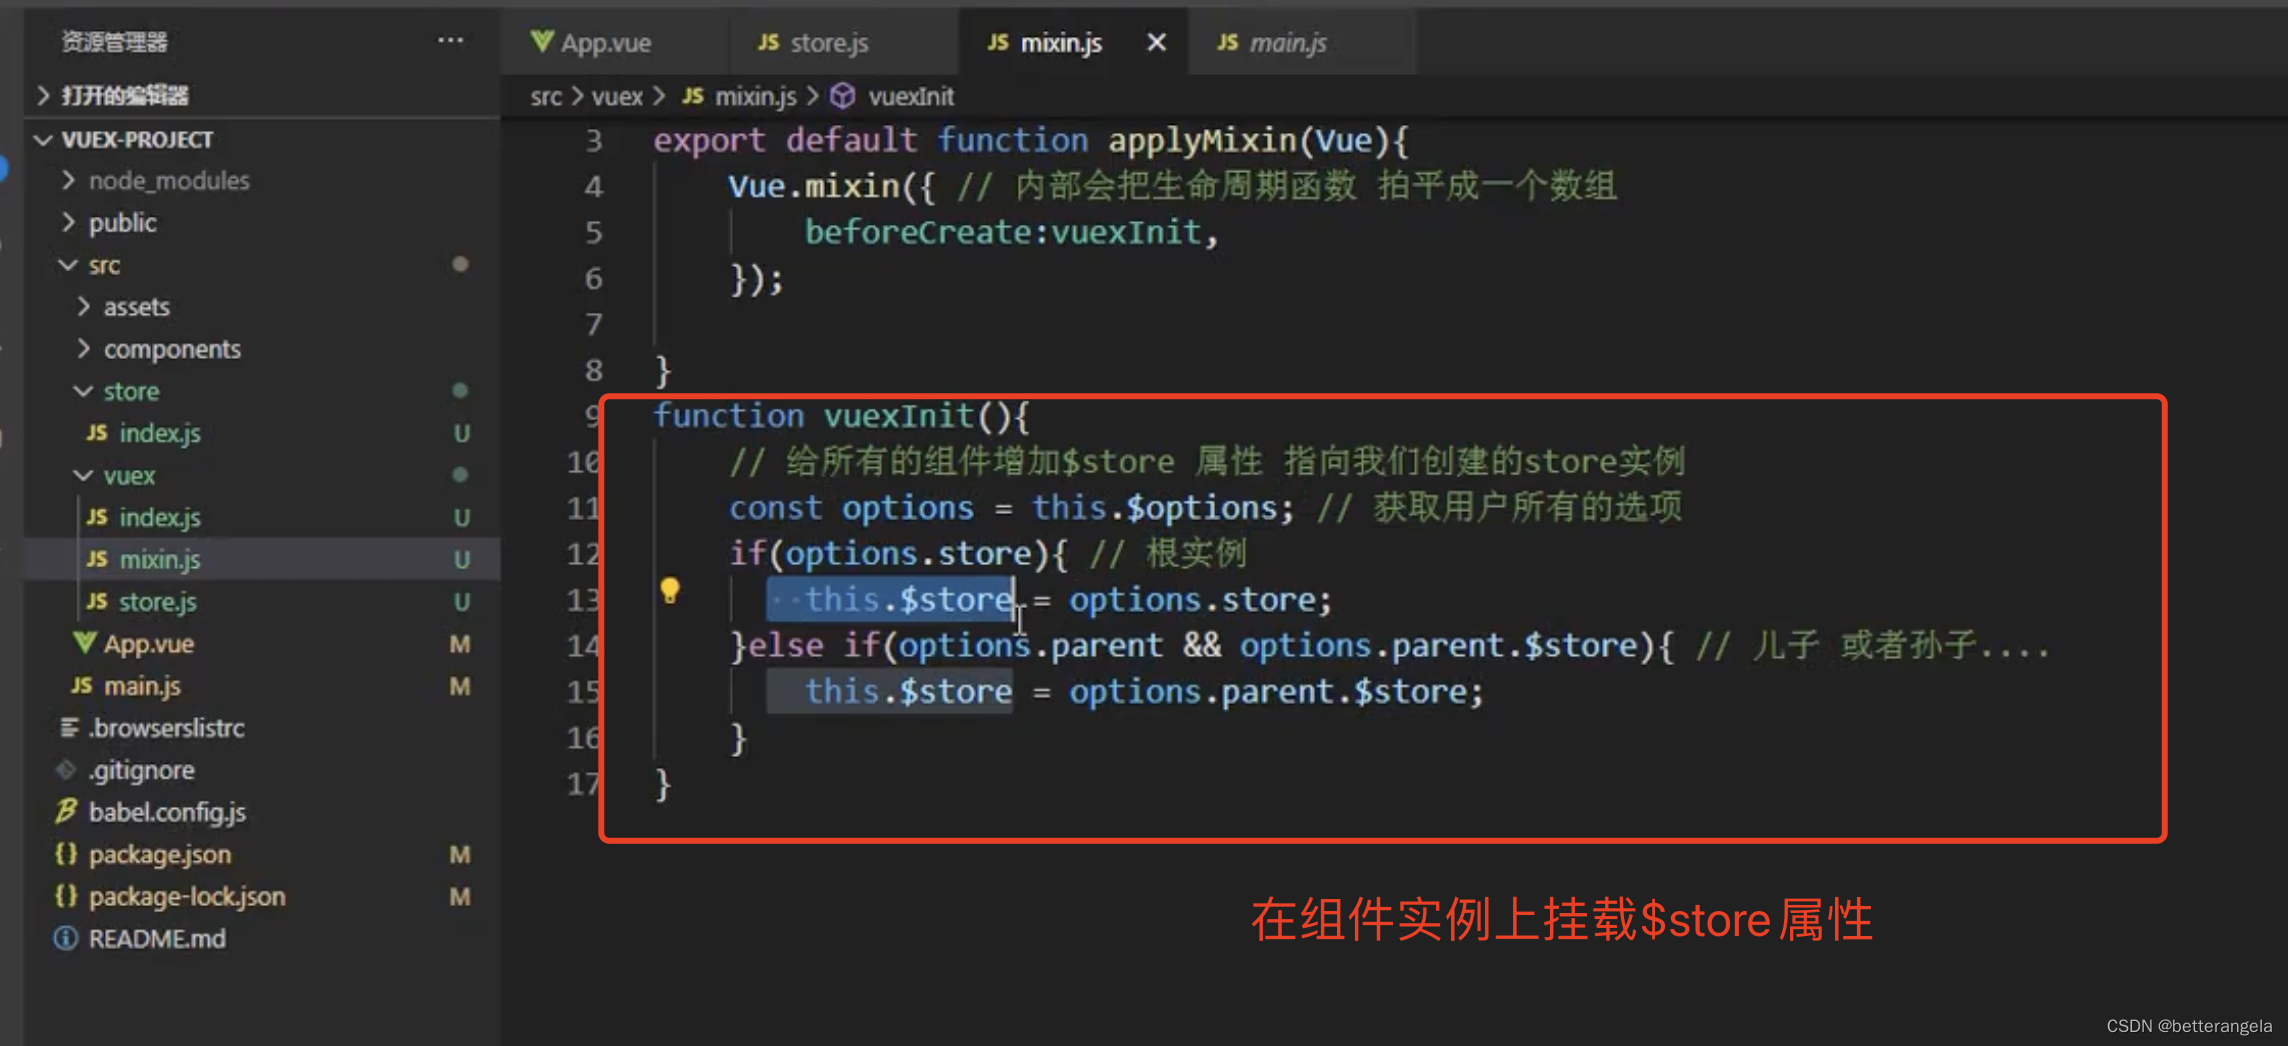
export default function applyMixin (Vue) {
  Vue.mixin({
    beforeCreate: vueInit
  })
}
function vueInit () {
  const options = this.$options
  if (options.store) {
    this.$store = options.store
  } else if (options.parent && options.parent.$store) {
    this.$store = options.parent.$store
  }
  // console.log('vueInit', this, this.$options.name)
}
状态实现 & 基本版实现
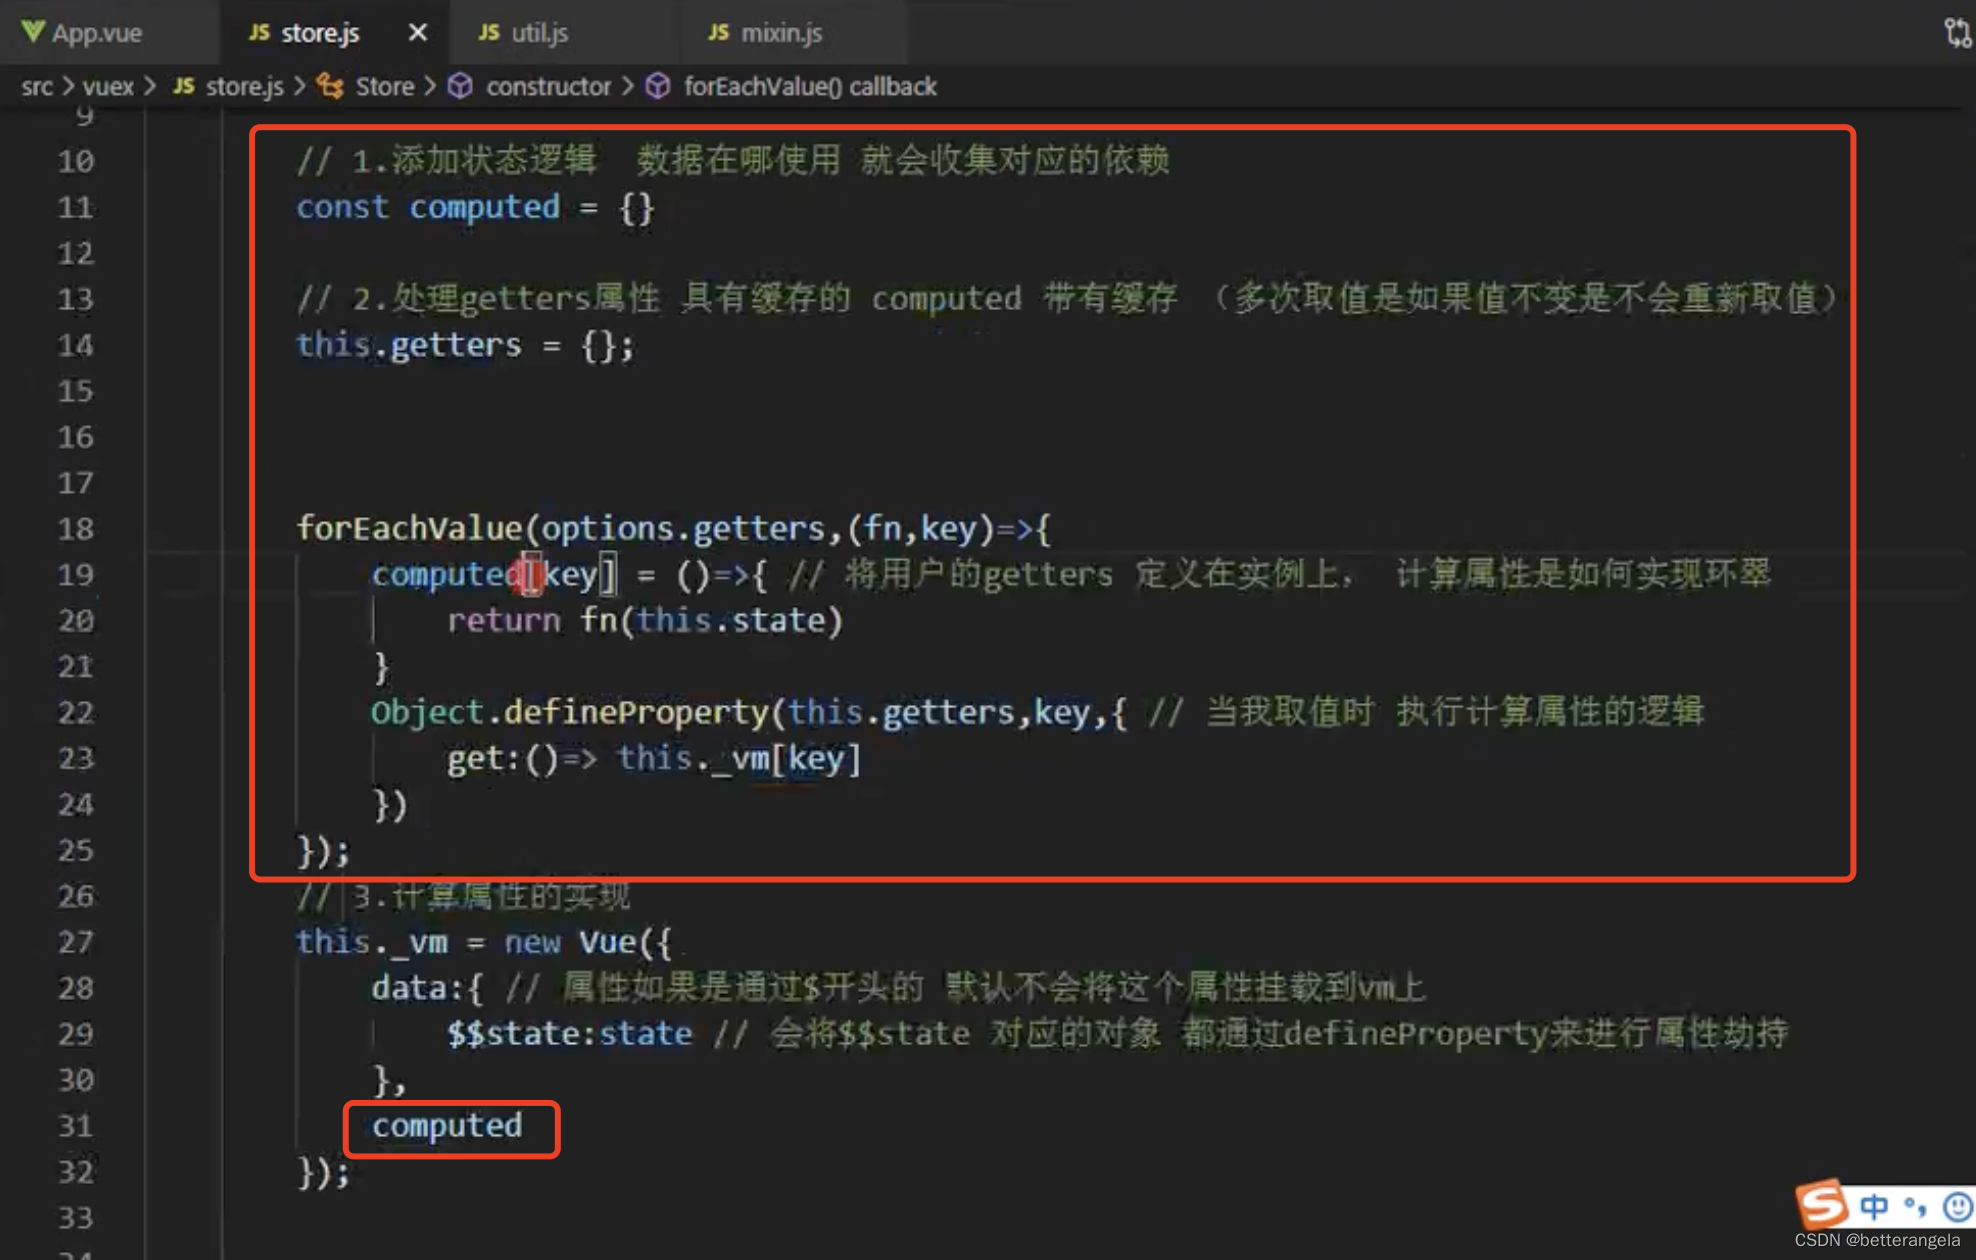
state实现:
getters实现:
借用computed。return结果不变,函数不会重新执行。
export default {
  data () {
    return {

    }
  },
  computed: {
    a () {
      return 'xxx'
    }

  }
}
mutations(actions同):

import applyMixin from './mixin'
let Vue
export class Store {
  constructor (options) {
    const state = options.state
    const getters = options.getters
    const computed = {}
    this.getters = {}
    Object.keys(getters).forEach(key => {
      const fn = getters[key]
      computed[key] = () => fn(this.state) // 注入state参数
      Object.defineProperty(this.getters, key, {
        get: () => {
          return this._vm[key]
        }
      })
    })

    this._vm = new Vue({
      data: {
        $$state: state
      },
      computed
    })
    const mutations = options.mutations
    const actions = options.actions
    this.mutations = {}
    this.actions = actions
    Object.keys(mutations).forEach(key => {
      const fn = mutations[key]
      this.mutations[key] = (payload) => fn(this.state, payload)
    })
    Object.keys(actions).forEach(key => {
      const fn = actions[key]
      this.actions[key] = (payload) => fn(this, payload)
    })
    const commit = (type, payload) => {
      this.mutations[type](payload)
    }
    const dispatch = (type, payload) => {
      this.actions[type](payload)
    }
    // this.commit = commit
    this.dispatch = dispatch
  }

  commit=(type, payload) => {
    this.mutations[type](payload)
  }

  get state () {
    return this._vm._data.$$state
  }
}
export const install = (_Vue) => {
  Vue = _Vue
  applyMixin(Vue)
}
模块划分*
namespaced: false
state会合并:
state:{
age:18,
a:{
age:28
},
b:{
age:58
}
}
mutations会把同名的组合成一个数组,然后commit的时候全部触发

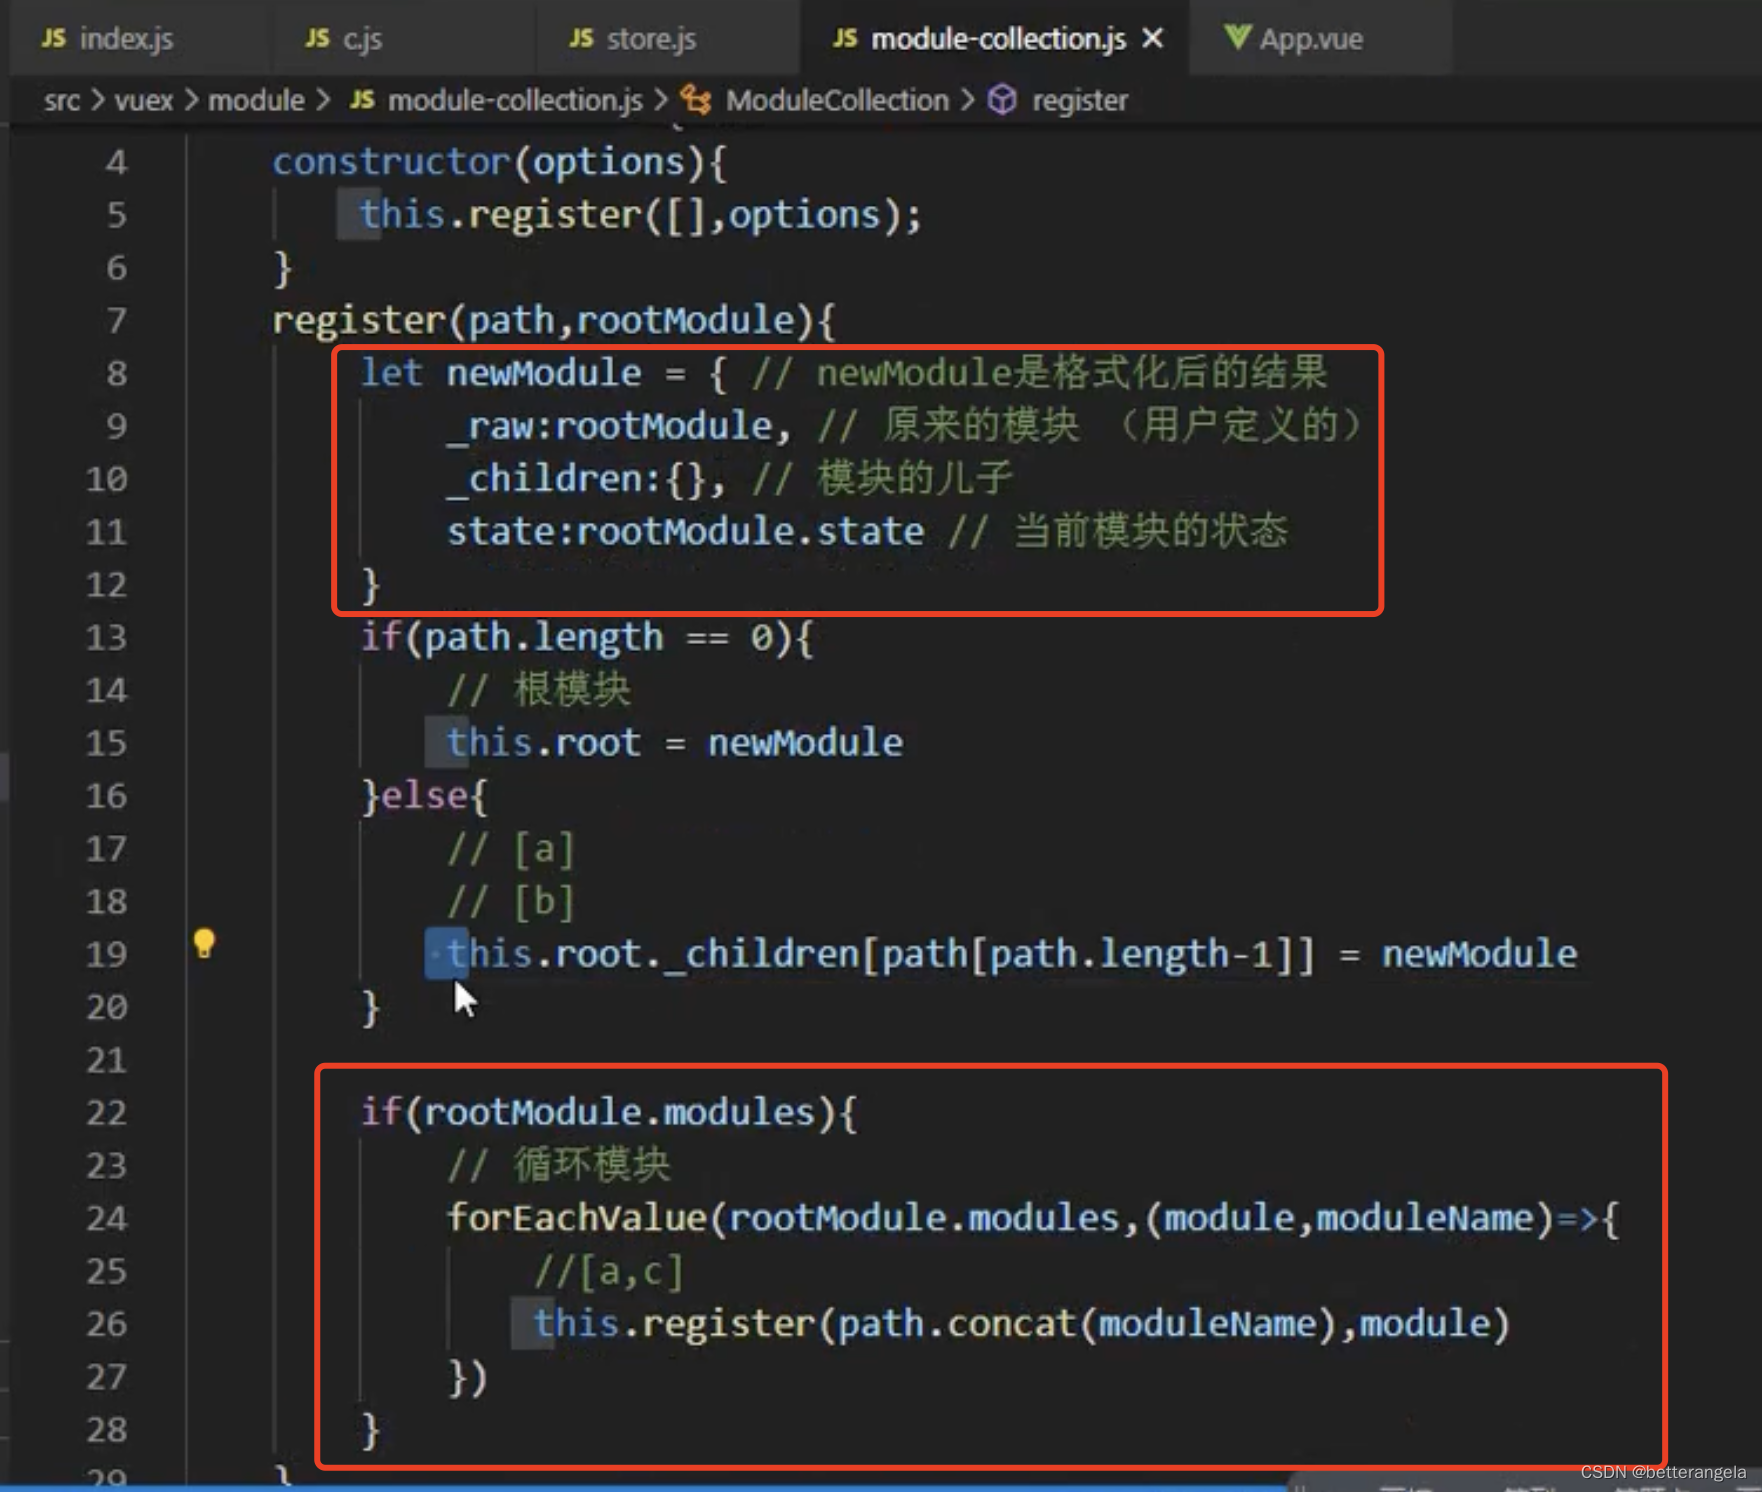
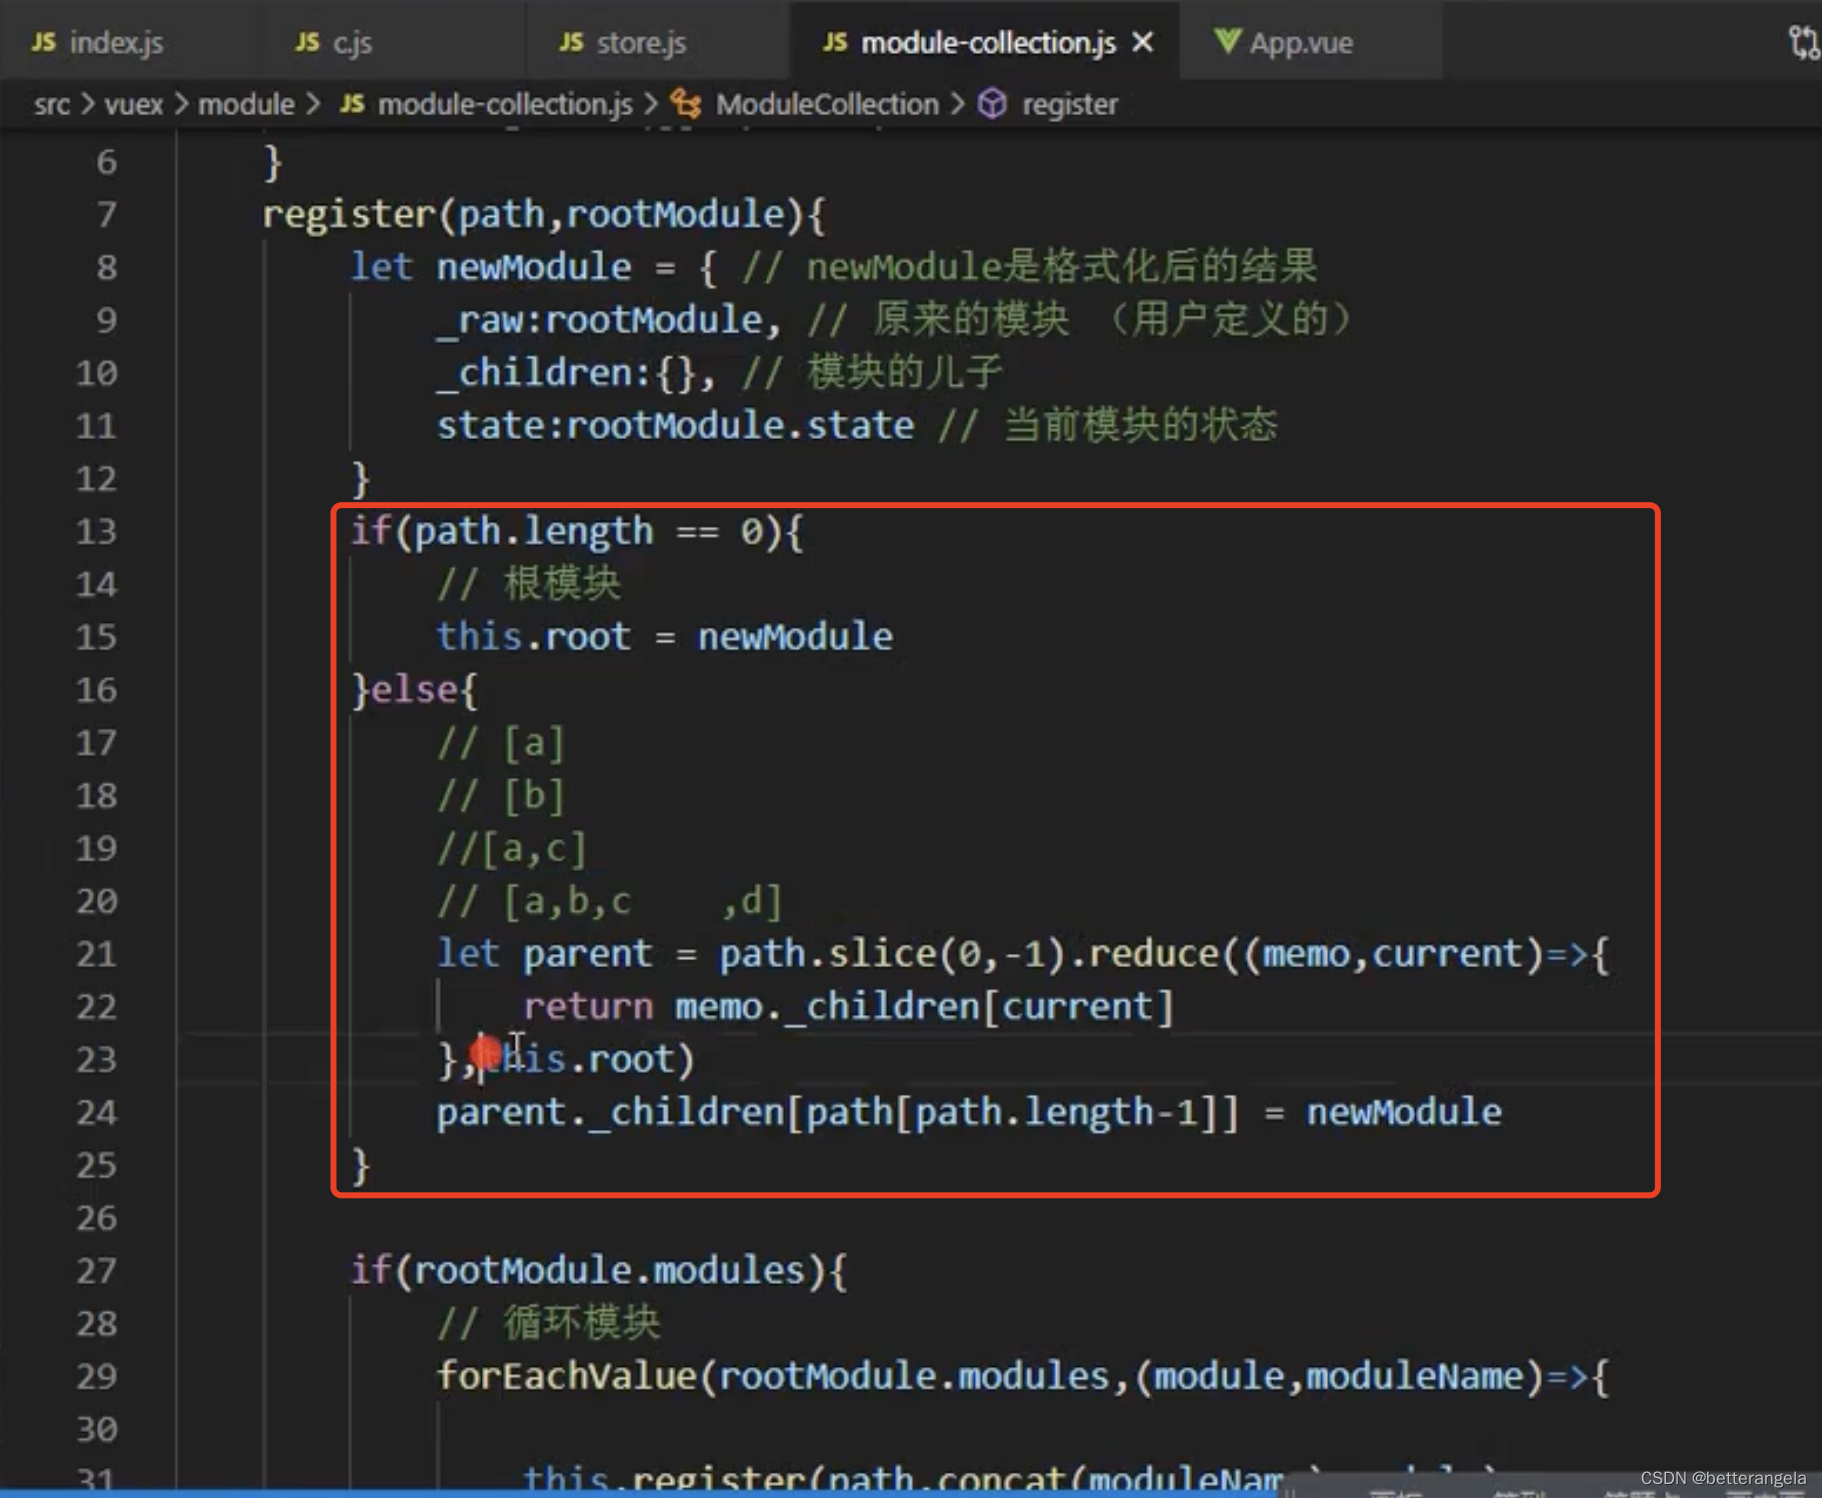
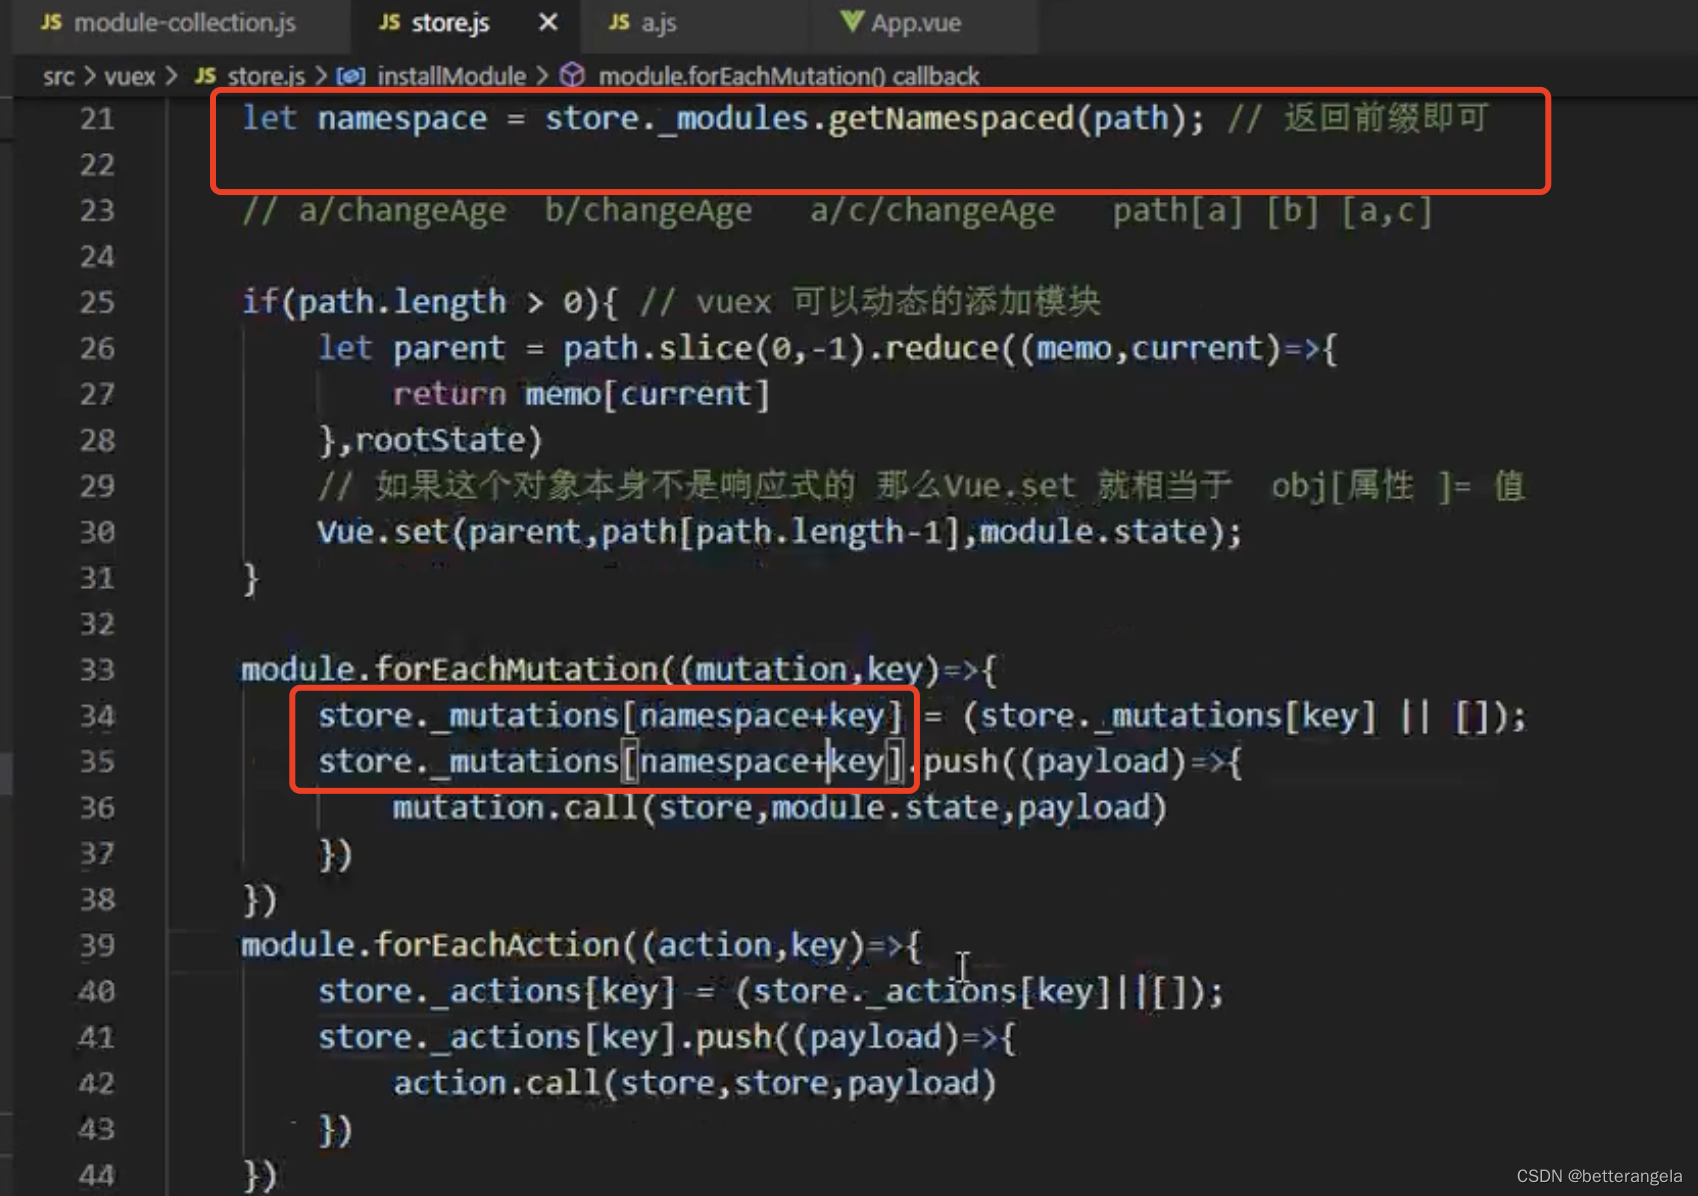
模块安装*

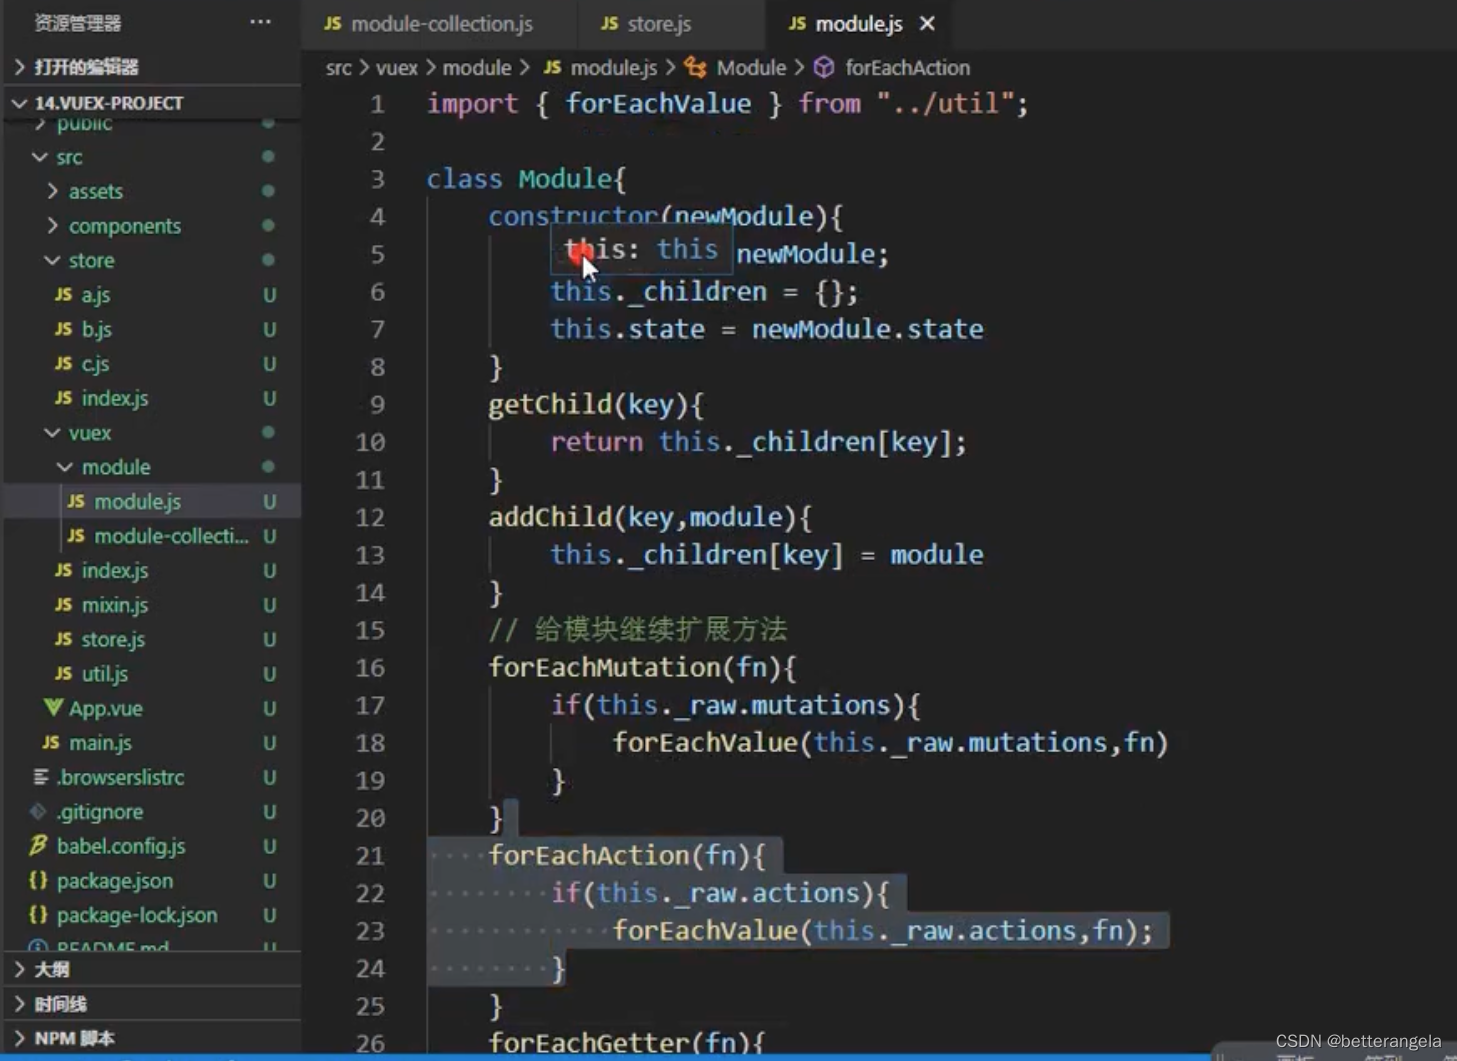
实现Module类
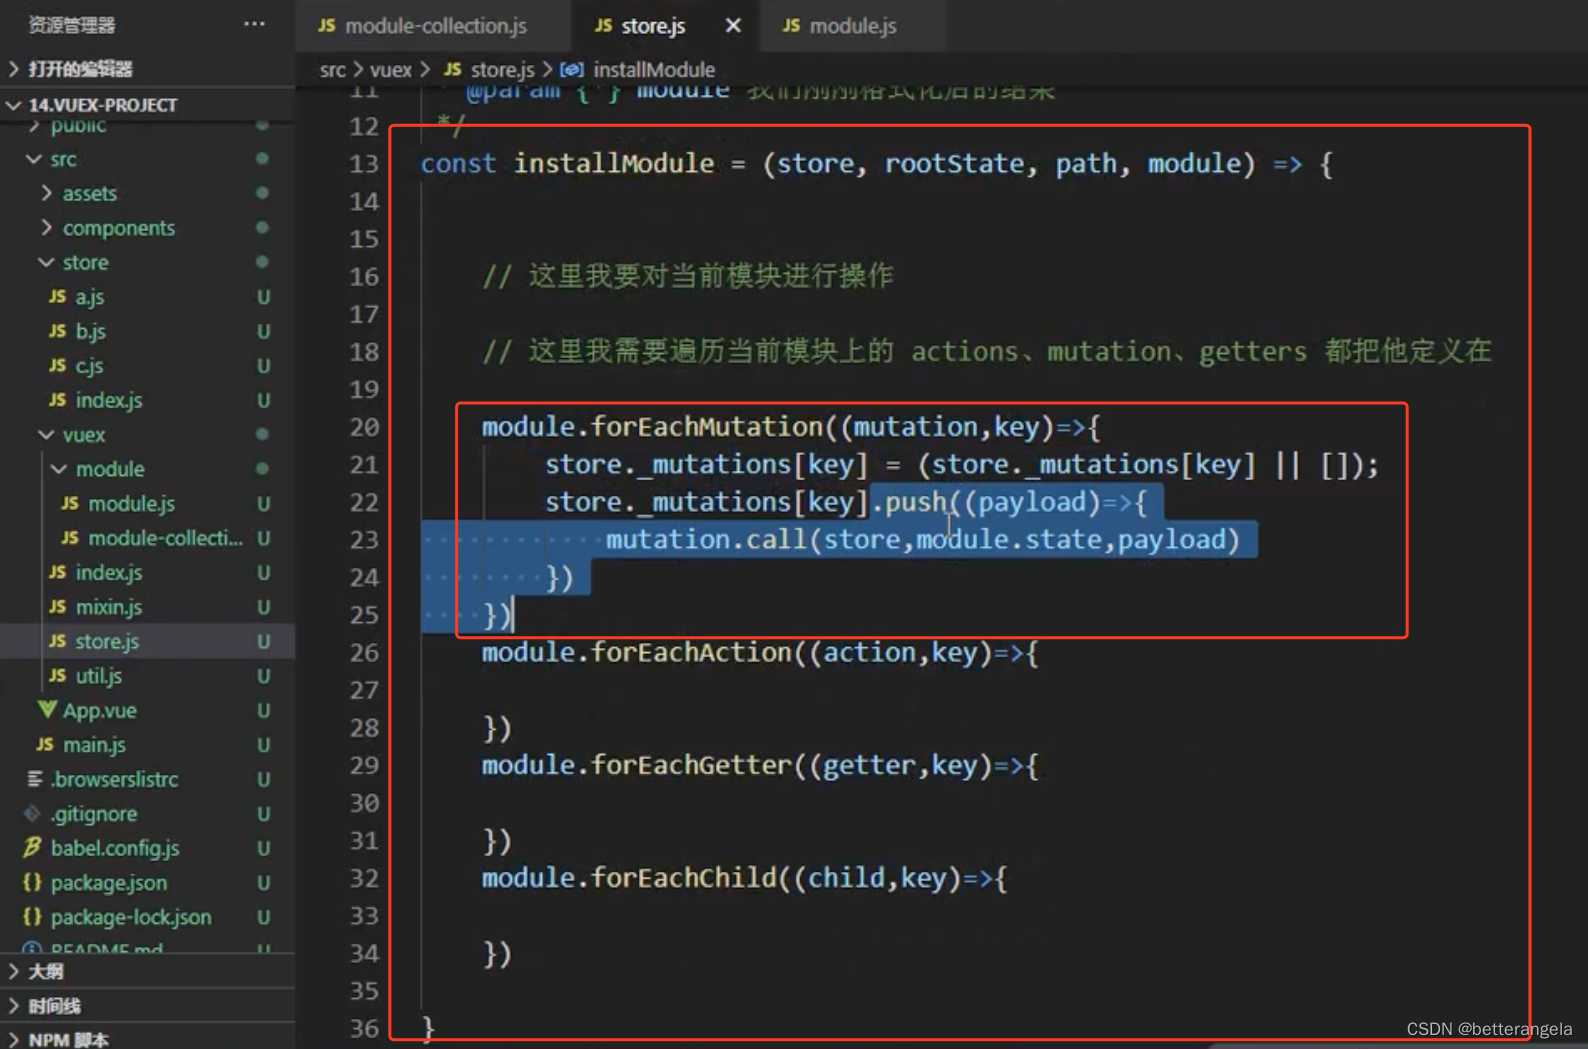
installModule


import applyMixin from './mixin'
import ModuleCollection from './module/module-collection'
const installModule = (store, rootState, path, module) => {
  module.forEachMutation((mutation, key) => {
    store._mutations[key] = store._mutations[key] || []
    store._mutations[key].push((payload) => {
      mutation.call(store, module.state, payload)
    })
  })
  module.forEachAction((action, key) => {
    store._actions[key] = store._actions[key] || []
    store._actions[key].push((payload) => {
      action.call(store, store, payload)
    })
  })
  module.forEachGetter((getter, key) => {
    store._wrappedGetters[key] = () => {
      return getter.call(store, module.state)
    }
  })
  module.forEachChild((child, key) => {
    installModule(store, rootState, path.concat(key), child)
  })
}
let Vue
export class Store {
  constructor (options) {
    const state = options.state
    /**
     * 对数据进行格式化操作:递归形成了一棵树
     */
    this._module = new ModuleCollection(options)
    console.log('this._module===', this._module)
    this._mutations = {}
    this._actions = {}
    this._wrappedGetters = {}
    installModule(this, state, [], this._module.root)
    // const getters = options.getters
    // const computed = {}
    // this.getters = {}
    // Object.keys(getters).forEach(key => {
    //   const fn = getters[key]
    //   computed[key] = () => fn(this.state) // 注入state参数
    //   Object.defineProperty(this.getters, key, {
    //     get: () => {
    //       return this._vm[key]
    //     }
    //   })
    // })
    //
    // this._vm = new Vue({
    //   data: {
    //     $$state: state
    //   },
    //   computed
    // })
    // const mutations = options.mutations
    // const actions = options.actions
    // this.mutations = {}
    // this.actions = actions
    // Object.keys(mutations).forEach(key => {
    //   const fn = mutations[key]
    //   this.mutations[key] = (payload) => fn(this.state, payload)
    // })
    // Object.keys(actions).forEach(key => {
    //   const fn = actions[key]
    //   this.actions[key] = (payload) => fn(this, payload)
    // })
    // const commit = (type, payload) => {
    //   this.mutations[type](payload)
    // }
    // const dispatch = (type, payload) => {
    //   this.actions[type](payload)
    // }
    // // this.commit = commit
    // this.dispatch = dispatch
  }

  // commit=(type, payload) => {
  //   this.mutations[type](payload)
  // }

  get state () {
    return this._vm._data.$$state
  }
}
export const install = (_Vue) => {
  Vue = _Vue
  applyMixin(Vue)
}
import { forEachValue } from '@/vuex/utils'

export default class Module {
  constructor (options) {
    this._raw = options
    this._children = {}
    this.state = options.state
  }

  getChild (moduleName) {
    return this._children[moduleName]
  }

  addChild (moduleName, newModule) {
    this._children[moduleName] = newModule
  }

  forEachMutation (fn) {
    if (this._raw.mutations) {
      forEachValue(this._raw.mutations, fn)
    }
  }

  forEachAction (fn) {
    if (this._raw.actions) {
      forEachValue(this._raw.actions, fn)
    }
  }

  forEachGetter (fn) {
    if (this._raw.getters) {
      forEachValue(this._raw.getters, fn)
    }
  }

  forEachChild (fn) {
    forEachValue(this._children, fn)
  }
}
模块的状态*


命名空间的实现

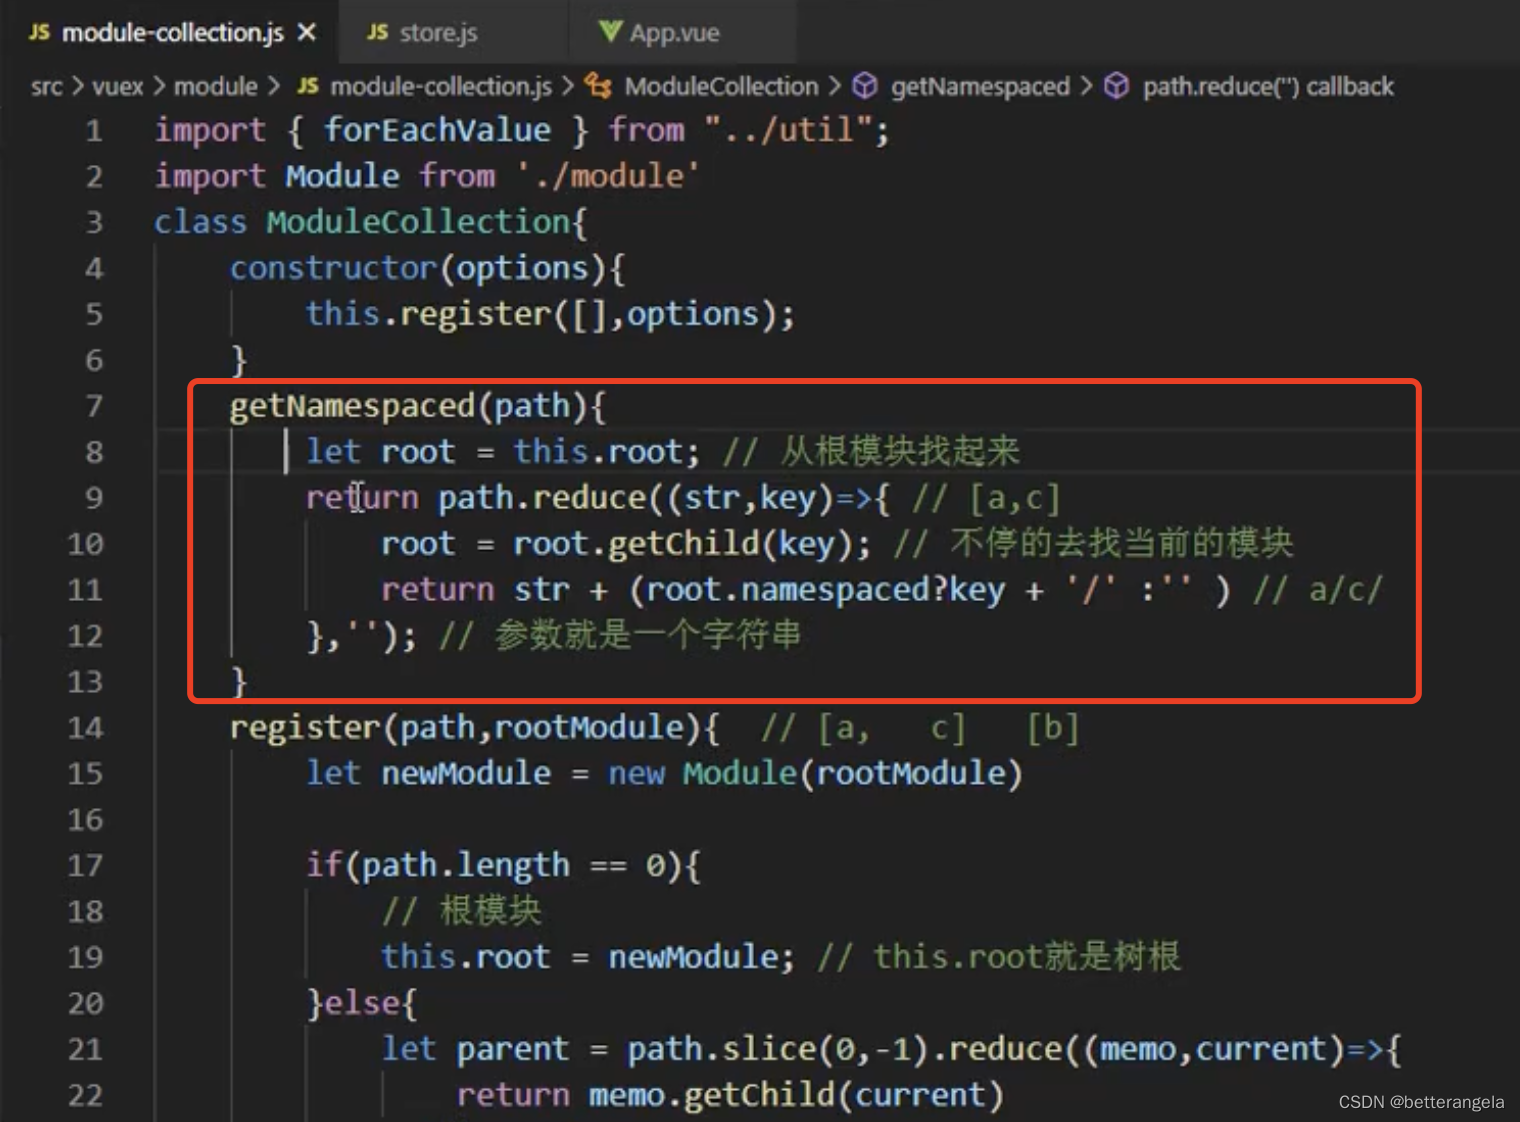
注册的是时候加上namespaced
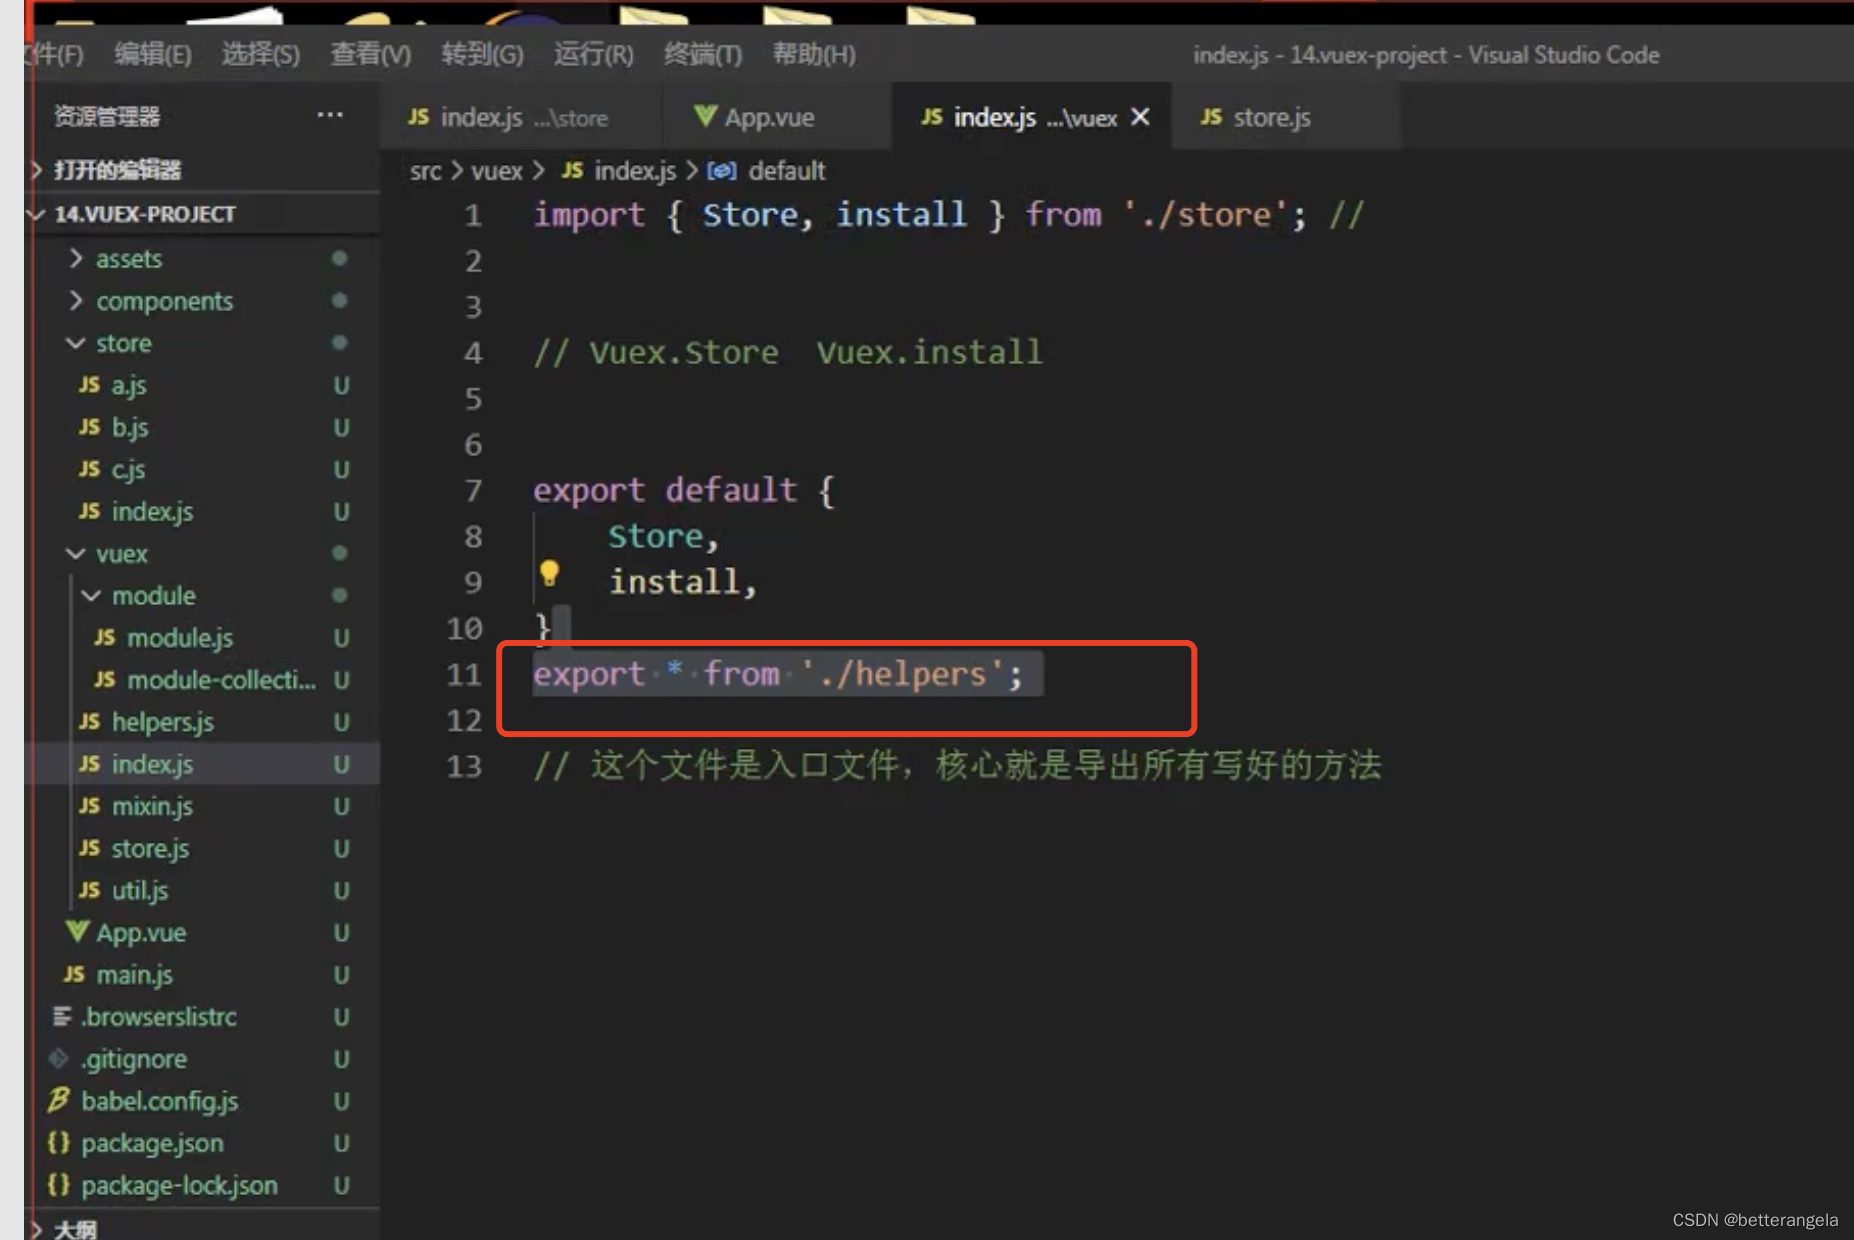
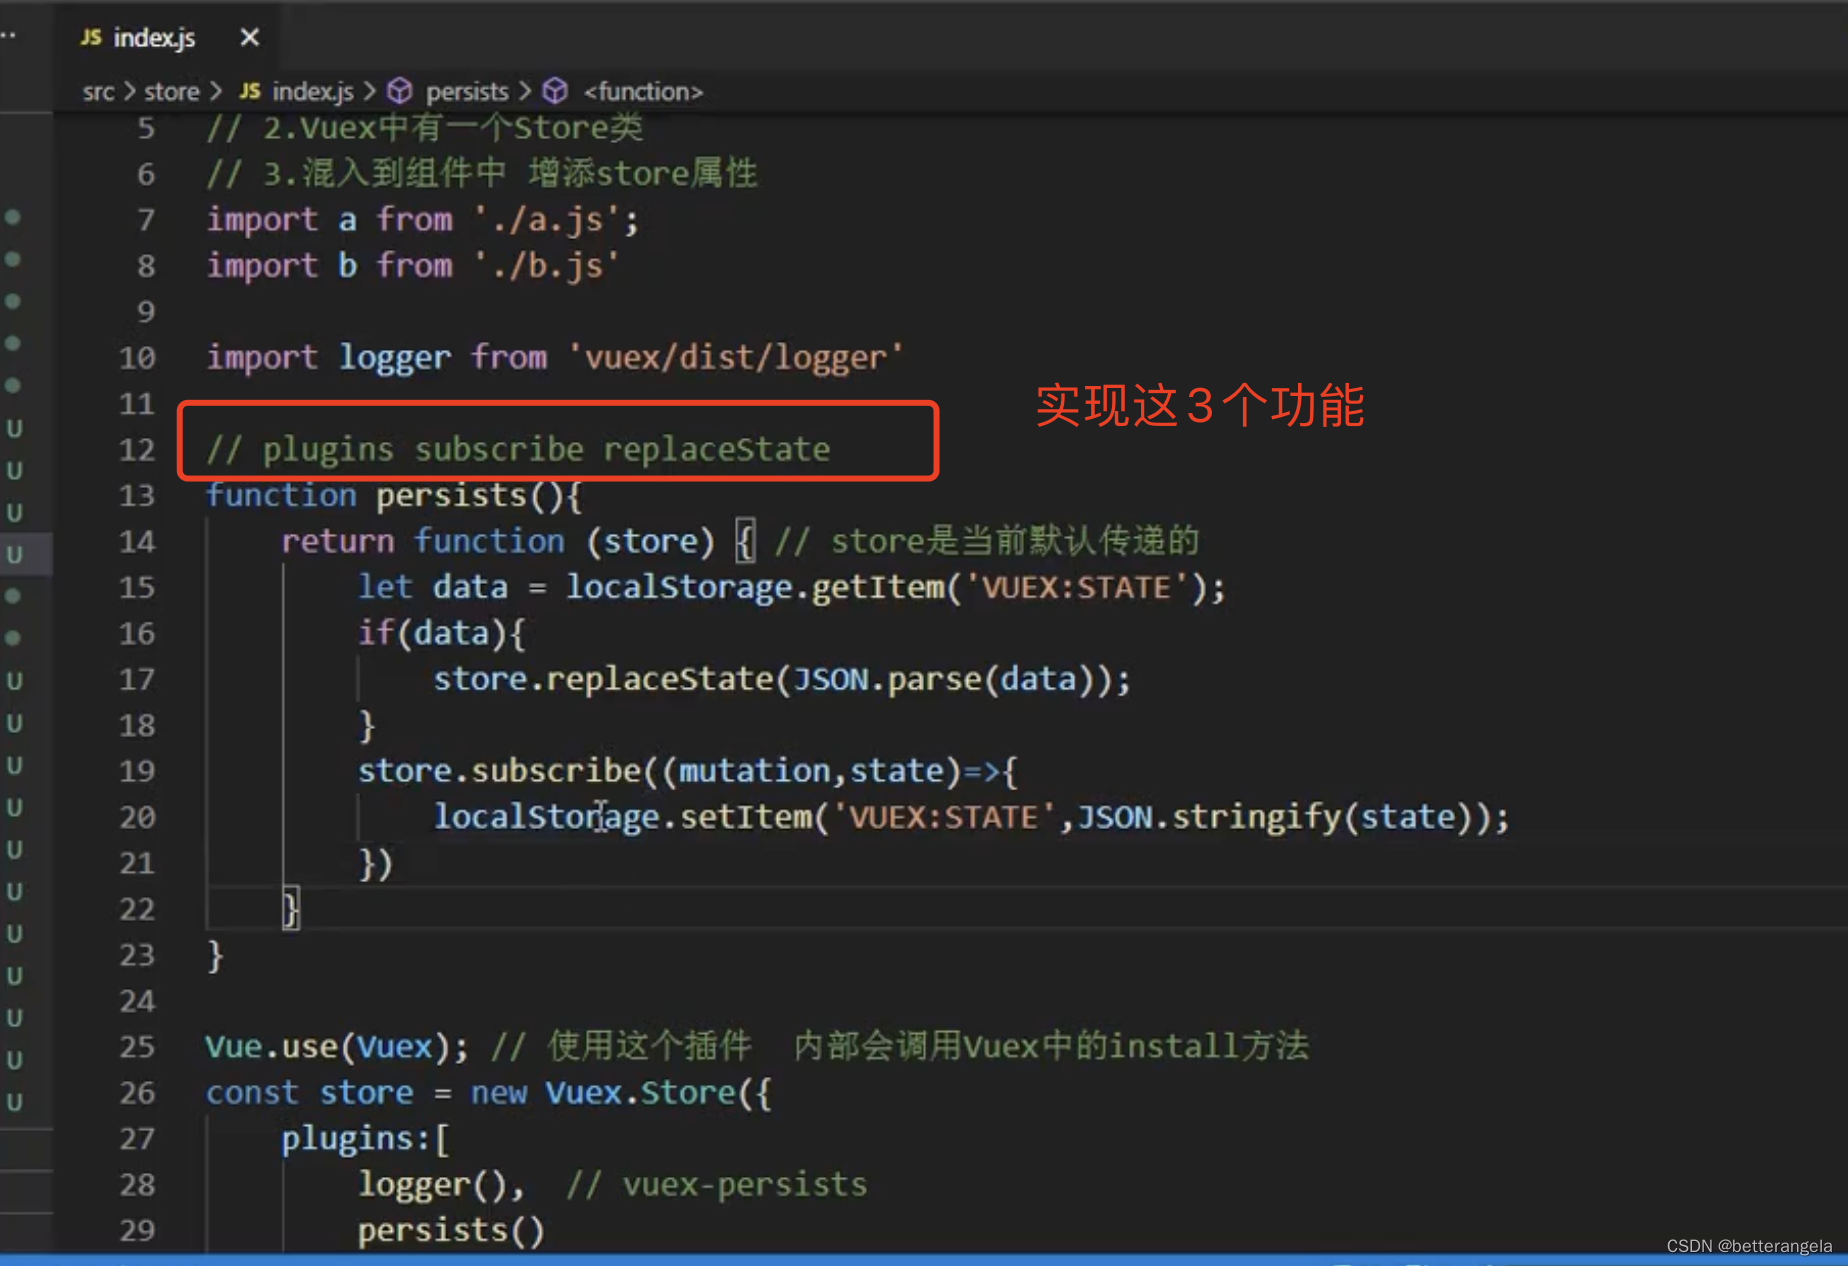
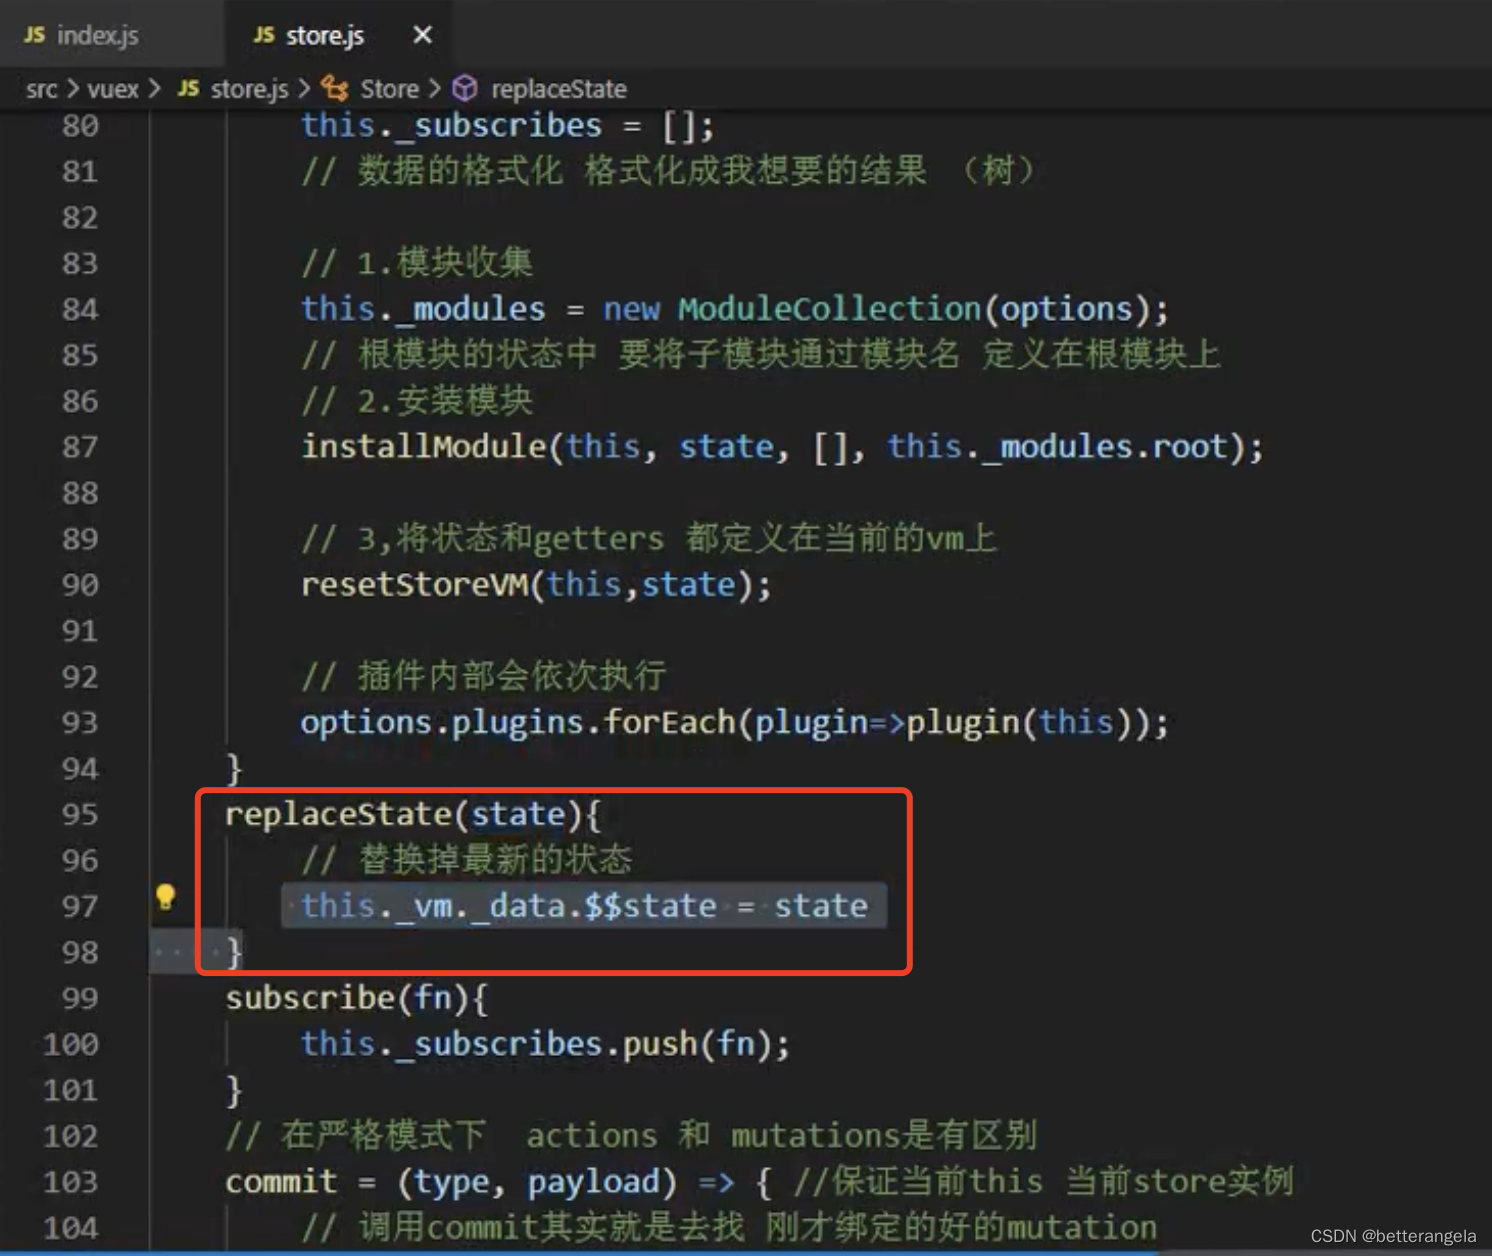
vuex插件的使用
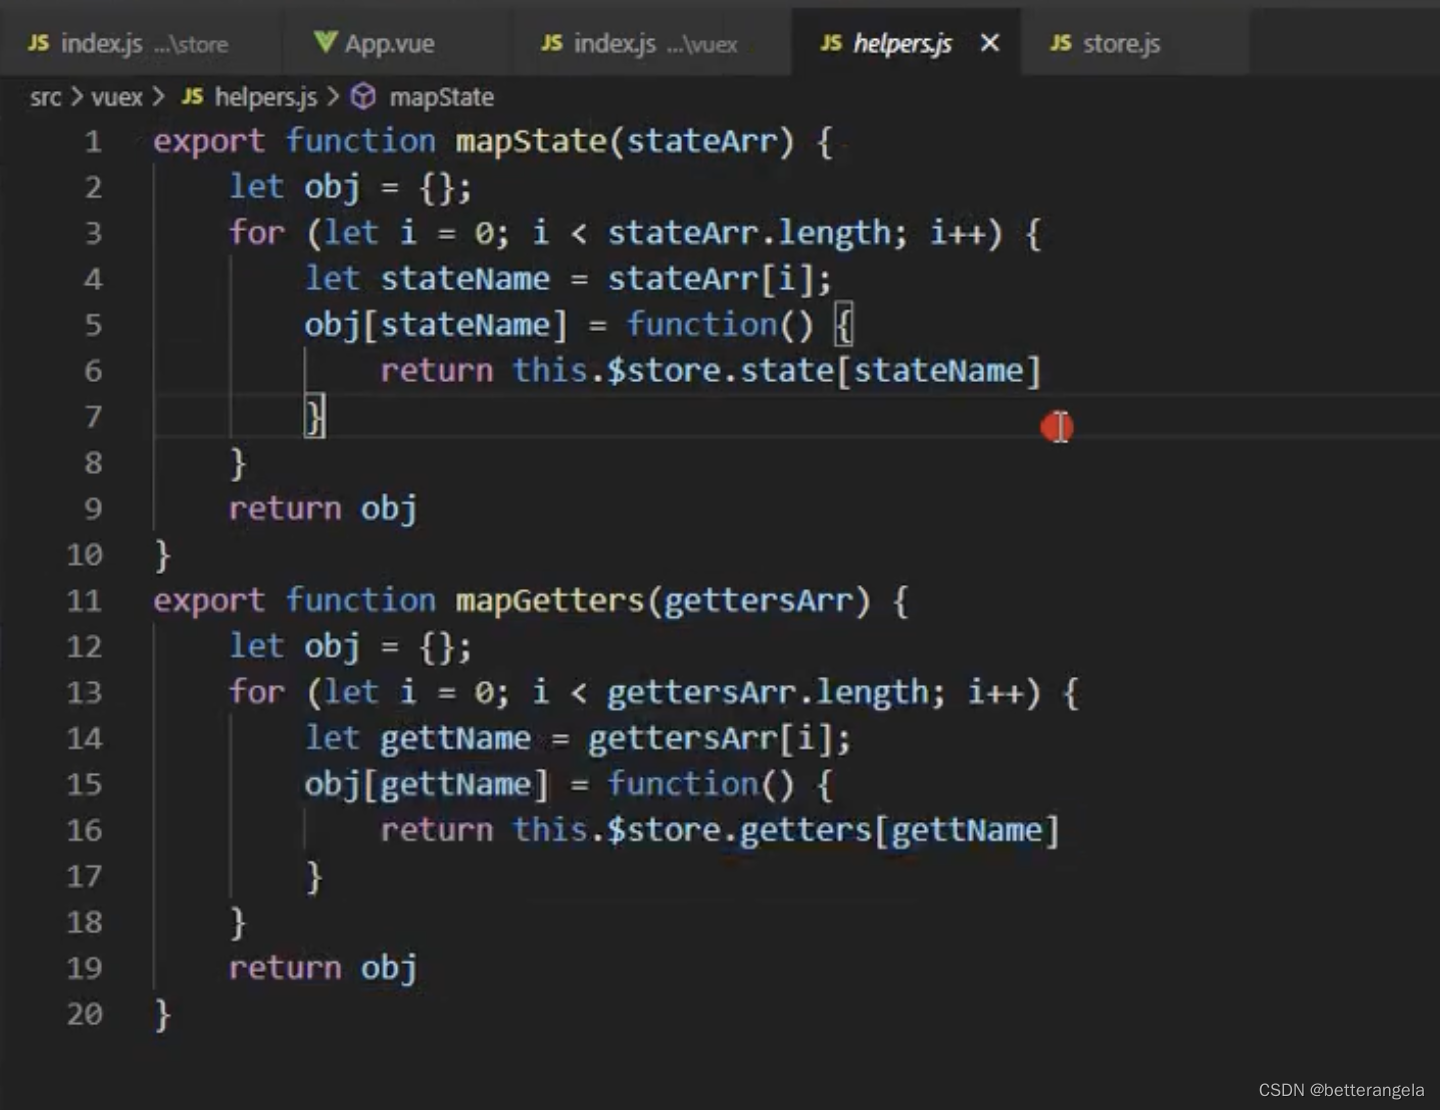
辅助函数